
ZFP416X - Range hood ZANUSSI - Free user manual and instructions
Find the device manual for free ZFP416X ZANUSSI in PDF.
 FR
FR
 AR
AR
 BG
BG
 CS
CS
 DA
DA
 DE
DE
 EL
EL
 EN
EN
 ES
ES
 ET
ET
 FI
FI
 HU
HU
 IT
IT
 KK
KK
 LT
LT
 LV
LV
 MK
MK
 NL
NL
 NO
NO
 PL
PL
 PT
PT
 RO
RO
 RU
RU
 SK
SK
 SL
SL
 SQ
SQ
 SR
SR
 SV
SV
 TR
TR
 UK
UK
| Product type | Range hood |
| Brand | ZANUSSI |
| Model | ZFP416X |
| Installation type | Built-in (sliding drawer) |
| Number of speeds | 3 |
| Lighting | Integrated LED |
| Controls | Push buttons |
| Housing material | Stainless steel |
| Grease filter | Metal, dishwasher safe |
| Charcoal filter | Optional, replacement every 4 months |
| Grease filter maintenance | Monthly cleaning |
| Lighting maintenance | LED bulb not user-replaceable |
| Dimensions (W x D x H) approx. | 60 cm x 30 cm x 15 cm |
| Weight approx. | 12 kg |
| Power supply | 220-240 V, 50 Hz |
| Total power approx. | 250 W |
| Operation | Ducted or recirculation (with charcoal filter) |
| Environmental protection | Recycling at end of life |
Frequently Asked Questions - ZFP416X ZANUSSI
User questions about ZFP416X ZANUSSI
0 question about this device. Answer the ones you know or ask your own.
Ask a new question about this device
Download the instructions for your Range hood in PDF format for free! Find your manual ZFP416X - ZANUSSI and take your electronic device back in hand. On this page are published all the documents necessary for the use of your device. ZFP416X by ZANUSSI.
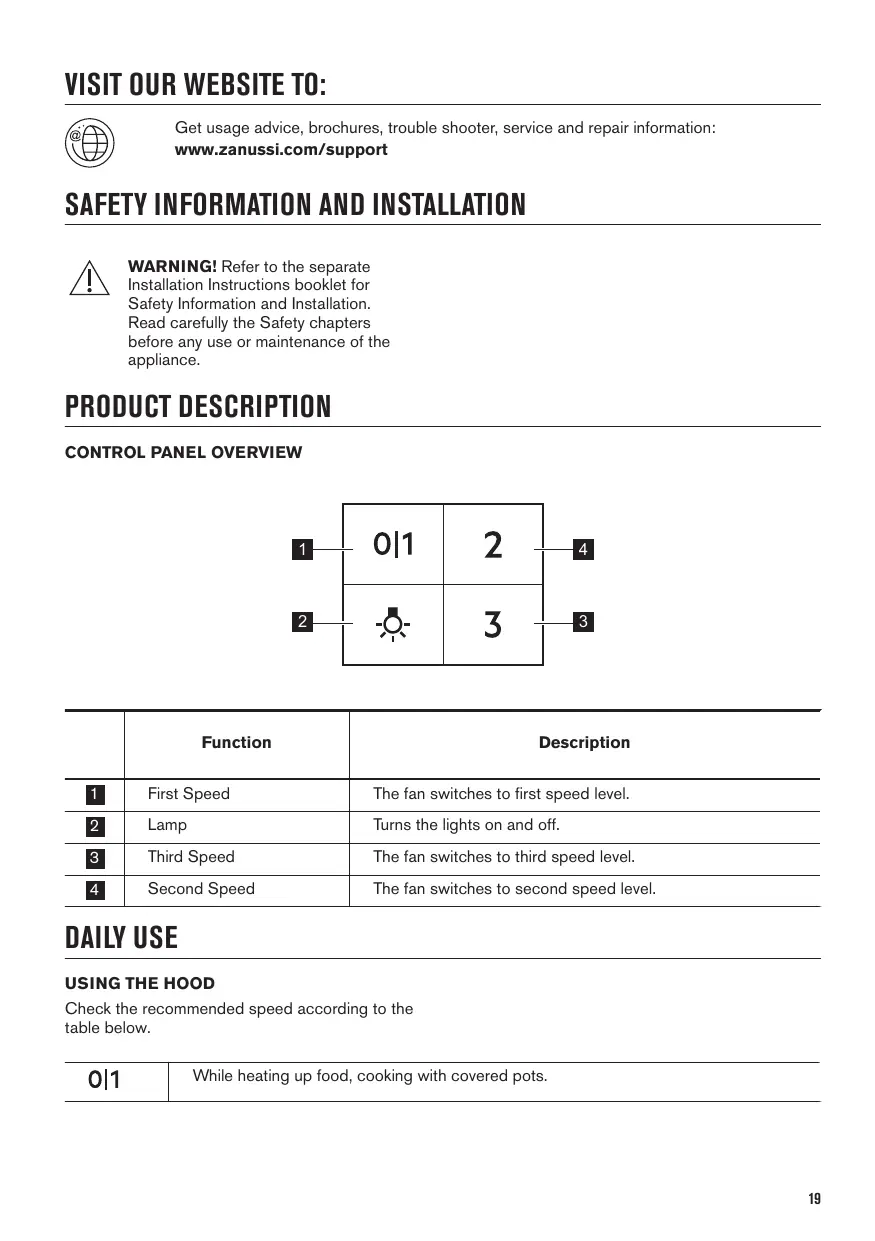
USER MANUAL ZFP416X ZANUSSI
SAFETY INFORMATION AND INSTALLATION

WARNING! Refer to the separate
Installation Instructions booklet for
Safety Information and Installation.
Read carefully the Safety chapters
before any use or maintenance of the
appliance.
PRODUCT DESCRIPTION
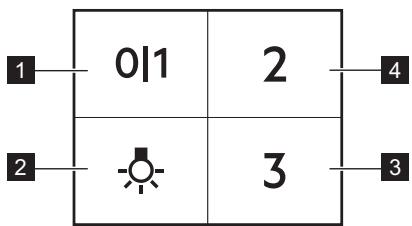
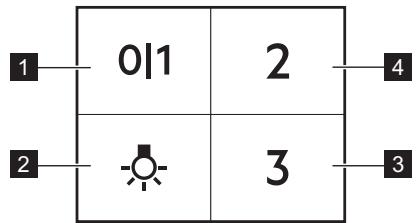
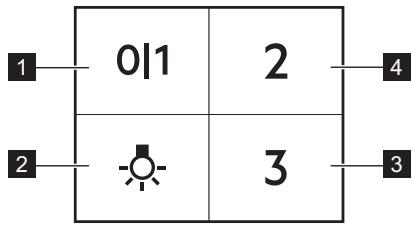
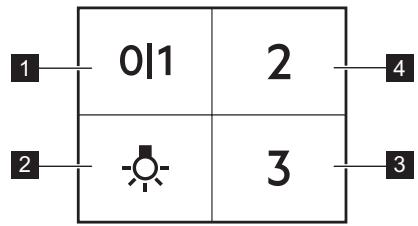
CONTROL PANEL OVERVIEW
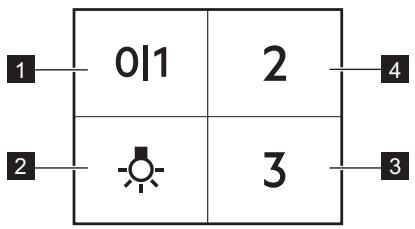
| Function | Description | |
| 1 | First Speed | The fan switches to first speed level. |
| 2 | Lamp | Turns the lights on and off. |
| 3 | Third Speed | The fan switches to third speed level. |
| 4 | Second Speed | The fan switches to second speed level. |
DAILY USE
USING THE HOOD
Check the recommended speed according to the table below.
01
While heating up food, cooking with covered pots.
2
While cooking with covered pots on multiple cooking zones or burners, gentle frying.
3
While boiling and frying big quantities of food without a lid, cooking on multiple cooking zones or burners.

It is recommended to leave the hood operating for approximately 15 minutes after cooking.
To operate the hood:
- Pull out the drawer of the hood more than 5 cm.
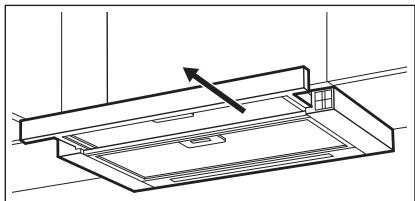
The control panel is exposed.
- To activate the function press the 01 button.
- If needed, change the speed by pressing the desired button.

The hood's light works independently of other hood functions. To illuminate the cooking surface press the light button. Closing the drawer has no effect on the hood light.
To turn off the fan press 01 or close the hood drawer.

The hood remembers the last setting of fan speed on closing the drawer. The hood will operate on this fan speed level when the drawer is pulled out again.
CARE AND CLEANING
NOTES ON CLEANING
| Cleaning Agents | Do not use abrasive detergents and brushes. Clean the surface of the appliance with a soft cloth with warm water and a mild detergent. |
| After cooking some parts of appliance can get hot. To avoid stains appliance must be cooled down and dried with clean cloth or paper towels. | |
| Clean stains with a mild detergent. | |
| Keep the hood clean | Clean the appliance and grease filters each month. Clean the interior and grease filters carefully from fat. Fat accumulation or other residue may cause fire. |
| Grease filters can be washed in a dishwasher. The dishwasher must be set to a low temperature and a short cycle. The grease filter may discolour, it has no influence on the performance of the appliance. | |
| Charcoal filter | The time of saturation of the charcoal filter varies depending on the type of cooking and the regularity of cleaning the grease filter. |
CLEANING THE GREASE FILTER
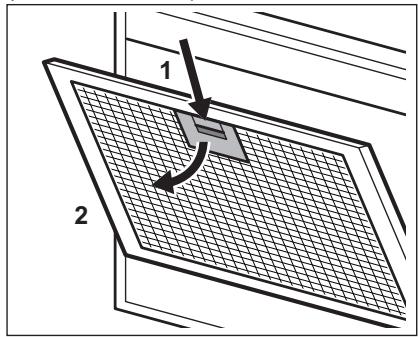
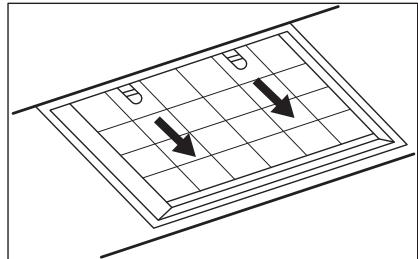
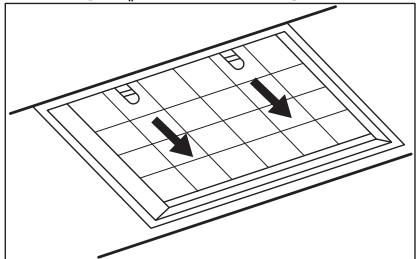
Filters are mounted with the use of clips and pins on the opposite side.
To clean the filter:
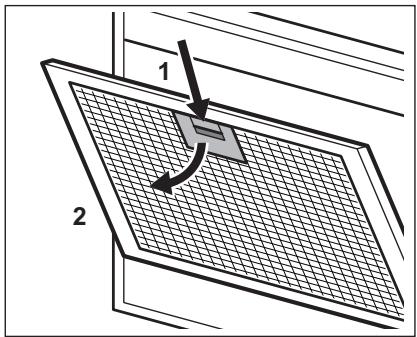
- Press the handle of the mounting clip on the filter panel underneath the hood.
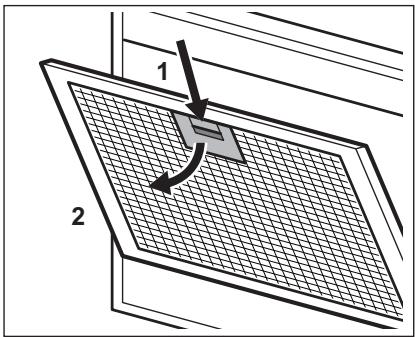
- Slightly tilt the front of the filter downwards, then pull. Repeat the first two steps for all filters.
- Clean the filters using a sponge with non-abrasive detergents or in a dishwasher.

The dishwasher must be set to a low temperature and a short cycle. The grease filter may discolour, but this has no influence on the performance of the appliance.
- To mount the filters back, follow the first two steps in reverse order.
Repeat the steps for all filters if applicable.
REPLACING THE CHARCOAL FILTER -
OPTIONAL

WARNING! Depending on type, the filter can or cannot be regenerated.
Refer to the leaflet provided with the filter.
ENVIRONMENTAL CONCERNS
Recycle materials with the symbol . Put the packaging in relevant containers to recycle it. Help protect the environment and human health by recycling waste of electrical and electronic appliances. Do not dispose of appliances marked
To replace the filter:
- Remove the grease filters from the appliance. Refer to "Cleaning the grease filter" in this chapter.
- Pull the tabs towards the bottom part of the filter.
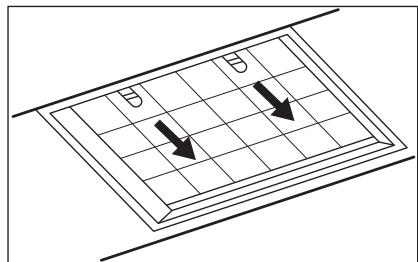
- Slightly tilt the front of the filter downwards, then pull.
- To install a new filter, perform the same steps in reverse order.
In any case, it is necessary to replace the filters at least every four months.
REPLACING THE LAMP
This appliance is supplied with a LED lamp. This part can be replaced by a technician only. In case of any malfunction refer to "Service" in the "Safety Instructions" chapter.
with the symbol with the household waste. Return the product to your local recycling facility or contact your municipal office.
www.zanussi.com/support
SAFETY INSTRUCTIONS AND INSTALLATION

OPERATION OF THE APPLIANCE
BEFORE USING THE APPLIANCE
OPERATING INSTRUCTIONS
CAREFULLY. KEEP FOR FUTURE REFERENCE
SERVICE
BEFORE INSTALLATION
TROUBLESHOOTING
ENVIRONMENT.
BUYING SPATULA
CONTROL PANEL
| Функция | Синатумасы | |
| 1 | Бірінші ксылдамнык | Желдетkiш ьірінші ксылдамнык.DeнгreiHe ayысады. |
| 2 | Шam | Шамарды kосадыЖэHe ошірedi. |
| 3 | Ушінші ксылдамнык | Желдетkiш ушінші ксылдамнык.DeнгreiHe ayысады. |
| 4 | Екінші ксылдамнык | Желдетkiш ekінші ксылдамнык.DeнгreiHe ayысады. |
Operation
AIR EXTRACTION DEVICE USAGE
Press the button located below the display.
| 011 | Тамаксы жылтыkanда, кakпak каблган bдыICTы колданы niciprene!. |
| 2 | Бірнese nicipy.aimaктарыnda hemece OTыктарда кaknaftы каблk bдыICTа тамак niciprene, bannen Kьлрогда. |
| 3 | Көн мөлшердэрү taramdarы Кakпakсыз кайнатkaнда көнecуьлргда, bірнese nicipy aimafында hemece OTыктарда niciprene!. |

After cooking, the air extraction device will continue to operate for 15 minutes and then turn off automatically.
To use the air extraction device:
CLEANING THE FILTER
| Жуftsш 3aTTAP | Жemіріш жуftsш 3aTTAPды жоне чітkepeppdi naіdanaanhaы.з. Курьлфынг anДынгы Кауьн Ing JСМСаK JСБИsh 3aT KOCblfah JСblIb cyfa батырьлфан JСМСаKУБЕРКпн Ta3alaHы.3. |
| Таfram Nicіргенін кійн JСуьлфынг Кійбір 6әліктepі bісын KeTyi MUMkін. Дakсы 6ОДырмас ушін JСуьлфынг Cytsын, Таза 7UБЕркпн Hemece КаФЗ 3CyrIMeH NурfaTу Kepek. | |
| Дakтары JСуьлсak JСуьлsh 3aTПпн Ta3alaHы.3. | |
| Aya tar'tьш Курал'dы ta3a устан'dз | Курьлфынг Jэоне май суztinerpin ai сayын тazalaHы.3. Kурьлфынг iшін Жэне май суztinerpin Майдан тazapынь.3. Май xиналfaHda Hemece 6acka Кал'dых XINHaLca, ор.TKayПи Tydbypyb MUMkiH. |
| Майысуztinerpin bIDbic JСуьлsh Maшинада JСуУfa 6OlaDы. bIDbic JСуьлsh Maшинafа Төмэн Төмпэрета ржоун KaICka ZUKN opHaTу Kepek. Май суzticinIH Tyci e3repyi MUMkiH, 6yI N Kурьлфынг JСуmbic icTeyɪhe эсяр etne'di. |
CLEANING THE WATER TANK
To install the water tank, short and long arrows are provided in the opposite direction.
To clean the water tank:
- Press the release button on the panel below the air extraction device.
- Remove the water tank by pulling it downwards and then take it out.
For all water tanks, repeat the same two steps.
- Do not use abrasive cleaners or sharp objects to clean the water tank.

Before using the device, carefully read the instructions for use. If you have any questions or problems, contact the manufacturer.
- The instructions for use should be kept for future reference.
If the device is damaged, contact the manufacturer.
CLEANING THE DEVICE
NOT

WARNING! Do not immerse the device in water or other liquids. Check the device for damage before use.
To clean the device:
- Remove the device from the power source.
Refer to the section "Removing the device" for instructions.
- Wipe the device with a soft, dry cloth.
- Do not use abrasive cleaners or solvents.
- Follow these steps to clean the device.
Occasionally, the device may need to be cleaned more thoroughly.
CLEANING THE DEVICE
The device is equipped with an LED indicator. This indicator is for technical use. If the indicator lights up, refer to the "Troubleshooting" section in the "Safety Instructions".
The materials that have been used are marked with the symbol . This means that these materials can be recycled. By recycling the materials, you can help protect the environment. For further information, please contact your local council.
Please do not dispose of the appliance with household waste. Please take it to a collection point for recycling.
Do not dispose of the appliance with household waste. Do not dispose of the appliance with flammable materials. For further information on recycling this product, please contact your local council or the shop where you purchased it.
Please contact your local council or the shop where you purchased it.
FOR MORE INFORMATION, VISIT OUR WEBSITE:

www.zanussi.com/support
SAFETY INFORMATION AND INSTALLATION

WARNING! Refer to the separate installation instructions brochure for safety information and installation. Before using the appliance or performing maintenance, carefully read the safety sections.
PRODUCT DESCRIPTION
CONTROL PANEL OVERVIEW
PRODUCT DESCRIPTION
CONTROL PANEL OVERVIEW

www.zanussi.com/support
SAFETY INFORMATION AND INSTALLATION

PLEASE READ
THE RULES RELATING TO SAFETY.
SAFETY.
DESCRIPTION OF THE DEVICE
GENERAL CONTROL PANEL
It is recommended to let the device run for about 15 minutes after preparation.
Turning on the extractor:
- Pull the extractor out more than 5 cm.
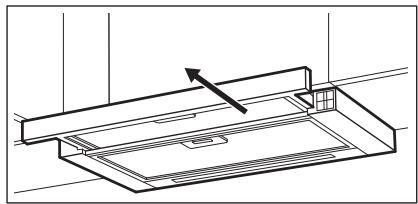
The control panel is open.
- To enable the function, press button 01
- If necessary, change the speed by pressing the desired button.

The extractor light works independently of other extractor functions. To turn on the backlight, the symbol
of the indicator, press the button for closing the damper and the light will turn on.
To turn off the fan, press 011 or close the damper.

The extractor remembers the last fan speed setting when the damper is closed. The extractor will operate at this fan speed level when the damper is opened again.
CLEANING AGENTS
NOTES ON CLEANING
Cleaning agents
Do not use abrasive cleaning agents or brushes.
Wipe the surface of the device with a soft cloth moistened with warm water and a mild cleaning agent.
After preparation, some parts of the device become very hot. To avoid burns, allow the device to cool down and wipe it dry with a soft cloth or paper towels.
Clean with a mild cleaning agent.
www.zanussi.com/support
SAFETY INSTRUCTIONS AND INSTALLATION

PRODUCT DESCRIPTION
CONTROL PANEL OVERVIEW
CONTROL PANEL OVERVIEW
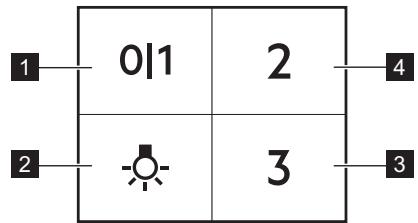
| Функциja | Опис | |
| 1 | Прва 6рзINA | Венилатор пераимаи на рву 6рзИнч. |
| 2 | Лампца | Укльчуjee и уckльчуjee севта. |
| 3 | Т repeиа 6рзINA | Венилатор пераимаи на т repeиу 6рзИнч. |
| 4 | Друга 6рзINA | Венилатор пераимаи на другу 6рзИнч. |
DAILY USE
USING THE APPLIANCE
CLEANING AND CARE
Follow the recommended frequency.
According to the table below.
01
Heating and cooking in a closed dish.
WARNING! Depending on the type, the filter may or may not be washable. See the instructions that come with the filter.
To replace the filter:
- Remove the old filter from the appliance. See the "Cleaning the filter" section in the relevant chapter.
- Press the new filter in the direction of the lower part of the filter.
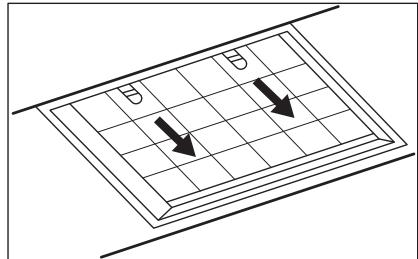
- Slightly tilt the front part of the filter down, then press.
- To install a new filter, repeat the same steps in reverse order.
The filter must be replaced with a new one at least every six months.
REPLACING THE LAMP
The appliance is supplied with a lamp. The lamp may only be replaced by a qualified specialist. In case of any malfunction, refer to the "Service" section in the "Safety Instructions" chapter.
Ensure the safety of secondary recycling of electrical and electronic devices. Do not throw away devices marked
with the symbol together with household waste. Return the product to
the manufacturer for recycling or contact local municipal authorities.


jul 2021 22 23 24 25
a
01 1 1 1 1 1 1
.
aaii jilwagaijll alall plaxwly aacli jul9 aebgall sbw abi
aagg gall y gll jgl. gall glj jn nn n nn n
aogawio glaaabjulaoa
aabjjjilw gail abi

a 1
a a a a a a a a a a a a a a a a a a a
.>g> 15 paleall lgl gnslls
JdIyllalwoc plawc uogdlljLg
jolg 2009.0009000000000000000000000000000000000000000
JgJgJgJgJgJgJgJgJgJgJgJgJgJgJgJgJgJgJgJgJgJgJgJgJgJgJgJgJgJgJgJgJgJgJgJgJgJgJg

aIbI Jc bId


- SAFETY INFORMATION AND INSTALLATION
- PRODUCT DESCRIPTION
- CONTROL PANEL OVERVIEW
- DAILY USE
- USING THE HOOD
- TO OPERATE THE HOOD
- CARE AND CLEANING
- CLEANING THE GREASE FILTER
- TO CLEAN THE FILTER
- REPLACING THE CHARCOAL FILTER
- OPTIONAL
- ENVIRONMENTAL CONCERNS
- REPLACING THE LAMP
- SAFETY INSTRUCTIONS AND INSTALLATION
- BUYING SPATULA
- OPERATION
- TO USE THE AIR EXTRACTION DEVICE
- CLEANING THE WATER TANK
- TO CLEAN THE WATER TANK
- CLEANING THE DEVICE
- NOT
- FOR MORE INFORMATION, VISIT OUR WEBSITE
- DESCRIPTION OF THE DEVICE
- TURNING ON THE EXTRACTOR
- CLEANING AGENTS
- NOTES ON CLEANING
Brand : ZANUSSI
Model : ZFP416X
Category : Range hood