
SOLO DELUXE - Coffee machine MELITTA - Free user manual and instructions
Find the device manual for free SOLO DELUXE MELITTA in PDF.
| Product type | Automatic coffee machine with grinder |
| Brand | Melitta |
| Model | Solo Deluxe |
| Dimensions (W x D x H) | 200 x 455 x 325 mm |
| Weight (empty) | 8.1 kg |
| Power supply | 220-240 V, 50/60 Hz, 1400 W max |
| Pump pressure | 15 bar max |
| Water tank capacity | 1.2 L |
| Bean hopper capacity | 125 g |
| Coffee preparation | One or two cups, espresso or long coffee (30-220 ml) |
| Intensity setting | 3 levels (mild, normal, strong) displayed by beans |
| Grind setting | Manual, from fine to coarse (lever on side) |
| Steam functions | Milk froth, hot milk, hot water via Cappuccinatore |
| Beverage types | Coffee, espresso, cappuccino, latte macchiato, hot water |
| Filtration system | Melitta PRO AQUA filter cartridge (optional) |
| Descaling | Automatic with integrated program (use Melitta ANTI-CALC) |
| Cleaning | Automatic program with Melitta PERFECT CLEAN tablets, manual cleaning of the brewing unit and Cappuccinatore |
| Safety | Automatic shut-off, energy saving mode, burn protection, electrical safety (cord, splashes) |
| Daily maintenance | Empty drip tray and grounds container, clean Cappuccinatore, wipe exterior |
| Repairability | Spare parts available through Melitta customer service; do not repair yourself |
| Brewing temperature | 3 adjustable levels (low, medium, high) |
| Automatic shut-off | Adjustable: 30 min, 2h, 4h, 8h |
| Energy saving mode | Adjustable: 5, 15, 30 min or disabled |
Frequently Asked Questions - SOLO DELUXE MELITTA
User questions about SOLO DELUXE MELITTA
0 question about this device. Answer the ones you know or ask your own.
Ask a new question about this device
Download the instructions for your Coffee machine in PDF format for free! Find your manual SOLO DELUXE - MELITTA and take your electronic device back in hand. On this page are published all the documents necessary for the use of your device. SOLO DELUXE by MELITTA.
USER MANUAL SOLO DELUXE MELITTA
SOLO® & perfect milk
Bedienungsanleitung / Operating Instructions / Mode d'emploi
Gebruiksaanwijzing / Istruzioni per l'uso / Manual de instrucciones
Betjeningsvejledning / Bruksanvising / Bruksanvising / Kayttoohje
Руковоство по заци / Instrukcja obstugi / Kullanma kilavuzu
Naudojimo instructkcija / Kasutusjuhend / Lietoşanas instructkcija
Navod k obsslze / 操作手册 / 社用 Shelming
B
C
D
E
Sicherheitshinweise
Entkalkungsphase 1 ():
Entkalkungsphase 3 ():
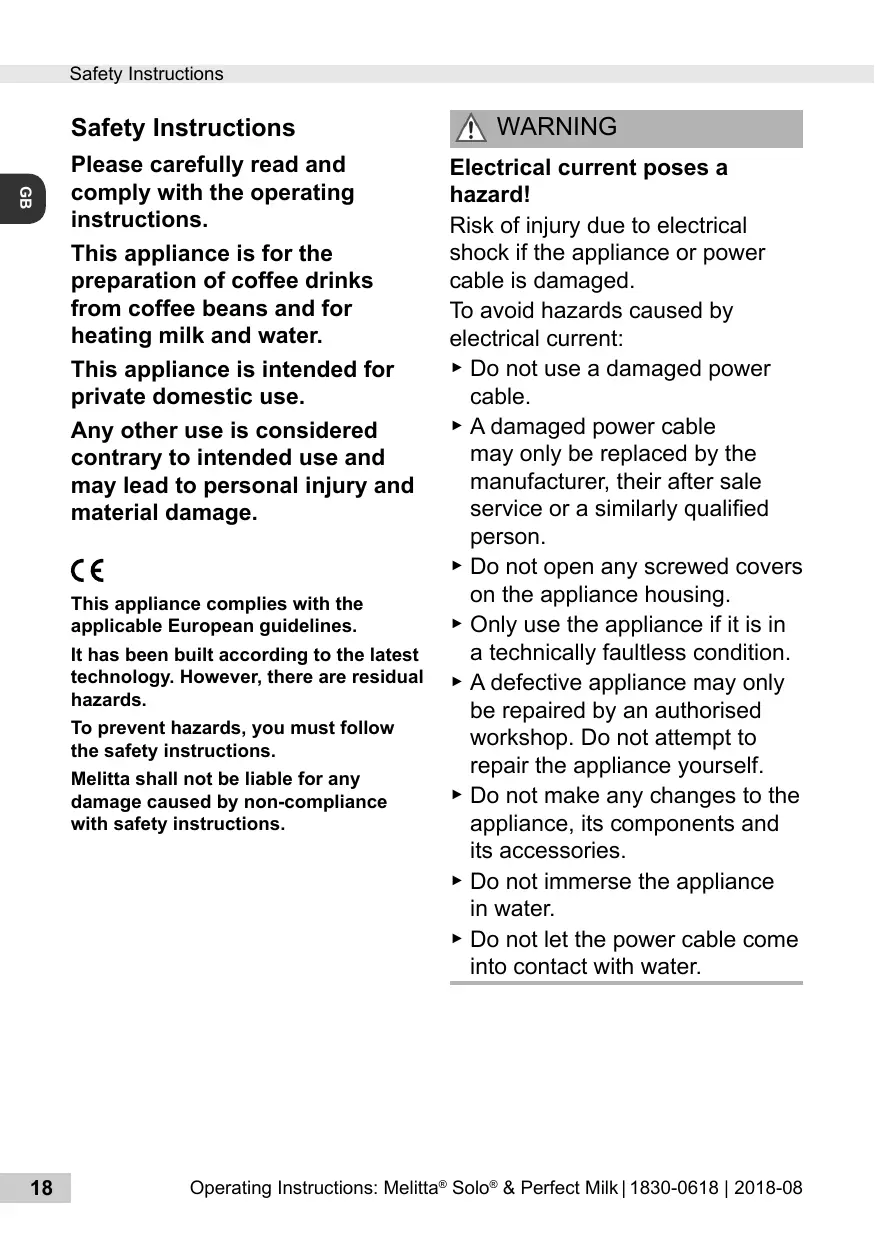
Please carefully read and comply with the operating instructions.
This appliance is for the preparation of coffee drinks from coffee beans and for heating milk and water.
This appliance is intended for private domestic use.
Any other use is considered contrary to intended use and may lead to personal injury and material damage.
C
This appliance complies with the applicable European guidelines.
It has been built according to the latest technology. However, there are residual hazards.
To prevent hazards, you must follow the safety instructions.
Melitta shall not be liable for any damage caused by non-compliance with safety instructions.

WARNING
Electrical current poses a hazard!
Risk of injury due to electrical shock if the appliance or power cable is damaged.
To avoid hazards caused by electrical current:
- Do not use a damaged power cable.
A damaged power cable may only be replaced by the manufacturer, their after sale service or a similarly qualified person.
Do not open any screwed covers on the appliance housing. - Only use the appliance if it is in a technically faultless condition.
A defective appliance may only be repaired by an authorised workshop. Do not attempt to repair the appliance yourself. - Do not make any changes to the appliance, its components and its accessories.
- Do not immerse the appliance in water.
Do not let the power cable come into contact with water.

WARNING
Burn injuries and scalding!
Released fluids and steam can be very hot. Parts of the appliance also become very hot.
To prevent scalding and burns:
- Avoid skin contact with the released fluids and steam.
- Do not touch any nozzles on the outlet during operation.
General safety!
To prevent personal injury and material damage:
- Do not operate the appliance in a cabinet or similar object.
- Do not reach into the interior of the appliance when it is in operation.
- Keep the appliance and power cable away from children younger than 8 years of age.
The appliance can be used by children from an age of 8 as well as by persons with limited physical, sensorial or mental capacities, or lacking experience and knowledge if they are supervised or were instructed on safe use of the appliance and understand the resulting risks.
Children may not play with the appliance. Children younger than 8 years of age may not perform cleaning and user maintenance. Children over 8 years of age must be supervised during cleaning and user maintenance. -
Disconnect the appliance from the power supply if it is unsupervised for a longer period of time.
-
Do not operate the appliance at high altitudes over 2000m .
- When cleaning the appliance and its components, comply with the instructions in the corresponding chapter ("Cleaning and maintenance", page 25).
At a glance
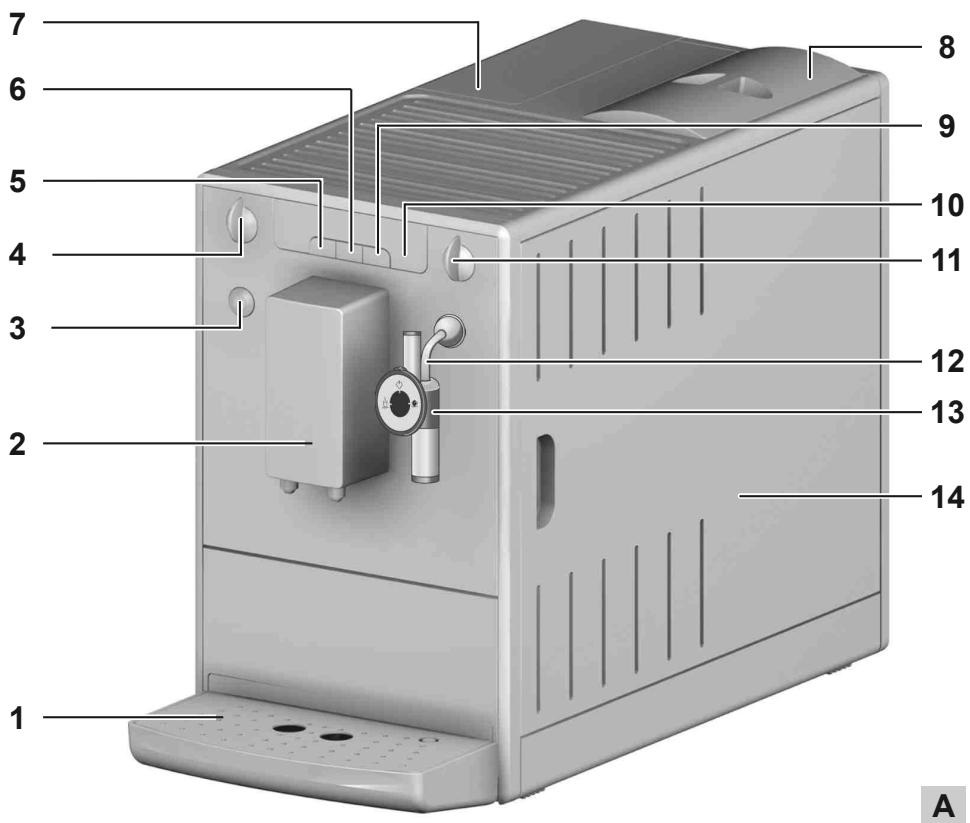
Figure A
| 1 | Drip tray with cup plate and coffee grounds container as well as display for full drip tray |
| 2 | Height-adjustable outlet |
| 3 | ON/OFF button ① |
| 4 | Coffee quantity regulator |
| 5 | Button for coffee dispensing ☐ ☐ |
| 6 | Button for coffee strength ☐ |
| 7 | Water tank |
| 8 | Bean container |
| 9 | Button for steam dispensing ☐ |
| 10 | Display |
| 11 | Valve for milk froth and hot water dispensing |
| 12 | Steam pipe |
| 13 | Cappuccinatore |
| 14 | Right cover (removable, covering the grinding fineness adjustment element, brewing unit and identification label) |
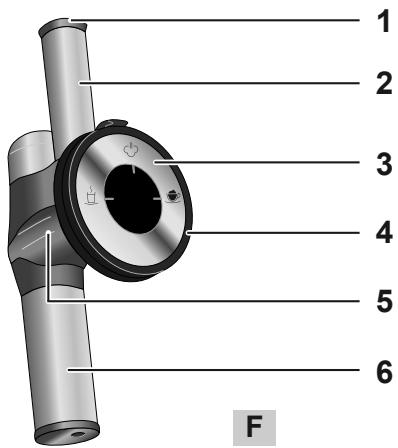
Figure F
| 1 | Air intake valve |
| 2 | Air intake pipe |
| 3 | Control dial |
| 4 | Connection for milk hose |
| 5 | Connecting piece |
| 6 | Milk froth / hot water nozzle |
Symbol on the Cappuccinatore selection switch
| Setting for warm milk |
| Setting for hot water |
| Setting for milk froth |
Display
| ① | Lights up | The appliance is ready for operation. |
| Flashes | Appliance is heating up or coffee is being dispensed. | |
| Lights up | Change the Melitta® PRO AQUA filter cartridge | |
| Flashes | Filter change in process | |
| Lights up | Fill the water tank | |
| Flashes | Insert the water tank | |
| Lights up | Empty drip tray and coffee grounds container | |
| Flashes | Insert the drip tray and coffee grounds container |
| Lights up | 1 bean: mild 2 beans: normal 3 beans: strong | |
| Flashes | Fill bean container; flashing stops after dispensing the next coffee. | |
| Lights up | Cleaning the device | |
| Flashes | Integrated cleaning programme is running | |
| Lights up | Descale the appliance | |
| Flashes | Integrated descaling programme is running | |
| Lights up | Froth standby or: Air is in the system. Turn valve switch 11 clockwise until the stop until water flows out of the appliance. | |
| Flashes | Milk froth or hot water dispensing in process. |
Before using for the first time
Check the scope of supply
Use the following list to check the completeness of the delivery. Please contact your retailer if there are missing parts.
Cappuccinatore
Milk hose
- Test strips to determine water hardness
General information
Only use pure water without carbonation.
- Use the supplied test strip to determine the hardness of the water used and set the water hardness ("Water hardness and filter", page 24).
If you wish to use a water filter, do not insert it until after the initial startup.
Information for using for the first time
The appliance must be vented before it is used for the first time. The appliance may only be powered on with a completely filled water tank.
Push the Cappuccinatore 13 onto the steam pipe up to the stop 12.
- Place a vessel under the Cappuccinatore 13.
Press the ① button to switch on the appliance.
illuminates on the display.
Turn the valve switch 11 clockwise until it stops. ① ② ③ ④ flashes on the display. Water will flow into the vessel.
- When is illuminated on the display, turn the valve switch 11 anticlockwise until it stops.
The device is ready for operation.
After initial startup, insert the Melitta PRO AQUA filter cartridge, if necessary (see page 24).
Starting up the appliance
Commissioning

WARNING
Danger of fire and electric shock due to incorrect supply voltage, incorrect or damaged connections and power cable!
- Ensure that the supply voltage corresponds to the supply voltage specified on the identification label of the appliance. The identification label is located on the right side of the appliance behind the cover (Image A, 14).
Make sure that the power socket meets the applicable standards for electrical safety. If in doubt, contact a qualified electrician. -
Never use damaged power cables (damaged insulation, bare wires).
-
Place the appliance on a stable, dry and level surface with sufficient clearance (at least 10cm ) to the sides.
Push the Cappuccinatore 13 onto the steam pipe 12 as far as it can go.
Plug the power cable into a suitable power socket.
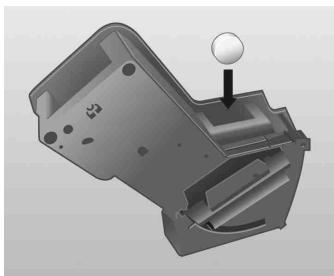
Remove the lid from the bean container 8. - Fill the bean container with suitable coffee beans.
Put the lid back on. -
Lift up the lid of the water tank 7 and pull the water tank up and out of the appliance.
-
Fill the water tank with fresh tap water only up to the max. mark.
- Insert the water tank into the appliance.
Place a vessel under outlet 2.
Press the on/off ① button to turn the appliance on or off. The appliance may perform an automatic rinse.
Preparation
- Fill the water tank with fresh water every day. The water tank must always be filled with enough water for the operation of the appliance.
- Fill the bean container preferably with espresso beans or bean mixtures for fully automatic coffee machines. Do not use any ground, glazed, caramelised, or otherwise sugar-coated coffee beans.
Setting the dispensed quantity and strength
Turn the coffee quantity regulator 4 to infinitely adjust the dispensed quantity. Regulator all the way to the left = 30ml per cup Regulator all the way to the right = 220ml per cup
Press the button until the desired strength is adjusted. The strength is shown by the beans on the display 10 (from 0 = mild to 0 = 0 = strong).
Dispensing coffee or espresso
One or two cups can be dispensed simultaneously.
Switch on the device.
- Place one or two cups under the outlet.
Preparing one cup: Press the button once.
Preparing two cups: Press the button twice.
Press the button again to cancel the coffee dispensing.
Preparing milk froth and heating milk and water
WARNING
There is a risk of burn injuries and scalding due to hot steam and the hot steam pipe!
- Never reach into the escaping steam.
- Avoid direct skin contact with hot water and the hot steam pipe.
- Never touch the steam pipe during use or immediately after use.
The Cappuccinatore is used to prepare milk froth, to heat milk or to dispense hot water.
It can froth the milk directly from the milk carton or a vessel into the cup.
You can optionally connect it to a Melitta® milk container.
Preparing milk froth
If possible, use cold milk with a high protein content.
Switch on the device.
Submerse the Cappuccinatore hose 13 directly into the milk.
Press the button. ① flashes while the appliance is heating up. After the heat-up phase, ② is illuminated.
Turn the control dial (Image F, 3) to the "Milk froth" position ( is pointing up).
Turn the valve switch 11 clockwise until the stop. is flashing. The milk froth is being prepared.
Turn the valve switch 11 anticlockwise until it stops. The preparation is finished.
Rinse the Cappuccinatore after each use.
Heating milk
Switch on the device.
Submerse the Cappuccinatore hose 13 directly into the milk.
Press the button. ① flashes while the appliance is heating up. After the heat-up phase, ② is illuminated.
Turn the control dial (Image F, 3) to the "Warm milk" position ( is pointing up).
Turn the valve switch 11 clockwise until it stops. is flashing. The milk is being heated.
Turn the valve switch 11 anticlockwise until it stops. The heating is completed.
Rinse the Cappuccinatore after each use.
Rinsing the Cappuccinatore
The Cappuccinatore should be cleaned at regular intervals ("Cleaning the Cappuccinatore", page 25).
It is recommended to rinse the Cappuccinatore on a weekly basis with the Melitta® PERFECT CLEAN milk system cleaner. Use the milk cleaning solution instead of clear water.
Switch on the device.
- Fill a vessel halfway with clear water.
- Hold a vessel under the Cappuccinatore. The hose of the Cappuccinatore must be submersed in the water.
Press the button for steam dispensing.
Turn the control dial (Image F, 3) to the "Milk froth" position ( is pointing up).
Turn the valve switch 11 clockwise until it stops. Close the valve switch when a mixture of clean water and steam comes out.
Wait for 30 seconds or press the button to change to the normal operating mode.
Dispensing hot water
A maximum of 150ml of hot water can be dispensed in each process. To dispense a larger amount of hot water, repeat the process.
Switch on the device.
Turn the control dial (Image F, 3) to the "Hot water" position ( ^ is pointing up).
Hold a vessel under the Cappuccinatore.
Turn the valve switch 11 clockwise until the stop. is flashing. Hot water will flow into the vessel.
Turn the valve switch 11 anticlockwise until it stops.
Water hardness and filter
It is important to properly set the water hardness so that the appliance displays the need to be descaled when required required. From the factory, it is set at water hardness 4.
The water hardness category 1 is automatically set after inserting the Melitta® PRO AQUA filter cartridge.
Melitta® PRO AQUA Filter cartridge
The Melitta® PRO AQUA filter cartridge filters lime scale and other contaminants from the water. The water filter should be changed every 2 months, however, at the latest when appears on the display. The water filter is available in specialised shops.
Inserting the water filter
flashes during the entire change procedure.
- Put the water filter in a glass with tap water for several minutes before inserting it in the appliance.
Switch off the device.
Press and hold the 0 and 1 buttons for approx. 3 seconds, then release. appears on the display. - Empty the drip tray and insert without the coffee grounds container.
- illuminates.
Pull the water tank 7 up and out of the appliance.
Empty the water tank. - Screw the water filter onto the thread at the bottom of the water tank.
- Fill the water tank with fresh tap water up to the max. mark.
Insert the water tank into the appliance. illuminates. - Place the coffee grounds container under Cappuccinatore 13.
Turn the valve switch 11 clockwise until it stops. ① ② ③ ④ flashes on the display. Water will flow into the vessel.
- When is illuminated on the display, turn the valve switch 11 anticlockwise until it stops.
The device is ready for operation. ① and illuminate. The water hardness is automatically set to hardness level 1.
- Empty and insert the coffee grounds container.
After inserting the water filter, the water can be cloudy during the first rinse because excess activated carbon is washed out of the filter. The water will then be clear again.
Setting the water hardness
The appliance includes a test strip to determine the water hardness.
Determine the hardness of the tap water using the test strip.
Switch on the device.
Press the l and buttons simultaneously for longer than 2 seconds. ① flashes rapidly.
Press the l button to show the menu for setting the water hardness. l illuminates.
- Set the determined water hardness by pressing the button. The selected water hardness is shown by the bean symbols .
| Water hardness | °dH | °e | °fH |
| 1: | 0-10 | 0-13 | 0-18 |
| 2: | 10-15 | 13-19 | 18-27 |
| 3: | 15-20 | 19-25 | 27-36 |
| 4: flashing | >20 | >25 | >36 |
Press ① to confirm the selection.
Cleaning and maintenance

WARNING
Electric shock hazard due to supply voltage!
- Pull the power supply plug before cleaning.
- Never immerse the appliance in water.
Do not use a steam cleaner.
Daily cleaning
- Wipe the outside of the appliance with a soft damp cloth and normal dishwashing liquid.
Empty the drip tray.
Empty the coffee grounds container.
Cleaning the Cappuccinatore
- Let the Cappuccinatore cool down.
Wipe the Cappuccinatore on the outside with a damp cloth.
Pull the Cappuccinatore 13 off of the steam pipe 12. - Remove the milk hose, the milk froth / hot water nozzle (Image F, 6) and the air intake pipe (Image F, 2) from the connecting piece (Image F, 5).
Rinse all of the parts thoroughly with water.
Reassemble the Cappuccinatore in the reverse order.
Push the Cappuccinatore 13 onto the steam pipe 12.
Cleaning the brewing unit
It is recommended to clean the brewing unit once a week.
Switch off the device.
Pull off the cover 14 to the right.
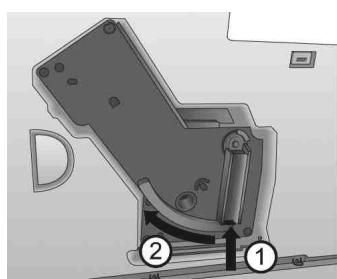
Press and hold the red button on the handle of the brewing unit (Image B, 1).
Turn the handle clockwise until it stops.
Pull the brewing unit out of the appliance by the handle.
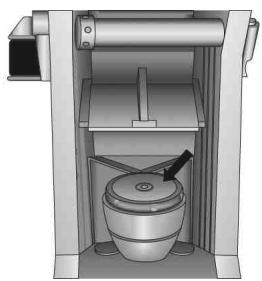
- Rinse the brewing unit thoroughly on all sides with clear water. The area shown in Image D (arrow) must be free of coffee residues.
Let the brewing unit drip dry.
- Remove coffee residues from the appliance.
- Insert the brewing unit back into the appliance, press and hold the red button (Image B, 1) and turn the handle anticlockwise until it stops.
Insert the cover until it clicks in.
Integrated cleaning programme
The integrated cleaning programme (takes about 15 minutes) removes residues and coffee oil residues that cannot be removed by hand. The cleaning symbol [ ] flashes during the entire process.
The cleaning programme should be performed every 2 months or after 200 brewed cups, however, at the latest when is illuminated.
Before starting the cleaning program, clean the brewing group and the interior ("Cleaning the brewing unit", page 25).
Only use Melitta® PERFECT CLEAN cleaning tabs.
Switch off the device.
- Fill the water tank with tap water up to the max. mark.
Insert the water tank.
Press the and ① buttons simultaneously for longer than 2 seconds. flashes, illuminates.
- Empty the drip tray and coffee grounds container.
- Insert the drip tray without the coffee grounds container
- Place the coffee grounds container under outlet 2.
Cleaning phase 1
Two rinsing processes will be executed. When 0 illuminates, proceed as follows:
Remove the brewing unit.
- Put a cleaning tab in the brewing unit (Image C).
Insert the brewing unit.
Cleaning phase 2
When 4 illuminates, proceed as follows:
- Fill the water tank with tap water up to the max. mark.
Press the button to continue with the cleaning programme (takes about 5 minutes).
Cleaning phase 3 (000):
When ① illuminates, proceed as follows:
- Empty the drip tray and coffee grounds container.
- Insert the drip tray without the coffee grounds container
- Place the coffee grounds container under outlet 2.
Cleaning phase 4 (the middle bean is flashing):
The cleaning programme will be continued again and takes about 5 minutes.
When ① illuminates, proceed as follows:
- Empty the drip tray and coffee grounds container and insert them in the appliance as usual.
The cleaning programme is finished.
Integrated descaling programme
WARNING
The descending agent can cause skin irritations!
Comply with the safety instructions and the dosing information specified on the descaling agent packaging.
The integrated descending programme (takes about 30 minutes) removes lime residues inside the appliance. The symbol for descending flashes during the entire process.
The descending programme should be performed every 3 months, however, at the latest when illuminates ("Setting the water hardness", page 24).
Only use Melitta® ANTI CALC.
Switch off the device.
- Remove the water filter if necessary ("Water hardness and filter", page 24).
Press the and ① buttons simultaneously for approx. 3 seconds.
flashes, illuminates.
Descending phase 1 (0):
Empty and reinsert the drip tray.
- Place the coffee grounds container under the Cappuccinatore.
Turn the control dial (Image F, 3) to the "Hot water" position () is pointing up). illuminates.
- Completely empty the water tank.
- Add the descending agent to the water tank according to the instructions on the packaging.
Insert the water tank.
Press the button to start the descending programme (takes about 15 minutes).
Dscaling phase 2
When illuminates, proceed as follows:
- Ensure that the coffee grounds container is placed under the Cappuccinatore.
Turn the valve switch 11 clockwise until the stop. is flashing. Water will flow intermittently into the coffee grounds container (takes about 10 minutes). is then illuminated. - Empty the drip tray and coffee grounds container.
- Reinsert the drip tray and put the coffee grounds container back under the Cappuccinatore. illuminates.
- Remove the water tank and rinse thoroughly with clear water.
- Fill the water tank with tap water up to the max. mark.
Insert the water tank.
Press the button to continue with the descending programme. is flashing. Water flows into the coffee grounds container.
Descending phase 3
When illuminates, proceed as follows:
Turn the valve switch 11 anticlockwise until it stops. Water flows inside the appliance into the drip tray.
- When is illuminated, empty the drip tray and the coffee grounds container and reinsert them. When is illuminated, the descaling programme is finished.
Insert the water filter if necessary ("Water hardness and filter", page 24).
Other settings
Energy-saving mode
After the last action, the appliance switches automatically (depending on the settings) to the energy-saving mode. From the factory, the appliance is set at 5 minutes
Switch on the device.
Press the 0 and 0 buttons simultaneously until 1 flashes.
Press the button twice. illuminates.
Press the button until one of the four times is set. The time is displayed by the beans on display 9.
| Display | Time |
| 5 minutes (factory setting) | |
| 15 minutes | |
| 30 minutes | |
| off |
Press the ① button to confirm the setting.
Auto-OFF function
The appliance switches off automatically after the last action (depending on the setting). From the factory, the appliance is set at 30 minutes
Switch on the device.
Press the 0 and 0 buttons simultaneously until 1 flashes.
Press the button three times. illuminates.
Press the button until one of the four switch-off times is set. The time is displayed by the beans on display 9.
| Display | Time |
| 30 minutes (factory setting) | |
| 2 hours | |
| 4 hours | |
| 8 hours |
Press the ① button to confirm the setting.
Brewing temperature
From the factory, the brewing temperature is set to Level 2 (medium [0 9].
Switch on the device.
Press the 0 and 0 buttons simultaneously until 1 flashes.
Press the button four times.
Illuminates.
Press the button, until one of the three brewing temperatures is set. The temperature is shown by the beans on display 9 (from 0 = low to 0 000 = high.).
Press the ① button to confirm the setting.
Adjusting the grinding fineness
The grinding fineness was set before the appliance was delivered. We therefore recommend to only adjust the grinding fineness after about 1000 coffee preparations (about 1 year).
The grinding fineness should only be adjusted immediately after starting coffee dispensing and only while the mill is running.
Pull off the cover 14 to the right.
Start dispensing coffee.
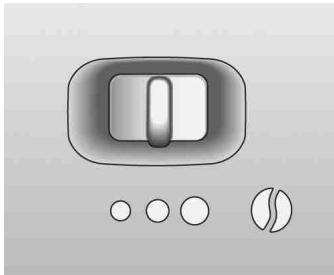
Put the lever (Image E) in a desired position (left = fine to right = coarse).
- Insert the cover and swivel to the left until it clicks in.
Transport, Storage and Disposal
Venting

WARNING
There is a risk of burn injuries and scalding due to hot steam and the hot steam pipe!
The machine releases hot steam when it is vented.
- Never touch the steam pipe during use or immediately after use.
The appliance should be vented when it has not been used for a while or has been transported. The appliance is then protected from frost damage.
- Remove the water filter if necessary ("Water hardness and filter", page 24) and keep it cool in a glass filled with tap water.
Switch on the device.
Press the l and ① buttons simultaneously for approx. 2 seconds. ① flashes, and then illuminates.
Pull the water tank 7 up and out of the appliance. illuminates. - Place a vessel under the Cappuccinatore 13.
- Turn the valve switch 11 clockwise until the stop. l is flashing. Water flows out of the steam pipe and into the vessel; steam will also escape.
- When there is no more steam escaping: Turn the valve switch 11 anticlockwise until the stop.
- Insert the water tank into the appliance.
Transport
- Vent the appliance.
- Empty and clean the drip tray and coffee grounds container.
- Empty the water tank and the bean container. If necessary, vacuum out beans that are stuck at the bottom.
Pull the Cappuccinatore 13 off of the steam pipe 12.
"Cleaning the brewing unit", page 25.
If possible, transport the appliance in the original packaging including the hard foam elements.
Disposal
This appliance is labelled according to the European Directive 2002/96/EC on waste electrical and electronic equipment (WEEE). The Directive prescribes the framework for a EU-wide applicable return and recycling of waste appliances. Please contact a specialised dealer for current disposal procedures.
| Troubleshooting | ||
| Malfunction | Cause | Measure |
| Coffee only flows drop-by-drop. | Grinding fineness is too fine. | Adjust the grinding fineness more coarse. Clean the brewing unit. Perform a descaling or cleaning programme if necessary. |
| Coffee does not flow. | Water tank not filled or incorrectly inserted. | Fill the water tank and make sure it is properly inserted. |
| The brewing unit is clogged. | Clean the brewing unit. | |
| The grinder is not grinding. | The beans are not falling into the grinder. | Tap lightly on the bean container. |
| Foreign objects in the grinder. | Call the hotline. | |
| Loud grinder noise. | Foreign objects in the grinder. | Call the hotline. |
| Bean symbols ⑥ are flashing although the bean container is full. | Insufficient quantity of ground beans in the brewing chamber. | Press the ⑦ button or ⑧ button. |
| Appliance indicates "no water" even though the water tank is filled. ① illuminates on the display. | The float is blocked. | Check the condition of the float in the water tank, remove the water and carefully shake the tank. |
| The ⑨ symbol is illuminated without a reason. | There is air in the lines inside the appliance. | Turn the valve switch 11 clockwise until the stop until water flows out of the appliance. Clean the brewing unit if necessary. |
| The cleaning or descaling process was interrupted. | The power supply was interrupted, e.g. due to a power outage. | The appliance performs a rinsing program autonomously. To do so, follow the instructions on the appliance. |
| Not enough milk froth is formed during the frothing process. | The control dial of the Cappuccinatore is in the wrong position. | Adjust to the proper position. |
| The Cappuccinatore is dirty. | Take the Cappuccinatore apart and clean it. | |
| The brewing unit can no longer be reinserted after removal. | The brewing unit is not properly locked. | Check whether the handle for locking the brewing unit is correctly engaged. |
| The actuator is not in the proper position. | Switch the appliance off and then on again. Press the ⑩ and ⑪ buttons simultaneously for longer than 2 seconds. The actuator is put into position. Then reinsert the brewing unit and make sure it is correctly locked into place. | |
| The symbols for cleaning and stand-by ① flash alternately. | The brewing unit is missing or not properly inserted. | Insert the brewing unit properly and lock. |
| The brewing chamber is overfilled. | Switch off the appliance and switch it on again using the ON/OFF button ① (repeat if necessary) until standby mode is displayed. | |
| Continuous flashing of all buttons. | System error | Switch off the appliance and switch it on again via the ON/OFF button ①; if this does not solve the problem send the appliance to the service department. |
Technical data
| Technical data | |
| Operating voltage | 220-240 V, 50/60 Hz |
| Power consumption | maximum 1400 W |
| Pump pressure | maximum 15 bar |
| Dimensions | |
| Width | 200 mm |
| Depth | 455 mm |
| Height | 325 mm |
| Capacity | |
| Bean container | 125 g |
| Water tank | 1.2 l |
| Weight (empty) | 8,1 kg |
| Ambient conditions | |
| Temperature | 10°C to 32°C |
| Relative humidity | 30% to 80% (non-condensing) |
Reset the appliance to the default settings
You can reset the appliance to the default settings.
Prerequisite: The appliance must be ready for operation.
To do so, press the on/off button ① and also press the steam dispensing button for more than 2 seconds.
The appliance has been reset to default settings.
Overview of default settings:
| Default settings | |
| Brewing temperature | Medium |
| Water hardness | Very hard |
| Timer for Auto OFF function | 30 minutes |
| Timer for energy-saving mode | 5 minutes |
Rengoringsfase 1 ():
Sette inn vannfilter
Under hele utskiftingsprossessen blinker
Annapat pa3pa6oTaH c yyeTOM HOBeiXx DoCTNXKeHn TEXHNKn. Tem He MeHee BO3MOxHbI OCTaTOUHbI pNCKn.
YTo6bI n36ExKaTb pnCKOB, Heo6xOaHMo HeyKoCHnTeJbHo co6JIHOdaTb yka3aHnno TEsHnke 6e3OnaChOCTn.
KomnaHn Ma Melitta He Hecet OTBeTCTBHeHcOt b 3a HeBbINOJHeHne yKa3aHn IO TexHnke 6e3OnaChOCTn.

OCTOPOXHO
PnroToBneHne KoFe nJIn 3cnpecco
OndHOBpeMeHHo MOxHO pnpiroTOBnTb OndHy IJI NDe YaXKN.
BknHouHTe annapaT.
IocTaBte OndHy nnn DBe yauKn noDycTpoiCTBO noDaun KoFe.
■PpuzomoeHue oDhou yaUKU: HaxMMTe KHOJky OoUn pa3.
■PpuzomoeHue 6yX yawek:HaXMITE KHOIky 6a pa3a.
Haxmte KhONky eue pa3, TTo6bl npepBaTb pInrOToBnEHeNKeOe.
PnroTOBHeM OJIOUHOI neHb I nOdoRpeB MoIoka NIN BOdBi
OCTOPOXHO
Onachoctb oxora ropaum napom nnn ropaey Tpy6kOJn npaunapa!
CneNyet n36eRaTb IIO6oKOHTaC BbIXOJaIIM napOM.
- N36eRaIte npraMOrO KOHTaKTA KOKN C ropey BODoN ropye TpykoJ dJa noDaunapa.
HnB Koem cnyae He KacaIteCb Tpy6kn IJn POnaun napa BO Bpemr ee NcNoJIb3OBAHnI INn Cpa3y Nocne Hero.
C nomoubko kanyuHaTopa moKHO npirotaBnBaT MOIOHyo NeHy, HarpBeBaT MoIOKO NIN NOJyAtb ropaTu BOy.
BcneHeHoe MOJOKO MOKHO pniROTOBtB dnyaIKN HeNOCpeDCTBeHHO n3 MOnOHoro NaKeTa nn KaKo-1n6o EMKOCTn.
Haxmte KhoNky ①, YTo6bl NOtBepNTb BblOp.
YxOД n OuIncTka

OCTOPOXHO
Onachoctb nopaxeHn3JIeKtpnuecknM TOKOM n3 CETnIHTAHNl!
13BJIeKInTe BnIky n3 po3eTKn nepeD OYNCTKOJ.
HnkOrda He norgykaTe annapaT B BOdy.
He nCnoJIb3yIte yCTpoIcTBA dIa napoctpyHoiO uNCTKn.
EkeiHeBnaOuNCTka
IpoTnTe annapat cnapxMmRko TkaHEBOcAnpEeKo,CMOueHHoB ODoC 0bHybIM bItOBbIM CpeDCTBOM DnA MbITbI NocyDbI.
Onopoknite noDOnH dJa c6opa KaJIb.
Onopokhnte emkoctb nra octaKOB kope.
OuIncTa KaanyUnHaTopa
ДаиTe kanyuHaToPy OcTbIb.
IpoTpuTe KaanyHaToP chapyKn BnaJHoN caJIpeTKoI.
CHIMITE KanyuHaTop 13 c Tpy6kn Ipa napa 12.
CHIMITE C COEINHITeBHO 3JeMeHTa (pnc F,5) MOIOuHbI IJNaHr,ΦOpCyHky IJRA MOIOUHOI NeHbI / TropyaeI BOJbI (pnc.F,6) IN Tpy6Ky IJRA BCaCbIBaHnra BO3dyxa (pnc.F,2).
TuaTeJIbHO npOMoIe BCE deTaII BOIOI.
Cobepnte kanyuHaTOp B o6paTHOM npraIKe.
YctaHOBIne KaanyuHaTOp 13 Ha Tpy6Ky dny noDaun napa 12.
OuNTka 6JIOka 3aBapNBaHnA
PekomeHnyeTcExeHeJeIbHaY OuHCTKa 6bloka 3abapubahn.
BbiknIOuHTe aannapaT.
CHIMMTE BnpaBO KOKyx 14.
Hakmte u yedeKnBaIte KpaChyKHOkny Ha pyuKe 6noka 3aBapnbAHnra(pnc.B,1).
ПовернITE ручу по чавоь стрелке до уnapа.
I3BnKeKInTe 6IOK 3aBaPbINBaHnIa pyKy n3 annpapata.
Ttataelbno n CO Bcex cSTOPH npomoi Te 6nok 3aBapuBaHnna YnCToB BoDo. Ha yuctke, OTmueeHHOM CTpeJIkoH ha pnc. D, He doJnxHO 6bItb OCTaTkoB KoPe.
ДаиTe BOe CTeYb n3 6noka 3aBapuBaHnI.
UdaIte octaTK KoFe n3 annapata.
BCTaBbTe 6IOK 3aBapuBaHnB aannapaT, HaxMnte KpaChyIO KNOpKy (pnc. B,1), ydepxuBaIte ee n nobepHnte pyky npOTNB YacOBoi CTpeKN Do ynpa.
BCTaBte koxydoeroΦnKcaun.
BcTpoEHnA nporpaMa oUncTkN
BcTpoEHHna npOrpaMaOuNCTKn (ДПИТeьнocTьОКОЛ 15 MInHyT) ydaJIaTe OCTaTkn KoPe N KoPeIHO rO Macla, KOTOpbIe HeBO3MOxHO yCTpaHITb BpyUHyO.Bo BpeMЯ BcEi npOeJypbl MnraET CmBON UcNCTKn
IporpaMMy OunchkN CJeDyET BblIOJIHrTb uee3 kajdbie 2 Mecaa nnn nocne nprirotobleny 200 yawek, Ho He I03dHee TOROMeHtA, KOrda 3arOpITcra CIMBOJ
■Пелед занусkom пограмьочисткочисте БлOK 3аварпваимяиВнутpeн gee пocstpaнctBo(«Очистka6лoka 3аварпваимя》,страниca 155).
IcnoJb3yIe ToJIbKO YnCTaIe Ta6JIeTkn Melitta PERFECT CLEAN.
BbiknIOuHTe annapaT.
3anonHnte pe3epByap IJRA BObI BOONPOBOHOB ODO JO OTMeTKI «max».
BCTaBtpepe3epByapIJI B0DbI.
OДнOBpeMeHNO HaKMnTe KHOPIKn ① n ydepknBaIte nx 6oJIe 2 cekyHd. Muraet , ropnt
Onopoxhnte noDIOH nIcOpa Kaenb I eMKoCTb IJIa OCTaTkoB KoPe.
BCTaBbTe POnDoH DnA c6opα Kaenb 6e3 emKoCTn DnA OCTaTkoB KoPe.
IIOCTaBBTe EMKOCtB DJIra OCTaTKOB KoOe NOJ yCTPOINCTBO NODaUN KoOe 2.
3man ouucmku 1
BbnoJHraTcBaZnKna npombIBKn.
EcnI ropnt ①, BbINOJIHInTe cJeDyUOuNHe DeiCTBnI:
N3BnKeKITE6nOK3aBaPunBaHna.
■Полokитей чостяю tablenув 6нок заварваима (рс.С).
YcTaHOBInTe 6nOK 3aBapuBaHnIy.
3man ouucmku 2 (00):
EcnI ropnt BbINOHnTe cneyuOuine DeiCTBnI:
3anonHnte pe3epByap dny BOdbI BOONPOBOHOB ODOJ DO OTMeTKN «max»
Haxmnte KhoNky ,yTo6bl npoJnKNTb BbINOJIHeHne nporpaMMbl OuHCTKN (dIHTenbHOCTb OKOIO 5 MNHyT).
3man ouucmku 3
EcnI ropnt, BbINONHte cneyuOuine deJeCTBnI:
Onopoxhnte noDOnH dIa c6opa kaneIb nemKoCTb Ira octaTkoB KoPe.
BCTaBte POnDOn DnA c6opα Kaenb 6e3 emKoCTn DnA OCTaTkoB KoPe.
IIOCTaBbTe EMKoCTb IJIr OCTaTKOB KoFe IOJ yCTPOJCTBO IOJaUH KoPe 2.
3man ouucmku 4 [000] Muaem cpeHee koepuHoe 3epHO):
BbIOnHeHne npOrpaMMbO uNcTKn 6ydet npoJolKeHo, OHa dInTcra Okono 5 MNHyT.
EcnI ropnt BbINOHnTe cneyuOuine deJeCTBnI:
Onopoknhte noDOnH dIra c6opa Kaenb I eMKoCTb Ira OCTaTKOB KoPe IN BCTaBbTe Ix B aannapat.
HactpoJa Ka TohKocTn NOMOJa
Hacpoika ToHKoCTn NOMOla 6bIa BbIIOJIHeHa nepei NoCTaBKOc 3aBOJa. IToTOMy peKOMeHNyETcN pOnCTpaNBaTb ToHKoCTb NOMOla TOnbKO nocJe nprirotOBNeHn 1000 yawek KoFe (npimepHo uepez 1 roJ).
HactpaBaiTe TOHKoCTb NOMOna HenoocpeIcTBeHHO nepeI NaHauJOM nprirotobHeN KoFe BO Bpempa60tki Kooemolkn.
CHIMITE BnpaBO KOKyx 14.
Haunnte npiroTOBHeNe KoFe.
YcTaHOBInTe pIyar (pnc. E) B Tpe6yeMoE nOIOXKeHnE (BJIeBO = TOHKN IOMOJ, BnPaBO = KpyNHbI NOMOJ).
BCTaBbTe KpbIuKy IIOBepHnTe ee BJIeBO Do qNKcaun.
TpaHcNoptnupOBka, xpaHeHne n yTuJIIn3aCnA
BbInapnbHne BoDbI

OCTOPOXHO
Onachoctb oxora ropaum napom nnn ropaey Tpykoon npdaunapa!
При Вьларпвани n3 annapata BbIXOДNT roрачи nap.
HnB Koem cnyae He KacaIteCb Tpy6kn Ipa NpaCh npa BO BpeMye nCpOJIb3OBAHn INn Cpa3y nocNe Hero.
Ecnn annapaT He 6yIeT nCNoJIb3OBAtbcA nnTeNbHbI nepNOB BpeMeHN IIN ero Heo6xOdIMo TpaHCnOpTnpOBaTb, CJeNyET BbInONHITb BblapNBaHne BOdbI n3 annapata. BlaorOapra 3tOMy OH 6yIeT 3aUHsEN OT NOLOMK pRn OTPucaTeNbHbIX TempepaTypax.
■Pn Heo6xOJIMOCtN 3BNEKITe ΦIbTp DnIg BObl (XKeCTKocTb BObl I ΦIbTp DnIg BObl), CTpaHnca 154) INOLOKInTe ero DnIg XpaHeHnB C BoOpnpOBdHO BDoB B IpoxJaDHOM MecTe.
BknHouTe annapaT.
OndHbpeMeHHo HaxMHTe KHOPIKn ① u ydepxmbaTe nx OKOIO 2cekyHd.Miraet ①,3aTeM rOpNT
N3BnKeKnte pe3epByap nIa BOIbI 7 n3 annapata no HanpaBHeHIO BBepx. FopNT
IIOCTaBbTe EMKOCTb NOd KanyuHaTOp 13.
■NoBepHnTe nepeKnIouaTeIb BeHTnJIa 11 no yacobOy cTpeIke Do ynpoA. Miraet .N3 Tpy6kn dIra NpaH npa B eMKoCTb BbITEkaET BOda, TaKKe BbIXoIIT nap.
Ecnnnap6oIbIe He BbIXOuNT, NOBepHnTe nepeKJIouaTeIb BeHTnJIa 11 npOTNB YacOBoi CTpeJKN Do ynpopa.
BcTaBbTe pe3epByap IЯ BObl Bannapat.
TpaHcnpToPobKa
BbIOnHnTe BbInapuBaHne BoIbI n3 annapata.
OnopoxkHnTe OuchCTNe NOIDON dIa c6opa Kaenb N eMKoCTb IJIra OCTaTKOB KoPe.
OnopokhnTe pe3epByap dIЯ BObl KONTeHep IJIKoFeiHbIX 3epeH. Iprn Heo6xoDImOcTn ydaJIte HaxOJaUneCeB rIy6HHe 3epHa C NOMOuBIO nbJInecoca.
CHIMITE KanyuHaTop 13 Tpy6Kn Ipa 12.
«OuNCTka 6Ioka 3aBapINBaHnra», CTpaHnca 155.
■No BO3MOXHOCTN TpaHcNOpTnpuYte annapat BOpunHaJIbHoI yNaKOBKe BmecTe C JkEcTKnM NeHONJaCTOM.
Ytun3açna
3TOT annapat IMeet MapknpoBky
corgnacHO eBponeckoI dIpeKtNBe
2002/96/EC o6 OTxOaX 3JIeKtpnueCKoro I
3JIeKtpOnHOrO obOpyDoBaHnA
(waste electrical and electronic
equipment WEEE). DaHHa IupeKtNBA
yCTaHaBnIBaet pamKn dJa DeiCtByUOuNX
Ha Teppntopn EC Bo3BpaTa I
yTnIIN3aun CTapbIX yCtpoiCTB.ДЯ
IOnyuEHeN INHΦopMaun Ob aKTyaJIbHbIX
MeToDaX yTnIIN3aun ObpaTInTeCb K
IpoDaBcy.
| Устранения несяправочи | ||||
| Немправочь | Прочана | Меры по устранения | ||
| Кофе постуает Товко каллам. | Слишков Тонкий пол. | Установке воже круший пол. Очироте с升降机 При неobхомост通风 пограму дая удалия пли有很大, пли有很大, пли有很大, пли有很大, пли有很大, пли有很大, пли有很大, пли有很大, пли有很大, пли有很大, пли有很大, пли有很大, пли有很大, пли有很大, пли有很大, пли有很大, пли有很大, пли有很大, пли有很大, пли有很大, пли有很大, пли有很大, пли有很大, | ||
| Кофе не постуает. | He 3anollhen илne неразвilingь Вставлие розервуар дая воры. | Задлениcopepe И празberгte празberгte установки. | ||
| Засорен升降 Засорinas Засорinas Засорinas | Очироте升降 Слес Осратente Осратente Осратente Осратente | |||
| Кофемолka паботает. | Зерна Кофемол Кофем Кофем Коф Коф Коф Коф Коф Коф Коф Коф Коф Коф Коф Коф Коф Коф Коф Коф Коф Kоф Kоф Kоф Kоф Kоф Kоф Kоф Kоф Kоф Kоф Kоф Kоф Kоф Kоф Kоф Kоф Kоф Kоф Kоф Kоф Kоф Kоф Kоф Kоф Kоф Коф Kоф Kоф Kоф Kоф Kоф Kоф Kоф Kоф Kоф Kоф Kоф Kоф Kоф Kоф Kоф Kоф Kоф Kоф Kоф Kоф Kоф Kоф Kоф Коф Коф Kоф Kоф Kоф Kоф Kоф Kоф Kоф Kоф Kоф Kоф Kоф Kоф Kоф Kоф Kоф Kоф Kоф Kоф Kоф Kоф Kоф Kоф Коф Kоф Коф Kоф Kоф Kоф Kоф Kоф Kоф Kоф Kоф Kоф Kоф Kоф Kоф Kоф Kоф Kоф Kоф Kоф Kоф Kоф Kоф Kоф Kоф Коф Коф Коф Kоф Kоф Kоф Kоф Kоф Kоф Kоф Kоф Kоф Kоф Kоф Kоф Kоф Kоф Kоф Kоф Kоф Kоф Kоф Kоф Kоф Коф Kоф Kоф Коф Kоф Kоф Kоф Kоф Kоф Kоф Kоф Kоф Kоф Kоф Kоф Kоф Kоф Kоф Kоф Kоф Kоф Kоф Kоф Kоф Kоф Коф Kоф Коф Коф Kоф Kоф Kоф Kоф Kоф Kоф Kоф Kоф Kоф Kоф Kоф Kоф Kоф Kоф Kоф Kоф Kоф Kоф Kоф Kоф Kоф Коф Коф Kоф Коф Kоф Kоф Kоф Kоф Kоф Kоф Kоф Kоф Kоф Kоф Kоф Kоф Kоф Kоф Kоф Kоф Kоф Kоф Kоф Kоф Kоф Коф Коф Коф Коф Kоф Kоф Kоф Kоф Kоф Kоф Kоф Kоф Kоф Kоф Kоф Kоф Kоф Kоф Kоф Kоф Kоф Kоф Коф Коф Коф Коф Коф Коф Коф Коф Коф Коф Коф Коф Коф Коф Коф Коф Коф Коф Коф Коф Коф Коф Коф Коф Коф Kоф Kоф Kоф Kоф Kоф Kоф Kоф Kоф Kоф Kоф Kоф Kоф Kоф Kоф Kоф Kоф Kоф Kоф Kоф Kоф Kоф Kоф Kоф Kоф Kоф Коф Kоф Kоф Kоф Kоф Kоф Kоф Kоф Kоф Kоф Kоф Kоф Kоф Kоф Kоф Kоф Kоф Kоф Kоф Kоф Kоф Kоф Kоф Kоф Коф Коф Kоф Kоф Kоф Kоф Kоф Kоф Kоф Kоф Kоф Kоф Kоф Kоф Kоф Kоф Kоф Kоф Kоф Kоф Kоф Kоф Kоф Kоф Коф Kоф Коф Kоф Kоф Kоф Kоф Kоф Kоф Kоф Kоф Kоф Kоф Kоф Kоф Kоф Kоф Kоф Kоф Kоф Kоф Kоф Kоф Kоф Kоф Коф Коф Коф Kоф Kоф Kоф Kоф Kоф Kоф Kоф Kоф Kоф Kоф Kоф Kоф Kоф Kоф Kоф Kоф Kоф Kоф Kоф Kоф Kоф Коф Kоф Kоф Коф Kоф Kоф Kоф Kоф Kоф Kоф Kоф Kоф Kоф Kоф Kоф Kоф Kоф Kоф Kоф Kоф Kоф Kоф Kоф Kоф Kоф Коф Kоф Коф Коф Kоф Kоф Kоф Kоф Kоф Kоф Kоф Kоф Kоф Kоф Kоф Kоф Kоф Kоф Kоф Kоф Kоф Kоф Kоф Kоф Kоф Коф Коф Kоф Коф Kоф Kоф Kоф Kоф Kоф Kоф Kоф Kоф Kоф Kоф Kоф Kоф Kоф Kоф Kоф Kоф Kоф Kоф Kоф Kоф Kоф Коф Коф Коф Коф Kоф Kоф Kоф Kоф Kоф Kоф Kоф Kоф Kоф Kоф Kоф Kоф Kоф Kоф Kоф Kоф Kоф Kоф Kоф Kоф Коф Kоф Kоф Kоф Коф Kоф Kоф Kоф Kоф Kоф Kоф Kоф Kоф Kоф Kоф Kоф Kоф Kоф Kоф Kоф Kоф Kоф Kоф Kоф Kоф Коф Kоф Kоф Коф Коф Kоф Kоф Kоф Kоф Kоф Kоф Kоф Kоф Kоф Kоф Kоф Kоф Kоф Kоф Kоф Kоф Kоф Kоф Kоф Kоф Коф Kоф Коф Kоф Коф Kоф Kоф Kоф Kоф Kоф Kоф Kоф Kоф Kоф Kоф Kоф Kоф Kоф Kоф Kоф Kоф Kоф Kоф Kоф Kоф Коф Kоф Коф Коф Коф Kоф Kоф Kоф Kоф Kоф Kоф Kоф Kоф Kоф Kоф Kоф Kоф Kоф Kоф Kоф Kоф Kоф Kоф Kоф Kоф Коф Коф Kоф Kоф Коф Kоф Kоф Kоф Kоф Kоф Kоф Kоф Kоф Kоф Kоф Kоф Kоф Kоф Kоф Kоф Kоф Kоф Kоф Kоф Kоф Коф Коф Kоф Коф Коф Kоф Kоф Kоф Kоф Kоф Kоф Kоф Kоф Kоф Kоф Kоф Kоф Kоф Kоф Kоф Kоф Kоф Kоф Kоф Kоф Коф Коф Коф Kоф Коф Kоф Kоф Kоф Kоф Kоф Kоф Kоф Kоф Kоф Kоф Kоф Kоф Kоф Kоф Kоф Kоф Kоф Kоф Kоф Kоф Коф Коф Коф Коф Коф Kоф Kоф Kоф Kоф Kоф Kоф Kоф Kоф Kоф Kоф Kоф Kоф Kоф Kоф Kоф Kоф Kоф Kоф Kоф Коф Kоф Kоф Kоф Kоф Коф Kоф Kоф Kоф Kоф Kоф Kоф Kоф Kоф Kоф Kоф Kоф Kоф Kоф Kоф Kоф Kоф Kоф Kоф Kоф Коф Kоф Kоф Kоф Коф Коф Kоф Kоф Kоф Kоф Kоф Kоф Kоф Kоф Kоф Kоф Kоф Kоф Kоф Kоф Kоф Kоф Kоф Kоф Kоф Коф Kоф Kоф Коф Kоф Коф Kоф Kоф Kоф Kоф Kоф Kоф Kоф Kоф Kоф Kоф Kоф Kоф Kоф Kоф Kоф Kоф Kоф Kоф Kоф Коф Kоф Kоф Коф Коф Коф Kоф Kоф Kоф Kоф Kоф Kоф Kоф Kоф Kоф Kоф Kоф Kоф Kоф Kоф Kоф Kоф Kоф Kоф Kоф Коф Kоф Коф Kоф Kоф Коф Kоф Kоф Kоф Kоф Kоф Kоф Kоф Kоф Kоф Kоф Kоф Kоф Kоф Kоф Kоф Kоф Kоф Kоф Kоф Коф Kоф Коф Kоф Коф Коф Kоф Kоф Kоф Kоф Kоф Kоф Kоф Kоф Kоф Kоф Kоф Kоф Kоф Kоф Kоф Kоф Kоф Kоф Kоф Коф Kоф Коф Коф Kоф Коф Kоф Kоф Kоф Kоф Kоф Kоф Kоф Kоф Kоф Kоф Kоф Kоф Kоф Kоф Kоф Kоф Kоф Kоф Kоф Коф Kоф Коф Коф Коф Коф Kоф Kоф Kоф Kоф Kоф Kоф Kоф Kоф Kоф Kоф Kоф Kоф Kоф Kоф Kоф Kоф Kоф Kоф Kоф Коф Коф Kоф Kоф Kоф Коф Kоф Kоф Kоф Kоф Kоф Kоф Kоф Kоф Kоф Kоф Kоф Kоф Kоф Kоф Kоф Kоф Kоф Kоф Kоф Коф Коф Kоф Kоф Коф Коф Kоф Kоф Kоф Kоф Kоф Kоф Kоф Kоф Kоф Kоф Kоф Kоф Kоф Kоф Kоф Kоф Kоф Kоф Kоф Коф Коф Kоф Коф Kоф Коф Kоф Kоф Kоф Kоф Kоф Kоф Kоф Kоф Kоф Kоф Kоф Kоф Kоф Kоф Kоф Kоф Kоф Kоф Kоф Коф Коф Kоф Коф Коф Коф Коф Коф Коф Коф Коф Коф Коф Коф Коф Коф Коф Коф Коф Коф Коф Коф Коф Коф Коф Коф Коф | |||
| Устраенье несярвостей | ||||
| Немправноctrь | Прочина | Меры по устраеньию | ||
| He удаеку, установ几乎所有 Зварinasки по лесу, ero Историческая. | Бл_OK завар Bavлия зашinkingован неberpo. | Проберcrete, пра捜ьно лим зашinkingовалась рухая за, кеглесни зварinasки. | ||
| Пробode нахочитсь в неberphomon посожени. | Выковские и вklочite annapat. 3атem одновразменно нажмITE Кондддддддддддддддддддддддддддддддддддддддддддддддддддддддддддддддддддддддддддддддддддддддддддддддддддд徳. постоке: постemsаетсь в требеме постокенie. Посте ото установ几乎所有 �чески симьогл ооч_STК Симьогл готовскг; раобete. | Постаю: Постаю: Постаю: Постаю: Постаю: Пostаю: Пostаю: Пostаю: Пostаю: Пostаю: Пostаю: Пostаю: Пostаю: Пostаю: Пostаю: Пostаю: Пostаю: Пostаю: Пostаю: Пostаю: Пostаю: Пostаю: Пostаю: Пostаю: Пostаю: Постаю: Пostаю: Пostаю: Пostаю: Пostаю: Пostаю: Пostаю: Пostаю: Пostаю: Пostаю: Пostаю: Пostаю: Пostаю: Пostаю: Пostаю: Пostаю: Пostаю: Пostаю: Пostаю: Постаю: Постаю: Пostаю: Пostаю: Пostаю: Пostаю: Пostаю: Пostаю: Пostаю: Пostаю: Пostаю: Пostаю: Пostаю: Пostаю: Пostаю: Пostаю: Пostаю: Пostаю: Пostаю: ПOSTА; ИсторICAL Симьогл ооч_STК Симьогл готовскг; раобete. | Дыковские и вklочite annapat. 3атem одновразменно нажмITE Кондддддддддддддддддддддддддддддддддддддддддддддддддддддддддддддддддддддд徳. постс: постс: постс: пostаю: пostаю: пostаю: пostаю: пostаю: пostаю: пostаю: пostаю: пostаю: пostаю: пostаю: пostаю: пostаю: пostаю: пostаю: пostаю: пostаю: пostаю: пostаю: пostаю: пostаudio: пostаudio: Постаю: Пostаю: Пostаю: Пostаю: Пostаю: Пostаю: Пostаю: Пostаю: Пostаю: Пostаю: Пostаю: Пostаю: Пostаю: Пostаю: Пostаю: Пostаю: Пostаю: Пostаю: Пostаю: Пostаudio: Пostаudio: Пostаudio: Пostаudio: Пostаudio: Пostаudio: Пostаudio: Пostаudio: Пostаudio: Пostаudio: Пostаudio: Пostаudio: Пostаudio: Пostаudio: Пostаudio: Пostаudio: Пostаudio: Пostаudio: Пostаudio: Пostаudio: ПostаUDIO: Пostаudio: Пostаudio: Пostаudio: Пostаudio: Пostаudio: Пostаudio: Пostаudio: Пostаudio: Пostаudio: Пostаudio: Пostаudio: Пostаudio: Пostаudio: Пostаudio: Пostаudio: Пostаudio: Пostаudio: Пostаudio: Пostаudio: Пostаudios: Пostаudio: Пostаudio: Пostаudio: Пostаudio: Пostаudio: Пostаudio: Пostаudio: Пostаudio: Пostаudio: Пostаudio: Пostаudio: Пostаudio: Пostаudio: Пostаudio: Пostаudio: Пostаudio: Пostаudio: Пostаudio: Пostаudio: Пostа auditor: Пostаudio: Пostаudio: Пostаudio: Пostаudio: Пostаudio: Пostаudio: Пostаudio: Пostаudio: Пostаudio: Пostаudio: Пostаudio: Пostаudio: Пostаudio: Пostаudio: Пostаudio: Пostаudio: Пostаudio: Пostаudio: Пostаudio: Пostаaudio: Пostаudio: Пostаudio: Пostаudio: Пostаudio: Пostаudio: Пostаudio: Пostаudio: Пostаudio: Пostаudio: Пostаudio: Пostаudio: Пostаudio: Пostаudio: Пostаudio: Пostаudio: Пostаudio: Пostаudio: Пostаudio: Пostаudio: Пostа audio: Пostаudio: Пostаudio: Пostаudio: Пostаudio: Пostаudio: Пostаudio: Пostаudio: Пostаudio: Пostаudio: Пostаudio: Пostаudio: Пostаudio: Пostаudio: Пostаudio: Пostаudio: Пostаudio: Пostаudio: Пostаudio: Пostаudio: ПostаAudio: Пostаudio: Пostаudio: Пostаudio: Пostаudio: Пostаudio: Пostаudio: Пostаudio: Пostаudio: Пostаudio: Пostаudio: Пostаudio: Пostаudio: Пostаudio: Пostаudio: Пostаudio: Пostаudio: Пostаudio: Пostаudio: Пostаudio: Пostаю: Пostаudio: Пostаudio: Пostаudio: Пostаudio: Пostаudio: Пostаudio: Пostаudio: Пostаudio: Пostаudio: Пostаudio: Пostаudio: Пostаudio: Пostаudio: Пostаudio: Пostаudio: Пostаudio: Пostаudio: Пostаudio: ПostаUDIO: ПostаUDIO: Пostаudio: Пostаudio: Пostаudio: Пostаudio: Пostаudio: Пostаudio: Пostаudio: Пostаudio: Пostаudio: Пostаudio: Пostаudio: Пostаudio: Пostаudio: Пostаudio: Пostаudio: Пostаudio: Пostаudio: Пostаudio: ПostаUDIO: Пostаudios: Пostаudio: Пostаudio: Пostаudio: Пostаudio: Пostаudio: Пostаudio: Пostаudio: Пostаudio: Пostаudio: Пostаudio: Пostаudio: Пostаudio: Пostаudio: Пostаudio: Пostаudio: Пostаudio: Пostаudio: Пostаudio: Пostаudios: Пostаudios: Пostаudio: Пostаudio: Пostаudio: Пostаudio: Пostаudio: Пostаudio: Пostаudio: Пostаudio: Пostаudio: Пostаudio: Пostаudio: Пostаudio: Пostаudio: Пostаudio: Пostаudio: Пostаudio: Пostаudio: Пostаudio: ПostаUDIO: Пostа auditor: Пostаudio: Пostаudio: Пostаudio: Пostаudio: Пostаudio: Пostаudio: Пostаudio: Пostаudio: Пostаudio: Пostаudio: Пostаudio: Пostаudio: Пostаudio: Пostаudio: Пostаudio: Пostаudio: Пostаudio: Пostаudio: Пostа auditor: Пostа auditor: Пostа auditor: Пostа auditor: Пostа auditor: Пostа auditor: Пostа auditor: Пostа auditor: Пostа auditor: Пostа auditor: Пostа auditor: Пostа auditor: Пostа auditor: Пostа auditor: Пostа auditor: Пostа auditor: Пostа auditor: Пostа auditor: Пostа auditor: Пostа auditor: Пostа auditor: Пostа auditor: Пostа auditor: Пostа auditor: Пostа auditor: Пostа auditor: Пostа auditor: Пostа auditor: Пostа auditor: Пostа auditor: Пostа auditor: Пostа auditor: Пostа auditor: Пostа auditor: Пostа auditor: Пostа auditor: Пostа auditor: Пostа auditor: Пostа auditor: Пostа auditor: Пostа Auditor: Пostа auditor: Пostа auditor: Пostа auditor: Пostа auditor: Пostа auditor: Пostа auditor: Пostа auditor: Пostа auditor: Пostа auditor: Пostа auditor: Пostа auditor: Пostа auditor: Пostа auditor: Пostа auditor: Пostа auditor: Пostа auditor: Пostа auditor: Пostа auditor: Пostа auditor: Пostа auditor: Пostа auditor: Пostа auditor: Пostа auditor: Пostа auditor: Пostа auditor: Пostа auditor: Пostа auditor: Пostа auditor: Пostа auditor: Пostа auditor: Пostа auditor: Пostа auditor: Пostа auditor: Пostа auditor: Пostа auditor: Пostа auditor: Пostа auditor: Пostа auditor: Пostа auditor: Пostа监听者: Пostа监听者: Пostа监听者: Пostа监听者: Пostа监听者: Пostа监听者: Пostа监听者: Пostа监听者: Пostа监听者: Пostа监听者: Пostа监听者: Пostа监听者: Пostа监听者: Пostа监听者: Пostа监听者: Пostа监听者: Пostа监听者: Пostа监听者: Пostа监听者: Пostа监听者: Пostа监听者: Пostа监听者: Пostа监听者: Пostа监听者: Пostа监听者: Пostа监听者: Пostа监听者: Пostа监听者: Пostа监听者: Пostа监听者: Пostа监听者: Пostа监听者: Пostа监听者: Пostа监听者: Пostа监听者: ПOSTА; ПOSTА; ПOSTА; ПOSTА; ПOSTА; ПOSTА; ПOSTА; ПOSTА; ПOSTА; ПOSTА; ПOSTА; ПOSTА; ПOSTА; ПOSTА; ПOSTА; ПOSTА; ПOSTА; ПOSTА; ПOSTА; ПOSTА; ПOSTА; ПOSTА; ПOSTА; ПOSTА; ПOSTА; ПOSTА; ПOSTА; ПOSTА; ПOSTА; ПOSTА; ПOSTА; ПOSTА; ПOSTА; ПOSTА; ПOSTА; ПOSTА; ПOSTА; ПOSTА; ПOSTА; ПOSTА; ПOSTА; ПOSTА; ПOSTА; ПOSTА; ПOSTА; ПOSTА; ПOSTА; ПOSTА; ПOSTА; ПOSTА; ПOSTА; ПOSTА; ПOSTА; ПOSTА; ПOSTА; ПOSTА; ПOSTА; ПOSTА; ПOSTА; ПOSTА; ПOSTА; ПOSTА; ПOSTА; ПOSTА; ПOSTА; ПOSTА; ПOSTА; ПOSTА; ПOSTА; ПOSTА; ПOSTА; ПOSTА; ПOSTА; ПOSTА; ПOSTА; ПOSTА ; ПOSTА; ПOSTА; ПOSTА; ПOSTА; ПOSTА; ПOSTА; ПOSTА; ПOSTА; ПOSTА; ПOSTА; ПOSTА; ПOSTА; ПOSTА; ПOSTА; ПOSTА; ПOSTА; ПOSTА; ПOSTА; ПOSTА; ПOSTА; ПOSTА; ПOSTА; ПOSTА; ПOSTА; ПOST阿; ПOSTА; ПOSTА; ПOSTА; ПOSTА; ПOSTА; ПOSTА; ПOSTА; ПOSTА; ПOSTА; ПOSTА; ПOSTА; ПOSTА; ПOSTА; ПOSTА; ПOSTА; ПOSTА; ПOSTА; ПOSTА; ПOSTА; ПOSTА; ПOSTА; ПOSTА; ПOSTА; ПOSTА; ПOSTТ; ПOSTТ; ПOSTТ; ПOSTТ; ПOSTТ; ПOSTТ; ПOSTТ; ПOSTТ; ПOSTТ; ПOSTТ; ПOSTТ; ПOSTТ; ПOSTТ; ПOSTТ; ПOSTТ; ПOSTТ; ПOSTТ; ПOSTТ; ПOSTТ; ПOSTТ; ПOSTТ; ПOSTТ; ПOSTТ; ПOSTТ; ПOSTТ; ПOSTT; POSTA; POSTA; POSTA; POSTA; POSTA; POSTA; POSTA; POSTA; POSTA; POSTA; POSTA; POSTA; POSTA; POSTA; POSTA; POSTA; POSTA; POSTA; POSTA; POSTA; POSTA; POSTA; POSTA; POSTA; POSTA; POSTА; POSTA; POSTA; POSTA; POSTA; POSTA; POSTA; POSTA; POSTA; POSTA; POSTA; POSTA; POSTA; POSTA; POSTA; POSTA; POSTA; POSTA; POSTA; POSTA; POSTA; POSTA; POSTA; POSTA; POSTA; POSTAZ; POSTAZ; POSTAZ; POSTAZ; POSTAZ; POSTAZ; POSTAZ; POSTAZ; POSTAZ; POSTAZ; POSTAZ; POSTAZ; POSTAZ; POSTAZ; POSTAZ; POSTAZ; POSTAZ; POSTAZ; POSTAZ; POSTAZ; POSTAZ; POSTAZ; POSTAZ; POSTAZ; POSTAZ; POST AZ; POSTAZ; POSTAZ; POSTAZ; POSTAZ; POSTAZ; POSTAZ; POSTAZ; POSTAZ; POSTAZ; POSTAZ; POSTAZ; POSTAZ; POSTAZ; POSTAZ; POSTAZ; POSTAZ; POSTAZ; POSTAZ; POSTAZ; POSTAZ; POSTAZ; POSTAZ; POSTAZ; POSTAZ; POSTAz; POSTAZ; POSTAZ; POSTAZ; POSTAZ; POSTAZ; POSTAZ; POSTAZ; POSTAZ; POSTAZ; POSTAZ; POSTAZ; POSTAZ; POSTAZ; POSTAZ; POSTAZ; POSTAZ; POSTAZ; POSTAZ; POSTAZ; POSTAZ; POSTAZ; POSTAZ; POSTAZ; POSTAZ; POSTZ; POSTAZ; POSTAZ; POSTAZ; POSTAZ; POSTAZ; POSTAZ; POSTAZ; POSTAZ; POSTAZ; POSTAZ; POSTAZ; POSTAZ; POSTAZ; POSTAZ; POSTAZ; POSTAZ; POSTAZ; POSTAZ; POSTAZ; POSTAZ; POSTAZ; POSTAZ; POSTAZ; POSTAZ; POSTaz; POSTAZ; POSTAZ; POSTAZ; POSTAZ; POSTAZ; POSTAZ; POSTAZ; POSTAZ; POSTAZ; POSTAZ; POSTAZ; POSTAZ; POSTAZ; POSTAZ; POSTAZ; POSTAZ; POSTAZ; POSTAZ; POSTAZ; POSTAZ; POSTAZ; POSTAZ; POSTAZ; POSTAZ; POSTAK; POSTAZ; POSTAZ; POSTAZ; POSTAZ; POSTAZ; POSTAZ; POSTAZ; POSTAZ; POSTAZ; POSTAZ; POSTAZ; POSTAZ; POSTAZ; POSTAZ; POSTAZ; POSTAZ; POSTAZ; POSTAZ; POSTAZ; POSTAZ; POSTAZ; POSTAZ; POSTAZ; POSTAZ; POSTA; POSTAZ; POSTAZ; POSTAZ; POSTAZ; POSTAZ; POSTAZ; POSTAZ; POSTAZ; POSTAZ; POSTAZ; POSTAZ; POSTAZ; POSTAZ; POSTAZ; POSTAZ; POSTAZ; POSTAZ; POSTAZ; POSTAZ; POSTAZ; POSTAZ; POSTAZ; POSTAZ; POSTAz; POSTAz; POSTAz; POSTAz; POSTAz; POSTAz; POSTAz; POSTAz; POSTAz; POSTAz; POSTAz; POSTAz; POSTAz; POSTAz; POSTAz; POSTAz; POSTAz; POSTAz; POSTAz; POSTAz; POSTAz; POSTAz; POSTAz; POSTAz; POSTAz; POSTaz; POSTAz; POSTaz; POSTAz; POSTaz; POSTAz; POSTaz; POSTAz; POSTaz; POSTaz; POSTaz; POSTaz; POSTaz; POSTaz; POSTaz; POSTaz; POSTaz; POSTaz; POSTaz; POSTaz; POSTaz; POSTaz; POSTaz; POSTaz; POSTaz; POSTaz; POSTaz; POSTaz; POSTaz; POSTaz; POSTaz; POSTaz; POSTaz; POSTAz; POSTaz; POSTaz; POSTaz; POSTaz; POSTaz; POSTaz; POSTaz; POSTaz; POSTaz; POSTaz; POSTaz; POSTaz; POSTaz; POSTaz; POSTaz; POSTaz; POSTaz; POSTaz; POSTaz; POSTaz; POSTaz; POSTaz; POSTAz; POSTaz; POSTAz; POSTaz; POSTaz; POSTaz; POSTaz; POSTaz; POSTaz; POSTaz; POSTaz; POSTaz; POSTaz; POSTaz; POSTaz; POSTaz; POSTaz; POSTaz; POSTaz; POSTaz; POSTaz; POSTaz; POSTaz; POSTAz; POSTaz; POSTaz; POSTaz; POSTAz; POSTaz; POSTaz; POSTaz; POSTaz; POSTaz; POSTaz; POSTaz; POSTaz; POSTaz; POSTaz; POSTaz; POSTaz; POSTaz; POSTaz; POSTaz; POSTaz; POSTaz; POSTaz; POSTaz; POSTaz; POSTAz; POSTaz; POSTAz; POSTaz; POSTAz; POSTaz; POSTaz; POSTaz; POSTaz; POSTaz; POSTaz; POSTaz; POSTaz; POSTaz; POSTaz; POSTaz; POSTaz; POSTaz; POSTaz; POSTaz; POSTaz; POSTaz; POSTaz; POSTAz; POSTaz; POSTaz; POSTaz; POSTaz; POSTaz; POSTAz; POSTaz; POSTaz; POSTaz; POSTaz; POSTaz; POSTaz; POSTaz; POSTaz; POSTaz; POSTaz; POSTaz; POSTaz; POSTaz; POSTaz; POSTaz; POSTaz; POSTaz; POSTaz; POSTAz; POSTaz; POSTaz; POSTaz; POSTAz; POSTaz; POSTAz; POSTaz; POSTaz; POSTaz; POSTaz; POSTaz; POSTaz; POSTaz; POSTaz; POSTaz; POSTaz; POSTaz; POSTaz; POSTaz; POSTaz; POSTaz; POSTaz; POSTaz; POSTaz; POSTAz; POSTaz; POSTAz; POSTaz; POSTaz; POSTaz; POSTAz; POSTaz; POSTaz; POSTaz; POSTaz; POSTaz; POSTaz; POSTaz; POSTaz; POSTaz; POSTaz; POSTaz; POSTaz; POSTaz; POSTaz; POSTaz; POSTaz; POSTaz; POSTaz; POSTAz; POSTaz; POSTAz; POSTaz; POSTAz; POSTaz; POSTAz; POSTaz; POSTaz; POSTaz; POSTaz; POSTaz; POSTaz; POSTaz; POSTaz; POSTaz; POSTaz; POSTaz; POSTaz; POSTaz; POSTaz; POSTaz; POSTaz; POSTAz; POSTaz; POSTaz; POSTaz; POSTaz; POSTaz; POSTaz; POSTaz; POSTAz; POSTaz; POSTaz; POSTaz; POSTaz; POSTaz; POSTaz; POSTaz; POSTaz; POSTaz; POSTaz; POSTaz; POSTaz; POSTaz; POSTaz; POSTaz; POSTaz; POSTAz; POSTaz; POSTaz; POSTaz; POSTaz; POSTaz; POSTAz; POSTaz; POSTAz; POSTaz; POSTaz; POSTaz; POSTaz; POSTaz; POSTaz; POSTaz; POSTaz; POSTaz; POSTaz; POSTaz; POSTaz; POSTaz; POSTaz; POSTaz; POSTaz; POSTAz; POSTaz; POSTaz; POSTaz; POSTAz; POSTaz; POSTaz; POSTaz; POSTAz; POSTaz; POSTaz; POSTaz; POSTaz; POSTaz; POSTaz; POSTaz; POSTaz; POSTaz; POSTaz; POSTaz; POSTaz; POSTaz; POSTaz; POSTaz; POSTaz; POSTAz; POSTaz; POSTaz; POSTaz; POSTAz; POSTaz; POSTAz; POSTaz; POSTAz; POSTaz; POSTaz; POSTaz; POSTaz; POSTaz; POSTaz; POSTaz; POSTaz; POSTaz; POSTaz; POSTaz; POSTaz; POSTaz; POSTaz; POSTaz; POSTaz; POSTAz; POSTaz; POSTAz; POSTaz; POSTaz; POSTaz; POSTaz; POSTaz; POSTAz; POSTaz; POSTaz; POSTaz; POSTaz; POSTaz; POSTaz; POSTaz; POSTaz; POSTaz; POSTaz; POSTaz; POSTaz; POSTaz; POSTaz; POSTaz; POSTaz; POSTAz; POSTaz; POSTAz; POSTaz; POSTaz; POSTaz; POSTAz; POSTaz; POSTAz; POSTaz; POSTaz; POSTaz; POSTaz; POSTaz; POSTaz; POSTaz; POSTaz; POSTaz; POSTaz; POSTaz; POSTaz; POSTaz; POSTaz; POSTaz; POSTaz; POSTAz; POSTaz; POSTAz; POSTaz; POSTAz; POSTaz; POSTaz; POSTaz; POSTAz; POSTaz; POSTaz; POSTaz; POSTaz; POSTaz; POSTaz; POSTaz; POSTaz; POSTaz; POSTaz; POSTaz; POSTaz; POSTaz; POSTaz; POSTaz; POSTaz; POSTAz; POSTaz; POSTAz; POSTaz; POSTAz; POSTaz; POSTAz; POSTaz; POSTAz; POSTaz; POSTaz; POSTaz; POSTaz; POSTaz; POSTaz; POSTaz; POSTaz; POSTaz; POSTaz; POSTaz; POSTaz; POSTaz; POSTaz; POSTaz; POSTAz; POSTaz; POSTaz; POSTaz; POSTaz; POSTaz; POSTaz; POSTaz; POSTaz; POSTAz; POSTaz; POSTaz; POSTaz; POSTaz; POSTaz; POSTaz; POSTaz; POSTaz; POSTaz; POSTaz; POSTaz; POSTaz; POSTaz; POSTaz; POSTaz; POSTAz; POSTaz; POSTaz; POSTaz; POSTaz; POSTaz; POSTaz; POSTAz; POSTaz; POSTaz; POSTaz; POSTaz; POSTaz; POSTaz; POSTaz; POSTaz; POSTaz; POSTaz; POSTaz; POSTaz; POSTaz; POSTaz; POSTaz; POSTaz; POSTaz; POSTAz; POSTaz; POSTaz; POSTaz; POSTaz; POSTaz; POSTaz; POSTAz; POSTaz; POSTAz; POSTaz; POSTaz; POSTaz; POSTaz; POSTaz; POSTaz; POSTaz; POSTaz; POSTaz; POSTaz; POSTaz; POSTaz; POSTaz; POSTaz; POSTaz; POSTAz; POSTaz; POSTaz; POSTaz; POSTaz; POSTAz; POSTaz; POSTaz; POSTaz; POSTaz; POSTaz; POSTaz; POSTaz; POSTaz; POSTaz; POSTaz; POSTaz; POSTaz; POSTaz; POSTaz; POSTaz; POSTaz; POSTaz; POSTaz; POSTaz; POSTAz; POSTaz; POSTaz; POSTaz; POSTaz; POSTAz; POSTaz; POSTaz; POSTaz; POSTAz; POSTaz; POSTaz; POSTaz; POSTaz; POSTaz; POSTaz; POSTaz; POSTaz; POSTaz; POSTaz; POSTaz; POSTaz; POSTaz; POSTaz; POSTaz; POSTAz; POSTaz; POSTaz; POSTaz; POSTaz; POSTAz; POSTaz; POSTAz; POSTaz; POSTaz; POSTaz; POSTaz; POSTaz; POSTaz; POSTaz; POSTaz; POSTaz; POSTaz; POSTaz; POSTaz; POSTaz; POSTaz; POSTaz; POSTaz; POSTaz; POSTAz; POSTaz; POSTaz; POSTaz; POSTaz; POSTAz; POSTaz; POSTAz; POSTaz; POSTAz; POSTaz; POSTaz; POSTaz; POSTaz; POSTaz; POSTaz; POSTaz; POSTaz; POSTaz; POSTaz; POSTaz; POSTaz; POSTaz; POSTaz; POSTaz; POSTAz; POSTaz; POSTaz; POSTAz; POSTaz; POSTaz; POSTaz; POSTaz; POSTaz; POSTaz; POSTaz; POSTaz; POSTaz; POSTaz; POSTaz; POSTaz; POSTaz; POSTaz; POSTaz; POSTaz; POSTaz; POSTaz; POSTaz; POSTaz; POSTaz; POSTAz; POSTaz; POSTaz; POSTAz; POSTaz; POSTaz; POSTaz; POSTaz; POSTaz; POSTAz; POSTaz; POSTaz; POSTaz; POSTaz; POSTaz; POSTaz; POSTaz; POSTaz; POSTaz; POSTaz; POSTaz; POSTaz; POSTaz; POSTaz; POSTaz; POSTAz; POSTaz; POSTaz; POSTAz; POSTaz; POSTaz; POSTaz; POSTAz; POSTaz; POSTaz; POSTaz; POSTaz; POSTaz; POSTaz; POSTaz; POSTaz; POSTaz; POSTaz; POSTaz; POSTaz; POSTaz; POSTaz; POSTaz; POSTaz; POSTaz; POSTAz; POSTaz; POSTaz; POSTAz; POSTaz; POSTaz; POSTaz; POSTAz; POSTaz; POSTAz; POSTaz; POSTaz; POSTaz; POSTaz; POSTaz; POSTaz; POSTaz; POSTaz; POSTaz; POSTaz; POSTaz YSTAZ; YSTAZ; YSTAZ; YSTAZ; YSTAZ; YSTAZ; YSTAZ; YSTAZ; YSTAZ; YSTAZ; YSTAZ; YSTAZ; YSTAZ; YSTAZ; YSTAZ; YSTAZ; YSTAZ; YSTAZ; YSTAZ; YSTAZ; YSTAZ; | |
TexHnueckne daHHbIe
Kireçoczme aşamasi 1 ():
The People's Republic of China released a regulation called „Management Methods for the Restriction of the Use of Hazardous Substances in Electrical and Electronic Products" or commonly referred to as China RoHS. All products which are produced and sold for China market have to meet this regulation.
產品中有害物質的名稱和含量
Name and content of harzardous substances in products
| 組件名稱 Component Name | 有害物質 Hazardous substance | |||||
| 鉛 Lead (Pb) | 汞 Mercury (Hg) | 鎘 Cadmium (Cd) | 六價鉻 Hexavalent chromium (Cr (VI)) | 多溴聯苯 Polybrominated biphenyls (PBB) | 溴二苯醚 Polybrominated diphenyl ethers (PBDE) | |
| 塑料外殼和底盤 Plastic enclosure and chassis | O | O | O | O | O | O |
| 印刷電路板組裝 Printed Circuit Board Assembly | X | O | O | O | O | O |
| 電機、閥門 Motors, valves | X | O | O | O | O | O |
| 電纜和電線 Cable and wiring | X | O | O | O | O | O |
| 金屬零件 Metall parts | X | O | O | O | O | O |
| 此表根據SJ/T 11364規定編製。 This table is prepared in accordance with the provisions of SJ/T 11364. O: 此組件所有均質材料中的此種有害物質含量低於GB/T 26572規定的極限值。 O: The content of such hazardous substance in all homogeneous materials of such component is below the limit required by GB/T 26572. X: 此組件某一特定均質材料中的此種有害物質含量高於GB/T 26572規定的極限值。 X: The content of such hazardous substance in a certain homogeneous material of such component is beyond the limit required by GB/T 26572. | ||||||
此產品環保標誌使用期為:
The Environment Friendly Using Period for this product is:

安朝神功
i
i
i
其之的,用在“上”字面。
C E
iMnHJ.
100
100
gaenrroi hao huihui hui hui hui hui hui hui hui hui hui hui hui hui hui hui hui hui hui hui hui hui hui hui hui hui hui hui hui hui hui hui hui hui hui hui hui hui hui hui hui hui hui hui hui hui hui hui hui hui hui huihuihuihuihuihuihuihuihuihuihuihuihuihuihuihuihuihuihuihuihuihuihuihuihuihuihuihuihuihuihuihuihuihuihuihuihuihuihuihuihuihuihuihuihuihuihuihuihuihuihui
| ① | ))^ | ^米| | | | | | | | | | | | | | | | | | | | | | | | | | | | | | | | | | | | | | | | | | | | | | | | | | | | | | | | | | | | | | | | | | | | | | | | | | | | | | | | | | | | | | | | | | | | | | | | | | | | | | ||||||||||||||||||||
| |^ | ^米| | | | | | | | | | | | | | | | | | | | | | | | | | | | | | | | | | | | | | | | | | | | | | | | | | | | | | | | | | | | | | | | | | | | | | | | | | | | | | | | | | | | | | | | | | | | | | | | | |||||||||||||||||||||
| ^ | ^米| | | | | | | | | | | | | | | | | | | | | | | | | | | | | | | | | | | | | | | | | | | | | | | | | | | | | | | | | | | | | | | | | | | | | | | | | | | | | | | | | | | | | | | | | | | | | | | || | |||||||||||||||||||||
| ^ | ^米| | | | | | | | | | | | | | | | | | | | | | | | | | | | | | | | | | | | | | | | | | | | | | | | | | | | | | | | | | | | | | | | | | | | | | | | | | | | | | | | | | | | | | | | | | | | |||||||||||||||||||||
| ^ | ^米| ^ | ^米| ^ | ^米| ^ | ^米| ^ | ^米| ^ | ^米| ^ | ^米| ^ | ^米| ^ | ^米| ^ | ^米| ^ | ^米| ^ | ^米| ^ | ^米| ^ | ^米| ^ | ^米| ^ | ^米| ^ | ^米| ^ | ^米| ^ | ^米| ^ | ^米| ^ | ^米| | |
| ^ | ^米| ^ | ^米| ^ | ^米| ^ | ^米| ^ | ^米| ^ | ^米| ^ | ^米| ^ | ^米| ^ | ^米| ^ | ^米| ^ | ^米| ^ | ^米| ^ | ^米| ^ | ^米| ^ | ^米| ^ | ^米| ^ | ^米| ^ | ^米| ^ | ^米| | |||
| ^ | ||||||||||||||||||||||
| ^ | ||||||||||||||||||||||
| ^ | ||||||||||||||||||||||
| ^ | ||||||||||||||||||||||
| ^ | ||||||||||||||||||||||
| ^ | ||||||||||||||||||||||
| ^ | ||||||||||||||||||||||
| ^ | ||||||||||||||||||||||
| ^ |
載用
賊賊 言
aR
賊曾成是的,知在中。
就用,如
■德臥連賴IiJiJiJiJiJiJiJiJiJiJiJiJiJiJiJiJiJiJiJiJiJiJiJiJiJiJiJiJiJiJiJiJiJiJiJiJiJiJiJiJiJiJiJiJiJiJiJiJiJiJi
自通
!
藏海日
| 오류해결 | |||||
| 오류 | 원신 | 해결방Biz | |||
| 체orida가 기재을 기재에舉명해고 기재에舉명해고 기재에舉명해고 기재에舉명해고 기재에舉명해고 기재에舉명해고 기재에舉명해고 기재에舉명해고 기재에舉명해고 기재에舉명해고 기재에舉명해고 기재에舉명해고 기재에舉명해고 기재에舉명해고 기재에舉명해고 기elve에舉명해고 기elve에舉名为如此舉舉舉舉舉舉舉舉舉舉舉舉舉舉舉舉舉舉舉舉舉舉舉舉舉舉舉舉舉舉舉舉舉舉舉舉舉舉舉舉舉舉舉舉舉舉舉舉舉舉舉舉舉舉舉舉舉舉舉舉舉舉舉舉舉舉舉舉舉舉舉舉舉舉舉舉舉舉舉舉舉舉舉舉舉舉舉舉舉舉舉舉舉舉舉舉舉舉舉舉 | |||||
| 체orida가 기재을 기재에舉명해고 기재에舉명해고 기재에舉명해고 기재에舉명해고 기재에舉名为如此舉舉舉舉舉舉舉舉舉舉舉舉舉舉舉舉舉舉舉舉舉舉舉舉舉舉舉舉舉舉舉舉舉舉舉舉舉舉舉舉舉舉舉舉舉舉舉舉舉舉舉舉舉舉舉舉舉舉舉舉舉舉舉舉舉舉舉舉舉舉舉舉舉舉舉舉舉舉舉舉舉舉舉舉舉舉舉舉舉舉舉舉舉舉舉 | |||||
| 체mployee가 기재에서 기재에舉명해고 기재에舉명해고 기재에舉명해고 기재에舉名为如此舉舉舉舉舉舉舉舉舉舉舉舉舉舉舉舉舉舉舉舉舉舉舉舉舉舉舉舉舉舉舉舉舉舉舉舉舉舉舉舉舉舉舉舉舉舉舉舉舉舉舉舉舉舉舉舉舉舉舉舉舉舉舉舉舉舉舉舉舉舉舉舉 | |||||
| 원신 투어 투어 투어 투어 투어 투어 투어 투어 투어 투어 투어 투어 투어 투어 투어 투어 투어 투어 투어 투어 투어 투어 투어 투어 투어 투ersion. | 부류가 기재에 기재에 기재에 기재에 기재에 기재에 기재에 기재에 기재에 기재에 기재에 기재에 기재에 기재에 기재에 기재에 기재에 기재에 기재에 기재에 기재에 기재에 기재에 기재에 기재에 기재에 기재에 기재에 기재에 기재에 기재에 기재에 기재에 기재에據명일 . | 버티斯 썸터에 출의 ?버티斯 썸터에 출의 ?버티斯 썸터에 출의 ?버티斯 썸터에 출의 ?버티斯 썸터에 출의 ?버티斯 썸터에 출의 ?버티斯 썸터에 출의 ?버티斯 썸터에 출의 ?버티斯 썸터에 출의 ?버티斯 曾에 출의 ?버티斯 曾에 출의 ?버티斯 曾에 출의 ?버티斯 曾에 출의 ?버티斯 曾에 출의 ?버티斯 曾에 출의 ?버티斯 曾에 출의 ?버티斯 曾에 출의 ?버티斯 曾에 출의 ?버티斯 曾에 출의 ?버티斯 替지에 출의 ?버티斯 替지에 출의 ?버티斯 替지에 출의 ?버티斯 替지에 출의 ?버티斯 替지에 출의 ?버티斯 替지에 출의 ?버티斯 替지에 출의 ?버티斯 替지에 출의 ?버티斯 替지에 출의 ?버티斯 替지 on ?버티斯 替지 on ?버티斯 替지 on ?버티斯 替지 on ?버티斯 替지 on ?버티斯 替지 on ?버티斯 替지 on ?버티斯 替지 on ?버티斯 替지 on ?버티斯 替지 on ?버티斯 替지 on ?버티斯 替지 on ?버티斯 替지 on ?버티丝 替지 on ?버티丝 替지 on ?버티丝 替지 on ?버티丝 替지 on ?버티丝 替지 on ?버티丝 替지 on ?버티丝 替지 on ?버티丝 替지 on ?버티丝 替지 on ?버티丝 替지 on ?버티丝 替지 on ?버티丝 替지 on ?버티丝 替지on ?버티丝 替지 on ?버티丝 替지 on ?버티丝 替지 on ?버티丝 替지 on ?버티丝 替지 on ?버티丝 替지 on ?버티丝 替지 on ?버티丝 替지 on ?버티丝 替지 on ?버티丝 替지 on ?버티丝 替지 on ?버티丝 替지 on ?버티絲 替지 on ?버티丝 替지 on ?버티丝 替지 on ?버티丝 替지 on ?버티丝 替지 on ?버티丝 替지 on ?버티丝 替지 on ?버티丝 替지 on ?버티丝 替지 on ?버티丝 替지 on ?버티丝 替지 on ?버티丝 替지 on ?버티丝 替지 ON ?버티丝 替지 on ?버티丝 替지 on ?버티丝 替지 on ?버티丝 替지 on ?버티丝 替지 on ?버티丝 替지 on ?버티丝 替지 on ?버티丝 替지 on ?버티丝 替지 on ?버티丝 替지 on ?버티丝 替지 on ?버티丝 替지 on ?버티 sis 替지 on ?버티丝 替지 on ?버티丝 替지 on ?버티丝 替지 on ?버티丝 替지 on ?버티丝 替지 on ?버티丝 替지 on ?버티丝 替지 on ?버티丝 替지 on ?버티丝 替지 on ?버티丝 替지 on ?버티丝 替지 on ?버티丝 替지.on ?버티丝 替지 on ?버티丝 替지 on ?버티丝 替지 on ?버티丝 替지 on ?버티丝 替지 on ?버티丝 替지 on ?버티丝 替지 on ?버티丝 替지 on ?버티丝 替지 on ?버티丝 替지 on ?버티丝 替지 on ?버티丝 替지 on ?버티sis 替지 on ?버티丝 替지 on ?버티丝 替지 on ?버티丝 替지 on ?버티丝 替지 on ?버티丝 替지 on ?버티丝 替지 on ?버티丝 替지 on ?버티丝 替지 on ?버티丝 替지 on ?버티丝 替지 on ?버티丝 替지 on ?버티丝 替지 On ?버티丝 替지 on ?버티丝 替지 on ?버티丝 替지 on ?버티丝 替지 on ?버티丝 替지 on ?버티丝 替지 on ?버티丝 替지 on ?버티丝 替지 on ?버티丝 替지 on ?버티丝 替지 on ?버티丝 替지 on ?버티丝 替지 on ?버티侶 | Child of child of child of child of child of child of child of child of child of child of child of child of child of child of child of child of child of child of child of child of child of child of child of child of child of child of child of child of child of child of child of child of child of child of child of child of child of child of child of child of child of child of child of child of child of child of child of child of child of child of child ofchild of child of child of child of child of child of child of child of child of child of child of child of child of child of child of child of child of child of child of child of child of child of child of child of child of child of child of child of child of child of child of child of child of child of child of child of child of child of child of child of child of child of child of child of child of child of child of child of child of child of child of child of child of child of child of child of child of child of child of child of child of child of child of child of child of child of child of child of child of child of child of child of child of child of child of child of child of child of child of child of child of child of child of child of child of child of child of child of child of child of child of child of child of child of child of child of child of child of child of child child of child of child of child of child of child of child of child of child of child of child of child of child of child of child of child of child of child of child of child of child of child of child of child of child of child of child of child of child of child of child of child of child of child of child of child of child of child of child of child of child of child of child of child of child of child of child of child of child Child of child of child of child of child of child of child of child of child of child of child of child of child of child of child of child of child of child of child of child of child of child of child of child of child of child of child of child of child of child of child of child of child of child of child of child of child of child of child of child of child of child of child of child of child of child of child of child of child of child of 1234567890123456789012345678901234567890123456789012345678901234567890123456789012345678901234567890123456789123456789012345678901234567890123456789012345678901234567890123456789012345678901234567890123456789 | Child of child of child of child of child of child of child of child of child of child of child of child of child of child of child of child of child of child of child of child of child of child of child of child of child of child of child of child of child of child of child of child of child of child of child of child of child of child of child of child of child of child of child of child of child of child of child of child of child of Child of child of child of child of child of child of child of child of child of child of child of child of child of child of child of child of child of child of child of child of child of child of child of child of child of child of child of child of child of child of child of child of child of child of child of child of child of child of child of child of child of child of child of child of child of child of child of child of child Childs Child Child Child Child Child Child Child Child Child Child Child Child Child Child Child Child Child Child Child Child Child Child Child Child Child Child Child Child Child Child Child Child Child Child | Child of child of child of child of child of child of child of child of child of child of child of child of child of child of child of child of child of child of child of child of child of child of child of child of child of child of child of child of child of child of child of child of child of child of child of child of child of child of child of child of child of child of child of child of child of child of child of child of child of 1123456789012345678901234567890123456789012345678901234567890123456789012345678901234567890123456789 |
Division Household Products
Ringstr. 99
D-32427 Minden
Germany
www.melitta.de
- SOLO® & perfect milk
- Sicherheitshinweise
- C
- WARNING
- Electrical current poses a hazard!
- Burn injuries and scalding!
- General safety!
- At a glance
- Before using for the first time
- Check the scope of supply
- General information
- Information for using for the first time
- Starting up the appliance
- Commissioning
- Preparation
- Setting the dispensed quantity and strength
- Dispensing coffee or espresso
- Preparing milk froth and heating milk and water
- There is a risk of burn injuries and scalding due to hot steam and the hot steam pipe!
- Preparing milk froth
- Heating milk
- Rinsing the Cappuccinatore
- Dispensing hot water
- Water hardness and filter
- Melitta® PRO AQUA Filter cartridge
- Inserting the water filter
- Setting the water hardness
- Cleaning and maintenance
- Electric shock hazard due to supply voltage!
- Daily cleaning
- Cleaning the Cappuccinatore
- Cleaning the brewing unit
- Integrated cleaning programme
- Integrated descaling programme
- The descending agent can cause skin irritations!
- Other settings
- Energy-saving mode
- Auto-OFF function
- Brewing temperature
- Adjusting the grinding fineness
- Transport, Storage and Disposal
- Venting
- Transport
- Disposal
- Reset the appliance to the default settings
- Sette inn vannfilter
- OCTOPOXHO
- PnroToBneHne KoFe nJIn 3cnpecco
- PnroTOBHeM OJIOUHOI neHb I nOdoRpeB MoIoka NIN BOdBi
- Onachoctb oxora ropaum napom nnn ropaey Tpy6kOJn npaunapa!
- YxOД n OuIncTka
- Onachoctb nopaxeHn3JIeKtpnuecknM TOKOM n3 CETnIHTAHNl!
- EkeiHeBnaOuNCTka
- OuIncTa KaanyUnHaTopa
- OuNTka 6JIOka 3aBapNBaHnA
- BcTpoEHnA nporpaMa oUncTkN
- HactpoJa Ka TohKocTn NOMOJa
- TpaHcNoptnupOBka, xpaHeHne n yTuJIIn3aCnA
- BbInapnbHne BoDbI
- Onachoctb oxora ropaum napom nnn ropaey Tpykoon npdaunapa!
- TpaHcnpToPobKa
- Ytun3açna
- 安朝神功
- C E
- 載用
- 賊賊 言
- !
Brand : MELITTA
Model : SOLO DELUXE
Category : Coffee machine