IKE95471FB - IKE95474FB - Hob AEG - Free user manual and instructions
Find the device manual for free IKE95471FB - IKE95474FB AEG in PDF.
User questions about IKE95471FB - IKE95474FB AEG
0 question about this device. Answer the ones you know or ask your own.
Ask a new question about this device
Download the instructions for your Hob in PDF format for free! Find your manual IKE95471FB - IKE95474FB - AEG and take your electronic device back in hand. On this page are published all the documents necessary for the use of your device. IKE95471FB - IKE95474FB by AEG.
USER MANUAL IKE95471FB - IKE95474FB AEG
| Buildings | 20-30 years |
| Leasehold improvements | 5-10 years |
| Fixtures and equipment | 3-5 years |

4. PERSHKRIMI PRODUKTIT
4.1 Skema e siperfaques sè gatimit
1 Siperfaqja e gatimit me induksion
2 Paneli kontrollit
4.2 Pamja e panelit te kontrollit
Pördorni fushat me sensor Pér tí Pérdorur pajisjen. Ekranet, treguesit dhe sinjalet akustike tregojne se cilat funkióne Pérdoren.
OBCJNYKBAHE HA KJINEHTN
BnHaH n3POn3BaIte opuHaHn pe3epBn qactn.
Korato ce cBbP3BaTe c HauHn OToPn3IpaH OTdEn „O6cIyKbaHe“, Tp8Ba Da IMaTe nOda pKa cNeHaTa INΦOpMaUaN: MoDen, PNC, cepueH Homep.
HΦopMaunra MoKe Da 6bJe OTKpuTa Ha TaBeJIkata C OCHOBn DaHHN
Iп dedурждени /Внимани-Инфорmaцяза 6e3oNaCHOCT
①Obua nHΦopMaζηι ΚbBettι
IINΦopMaζηa 3a OKJHaTa cpeJa
3ana3bame cn npabTo Ha n3MeHeHn.
CbIbPJKAHNE
- INHΦOPMALIJI 3A BE3OПАСНОCT 22
- INHCTPYKUIN 3A BE3OJNACHOCT 25
3.MOHTAX 27
4.ОПИСАНЕHA UРEDA 29 - BCEKNIHEBHA YNOTPEBA 30
- ПЕПОРьКИ СбВETN 36
7.ΓPINAIIOUHCTBAHE 39 - OTCTPAHRAHE HA HEN3PABHOCTN 39
- TEXHINUECKN DAHHN 41
- EHEPNIHA EΦEKTINBHOCT 42
11.ОПАЗВЕHA OKOLHATA CPEДA 43
1. UNHΦOPMAÇΥA 3A BE3OПACHOCT
IpeiMoHTnpaHTo uynoTpe6aTa Ha ypeDa BnMaTeJHo npOueTe IpeIoCTaBeHNTe HNCTpyKcU. Ipon3BODnteJIaT
He e OTROBOpeH 3a HapaHЯBaHnI IIN IOBpeI N B pe3yJITaT Ha He npabuHa IHCTaIauZnI IIN yNOTpe6a. BInarN dpbXTe INCTpyKcIInTe Ha 6e3OpaCHO I IecHO DOCTbPiHO MRCTO 3a CnpabKa B 6bDeIe.
1.1 Безогасноct за Deца И Лица в Неравноctоннолохжни
To3n ypeJ moKe Da 6bDe n3noJ3BaH OT Deca HAD 8- roDnSHA Bb3pact, KaKTO I OT LInCa C HAmaleHn fN3nueckn, CeTINBHN yMCTBeHN Bb3MOxHOCTn INIOT LInCa 6e3 OINT NIO3HaHnA, CaMO aKO Te Ca NOd HABLODEHne INIbDat IHCTpykTnpaHn OTHOCHO 6e3OJaCHATA yNoTpe6a Ha ypeDa n pa3bupat Bb3MOxHnTe pNCKOBe. Deca PoD 8-roDnSHA Bb3pact n Xopa C TejKn INI KOMPJIeKCHn YBpeJdaHnra Tp8Ba Da ce DbpXkaT daJeU OT ypeDa, OCBHe Ako He ca NOCToAHNO HABLIODeHne.
- Децata Трава Да Бдат пон habлodehoe, за да се rapaHTupa, че не си ngparTс урда.
- ДрьжтЕ BCИЧКИ ONAΚΟВКИ дале ue OT Deça и ИЗXBырleteОпаΚΟВКИТЕ NO MeCTHNTe павила.
ПЕДУПЕЖДEHNE: Па3ete DeцаТи ДомашнITE Лобимци далоче OT урета, korato pa6OTи Или korato ИЗCTИВа. Има дocтьпни части, кОТTO се награват по Всeme на уnotpe6a.
- Ako ypeiBt nMa yctpoiCTBO 3a DeTcKa 6e30nacHOCT, TOrTp8Ba Da ce aKTHBnpa.
- Деца He Трава Да ИЗвьршВаТ почиствае Или РODдрьжka на урEDA, korato ca 6e3 Надзор.
1.2 Ośza 6e3oNaChocT
- ПЕДУПЕЖДЕНЕ: Урети和他的овпес досьни чаши ce haropeeяват по врeme на уnotpe6a. Трава за се Вима вда се ИЗбягва дOKOCBAнe Ha harpaипe te ce elementHTN.
-
ПЕДУПЕЖДЕHINE: Говенeto сжИВOTинска Или растпелна мaЗнина 6e3 надзор може за e опасно и ду пpeДиЗВИКа пожар.
-
HNKOΓA He ce onntBaIte Da 3aracnte noJapc BODa, a n3KJIouTe ypeDa n CpeD TOBa NOKpIe TpIaMbka HApP. c KaNaK nIIn ORHeynpHO ODeJIo.
- ПЕДУПЕЖДЕНЕ: Урет He Тябада e 3axpaHbaNЧe3 Вншно певкючвацу устpoистBO KaTO TaIMep Илдa e CBbp3an KBm eелковесka Беригra, KОТо NOCTOЯнhoece BKluoyBa ИИЗКЛючBa OT устpoистBO.
BHIMAHNE:Процьт ha rotbehe trpa6ba da 6bde Ha6JIIOdaBaH. KpaTknayt pOuec Ha rotbehe trpa6ba da 6bde Ha6JIIOdaBaH NOCTOaHHo. - ПЕДУПЕЖДЕНЕ: Onacnot OT noxap: He cbyxaHЯBaIte npedmetn Bbpxy NOBbpxHOCTnte 3a IOTBeHe.
MeTaJIHn IpeDMeTn KaTo HOXOBe, BUNIcN, JbJxNcN IN KaNaCn He Tp8Ba Da ce NocTaBrt BbpxrTO. NIOr, TbN KaTo MOrat Da Ce 3aRpeT.
He n3noJ3BaIte ypeJa, npeNi Da ro IHCTaIIpaTe BbB BrpaJeHata KOHCTpyKcIy. - He nouchteBaIte ypeDa c napounchaKa.
Clej ynoTpe6a, n3KJIOUeTe PLOTa NocpeDCTBOM KJIIOUa 3a ynpabIeHne I He pa3uHTaIte Ha yHKzIyTA 3a JOKaJIIN3IpaHe Ha rotB. CbIOBe.
Ako cTBkIIOKepaMnUHaTa / cTBKJIeHaTa NOBbpxHOCT e HanykaHa, n3KJIIOUeTe ypeDa n rO n3KJIIOUeTe OT eJekTpnuCeCKaTa MpeXa. B clyuay che ypeDbT e CBbp3aH dIpeKTHO KbM eJekTpnuCeCKaTa MpeXa C NOMOHTa Ha CbeDINHTeJIHa KUTy, npemaxHeTe ppeDnA3ITeJIy, 3a Da n3KJIIOUHTe ypeDa OT eJekTpnuCeCKaTa MpeXa. BbB BCEKn EINH clyuay Ce CBbpXeTe C OTOpN3IpaHnA cepBn3EH UeHTbp.
Ako 3axpaHbauT Ka6e nOBpeDeH, ToT Tp8Ba da ce 3aMeHN OT npOn3BOdnteJI, OT yNtBnHOMOseHnE cepBn3eH ueHTbp INIOT IInca CbC CXoHa KBaJIINΦnKauzn, 3a da ce n36eHHe onaCHOCT. - ПЕДУПЕЖДЕНЕ: Използваite само пpeдпа3итей 3a кOTлони ра3рабOTени OT прOn3ВODИТЕЯ Или
ynpomeHaTn OT HeRo B HNCTpyKcHnTe 3a yNoTppe6a, nIIN ppeDpa3nteJI N 3a KOTIOHn BRpaDeHn BVpeJa.
IV3noJ3BaHeTo Na HEnOxDxOJaU npeDpa3nteJI MoKe da DOBeJe Do 3IonoJnyKn.
2.ИHCTPYKUIN3ABE3OПАСHOCT
2.1 ИстANAuaia

BHIMAHNE!
Camo KBaIINΦHnIpaHo IInCe MoKe Da n3BbPbN MOHTaKa Ha ypeDa.

BHIMAHNE!
OnachocOT HapaHbAne nnn noBpeHa Ha ypeHa.
Maxhete BCnUKN ONAKOBN.
He mONTpaTne Hn H3noJ3BaIte noBpeDeH ypeI.
CneDbaiTe HNCTpyKuInTe 3a INHCTaJInpaHe, pINIOKeHN KbM ypeJa.
Tp6Ba Da cna3BaTe MHHMaJIHOTO pa3CToHne Do npyU ypeu n uycTroIcTa.
BnHaRn BnHmAbaYte, KOraTo MeCTnTe ypeDa, TbI KaTO e TeKbK. BnHaRn n3NoJ3BaYTe pPeJna3Hn pKaBnCn n 3aTBopeHn OByBKn.
- YnTHeTe cpr3aHnTe NOBbpxHOCTu cnYnTbTHnTeI, 3a da npedOTbpaTnTe n3dYBaHe nopadn Bnara.
- Празаьiate Долнata уст на урда от napa и вага.
He montnpaIte ypeia 6n3o do bpaT a nn npd npo3opeu. Taka ue npdeotbparnte naaneto Ha ropeun rotbapckn cbdoBe ot ypeia, kOrato ce OTBOPN Bpataa nn npo3opeuT.
- BCEKUpeiIMaOxnaJaUNBeHTINaTOPnHaDbHOTo.
Ako ypeBt e MOHTnpaH naJyekMeJKeTo:He cKnadnpaIte MaKn napYeHcuaNINXapTNIKN, KOITo MOrat da 6bDatBCMyKaHN N Da HapaHrTOxJaDaUNTe BeHTNJaTOPu INI daIOBpeJrT OXJaXdaUcaTa CnCTema.
-
Пазetime Достанция OT МИнмуm 2 cm Мекд дьно на урда и Складиранite чати в чекmedжeto.
-
OtctpaHete BCaKaBn pa3JeIaI nnHeJI, MoHTnpaHI B WkaFpa IoI ypeJa.
2.2 EneKtpnuecko Cbbp3BaHe

BHIMAHNE!
Pnck OT noxkap nnn TOKOB ynap.
BcnuKn eNeKtpuyeckn Bp3kn Tp86Ba da ce n3BbPWBat OT KBaIINΦuIpaH eneKtpoTeXnK
- YpeIbT TpI6Ba Da e 3a3eMeH.
- Прази за извьршпе DeиctВи, се у breaste, ue ypeBt e n3KJIuOyeH OT eNeKTe03axpaHbaHeto.
- YBepete ce, Ye napameTpnte Ha TabeIkata C TexHnueckn DaHHn Ca CbBMeCTUMN C eNEKtpuecknTe DaHHn Ha 3axpaHbAaTa Mpeka.
- YBepTe Ce, Ye ypeIbT e MOHTnpaH npabnlnHO. Xna6abu n HenpaBnHn eJeKtpnueckn 3axpaHbaun Ka6eIN nn IeNceIn (aKo ca HaJIuHn) MoarTa da DoBeDaT DO ppeHaqrBaHe.
- I3noJI3BaIte IoJXOJaIz 3axpaHbaIka6eI.
He n03BoJbAaTe 3axpaHbAuzT Ka6eI da ce npenlnta.
- YBepete ce, ye e nHctaInpaHa 3aunTa OT TOKOB ynap.
3akpenete ka6ena c npitraua cko6a npotnb onbbahe.
- YBepTe ce, Ye Ka6eIbT 3a eIeKtpO3axpaHbAHeTO IINI UeIcEJIbT (aKe e HAIuHEn) He DOKOCBaT HArOpESeHnYpeD INIIN RopeuCn CbIOBe 3a RotBeHe, KOraTO BKNIOUHTe UpeDa B KOHTaKT.
He n3no3BaTe pa3KnOHTeIu nn aadantepn C MHORO BXOIOBE.
He nobpekdaIte 3axpaHbauu yencel (ako e hannueh) nll 3axpaHbauu kabeJ. CbpxeTe ce c haunia OTOpn3npaH cepBn3eh ueHTbp nll eJeKtpoTeXnK 3a cmHaT a Ha nobpeDeH 3axpaHbau ka6eJ.
3aunntata ot tokob ynap ha ropeunte n 30inpanu hactn Tpr6ba da 6bde 3aterhata no TaBb HauHH, ye da He MOKe da ce OTCTpAHn 6e3 INHCTpyMeHTN.
CbpxkeTe Ka6eJa 3a 3axpaHbaHeTo KbM KOHTaKa eINHCTBeHO B KpaHa INCTaIauTt. YBepTe ce, Ye IeNcIbT 3a 3axpaHbaHe e OocTbneH CJIeD INCTaIIpaHeto.
Ako KOHTaKbT e pa3xJa6eH, He CBbP3BaIte 3axpaHbAunu IeNceJ.
He n3dbpnbai Te 3axpaHbau nka6eI,3a da n3kIouHTe ypea.Bunar n3dbpnbai Te uencena Ha 3axpaHbAHeto.
- I3noI3BaIte caMo npabInHn yCTpoIcTbA 3a I3OlaCua: npeIpa3Hn npeKbcBauH na Mpekata, npeIpa3HTeIN (npedna3HTeNTe OT BnHTOB TnT Tp8Ba Da ce I3BaIaT OT facyrata), INKIOVABeTI N KOHTaKTOpN 3a yTeUka Ha 3a3EMBAHeTO.
- EneKtpnueckaTa nHcTaJaZaunr Tpr6Ba da nma n30JnpaUO yCTpoiCtBO, KoTo Bn no3BOLraBa da n3KJIIOuHTe ypeDa ot en. mpejata npn BCNUKn PONHOcN. N30JnpaUTo yCTpoiCTBO Tpr6Ba da e c shinpHa Ha OTBapRHe Ha KOHTaKtAmNHmym 3 MM.
2.3 IV3noI3BaHe

BHIMAHNE!
PnCK OT hapaHЯBaHe, n3rapaHnIy n TOKOB yap.
- OTeTpaHete BCnUckn OnaKOBKn, eTNKeTn 3aunTHo fOJIINO (ako e Heo6xoJIMo) npdei nbpBOHaJHaTa ynoTp6a.
To3n ype3 e npedHa3NaeHcMo 3a DomaunHa (Ha 3akpnto) ynoTepe6a.
He npomehyTe npedHa3NaueHneTo Ha ypeda. - YBepete ce, ye BeHTnlaZuHOHHIte OTbOpn He ca 6IOKnpaHn.
He octabrayte ypeda 6e3 hao3op no Bpeme Ha pa6ota. - N3KJIIOUBAIte 3OHaTa 3a rotBeHe cIeD BcRAka ynoTpe6a.
He noctabray Te npibopn 3a xpahe He nn TeHxepn Bbpxy 30hnte 3a roTbe. Te Morat da ce haropeu.
He pa6oTeTe c ypeDa c MOKpn pBue nI IN KOraTo NMa KOHTaKT C B0da.
He n3noJI3BaIte ypeDa KaTo pa6OTha NOBbpxHOCT INI NOBbpxHOCT 3a CbXpaHeHne.
Ako noBbpxHocTtHa ypeDa e HanykaHa, He3a6abHo n3KnHouTe ypeDa OT 3axpaHbAHeto. Toba ce npabn C uei npdeoTbpaTaBaHe Ha TKOB ynap.
IotpebnteIn cneimcmeKbprp8ba da cnaa3BaT dncTaHnna Hn-MaKo 30 cm ot INdykCIOOHnTe 3OHN 3a rotBeHe, KOrato ypeDbT pa6Ot.
Korato noctabraye xpana B ropeuO MaCNo, TЯ може дл пьcka Ma3HnHa.

BHIMAHHE!
OnachocT OT noXap nnn EKcIIO3nA
HaropeeHNTe Ma3HHn HnMaCNo MOrat Da IOBeDat DO OTdJIaHe Ha Bb3JIaMeHmN Napi. He Do6JIxKabAte TnMaMbK HnHaropeeHn IpEaMeTn Do Ma3HHaTa HnMaCNoTO, KOraTO rOTBnTe C TaKIBa.
- Napute, Konto OTdela MHOrO HaropeueHTo MaCNo, Morat Da DOBeedaT Do BHe3aHNO Bb3PiJaMeHaBaHe.
- I3noJ3BaHOTo MacNo, KOeTo MOKe Ja cBdIbPka OCTaTbUO OT XpaHa, MOKe Da npuHHn IOXapr pni NO-HNcKa TemnepaTypa B CpaBHeHne C MaCJIOTO, I3noJ3BaHO 3a IIpbBn IIbT.
He noctabayTe 3anaJIMn npOdyKTn nn nppeMeTn, KOInTO ca HAMOKpeHn CbC 3anaJIMn npOdyKTn, B 6bn3oCT do ypea nnBbpxy Hero.

BHIMAHHE!
OnachocT OT noBpea B ypea.
He npbXnhe ropeu nroTbapcN cIIOBe Bbpxy TaJIoTO 3a ynpabJIeHne.
He noctabaIte ropeu kanaKHa TnraH Bbpxy CTbKLeHaTa NOBbPxHOCT Ha Nlota.
He octabraye TeuHocTa B roTbapcknTe CbIOBe Da N3Bpu HAnbJHO.
BHMmabaiTe da He n3TbPaTe npedmetn nnr rotBapcKn cboBe Bbpxu ypeJa. NobbpxHocCTTa moKe da ce nobpeiN.
He BkIIOUbaIte 3OHNTE 3a rotBeHe, KOrato Ha TEx Ima npa3Hn RotBapcKn CbIDoe, INI KOrato HMa TaKuBa.
He nocTabraTe aIyMnHneBO oIIO Bbpxu ypeJa.
IOTBapCKNTE CbIOBe, HAnpaBEnO TcYrHy, AnyMnHmN mC TaKnBa C NOBpeDeHO bHo, MoRt Da HaDpaCKaT CTbKnIoTO/CTbKnIOkepAMnKaTa. BnHaRn NOBnIraTe Te3n PneMeTu, KOrato Tp86Ba Da rN nPpeMeCTNe Bbpxy NOBbPxHOCTTA 3a RotBeHe.
To3n ypeD e npedHa3NaueH cAmo 3a roTBeHe. ToI He Tp8Ba Da ce n3no13Ba 3a DpyrN ZeIN, KaTO HApPIMep 3a OTOpJIeHne Ha NOMEuEHNTo.
2.4 Frpka n nouchTaBaHe
Почистваite peIDOBHO ypeda,3a da npdeIoTbpaTne yBpeKdAne Ha NOBbpxHOCTHnMaTePnAJI.
- Izhkiyuteyepea ngocTabe da ce oxlaan, npedn da ro nouchte.
He n3no3BaIte BODoctpyka nIin npa, 3a Da noUcHtne Upeda.
- Почистения уразс мokра и мека кьрп.
- Изллbaитcaю Heytrpanн
- пени рати. He Изллbaитfe abpa3иВи
- пожукт, гралави, почstваци Кьрп,
- ра3творптелл металнп пешдmetи.
2.5 O6cnyxbaHe
3a nonpaBka Ha ypea ce cBbpxe Ce OTOpUN3nPAHNA cepBn3en UeHTbp.
3. MOHTAKK

BHIMAHHE!
Bx. rnaBa "Be3onacnoct".
3.1 Ппеди мотаякa
Ipei Da nHCTaJInpate nIIOyata, no-dOny 3aIIwete nHΦopMaζηraT oT tabeNkata C daHH. TabeNkata c ochOBnTe daHH e pa3noJoxeHa BdoJIhata Yact Ha nIIOyata.
CepneH Homep
U3noJI3BaIte cAmO opuHnHaJIHn pe3epBHN qactn.
- OTHOCHO JAMnata(HTe) BbTpE B TO3n npOdyKT n pe3epBHNte JAMnn, npOdaBaHn OTdEJIHo: Te3n JAMnn ca npPeJHa3NaueHn Da n3IbPjKAT Ha ekCTpeMnHn fN3UeCKn ycNoBnB DOMaKnHcckn ypeDn, KaTO TemNepaTpya, Bn6paqnn, BnaxKHOCTn nn Ca npPeJHa3NaueHn Da cNtHaJIIN3npaT INΦOpMauŋ 3a pa6oTHOTO CbCTOJHne Ha ypeDa. Te He naPeJHa3NaueHn 3a m3NOJ3BaHe B Dpyr n pRNUOKeHn n He ca NODXoJAsn 3a OCBeTBAHe Ha NOMeUeHn B DomaKnHCTBOTO.
2.6 N3xBbPJIaHe

BHIMAHNE!
Puck OT HapaHyaBe nIi 3aDywaBaHe.
Cbpxte ce c 6uHcknte Bnactn 3a HOpMaunKa da nXbplnte ypeda.
- Izhkiuye Te ype da ot eJeKtpo3axpaHbaHeTo.
- ɪəbʌdæTe 3axpaɪhBaɪŋa eŋ. Ka6eŋ B 6ɒnɪzɔct ὄуpeə n I rɒ nɪxBvbPjneTe.
3.2 Brpaedn nloyn
BrpadeHnTe PIOOuMOraTaCe I3PON3BaT cAmo CneI KaTo Ca MOHTnpaHb NpOxDoxAun BrpadeHn EeINHnU pa60THn PIoTOBe, KOINTOTROBaprHa CTaHdApTHe.
3.3 Cbbp3BaU Ka6eI
-Плоча tcdoctabc bsc cBbP3Baц ka6eJ.
3a da noDMeHnTe NOBpeDeH 3axpaHBaU Ka6eN, n3noN3BaIte Ka6eN TnI: H05V2V2-F KOrTo n3dbpXa Ha TemnepaTpya ot 90^ nn no-BvcoKa.
CbpxKeTe ce c yIbIHHOMOeH cepBn3eH
cHTbp. CbP3Baunr Ka6eM MoKe da ce
noMeHcMoOT KBaINuNpuh
eJeKtpoTeXnK.
3.4 Crlio6BaHe
Ako nHcTaInpaTe IIOt IOn I NaHeNa Ha a6cop6aTopa, MoJIy, BnKTe MInHMmaJIHOto pa3CTOraHne MeXdY ypeDInTe B INHCTpyKUnTe 3a MOHTaX Ha a6cop6aTopa.

Ako ypeIbTe eHCTaJIpaH nA du YekMeJxke, BeHTnlaZIraTa Ha IIOta MOKe da 3aRpee eJeMeHTnte, CbXpaHЯBaHn B YekMeJxKeTO NO BpeMe Ha IPOceCa Ha rotBeHe.

Iotbpcete Bndeo ypoka ,KaKa ma MoHTnpate Baunna HndykuHoneh Nnot AEG - moHTax Ha pa60te HnIOT" ,kato HanuWte TbnHoto IMe, noka3aHO Ha rpaqnkata No-dony.

YouTube
www.youtube.com/electrolux
www.youtube.com/aeg

4.ОПИSCAHNEHA YPEДА
4.1 Pa3noIoxKeHne Ha NOBbpxHOCTTa 3a rotBeHe

1 INdykunOHn NOBbpxHOCT 3a roTBeHe
2 KoHTpOJIeH nAneH
4.2 Pa3noJoxeHne Ha KOMaHdHTo Ta6JIo

I3noJI3BaIte ceH3OpHnTE noIeTa, 3a da pa60Tne cypeJa. Ioka3aHnraHa DaicnpeA, INdikatopnte n 3ByKOBIne CnHaJn Noka3BAt KOn fYHKun pa60Tart.
| Сенихорно по- лес | Белекka | |
| 1 | ① | 3a akтувираце и Deakтувираце на плота. |
| 2 | 3a akтувираце и Deakтувираце на 3akлючаве ялл 3aшита за.Deца. | |
| 3 | 3a пokaразе на akтувнаты зона. | |
| 4 | Инданкатор CountUp Timer. | |
| 5 | Инданкатор Таймер за озбраве. | |
| 6 | - | Еран на таймера: 00 - 99 минутп. |
| 7 | 3a akтувираце и Deakтувираце на Bridgeи за певкульчаве можду ржимITE. | |
| 8 | 3a Избираце на Функципente Таймер. | |
| Сенисторно- лес | Белека | |
| 9 | +/- | 3a уVESоча велини hamалява врemeуо. |
| 10 | - | 3a akтувиране и.Deakтувиране на Hobу Hood. |
| 11 | || | 3a akтувиране и.Deakтувиране на Пayза. |
| 12 | P | 3a akтувиране на PowerBoost. |
| 13 | - | 3a заимане на толлинна настroduka: 0 - 9. |
| 14 | ♀ | 3a akтувиране и.Deakтувиране на PowerSlide. |
5. BCEKNДHEBHA YNOTPEBA

BHIMAHNE!
Bx. rnaBa "Be3onachocT".
5.1 AkTbBnpaHe n DeaKTHBnpaHe
Дokochete ① 3a 1 cekyнда,за да akTbNpaTe nnn DeakTbNpaTe pNoata. KomahdHOTo tabno CBETBa cIeD kaTO cTe akTbNpaII pNoataи nI3racBa cIeD kaTOЯ deakTbNpaTe.
5.2 ABTomatnHOn n3KJIIOUyBaHe
Ta3nФyHKcna Cnnpa ABTomatNHO nloyata, ako:
He nocTaBraTe CbIOBeTe 3a rotBeHe 3a 50 CEkyHn,
He 3aabaTe HAcTpoKaTa 3a HaPraBaHe 3a 50 cekyHn CneI nocTabaHrTo Ha cbdoBeTe,
pa3JIeTe TeUHOCT IIN OCTaBnTE HЯKaKBbI ppeIMet (CbI, Kbpna) Ha KOMaHdHOTo Ta6No 3a NObeue ot 10 cekyHn. Korato ChyeTe akCTnueH cnrHaI, nIOuata ce DeakTINbIpa.CBaIeTe OT nIOuYATA INI NOuchTe TE KOMaHdHOTo Ta6No.
Плоча CTaba MHoro ropeша (Hanp., KOraTO TeHdKepaTa e n3Bprna HnTbIHO). OcTaBeTe 3OHaTA 3a rotBeHe da ce oxJaDi, npeDi OTHOBO da n3POn3BaTe PIIChaTA.
He DeakTnBupate 30HaTa 3a rotBeHe IIN He npomeHrTe CTeNEHTa 3a HarpaBaHe.
Cnei onpeedeJeHo BpeMe nIouata Ce deakTnBupa.
Bp3kaTaeMxdy CTeneHtA 3a HarpBaHe IN BpemTo, cIe KaTo PnOyata e CnpHa:
| Стени на.harрая- нe | Плоча се Deaktni- Вира сед |
| 1 - 2 | 6 ча |
| 3 - 4 | 5 ча |
| 5 | 4 ча |
| 6 - 9 | 1,5 ча |
5.3ИзползВанеHa 3онота 3a rotBeHe

IPEyIPEKDEHNE!
He nocTabraIte ropeuIN rOtBapcN CbDoBE Bbpxy KOMaHnHOTo Ta6JIO. IMa pNCK OT nobPeDa Ha eNeKTPoHNHTe Yactn.
CNoxKeTe roTbapcknTe cbDoBe Bbpyx
ZeHTbpa Ha n36paHata 30Ha 3a rotBeHe.
HdUkyOnOHnTe 30Hn 3a rotBeHe ce
npncOcO6BaBAT KbM DbHOTo Ha rotBapckn
CbAbTOMaTHNO.
Korato NoCTabNTe CbOBete B npabInHaTa
no3uN, IIOyata r pa3no3HaBa N
cbOTbETHa IeHa 3a ynpabHeNe ce
BkNoCyBa.Had KOthpOInHaTa JeHtce
No8BA YerBEN INDnKaTOp 3a 30HaTa 3a
rotBeHe n NOKa3Ba NO3uNra Ta Ha cbDa.
Bcekn KBaIpaT Ha KOHTpONHn IaHEn
IpeIcTaNJIbAeNHa 3OHa 3a rotBeHe Ha
INyKUHOHHaTa rOTBapCkA NOBbPxHOCT.
INdIkaTOPnTe 3a 3OHnTe NOKa3Bat KOr 3OHa
3a rotBeHe ce KOHTpONIPA o TcBOTBeTHaTa
KOHTpONHaJeHTa.
5.4 HactpoKn 3a 3atOpJIaHe
- Hatnchete XeJahata CTenen Ha HargraBaHe Ha IeHTa3a ynpabJeHne. MoXte CbIoo Da DnKInTe npbcta cn no IeHTata 3a ynpabJeHne, 3a Da 3aJaTe Hnn IpomEnTe HactpojKaTa Ha HargraBaHe 3a 3OHa 3a rotBeHe.
- 3a Да ДeakTиВирTe 3OHa 3a rOTBeHe, HATiNCHete 0.
CneI KaTo NoCTaBInTe CbDA B 30HaTa N 3aJaTe HeCTPOJKAta 3a HArpBAHe, Tg OCTaba HEnPOMeHEna 3a 2 MNHyTn, CNeI KaTo IpemaxHeTe CbDa. KOHTPOJIHATA JeHtA n INDINKAToPbT Ha 30HaTA 3a rOTBeHE MmRat 3a 2 MNHyTn. AKO NOCTaBInTe CbDa B 30HaTA 3a rOTBeHE OTHOBO ppe3 TOBa Bpeme, HAcTPOJkata 3a HArpBAHe OTHOBO ce AKTINBpa. B IpOTIBeH Cnyuai 30HaTA 3a RotBeHe Ce DeAKTINBpa.
5.5 PowerBoost
Ta3nФyHKUЯ AKTNBIPA NOBEYe MOUHOCT 3a NODXODJUaTA INNDYKUHOHHa 3OHa 3a rotBeHe, B 3aBNCIMoCT OT pa3Mepa Ha CbIDOBeTe.ФyHKUraTa MoKe Da 6bJe akTNBIPAHa cAmO 3a OgraHnueH nepNoD ot Bpeme.
ДOKОСHETe P, 3a Да АКТИВИРATE ФУнкцЯт a 3a n3бpaHaTa 3OHa 3a rotBeHe.
CIMBOJbT CTaba YepBeH.
ФункцятacdeakTNbupaabTomuHNO.
i
3a MaKcMaJHn CTOnHOCTn Ha npOdbJIJKntJIHOCCTTa BNXTe ,TexHnueckn DaHHN".
5.6 OptiHeat Control (3-cTbNKOB INHdNKaTOP 3a OCTaTbUHa TOnJIHa)

BHIMAHNE!
= /=/ -ДOKATO INHДКATOPbT CBETN, CbIeCTByBa PMCK OT N3rapaHnOT OCTaTbUHa TOПИнHa.
Инданьждат ТОПЛИНа, НEOбхODIMа 3a\ Ipoцeca на ROTBEHe, HanpaBO Ha ДьHOTоHa\ ROTВарсьд. СтьКIOkepAMNKaTa ce\ 3a rgbra ot TОПЛINHaТа Ha CьДOBeTe 3a\ ROTBeHe.
HdkaTopte /=/-ce NOBBAt, KORATO3a 3a rotBeHe e ropeua. Te NOKA3BAT HVBOTO Ha OCTaTbUHaTa TOnJIHa 3a 3OHTe 3a rotBeHe, KOITO N3NOJ3BaTe B MOMeHTa.
HnDnKaToptbT MoKe CbIoo Da ce nOaBn:
3a CbceHnTe 30Hn 3a rOtBeHe, DOpn aKO He rN n3PON3BaTe,
Korato ropeu CbdoBe 3a rotBeHe ca Noctabehn Ha CTydeHa 30Ha 3a rotBeHe,
KOrato NIOUaTa e IN3KIIuOeHa, Ho 3oHaTa 3a rotBeHe e BCE OSe Ropeua.
HnkaTbN3ye3Ba, KOraTo 3oHaTa 3a rotBeHe ce Oxla.
5.7 Taumep
TaMep 3a oT6pOBAHe
Ako TaIMepeT He e HAcTePoEH, BCNUKn INDkATOpN n3Ye3BaT CJIe4 CEkyHdN.
2.ДOKOCHTe+UNN一,3a da Hargnacnte BpeMeTo (00-99 MNHyTN).
Cne3 cekyni TaMepbT 3anOyBa aBTOMaTHNO 6paTHo 6poHe.
NHHaKATOpHTe 1+H- n3yue3BaT. octaba YepBeH.
Korato BpeMeTo Cbpln, np03ByuBa 3BykOB cHnI n CBetBa. 3a da cnpeTe cHana,doKoCHete
3a da n3KnHouHTe cyHKUyTA:doKoCHete ①. HdknKatOpHTe +n Ce BkHouBAT.
N3noJ3BaIe Tnn+ 3a da 3aJaIaeTe O Ha nCnpe.AItePhaTNBHa Bb3MOXHOCT eHa HAcTPONe HNBOTo Ha HArpBaHe Ha 0. B pe3yNTat OT TOBA npO3Byuaba CnHAn I TaImepbT cnipa.
CountUp Timer
Mokete Da n3no3BaTe Ta3n fynKcny, 3a da ha6IIOdaBATE KOJIKO DbIro pa6OTn 3oHaTa 3a rotBeHe.
Korato DeakTbInpaTe IIOuata, DeakTbInpaTe CbIoo N Ta3N 0yHKUJ.
5.12 3aunta 3a deca
Ta3nФyHKnI npEoTbpaTBA HeBOLHO 3nOJ3BaHe Ha nloYata.
AknBpaIte nbpBO nIOuata n He 3aDaBaIte HAcTpoKata 3a HarpBaHe.
ДOKОСHTe ,ДOKATO CTaHе YeрВeH, 3a ДаakTINBnPaTeФункцЯТа.
KoHTpOJIHnTe JeHTn n3Ye3BaT. I3KJIIOUeTe nnOyata.
Korato DeaknBnpate nlochaTa, fynkuiyra BCE ose e aKTNBHa.
3a da DeaktnBupate yHKunra cmo 3a eINn nepno Ha rotBeHe: AKnBpuAte
nloyata c ①. CBETBa. DOKOCHTe ,DOKATO CTAHe 6aJNo. KOHTPONHIne JIeHTNc CE NOBBAAT. 3aJaTHe HAcTPOJKaTa 3a HaRpaBaHe Do 50 cekyn.MoKeTe da paBoTne c nloyata. Korato DeakTNbupate nloyata c ①, fynKzraTa BCE OSe e aKTNBHa.
3a da DeakTbBpuTe yHKnTuTa 3a noctoHHo:AKTbBpaIte IIOUaTa n He 3aDaBaIte HAcTpoKkTa 3a HarpBaHe.
DOKOCHETe 1, DOKATOCTaHe 6raNo.
KoHTpOJIHInTe JIeHTn Ce NOrBraBAt.
13KJIIOUeTe nJIOuata.
5.13 OffSound Control
(ДeakTNBupaHe n akTNBupaHe Ha 3ByuNTe)
Пьрв Дразковарпт пючata.
1.ДOKOCHTe ①3a3cekyHДn,3a da aKTHBnpuTeФyHKUЯТа.
EkpaHbT Ce BkHIOUyBa nI3rAcBa.
2.ДOKOCHETe 3a3ceKHydM.
b0nn bCBETBA.
3.ДOKOCHETe+OT TaMepa,3a da n36peTe eHNo OT CNeDHnTe:
-
3byuHte ca n3Kluoyehn
-
60-3ByuTe ca BkHoueHH
-
3a da notbbpnte cBor n36op, n3yakaTe DOkato pNoYuata ce DeakTbNIPA aBTOMaTnHO.
KoratoФункцятаeзадаendeHa bI, MoXeTe Da YuBaTe 3ByuTe, Camo Korato:
- HaTINCHETe ①
- Taɪmep ce noHxN
- Taɪmep 3a Otɒpɔrbahe ce nɒhʌŋ
- NOCTABNTe HeIoo Bbpxy KOMaHdHOTo Ta6no.
5.14 Hob²Hood
ToBa e MoDEpHa aBTOMaTHUHa fYHKUH, CBbp3Ba7a PIOuata KbM Cneuane H a6cOp6aTOp. KaKTo PIOuata, Taka n a6cOp6aTOptBt pa3NOJarat C KOMyHNKaTOp C INΦpauepeBEN CnHAn. CkOPOCTTa Ha BENTINaTOPa Ce ONpeDJIeA bTOMaTHUHO, Bb3 OCHOBa HA NaCtpoiKaTa Ha peXmua N TEMNEpATypaTa HA Na- ropeuTe rOTbapCKN CbDOBe Bbpy PIOuata. CbIto Taka MOKeTe Da ynpabJIaBAte BENTINaTOPa n PbUHO, OT PIOUATA.

При NOвechуTo abcop6aTopn ДиCTAHUOnHHaTc CnCTema e ДeakTNBupaHa no ЮндаЗИраHe. AKTNBupaIteЯ, празДа ИЗПОЛЗВATE ФункцяТа. 3a NOвeche ИнфOPmaцЯ ВИКтЕ РьководCTBOTO 3a ynotpe6a Ha a6cop6aTopa.
A bTOMaTHUHO ynpabJIeHne HaФyHKcIyTa
3a da ynpabnbaTe cyHKnraTa
abTomatnuHo, hactpoite aBtomatuHnna
pexim Ha H1 - H6. IIpbBOHaayalno nIooata
e hactpoeHa Ha H5. Abcop6aTopbT pearupa
pnp pa6oTa c nIooata. IIOUata
abTomatnuHo pa3nO3Haba TeMnepaTypa
Ha rotBapcKnTe cbDoBe n peryInpa
CKOPocTTa Ha BeHTnlaTopa.
Aktubupahe Ha oCBetJehneTo
MoxTe Da hactponte IIOOaTa Da BKNIOUBA OCBETIeHHeTO ABTomATnUHO, BINHaN KOraTo aAKTbInpate.3a Ta3n CEh NACTpOnTe abTomATnHnpeXIM Ha H1-H6.
OcbetTneHnTo Ha a6copbAtopa ce DeaKTHBnpu 2 MNHyTu CneI N3KJIIOUBAHeTO Ha IIOuYtA.
A bTOMaTHn peKmH
Pa3mepn Ha roTbapckn cIdoBe
IHyDyKUHOHHTE 3OHN 3a rotBeHe aBTOMaTNUH0 Ce npNCIO6BaBt KbMa pa3Mepa Ha DbHOTo Ha rotBapCKnCbD.
- EfeKTHBHOCTTa Ha 3oHaTa 3a rotBeHe 3aBcN O T dIaMeTbpa Ha rOTBapCKn cBd. CbDoBe 3a rotBeHe C NO-MaJIbK dIaMeTbp OT MInHMaJIHnI NOJyAbaT cAmO qACT OT MOUHOCTTa, rHeepnpaHa OT 3oHaTa 3a rotBeHe.
- Ot cbo6paXeHn 3a cnIpyHocT n 3a onTNMaJIHN pe3yIITaTI npri rotBeHe, He n3NoJ3BaIte roTbapcN cBd, KOHTo e noTROJAM OT nOCOeHOTo B „CneUΦnKauzn Ha 3OHn 3a rotBeHe". N36raTBAIte n3NoJ3BaHETo Ha roTbapcN cBd 6n30 Do KOHTPOJHOTo TaIIO NO BpeMe Ha
rotbeHe. Toba MoXe Da nOBnIe Bbpxy fYHKUOHNpaHETo Ha KOHTPOHOTo Ta6No NII MoXe CnyaHOn Da aKTUBnPa fYHKUINTe Ha KOTnOHa.

BnKTe,TexHnueeCKn xapakTepnCTnKn".
6.2 UymoBete no BpeMe Ha pa6ota
Ako yBaTe:
- pykaiz yum: rotbapcknT cBd e hapanabeH ot pa3Jnueh MaTePnA1 (KOHCTpykCnna CaHDbV).
CbIpeHe:Bue n3noJI3BaTe 3OHa 3a roTBeHe C BnCOKo HnBO Ha MOUHOCT, a roTbAPCKnT CbI e HAnpABeH OT pa3JInuH MaTePnAJI (KOHCTpyKcIg CaHDbV). - 6yuehe: Bue n3noJ3BaTe BnCOKO HnBO Ha MOUHOCT.
- UpaKaHe: eJekTpueeCKo npeBkIouyBaHe.
CBNCTeHe,6pbMueHe:BENTnataOpT pa6oTu.
UymoBeTe ca HopMaJIHn He noka3BaT HEn3npaBHOCT.
6.3 Öko Timer (Eko Taïmep)
3a da nectnte eheprnHa,HarpeBaTeJrT Ha 30HaTa 3a rotBeHe Ce DeakTbNpa npeDn CnHaHa Ha TaMepa 3a OTbpoBaHe Ha octBaAto Bpeme. Pa3IkaTata BB BpemTo 3a pa6ota 3abncn OT CTeneHtHa Ha HarpBaHe N BpemETpaeheto Ha rotBeHTo.
How to install your AEG Induction Hob - Worktop installation

4. OPIS PROIZVODA
5. SVAKODNEVNA UPORABA

UPOZORENJE!
| How to install your AEG Induction Hob - Worktop installation |

4. POPIS SPOTREBICE
How to install your AEG Induction Hob - Worktop installation

4. PRODUKTBESKRIVELSE
6.2 Lyden under drift
Hvis du kan hore:
6.3 Öko Timer (Eco-timer)
For at spare energi bør kogezonens
varmelegeme slukkes, for minuture lyder.
Thank you for choosing this AEG product. We have created it to give you impeccable performance for many years, with innovative technologies that help make life simpler – features you might not find on ordinary appliances. Please spend a few minutes reading to get the very best from it.
Visit our website to:

Get usage advice, brochures, trouble shooter, service and repair information: www.aeg.com/support

Register your product for better service: www.registeraeg.com

Buy Accessories, Consumables and Original spare parts for your appliance: www.aeg.com/shop
CUSTOMER CARE AND SERVICE
Always use original spare parts.
When contacting our Authorised Service Centre, ensure that you have the following data available: Model, PNC, Serial Number.
The information can be found on the rating plate.
Warning / Caution-Safety information
① General information and tips
Environmental information
Subject to change without notice.
CONTENTS
1.SAFETY INFORMATION. 102
2.SAFETYINSTRUCTIONS 104
3. INSTALLATION 107
4.PRODUCT DESCRIPTION 108
5.DAILYUSE 109
6. HINTS AND TIPS 114
7.CARE AND CLEANING. 117
8.TROUBLESHOOTING 117
9. TECHNICAL DATA 119
10. ENERGY EFFICIENCY 119
11. ENVIRONMENTAL CONCERNS 120
1. SAFETY INFORMATION
Before the installation and use of the appliance, carefully read the supplied instructions. The manufacturer is not responsible for any injuries or damage that are the result of incorrect
installation or usage. Always keep the instructions in a safe and accessible location for future reference.
1.1 Children and vulnerable people safety
- This appliance can be used by children aged from 8 years and above and persons with reduced physical, sensory or mental capabilities or lack of experience and knowledge if they have been given supervision or instruction concerning the use of the appliance in a safe way and understand the hazards involved. Children of less than 8 years of age and persons with very extensive and complex disabilities shall be kept away from the appliance unless continuously supervised.
- Children should be supervised to ensure that they do not play with the appliance.
- Keep all packaging away from children and dispose of it appropriately.
- WARNING: Keep children and pets away from the appliance when it operates or when it cools down. Accessible parts become hot during use.
- If the appliance has a child safety device, it should be activated.
- Children shall not carry out cleaning and user maintenance of the appliance without supervision.
1.2 General Safety
- WARNING: The appliance and its accessible parts become hot during use. Care should be taken to avoid touching heating elements.
WARNING: Unattended cooking on a hob with fat or oil can be dangerous and may result in fire. - NEVER try to extinguish a fire with water, but switch off the appliance and then cover flame e.g. with a lid or a fire blanket.
-
WARNING: The appliance must not be supplied through an external switching device, such as a timer, or connected to a circuit that is regularly switched on and off by a utility.
-
CAUTION: The cooking process has to be supervised. A short term cooking process has to be supervised continuously.
- WARNING: Danger of fire: Do not store items on the cooking surfaces.
- Metallic objects such as knives, forks, spoons and lids should not be placed on the hob surface since they can get hot.
- Do not use the appliance before installing it in the built-in structure.
- Do not use a steam cleaner to clean the appliance.
- After use, switch off the hob element by its control and do not rely on the pan detector.
- If the glass ceramic surface / glass surface is cracked, switch off the appliance and unplug it from the mains. In case the appliance is connected to the mains directly using junction box, remove the fuse to disconnect the appliance from power supply. In either case contact the Authorised Service Centre.
- If the supply cord is damaged, it must be replaced by the manufacturer, an authorized Service or similarly qualified persons in order to avoid a hazard.
- WARNING: Use only hob guards designed by the manufacturer of the cooking appliance or indicated by the manufacturer of the appliance in the instructions for use as suitable or hob guards incorporated in the appliance. The use of inappropriate guards can cause accidents.
2. SAFETY INSTRUCTIONS
2.1 Installation

WARNING!
Only a qualified person must install this appliance.

WARNING!
Risk of injury or damage to the appliance.
- Remove all the packaging.
- Do not install or use a damaged appliance.
- Follow the installation instructions supplied with the appliance.
-
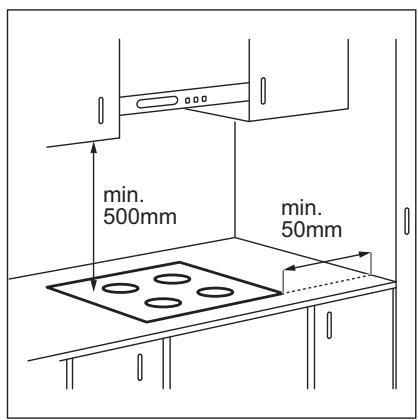
Keep the minimum distance from other appliances and units.
Always take care when moving the appliance as it is heavy. Always use safety gloves and enclosed footwear. -
Seal the cut surfaces with a sealant to prevent moisture from causing swelling.
- Protect the bottom of the appliance from steam and moisture.
-
Do not install the appliance next to a door or under a window. This prevents hot cookware from falling from the appliance when the door or the window is opened.
Each appliance has cooling fans on the bottom.
If the appliance is installed above a drawer: -
Do not store any small pieces or sheets of paper that could be pulled in, as they can damage the cooling fans or impair the cooling system.
-
Keep a distance of minimum 2 cm between the bottom of the appliance and parts stored in the drawer.
-
Remove any separator panels installed in the cabinet below the appliance.
2.2 Electrical Connection

WARNING!
Risk of fire and electric shock.
- All electrical connections should be made by a qualified electrician.
The appliance must be earthed. - Before carrying out any operation make sure that the appliance is disconnected from the power supply.
- Make sure that the parameters on the rating plate are compatible with the electrical ratings of the mains power supply.
- Make sure the appliance is installed correctly. Loose and incorrect electricity mains cable or plug (if applicable) can make the terminal become too hot.
- Use the correct electricity mains cable.
- Do not let the electricity mains cable tangle.
Make sure that a shock protection is installed. - Use the strain relief clamp on the cable.
- Make sure the mains cable or plug (if applicable) does not touch the hot appliance or hot cookware, when you connect the appliance to a socket.
-
Do not use multi-plug adapters and extension cables.
-
Make sure not to cause damage to the mains plug (if applicable) or to the mains cable. Contact our Authorised Service Centre or an electrician to change a damaged mains cable.
- The shock protection of live and insulated parts must be fastened in such a way that it cannot be removed without tools.
- Connect the mains plug to the mains socket only at the end of the installation. Make sure that there is access to the mains plug after the installation.
If the mains socket is loose, do not connect the mains plug. - Do not pull the mains cable to disconnect the appliance. Always pull the mains plug.
- Use only correct isolation devices: line protecting cut-outs, fuses (screw type fuses removed from the holder), earth leakage trips and contactors.
- The electrical installation must have an isolation device which lets you disconnect the appliance from the mains at all poles. The isolation device must have a contact opening width of minimum 3 mm.
2.3 Use

WARNING!
Risk of injury, burns and electric shock.
- Remove all the packaging, labelling and protective film (if applicable) before first use.
- This appliance is for household (indoors) use only.
- Do not change the specification of this appliance.
Make sure that the ventilation openings are not blocked. - Do not let the appliance stay unattended during operation.
- Set the cooking zone to "off" after each use.
- Do not put cutlery or saucepan lids on the cooking zones. They can become hot.
- Do not operate the appliance with wet hands or when it has contact with water.
- Do not use the appliance as a work surface or as a storage surface.
If the surface of the appliance is cracked, disconnect immediately the appliance
from the power supply. This to prevent an electrical shock.
- Users with a pacemaker must keep a distance of minimum 30~cm from the induction cooking zones when the appliance is in operation.
- When you place food into hot oil, it may splash.

WARNING!
Risk of fire and explosion
- Fats and oil when heated can release flammable vapours. Keep flames or heated objects away from fats and oils when you cook with them.
- The vapours that very hot oil releases can cause spontaneous combustion.
- Used oil, that can contain food remnants, can cause fire at a lower temperature than oil used for the first time.
- Do not put flammable products or items that are wet with flammable products in, near or on the appliance.

WARNING!
Risk of damage to the appliance.
- Do not keep hot cookware on the control panel.
- Do not put a hot pan cover on the glass surface of the hob.
- Do not let cookware boil dry.
- Be careful not to let objects or cookware fall on the appliance. The surface can be damaged.
- Do not activate the cooking zones with empty cookware or without cookware.
- Do not put aluminium foil on the appliance.
- Cookware made of cast iron, aluminium or with a damaged bottom can cause scratches on the glass / glass ceramic. Always lift these objects up when you have to move them on the cooking surface.
- This appliance is for cooking purposes only. It must not be used for other purposes, for example room heating.
2.4 Care and cleaning
Clean the appliance regularly to prevent the deterioration of the surface material.
- Switch off the appliance and let it cool down before cleaning.
- Do not use water spray and steam to clean the appliance.
- Clean the appliance with a moist soft cloth. Use only neutral detergents. Do not use abrasive products, abrasive cleaning pads, solvents or metal objects.
2.5 Service
To repair the appliance contact the Authorised Service Centre. Use original spare parts only.
- Concerning the lamp(s) inside this product and spare part lamps sold separately: These lamps are intended to withstand extreme physical conditions in household appliances, such as temperature, vibration, humidity, or are intended to signal information about the operational status of the appliance. They are not intended to be used in other applications and are not suitable for household room illumination.
2.6 Disposal

WARNING!
Risk of injury or suffocation.
- Contact your municipal authority for information on how to dispose of the appliance.
- Disconnect the appliance from the mains supply.
- Cut off the mains electrical cable close to the appliance and dispose of it.
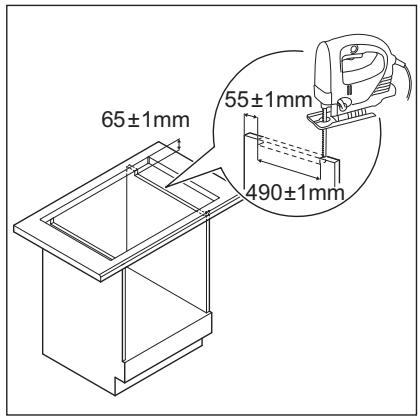
3. INSTALLATION

WARNING!
Refer to Safety chapters.
3.1 Before the installation
Before you install the hob, write down the information below from the rating plate. The rating plate is on the bottom of the hob.
Serial number
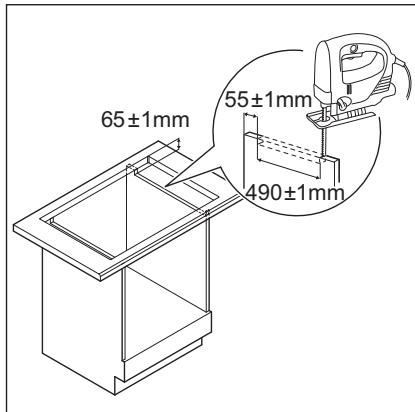
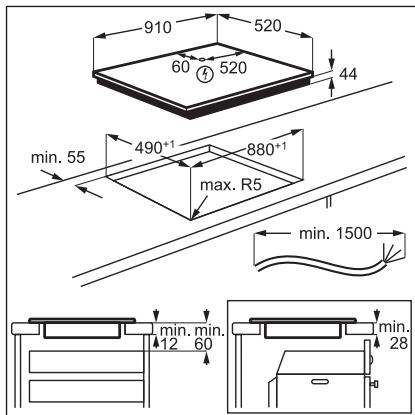
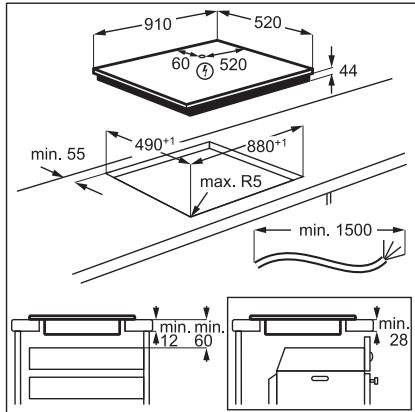
3.2 Built-in hobs
Only use the built-in hobs after you assemble the hob into correct built-in units and work surfaces that align to the standards.
3.3 Connection cable
- The hob is supplied with a connection cable.
- To replace the damaged mains cable, use the cable type: H05V2V2-F which withstands a temperature of 90^ or higher. Contact an Authorised Service Centre. The connection cable may only be replaced by a qualified electrician.
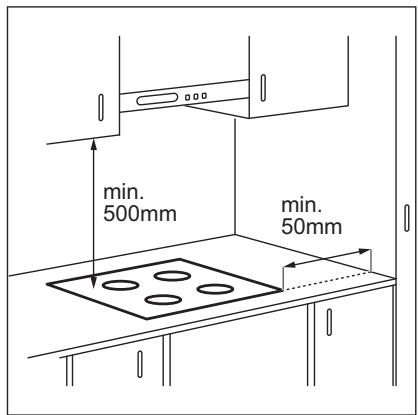
3.4 Assembly
If you install the hob under a hood, please see the installation instructions of the hood for the minimum distance between the appliances.
If the appliance is installed above a drawer, the hob ventilation can warm up the items stored in the drawer during the cooking process.
Find the video tutorial "How to install your AEG Induction Hob - Worktop installation" by typing out the full name indicated in the graphic below.

YouTube
www.youtube.com/electrolux
www.youtube.com/aeg
How to install your AEG Induction Hob - Worktop installation

4. PRODUCT DESCRIPTION
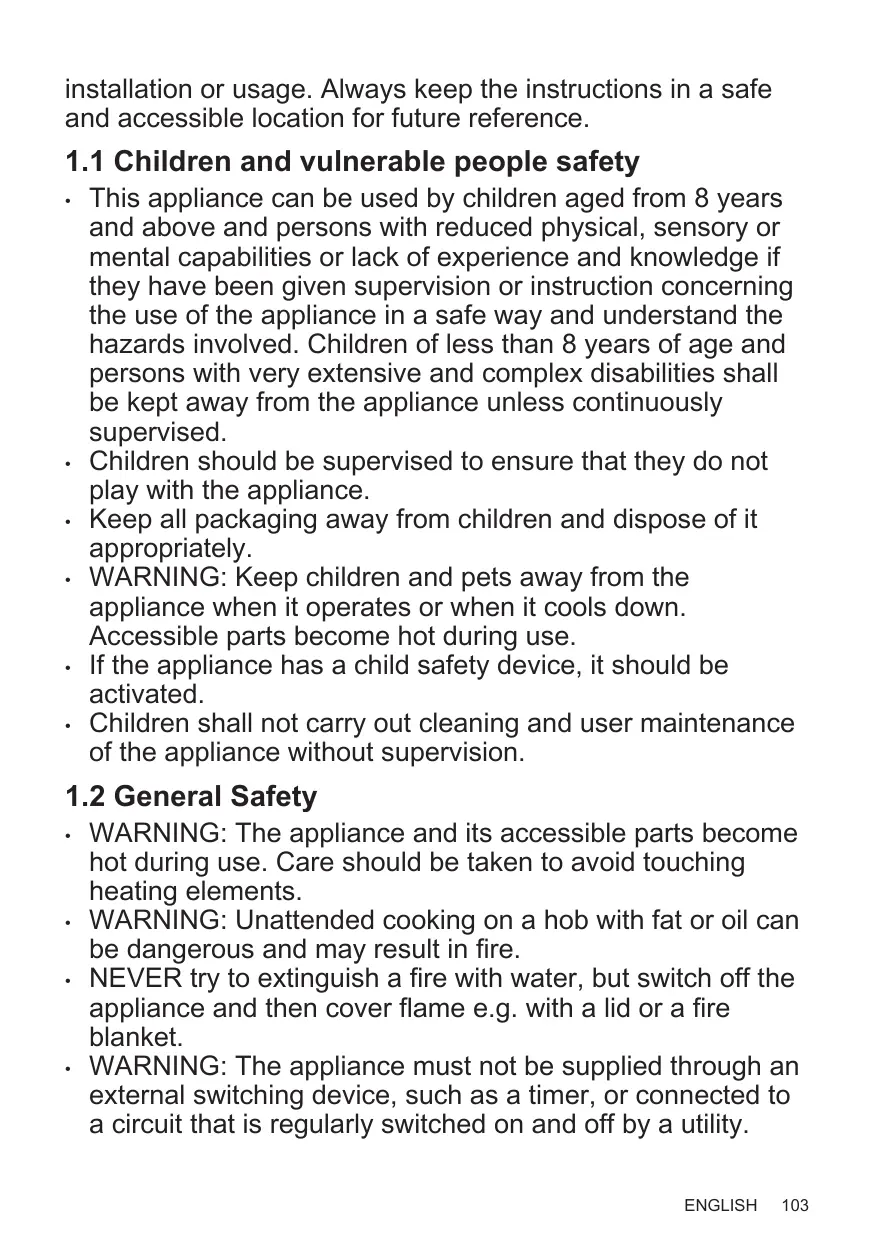
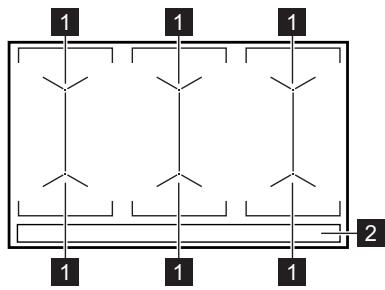
4.1 Cooking surface layout

1 Induction cooking surface
2 Control panel
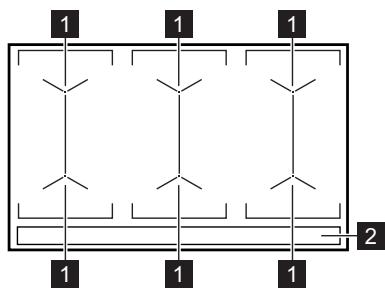
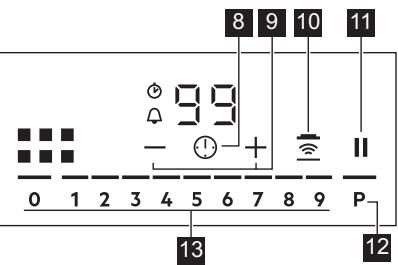
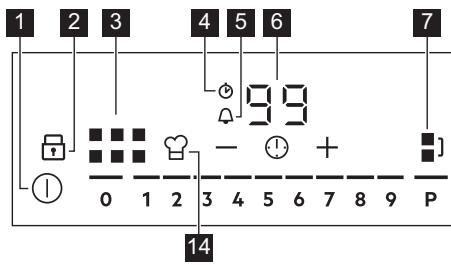
4.2 Control panel layout
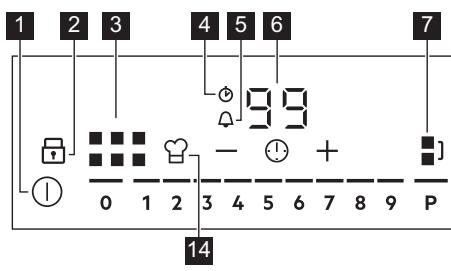
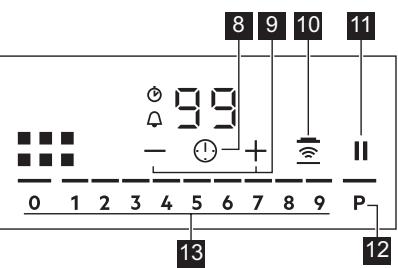
Use the sensor fields to operate the appliance. The displays, indicators and sounds tell which functions operate.
| Sensor field | Comment | |
| 1 | ① | To activate and deactivate the hob. |
| 2 | To activate and deactivate Lock or Child Safety Device. | |
| 3 | To show the active zone. | |
| 4 | CountUp Timer indicator. | |
| 5 | Count Down Timer indicator. | |
| 6 | - | Timer display: 00 - 99 minutes. |
| 7 | To activate and deactivate Bridge and to switch between the modes. | |
| 8 | To select Timer functions. | |
| 9 | +/- | To increase and decrease the time. |
| 10 | - | To activate and deactivate Hob2Hood. |
| 11 | || | To activate and deactivate Pause. |
| 12 | P | To activate PowerBoost. |
| 13 | - | To set a heat setting: 0 - 9. |
| 14 | - | To activate and deactivate PowerSlide. |
5. DAILY USE

WARNING!
Refer to Safety chapters.
5.1 Activating and deactivating
Touch ① for 1 second to activate or deactivate the hob.
The control panel comes on after you activate the hob and goes off after you deactivate the hob.
5.2 Automatic Switch Off
The function deactivates the hob automatically if:
- you do not place any cookware on the hob for 50 seconds,
you do not set the heat setting for 50 seconds after you place the cookware, - you spill something or put something on the control panel for more than 10 seconds (a pan, a cloth). When you hear the acoustic signal, the hob deactivates. Remove the object or clean the control panel.
- the hob gets too hot (e.g. when a saucepan boils dry). Let the cooking zone cool down before you use the hob again.
- you do not deactivate a cooking zone or change the heat setting. After some time, the hob deactivates.
The relation between the heat setting and the time after which the hob deactivates:
| Heat setting | The hob deactivates after |
| 1 - 2 | 6 hours |
| 3 - 4 | 5 hours |
| 5 | 4 hours |
| 6 - 9 | 1.5 hours |
5.3 Using the cooking zone

CAUTION!
Do not place hot cookware on the control panel. There is a risk of damage to the electronic parts.
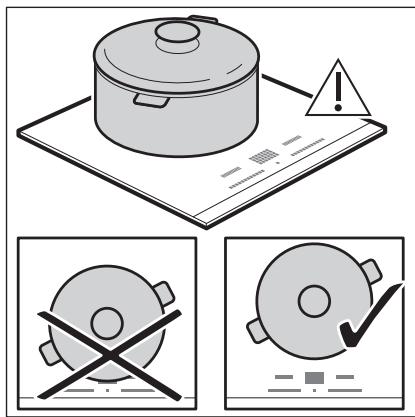
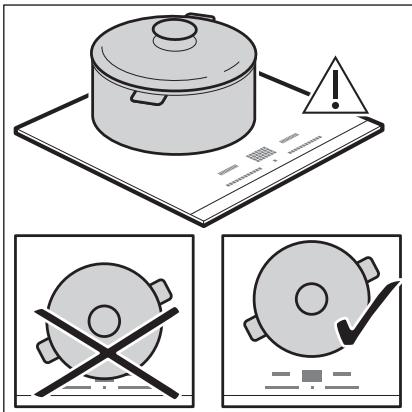
Place the cookware in the centre of the selected zone.
Induction cooking zones adapt to the dimension of the bottom of the cookware automatically.
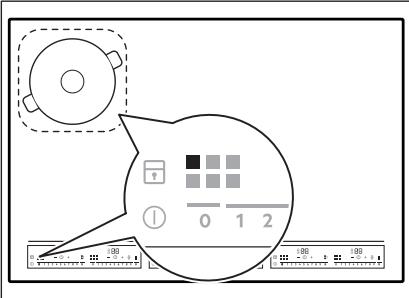
When you place the cookware in the correct position, the hob recognizes it and the appropriate control bar comes on. A red cooking zone indicator appears above the control bar and indicates the position of the pot.
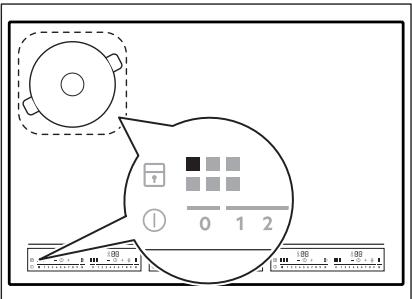
Each square on the control panel represents one cooking zone on the induction cooking surface. Zone indicators show which cooking zone is controlled by the appropriate control bar.
5.4 Heat setting
- Press the desired heat setting on the control bar. You can also move your finger along the control bar to set or change the heat setting for a cooking zone.
- To deactivate a cooking zone, press 0. Once you place a pot on the cooking zone and set the heat setting, it remains the same for 2 minutes after you remove the pot. The control bar and the cooking zone indicator blink for 2 minutes. If you place the pot on the cooking zone again within this time, the heat setting reactivates. Otherwise the cooking zone deactivates.
5.5 PowerBoost
This function activates more power for the appropriate induction cooking zone, depending on the cookware size. The function can be activated only for a limited period of time.
Touch P to activate the function for the cooking zone.
The symbol turns red.
The function deactivates automatically.

For maximum duration values, refer to "Technical data".
5.6 OptiHeat Control (3 step Residual heat indicator)

WARNING!
/ = / - As long as the indicator is on, there is a risk of burns from residual heat.
The induction cooking zones produce the heat necessary for the cooking process directly in the bottom of the cookware. The glass ceramic is heated by the heat of the cookware.
The indicators = = appear when a cooking zone is hot. They show the level of the residual heat for the cooking zones you are currently using.
The indicator may also appear:
for the neighbouring cooking zones even if you are not using them,
- when hot cookware is placed on cold cooking zone,
- when the hob is deactivated but the cooking zone is still hot.
The indicator disappears when the cooking zone has cooled down.
5.7 Timer
Count Down Timer
Use this function to specify how long a cooking zone should operate during a single cooking session.
First set the heat setting, then set the function.
- Touch ① to activate the function or change the time.
The timer digits 00 and the indicators + and come on the display. turns red, and turns white.
If the timer is not set, all indicators disappear after 4 seconds.
- Touch + or — to set the time (00 - 99 minutes).
After 3 seconds, the timer starts to count down automatically. The indicators ① , +, and - disappear. stays red.
When the time comes to an end, a signal sounds and 00 flashes. To stop the signal, touch ①.
To deactivate the function: touch ① . The indicators + and come on. Use - or + to set on the display. Alternatively, set the heat level to 0. As a result, a signal sounds and the timer is cancelled.
CountUp Timer
You can use this function to monitor how long a cooking zone operates.
Touch ① twice to activate the function.
The indicator turns red, the timer starts to count up automatically.
To deactivate the function: touch ①. When the indicators light up, touch —.
Minute Minder
You can use this function when the hob is activated but no cooking zone operates.
To see the control panel, place a pot on a cooking zone.
- Touch ① until the indicator 品 turns red, to activate the function.
- Touch + or - to set the time.
The function starts automatically after 4 seconds. The indicators ① , + , and - disappear. stays red.
When you set the function, you can remove the pot.
When the time comes to an end, a signal sounds and 00 flashes. Touch ① to stop the signal.
To deactivate the function: touch ①. The indicators + and - light up. Use - or + to set 00 on the display.
The function has no effect on the operation of any cooking zone.
5.8 Bridge
This function connects two cooking zones and they operate as one. You can use the function with large cookware.
- Place the cookware on two cooking zones. The cookware must cover the centres of both zones.
turns white.
2. Touch to activate the function.
3. Set the heat setting.
The cookware must cover the centres of both zones but not go beyond the area marking.
To deactivate the function, touch.1. The cooking zones operate independently.
5.9 PowerPoint
This function allows you to adjust the temperature by moving the cookware to a different position on the induction cooking area.
The function divides the induction cooking area into three areas with different heat settings. The hob detects the position of the cookware and adjust the heat setting corresponding with the position.

Use only one pot when you operate the function. If you want to change the heat setting, lift up the cookware and place it on a different zone. Sliding the cookware can cause scratches and discolouration of the surface.
- The zone indicator shows both zones in a bridge even if only one of the zones is used.
- You may adjust the heat setting manually only if at least one of the zones is activated automatically.
- You can change the heat settings for each position separately. When you deactivate the hob, it remembers your heat settings and applies it next time you activate the function.
- If you want to change the heat setting, lift up the cookware and place it on a different zone. Sliding the cookware can cause scratches and discolouration of the surface.
Touch to activate the function. The symbol turns red and the control bar displays the default heat setting. All cooking zones operate for 9 minutes. After 9 minutes, an acoustic signal sounds and the empty cooking zones are deactivated. Touch to resume this function. You can move the pot or place it in a new position. To modify the default heat setting manually touch the control bar and choose the appropriate level.
-
You may change the default heat setting only if the function is active.
-
You can change the default heat settings for each position separately. When you deactivate the hob, it remembers your settings and applies them the next time you activate the function.
To deactivate the function, touch . The symbol turns white.
5.10 Pause
When the function is active, ① and Ⅱ symbols can be used.
The function does not stop the timer functions.
Press to activate the function.
The symbol turns red. The heat setting is lowered to 1.
To deactivate the function: press . The symbol turns white. The previous heat setting comes on.
5.11 Lock
You can lock the control panel while the hob operates. It prevents an accidental change of the heat setting.
Set the heat setting first.
Touch to activate the function. The symbol turns red and blinks.
To deactivate the function, touch. The symbol turns white.

When you deactivate the hob, you also deactivate this function.
5.12 Child Safety Device
This function prevents an accidental operation of the hob.
Activate the hob first and do not set the heat setting.
Touch until it turns red to activate the function.
The control bars disappear. Deactivate the hob.

When you deactivate the hob, the function is still active.
To deactivate the function for only one cooking time: Activate the hob with ① . comes on. Touch until it turns white. The control bars appear. Set the heat setting within 50 seconds. You can operate the hob. When you deactivate the hob with ① the function is still active.
To deactivate the function permanently: Activate the hob and do not set the heat setting. Touch until it turns white. The control bars appear. Deactivate the hob.
5.13 OffSound Control (Deactivating and activating the sounds)
Deactivate the hob first.
- Touch ① for 3 seconds to activate the function.
The display comes on and goes out. - Touch for 3 seconds.
bO or bI comes on. -
Touch + of the timer to choose one of the following:
-
the sounds are off
-
b0 - the sounds are on
-
Wait until the hob deactivates automatically to confirm your selection.
When the function is set to b I you can hear the sounds only when:
- you touch ①
- Minute Minder comes down
- Count Down Timer comes down
- you put something on the control panel.
5.14 Hob²Hood
It is an advanced automatic function which connects the hob to a special hood. Both the hob and the hood have an infrared signal communicator. Speed of the fan is defined automatically on the basis of the mode setting and temperature of the hottest cookware on the hob. You can also operate the fan from the hob manually.
For most of the hoods, the remote system is originally deactivated. Activate it before you use the function. For more information refer to the hood user manual.
Operating the function automatically To operate the function automatically set the automatic mode to H1 - H6. The hob is originally set to H5. The hood reacts whenever you operate the hob. The hob recognizes the temperature of the cookware automatically and adjusts the speed of the fan.
Activating the light
You can set the hob to activate the light automatically whenever you activate the hob. To do so set the automatic mode to H1 - H6.
The light on the hood deactivates 2 minutes after deactivating the hob.
Automatic modes
| Automatic light | Boiling1) | Frying2) | |
| Mode H0 | Off | Off | Off |
| Mode H1 | On | Off | Off |
| Mode H23) | On | Fan speed 1 | Fan speed 1 |
| Mode H3 | On | Off | Fan speed 1 |
| Mode H4 | On | Fan speed 1 | Fan speed 1 |
| Mode H5 | On | Fan speed 1 | Fan speed 2 |
| Mode H6 | On | Fan speed 2 | Fan speed 3 |
1) The hob detects the boiling process and activates the fan speed in accordance with the automatic mode.
2) The hob detects the frying process and activates the fan speed in accordance with the automatic mode.
3) This mode activates the fan and the light and does not rely on the temperature.
Changing the automatic mode
- Deactivate the appliance.
- Touch ① for 3 seconds.
The display comes on and goes off.
- Touch for 3 seconds.
- Touch ① a few times until H comes on.
- Touch + of the Timer to select an automatic mode.
When you finish cooking and deactivate the hob, the hood fan may still operate for a certain period of time. After that time the system deactivates the fan automatically and prevents you from an accidental activation of the fan for the next 30 seconds.

To operate the hood directly on the hood panel deactivate the automatic mode of the function.
Operating the fan speed manually
You can also operate the fan from the hob manually.
Touch when the hob is active.
This deactivates automatic operation of the function and allows you to change the fan speed manually.
When you press, you raise the fan speed by one. When you reach an intensive level and press again, you set the fan speed to 0 which deactivates the hood fan. To start the fan again with the fan speed 1 touch

To activate an automatic operation of the function, deactivate the hob and activate it again.
6. HINTS AND TIPS

WARNING!
Refer to Safety chapters.
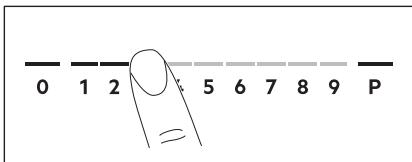
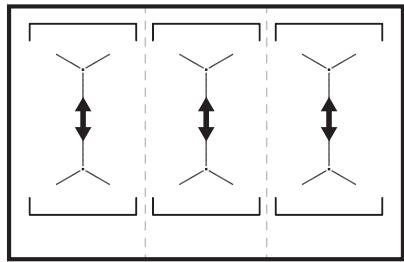
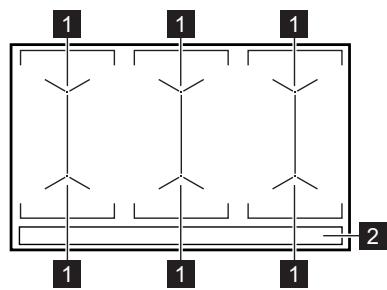
5.15 Power management
If multiple zones are active and the consumed power exceeds the limitation of the power supply, this function divides the available power between all cooking zones. The hob controls heat settings to protect the fuses of the house installation.
- Cooking zones are grouped according to the location and number of the phases in the hob. Each phase has a maximum electricity loading of 3680 W. If the hob reaches the limit of maximum available power within one phase, the power of the cooking zones will be automatically reduced.
- For cooking zones that have a reduced power, the control panel shows the maximum possible heat settings.
If a higher heat setting is not available reduce it for the other cooking zones first. - The activation of the function depends on the number and size of pots.
Refer to the illustration for possible combinations in which power can be distributed among the cooking zones.
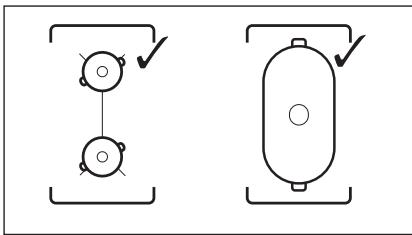
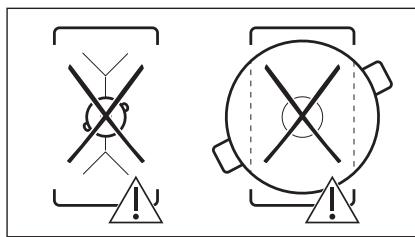
6.1 Cookware
For induction cooking zones a strong electro-magnetic field creates the heat in the cookware very quickly.
Use the induction cooking zones with suitable cookware.
- The bottom of the cookware must be as thick and flat as possible.
- Ensure pan bases are clean and dry before placing on the hob surface.
In order to avoid scratches, do not slide or rub the pot across the ceramic glass.
Cookware material
- correct: cast iron, steel, enamelled steel, stainless steel, multi-layer bottom (with a correct marking from a manufacturer).
not correct: aluminium, copper, brass, glass, ceramic, porcelain.
Cookware is suitable for an induction hob if:
water boils very quickly on a zone set to the highest heat setting.
- a magnet pulls on to the bottom of the cookware.
Cookware dimensions
- Induction cooking zones adapt to the dimension of the bottom of the cookware automatically.
- The cooking zone efficiency is related to the diameter of the cookware. The cookware with a diameter smaller than the minimum receives only a part of the power generated by the cooking zone.
- For both safety reasons and optimal cooking results, do not use cookware larger than indicated in "Cooking zones specification". Avoid keeping cookware close to the control panel during the cooking session. This might impact the functioning of the control panel or accidentally activate hob functions.

Refer to "Technical data".
6.2 The noises during operation
If you can hear:
- crack noise: cookware is made of different materials (a sandwich construction).
whistle sound: you use a cooking zone with a high power level and the cookware is made of different materials (a sandwich construction).
humming: you use a high power level. - clicking: electric switching occurs.
- hissing, buzzing: the fan operates.
The noises are normal and do not indicate any malfunction.
6.3 Öko Timer (Eco Timer)
To save energy, the heater of the cooking zone deactivates before the count down timer sounds. The difference in the operation time depends on the heat setting level and the length of the cooking operation.
6.4 Examples of cooking applications
The correlation between the heat setting of a zone and its consumption of power is not linear. When you increase the heat setting, it is not proportional to the increase of the consumption of power. It means that a cooking zone with the medium heat setting uses less than a half of its power.

The data in the table is for guidance only.
| Heat setting | Use to: | Time (min) | Hints |
| 1 | Keep cooked food warm. | as neces-sary | Put a lid on the cookware. |
| 1 - 2 | Hollandaise sauce, melt: butter, choco-late, gelatine. | 5 - 25 | Mix from time to time. |
| 1 - 2 | Solidify: fluffy omelettes, baked eggs. | 10 - 40 | Cook with a lid on. |
| 2 - 3 | Simmer rice and milkbased dishes, heat up ready-cooked meals. | 25 - 50 | Add at least twice as much liquid as rice, mix milk dishes halfway through the procedure. |
| 3 - 4 | Steam vegetables, fish, meat. | 20 - 45 | Add a couple of tablespoons of liquid. |
| 4 - 5 | Steam potatoes. | 20 - 60 | Use max. 1/4 l of water for 750 g of potatoes. |
| 4 - 5 | Cook larger quantities of food, stews and soups. | 60 - 150 | Up to 3 l of liquid plus ingredients. |
| 6 - 7 | Gentle fry: escalope, veal cordon bleu, cutlets, rissoles, sausages, liver, roux, eggs, pancakes, doughnuts. | as neces-sary | Turn halfway through. |
| 7 - 8 | Heavy fry, hash browns, loin steaks, steaks. | 5 - 15 | Turn halfway through. |
| 9 | Boil water, cook pasta, sear meat (goulash, pot roast), deep-fry chips. | ||
| P | Boil large quantities of water. PowerBoost is activated. | ||
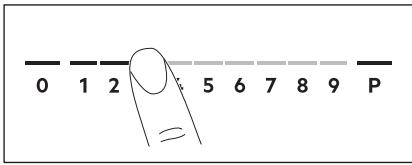
6.5 Hints and Tips for Hob²Hood
When you operate the hob with the function:
- Protect the hood panel from direct sunlight.
- Do not spot halogen light on the hood panel.
- Do not cover the hob control panel.
- Do not interrupt the signal between the hob and the hood (e.g. with the hand, a cookware handle or a tall pot). See the picture.
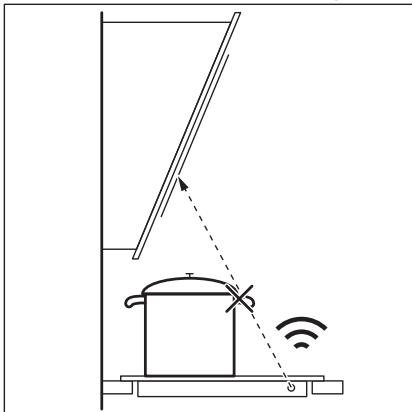
The hood in the picture is only exemplary.
Other remotely controlled appliances may block the signal. Do not use any such appliances near to the hob while Hob²Hood is on.
Cooker hoods with the Hob²Hood function To find the full range of cooker hoods which work with this function refer to our consumer website. The AEG cooker hoods that work with this function must have the symbol
7. CARE AND CLEANING

WARNING!
Refer to Safety chapters.
7.1 General information
- Clean the hob after each use.
Always use cookware with a clean base. - Scratches or dark stains on the surface have no effect on how the hob operates.
- Use a special cleaner suitable for the surface of the hob.
Use a special scraper for the glass.
7.2 Cleaning the hob
- Remove immediately: melted plastic, plastic foil, sugar and food with sugar,
otherwise, the dirt can cause damage to the hob. Take care to avoid burns. Use a special hob scraper on the glass surface at an acute angle and move the blade on the surface.
- Remove when the hob is sufficiently cool: limescale rings, water rings, fat stains, shiny metallic discoloration. Clean the hob with a moist cloth and a non-abrasive detergent. After cleaning, wipe the hob dry with a soft cloth.
- Remove shiny metallic discoloration: use a solution of water with vinegar and clean the glass surface with a cloth.
8. TROUBLESHOOTING

WARNING!
Refer to Safety chapters.
8.1 What to do if...
| Problem | Possible cause | Remedy |
| You cannot activate or operate the hob. | The hob is not connected to an elec- trical supply or it is connected incor- rectly. | Check if the hob is correctly connected to the electrical supply. |
| The fuse is blown. | Make sure that the fuse is the cause of the malfunction. If the fuse is blown again and again, contact a qualified electrician. | |
| You touched 2 or more sensor fields at the same time. | Touch only one sensor field. | |
| Pause operates. | Refer to "Daily use". | |
| There is water or fat stains on the control panel. | Clean the control panel. | |
| You cannot select the maximum heat setting for one of the cook- ing zones. | The other zones consume the maxi- mum available power. Your hob works properly. | Reduce the heat setting of the other cooking zones connected to the same phase. Refer to "Power management". |
| An acoustic signal sounds and the hob deactivates. An acoustic signal sounds when the hob is deactivated. | You put something on one or more sensor fields. | Remove the object from the sensor fields. |
| The hob deactivates. | You put something on the sensor field ①. | Remove the object from the sensor field. |
| Residual heat indicator does not come on. | The zone is not hot because it operated only for a short time or the sensor is damaged. | If the zone operated sufficiently long to be hot, speak to an Authorised Service Centre. |
| Hob²Hood does not work. | You covered the control panel. | Remove the object from the control panel. |
| You use a very tall pot which blocks the signal. | Use a smaller pot, change the cooking zone or operate the hood manually. | |
| There is no sound when you touch the panel sensor fields. | The sounds are deactivated. | Activate the sounds. Refer to "Daily use". |
| comes on. | Child Safety Device or Lock oper- ates. | Refer to "Daily use". |
| The control bar blinks. | There is no cookware on the zone or the zone is not fully covered. | Put cookware on the zone so that it fully covers the cooking zone. |
| The cookware is unsuitable. | Use suitable cookware. Refer to "Hints and tips". | |
| The diameter of the bottom of the cookware is too small for the zone. | Use cookware with correct dimen-sions. Refer to "Technical data". | |
| PowerSlide operates. Two pots are placed on the flexible induction cooking area. | Use only one pot. Refer to "Flexible in-duction cooking area". | |
| and a number come on. | There is an error in the hob. | Deactivate the hob and activate it again after 30 seconds. If comes on again, disconnect the hob from the electrical supply. After 30 seconds, connect the hob again. If the problem continues, speak to an Authorised Service Centre. |
| You can hear a constant beep noise. | The electrical connection is incor- rect. | Disconnect the hob from the electrical supply. Ask a qualified electrician to check the installation. |
8.2 If you cannot find a solution...
If you cannot find a solution to the problem yourself, contact your dealer or an Authorised Service Centre. Give the data from the rating plate. Make sure, you operated the hob correctly. If not the
servicing by a service technician or dealer will not be free of charge, also during the warranty period. The information about guarantee period and Authorised Service Centres are in the guarantee booklet.
9. TECHNICAL DATA
9.1 Rating plate
Model IKE96654FB
Typ 61 E6A 04 AA
Induction 11.0 kW
Ser.Nr.
AEG
PNC 94959761900
400V3N50-60Hz
Made in: Germany
11.0 kW
C∈
9.2 Cooking zones specification
| Cooking zone | Nominal power (maximum heat setting) [W] | PowerBoost [W] | PowerBoost maximum dura- tion [min] | Cookware diameter [mm] |
| Left front | 2300 | 3200 | 10 | 125 - 210 |
| Left rear | 2300 | 3200 | 10 | 125 - 210 |
| Middle front | 2300 | 3200 | 10 | 125 - 210 |
| Middle rear | 2300 | 3200 | 10 | 125 - 210 |
| Right front | 2300 | 3200 | 10 | 125 - 210 |
| Right rear | 2300 | 3200 | 10 | 125 - 210 |
The power of the cooking zones can be different in some small range from the data in the table. It changes with the material and dimensions of the cookware.
For optimal cooking results use cookware no larger than the diameter in the table.
10. ENERGY EFFICIENCY
10.1 Product Information*
| Model identification | IKE96654FB | |
| Type of hob | Built-In Hob | |
| Number of cooking areas | 3 | |
| Heating technology | Induction | |
| Length (L) and width (W) of the cooking area | Left | L 37.9 cm W 22.0 cm |
| Length (L) and width (W) of the cooking area | Middle | L 37.9 cm W 22.0 cm |
| Length (L) and width (W) of the cooking area | Right | L 37.9 cm W 22.0 cm |
| Energy consumption of the cooking area (EC electric cooking) | Left | 186.8 Wh / kg |
| Energy consumption of the cooking area (EC electric cooking) | Middle | 186.8 Wh / kg |
| Energy consumption of the cooking area (EC electric cooking) | Right | 186.8 Wh / kg |
| Energy consumption of the hob (EC electric hob) | 186.8 Wh / kg | |
- For European Union according to EU 66/2014. For Belarus according to STB 2477-2017, Annex A. For Ukraine according to 742/2019.
EN 60350-2 - Household electric cooking appliances - Part 2: Hobs - Methods for measuring performance.
The energy measurements referring to the cooking area are identified by the markings of the respective cooking zones.
10.2 Energy saving
You can save energy during everyday cooking if you follow below hints.
- When you heat up water, use only the amount you need.
- If it is possible, always put the lids on the cookware.
Before you activate the cooking zone put the cookware on it. - Put the smaller cookware on the smaller cooking zones.
- Put the cookware directly in the centre of the cooking zone.
Use the residual heat to keep the food warm or to melt it.
11. ENVIRONMENTAL CONCERNS
Recycle materials with the symbol . Put the packaging in relevant containers to recycle it. Help protect the environment and human health by recycling waste of electrical and electronic appliances. Do not dispose of
appliances marked with the symbol with the household waste. Return the product to your local recycling facility or contact your municipal office.
PARIMATE TULEMUSTE SAAVUTAMISEKS
How to install your AEG Induction Hob - Worktop installation

4. TOOTE KIRJELDUS
How to install your AEG Induction Hob - Worktop installation

4. TUOTEKUVAUS
4.1 Keittoalueet
1 Induktiokeittovalue
2 Kayttopaneeli
How to install your AEG Induction Hob - Worktop installation

4. DESCRIPTION DE L'APPAREIL
10.1 Informations products*
FYRIR FULLKOMINN ARANGUR
Bakka PérFYR aOvelja Pessa AEGVORu. Viohofumframleitt bessa vORu til aO starfa fullkomlega i morg ar og vio hOFum notao nystarlega tækni sem gerir liFi einfaldara meo aOgeroumsem ekki er vist aO séu til staor avenjulegum heimilistaekjum.Vinsamlegast lestu pER til i nokkrar minutur til aO geta nytt taei oem best.
How to install your AEG Induction Hob - Worktop installation

4. VÖRULYSING
4.1 Uppsetting eldunarhellu

1 Spaneldunarsvədi
2 Stjornbor
4.2 Ültit stjörnboros


Notaǒu skynjarareitina til aǒ beita heimilistækinu. Skjáir, visar og hljóð gefa til kynna hvaöa aÖgeröir eru i gangi.
How to install your AEG Induction Hob - Worktop installation

4. IZSTRÄDÄJUMA APRAKSTS
2.2 Nobp3yBaHe Ha ctpya

IPEDYIPEDYBAHbE!
Pn3nk od nojkap n cTpyeH yap.
Cnte eIektpnHn Bpckn Tpe6a da n m3Bpwn KbaJInΦNkyBaH eIektpnUap.
AnapaTOMpa da 6nde 3a3emjeH.
- Празда се ИЗБуВаAT КАВИ SFIIO pa6OTи, поверетe дALIN anapatOT e NCKIyUeH OД CTpyja.
- Поберете далп napаметрпе на плоча со сецифигаши се коматиблисо сеелктунata мokhoct ha Мөжatable на сеелктуна сөнрига.
- IorpnjkeTe ce anapatot Da e npabuHNO mOnTnpan. Na6ab N HecooDbTeH Ka6en 3a cTpyja NiN pRnkIyUOK (ako e npimEnHInBO) MOKe Da npeDn3Bnka nperepeBaHe Ha TepMNHaNoT.
KopncTeCooDbBeTe HneKtpuHc Ka6eJ.
He do3BonybajTe eJektpnHnot Ka6eJ da ce 3anJeTka.
IporpnkTe Ce da 6nde nHCTaInpapa3aHTnTa oEneKtpuHeh oK.
Kopunctete ctera3a 3aterhyBahe Ha ka6eJIoT.
- YBepete Ce deka Ka6eNoT 3a cTpyja NnnpNKnyOKOT (ako e npImeHnBO) He ro donnpaat TOnNIOt anapat Nn ToNlnte caOBN 3a RotBeHe Kora ro Nobp3yBaTe anapatOT co wTeKePI.
HekopncTeTe aadantepn co nobeKe npikluyoun n pdoJxHn ka6nn.
BHHMabajte da He ro oWTeNTe npNKJyOkOT 3a cTpyja (ako e npIMHeHnBO) uIN Ka6eNoT. KOHTAKTpajte CO hauNtO OBnacteh cepBvCeH zENTap uIN eNEKtpuap 3a da CMeHnte OwTeTeH ka6eI.
3aHTntata OJ eJIeKtpuH yIap Ha aKTINBHInTe N I3OJInpaHInTe DeIOBn MOpa Da ce IOBp3e Ha TAKOB HauHn ITO HeMa Da MOKe Da Ce I3BaAn 6e anaTKn.
- Поврзete ro пиклуокot 3a CTpyja coшт ekopot на Кра差别 OД мontхараз.поверете далп риклуокOT 3a CTpyja eппостанен NO монтраьeto.
ДOKOLKY wTekepoTe nab, He npKnyBajTe ro npKnyokOT 3a cTpyja.
He bneute ro kaebenot 3a da ro ncknyuhte anapatot od ctpya.Cekora w nobkeybajte ro npnknyokot 3a ctpya.
KopncTeTe cAmO COoDbETn UpeN 3a n30Jaunja: 3aUHTTNn IpeKNHyBaun Ha nnHjna,OCINrpyBaun (OCINrpyBaun Ha BpTeHe n3BaDeHN OJ dpXkaOT), 3a3emjyBaBe N KOHTAKTOPn.
- EneKtpnUHaTa INCTaJaNja Mopa Da nMa n3OlaucNcN ypeD KOJ wTO BN OBO3MOkyBa da rO NCKyUnTe anapaTOT oD npNKnyOKOT 3a Ctpya OD cNTe noIobN. N3oLaucckNt ypeD mopa Da nMa KOHTaKTeH OTBOP CO WIPrHa OD HajMaIky 3 MM.
2.3 ynoptpe6a

PPEyPENEYBAIbe!
Pn3nk oJ noBpeJa, n3ropeHnCi, n cTpyen ynap.
- OtctpaheTe ja ueJaTa am6aJaxa, etKetn 3aWtHTHnot fNIM (DOKOKy e npImeHnIBO) nped npBaTa yNotpe6a.
- Oboj anapa t e camo 3a DomaSHA ynoTpe6a (BHaTpe).
He meHyBaJTe ja cneuΦnKaunjata Ha oBoj anapat.
Ocunrgpajte ce deka OTBOpnte 3a BeHTnlaucija He ce 6nokupaHn.
He ro octabajte anapatot da pa6otn 6e3 Hau30p. - Noctabete ja pnuHnlaTa Ha ,NCKnyeHo" no cekoja ynoTpe6a.
He ctabajte npnbop 3a jaedehe nIIN kanaun Ha caobn 3a coc Ha pHHnTe. Tne moke da ctaHAT Jekn.
He pakybajte co anapaTOT co MOKpn paue INI KORA IMA KOHTAKT CO BOda.
He yonotpe6ybajTe ro anapaTOT kaKa pa6oTHa NOBpUNHa IIN NOBpUNHa 3a ckJaIupaHBe.
Ako noBpHnHaTa Ha anapaTc e nyKhata, BeHaaN NCKnyCte ro anapaTcOd HanojyBaHe. Obae 3a da ce cnpeu nEnekTpueH zoK.
Kopncnnte co nejcmejkep mopa da ce dpkaT ha pactojaHne od MNHMym 30 cm od INdYkTNBHNte pHHrN Kora anapatot pa60tn.
Kora ke cTabnte xpaHa BO BpeNo MacNo, Toa MoKe da ce pacnpche.

PPEyIPEyBAHbE!
Onachoct od noxap n 13ropeHn
- Пизаграваьe, масотипe и маслOTO можатда Испuyтайтazаливи пари. Джete ro паменOTилзаганITE npedmetи подалеку od machotип e MacLOTOKORA rotBnTe CO HNB.
IcnapyBaHbTa KOn rN nCnPyUHa MhOry JxewKOTO MaCNo MoKe Da npEdu3BnKaaT CNOHTaHO COROpyBaHe. - YnOtpe6eHOTo MaCNo, KOe MoKe Da coOpJNIOCTaTOU OD XpaHa, MOKe Da npEiIN3BnKa NOKap Ha NOnHcKa TemnepaTpya OTKOLKy MaCNoTO KOe Ce KOpIcTN 3a IpbNaT.
He ctabajte 3anaJINBn npOn3BOyn nI INpeDMeTn KOU CE MOKPN 3aeHNO CO 3anaJINBn npOn3BOyn BO anapaTOT, IIN BO HcROBA 6JIIm3Ha.

PPEyPENEYBAHe!
OnachocT OJ OWTeYBaHe Ha anapatOT.
He yubajte KeuKn caobn 3a rotbehe ha KOHTpOHHaTApnoa.
He ro CTabajTe kanakOT ha XeUka Taba Bp3 CTAkNeHaTa NOBpuHa Ha IIOuYata 3a rotBeHc.
He octabajte caobu 3a rotbehe da Bpjuat 6e3 BOda.
BHHMabajTe da He naHnat npedmetn nn caoBN Ha anapatot. NobpunHaTa moKe da ce owTeTN.
He nBknyyBaJte 30HnTe 3a rotBeHe ce co npa3HN caOBOu nn6e caOBOu.
He ctabajte anymunnymcka foJna ha anapatot.
Caobnte HnpaBEno JInHeNo Jele30, aJyMnHym nIc OOnTeTeHO dHO MoKe Ja npedn3BnKaAaT rpebaHnHa cTaKnoto / cTaklokepamKata. CekoraI noiRhyBaJte nObne npedmetn Harope Kora Tpe6a Da nI NOMeCTNe Ha NOBpunHaTa 3a rotBeHe.
- Oboj anapat e hamehet cmo 3a roTbeHe. He cMee da ce kOpncn 3a dpyn uei, Na npimep 3a rpeehe Ha npocstopija.
2.4 Hera n YnCTeBe
- PeioBHO uHCTeTo ra anapatOT 3a da cnpeuHTe OHTeYBaHe Ha NOBpHnHcKnOT MaTepnjAn.
Icknyete ro anapatot n octabeTe ro da ce onaDi nped qncTeHeto.
He KopncTeTe BoDen cnpej n npapea 3a YnCTeHBe Ha anapatOT.
-Чистете ro anapatot co Meka, Влжн Ka ра. Коростete само Heyтралидөгөгэн. He коростete abpa3иВи npoизвди, abpa3иВи cyнгөри 3a Chstөьe, pactbopуBaun iJin MeanHи ppeДмETи.
2.5 CepBnC
3a da ro nonpaBnte anapatot, KOHTAKTnpajTe CO OBnactehNt cepBnceH
3. MOHTAXKA

IPEyIPEyBAHbE!
BnuTe Bo norgnabjata 3a 3awTNTa n cnrgpnoct.
3.1 Празд монтжата
Ipei da ja MOHTnpate NOBpHnHaTa 3a rotBeHe, HAnuWeTe rN INHOpMaunTe noDOny od nNoUkata 3a cneuCnKaun. INoUkata co CneuCnKaun ce Haora Ha dnHOTo OD KyKmTeto Ha anapaTOT.
Cepnckn 6poj (S.N.)
centap.KopncTe caMo opnHaJIHn pe3epBHN DeNoBn.
Bo odHoc Ha CBeTnIte BO BHaTpeUHOCtHa OBOJ npOn3BOD n pe3epBnHTe CBeTnIKu wTO ce npOdaBaAT nOc6Ho: Obne CBeTnIKu ce npEdnEHN da n3dpxkat ekCTpemHn cIn3mKu ycJbON BO anapatNTe 3a DomaknHCTBO, KaKo STO ce TempepaTu, Bn6paun, BnaxHoct nnCe npEdnEHN 3a DaBaHbe cRHaHn 3a paobTHata coCtoj6a Ha anapatOT. Tne He ce npEdnEHN da ce KopncTat 3a DpyrHn HameHn H ne Ce nOrOHN 3a OCBeTnyBaHe IpocToPmN BO DoMOT.
2.6 OtcTpaHyBaHbE

PPEyPENEYBAIbe!
Pn3nk OJ NOBpeJa nnn 3aDySuBaHbe.
- KohtaktnpajTe co BaUnITE ontHcNn opraHn 3a da doBneTe nHΦopMaunn 3a Toa KaKo da ce ocNo6OuTe oJ anapatOT.
- NcknyeTe ro anapaTOT od npNKnyOKOT 3a cTpyja.
- I3BaTeTe ro eJekTpHnOt Ka6eI 6ncky do anapaToT n φpNeTe ro.
3.2 Brpaedn nloyn 3a rotBeHe
KopncTeTe r anapatnte 7To ce BrpaDyBaAT camo aKO Ce npetXoJHO BrpaJeHN BO COOBeTHN eJEMENTn 3a BrpaDyBaHe N BO pa60THN NOBpUHn KOn rN nCNoJIHyBaAT cTaNapdNTe.
3.3 Ka6eI 3a noBp3yBaHbE
Плочараза заютveье Има кавелзаповрзуваь.
3a da ro 3aMeHnte OoTeTeHIO TpNKJyHnK 3a cTpyja, KopNCTeTe TIN Ha Ka6eI: H05V2V2-F Koe n3dpxyBa
TeMnepeIpya od 90 ^ C nIIIOBnCOka. KOnTaKTIpaJte CO OBlaCTeH CepBVCeH ceHTap.Ka6eNoT 3a NOBp3yBaHbe cMee da 6nde 3aMeHeT cAmO oN KBaJIINΦnkyBaH eJeKTPuHap.
3.4 CklonyBaHe
AkoMOHTopateIIOUa3arotBeHeIOxay6a,BE MOJIMe Da rN BnDITe yNaTCTBaTa3aMOHTnpaHBeHa xay6bTa 3a MmHImaJIHaДICTAHCaMeIy anapatnte.

Ako anapaTOT e MOHTnpaH naΦnOKaTa, BEHTINlauJaTa ha NOBpUHHaTa 3a rOTBeHe MoXe Da Tn 3aTOPnI INpeDMETNE KOI CE cyBaat BOΦnOKaTa 3a Bpeme Ha IpouecOT Ha rOTBeHe.
Hajnde ro Bnideo ynaTcBOTO ,Kako da ja na HnCTaInpate BaWata nNdykUncKa pNoya 3a rotBeHe AEG-MOnHTnpaHe"TaKa wTo Ke ro BheCete ueIoto Ime HabedeHo Ha cNkata noDony.

YouTube
www.youtube.com/electrolux
www.youtube.com/aeg
| How to install your AEG Induction Hob - Worktop installation |
4.ОПИС HA ПОН3ВОДOT
4.1 PacnopeHa noBpHnHaTa 3a rotBeHe
1 INdykuncka NOBpHnHa 3a rotBeHe
2 KoHTpOHa nIooA
4.2ИЗгелд На КОТролна ТаБпа

Pakybaje co anapatot co nomou ha ceH3opcknte noJIbHa. EkpaHnTe, noka3aTeIte n 3ByuNTe nokajybaaT kon yHKun pa6oTaT.
| Сенисторическая рone | Комentар | |
| 1 | ① | За вklучваши и пооча на пioчата за rotвенье. |
| 2 | За вklучваши и пооча на зakлuyваши яйу урет за бeзб endocт на.Deца. | |
| 3 | За за се пokаме akтунatable рингла. | |
| 4 | Показно с Bretло CountUp Timer. | |
| 5 | Показно с Bretло Тajмер за odбpoюваши. | |
| 6 | - | Екраз на тajмер: 00 - 99 мін'tи. |
| 7 | За вklучваши и пооча Bridgeи за піреминваши мігу ржими. | |
| 8 | ① | За за odберete Тajмер Функуши. |
| 9 | +/- | 3a згелемувашие и наималувашие на врemeTo. |
| 10 | - | 3a вklучвашие и在其専лучвашие Hob? Hood. |
| 11 | || | 3a вklучвашие и在其専лучвашие Пайза. |
| 12 | P | 3a вklучвашие PowerBoost. |
| 13 | - | 3a поставвашие поставka за щачина на толпината: 0 - 9. |
| 14 | ♀ | 3a вklучвашие и在其専лучвашие Slide. |
5. CEKOДHEBHA YNOTPEBA

IPEyIPEyBAhE!
BnuTe Bo norgnabjata 3a 3awTNTa n cnrgpnoct.
5.1 AkTnBupaHbe n DeaakTnBupaHbe
DoppeTo ro ① 1cekyHda3aJa ja ncknyuHTe NOBpUHHata3a rotBeHe.
KoHTpOJIHATA IIIOUa Ce BkIyUyBa OTkaKO Ke ja BkIyUHTe NOBpUHAta 3a rotBeHe n ce NCKIyUyBa OTKaKO Ke ja NCKIyUHTe NOBpUHAta 3a rotBeHe.
5.2 ABTomatcko NcknyuBaHe
Функида abTomatckn ja ncknyyba NOBpshHaTa 3a rotBehe aKO:
He cTe cTaBnJIe caI 3a rotBeHbe Ha noBpUHaT a 3a rotBeHbe 3a BpeMe oI 50 CEkyHdN,
He cTe ja nOCTaBnIe nOCTaBkata 3a jaunHa 3a Bpeme oD 50 cekyHn OTKAKo Cte CTaBnIe caD 3a rotBeHe,
Ke nCTypnTe nIi Ke CTaBnTe HeWTo Ha KOHTpOHaTa Ta6Na NOBeKe od 10 ceKynDn (TeHcpe, TkaeHNHa). Kora Ke cLyuShHeTe 3Byeu CnHaN, Ce NCKnyUBa NOBpUHaTa 3a rotBeHe. OTrpaHete ro npEMeTOT nIi ja IcNCTeTe KOHTpOHaTa PIOHa.
ПлочаТа 3a rotBeHbe CTaHyBa ПпemHoryжшka (Ha np. KORA Вре праЗно龟pepe).Octabete ja ринглata DA ce
Olaani ppei NOBTOPO Da ja ja KOpuctte IIOyata 3a rotBeHe.
He ja ncknybATE pHHnata n He ja MeHyBaTe NOCTaBkata 3a jaYHa Ha TOnJIInHATA. IIO n3BeCHO BpeMe, IIOyata 3a rotBeHe ce nCKnyuBa.
Ondocot nomeIy noCTaByBaHbeTo Ha TOnJIuHaTa N BpeMeTo NO KOe Ce NCKJyuBa NIOUaTa 3a rotBeHe:
6.1 CaIOBn 3a roTBeHe

3a INyKTHBn pINrN, CINHO eJekTpomarHeTNO nOE ja CO3dAba TOnnHaTa BO caIOBNTe 3a rotBeHbE MHOry 6p30.
KopncTeTg INNyKTbHnTe pInrJIn CO COoDBETHn CaOBO 3a rotBeHe.
- ΠΗΟΤΟ ḀλΑΟΒΙTE 3a τοτΒΕΝΕ MΟρα Αα δινε ΚΚΥ οῦ ΜΟΥ Φόπε έπεδεΝΟ ΑνραμΗΟ.
OcngypeTe ce deKa dHOTo Ha TeHepeTo e YnCTO n cyBO nped Da ro CTaBIne Ha NOBpUnHaT a Ha IIOUaTa 3a rotBeHe.
3a da ce n36erHaT rpe6HaTHnH, He IIN3raJte ja INn He TpujTe ro TeHapeTe O Bp3 KepamNcKOTO CTAKNo.
MaTepnjAn Ha caOboNte 3a roTBeHe
noroJen: JneHo JeJe3o, YeJIHK, emajInpaH YeJIHK, YeJIHK 1TO He 'proCyBa, NOBeKeCIOJHO dHO (O3NaYeHO KaKO nOrODHO oN pOn3BODInTeJOT).
- HenorOeH: aIyMnHiym, 6aKap, 6poH3a, cTakNo, Kepamika, nopueHaH.
CaIOBNTe 3a roTBeHbe ce nOroHN 3a INHyKTnBHaTa PNOy a 3a roTBeHbe aKO:
BODaTbPnE MhOry 6p3o Ha pHnIpaNOCTaBeHa Ha HajBnCOKaTa NocTabKa 3a jaUnHa HToPnIHnHaTa.
- MaHHeT Ce IpiBJIeKyBa Ha IdHOT Ha CaIOT 3a IOTBeHBe.
ДиMuHnHaCaObIte3arotBeHe
- INHNYKTNBHNTe PNHJIN aBOMaTcN CE npNJarOdyBaat Ha dIMeH3nTE Ha dHOTO Ha cAOT 3a rOTBeHe.
- Eфикасоста на ринлataе e noВрзаHa coДиjamETapOT Ha caTOT 3a rotBeHee. CaTOT 3a rotBeHbe coДиjamETap KoJTo e NOMAN OM MHNMaHnO TdoBnBa cAmO DeI ON eHeprijata koJaWTo ja IcNpyTa pInHrIATA.
3apaan6e36eHocn npuHHn 3a nocTHnHyBaHe oNTmAMHN pe3yIaTn OJ rotBeHTo, He KopncTeCeAOBn 3a rotBeHbe IoroJIemN OJ HabeJeHOTo BO ,CneunPkaun Ha pIHJInTe".
N36erHyBaJTe Da rn DpKInTe CaOBNTe 3a rotBeHe BO 6n3nHa Na KOHTpOJHATA nloa BO TEKOT Ha rotBeHbeto.Toa MOKe da BnJae Ha fynHKUHOHpAbeTo Ha KOHTpOJHATA NIOUa Nn HeHamePHo da rN BkLyu FyHKUInTe Ha NOBpUHNHaTa 3a rotBeHe.
BvndTe Bo,Texnukn npdaTouN".
6.2 3Byu n BO TeKOT Ha pa6oTaTa
Ako cnyuwaTe:
3ByK Ha NykaHBe: caDOT 3a rotBe he e HaprabEH OJ pa3JIuHn MaTeprJaJI (ceHNDbN KOnCTpyKUJja).
3Byk Ha CBnPkHaBe: ja KopnCTnTe pInHrIaTa Ha rOleMa jaUnHa n caOnBnTe 3a rOtBeHe ce HappaBEno od pa3JIuHm MaTepnJaN (ceHNDbN KoHcTpyKUJja).
SyHeBe: KOpIcTInTe BnCOKo eHepReTCKO HnBO.
KIIkaHe: ce nojabyBa eIeKtpuHOn npedeppnyBaHe.
ПИштelve,брмчebe:ВERTINaTOpOT pa6oTu.
3ByuTe Ce HopMaHn H He Ce 3HaK 3a HenCnpabHOCT.
6.3 Öko Timer (Ekolouk Tajmep)
3a 3aCyByBaHé Ha eHeprJna, rpejauOT 3a pInHrlata ce ncknyuBa nped da ce orLnacn nporpamatopot 3a od6pojyBaHe. Pa3Nkata BO BPeMeTO Ha pa60Ta 3aBnCn OD HbOTO Ha NOCTaBeHaT TOJIINHa I DoJxHnHa T a rotBeHeto.
6.4 Пгимери 3a annilkaци 3a roTBeHbE
Ondocot MeIy noCTaBkataHa TemnepaTpaTa I NOTPOwYBaUkata Ha cTpyJa hA pINrJIATA He e IInHeapeH. Kora Ke ja 3rOJEMITE TempeAtypata, NOTPOwYBaUkata Ha cTpyJa hA pINrJIATA He ce 3rOJEMyBa npONOpZIOHaJIHO. Toa 3NaHn Deka pINrJIa NOCTaBeHa HcpeHa TemnepaTpA KOpICTN NOMaJIky Od NOLOBnHa OD MOKHOCTa.
I PtouTe Bo Ta6eNaTa ce cAmo HacOKn.
| Посставки за所提供гравке | УлOTробerte за за: | Врeme (min) | Совети |
| 1 | ЧьавITE ja зrostвенataхрана топпа. | какошто e Heontхорд o | Ставete калak на садот за rotва bene. |
| 1 - 2 | Hollandaise сок, толеге: пуters, чokаладо, келатин. | 5 - 25 | Промшувajte odвреме-hаврeme. |
| 1 - 2 | Зацчсунваъе: мени OMлети, пechени щajца. | 10 - 40 | Готveъе поочино с可靠ak. |
| 2 - 3 | Гotваъе ориги ќаденьа сб млеско,所提供грав颦 roTOВи щаденьа. | 25 - 50 | Дожа对接 Нajмалку Двалати nobEVe TEчност od КOLTININATA на opIMOT, Meшajte Ги ќаденьате смлеско на поLOВИнна на rotBEBJeTO. |
| 3 - 4 | Гotвete на паea зеленчuk, риба, месо. | 20 - 45 | Дожа对接 НжOLКУ гоLEМи лжици TEчност. |
| 4 - 5 | Гotвete komпири на паea. | 20 - 60 | УлOTробerte маск. ¼ I вoda за 750 g komпири. |
| 4 - 5 | Гotвete полеми колчинихрана, чорби и суни. | 60 - 150 | До 3 по trп ТЕЧНOST пUCS coSTojkn. |
| 6 - 7 | Лесно пожеве:шицla, телешко кордан简易, кOTлети, ризоли, кOLTбasi, цн дрб, задшka, щajца, палачинки, крфни. | какошто e Heontхорд o | Завтete на поLOВИнна врeme. |
| 7 - 8 | Иntehinizho поожеве, пожен ренинkomпир,шицл. | 5 - 15 | Завтete на поLOВИнна врeme. |
| 9 | Сbatе вoda, ratвete т检тени, сржete месо (rynaш, пechенье), пжete komпир во Фрітера. | ||
| P | Вареюrel'mу кolyочебва вoda. PowerBoost e Вкту老人家. |
6.5 Пpenopakni coBeten 3a Hob²Hood
Kora pakybate co nnoyata 3a rotbehe co yHKnjaTa:
3aunTeJe ja nOuata Ha acnnpaTopoD DnpeKTHa CBETnHa.
He ctabajte xaIoreha CBetnka Ha nnoyata Ha acnpaTopoT.
He ja nokpmbajte nloyata ha nloyata 3a roTbeHe.
He ro npeknHybajte cnHanot nomery nnoyata 3a rotBebe n pokloneot (Ha npimep co paka nIin co paqka od caad 3a rotBebe nIIN BnCOK IOne).Budete ja cInkata.
AcnnpaTopoT Ha cnkaTa e camo npmep.
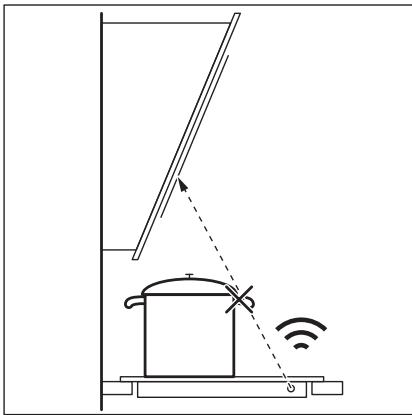

Дугnte Далачинско -уnpавваши anapatni може д罗блokираат сигнанOT. HeKористete takOB anapatьлпсkydo почараза за rotvebe kora eВкунчeha Hob²Hood.
AcnpaTopn co yHKunja Hob²Hood 3a da ja hajnde Te cetaTa Hn3a acnpaTopn kon pa6oTAT CO OBaa yHKunja, BnTe ja haata VHTepHET-CTpaHnca. AcnpaTopnte AEG kon pa6oTAT CO OBaa yHKunja Mopa da ro mMaat Cm60JOT
7. HEGA UN YNCTEHe

IPENyIPENyBAHbE! BnTe Bo norgabjata 3a 3awTNTa nCnrgpnoct.
7.1 OnuTN HOpMaun
- Ynctete ja noBpuHnHaTa 3a roTbeHe ne cekoja ynoTpe6a.
- Cekoraш уnotpe6ybajte caobn 3a rotbehe co yncTo dHO.
IpebaHnUte HNI TEMHNTe dAMKn Ha NOBpUnHaTHeMaat eOeKT Ha Toa KaKo 0yHKuOHnpa NOBpUnHATA 3a rotBeHe.
KopncTeTe cneujiAnHO cpeDCTBO 3a YnCTeHe HameHTo 3a NOBpUnHi 3a rotBeHe.
KopncTeTe cneuJaHa rpeBaIka 3a cTakIoTO.
7.2 YnCTeHbHa nNoyata 3a rotBeHe
Bedhaoh orctpaHete: cToneHa pIaCTnka, pIaCTnHa fOJInja,weKepe n XpHa co
IeKep, BO cnpOTnBHO, HeuNCTOTnJaT MoKe Da ja OwTeTn IIOyata 3a rotBeHe. BnMabajTe Da He ce Nsropnte. CTabete ro CneuJaHOTo CTpyraJIO 3a NcTeHe Ha IIOyata Na CtaKNeHaTa NOBpUnHa NoD octar an DmXkeTe ro CeYNBOTO no NobPunHa.
I3BaTeTnOTkako anapatot e BOBONHO 3Jaaden: npCTeHn OJ 6nroP, BOda, daMKN OJ MACOTNI, CBETKABN MeTaJIHn pOMeHn Ha 6oJata. YncTeTe ja nNooyata 3a roTBeHe co BnaXHa Kpna I Hea6pa3uVeH denTeprHr. NOpYcTeHeto, m36puiWeTe ja nNooyata 3a roTBeHe co MEka Kpna.
I3BaTe ja cBetKaBaTa metaHa 6oJa Koja ce ry6n: Kopntepe pactbOp OJ BOda n OcET n YnCTe ja cTakneHaTa NOBpUnHa CO BlaXHa Kpna.
8. PEUABAHB E IPOBJEMN

IPENyIPENyBAHbE! BnTe Bo norgabjata 3a 3awTNTa n cnrgpnoct.
9. TEXHnUcKINoDATOuN
How to install your AEG Induction Hob - Worktop installation

4. PRODUKTBESKRIVELSE
How to install your AEG Induction Hob - Worktop installation

4. OPIS URZADZENIA
PnuctynMpexHOM yTnKaCy hakoH nHCTanaJJe.
Ako je 3nHa yTuHnHa Za naababa, HEmoJTe da npNKbuyjte MpeXHN yTuKaU.
He ByuNTe Ka6I 3a HanajaJIbe KaKo 6nCTe NCKJbUyHIn ypehaj. Ka6I NCKJbUyHTe TaKO 7TO hETe H3ByHn YtNkau n3 yTtNHNJIe.
Kopncntte camo ncpabHe paCTabHe npeknlaue: 3aHTnThe npekndaue, ocirpyaue (ocirpyaue ca haBojem tpeba ckHyTu ca Hocau), ayTomatCke 3aHTnThe npekndaue n KOHTakTope.
- Y eNeKtpnUHoj INcTaIaIuJn Mopa nocTojATn pAcTaBn IpeKuJaU KoJi Bam OMOryhaba Da IckbYuIne CBe pa3e HanajaHa ypehaja. Pa3MaK n3MeHy KOHTaKaTa Ha pactaBHom IpeKuJaU Mopa Da n3Hocn HajMaHe 3 mm.
2.3 ynoptpe6a

YN03OPEHbE!
Ioctoj np3nk od nobpepe, oneKOTnHa n ctpyjHOr ydapa.
- YKJIOHNTe CBO naKOBaHbe, HAJIeHNHcE n 3aUHTHy FOJIny (aKO je IMa) npe npBor KOpuShHeBa.
Obaj ypehaj je hamehebe camo 3a kyhny ynoTpe6y (y 3aTbopeHOM npocTopy). - Hemojte da MeBaTe cneuФkaUjy OboI ypehaja.
Bodnte paunha da oTbOpn 3a BeHTnlaunjy He 6ydy 3anyuWeHn.
He octabjte ypehaj 6e3 ha30pa TOKOM pana.
IOnecnTe 30Hy 3a KyBaHbHe Ha "NCKJbUyeHO" NaKOH cBAke yNoTpe6e.
Hemojte ctabbata npnbop 3a jeno nnn poknonje uepnn Ha 30he 3a kybahe. Ohmory noctatn BpeJi. -
Hemojte pykOBaTu ypehajem kaJa cy Bam MOKpe pyke nn KaJa je OH y KOHTaKTy ca BOJOM.
Hemojte Kopunctu ypehaj kao paHy noBpunHy nn npocstop 3a oDnarahe.
Ako je noBpHnHa ypehaja hanykna, Odmax ra nckbuynte n3 3nHe yTuHnCe. To cnpueyaba ctpyjH yap.
Kopinchius ca nejcmejkepm Mopajy da odpkabajy pactojahe od hajmahe 30 cm od INdykuohnx 30ha 3a Kybahe Kaada ypehaj paani. -
Kaça CTaBnTe xpaHy y Bpyh e yIbe, MoKe Da npcHe.

YNO3OPEHbE!
Pn3nk oD noXkapa n ekcnIIO3nje
Mactn uybe ka da ce 3arpejy mory da ocnofoe 3anaIbna IcnapeHa. IprKeTe PnAmehoBe nIIN 3arpejahe npedMeTe daJe OD MaCTn uyba Ka Da KyBaTe ca HbMa.
IcnapeBa koja ocnobahajy Beoma Bpena yba Mory da n3a3OBy cnoHTaHO caropeBaHe.
- YnOTope6bIbeHO yIbe, koJe MoKe da caApxN ocTaTke XpaHe, MoKe Da ce 3aPaJIn Ha HnKoJ TempePaTyPi Hero yIbe KoJe CE KOpIcTn IIO npBn pYt.
3anaJbNbE MaTePnje nn nIpeMMeTe HaTOnJIbeHe 3anaJbNBM MaTePnjaMaHemOjTe CTaBbAtuYHyTap I NopeD ypehaja nn Ha hera.

YNO3OPEHbE!
Ioctojnp3nKoD oWtehehaypehaja.
Hemojte cTabbata Bpyhe nocyhe ha komaHnHy Ta6ny.
He ctabbajte Bpeo noknona TnraBaHa cTaKneHy nobpunHy nloe 3a KyBaHbe.
He do3BOJNTe Da TeuHocT y nocyhy 3a KyBaHbe NotnyHO nCnapn.
- PanaTe Da npedMeTn nn nocyhe 3a kyBaIbe He naHy Ha ypehaj. Moxe ce OwTeTtN NOBpUnHa nloye.
HemojTe yKbUyBnBaTn 3OHe 3a KyBaHBe yKoNko je nocyhe npa3Ho nIi ra Hema.
He cTAbJbajTe aIyMnHjymcky foJIny haypehaj.
Iocyhe 3a KyBaHbe HnPaBbEHO od IINBEHor rBoxhJa, IINBEHor aIyMnHjyma nn Ca OwTeHeHm DoHm NOBpHnHaMa MOnKe Da HnPaBn Orpe6OtnHe Na CtakN/ cTakNokepaMnU. YBeK NODInHnTe OBe npEdMeTe KaDa Tpe6a Da nX NOMepaTe No NOBpShn3a KyBaHbe.
Obaj ypehaj je Hamehen camo 3a Kybahe. He cme ce kopncnttu y dpyre cbpxe, Hnp. 3a 3arpeBaHe npocctopnje.
2.4 Hera n ynihebe
PezoHNo uNtne ypehaj da 6ncte cnpeuHn nponaDahe noBpHnHcKor maTepnjana.
- Пе чишениа уckьуне урегaj и octabinte raда ce oxlaeni.
- Hemojte Kopncttu Mla3 Boe nn npy 3a uuhebe ypehaja.
- Ypehaj chntte BnaXHOM MeKOM KpNOM. KopnCTte NckbYunBO HeytpaIHe deTepseHte. HemojTe KopnCTtU a6pa3NBhe npOn3BOe, abpa3NBhe jacTyHne 3a quShHe, pactBapaue nIIM MetaJIHe npEdMeTe.
2.5 CepBncupahe
- Paeni onpavke ypehaja obpaTnte ce OBlaaunehom cepBnCHOM ueHTpy. KopniCTnte camo opuRnHaJIHe pe3epBHe DeJIOBe.
Kaanda ce paani o cnjaniuama yHytap npoun3BODa n pe3epBnHex DeNoBa, cnjaniue koje ce npoajy 3ace6Ho: OBe
CnjaJIncIe cy HAmHe He Da n3dPrKe ekCTpeMHe fUzHcKe yCLOBe y KyHnIM anapATIma, KaO uTO cy TempePAtya, Bn6paunje, Bnara, nnn cy HameHe Da CnHAnN3npajy nHΦopMaJne o padHom cTaBy ypehaja. HnCy npEdbHene 3a ynoTpebY dpyrUm ypehajmua NHCy noOrOHe 3a OCBetlbabaHbe npocToPiJa y domaHnHCTBy.
2.6 Ondarabe

YNO3OPEHbE!
Pn3nk od nobpepe nnr yueba.
- 06paTnTe ce ontHnckm opraHnma da 6ncTe ca3HaJI KAKO da OJIOxNte ypehaj y OTnad.
- Nckbuynte ytukay ka6na 3a Hanajaheypehaja n3 mpexhe ytunHnue.
- InceuTe MpexHn eJeKtpuHn Ka6n Ha MeCTy Koje je 6Iu3y ypehaja n OndIOXHTe ra.
3.ИHCTAJINPAHBe

YI03OPEHbE!
Iorneajte norgaBba o 6e36bNoCTn.
3.1 Ппсинсталларьа
Ipe Hero Ito INHCTaIInape TeIIOuy 3a KyBaHbe, 3aIIuINte POJaTke KOJn Ce Hana3e Ha IIIOUInc Ca TEXHNyKIM KapaKTepNCTIKama. IIOUInca TaTexHNyKIM KapaKTepNCTIKama HaJaaN Ce Ha DoBoj CTpaHn IIOUe 3a KyBaHbe.
CepnjcN 6poj
3.2 YrpaDHe nIIOue 3a KyBaHbe
UrpaIne pIooe 3a KyaBaHe Ido3BOJbeHo je kOpncTnTc camo nocne yrpaIbHe y oIroBapajyhe KyxHbCKe eIemEnTe 3a yrpaIbHy npadHe nobpShne Koje cy y cKlaNy ca cTaHapdIma.
3.3 Ka6π 3a HanajaHe
Плоча 3a Куваье се Hanajaструюптем кабla 3a Hanajaыe.
3a 3amehy oWteheHor Ka6na 3a Hanajahe KopnCTnte Tn Ka6na: H05V2V2-F Kojn n3dpkaba TemnepaTpy od 90^ nnn Bnny. KoNTaKtnpajTe OBnauHeHn cepBnCHn ceHTap. Ka6n 3a Hanajahe Cme da 3amEHn NCKbYuNBO KbALINΦNKOBAHn eJNEKTpUAP.
3.4 MoNTnpaHe
Ako nHCTaJInpaTe nIIOUy 3a KyBaHBe nCNoJd acnnapota, nOrIeJaTye yNyTcTa 3a INCTaJIauNiJy acnnpatopa koja ce OndOce Ha MNIMMaJIne ydaJIbeHOctn nImHeHyypeJaja.
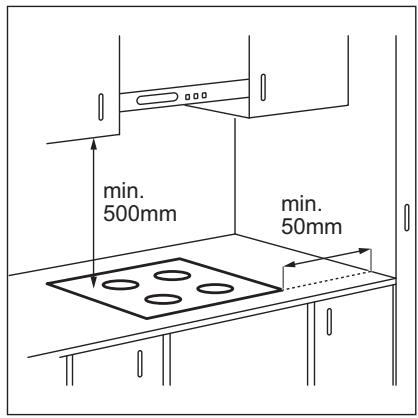
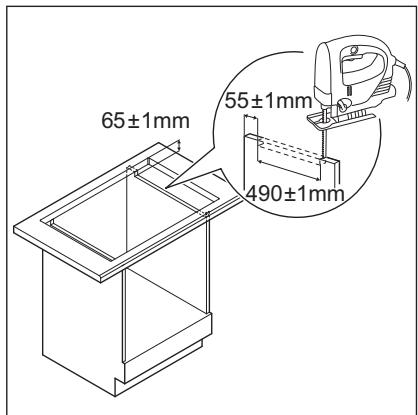
Ako ce ypehaj nHctaInpa n3naIΦnOKe, BENTINaJJa nIOue 3a KyBaHe MoXe
3aqrpejTu npEzmTe ycklaanlTeHe yΦnozu TOKOM npoceca KyBaHa.
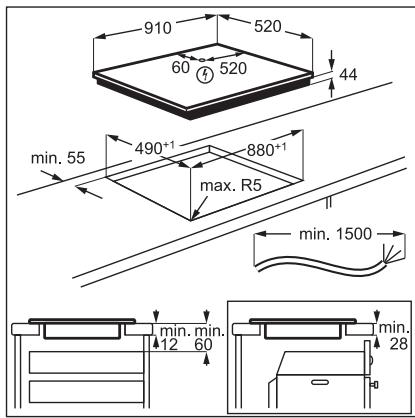
Iorleajte Bndeo ynytCTBO,Kako ce nHctanpa AEG uNdykunoha nloya 3a kyBaHe -yrgaDbHa paDHy NOBpuHNy" yHOsehEm npHOr Ha3nBa Ha3NaueHOr Ha cInuNCnoi.

YouTube
www.youtube.com/electrolux
www.youtube.com/aeg
How to install your AEG Induction Hob - Worktop installation

4.ОПИС ПОН3ВОДА
4.1 Wema noBpunHe 3a KyBaHbE

1 VnHykCIOHa noBpUHnHa 3a KyBaHe
2 KomaHnHa Ta6na
4.2Пергелд komаннда Табл e


YnOTope6bTe cEn3OpcKa noBa da 6nCTe pykoBaN ypehajem. DInCnPejN, INHnKaTOpN n 3ByHn CnHaHn ynyhjy ha To koje cy fynKcnJe aKtNBHe.
5.15 YnpaBbahe notpoohbom
Ako je akTnBHO HeKoJInKO 3OHa, a yKynHa
chara npehje orpaHneHe noTpOuHBe, Oba
fynKuJa he pacNoJeNTn paCnoIooXnBy
eJeKTPnuHy eHeprNjy Ha CBe 3OHe 3a
kyBaHe. IIOUa 3a kyBaHe perylniSe
noDeWabaHa toPiote kako 6n 3aWtNTnla
ocnrypae y kyHoJ nHCTaNaJn.
3OHe 3a KyBaHcE cy rpyuNcaHe npema Iokaunn 6pojy pa3a y nloyn 3a kyBaHe. Cbaka pa3a nMa MaKcMaIHo eNeKtpnUHO ONTepeHebe oD 3680 W.Ako pNoHa 3a KyBaHe DoCTnHRe MaKcMaIHy pacnoJoxnBy cHary 3a jeDnY pa3y, Chara 3Ona 3a kyBaBe he ce ayTomatckn CmAbNTt.
3a 30he 3a KyaBaHe KoJn mAjy cMaHbEnHy Chary, KomaHdHa Ta6la npiKa3yje MaKcMaJIHa Moryh a NoDeIaBAHa TOnJIOTE.
- YKOLINKO HJNE DoCTyNAH Behn CTenEH TOnJIIOTe, npBO rA CmaHbNTe 3a OCTaNe 3OHe 3a KyBaHBe.
- AKTINBaUNjaФyHKUJIe 3aBUCN OJ 6poJa IN BELINuHHe NocUda 3a KUbaHe.
Iorneajte Ha cniuu Moryhe KombuaJe pacnoJe eektpnue he eepnje mehy 30HaMa 3a KyBaHe.
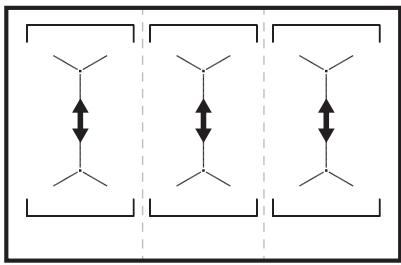
6. KOPINCHN CABETN

YI03OPEHbE!
Iorneajte norgaBba o 6e36eHoctn.
6.1 Nocyhe

JaKeTpMaHHeTHo NoBe y INyKUHOHM 3OHaMa 3a KyBaHbE BpI0 6p30 CTbapa TOIIOTy y nocHy 3a KyBaHbE.
Kopuncte INdykunoe 30he 3a Kybahe y kombina jn ca odrobapajyHm nocyHem 3a Kybahe.
-Дно nocуна 3a Кваи мора да будеобелю nшт jo мoryне paBNije.
Ocngypajte da cydohe noBpshnHe nocya qncTe n cybe ppe hero uTo nx CTabNTe Ha noBpshnHy nloye.
Дабисте спецнин Habstahak orpe60tHa, He npeBnaHTe n He TpIbajTe Shepy npeKo KepaMvKOr ctaKna.
MATEPNJAN 3a KyBaHbE
IcnpabH0:JIbBEHO rBOxHe,YeJIK, emajnpaHn YeJIK, HephajyHn YeJIK, nocyHe ca BwUeCNojHM dHOM (ca IcnpabHOM O3HaKOM IpOn3BoJaua).
HeNcnpaBHO: aIyMmHnjiym, 6akap, MeCNHr, cTaKJIO, KepaMnka, NOpceJaan.
Nocyhe je noroJHO 3a INdyKUHOHy nlouy 3a KyBaHbe aKO:
B0da 6p30 npokbyya Ha 3OHN 3a KyBaHKeja je IOpdeWeHa Ha HajBnHn HnBO TOnJlote.
-Дно посуна пивлачи Магнет.
ДиMuH3nje nocyha 3a KyBaHbe
- INdnyKUHOHe 30He 3a KyBaHc ce ayTomatcKn npnilarOHaBajy dImeH3nJn DHa NocyHa 3a KyBaHc.
- Eфикасоct 3онe 3a KyBa№ je BeЗаHa 3a пеуньпocу hya 3a KyBa№. Пocу hye 3a KyBa№.Yиjne jipeunHK MaHy oD MInHmAlnHOr ПрIMа сamo Deo eHeprNiJe KoJy reHepnIe 3OHa 3a KyBa№.
PaDi 6e36eHocTn IN ONTImaJIHnIX pe3yIITATA KyaBaHa He KOpNCTInTe nocyhe 3a KyBaBaBe Koje je BeHe OD nocyHa habeDeHOr y CneuФkaUJama 3OHa 3a kyBaHe". N36erabajte Da nocyHe 3a KyBaBe dpxKInTe 6bI3y KomAnDHe TabJe TOkOM KyBaHa. OBO MoKe Da yTuHe Ha fynKcIOHAnHOCT KOMaHdHe TabJe nnJa da CnyaJHo aKtINBnpa fynKcIJe pNoOe 3a KyBaHa.

IorpeaTe OeJbak ,Texnukn noaun".
6.2 Byka TOKOM paJa ypehaja
Ako moxete da uyjete:
6ky haink nykeTaHy: nocyhe 3a KyBaHbe je hnpabBbeHO od pa3nHTnx MaTepnjana (ceHdbu cNCTem KOHcTpyKuJe).
3ByK HaJIHK 3BnJdUky: KOpIcTInTe 3OHy 3a KyBaHbe Ca BnCOKIM HnBOOM CHare a NocyJhe 3a KyBaHbe je HnPaBJIeHO OD pa3JIuHTnx MaTePnJaJa (CeHDbNcCTEm n3paJe).
6pyjaHe: KOpNCHTe BnCOK HnBO Chare.
-шкьоцань:юлзи до eilektpnHOr npeknidaHa.
-Шиштawe, 3yjahe: paani BeHTnlaTOP.
OBN3ByuCy HopMaHn HHe yka3yjHa 6nloKaKab KBap.
6.3 Öko Timer (Eko Tajmep)
2. BEZPEČNOSTNÉ POKNY
2.1 Montáz

VAROVANIE!
Tento spotrebič moze nainštalovat' len kvalifikovaná osoba.

VAROVANIE!
How to install your AEG Induction Hob - Worktop installation

4. POPIS VYROBKA
How to install your AEG Induction Hob - Worktop installation

4. OPIS IZDELKA
How to install your AEG Induction Hob - Worktop installation