
IKE95471FB - IKE95474FB - Hob AEG - Free user manual and instructions
Find the device manual for free IKE95471FB - IKE95474FB AEG in PDF.



| Brand | AEG |
| Model | IKE95471FB / IKE95474FB |
| Product type | Built-in induction hob |
| Number of cooking zones | 6 induction cooking zones |
| Dimensions of each zone (L x W) | 37.9 cm x 22.0 cm |
| Power supply | 400V3N, 50-60 Hz |
| Maximum total power | 11.0 kW |
| PowerBoost function | Yes, up to 3200 W per zone |
| Bridge function | Yes, to link two zones |
| Pause function | Yes, reduces power to 1 |
| Child safety | Yes, key lock |
| Timer | Yes, countdown timer and CountUp |
| Hob²Hood | Yes, automatic connection with compatible hood |
| PowerSlide | Yes, power adjustment by moving the cookware |
| Automatic safety shut-off | Yes |
| Cleaning | Ceramic glass surface, use a special scraper |
| Compatible cookware materials | Cast iron, steel, enameled steel, stainless steel, multilayer base |
| Energy consumption (EC electric hob) | 186.8 Wh/kg |
| Spare parts | Use only original parts |
| Country of manufacture | Germany |
Frequently Asked Questions - IKE95471FB - IKE95474FB AEG
User questions about IKE95471FB - IKE95474FB AEG
0 question about this device. Answer the ones you know or ask your own.
Ask a new question about this device
Download the instructions for your Hob in PDF format for free! Find your manual IKE95471FB - IKE95474FB - AEG and take your electronic device back in hand. On this page are published all the documents necessary for the use of your device. IKE95471FB - IKE95474FB by AEG.
USER MANUAL IKE95471FB - IKE95474FB AEG
| Buildings | 20-30 years |
| Leasehold improvements | 5-10 years |
| Fixtures and equipment | 3-5 years |

4. PRODUCT DESCRIPTION
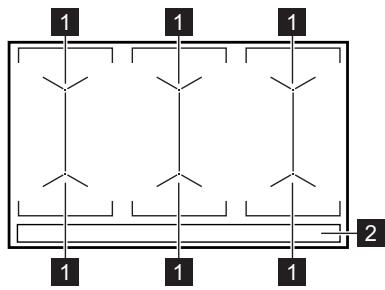
4.1 Cooking surface layout
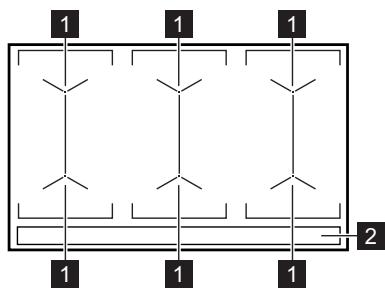
1 Induction cooking surface 2 Control panel
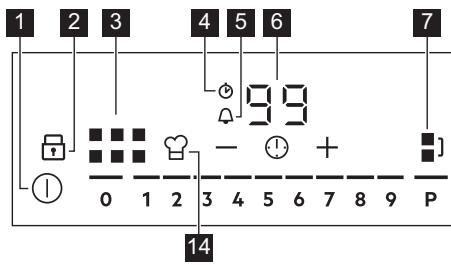
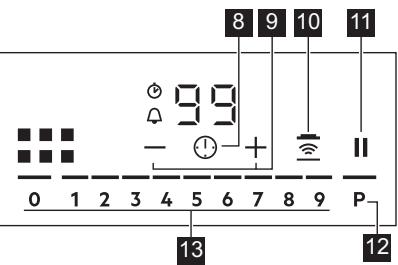
4.2 Control panel view
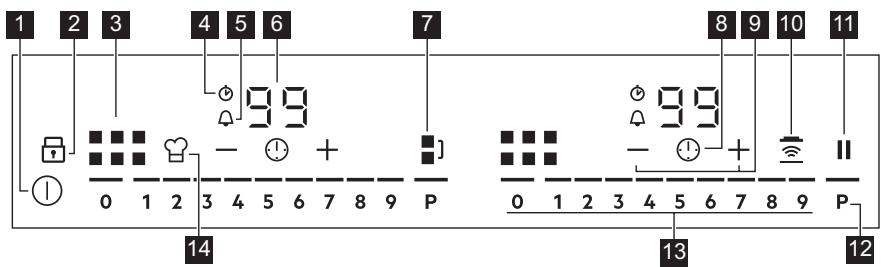
Use the sensor fields to operate the appliance. The displays, indicators, and acoustic signals show which functions are in use.
Always use original spare parts.
Contact our authorized service center. To have the following information at hand: Model, PNC, serial number.
The information can be found on the rating plate.
Safety information / Warnings - Safety information ① General information Safety instructions Environmental information
We reserve the right to make changes.
CONTENTS
- SAFETY INFORMATION 22
- SAFETY INSTRUCTIONS 25 3. INSTALLATION 27 4. PRODUCT DESCRIPTION 29
- DAILY USE 30
- CONTENTS 36 7. TROUBLESHOOTING 39
- REPAIR OF FAULTS 39
- TECHNICAL DATA 41
- ENERGY EFFICIENCY 42 11. ENVIRONMENTAL PROTECTION 43
1. SAFETY INFORMATION
Before installing and using the device, please read the instructions carefully. The manufacturer
is not responsible for damage or injury resulting from incorrect installation or use. Keep these instructions in a safe and accessible place for future reference.
1.1 Safety for Children and Persons with Reduced Abilities
This device may be used by children aged 8 and above, as well as by persons with reduced physical, sensory, or mental capabilities, or lack of experience and knowledge, provided they are supervised or have been instructed on the safe use of the device and understand the potential risks. Children under 8 years of age and persons with severe and complex disabilities should be kept away from the device unless constantly supervised. Children must be supervised to ensure they do not play with the device. Keep all packaging away from children and dispose of it according to local regulations. WARNING: Keep children and pets away from the device when it is in operation or cooling down. Accessible parts become hot during use. If the device has a child safety device, it must be activated. Children must not perform cleaning or maintenance of the device without supervision.
1.2 General Safety
- WARNING: The device and its accessible parts become hot during use. Care should be taken to avoid touching heating elements.
- WARNING: Cooking with animal or vegetable fat without supervision can be dangerous and may cause a fire.
- NEVER attempt to extinguish a fire with water, but disconnect the device and then cover the flame with a lid or a fireproof blanket.
- WARNING: The appliance must not be connected to the mains via a timer or a separate remote control system that switches it on and off constantly. ATTENTION: The cooking process must be supervised. A short cooking process must be supervised constantly.
- WARNING: Fire hazard: Do not place objects on the cooking surfaces. Metal objects such as knives, forks, spoons, and lids should not be placed on the surface. They can get hot. Do not use the appliance before installing it in the built-in structure.
- Do not use the appliance with a programmer. After use, switch off the appliance using the control knob and do not rely on the pan detection function. If the ceramic/glass surface is cracked, switch off the appliance and disconnect it from the mains. If the appliance is directly connected to the mains via a junction box, remove the fuse to disconnect the appliance from the mains. In any case, contact an authorized service center. If the supply cord is damaged, it must be replaced by the manufacturer, an authorized service center, or a similarly qualified person to avoid a hazard.
- WARNING: Use only cookware designed by the manufacturer or
recommended by them in the instructions for use, or cookware marked as suitable for induction hobs. Using unsuitable cookware may lead to danger.
2. SAFETY INSTRUCTIONS
2.1 Installation

ATTENTION!
Only a qualified person may install the appliance.

ATTENTION!
Risk of injury or damage to the appliance.
Remove all packaging. Do not install or use a damaged appliance. Follow the installation instructions supplied with the appliance. You must maintain the minimum distance from other appliances and units. Be careful when moving the appliance, as it is heavy. Use protective gloves and closed shoes. - Clean the surfaces that will be in contact with the appliance to prevent the absorption of moisture. - Clean the bottom of the appliance from dust and moisture. Do not install the appliance near a door or under a window. This will prevent hot cookware from falling off the appliance when the door or window is opened. - Always ensure adequate ventilation. If the appliance is installed under a worktop: Do not store flammable materials or items that can be sucked in and damage the ventilation or the cooling system.
- Keep a distance of at least 2 cm between the bottom of the appliance and stored items in the drawer.
- Remove any dividers or panels installed in the cabinet under the appliance.
2.2 Electrical connection

WARNING!
Risk of fire or electric shock.
All electrical connections must be carried out by a qualified electrician. - The appliance must be earthed. - Before performing any action, ensure that the appliance is disconnected from the power supply. - Make sure that the parameters on the rating plate are compatible with the electrical data of the mains supply. - Ensure that the appliance is installed correctly. Faulty or incorrect electrical connection cables or plugs (if present) can cause overheating. - Use a suitable connection cable. Do not allow the connection cable to be pinched. - Ensure that protection against electric shock is installed. Secure the cable with the supplied clamp against pulling. - Ensure that the cable for electrical connection or the plug (if present) does not touch hot parts or the burner components when you switch on the device at the socket. Do not use multi-socket adapters or adapters with multiple inputs.
Do not damage the connection plug (if present) or the connection cable. Contact our authorized service center or an electrician to replace a damaged connection cable. The protection against electric shock of the heating and cooking parts must be secured in such a way that it cannot be removed without tools. Connect the connection cable to the socket only at the end of the installation. Ensure that the connection plug is accessible after installation. If the socket is loose, do not connect the connection plug. Do not pull the connection cable to disconnect the device. Always pull the plug. - Use only proper disconnection devices: circuit breakers on the mains, fuses (screw-type fuses must be removed from the holder), residual current devices and contactors for earthing leakage. - The electrical installation must have a disconnection device that allows you to disconnect the device from the mains with a contact opening of at least 3 mm.
2.3 Use

WARNING!
Risk of burns, fire, and electric shock.
- Remove all packaging, protective film (if necessary) before first use. This appliance is intended for domestic (indoor) use. Do not change the intended use of the appliance.
- Ensure that the ventilation openings are not blocked. Do not leave the appliance unattended during operation.
- Switch off the heating zone after each use.
Do not place the appliance near or above hot zones. It may catch fire. Do not work with the appliance with wet hands or when it has contact with water. Do not use the appliance as a work surface or as a storage surface. If the surface of the appliance is cracked, immediately unplug the appliance. This is done to prevent electric shock. The user must maintain a distance of at least 30 cm from the induction heating zones when the appliance is operating. When placing food in hot oil, it may splatter.

WARNING!
Risk of fire or explosion
Hot oils and fats may cause ignition of flammable vapors. Do not place flammable or overheated items near the oil or fat when cooking with such. - Vapors released from highly heated oil may cause sudden ignition. - Used oil that may contain food residues can cause fire at a lower temperature compared to oil used for the first time. Do not place flammable products or items soaked with flammable products near or on the appliance.

WARNING!
Risk of damage to the appliance.
Do not place hot cookware on the control panel. Do not place hot lids or pans on the glass surface of the hob. Do not leave the cookware handles protruding. Be careful not to drop objects or cookware handles onto the appliance. The surface may be damaged.
Do not switch on the heating zones when there are empty cookware or such items on them. Do not place aluminum foil on the appliance. Cookware handles, if turned incorrectly, aluminum foil, and similar with damaged bottoms may scratch the glass/ceramic. Carefully lift items when you need to move them on the cooking surface. This appliance is intended only for cooking. It must not be used for other purposes, such as heating the room.
2.4 Cleaning and maintenance
Clean the appliance regularly to prevent damage to the surface material. - Unplug the appliance and let it cool down before cleaning. Do not use a steam cleaner or high-pressure cleaner to clean the appliance. - Clean the appliance with a damp, soft cloth. - Use neutral cleaning agents. Do not use abrasive cleaners, scouring pads, solvents, or metal objects.
2.5 Servicing
For repairs of the appliance, contact an authorized service center.
3. INSTALLATION

WARNING!
See chapter "Safety".
3.1 Before installation
Before installing the appliance, please read the information from the data table. The data table with the basic information is located on the back of the appliance.
Serial number
Use only original spare parts. - Regarding the lamp(s) inside this product and the spare lamps sold separately: These lamps are intended to withstand extreme physical conditions in household appliances, such as temperature, vibration, humidity, or are intended to signal information about the working state of the appliance. They are not intended for use in other applications and are not suitable for lighting rooms in households.
2.6 Switching on

WARNING!
Risk of injury or burns.
Follow the safety instructions to switch on the appliance. - Plug the appliance into an electrical outlet. - Connect the power cord to the appliance and then switch it on.
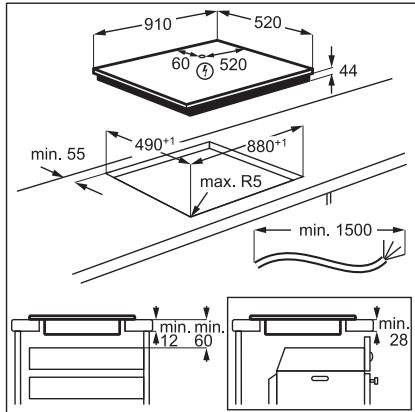
3.2 Built-in installation
Built-in installation must be carried out only by qualified personnel, as the built-in units must comply with the standard requirements.
3.3 Connecting the cable
The connection cable must be connected by a qualified electrician. To replace a damaged power cable, use cable type: H05V2V2-F which can withstand temperatures of 90°C or higher.
Contact an authorized service center. The connection cable may only be replaced by a qualified electrician.
3.4 Installation
If you install the appliance under or above an absorber, keep the minimum distance between the appliances as specified in the installation instructions of the absorber.
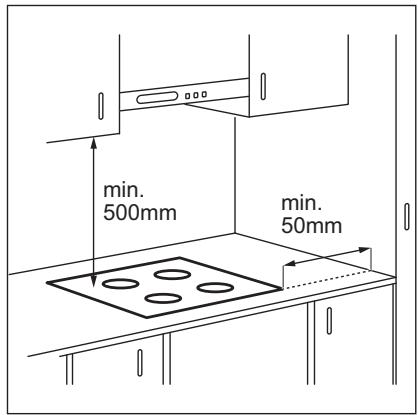
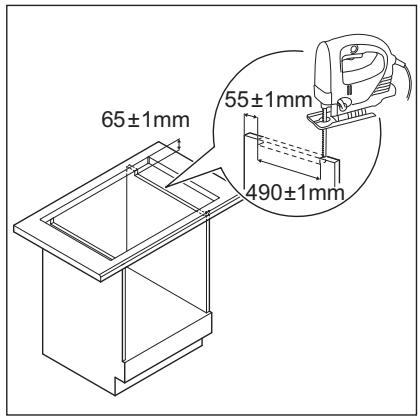
If the hob is installed above a drawer, the ventilation of the drawer may overheat the elements stored in the drawer during the cooking process.
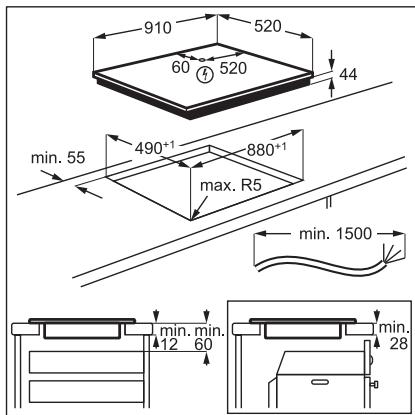
Watch the video tutorial on how to install your AEG induction hob - "Installation of the hob" by typing the full name shown on the graphic below.

YouTube
www.youtube.com/electrolux
www.youtube.com/aeg

4. DESCRIPTION OF THE APPLIANCE
4.1 Layout of the cooking surface
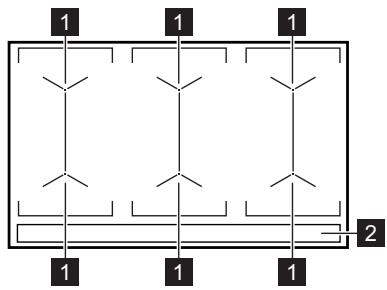
1 Induction cooking surface 2 Control panel
4.2 Layout of the control panel
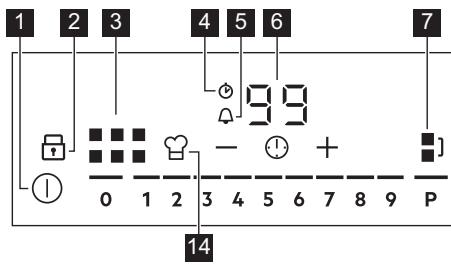
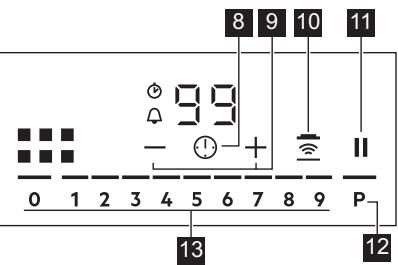
Use the sensor fields to operate the appliance. The displays, indicators and acoustic signals show which functions are active.
| Сенихорно по- лес | Белекka | |
| 1 | ① | 3a akтувираце и Deakтувираце на плота. |
| 2 | 3a akтувираце и Deakтувираце на 3akлючаве ялл 3aшита за.Deца. | |
| 3 | 3a пokaразе на akтувнаты зона. | |
| 4 | Инданкатор CountUp Timer. | |
| 5 | Инданкатор Таймер за озбраве. | |
| 6 | - | Еран на таймера: 00 - 99 минутп. |
| 7 | 3a akтувираце и Deakтувираце на Bridgeи за певкульчаве можду ржимITE. | |
| 8 | 3a Избираце на Функципente Таймер. | |
| Сенисторно- лес | Белека | |
| 9 | +/- | 3a уVESоча велини hamалява врemeуо. |
| 10 | - | 3a akтувиране и.Deakтувиране на Hobу Hood. |
| 11 | || | 3a akтувиране и.Deakтувиране на Пayза. |
| 12 | P | 3a akтувиране на PowerBoost. |
| 13 | - | 3a заимане на толлинна настroduka: 0 - 9. |
| 14 | ♀ | 3a akтувиране и.Deakтувиране на PowerSlide. |
5. DAILY USE

WARNING!
See chapter "Safety".
5.1 Activating and deactivating
Touch ① for 1 second to activate or deactivate the hob. The control panel lights up when you activate the hob and goes out when you deactivate it.
5.2 Automatic operation
The function panel operates automatically when:
If you do not place the dishes for washing within 50 seconds, do not set the heating level for 50 seconds after placing the dishes, separate the liquids or leave any objects (dishes, lids) on the control panel for more than 10 seconds. When an active signal is detected, the panel is activated. Remove the dishes from the panel or press the control panel. The panel becomes very hot (e.g., when the tank is emptied or filled). Leave the washing zone to cool down before using the panel again. Do not activate the washing zone or change the heating level.
After a certain time, the panel is deactivated.
The relationship between the heating level and the time, after the panel is activated:
| Стени на.harрая- нe | Плоча се Deaktni- Вира сед |
| 1 - 2 | 6 ча |
| 3 - 4 | 5 ча |
| 5 | 4 ча |
| 6 - 9 | 1,5 ча |
5.3 Using the washing zone

WARNING!
Do not place hot dishes on the control panel. There is a risk of damage to the electronic parts.
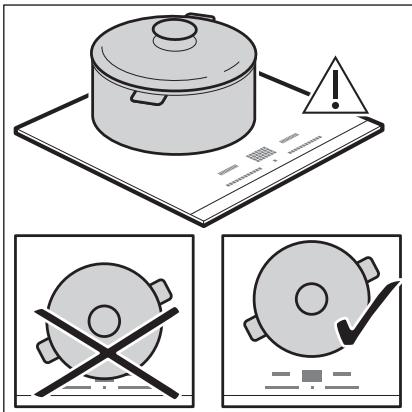
Place the dishes on the center of the selected washing zone. The induction washing zones adapt to the bottom of the dishes automatically. When you place the dishes in the correct position, the panel recognizes them and the corresponding heating level is activated. On the control panel, an indicator for the washing zone appears and shows the position of the dishes.
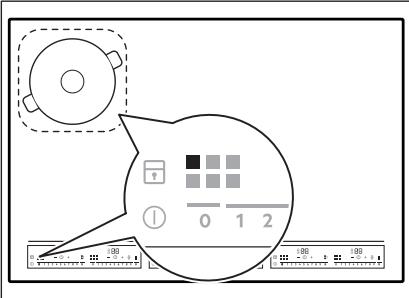
Each square on the control panel represents a washing zone of the induction cooking surface. The indicators for the zones show which zone is controlled by the corresponding control panel.
5.4 Settings for heating
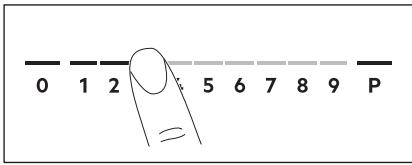
- Press the desired heating level on the control panel. You can also slide your finger along the control panel to set or change the heating setting for the washing zone.
- To deactivate the washing zone, press 0.
After placing the dishes in the zone and setting the heating level, it remains unchanged for 2 minutes, after which the dishes are removed. The control panel and the zone indicator flash for 2 minutes. If you place the dishes in the washing zone again during this time, the heating level is activated again. Otherwise, the washing zone is deactivated.
5.5 PowerBoost
The function can be activated for the heating zone, depending on the size of the cookware. The function can be activated only for a limited period of time.
Press to activate the function for the selected heating zone.
The symbol turns red.
The function is activated automatically.
For maximum cooking duration, see "Technical Data".
5.6 OptiHeat Control (3-stage residual heat indicator)

WARNING!
If the indicator lights up, there is a risk of burns from residual heat.
The residual heat indicator shows the heat needed for the cooking process, directed to the cookware. The cookware is heated by the heat from the cookware for cooking.
The indicator appears when the heating zone is hot. It shows the level of residual heat for the heating zones that you are using at the moment.
The indicator can appear:
For all heating zones, even if you do not use them, when the cookware for cooking is placed on a cold heating zone, when the hob is switched on, but the heating zone is still hot.
It disappears when the heating zone cools down.
5.7 Timer
Timer for switching off
If the timer is not set, the indicators will disappear after a few seconds.
2. Touch the + or - buttons to set the time (00-99 minutes).
After a few seconds the timer will start counting down automatically.
The 1+ and 1- indicators will disappear. The display remains.
When the time is up, an audible and visual signal sounds. To stop it, touch
To deactivate the function: touch ①. The + and - indicators will light up.
Use the + and - buttons to set the desired alternative heating temperature. As a result, the signal sounds and the timer stops.
CountUp Timer
You can use this function to observe how long the cooking zone has been working.
When you activate the zone, the same function is activated as well.
5.12 Child safety lock
This function prevents unintentional use of the hob.
Activate the hob first and do not set a heating setting.
Touch and hold until the display turns red to activate the function.
Check the control strips for wear. Disconnect the plug.
When the plug is disconnected, all functions are inactive.
To deactivate the function for one heating period: activate
the plug with ①. The indicator lights up. Press until it becomes white. The control strips appear. Set the heating time to up to 50 seconds. You can work with the plug. When you deactivate the plug with ①, the function is inactive.
To deactivate the function permanently: activate the plug and do not set the heating time.
Press 1 until it becomes white.
The control strips appear.
Disconnect the plug.
5.13 OffSound Control
(Deactivating and activating the sounds)
First press the plug.
1. Press ① for 3 seconds to activate the function.
The screen turns on and sounds.
2. Press for 3 seconds.
The indicator lights up.
3. Set the timer to select one of the following:
- The sounds are muted
- 60- The sounds are enabled
- To confirm your selection, wait until the device activates automatically.
When the function is set, you can hear sounds only when:
- Press ①
- Timer is on
- Timer for delay is on
- Place it on the command panel.
5.14 New mode
This is a modern automatic function that connects the device to a sensor and an absorber. Both the device and the absorber have a communication port with an infrared signal. The speed of the ventilator is determined automatically, based on the setting of the mode and the temperature of the hot gases in the device. You can also control the ventilator manually from the device.

When using the absorber, the remote system is deactivated by default. Activate it before using the function. For more information, see the absorber's user manual.
Automatic control of the function
To control the function automatically, set the automatic mode to H1 - H6. The default setting is H5. The absorber reacts when working with the hood. The hood automatically detects the temperature of the food and adjusts the fan speed.
Activating the lighting
You can set the hood to turn on the lighting automatically, for example when you activate it. For this purpose, set the automatic mode to H1-H6.
The absorber lighting is deactivated 2 minutes after switching off the hood.
Automatic mode
Dimensions of the food
The induction zones for cooking automatically adapt to the size of the food. - The effectiveness of the cooking zone depends on the diameter of the food. Food with a smaller diameter than the minimum receives only part of the power generated by the cooking zone. - For safety and optimal cooking results, do not use food that is not suitable for the "Cooking zone specification". Avoid using food close to the control panel during
cooking. This may affect the operation of the control panel or may accidentally activate the functions of the button.

See "Technical characteristics".
6.2 Noises during operation
If you hear:
- Rattling: the food is placed on different materials (construction sand). You are using the cooking zone at a high power level, and the food is placed on different materials (construction sand).
- Buzzing: You are using a high power level.
- Crackling: electrical switching. Whistling: the fan is working.
The device does not indicate a malfunction.
6.3 Eco Timer
To save energy, the heating element of the cooking zone will be deactivated before the timer signal sounds. The remaining time depends on the heat setting and the cooking time.
How to install your AEG Induction Hob - Worktop installation

4. PRODUCT DESCRIPTION
5. DAILY USE

WARNING!
| How to install your AEG Induction Hob - Worktop installation |

4. APPLIANCE OVERVIEW
How to install your AEG Induction Hob - Worktop installation

4. PRODUCT DESCRIPTION
6.2 Sound during operation
If you can hear:
6.3 Eco Timer
To save energy, the heating element of the cooking zone should be switched off before the timer sounds.
Thank you for choosing this AEG product. We have created it to give you impeccable performance for many years, with innovative technologies that help make life simpler – features you might not find on ordinary appliances. Please spend a few minutes reading to get the very best from it.
Visit our website to:

Get usage advice, brochures, trouble shooter, service and repair information: www.aeg.com/support

Register your product for better service: www.registeraeg.com

Buy Accessories, Consumables and Original spare parts for your appliance: www.aeg.com/shop
CUSTOMER CARE AND SERVICE
Always use original spare parts. When contacting our Authorised Service Centre, ensure that you have the following data available: Model, PNC, Serial Number. The information can be found on the rating plate.
Warning / Caution-Safety information ① General information and tips Environmental information
Subject to change without notice.
CONTENTS
1. SAFETY INFORMATION. 102 2. SAFETY INSTRUCTIONS 104 3. INSTALLATION 107 4. PRODUCT DESCRIPTION 108 5. DAILY USE 109 6. HINTS AND TIPS 114 7. CARE AND CLEANING. 117 8. TROUBLESHOOTING 117 9. TECHNICAL DATA 119 10. ENERGY EFFICIENCY 119 11. ENVIRONMENTAL CONCERNS 120
1. SAFETY INFORMATION
Before the installation and use of the appliance, carefully read the supplied instructions. The manufacturer is not responsible for any injuries or damage that are the result of incorrect
installation or usage. Always keep the instructions in a safe and accessible location for future reference.
1.1 Children and vulnerable people safety
- This appliance can be used by children aged from 8 years and above and persons with reduced physical, sensory or mental capabilities or lack of experience and knowledge if they have been given supervision or instruction concerning the use of the appliance in a safe way and understand the hazards involved. Children of less than 8 years of age and persons with very extensive and complex disabilities shall be kept away from the appliance unless continuously supervised.
- Children should be supervised to ensure that they do not play with the appliance.
- Keep all packaging away from children and dispose of it appropriately.
- WARNING: Keep children and pets away from the appliance when it operates or when it cools down. Accessible parts become hot during use.
- If the appliance has a child safety device, it should be activated.
- Children shall not carry out cleaning and user maintenance of the appliance without supervision.
1.2 General Safety
- WARNING: The appliance and its accessible parts become hot during use. Care should be taken to avoid touching heating elements. WARNING: Unattended cooking on a hob with fat or oil can be dangerous and may result in fire.
- NEVER try to extinguish a fire with water, but switch off the appliance and then cover flame e.g. with a lid or a fire blanket.
- WARNING: The appliance must not be supplied through an external switching device, such as a timer, or connected to a circuit that is regularly switched on and off by a utility.
- CAUTION: The cooking process has to be supervised. A short term cooking process has to be supervised continuously.
- WARNING: Danger of fire: Do not store items on the cooking surfaces.
- Metallic objects such as knives, forks, spoons and lids should not be placed on the hob surface since they can get hot.
- Do not use the appliance before installing it in the built-in structure.
- Do not use a steam cleaner to clean the appliance.
- After use, switch off the hob element by its control and do not rely on the pan detector.
- If the glass ceramic surface / glass surface is cracked, switch off the appliance and unplug it from the mains. In case the appliance is connected to the mains directly using junction box, remove the fuse to disconnect the appliance from power supply. In either case contact the Authorised Service Centre.
- If the supply cord is damaged, it must be replaced by the manufacturer, an authorized Service or similarly qualified persons in order to avoid a hazard.
- WARNING: Use only hob guards designed by the manufacturer of the cooking appliance or indicated by the manufacturer of the appliance in the instructions for use as suitable or hob guards incorporated in the appliance. The use of inappropriate guards can cause accidents.
2. SAFETY INSTRUCTIONS
2.1 Installation

WARNING!
Only a qualified person must install this appliance.

WARNING!
Risk of injury or damage to the appliance.
- Remove all the packaging.
- Do not install or use a damaged appliance.
- Follow the installation instructions supplied with the appliance.
- Keep the minimum distance from other appliances and units. Always take care when moving the appliance as it is heavy. Always use safety gloves and enclosed footwear.
- Seal the cut surfaces with a sealant to prevent moisture from causing swelling.
- Protect the bottom of the appliance from steam and moisture.
- Do not install the appliance next to a door or under a window. This prevents hot cookware from falling from the appliance when the door or the window is opened. Each appliance has cooling fans on the bottom. If the appliance is installed above a drawer:
- Do not store any small pieces or sheets of paper that could be pulled in, as they can damage the cooling fans or impair the cooling system.
- Keep a distance of minimum 2 cm between the bottom of the appliance and parts stored in the drawer.
- Remove any separator panels installed in the cabinet below the appliance.
2.2 Electrical Connection

WARNING!
Risk of fire and electric shock.
- All electrical connections should be made by a qualified electrician. The appliance must be earthed.
- Before carrying out any operation, make sure that the appliance is disconnected from the power supply.
- Make sure that the parameters on the rating plate are compatible with the electrical ratings of the mains power supply.
- Make sure the appliance is installed correctly. Loose and incorrect electricity mains cable or plug (if applicable) can make the terminal become too hot.
- Use the correct electricity mains cable.
- Do not let the electricity mains cable tangle. Make sure that a shock protection is installed.
- Use the strain relief clamp on the cable.
- Make sure the mains cable or plug (if applicable) does not touch the hot appliance or hot cookware, when you connect the appliance to a socket.
- Do not use multi-plug adapters and extension cables.
- Make sure not to cause damage to the mains plug (if applicable) or to the mains cable. Contact our Authorised Service Centre or an electrician to change a damaged mains cable.
- The shock protection of live and insulated parts must be fastened in such a way that it cannot be removed without tools.
- Connect the mains plug to the mains socket only at the end of the installation. Make sure that there is access to the mains plug after the installation. If the mains socket is loose, do not connect the mains plug.
- Do not pull the mains cable to disconnect the appliance. Always pull the mains plug.
- Use only correct isolation devices: line protecting cut-outs, fuses (screw type fuses removed from the holder), earth leakage trips and contactors.
- The electrical installation must have an isolation device which lets you disconnect the appliance from the mains at all poles. The isolation device must have a contact opening width of minimum 3 mm.
2.3 Use

WARNING!
Risk of injury, burns and electric shock.
- Remove all the packaging, labelling and protective film (if applicable) before first use.
- This appliance is for household (indoors) use only.
- Do not change the specification of this appliance. Make sure that the ventilation openings are not blocked.
- Do not let the appliance stay unattended during operation.
- Set the cooking zone to "off" after each use.
- Do not put cutlery or saucepan lids on the cooking zones. They can become hot.
- Do not operate the appliance with wet hands or when it has contact with water.
- Do not use the appliance as a work surface or as a storage surface. If the surface of the appliance is cracked, disconnect immediately the appliance
from the power supply. This to prevent an electrical shock.
- Users with a pacemaker must keep a distance of minimum 30 cm from the induction cooking zones when the appliance is in operation.
- When you place food into hot oil, it may splash.

WARNING!
Risk of fire and explosion
- Fats and oil when heated can release flammable vapours. Keep flames or heated objects away from fats and oils when you cook with them.
- The vapours that very hot oil releases can cause spontaneous combustion.
- Used oil, that can contain food remnants, can cause fire at a lower temperature than oil used for the first time.
- Do not put flammable products or items that are wet with flammable products in, near or on the appliance.

WARNING!
Risk of damage to the appliance.
- Do not keep hot cookware on the control panel.
- Do not put a hot pan cover on the glass surface of the hob.
- Do not let cookware boil dry.
- Be careful not to let objects or cookware fall on the appliance. The surface can be damaged.
- Do not activate the cooking zones with empty cookware or without cookware.
- Do not put aluminium foil on the appliance.
- Cookware made of cast iron, aluminium or with a damaged bottom can cause scratches on the glass / glass ceramic. Always lift these objects up when you have to move them on the cooking surface.
- This appliance is for cooking purposes only. It must not be used for other purposes, for example room heating.
2.4 Care and cleaning
Clean the appliance regularly to prevent the deterioration of the surface material. - Switch off the appliance and let it cool down before cleaning. - Do not use water spray and steam to clean the appliance. - Clean the appliance with a moist soft cloth. Use only neutral detergents. Do not use abrasive products, abrasive cleaning pads, solvents or metal objects.
2.5 Service
To repair the appliance contact the Authorised Service Centre. Use original spare parts only. - Concerning the lamp(s) inside this product and spare part lamps sold separately: These lamps are intended to withstand extreme physical conditions in household appliances, such as temperature, vibration, humidity, or are intended to signal information about the operational status of the appliance. They are not intended to be used in other applications and are not suitable for household room illumination.
2.6 Disposal

WARNING!
Risk of injury or suffocation.
- Contact your municipal authority for information on how to dispose of the appliance.
- Disconnect the appliance from the mains supply.
- Cut off the mains electrical cable close to the appliance and dispose of it.
3. INSTALLATION

WARNING!
Refer to Safety chapters.
3.1 Before the installation
Before you install the hob, write down the information below from the rating plate. The rating plate is on the bottom of the hob.
Serial number
3.2 Built-in hobs
Only use the built-in hobs after you assemble the hob into correct built-in units and work surfaces that align to the standards.
3.3 Connection cable
- The hob is supplied with a connection cable.
- To replace the damaged mains cable, use the cable type: H05V2V2-F which withstands a temperature of 90°C or higher. Contact an Authorised Service Centre. The connection cable may only be replaced by a qualified electrician.
3.4 Assembly
If you install the hob under a hood, please see the installation instructions of the hood for the minimum distance between the appliances.
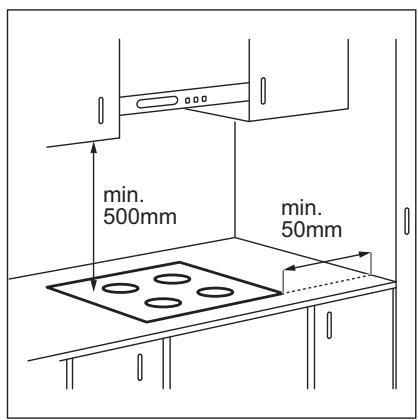
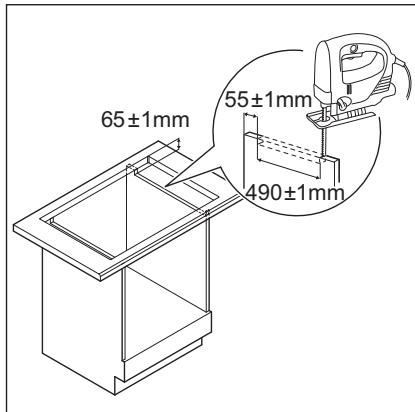
If the appliance is installed above a drawer, the hob ventilation can warm up the items stored in the drawer during the cooking process.
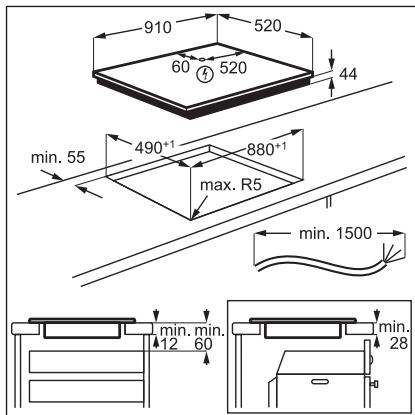
Find the video tutorial "How to install your AEG Induction Hob - Worktop installation" by typing out the full name indicated in the graphic below.

YouTube
www.youtube.com/electrolux
www.youtube.com/aeg
How to install your AEG Induction Hob - Worktop installation

4. PRODUCT DESCRIPTION
4.1 Cooking surface layout
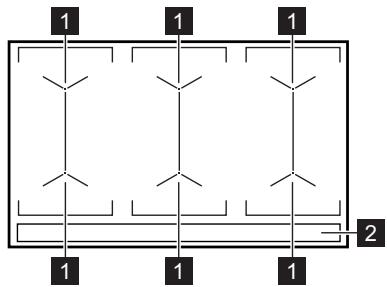
1 Induction cooking surface 2 Control panel
4.2 Control panel layout
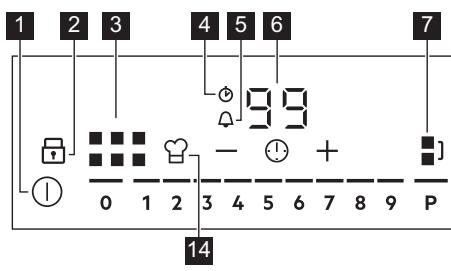
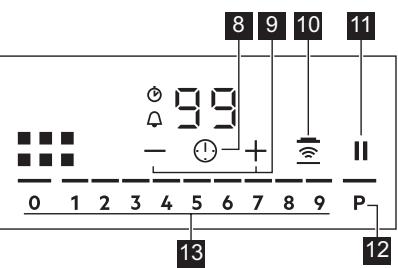
Use the sensor fields to operate the appliance. The displays, indicators and sounds tell which functions operate.
| Sensor field | Comment | |
| 1 | ① | To activate and deactivate the hob. |
| 2 | To activate and deactivate Lock or Child Safety Device. | |
| 3 | To show the active zone. | |
| 4 | CountUp Timer indicator. | |
| 5 | Count Down Timer indicator. | |
| 6 | - | Timer display: 00 - 99 minutes. |
| 7 | To activate and deactivate Bridge and to switch between the modes. | |
| 8 | To select Timer functions. | |
| 9 | +/- | To increase and decrease the time. |
| 10 | - | To activate and deactivate Hob2Hood. |
| 11 | || | To activate and deactivate Pause. |
| 12 | P | To activate PowerBoost. |
| 13 | - | To set a heat setting: 0 - 9. |
| 14 | - | To activate and deactivate PowerSlide. |
5. DAILY USE

WARNING!
Refer to Safety chapters.
5.1 Activating and deactivating
Touch ① for 1 second to activate or deactivate the hob.
The control panel comes on after you activate the hob and goes off after you deactivate the hob.
5.2 Automatic Switch Off
The function deactivates the hob automatically if:
- you do not place any cookware on the hob for 50 seconds, you do not set the heat setting for 50 seconds after you place the cookware,
- If you spill something or place something on the control panel for more than 10 seconds (e.g., a pan, a cloth), the hob will deactivate after an acoustic signal. Remove the object or clean the control panel.
- If the hob gets too hot (e.g., when a saucepan boils dry), let the cooking zone cool down before using the hob again.
- If you do not deactivate a cooking zone or change the heat setting, the hob will deactivate after some time.
The relationship between the heat setting and the time after which the hob deactivates:
| Heat setting | The hob deactivates after |
| 1 - 2 | 6 hours |
| 3 - 4 | 5 hours |
| 5 | 4 hours |
| 6 - 9 | 1.5 hours |
5.3 Using the cooking zone

CAUTION!
Do not place hot cookware on the control panel. There is a risk of damage to the electronic parts.
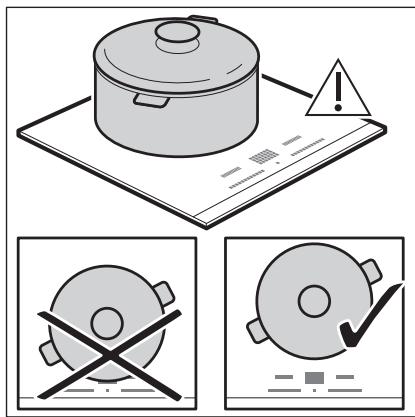
Place the cookware in the center of the selected zone.
Induction cooking zones automatically adapt to the size of the cookware's bottom.
When you place the cookware in the correct position, the hob recognizes it and the appropriate control bar lights up. A red cooking zone indicator appears above the control bar and indicates the position of the pot.
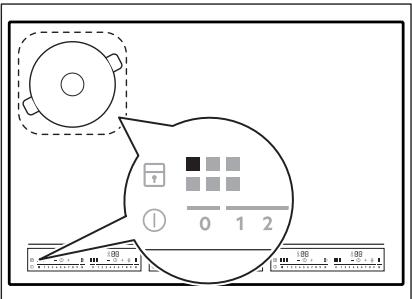
Each square on the control panel represents one cooking zone on the induction cooking surface. Zone indicators show which cooking zone is controlled by the corresponding control bar.
5.4 Heat setting
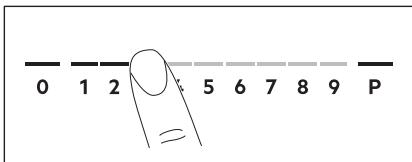
- Press the desired heat setting on the control bar. You can also slide your finger along the control bar to set or change the heat setting for a cooking zone.
- To deactivate a cooking zone, press 0. Once you place a pot on the cooking zone and set the heat setting, it remains the same for 2 minutes after you remove the pot. The control bar and the cooking zone indicator blink for 2 minutes. If you place the pot back on the cooking zone within this time, the heat setting reactivates. Otherwise, the cooking zone deactivates.
5.5 PowerBoost
This function activates more power for the appropriate induction cooking zone, depending on the cookware size. The function can be activated only for a limited period of time.
Touch P to activate the function for the cooking zone.
The symbol turns red.
The function deactivates automatically.

For maximum duration values, refer to "Technical data".
5.6 OptiHeat Control (3 step Residual heat indicator)

WARNING!
As long as the indicator is on, there is a risk of burns from residual heat.
The induction cooking zones produce the heat necessary for the cooking process directly in the bottom of the cookware. The glass ceramic is heated by the heat of the cookware.
The indicators appear when a cooking zone is hot. They show the level of the residual heat for the cooking zones you are currently using.
The indicator may also appear:
for the neighbouring cooking zones even if you are not using them, - when hot cookware is placed on cold cooking zone, - when the hob is deactivated but the cooking zone is still hot.
The indicator disappears when the cooking zone has cooled down.
5.7 Timer
Count Down Timer
Use this function to specify how long a cooking zone should operate during a single cooking session.
First set the heat setting, then set the function.
- Touch ① to activate the function or change the time.
The timer digits 00 and the indicators + and - come on the display. turns red, and turns white.
If the timer is not set, all indicators disappear after 4 seconds.
- Touch + or — to set the time (00 - 99 minutes).
After 3 seconds, the timer starts to count down automatically. The indicators ① , +, and - disappear. stays red.
When the time comes to an end, a signal sounds and 00 flashes. To stop the signal, touch ①.
To deactivate the function: touch ① . The indicators + and - come on. Use - or + to set on the display. Alternatively, set the heat level to 0. As a result, a signal sounds and the timer is cancelled.
CountUp Timer
You can use this function to monitor how long a cooking zone operates.
Touch ① twice to activate the function.
The indicator turns red, the timer starts to count up automatically.
To deactivate the function: touch ①. When the indicators light up, touch —.
Minute Minder
You can use this function when the hob is activated but no cooking zone operates.
To see the control panel, place a pot on a cooking zone.
- Touch ① until the indicator 品 turns red, to activate the function.
- Touch + or - to set the time.
The function starts automatically after 4 seconds. The indicators ①, +, and - disappear. ◁ stays red.
When you set the function, you can remove the pot.
When the time comes to an end, a signal sounds and 00 flashes. Touch ① to stop the signal.
To deactivate the function: touch ①. The indicators + and - light up. Use - or + to set 00 on the display.
The function has no effect on the operation of any cooking zone.
5.8 Bridge
This function connects two cooking zones and they operate as one. You can use the function with large cookware.
- Place the cookware on two cooking zones. The cookware must cover the centres of both zones.
turns white. 2. Touch to activate the function. 3. Set the heat setting.
The cookware must cover the centres of both zones but not go beyond the area marking.
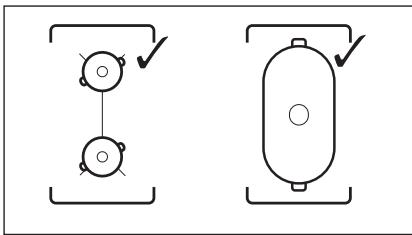
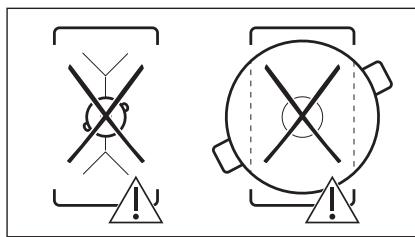
To deactivate the function, touch ①. The cooking zones operate independently.
5.9 PowerPoint
This function allows you to adjust the temperature by moving the cookware to a different position on the induction cooking area.
The function divides the induction cooking area into three areas with different heat settings. The hob detects the position of the cookware and adjusts the heat setting corresponding to the position.

Use only one pot when you operate the function. If you want to change the heat setting, lift up the cookware and place it on a different zone. Sliding the cookware can cause scratches and discolouration of the surface.
- The zone indicator shows both zones in a bridge even if only one of the zones is used.
- You may adjust the heat setting manually only if at least one of the zones is activated automatically.
- You can change the heat settings for each position separately. When you deactivate the hob, it remembers your heat settings and applies them next time you activate the function.
- If you want to change the heat setting, lift up the cookware and place it on a different zone. Sliding the cookware can cause scratches and discolouration of the surface.
Touch to activate the function. The symbol turns red and the control bar displays the default heat setting. All cooking zones operate for 9 minutes. After 9 minutes, an acoustic signal sounds and the empty cooking zones are deactivated. Touch to resume this function. You can move the pot or place it in a new position. To modify the default heat setting manually, touch the control bar and choose the appropriate level.
- You may change the default heat setting only if the function is active.
- You can change the default heat settings for each position separately. When you deactivate the hob, it remembers your settings and applies them the next time you activate the function.
To deactivate the function, touch . The symbol turns white.
5.10 Pause
When the function is active, the ① and Ⅱ symbols can be used.
The function does not stop the timer functions.
Press to activate the function.
The symbol turns red. The heat setting is lowered to 1.
To deactivate the function: press . The symbol turns white. The previous heat setting comes on.
5.11 Lock
You can lock the control panel while the hob operates. It prevents an accidental change of the heat setting.
Set the heat setting first.
Touch to activate the function. The symbol turns red and blinks.
To deactivate the function, touch. The symbol turns white.

When you deactivate the hob, you also deactivate this function.
5.12 Child Safety Device
This function prevents an accidental operation of the hob.
Activate the hob first and do not set the heat setting.
Touch until it turns red to activate the function.
The control bars disappear. Deactivate the hob.

When you deactivate the hob, the function is still active.
To deactivate the function for only one cooking time: Activate the hob with ① . comes on. Touch until it turns white. The control bars appear. Set the heat setting within 50 seconds. You can operate the hob. When you deactivate the hob with ① the function is still active.
To deactivate the function permanently: Activate the hob and do not set the heat setting. Touch until it turns white. The control bars appear. Deactivate the hob.
5.13 OffSound Control (Deactivating and activating the sounds)
Deactivate the hob first.
- Touch ① for 3 seconds to activate the function. The display comes on and goes out.
- Touch for 3 seconds. bO or bI comes on.
- Touch + of the timer to choose one of the following:
- the sounds are off
- b0 - the sounds are on
- Wait until the hob deactivates automatically to confirm your selection.
When the function is set to b I you can hear the sounds only when:
- you touch ①
- Minute Minder comes down
- Count Down Timer comes down
- you put something on the control panel.
5.14 Hob²Hood
It is an advanced automatic function which connects the hob to a special hood. Both the hob and the hood have an infrared signal communicator. Speed of the fan is defined automatically on the basis of the mode setting and temperature of the hottest cookware on the hob. You can also operate the fan from the hob manually.
For most of the hoods, the remote system is originally deactivated. Activate it before you use the function. For more information refer to the hood user manual.
Operating the function automatically To operate the function automatically set the automatic mode to H1 - H6. The hob is originally set to H5. The hood reacts whenever you operate the hob. The hob recognizes the temperature of the cookware automatically and adjusts the speed of the fan.
Activating the light
You can set the hob to activate the light automatically whenever you activate the hob. To do so set the automatic mode to H1 - H6.
The light on the hood deactivates 2 minutes after deactivating the hob.
Automatic modes
| Automatic light | Boiling1) | Frying2) | |
| Mode H0 | Off | Off | Off |
| Mode H1 | On | Off | Off |
| Mode H23) | On | Fan speed 1 | Fan speed 1 |
| Mode H3 | On | Off | Fan speed 1 |
| Mode H4 | On | Fan speed 1 | Fan speed 1 |
| Mode H5 | On | Fan speed 1 | Fan speed 2 |
| Mode H6 | On | Fan speed 2 | Fan speed 3 |
1) The hob detects the boiling process and activates the fan speed in accordance with the automatic mode. 2) The hob detects the frying process and activates the fan speed in accordance with the automatic mode. 3) This mode activates the fan and the light and does not rely on the temperature.
Changing the automatic mode
- Deactivate the appliance.
- Touch ① for 3 seconds.
The display comes on and goes off.
- Touch for 3 seconds.
- Touch ① a few times until H comes on.
- Touch + of the Timer to select an automatic mode.
When you finish cooking and deactivate the hob, the hood fan may still operate for a certain period of time. After that time the system deactivates the fan automatically and prevents you from an accidental activation of the fan for the next 30 seconds.

To operate the hood directly on the hood panel deactivate the automatic mode of the function.
Operating the fan speed manually
You can also operate the fan from the hob manually.
Touch when the hob is active.
This deactivates automatic operation of the function and allows you to change the fan speed manually.
When you press, you raise the fan speed by one. When you reach an intensive level and press again, you set the fan speed to 0 which deactivates the hood fan. To start the fan again with the fan speed 1 touch

To activate an automatic operation of the function, deactivate the hob and activate it again.
6. HINTS AND TIPS

WARNING!
Refer to Safety chapters.
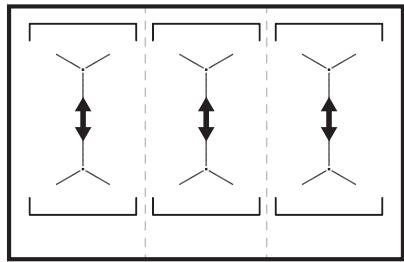
5.15 Power management
If multiple zones are active and the consumed power exceeds the limitation of the power supply, this function divides the available power between all cooking zones. The hob controls heat settings to protect the fuses of the house installation.
- Cooking zones are grouped according to the location and number of the phases in the hob. Each phase has a maximum electricity loading of 3680 W. If the hob reaches the limit of maximum available power within one phase, the power of the cooking zones will be automatically reduced.
- For cooking zones that have a reduced power, the control panel shows the maximum possible heat settings. If a higher heat setting is not available reduce it for the other cooking zones first.
- The activation of the function depends on the number and size of pots.
Refer to the illustration for possible combinations in which power can be distributed among the cooking zones.
6.1 Cookware
For induction cooking zones a strong electro-magnetic field creates the heat in the cookware very quickly.
Use the induction cooking zones with suitable cookware.
- The bottom of the cookware must be as thick and flat as possible.
- Ensure pan bases are clean and dry before placing on the hob surface. In order to avoid scratches, do not slide or rub the pot across the ceramic glass.
Cookware material
- correct: cast iron, steel, enamelled steel, stainless steel, multi-layer bottom (with a correct marking from a manufacturer). not correct: aluminium, copper, brass, glass, ceramic, porcelain.
Cookware is suitable for an induction hob if:
water boils very quickly on a zone set to the highest heat setting. - a magnet pulls on to the bottom of the cookware.
Cookware dimensions
- Induction cooking zones adapt to the dimension of the bottom of the cookware automatically.
- The cooking zone efficiency is related to the diameter of the cookware. The cookware with a diameter smaller than the minimum receives only a part of the power generated by the cooking zone.
- For both safety reasons and optimal cooking results, do not use cookware larger than indicated in "Cooking zones specification". Avoid keeping cookware close to the control panel during the cooking session. This might impact the functioning of the control panel or accidentally activate hob functions.

Refer to "Technical data".
6.2 The noises during operation
If you can hear:
- crack noise: cookware is made of different materials (a sandwich construction). whistle sound: you use a cooking zone with a high power level and the cookware is made of different materials (a sandwich construction). humming: you use a high power level.
- clicking: electric switching occurs.
- hissing, buzzing: the fan operates.
The noises are normal and do not indicate any malfunction.
6.3 Öko Timer (Eco Timer)
To save energy, the heater of the cooking zone deactivates before the countdown timer sounds. The difference in the operation time depends on the heat setting level and the length of the cooking operation.
6.4 Examples of cooking applications
The correlation between the heat setting of a zone and its consumption of power is not linear. When you increase the heat setting, it is not proportional to the increase of the consumption of power. It means that a cooking zone with the medium heat setting uses less than a half of its power.

The data in the table is for guidance only.
| Heat setting | Use to: | Time (min) | Hints |
| 1 | Keep cooked food warm. | as neces-sary | Put a lid on the cookware. |
| 1 - 2 | Hollandaise sauce, melt: butter, choco-late, gelatine. | 5 - 25 | Mix from time to time. |
| 1 - 2 | Solidify: fluffy omelettes, baked eggs. | 10 - 40 | Cook with a lid on. |
| 2 - 3 | Simmer rice and milkbased dishes, heat up ready-cooked meals. | 25 - 50 | Add at least twice as much liquid as rice, mix milk dishes halfway through the procedure. |
| 3 - 4 | Steam vegetables, fish, meat. | 20 - 45 | Add a couple of tablespoons of liquid. |
| 4 - 5 | Steam potatoes. | 20 - 60 | Use max. 1/4 l of water for 750 g of potatoes. |
| 4 - 5 | Cook larger quantities of food, stews and soups. | 60 - 150 | Up to 3 l of liquid plus ingredients. |
| 6 - 7 | Gentle fry: escalope, veal cordon bleu, cutlets, rissoles, sausages, liver, roux, eggs, pancakes, doughnuts. | as neces-sary | Turn halfway through. |
| 7 - 8 | Heavy fry, hash browns, loin steaks, steaks. | 5 - 15 | Turn halfway through. |
| 9 | Boil water, cook pasta, sear meat (goulash, pot roast), deep-fry chips. | ||
| P | Boil large quantities of water. PowerBoost is activated. | ||
6.5 Hints and Tips for Hob²Hood
When you operate the hob with the function:
- Protect the hood panel from direct sunlight.
- Do not spot halogen light on the hood panel.
- Do not cover the hob control panel.
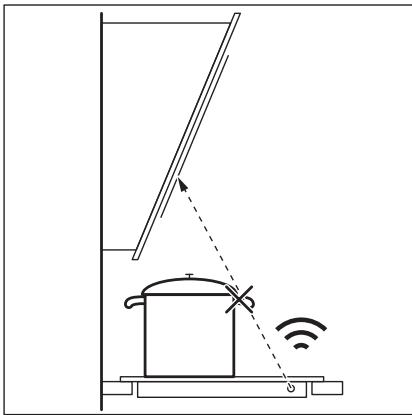
- Do not interrupt the signal between the hob and the hood (e.g. with the hand, a cookware handle or a tall pot). See the picture.
The hood in the picture is only exemplary.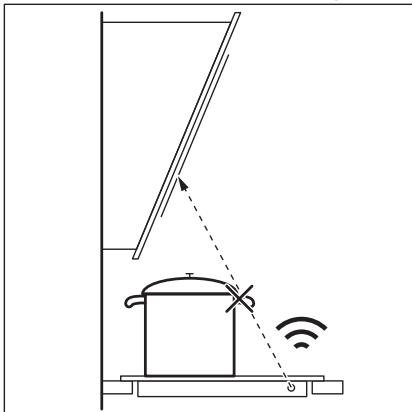
Other remotely controlled appliances may block the signal. Do not use any such appliances near to the hob while Hob²Hood is on.
Cooker hoods with the Hob²Hood function To find the full range of cooker hoods which work with this function refer to our consumer website. The AEG cooker hoods that work with this function must have the symbol
7. CARE AND CLEANING

WARNING!
Refer to Safety chapters.
7.1 General information
- Clean the hob after each use. Always use cookware with a clean base.
- Scratches or dark stains on the surface have no effect on how the hob operates.
- Use a special cleaner suitable for the surface of the hob. Use a special scraper for the glass.
7.2 Cleaning the hob
- Remove immediately: melted plastic, plastic foil, sugar and food with sugar,
otherwise, the dirt can cause damage to the hob. Take care to avoid burns. Use a special hob scraper on the glass surface at an acute angle and move the blade on the surface.
- Remove when the hob is sufficiently cool: limescale rings, water rings, fat stains, shiny metallic discoloration. Clean the hob with a moist cloth and a non-abrasive detergent. After cleaning, wipe the hob dry with a soft cloth.
- Remove shiny metallic discoloration: use a solution of water with vinegar and clean the glass surface with a cloth.
8. TROUBLESHOOTING

WARNING!
Refer to Safety chapters.
8.1 What to do if...
| Problem | Possible cause | Remedy |
| You cannot activate or operate the hob. | The hob is not connected to an elec- trical supply or it is connected incor- rectly. | Check if the hob is correctly connected to the electrical supply. |
| The fuse is blown. | Make sure that the fuse is the cause of the malfunction. If the fuse is blown again and again, contact a qualified electrician. | |
| You touched 2 or more sensor fields at the same time. | Touch only one sensor field. | |
| Pause operates. | Refer to "Daily use". | |
| There is water or fat stains on the control panel. | Clean the control panel. | |
| You cannot select the maximum heat setting for one of the cook- ing zones. | The other zones consume the maxi- mum available power. Your hob works properly. | Reduce the heat setting of the other cooking zones connected to the same phase. Refer to "Power management". |
| An acoustic signal sounds and the hob deactivates. An acoustic signal sounds when the hob is deactivated. | You put something on one or more sensor fields. | Remove the object from the sensor fields. |
| The hob deactivates. | You put something on the sensor field ①. | Remove the object from the sensor field. |
| Residual heat indicator does not come on. | The zone is not hot because it operated only for a short time or the sensor is damaged. | If the zone operated sufficiently long to be hot, speak to an Authorised Service Centre. |
| Hob²Hood does not work. | You covered the control panel. | Remove the object from the control panel. |
| You use a very tall pot which blocks the signal. | Use a smaller pot, change the cooking zone or operate the hood manually. | |
| There is no sound when you touch the panel sensor fields. | The sounds are deactivated. | Activate the sounds. Refer to "Daily use". |
| comes on. | Child Safety Device or Lock oper- ates. | Refer to "Daily use". |
| The control bar blinks. | There is no cookware on the zone or the zone is not fully covered. | Put cookware on the zone so that it fully covers the cooking zone. |
| The cookware is unsuitable. | Use suitable cookware. Refer to "Hints and tips". | |
| The diameter of the bottom of the cookware is too small for the zone. | Use cookware with correct dimen-sions. Refer to "Technical data". | |
| PowerSlide operates. Two pots are placed on the flexible induction cooking area. | Use only one pot. Refer to "Flexible in-duction cooking area". | |
| and a number come on. | There is an error in the hob. | Deactivate the hob and activate it again after 30 seconds. If comes on again, disconnect the hob from the electrical supply. After 30 seconds, connect the hob again. If the problem continues, speak to an Authorised Service Centre. |
| You can hear a constant beep noise. | The electrical connection is incor- rect. | Disconnect the hob from the electrical supply. Ask a qualified electrician to check the installation. |
8.2 If you cannot find a solution...
If you cannot find a solution to the problem yourself, contact your dealer or an Authorised Service Centre. Give the data from the rating plate. Make sure you operated the hob correctly. If not, the
servicing by a service technician or dealer will not be free of charge, also during the warranty period. The information about the guarantee period and Authorised Service Centres is in the guarantee booklet.
9. TECHNICAL DATA
9.1 Rating plate
Model IKE96654FB
Typ 61 E6A 04 AA
Induction 11.0 kW
Ser.Nr.
AEG
PNC 94959761900
400V3N50-60Hz
Made in: Germany
11.0 kW
C∈
9.2 Cooking zones specification
| Cooking zone | Nominal power (maximum heat setting) [W] | PowerBoost [W] | PowerBoost maximum dura- tion [min] | Cookware diameter [mm] |
| Left front | 2300 | 3200 | 10 | 125 - 210 |
| Left rear | 2300 | 3200 | 10 | 125 - 210 |
| Middle front | 2300 | 3200 | 10 | 125 - 210 |
| Middle rear | 2300 | 3200 | 10 | 125 - 210 |
| Right front | 2300 | 3200 | 10 | 125 - 210 |
| Right rear | 2300 | 3200 | 10 | 125 - 210 |
The power of the cooking zones can differ slightly from the data in the table. It changes with the material and dimensions of the cookware.
For optimal cooking results, use cookware no larger than the diameter specified in the table.
10. ENERGY EFFICIENCY
10.1 Product Information*
| Model identification | IKE96654FB | |
| Type of hob | Built-In Hob | |
| Number of cooking areas | 3 | |
| Heating technology | Induction | |
| Length (L) and width (W) of the cooking area | Left | L 37.9 cm W 22.0 cm |
| Length (L) and width (W) of the cooking area | Middle | L 37.9 cm W 22.0 cm |
| Length (L) and width (W) of the cooking area | Right | L 37.9 cm W 22.0 cm |
| Energy consumption of the cooking area (EC electric cooking) | Left | 186.8 Wh / kg |
| Energy consumption of the cooking area (EC electric cooking) | Middle | 186.8 Wh / kg |
| Energy consumption of the cooking area (EC electric cooking) | Right | 186.8 Wh / kg |
| Energy consumption of the hob (EC electric hob) | 186.8 Wh / kg | |
- For the European Union according to EU 66/2014. For Belarus according to STB 2477-2017, Annex A. For Ukraine according to 742/2019.
EN 60350-2 - Household electric cooking appliances - Part 2: Hobs - Methods for measuring performance.
The energy measurements referring to the cooking area are identified by the markings of the respective cooking zones.
10.2 Energy saving
You can save energy during everyday cooking if you follow the hints below.
- When heating water, use only the amount you need.
- If possible, always put the lids on the cookware. Before activating the cooking zone, place the cookware on it.
- Put the smaller cookware on the smaller cooking zones.
- Place the cookware directly in the centre of the cooking zone. Use the residual heat to keep food warm or to melt it.
11. ENVIRONMENTAL CONCERNS
Recycle materials with the symbol . Put the packaging in relevant containers to recycle it. Help protect the environment and human health by recycling waste of electrical and electronic appliances. Do not dispose of
appliances marked with the symbol with the household waste. Return the product to your local recycling facility or contact your municipal office.
FOR BEST RESULTS
How to install your AEG Induction Hob - Worktop installation

4. PRODUCT DESCRIPTION
How to install your AEG Induction Hob - Worktop installation

4. PRODUCT DESCRIPTION
4.1 Cooking zones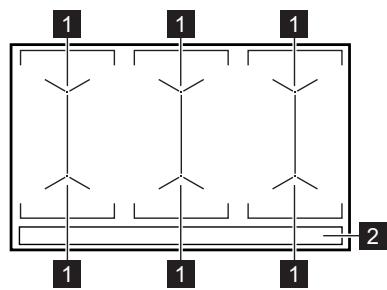
1 Induction cooking zone 2 Control panel
How to install your AEG Induction Hob - Worktop installation

4. DESCRIPTION DE L'APPAREIL
10.1 Product information*
FOR PERFECT RESULTS
Thank you for choosing this AEG product. We have designed it to work perfectly for many years and we have used the latest technology to make your life simpler with features that may not be present on ordinary household appliances. Please take a few minutes to read this manual to get the best out of your appliance.
How to install your AEG Induction Hob - Worktop installation

4. PRODUCT DESCRIPTION
4.1 Setting up the appliance
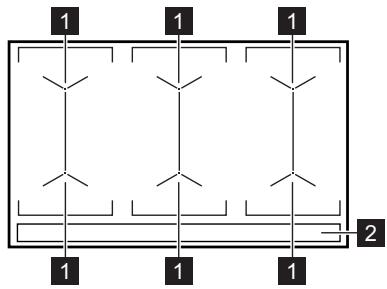
1 Control panel 2 Hob
4.2 Hob overview
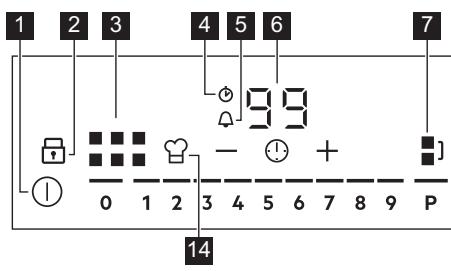
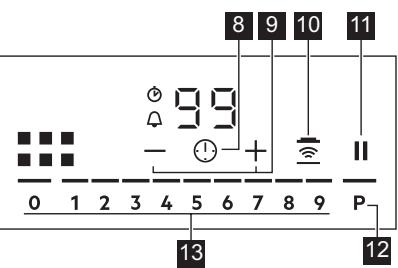
Use the sensor fields to operate the appliance. The displays, indicators and sounds show which functions are in operation.
How to install your AEG Induction Hob - Worktop installation

4. PRODUCT DESCRIPTION
2.2 Connection to the mains

WARNING!
Risk of fire and electric shock.
All electrical connections must be made by a qualified electrician. The appliance must be earthed. - Before carrying out any work, disconnect the appliance from the mains. - Make sure that the appliance parameters are compatible with the electrical supply of your home. - Make sure that the appliance is correctly installed. A damaged or incorrect mains cable (if applicable) can cause overheating of the terminals. Use the correct electrical cable. Do not let the electrical cable become tangled. Make sure that it is installed by a qualified electrician. Use the earthing system for the cable. - Make sure that the mains cable or the plug (if applicable) does not touch the hot appliance or hot cookware when you connect the appliance to the mains.
Do not use adapters with multiple sockets and extension cables. Be careful not to damage the plug (if applicable) or the cable. Contact our Authorised Service Centre or an electrician to replace a damaged cable. The connections of the live and insulated parts must be made in such a way that they cannot be removed without tools. - Connect the plug to the socket at the end of the installation. Make sure that the plug is correctly installed. While the appliance is under warranty, do not disconnect the plug from the mains. Do not pull the cable to disconnect the appliance from the mains. Now you can connect the plug to the mains. Use only correct insulation devices: line protective switch, fuse (screw-type fuse removed from the holder), earthing and contactors. - The electrical installation must have an isolation device that allows you to disconnect the appliance from the mains from all poles. The isolation device must have a contact opening width of at least 3 mm.
2.3 Use

WARNING!
Risk of injury, burns, and electric shock.
- Remove all packaging, stickers and the protective film (if applicable) before the first use.
- This appliance is intended for domestic use only (indoor). Do not modify the specifications of this appliance. Make sure the ventilation openings are not blocked. Do not leave the appliance running unattended.
- Set the switch to "Off" after each use.
Do not place food or containers on the appliance while it is in use. They may become hot. Do not touch the appliance with wet hands or when it is in contact with water. Do not use the appliance as a work surface or as a surface for placing items. If the surface of the appliance is cracked, turn it off and unplug it immediately. This is to prevent electric shock. Keep a minimum distance of 30 cm between the induction rings and any pacemaker when the appliance is operating. When you place food in hot oil, it may splatter.

WARNING!
Risk of fire and burns.
- Oil, fat, and grease can ignite if overheated. Keep flammable objects away from oil and fat while cooking. Be careful when frying; very hot oil can spontaneously ignite.
- Used oil that may contain food residues can catch fire at a lower temperature than oil used for the first time. Do not place flammable products or objects that are wet with flammable products in or near the appliance.

WARNING!
Risk of burns from the appliance.
Do not immerse the cooking containers in water. Do not place the lid of the hot plate on the glass surface of the cooking zone. Do not leave cooking containers without water. Be careful not to drop objects or containers on the appliance. The surface may break.
Do not turn on the cooking zones with empty containers or without containers. Do not place aluminum foil on the appliance. Containers made of cast iron, aluminum, or with damaged bottoms may scratch the glass/glass-ceramic surface. Always lift objects when placing them on the cooking surface. - This appliance is intended only for cooking. It must not be used for other purposes, such as heating a room.
2.4 Cleaning and Maintenance
- Clean the appliance regularly to prevent damage to the surface material. Turn off the appliance and let it cool down before cleaning. Do not use water spray or steam for cleaning. - Clean the appliance with a soft, damp cloth. Use only neutral detergents. Do not use abrasive products, abrasive sponges, solvents, or metal objects.
2.5 Service
To repair the appliance, contact an authorized service center.
3. MAINTENANCE

WARNING!
Read the instructions for safety and reliability.
3.1 Maintenance procedure
Before installing the heating surface, read the information on the specification plate. The specification plate is located on the bottom of the device.
Serial number (S.N.)
Use only original spare parts.
Regarding the lamps inside this product and the spare lamps sold separately: these lamps are designed to withstand extreme conditions in household appliances, such as temperature, vibration, humidity, and are not designed for signaling the operating status of the device. They are not intended for other purposes and are not suitable for lighting rooms in the home.
2.6 Disposal

WARNING!
Risk of injury or damage.
- Contact your local authorities to obtain information on how to dispose of the device.
- Disconnect the device from the power supply.
- Remove the power cord from the device and dispose of it.
3.2 Installation of the heating surface
Use the appliance only if it is installed in the appropriate built-in elements and on work surfaces that comply with the standards.
3.3 Connection cables
The appliance has a connection cable. To replace the damaged power cord, use the cable type: H05V2V2-F which withstands
temperatures up to 90 °C and high voltage. Contact your local service center. The connection cable must only be replaced by a qualified electrician.
3.4 Installation
If the hob is installed above an oven, we ask you to follow the installation instructions for the oven to ensure the minimum distance between the appliances.
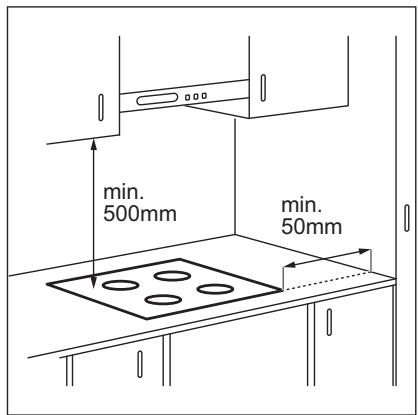
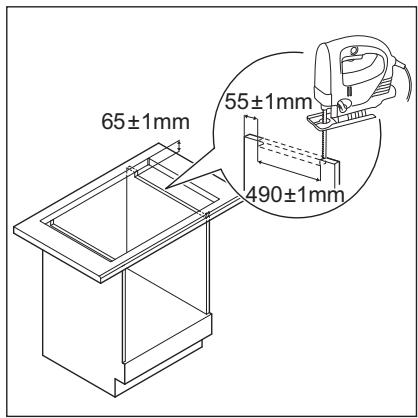
If the appliance is installed above a drawer, the ventilation of the surface for cooking may be obstructed by objects that are stored in the drawer during the cooking process.
Watch the video tutorial "How to install your induction hob AEG-Mounting" by entering the full name shown in the picture below.

YouTube
www.youtube.com/electrolux
www.youtube.com/aeg
| How to install your AEG Induction Hob - Worktop installation |
4. PRODUCT DESCRIPTION
4.1 Cooking surface layout
1 Induction cooking zone 2 Control panel
4.2 Control panel overview
Press the button to select the desired language. Explain, show and sound the functions work.
| Сенисторическая рone | Комentар | |
| 1 | ① | За вklучваши и пооча на пioчата за rotвенье. |
| 2 | За вklучваши и пооча на зakлuyваши яйу урет за бeзб endocт на.Deца. | |
| 3 | За за се пokаме akтунatable рингла. | |
| 4 | Показно с Bretло CountUp Timer. | |
| 5 | Показно с Bretло Тajмер за odбpoюваши. | |
| 6 | - | Екраз на тajмер: 00 - 99 мін'tи. |
| 7 | За вklучваши и пооча Bridgeи за піреминваши мігу ржими. | |
| 8 | ① | За за odберete Тajмер Функуши. |
| 9 | +/- | 3a згелемувашие и наималувашие на врemeTo. |
| 10 | - | 3a вklучвашие и在其専лучвашие Hob? Hood. |
| 11 | || | 3a вklучвашие и在其専лучвашие Пайза. |
| 12 | P | 3a вklучвашие PowerBoost. |
| 13 | - | 3a поставвашие поставka за щачина на толпината: 0 - 9. |
| 14 | ♀ | 3a вklучвашие и在其専лучвашие Slide. |
5. DAILY USE

WARNING!
Read the safety and warning instructions.
5.1 Activating and deactivating
Press the ① for 1 second to turn off the cooking zone.
The control panel is activated when you turn on the cooking zone and is deactivated when you turn off the cooking zone.
5.2 Automatic shut-off
The function automatically turns off the cooking zone if:
You have not placed a pan on the cooking zone for 50 seconds, you have not placed the pan on the cooking zone for 50 seconds after turning it on, you will step away and place something on the control panel for more than 10 seconds (pan, cloth). When you hear the sound signal, the cooking zone turns off. Remove the object or press the control panel. The cooking zone becomes standby (e.g. when the pan is empty). Let the ring cool down
Repeat the procedure to use the cooking zone again.
Do not turn off the ring and do not change the pan setting on the hob. After a certain time, the cooking zone turns off.
Relation between the setting of the hob and the time after which the cooking zone turns off:
6.1 Cooking zones

For the induction rings, the strong electromagnetic field can heat the cooking zones very quickly.
The induction rings are intended for use in accordance with the word for response.
- Place the rings for response only on a clean and dry surface before placing them on the cooking surface. Make sure the surface of the hob is clean and dry before placing it on the cooking surface. To avoid scratches, do not slide or drag the rings over the ceramic glass.
Material of the rings for response
Suitable: cast iron, steel, enameled steel, steel that does not rust, stainless steel (marked as suitable by the manufacturer). - Unsuitable: aluminum, copper, bronze, glass, ceramic, porcelain.
The rings for response are suitable for induction hobs for response if:
The water boils very quickly on the highest setting for the largest hob. - The magnet is attracted to the bottom of the ring for response.
Dimensions of the rings for response
- The induction rings are automatically adjusted to the dimensions of the bottom of the ring for response.
- The efficiency of the rings is related to the diameter of the ring for response. The ring for response with a diameter that is smaller than the minimum will only use part of the energy that the ring can use. To ensure safety and achieve optimal results from the response, do not use rings for response larger than those specified in the "Specification of the rings".
Avoid touching the rings for response near the control panel during the response process. This may affect the functioning of the control panel and unintentionally activate the functions of the response surface.
See "Technical data".
6.2 Sounds during operation
If you hear:
Humming sound: the ring for response is made of different materials (sandwich construction). Whistling sound: use the ring on a large hob and the rings for response are made of different materials (sandwich construction). Clicks: use a high energy level. Cracking: occurs due to electrical interference. Hissing, buzzing: the inverter is working.
The sounds are normal and are not a sign of malfunction.
6.3 Eco Timer (Eco Timer)
To save energy, the hob is automatically switched off before the programme for processing is activated. The difference in the working time depends on the set temperature and the duration of the cooking.
6.4 Examples of cooking applications
The relationship between the set temperature and the power consumption of the hob is not linear. When you increase the temperature, the power consumption of the hob does not increase proportionally. This means that a hob set to a lower temperature uses less than half of the maximum power.
The values in the table are only indicative.
| Посставки за所提供гравке | УлOTробerte за за: | Врeme (min) | Совети |
| 1 | ЧьавITE ja зrostвенataхрана топпа. | какошто e Heontхорд o | Ставete калak на садот за rotва bene. |
| 1 - 2 | Hollandaise сок, толеге: пуters, чokаладо, келатин. | 5 - 25 | Промшувajte odвреме-hаврeme. |
| 1 - 2 | Зацчсунваъе: мени OMлети, пechени щajца. | 10 - 40 | Готveъе поочино с可靠ak. |
| 2 - 3 | Гotваъе ориги ќаденьа сб млеско,所提供грав颦 roTOВи щаденьа. | 25 - 50 | Дожа对接 Нajмалку Двалати nobEVe TEчност od КOLTININATA на opIMOT, Meшajte Ги ќаденьате смлеско на поLOВИнна на rotBEBJeTO. |
| 3 - 4 | Гotвete на паea зеленчuk, риба, месо. | 20 - 45 | Дожа对接 НжOLКУ гоLEМи лжици TEчност. |
| 4 - 5 | Гotвete komпири на паea. | 20 - 60 | УлOTробerte маск. ¼ I вoda за 750 g komпири. |
| 4 - 5 | Гotвete полеми колчинихрана, чорби и суни. | 60 - 150 | До 3 по trп ТЕЧНOST пUCS coSTojkn. |
| 6 - 7 | Лесно пожеве:шицla, телешко кордан简易, кOTлети, ризоли, кOLTбasi, цн дрб, задшka, щajца, палачинки, крфни. | какошто e Heontхорд o | Завтete на поLOВИнна врeme. |
| 7 - 8 | Иntehinizho поожеве, пожен ренинkomпир,шицл. | 5 - 15 | Завтete на поLOВИнна врeme. |
| 9 | Сbatе вoda, ratвete т检тени, сржete месо (rynaш, пechенье), пжete komпир во Фрітера. | ||
| P | Вареюrel'mу кolyочебва вoda. PowerBoost e Вкту老人家. |
6.5 Practical advice for the hob
When you cook with the hob function:
Make sure that the extractor hood is not exposed to direct light. Do not place hot pans on the extractor hood. Do not cover the hob surface. Do not place any objects between the hob and the extractor hood (for example, with a hand or with a pan from the hob or a high pan). Be careful.
The extractor hood in the picture is only an example.

Remote control devices can block the signal. Do not use such devices near the hob when the hob is switched on.
Hobs with the hob function: to find out which hobs work with this function, visit the website. Hobs that work with this function must have the symbol
7. CARE AND CLEANING

WARNING! See the chapter on safety.
7.1 General information
- Clean the cooking surface after each use.
- Always use the cleaning agents for the hob. Before cleaning, remove the pan supports and the pan supports' effect on how the hob functions. Use a special cleaning agent for the hob. Use a special scraper for the glass.
7.2 Cleaning the hob
Remove: the pan support, the pan support grid, the wok ring, and the wok
Wok, on the contrary, dirt can damage the hob. Be careful not to scratch it. Place the special scraper for cleaning the hob on the glass surface and slide it over the surface.
The appliance is sufficiently protected: stains from food, water, fat stains, shiny metal marks on the hob. Clean the hob with a damp cloth and a mild detergent. After cleaning, wipe the hob with a soft cloth. Remove the shiny metal marks that remain: use a solution of water and vinegar and clean the glass surface with a damp cloth.
8. TROUBLESHOOTING

WARNING! See the chapter on safety.
9. TECHNICAL DATA
How to install your AEG Induction Hob - Worktop installation

4. PRODUCT DESCRIPTION
How to install your AEG Induction Hob - Worktop installation

4. APPLIANCE DESCRIPTION
Connect the appliance to the power supply after installation.
If the appliance has a fault, do not connect it to the power supply. Do not pull the power cable to disconnect the appliance. Disconnect the appliance by pulling the plug out of the socket. Use only correct separation devices: separation devices, fuses (fuses with a rating must be removed from the holder), automatic separation devices and contactors. - In the electrical installation there must be a separation device that allows you to disconnect all phases of the appliance. The distance between the contacts of the separation device must be at least 3 mm.
2.3 Use

WARNING!
Risk of injury from electric shock.
- Unpack the appliance, check it and protect the head (if any) before first use. This device is intended for indoor use only (in a closed space).
- Do not modify the specifications of this device. Make sure the ventilation openings are not blocked. Do not leave the device unattended during operation. Switch the cooking zone to "OFF" after each use. Do not place cookware or lids on the cooking zones. They may become hot.
- Do not operate the device with wet hands or when it is in contact with water. Do not use the device as a work surface or storage space. If the surface of the device is cracked, immediately disconnect it from the power supply. This prevents electric shock. Users with pacemakers must maintain a distance of at least 30 cm from the induction cooking zones when the device is operating.
- When you place food in hot oil, it may splatter.

WARNING!
Risk of fire and explosion
Fats and oils can release flammable vapors when heated. Keep the appliance and its heating elements away from fats and oils when cooking with them. Vapors released by very hot oils can ignite spontaneously. - Used oil, which may contain food residues, can ignite at a lower temperature than oil used for the first time. Flammable materials or objects soaked with flammable materials should not be placed on or near the device.

WARNING!
Risk of damage to the device.
Do not place hot cookware on the control panel. Do not place hot lids on the glass surface of the cooking zone. Do not allow liquid in the cooking zone to completely evaporate. - Make sure that objects or cookware do not fall on the device. The surface may be damaged. Do not activate the cooking zones if the cookware is empty or absent. Do not place aluminum foil on the device. Cookware made of cast iron, aluminum, or with damaged bottoms may scratch the glass/glass-ceramic. Always lift these items when moving them on the cooking surface. This device is intended for cooking only. It must not be used for other purposes, e.g., for heating the room.
2.4 Care and cleaning
Before cleaning, remove any adhesive residue or leftover material. After cleaning, wipe dry and leave to air dry. Do not use sharp objects or other tools for cleaning. Clean the device with a soft, dry cloth. Use only neutral detergents. Do not use abrasive products, abrasive sponges for dishes, solvents, or metal objects.
2.5 Servicing
- For servicing of the device, contact the authorized service center. Use only original spare parts. When it comes to failures inside the product and spare parts, parts sold separately:
These parts are not designed to withstand extreme physical conditions in some devices, such as temperature, vibrations, moisture, or are intended to provide information about the operating status of the device. They are not intended for use in other devices and are not suitable for lighting spaces in households.
2.6 Disposal

WARNING!
Risk of injury or damage.
- Contact the local organization to find out how to dispose of the device as waste.
- Disconnect the power cable of the device from the mains outlet.
- Cut the mains power cable at a location near the device and dispose of it.
3. INSTALLATION

WARNING!
See the safety sections.
3.1 Installation
Before installing the hob, note the data found on the rating plate with technical characteristics. The rating plate with technical characteristics is located on the bottom page of the hob.
3.2 Worktop cut-out
The worktop cut-out may only be used after installation in accordance with the corresponding kitchen elements for the worktop surface, which are in line with the standards.
3.3 Supply cable
The hob is supplied with a supply cable. To replace a damaged supply cable, use the cable type: H05V2V2-F which withstands a temperature of 90°C or higher. Contact the authorized service center. The supply cable may only be replaced by a qualified electrician.
3.4 Installation
If you install the hob under an extractor hood, refer to the installation instructions for the hood regarding the minimum distance from the hob.
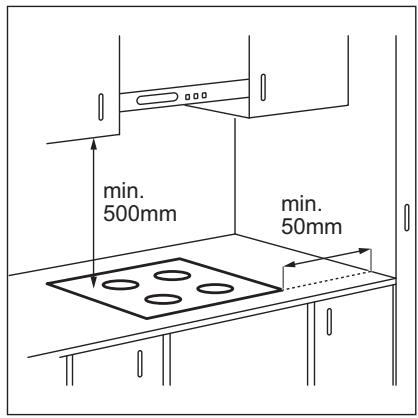
If the appliance is installed above an oven, the hob may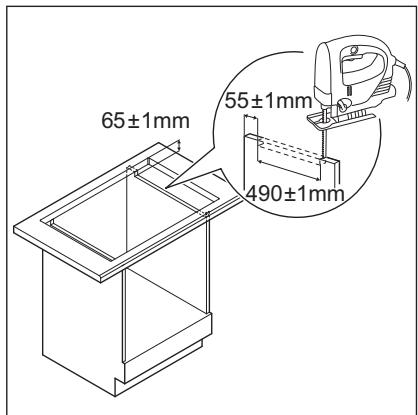
Preheat the utensils before the cooking process.
Watch the video instruction on how to install the AEG induction hob - worktop surface" by entering the name indicated on the type plate.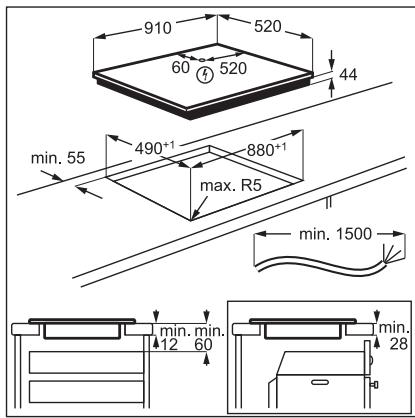

YouTube
www.youtube.com/electrolux
www.youtube.com/aeg
How to install your AEG Induction Hob - Worktop installation

4. PRODUCT DESCRIPTION
4.1 Control panel for cooking zones
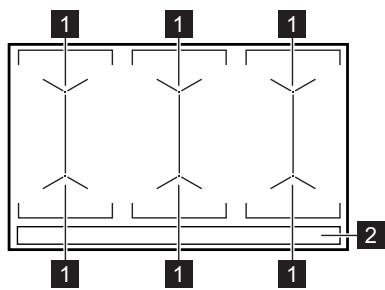
1 Cooking zone control 2 Control panel
4.2 Control panel description
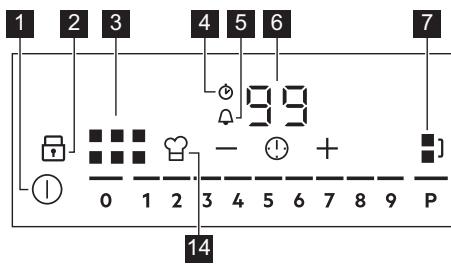
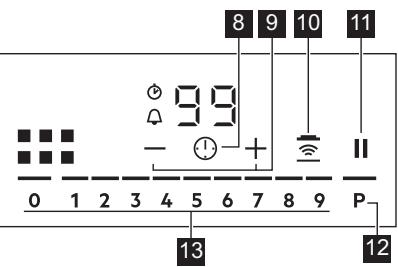
Use the sensor buttons to control the appliance. The indicators and acoustic signals indicate which functions are active.
5.15 Power management
If several zones are active and the total power exceeds the power limit, this function will distribute the available electrical energy among all cooking zones. The cooking zone regulates the required heat to protect the fuse in the household installation.
The cooking zones are grouped according to the number of phases in the cooking hob. Each phase has a maximum electrical load of 3680 W. If a cooking zone reaches the maximum available power for one phase, the power of the cooking zone will be automatically reduced. For cooking zones with reduced power, the control panel shows the maximum possible heat setting. - If a higher heat setting is selected, first reduce it for the other cooking zones. - The activation of the function depends on the number and size of the cooking zones.
See the possible combinations of electrical energy distribution among the cooking zones.
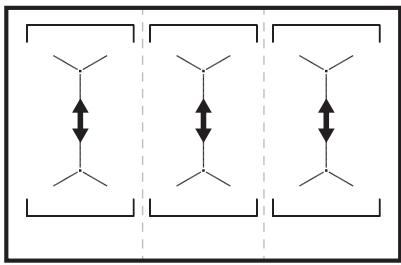
6. USEFUL TIPS

WARNING!
See the safety sections.
6.1 Cookware

The induction coils in the cooking zones very quickly generate heat in the cookware.
Use the cooking zones in combination with suitable cookware.
- The bottom of the cookware must be as flat as possible. Make sure that the bottom surfaces of the cookware are clean and dry before placing them on the hob surface. To avoid scratching the ceramic glass, do not slide or drag the cookware across it.
MATERIAL FOR COOKING
Correct: glass ceramic hob, glass ceramic hob, ceramic hob, dishes with a flat bottom (with the manufacturer's mark). Incorrect: aluminum, bakelite, plastic, glass, ceramics, porcelain.
The cookware is suitable for the cooking zone if:
Water quickly boils on the cooking zone when it is set to the highest temperature. - The bottom of the cookware attracts a magnet.
Dimensions of cookware for cooking
- The cooking zones automatically adjust to the dimensions of the cookware for cooking.
- The efficiency of the cooking zone is related to the diameter of the cookware for cooking. Cookware for cooking that is smaller than the minimum diameter only uses part of the energy generated by the cooking zone. For safety and optimal cooking results, do not use cookware for cooking that is larger than the cookware specified in the cooking zone specifications. Avoid keeping cookware for cooking close to the control panel during cooking. This may affect the functionality of the control panel or accidentally activate the cooking zone functions.

See the chapter "Technical data".
6.2 Noise during operation of the appliance
If you can hear:
Clicking: the cookware for cooking is made of different materials (sensor system construction). Whistling: use the cooking zone with a high power level and the cookware for cooking is made of different materials (sensor system construction). Humming: use a high power level. - Cracking: this may be due to an electrical discharge. - Hissing, buzzing: the fan is running.
These sounds are normal and do not indicate a fault.
6.3 Eco Timer
2. SAFETY INSTRUCTIONS
2.1 Installation

WARNING!
This appliance may only be installed by a qualified person.

WARNING!
How to install your AEG Induction Hob - Worktop installation

4. PRODUCT DESCRIPTION
How to install your AEG Induction Hob - Worktop installation

4. PRODUCT DESCRIPTION
How to install your AEG Induction Hob - Worktop installation

4. PRODUCT DESCRIPTION
- PRODUCT DESCRIPTION
- COOKING SURFACE LAYOUT
- CONTROL PANEL VIEW
- CONTENTS
- SAFETY INFORMATION
- SAFETY FOR CHILDREN AND PERSONS WITH REDUCED ABILITIES
- GENERAL SAFETY
- SAFETY INSTRUCTIONS
- INSTALLATION
- ATTENTION
- ELECTRICAL CONNECTION
- WARNING
- USE
- CLEANING AND MAINTENANCE
- SERVICING
- BEFORE INSTALLATION
- SWITCHING ON
- BUILT-IN INSTALLATION
- CONNECTING THE CABLE
- YOUTUBE
- DESCRIPTION OF THE APPLIANCE
- LAYOUT OF THE COOKING SURFACE
- LAYOUT OF THE CONTROL PANEL
- DAILY USE
- ACTIVATING AND DEACTIVATING
- AUTOMATIC OPERATION
- USING THE WASHING ZONE
- SETTINGS FOR HEATING
- POWERBOOST
- OPTIHEAT CONTROL (3-STAGE RESIDUAL HEAT INDICATOR)
- TIMER
- TIMER FOR SWITCHING OFF
- COUNTUP TIMER
- CHILD SAFETY LOCK
- OFFSOUND CONTROL
- (DEACTIVATING AND ACTIVATING THE SOUNDS)
- NEW MODE
- AUTOMATIC CONTROL OF THE FUNCTION
- ACTIVATING THE LIGHTING
- AUTOMATIC MODE
- DIMENSIONS OF THE FOOD
- NOISES DURING OPERATION
- IF YOU HEAR
- THE DEVICE DOES NOT INDICATE A MALFUNCTION
- ECO TIMER
- APPLIANCE OVERVIEW
- SOUND DURING OPERATION
- IF YOU CAN HEAR
- CUSTOMER CARE AND SERVICE
- CHILDREN AND VULNERABLE PEOPLE SAFETY
- CARE AND CLEANING
- SERVICE
- DISPOSAL
- BEFORE THE INSTALLATION
- BUILT-IN HOBS
- CONNECTION CABLE
- ASSEMBLY
- CONTROL PANEL LAYOUT
- AUTOMATIC SWITCH OFF
- THE FUNCTION DEACTIVATES THE HOB AUTOMATICALLY IF
- USING THE COOKING ZONE
- CAUTION
- HEAT SETTING
- OPTIHEAT CONTROL (3 STEP RESIDUAL HEAT INDICATOR)
- COUNT DOWN TIMER
- MINUTE MINDER
- BRIDGE
- POWERPOINT
- PAUSE
- LOCK
- CHILD SAFETY DEVICE
- OFFSOUND CONTROL (DEACTIVATING AND ACTIVATING THE SOUNDS)
- HOB²HOOD
- ACTIVATING THE LIGHT
- CHANGING THE AUTOMATIC MODE
- OPERATING THE FAN SPEED MANUALLY
- HINTS AND TIPS
- POWER MANAGEMENT
- COOKWARE
- COOKWARE MATERIAL
- COOKWARE IS SUITABLE FOR AN INDUCTION HOB IF
- COOKWARE DIMENSIONS
- THE NOISES DURING OPERATION
- THE NOISES ARE NORMAL AND DO NOT INDICATE ANY MALFUNCTION
- ÖKO TIMER (ECO TIMER)
- EXAMPLES OF COOKING APPLICATIONS
- HINTS AND TIPS FOR HOB²HOOD
- GENERAL INFORMATION
- CLEANING THE HOB
- TROUBLESHOOTING
- WHAT TO DO IF
- IF YOU CANNOT FIND A SOLUTION
- TECHNICAL DATA
- RATING PLATE
- COOKING ZONES SPECIFICATION
- ENERGY EFFICIENCY
- PRODUCT INFORMATION
- ENERGY SAVING
- ENVIRONMENTAL CONCERNS
- FOR BEST RESULTS
- DESCRIPTION DE L'APPAREIL
- FOR PERFECT RESULTS
- SETTING UP THE APPLIANCE
- HOB OVERVIEW
- CONNECTION TO THE MAINS
- MAINTENANCE
- MAINTENANCE PROCEDURE
- INSTALLATION OF THE HEATING SURFACE
- CONNECTION CABLES
- CONTROL PANEL OVERVIEW
- AUTOMATIC SHUT-OFF
- THE FUNCTION AUTOMATICALLY TURNS OFF THE COOKING ZONE IF
- COOKING ZONES
- MATERIAL OF THE RINGS FOR RESPONSE
- THE RINGS FOR RESPONSE ARE SUITABLE FOR INDUCTION HOBS FOR RESPONSE IF
- DIMENSIONS OF THE RINGS FOR RESPONSE
- SOUNDS DURING OPERATION
- THE SOUNDS ARE NORMAL AND ARE NOT A SIGN OF MALFUNCTION
- ECO TIMER (ECO TIMER)
- PRACTICAL ADVICE FOR THE HOB
- APPLIANCE DESCRIPTION
- WORKTOP CUT-OUT
- SUPPLY CABLE
- CONTROL PANEL FOR COOKING ZONES
- CONTROL PANEL DESCRIPTION
- USEFUL TIPS
- MATERIAL FOR COOKING
- THE COOKWARE IS SUITABLE FOR THE COOKING ZONE IF
- DIMENSIONS OF COOKWARE FOR COOKING
- NOISE DURING OPERATION OF THE APPLIANCE
Brand : AEG
Model : IKE95471FB - IKE95474FB
Category : Hob