FP 3121 - Food Processor MOULINEX - Free user manual and instructions
Find the device manual for free FP 3121 MOULINEX in PDF.

User questions about FP 3121 MOULINEX
0 question about this device. Answer the ones you know or ask your own.
Ask a new question about this device
Download the instructions for your Food Processor in PDF format for free! Find your manual FP 3121 - MOULINEX and take your electronic device back in hand. On this page are published all the documents necessary for the use of your device. FP 3121 by MOULINEX.
USER MANUAL FP 3121 MOULINEX
Thank you for choosing an appliance from the Moulinex range, which is intended exclusively for the preparation of food and is only for indoor, domestic use.
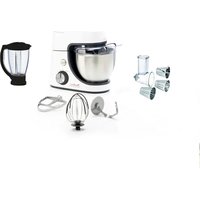
The accessories contained in the model you have bought are represented on the label located on the top of the packaging.

SAFETY INSTRUCTIONS
- Read the instructions for use carefully before using your appliance for the first time: the manufacturer shall accept no liability in the event of any use that does not comply with the instructions.
- This appliance is designed for domestic use only. Any commercial use, inappropriate use or failure to comply with the instructions, the manufacturer accepts no responsibility and the guarantee will not apply.
- This appliance is not intended for use by persons (including children) with reduced physical, sensory or mental capabilities, or lack of experience and knowledge, unless they have been given supervision or instruction concerning use of the appliance by a person responsible for their safety.
Children should not be allowed to play with the appliance. - Please check that the supply voltage indicated on the name plate of the appliance corresponds to your electrical installation.
- The appliance must be unplugged when no longer in use, during cleaning or in the event of a power cut.
- Do not use your appliance if it does not operate correctly, if it has been damaged or if the power cord or plug is damaged. To maintain safety, these parts must be replaced by an approved service centre (see list in the service booklet).
- Any maintenance other than routine cleaning and upkeep by customers
must be carried out by an approved service centre.
- Do not immerse the appliance, cord or plug in liquid.
- Do not leave the power cord within reach of children, close to a heat source or on a sharp edge.
- For your safety, only use accessories and spare parts that correspond to your appliance, sold by an approved service centre.
- Handle the blades and discs very carefully: they are extremely sharp. You must remove the chopping blade (c2) by the drive (c1) before emptying the bowl of its contents.
- Do not use the blender (d1) empty or only with dry products (hazelnuts, almonds, peanuts, sugar, etc.)
Always use the blender (d1) with its lid (d2). Only use liquids or food at simmering temperature or below.
Always pour the liquid ingredients into the blender first (d1), before adding the solid ingredients, without exceeding the maximum level. Never pour a boiling liquid into the bowls.
- When you wish to grate or slice food, always use the pusher (b4). Never use your fingers or another utensil to push the food down.
- Never attempt to remove moving accessories. Wait for the appliance to stop completely before removing the accessories.
- Do not use the bowls as containers for freezing, cooking or sterilisation.
- Do not leave the appliance unattended whilst in use.

USING FOR THE FIRST TIME
- Remove the accessories from the packaging and clean them with warm water and washing up liquid Rinse and dry them carefully.
The knives and discs are extremely
sharp; handle them with caution.
- Place the motor unit (a1) on a flat, clean, heat resistant and dry surface and then plug in your appliance.

USING YOUR APPLIANCE
- Before turning on the appliance, you must fit the bowl (b1) on the motor unit (a1), making sure it is perfectly positioned in the slots provided. (Fig. 1a).
Place the accessory corresponding to the intended use in the bowl. Place the metal spindle on of the lid (b2) in the hole on the motor unit (a1) (Fig. 1b). Position the lid on top of the bowl. Lock the lid (b2) by pressing on the trim of the feeder tube (b3). Make sure the lid is locked correctly (you should hear it "click")
- Then turn the speed selector (a2).
- Pulse: for better control of certain preparations.
- Continuous operation: Turn the selector to position 1 (slow) or 2 (fast).
- Stop: Turn the selector to position 0
To unlock the lid, turn the speed selector to stop position, press the unlock button (a3) before attempting to remove the lid (Fig. 2a).
Once unlocked you can then remove or rotate the lid clockwise. (Fig. 2b)
KNEADING/MIXING/CHOPPING/ BLENDING
- Fit the chopping blade (c2) in the drive (c1) and turn clockwise until it locks. (Fig. 3).
- Place the assembly on the central shaft of the bowl.
- Put the ingredients in the bowl.
- Fit the lid and lock it. Start the appliance. If making dough, stop the appliance as soon as you see it form a ball. Do not chop products that are too hard (ice, sugar) or that need to be finely ground (grains, coffee beans, hard spices).
BEATING/EMULSIFYING/WHISKING
- Fit the emulsifying disc (c3) in the drive (c1) and turn clockwise until it locks. (Fig. 4)
- Place the assembly on the central shaft of the bowl.
- Put the ingredients in the bowl.
- Fit the lid and lock it. Start the appliance. Never use this accessory to knead heavy dough (bread dough, etc.) or to mix light mixtures (cookies, sponge cakes, etc.). Instead use the chopping blade.
GRATING/SLICING
- Place the drive (c1) on the central shaft of the bowl. Then place the disc (A/D, C/H or E) on the drive. (Fig. 5)
-
Fit the lid and lock it. Start the appliance.
-
Disc A (fine grating) / Disc D (fine slicing) (*depending on model).
- Disc C (coarse grating) / Disc H (thick slicing) (*depending on model).
- Disc E (chips) (*depending on model).
To use the blender (d1) alone, the empty bowl (b1) (without any accessories) must be in position on the motor unit with the lid locked (b2). (Fig. 6a)
-
Open the cover (a4) on the rear of the motor unit (a1). Place the blender (d1) on the hatch cover. (Fig. 6b).
-
Put the ingredients in the jug and lock the blender lid (d2) with the measuring cap (d3) in place.
- Start the appliance.
To add ingredients while the appliance is working, remove the measuring cap (d3) from the lid and add the ingredients through the feeder hole.
When blending, if the ingredients stick to the sides of the bowl, stop the appliance and unplug it. Remove the blender unit from the body of the appliance. Using the spatula (I), scrape drop the ingredients onto the blades.
TWIN SYSTEM: (b1) + (d*) (* Depending on model)

You can prepare food in the food processor bowl (b1) and blender (d^*) at the same time. For example, a soup in the blender and dough in the bowl.
Preparations: (* Depending on model)
| Function | Max quantity | Time | Speed | Accessories |
| CHOPPING | ||||
| •Hard vegetables (carrots, celery, etc.) | 350 g | 30 sec. | 2-Pulse | c2 |
| •Soft vegetables (onions, spinach, etc.) | 350 g | 30 sec. | 2-Pulse | |
| •Raw meat (boneless, sinew removed, diced) | 350 g | 30 sec. | 2-Pulse | |
| •Raw and cooked fish | 350 g | 30 sec. | 2-Pulse | |
| •Cheese, dry fruits | 350 g | 30 sec. | ||
| BLENDING | ||||
| •Soup, stewed fruit | 0.5 l | 20 sec. | 2-Pulse | c2 |
| KNEADING | ||||
| •Heavy dough (bread dough, crumble mixture, pastry, shortcrust pastry, pizza) | 800 g | 30 sec. | 2 | c2 |
| •Light mixture (cookies, sponge cake) | 1 kg | 1 min 30 | 2 | |
| GRATING | ||||
| •Carrots, celery, etc. | 700 g | 20 sec. | 2-Pulse | A/C* |
| SLICING | ||||
| •Potatoes, carrots, cucumbers | 700 g | 20 sec. | 1-2-Pulse | D/H* |
| •Chips | 700 g | 20 sec. | 1-2-Pulse | E* |
| BEATING/ EMULSIFYING | ||||
| •Whipped egg whites & cream | 4 egg whites / 300 ml fresh cream | 1-2 min | 1-2 | c3 |
| •Mayonnaise | 1 egg yolk / 250 ml oil | 60-120 sec | 1-2 | |
| BLENDING | ||||
| •Cream soup | 1 l | 1 min 30 | 2-Pulse | d* |
| •Stewed fruit | 1 l | 1 min 30 | 2-Pulse | |
| •Milkshake, cocktail | 1 l | 1 min 30 | 2-Pulse | |
| •Liquid batter (pancakes, fritters, Yorkshire pudding). | 1 l | 2 min | 2-Pulse |
- Unplug the appliance. The blades of the accessories are very sharp. Handle them with caution.
- For easier cleaning, rinse the accessories quickly after use.
- Wash, rinse and dry the accessories, bowls and lids: they can go in the dishwasher, or under the tap with the exception of the motor unit (a1). Wipe them with a damp sponge.
- The metal spindle of the lid (b2) is protruding; be careful when placing it in the dishwasher.
- Do not use scouring pads or objects containing metal parts.
Tips:
- In the event any of your accessories are coloured by food (carrots, oranges, etc.), rub with a cloth soaked in cooking oil and then clean them as usual.
- Pour hot water with a few drops of washing up liquid in the blender (d1). Close the lid (d2). Press pulse a few times. Unplug the appliance. Rinse the bowl in running water and leave it to dry.

WHAT TO DO IF YOUR APPLIANCE DOES NOT WORK?
If your appliance does not work, check:
- that it is properly plugged in
- that the bowl is positioned correctly (b1), that the lid is locked in place (B2), that the accessories are inserted correctly.
- that the speed selector in the correct position (a2)
- that the chopper bowl (b1) and its lid (b2) are locked in place before operating the blender (d1).
Your appliance is equipped with an exclusive overheat protection system. If your appliance stops while being operated, unplug the cord and let it cool down for 30 minutes before continuing with your initial preparation.
If you have followed all these instructions and your appliance still fails to operate:
Contact an authorised service centre (see list in the Service booklet).

ACCESSIONS
You can customise your appliance and obtain the following accessories from an authorised service centre:
A/D: Fine grating / Thin slicing
E: Chip cutter
- Blender (d)
- Grinding accessory

- Disposal of the appliance and its packaging materials
The packaging is comprised exclusively of materials that present no danger for the environment and which may therefore be disposed of in accordance with the recycling measures in force in your area.
For disposing of the device itself, please contact the appropriate service of your local authority.
End of life electrical and electronic products:
Your appliance is expected to last for many years. However, when the time comes to replace it, do not throw it in the bin or in a dump, but take it to the recycling centre in your town (or to a waste reception centre where applicable).

①

Think of the environment!
Your appliance contains valuable materials which can be recovered or recycled.
Leave it at a local civic waste collection point.
If you have any problems or queries, please call our Helpline:
HELPLINE:
0845 602 1454 - UK
(01) 6774003 - ROI
Or consult our website - www.moulinex.co.uk
TWIN-SYSTEM: (b1) + (d^*)(*jenachModell)

RENGORING AF APPARATET
IPIN ANO THN INPQTH XPHSH
ApaipoeTe ta eApntmuTa aTo tn OuOeuaia Touc KAL KAthetapeTe Ta me vpoc Kaatouvad. EenluveTe KAL OKoutiote Ta KaA
Oi IeipieKai OI biokoi eivai Eaeipetik aixmu, Va T
XeipieoTe npoooxn.
ToT0eTnOte Tny KevTpkn Movad8a (a) Tavw Oe Ia Etnite8n, K0Xapn kai OTeYvN EtIupAve1a KAI KAtoTIV ouvdeTe Tn ouoKeun oTopeu.

XPHSE
aalal yaiy gaiy dkiay ci ylae jaiy aaiy gaiy aiaii
$$ (d ^ {*}) + (b 1): \text {g i j o p} $$
$$ (j _ {i} \text {s a l l} ^ {*}) $$
jai jai plai jai (b1) 1gll jaiiyu piabll .gill g (d* ) bliy

e 1111 1111 1111 1111 1111 1111 1111 1111 1111 1111 1111 1111 11
paball yaaal jaaalal gddjiall
aill 1e 1 aagall 1al 1e 8gdo. gail gai all e aol all
aXuU
ailll l iuulll 1
gaii I Lai iiee y iiaal
laee jy 1
j jy 11111111111111111111111111
g jlll l l l l l l l l l l l l l l l l l l l l l l l l l l l l l l l l l l l l l l l l l l l l l l l l l l l l
aJ 1 aJ 1 J 1 J
gllg. 110
slll jslj 8u 8u 8u 8u 8u 8u 8u 8u 8u 8u 8u 8u 8u 8u 8u 8u 8u 8u 8u 8u 8u 8u 8u 8u 8u 8u 8u 8u 8u 8u 8u 8u 8u 8u
glally gi. iejdi (d1) 6xjj Jaaas
Lao, gaiill, jolll, gaiill Jio
(Layg, Sall) (d1) bly all lai Jaiiw.
(2) ydiell wail baiy laiw.(d2)
Jaiuul plalal gaiy Jaiu yloic jai Laiu Jaiiu (b4) uall Las
Jaiyil all lalal y jai Jai jai 15jai 15 jai jai
Jalalall Jd Jai pealll jajil cayjai Jai