USER MANUAL MDS7205X CATA
Operating and maintenance instructions for built-in ovens
IT
HctpyKuH N O 3KcIIpyaTuHH IN TexHHuecKOMy 06cJIyJKBaHHIO BCTpaHBAeMbIX JYXOBOK.
CH
嵌入式烤箱操作及维护指引
REEMPLACEMENT DE L'AMPOULE DU FOUR
DIMENSIONS INTÉRIÉUES
Thank you for choosing one of our products. We hope this household appliance provides you with the best service. Therefore, we suggest you read the instructions and suggestions contained in this manual carefully in order to use our products correctly.
The specifications plate for this oven is available on this appliance. This plate, visible by opening the door, displays all the necessary identification information for this appliance for ordering replacement parts.
Please read this manual carefully before using the appliance. It is important that all the control functions are understood before beginning to cook with this appliance.
Heed the advice and warnings included under the title "IMPORTANT - Safety advice and instructions".
- This appliance has been designed for private domestic use and can be integrated into standard kitchen furnishings or similar.
- In order to use in caravan-type vehicles, the suitable indications included in the Installation Instructions should be borne in mind.
- Use of this appliance for any other purpose or in any other environment without the manufacturer's express agreement will invalidate any guarantee or liability.
- This new appliance is guaranteed against electrical or mechanical defects, subject to certain exclusions indicated in the Manufacturer's Terms and Conditions of the Guarantee.
- The above does not affect your statutory rights.
Ensure that all protective packaging and covering has been removed before using this appliance.
To collaborate in protecting the environment, separate the packaging materials into the different types and dispose of them according to local waste disposal regulations.
The packaging is designed so as not to harm the environment; it can be recovered or recycled as it is an ecological product. By recycling the packaging, you will contribute to saving raw materials and reducing the volume of industrial and domestic waste.
Any additional information on waste disposal may be requested from your local environmental agency.
When used for the first time, a slight smell from the protective covering or damp may be noticeable, which will disappear after a short time.
The symbol on the product or its packaging indicates that this product cannot be treated as normal household waste. This product must be handed over to an electric and electronic equipment collection point for recycling. On ensuring that this product is disposed of correctly, you will help to avoid possible negative consequences for the environment and public health, which could occur if this product is not handled correctly. To
receive more detailed information about recycling this product, contact your local government, domestic waste disposal services or the outlet where the product was bought.
This appliance has been built and distributed in compliance with the essential requirements of the following EEC EUROPEAN LAWS AND DIRECTIVES:
EC Symbol - 93/68 Low voltage - 73/23 CEM-89/336
Safety Rules - EN 60 335-1, EN 60 335 -2 -6.
This appliance respects laws of the suppression of radio-interference.
As the Manufacturer has a policy of continuous product improvement, it reserves the right to adapt and carry out any modification considered necessary without prior warning.
IMPORTANT NOTICE
SAFETY INSTRUCTIONS AND WARNING
INSTRUCTIONS
This User Manual must be kept for future reference and use by someone who is not familiar with the appliance.
Before using the oven, carefully clean the inside with a non-abrasive detergent and warm water. Introduce the grill and tray in their respective runners. Once the operation is complete, turn the oven on to the maximum temperature for approximately 20 minutes to remove any traces of manufacturing grease, oil or resins which may cause unpleasant odours when cooking.
WARNING: During this first heating some smoke or unpleasant odours may appear. Should this happen ventilate the room suitably until the first operation is finalised.
Once this simple operation has been carried out the oven is ready to use for cooking.
This appliance is exclusively for domestic use.
Use the oven to cook food only.
USING THE OVEN
The oven is controlled by a thermostat between 50^ and 250 ^ C, depending on the temperature required. The thermostat pilot light turns on and off to indicate the temperature control during use.
The required cooking mode is selected using the multi-functional control button. The functions that may be selected are:

A. OVEN LIGHT. Automatic when selecting the cooking mode for all models. The oven light remains on when using the oven.

B. CONVECTION MODE. Provides traditional cooking with heat from the upper and lower elements.

C. UPPER ELEMENT MODE. For gentle cooking, browning or keeping cooked dishes warm.

D. LOWER ELEMENT MODE. For slow cooking and heating food.

E. FAN-ASSISTED CIRCULAR ELEMENT MODE. Provides uniform heating with the fan and allows different
dishes to be cooked at the same time on different levels.

F. FAN-ASSISTED LOWER ELEMENT MODE. This provides heating by semi-convection with the lower element elicate dishes.

G. FAN-ASSISTED CONVECTION MODE. This provides convection heating of the upper and lower elements for form cooking.

H. GRILL. For gratinating and browning food.

I. MAXI-GRILL. As above, but the grill element provides a larger area for roasting.

J. FAN-ASSISTED GRILL. This provides fast browning so that food remains juicy. For convection baking, this is the most energy-efficient function.

K. THAWING MODE
The fan works without heat to reduce the thawing time for frozen food.
USEFUL ADVICE
- Before cooking, make sure all oven accessories that are not required are removed from the oven.
- Pre-heat the oven to the cooking temperature before using it.
- Place the cooking trays in the centre of the oven and leave space in between when using more than one, so that the air can circulate.
- Do not fill the tray to full when preparing a juicy, fruit cake. Any fruit juice that drips from the tray will produce stains that cannot be removed.
- Do not put oven trays on the base of the oven or cover it with aluminium foil. This will cause thermal accumulation. The cooking and roasting times will not coincide and the enamel may be damaged.
- Try to open the oven door as little as possible to see the food (the oven light remains on during cooking).
- Take care when opening the door to avoid contact with hot parts and steam.
COOKING INSTRUCTIONS
Read the information of the food packaging for the cooking temperatures and times. Once familiar with the performance of the appliance, the temperatures and times may be varied to adapt them to your personal tastes.
Check that frozen food is completely thawed before cooking, unless indicated otherwise.
| Type of food | Temp. °C | Runners | Cooking time
in minutes
Suggested | Personal |
| Cake mixture desserts in moulds |
| Sponges or buns | 175 | 2 | 55-65 | |
| Cake | 175 | 3 | 60-70 | |
| Short pastry desserts in moulds |
| Pie base | 200 | 3 | 08-10 | |
| Cheesecake pie base | 200 | 3 | 25-35 | |
| Fruit pie base | 200 | 3 | 25-35 | |
| Raised dough desserts in moulds |
| Pie base | 180 | 3 | 30-45 | |
| Soft bread 1 kg of flour | 200 | 3 | 25-35 | |
| Small pastries |
| Short pastry | 200 | 3 | 10-15 | |
| Doughnut dough | 200 | 2 | 35-45 | |
| Biscuit dough | 200 | 3 | 15-20 | |
| Lasagne | 225 | 2 | 40-50 | |
| Meats (Cooking time per cm of thickness) |
| Long roasts | 200 | 2 | 120-150 | |
| Short roasts | 200 | 2 | 60-90 | |
| Meatballs | 200 | 2 | 30-40 | |
| Poultry |
| Duck 1 1/2 Kg | 200 | 2 | 120-180 | |
| Goose 3 Kg | 200 | 2 | 150-210 | |
| Roast chicken | 200 | 2 | 60-90 | |
| Turkey 5Kg | 175 | 2 | 240-260 | |
| Game |
| Hare | 200 | 2 | 60-90 | |
| Leg of venison | 200 | 2 | 90-150 | |
| Vegetables |
| Oven-baked potatoes | 220 | 2 | 30-40 | |
| Cooked vegetable flan | 200 | 2 | 40-50 | |
| Fish |
| Trout | 200 | 2 | 40-50 | |
| Sea Bream | 200 | 2 | 40-50 | |
| Pizza | 240 | 3 | 10-20 | |
| Grill |
| Chops | | 4 | 8-12 | |
| Sausages | | 4 | 10-12 | |
| Grilled chicken | | 2 | 25-35 | |
| Spit-roasted veal 0,6Kg | | | 50-60 | |
- The runner number is counted from the bottom of the oven up (Excluding the base of the oven as trays cannot be placed on it)
THE POSITION INFORMATION IS INDICATIVE BECAUSE THE COOKING TYPE AND TIMES CHANGE DEPENDING ON THE QUANTITY AND QUALITY OF THE FOOD.
HOW TO USE THE GRILL
Place the food to be browned on the grid or in the shallow tray. The grid has to be placed on the highest runner, whilst the tray for collecting fat should be on the lower runner. Connect the grill using the following positions of fan-assisted oven selector knob or in the position of the multi-function oven selection knob.
Depending on the type of food (meat, fish, poultry, etc.) it will be necessary to turn it over to expose both sides to the infra-red rays of the grill. For guidance only, we indicate some cooking times below:
| Food to be grilled | Cooking times in minutes Suggested |
| Lean or thin meat | 4-6 |
| Normal meat | 5-8 |
| Fish without scales | 8-10 |
| Fish (e.g. Trout, salmon) | 12-15 |
| Sausages | 10-12 |
| Sandwiches | 2-5 |
WARNING
- Do not use aluminium foil to cover the grill tray or heat.
- Do not wrap elements in aluminium foil or place them under the grill - the great reflective quality of aluminium may damage the grill element.
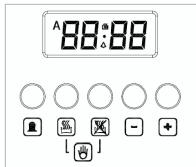
Description of the button functions:

Alarm

Automatic cooking (duration)

End of cooking time (end time)

Manual operation

Reducing numbers in all programmes

Adding numbers in all programmes
Meaning of the lit symbols:

Indicates that programmed cooking is under way or it is the manual position.

Programmed alarm.

More "A" (Both flashing): Programming error.
A: AUTOMATIC PROGRAMME
Flashing: Programmer in automatic position, but not programmed or ended.
(Light on): Programmer in automatic position and programmed.
No symbol lit, except the clock numbers means that a waiting
time is programmed.

Programmer functions:
24-hour display clock.
Alarm (Maximum 23:59).
Automatic programming (start and end of cooking).
Semi-automatic cooking (only start or only end of cooking).
The timer only works when the appliance is connected to the electricity supply.
Electronic clock
Immediately after connection (Also after a power cut) THREE flashing digits will appear on the panel.
To enter the correct time press + simultaneously and AT THE SAME TIME one of the buttons -ó + until the correct time is shown. There is a 5-second acceptance delay during which no button should be touched.
The speed that the marker changes will noticeably increase some seconds after beginning to press the buttons and
Manual cooking
(Without using the programmer)
To use the oven with the help of the programmer, the flashing «A» indication must be cancelled by pressing the button
If the «A» indicator is not flashing (which means that the
oven is programmed) the programming must be cancelled first by pressing and setting the marker to 0.
Automatic cooking.
(Start and end of cooking)
1)Programme the cooking time using
2)Programme the end of the cooking time using
3) Select the temperature and function required using the thermostat and selector knobs.
After these operations, the «A» symbol will appear on the display, indicating that the oven has been programmed.
Practical example:
We wish to cook for 45 minutes and that the cooking time ends at 2 p.m.
- Pressing (1) we set 0.45 on the display.
- Pressing we set 14:00 on the display.
After these operations the current time will reappear on the display as well as the «A» symbol, indicating that our programming has been understood and memorised.
At 13:15 (14:00 minus 45 minutes), the oven will automatically start, the symbols 15.00 min 15.00 min . and «A» appearing during cooking.
At 14:00 the cooking will automatically stop and the alarm will
sound intermittently.
Press to turn the alarm off.
Semi-automatic cooking
A. Programming the duration of the cooking
Set the chosen cooking time using the button and set the duration.
Cooking will start immediately, the symbols «A» and «B» will appear on the display. When the programmed time has passed the cooking will stop and the alarm will sound intermittently. Turn the alarm off as described above.
B. Programming the end of the cooking
Set the chosen end time for the cooking using the button and set the end time. Cooking will start immediately and the symbols «A» and will appear on the display. Cooking will end at the set time and the alarm will sound intermittently. Turn it off as indicated above. The state of the programming can be checked at any time by pressing the corresponding button.
The programming can also be cancelled at any time by pressing and setting the marker to zero. By then pressing the oven will be ready for manual operation.
Electronic alarm
The timer function consists solely of an alarm which can be adjusted for a maximum period of 23:59. To adjust the time, press the button and at the same time (+) or (-) until the desired time appears. Having made the adjustment, the real time will reappear next to the symbol
The countdown will begin immediately and can be viewed on the display at any time by simply pressing the button. When the time has ended, the symbol will disappear and the alarm will sound intermittently, which may be turned off by pressing the button. The alarm does not control any of the oven functions.
NOTE
- If an error is made it will be indicated via an alarm and the "A" symbol will flash. Cancel the adjustment by pressing the button , and then re-programme to rectify it.
- The alarm that sounds at the end of a programme will continue for seven minutes unless cancelled by pressing the button. However, at the end of the seven minutes the "A" symbol will continue flashing.
- The alarm has three tone positions, low, medium and high. To adjust the tone, check that the timer is in the manual mode, then press the button and hold down to hear the tone selected.
On releasing the button, press again and hold down to select another tine. Repeat the procedure until the required tone is heard.
WARNING! a power cut will result in the programmed functions to be cancelled, including the clock. Once the power returns three flashing zeros will appear and the oven can be re-programmed.
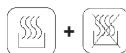
USING THE MECHANICAL TIMER
Once the thermostat controls are in the desired position, turn the knob clockwise to the maximum position and then turn it anti-clockwise to the desired time; at the end of this set time the buzzer will sound. The timer only indicates the end of the set time, but it does not stop the function being used.
CLEANING THE APPLIANCE
IMPORTANT
As a safety precaution, before beginning to clean the oven always unplug it from the power supply or remove the appliance power lead.
Cleaning an oven that does not self-cleaning panels must be done after use, when it is switched off but still warm, not hot, so that the film of grease produced by the cooking vapours on the walls is still easy to remove, as well as the drips and splashes of fat that are not yet hard and dry.
Remove the chrome-plated wire side supports; pull the front part upwards to unattach them from the wall and remove them from the rear orifices. Clean the oven with a soft cloth soaked in a diluted ammoniac solution; rinse and dry. If there are still stains and splashes, place a damp cloth soaked in ammoniac at the back, close the door and, after a few hours, wash the oven with warm water and liquid detergent, rinse and dry carefully. To clean the shiny metal outside doors, use a soft cloth with soap and water; do not use any powdered products that contain abrasive substances.
Also avoid the use of acid or alkaline substances (lemon juice, vinegar, salt, tomatoes, etc.). Avoid using products containing chlorine, acid or abrasive substances specially for cleaning the varnished walls. Do not use thick steel wool or hard utensils, as they can damage the surface finishes.
Do not use high pressure cleaners or steam appliances for cleaning the oven.
Normally, wiping with a damp soft cloth and warm detergent is enough, but for stubborn stains the following is recommended:
VTRIFIED ENAMELLED PARTS
Only use a recommended cleaner for this type of material - avoid chloride-based products such as bleach.
GLASSDOOR PANEL
Do not use abrasive products which could damage the glass. Remember that if the surface of the glass panel becomes scratched, it could cause a dangerous failure.
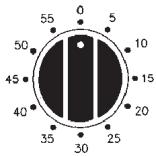
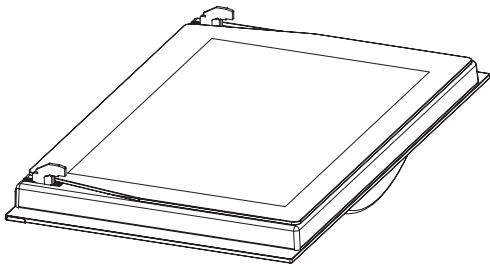
To simplify the cleaning, the inner glass panel can be taken out of the door.
REMOVING THE DOOR FROM THE OVEN
To simplify cleaning the interior of the oven, the door can be removed.
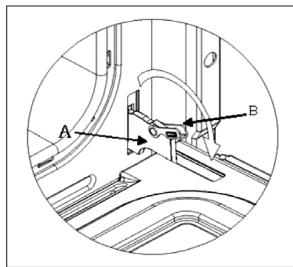
Door type
The hinges "A" have two moving bolts "B".
When the bolt "B" is lifted, the hinge comes out of its housing.
Then close the door to the half-way position.
Next, lift the door upwards and remove it, sliding it outwards; hold the door by the sides close to the hinges when doing this. To replace the door, first slide the hinges into their grooves and open the door completely.
Remember to turn the two moving bolts "B" used to engage the two hinges before closing the door (Fig. 3).
WARNING
- Take care not to remove the hinge locking system when taking off the door, as the hinge mechanism can spring back suddenly.
- Never submerge the door in water for any reason.
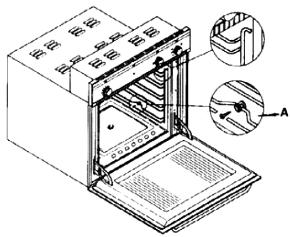
Oven accessories (Fig. 4)
The oven can be provided with lateral guides fitted to the oven wall. Insert the grid and oven sheet provided on the lateral guides. To remove the guides proceed as follows for the two types:
To remove the lateral guides press downwards at point A.
INSTRUCTIONS FOR INSTALLATION
This appliance must be installed by a competent person, in accordance with the current version of the UK Safety Rules and Regulations or their European equivalent:
Urban development regulations (published by the Department of Environment).
Urban development laws (published by the Scottish Executive Development Department).
IEE wiring regulations.
Electricity in labour regulations.
PRIOR START-UP OF THE APPLIANCE
When it is unpacked, check that the following parts are with the oven:
- Instructions and Installation Manual
oven grid
-1 tray
- Screws and stoppers for fitting the appliance in the housing
FITTING THE APPLIANCE (see Fig. 5)
These appliances are classified as Class I.
The earth is obligatory as provided for by law. The manufacturer declines all liability in the event that the accident prevention rules have not been followed.
IMPORTANT
The adjacent piece or furniture or cupboard and all the materials used in the installation must resist a minimum temperature increase of 85^ above the ambient temperature during use of the appliance.
Certain types of vinyl or laminated kitchen furniture are particularly susceptible to damage due to decolouration at temperatures below those indicated.
If the appliance is installed without paying attention to this temperature limit or if it is placed less than 4mm from the adjacent cupboards, liability will belong to the owner.
INSTALLATION NOTES
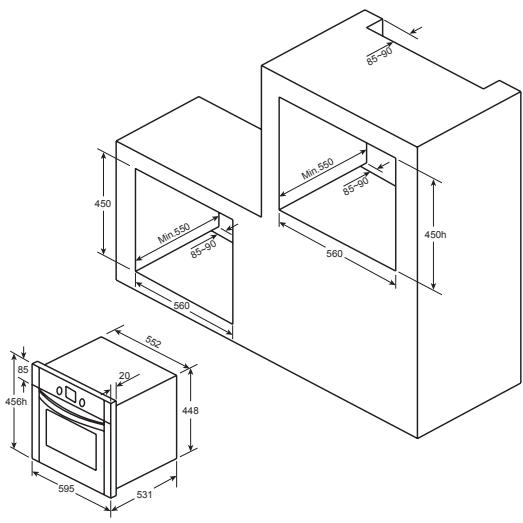
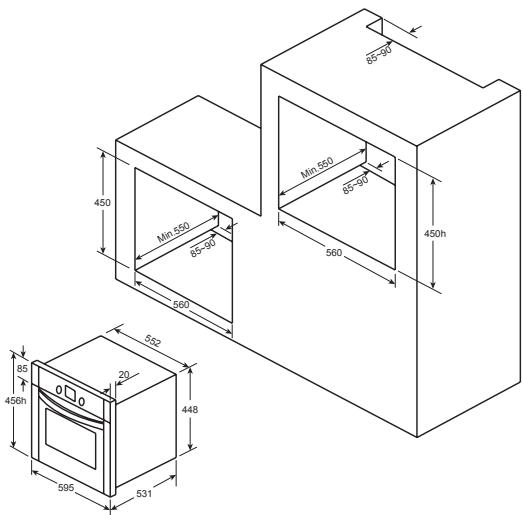
- The oven has to be installed in a standard gap of 600mm as indicated in Fig. 5, whether under a hob or in a column.
- On inserting the oven in a column, it is essential in order to ensure there is enough ventilation, to remove the rear panel of the furniture and have an opening of at least 85 - 90mm as indicated in Fig. 5.
- Check that the oven has been fixed securely in the housing. Fixing the oven into the cupboard is done using 4 screws "A" Fig.5. One in each corner of the oven door frame.
Fig. 5: Installation distanced for simple electric ovens of 60 cms wide (the shape of the upper casing may vary) and attachment to the cupboard.
A. The support runner must be removed
B. Spacing of 75 - 90mm between the wall and the rear part of the support shelf and the base of the cupboard
C. Base
D. False box front to be assembled
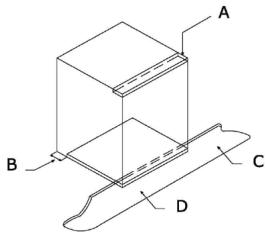
Fig. 7: Ventilation and gap requirements for the installation of e simple electric oven in a standard cooking unit.
Minimum ventilation requirements for upper, base and support shelves for the rear part of the unit.
A. Rear panel
B. Storage space
C. Remove the rear part of this section
D. Real panel
E. Storage space
F. Base
G. Minimum ventilation gap 80 cm2
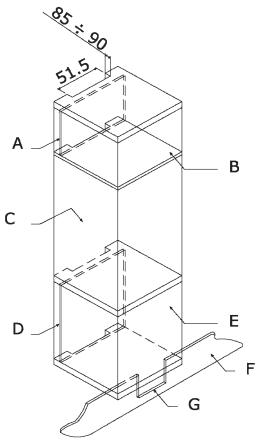
Fig. 8: Ventilation and gap requirements for the installation of a simple electric oven in an upper cupboard.
ELECTRICAL CONNECTION
Before connecting the appliance, check that the voltage marked on the specifications plate coincides with the voltage of the electricity network.
The NICEIC register is recommended for electrical installations.
WARNING - THIS APPLIANCE MUST BE EARTHED
This appliance must be wired to a 13 A bipolar automatic switch with protected socket, which has a 3mm separation between contacts and is placed in an easily accessible place next to the appliance.
IMPORTANT
The conductors of the network power supply lead are coded by colours are follows:
Green and yellow -Earth
Blue - Neutral
Brown-Live
- The green and yellow conductor must be connected to the terminal marked "E" or with the symbol of the earth or which is green and yellow.
- The blue conductor must be connected to the terminal marked "N".
- The brown conductor must be connected to the terminal marked "L".
The lead must not reach a temperature higher than 50^ above the ambient temperature at any point.
- If the power lead is damaged, it must be replaced by a special lead or unit supplied by the manufacturer or it after-sales service.
REPLACEMENT OF THE NETWORK POWER SUPPLY LEAD
If it is necessary to replace the network power supply lead, proceed as follows:
- Disconnect the appliance from the power supply, unscrews the fastening screws and remove the rear panel.
- Unscrew the fastening screws and those of the terminals to free the existing lead.
- Assemble the replacement lead which must comply with the information listed in the Specifications, ensuring the correct connection of the colour codes and that all the screws are correctly tightened.
MAINTENANCE
Before carrying out maintenance, disconnect the appliance from the power supply.
During the guarantee period, if necessary all services should be commissioned to the Manufacturer's Technical Assistance Service Department. Bear in mind that intervention or repair by unauthorised personnel will invalidate this guarantee.
REPLACEMENT OF THE OVEN LIGHTBULB
Not covered by the appliance guarantee.)
The oven has a light with the following characteristics: 15 W or 25 W, 300^ and type E-14
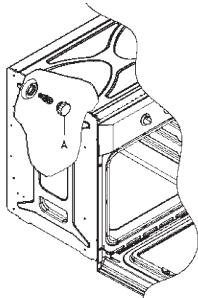
WARNING: Disconnect the appliance from the electricity supply, remove the oven door (as described above), as well as the oven shelves.
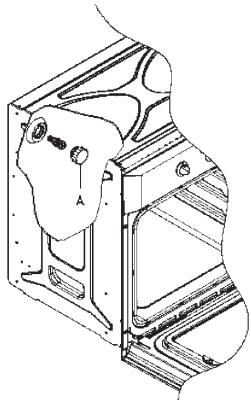
Remove the glass cover that protects the light bulb by turning it anti-clockwise. Fig. 9 (A)
Unscrew the old light bulb and dispose of it safely and ecologically, change it for one as specified in the Specifications and replace the cover.
NOTE - The glass cover may be tight and, therefore, may need a grip to release it.
CARE AND REPLACEMENT OF THE CATALYTIC COVERING
(When assembled, the covering is not covered by the appliance guarantee).
In order to keep the covering "always clean" efficiently, the oven must be heated to a minimum of 200^ whenever there are stubborn stains, so that they do not become permanent.
If the covering becomes black and shiny, they must be replaced. Remove all the internal accessories to facilitate the replacement of the covering.
The replacement covering may be bought directly from the Manufacturer's Replacement Part Department (see details included in the cover). Indicate the reference numbers of the product type described in the specifications plate and/or the series number of the appliance on ordering.
SPECIFICATIONS
INTERIOR DIMENSIONS
Height: 340~mm
Width: 440 mm
Depth: 390 mm
Useful volume: 59 litres
Nominal voltage:
220V-240V\~50Hz
Power connection: 13A (automatic bipolar switch with protected socket, with 3mm separation between contacts)
POWER ABSORPTION
Base Resistance: 1,30 kW
Roof Resistance: 0,90 kW
Fan Resistance: 2,30 kW
Grill Resistance: 1,35 kW
Network power cable:
3x1.5mm2 type H07RN-F
Oven light bulb:
15 W - 25 W / 300 °C screw type E-14
The Manufacturer declines all liability for damage caused to persons and objects due to incorrect or improper installation of the appliance.
The Manufacturer reserves the right to make any modification it believes necessary and useful to the products, without prior warning.
ISTRUZIONI PER L'UTENTE
Volume utile: 48 litri
DATI ELETTRICI
Tensione nominale:
220V-240V\~50Hz
WAARSCHUWING en VEILIGHEIDSVOORSCHRIFTEN
WAARSCHUWING -DIT APPARAAT MOET GEAARD WORDEN
Para as instalacoes electrolyicas, recomenda-se o registo NICEIC.
ADVERTÉNCIA - ESTE APARELHO DEVE SER LIGADO A TIERRA
Hn OoH CmBON He NoDcBceH 3a NCKIIOUeHHem ZuOp YacOB, YTO O3Haayet, YTO pOrpaMMpyETc BpMaOxndaHn.
ФункциnporpammaTopa:
YacbIc 24-ycobblm Iucnpeem
CnHraJIIn3aIy(MaKcIMMym 23:59)
ABytOMaTnueCKeI npOrpaMMnPOBaHne (Haayano nOKOHuaHne TeNIOBOI o6pa6OToK)
CTEKJIaHHa IaHEnb DBEPcbl
3anpeaetcncnlo30BaTbabpa3nBhIe cpeDCTBa, KOTOpBe MOrTy nOuapanaTb CTeKNo. POMHITe O TOM, yTO NpOBLeHne Ucapann H Na NOBepxHOCTN CTeKJa MOKET npIBeCTN K BO3HNKOBHeHNO OAnCHOI CNTyaUIN.
BbMOKeTe BbHyTb BHyTpHHee CTeKNo I3 DBePbI n IpMbItb erO.
KAK BbIHyTb DBEPU YEHN
HopMbI rpaIOCTpOHTeINbCTBa (ony6NIKOBaHbI dIenapTaMeHTOM OKpykaIOUe i Cpebl)
3aKoHb rpaOCTpOnTeNbCTBa (ony6nIOKaOBaHbI WOTNaHDCKM NCNOHNTeNbHbIM DeNapTaMeHTOM pa3BvTna)
3JIeKTPoTeXHnueCKeI npaBnA VHCTNtYTa INHXeHepOB nO 3JIeKTPnke I 3JIeKTPoHnke
3NeKtpnueCTBO TpyIOBOM 3aKOHOdaTeJIbCTBE
NEPED BKIOUeyHnEM DYXOBKN
Ppi paacnakOBKe npOBepbTe, HaxoJATcR N B DuxOBKe CneDyUOuNe DeTani:
- INHCTpykUnn n pyKOBoDCTBO no yCTaHOBKe.
- NeuHbIe peWetKn NJI
- 1npotnbHb
BnhtbI cTOnOpblIy BCTpaNBHry DyxOBKn B HnUy.
MOHTAK DuyxOBKn (CMOTpn pnc.5)
3Tn dxyobkn klaaccnphiunpyoTcno knaccy I.
3aemnne o6raTeIbHO, KaToro Tpe6yet 3aKOH.
I3rotOBHTeB CHNMAeT Cce6B BcO OTBeCTBeHHOCtB npn Heco6nIODeHn PpaBn IpeDOrBpaUeHn Hecuacthblx cnyaeB.
BAXHOE 3AMEUAHNE:
Примькадашая Мбениншkaф,а тarkже BCEМaterпалы,испоблбуемBLEprn yctановke,ДOTЖНБВыдерхиВаТКAKMinHmM,NOBblIeHne TempepatypHa 85°C BiWSe TempepatypBb OKpyжAoошсpeдь BO Врмя pa60Ты dYxOBK.
OnpehenHeIbte TINbIkyoHHO Me6en I3 BnHnla Hnn CnoCTORO PAACTNka Oc060 YyBCTBnTeNbHbIK NOBPEKdENm B CBy3n C oBeCuBcYBaHMePn TEmpepTaPax Hnke yKa3aHHo. Ecn D yXOBkyaCTahAbNbaeTc8 Be3 yUeTa 3TOr TEmpepaTyHoro npedena, E nCn OHa YctaHaBnBaeTcHa pacSTOrAHm MEhee 4 MM OT npIMbIkaOuIXs KkaΦOB, OTBETCTBeHHOCtB 3a 3TO 6yDet HeCTn BlaJeNeu.
3AMEUAHINIOYCTAHOBKE
1.DyXOBa yCTaHaBJIbAeTcB CtAHdApTHOM nPoeme 600 MM, kak yka3aHO Ha pncyHke 5, 6ybTo noI nonKo dIg HarpeBaHnI nn B neHaI.
2.Pn yctahOBKe DyXOBKn B nHaJ OeHb BaxHo, YTObbl oecneuNTb DOCTaTOUHy BOHTNIIaIIO, CHrTb 3aDHIIO NaHeB C MeBei N npEpyCMOTpeb OTBepCTNe pAsMePAMn, NO kpaHne Mepe, 85-90 MM KAK yka3aHO h PncyHke 5.
3.Поберьт, УTo6bl dYxOBka 6bla HaDEJHO 3aФИСИРОВАВа B NHIe.Зakрплелпсд YxOBKN B uKaФу OcUSeCTBnIeTcprn NOMOuN 4 BnHTOB "A", pnc. 5. По nDHomBy B kaxdOm yrIy DBeHOr paMbI dYxOBKn.
Pnc.5: PacctoHnna npu yCTaHOBKe dIy npocbIX 3JIeKTPnuecknx neey shnpHoN 60 cm (ΦopMa bepxHero Koxyxa MoKet 6bITb pa3HO) IN BCTpanBaHne B wkaΦ.
A. OnopHyu HnpaBnaIouyH yKHO ChrTb
B.PacctoHne 75-90 MM MeKdy CTeHKoN 3aJHeuactbI OONPHO NOLKN N OCHOBaHNEM uKapa
C. OCHOBAHHe
D. YctahabnBaETcAdekopaTbHaa HkJaIka

Pnc.7: Tpe6oBaHnK BHeTnJIaCmN 3a3Opam npu yCTaHOBKe npocToI 3neKtpnueckoJ DyXOBKn B CTaNdapTHoK KyxOHHO Me6eIi.
MnHmMaIbHbIe Tpe6oBaHnK BeHTnJIaCnI dJIa BepXHe, 6a3OBoN nOnOpHoi nOIOK dJIa 3aJHeuactn DyXOBKn.
PNEyPEXEHEN:OTCOeINHtE DYXOBKY OT CETN 3JIeKTPnueCKOrO PITaHn, CHIMITE DBepCu DYXOBKn (KaK OINCaHO BbIe), a TaKKe PONKl DYXOBKn.
CHIMMITE CTKJIYHHYU KpbIUYU,3aUHJUOIOUHOJIAMNOKHY, NOBEPHyB ee npOTNB yacOBN CTpeKN.Puc.9(A)
BbInHTIe CTAPyIO JAMNOKY uYTNIN3NpyyIte ee 6eONaChbIM o6p3OM u 6e3 BpeDA OKpyXaHOeI CEpe, BBeNTIe HOByO, KAK yKa3aHO B TexHNueckNX ycNoBHX, INoCTaBtE Ha MeCTo KpbIuK.
PIMMEUHNE - CTeKJIaHHa KpbIuKa MoKET cnDeTb Tyro, nДЯ ChrTnMoKET NOTpeBoBaTbcYcUNHe.
YxOД 3a KaTJIHTUeCKIM NOKpbITHeM I erO 3aMeHa
(Ecπn πeDyCMOTpeHO 3TO NOKpbITne, rapaHTna Ha duXOBky Ha NOKpbITne He paCnPoCTpaHReTc).
Длг.TORO YTObI NOKpbITNe BcERda OCHUaIIOCb 3Фф�EKTNBHO,DyOBKa DOLJXHa HARpeBaTbCЯ,NO KpaHne Mep,do 200^ B IIObOM Cnyae,KoRda BO3HNKAOT TpydHOBbIBOIDMbIe PnTHa C Tem,YTObI OH He OCTaJIncb HABCErDa.
Ecnnn nokpbitne ctaHOBntcyaepHbIMn 3epKaIbHbIM, eno HxNHO 3aMeHITb. N3BNeKnTe BCE BHYtpEHnne npHaNDJeXHOctn, YTO6bIbIOJIeYue npOIm3BODITb 3aMeHY nOKpbTtna.
IokpbItne Ha 3ameHy MoXHO npnoobpecTn HenocepndBeHHO B OTDeNe 3aNaChbIx ChacteN h3ROTOBHTeJI (CMOTpn IOpDpo6Hy INHΦopMaunIO, yka3aHHyHa NOKpbItn).Pp3aka3e ykaKnte CnpabOchIbe Homepa Tnna npodykTa, yka3aHHbIe Ha nacoprTHo TaBnUke n (nIi) cepuHbI Homep dYxOBKn.
TEXHNUECKNE YCIOBNA
BHYTEHHNE PA3MEPbl:
BbICota: 260 MM
山npuHa: 430 MM
TnybHa: 340 MM
Poneehbi o6bem: 48 nItpoB
OXJIAKDAIOUINBEHTNIATOP
TaHreHnauNbHBeHTNJaTOp OxnaJKeHnayctaHaBnBaetcHa CNeDyUOxM MoeIax:
3NEKTPNUECKNE DAHHbIE
HomHaJIbHoe HapJxKeHne:
220-240 BoIbT, 50 rep
I3rotOBtTeIb He HecET HNKaKoI
OTBETCTBEHHOCTb 3a yuep6, npuHHeHHbI
JIIOJAM M MaTePnaIbHOMy HmUyIeCTBy I3-3a
HEnpaBnIbHOy yCTaHOBKn DxyOBKn.
N3rotOBHTeIb coxpaHReT 3a co6oI npaBO
BHCNTb B N3dJIINn N3MeHeHn, KOToPbIe,
no ero MHeHIO, RABJIOTcR Heo6xoDnMbIMN
HnI NOJIe3HbIMN 6e3 npeBapntelbHorO
YBEdOMJIeHnI.

用户手册