
CM760ASBK - Built-in oven CATA - Free user manual and instructions
Find the device manual for free CM760ASBK CATA in PDF.



| Brand | CATA |
| Model | CM760ASBK |
| Product type | Built-in oven |
| Usable volume | 70 litres |
| Rated voltage | 220V-240V~50Hz |
| Maximum power | 2100 W / 3000 W |
| Power connection | 13 A (bipolar automatic switch with protected socket, contact separation 3 mm) |
| Built-in width | 600 mm |
| Upper heating element | 950 W |
| Grill heating element | 2000 W |
| Lower heating element | 1100 W |
| Convection heating element | 2000 W |
| Convection motor | 33 W |
| Cooling fan | 23 W |
| Oven lighting | 25 W (bulb E-14, 15W or 25W, 300°C) |
| Power cable | 3×1.5 mm² type H07RN-F |
| Cooking functions | Convection, upper element, lower element, convection with fan, grill, maxi-grill, grill with fan, defrost, pyrolysis |
| Temperature range | 50°C to 250°C (pyrolysis up to 450°C) |
| Programming | Timer, cooking duration, cooking end, automatic programming, 9h reminder |
| Safety | Child lock, automatic shutdown, door lock during pyrolysis |
| Cleaning | Pyrolysis (1h30 or 2h), manual cleaning |
| Accessories included | Grid, drip tray, screws and fixing covers |
| Country of manufacture | Not specified |
Frequently Asked Questions - CM760ASBK CATA
User questions about CM760ASBK CATA
0 question about this device. Answer the ones you know or ask your own.
Ask a new question about this device
Download the instructions for your Built-in oven in PDF format for free! Find your manual CM760ASBK - CATA and take your electronic device back in hand. On this page are published all the documents necessary for the use of your device. CM760ASBK by CATA.
USER MANUAL CM760ASBK CATA
Operating and maintenance instructions for built-in ovens
IT
REEMPLACEMENT DE L'AMPOULE DU FOUR
DIMENSIONS INTÉRIÉUES
Hauteur:346,5mm
Largeur:457mm
Profondeur:410mm
Thank you for choosing one of our products. We hope this household appliance provides you with the best service. Therefore, we suggest you read the instructions and suggestions contained in this manual carefully in order to use our products correctly.
The specifications plate for this oven is available on this appliance. This plate, visible by opening the door, displays all the necessary identification information for this appliance for ordering replacement parts.
GENERAL INFORMATION
Please read this manual carefully before using the appliance. It is important that all the control functions are understood before beginning to cook with this appliance.
Heed the advice and warnings included under the title "IMPORTANT - Safety advice and instructions".
- This appliance has been designed for private domestic use and can be integrated into standard kitchen furnishings or similar.
- In order to use in caravan-type vehicles, the suitable indications included in the Installation Instructions should be borne in mind.
- Use of this appliance for any other purpose or in any other environment without the manufacturer's express agreement will invalidate any guarantee or liability.
- This new appliance is guaranteed against electrical or mechanical defects, subject to certain exclusions indicated in the Manufacturer's Terms and Conditions of the Guarantee.
- The above does not affect your statutory rights.
Ensure that all protective packaging and covering has been removed before using this appliance.
To collaborate in protecting the environment, separate the packaging materials into the different types and dispose of them according to local waste disposal regulations.
The packaging is designed so as not to harm the environment; it can be recovered or recycled as it is an ecological product. By recycling the packaging, you will contribute to saving raw materials and reducing the volume of industrial and domestic waste.
Any additional information on waste disposal may be requested from your local environmental agency.
When used for the first time, a slight smell from the protective covering or damp may be noticeable, which will disappear after a short time.
The symbol on the product or its packaging indicates that this product cannot be treated as normal household waste. This product must be handed over to an electric and electronic equipment collection point for recycling. On ensuring that this product is disposed of correctly, you will help to avoid possible negative consequences for the environment and public health,
which could occur if this product is not handled correctly. To receive more detailed information about recycling this product, contact your local government, domestic waste disposal services or the outlet where the product was bought.
This appliance has been built and distributed in compliance with the essential requirements of the following EEC EUROPEAN LAWS AND DIRECTIVES:
EC Symbol - 93/68 Low voltage - 73/23 CEM-89/336
Safety Rules - EN 60335-1, EN 60335-2-6.
This appliance respects laws of the suppression of radio-interference.
As the Manufacturer has a policy of continuous product improvement, it reserves the right to adapt and carry out any modification considered necessary without prior warning.
IMPORTANT NOTICE
SAFETY INSTRUCTIONS AND WARNING
- The appliance and its accessible parts become hot during use.
Children less than 8 years of age shall be kept away unless continuously supervised. - This appliance can be used by children aged from 8 years and above and persons with reduced physical, sensory or mental capabilities or lack of experience and knowledge if they have been given supervision or instruction concerning use of the appliance in a safe way and understand the hazards involved. Children shall not play with the appliance. Cleaning and user maintenance shall not be made by children without supervision.
- This appliance complies with all current European safety legislation, however, the Manufacturer must emphasise that this compliance does not prevent the surfaces of the appliance from heating up during use and remaining hot during its operation.
- Therefore, the Manufacturer highly recommends that this appliance is kept out of the reach of babies and small children.
- If children cannot be kept out of the kitchen, they must be watched at all times.
- We also recommend that great care is taken during use and cleaning. Read the cleaning and maintenance sections for this appliance carefully.
- Do not place heavy objects on this oven or lean on the door when opening it, as this may damage the hinges.
- Do not leave hot oil or fats unattended as they may catch light.
- Do not place oven dishes or trays of the lower part of the oven or cover it in aluminium foil.
- Never store flammable objects inside the oven as they may catch light.
- Do not allow the accessories or electric cables to touch the hot parts of the appliance.
- Do not use the appliance for special heating or drying clothes.
-
Do not install the appliance near curtains or upholstered furniture.
-
Do not try to lift or move kitchen appliances by pulling any door or handle as this may cause damage.
- If the oven join is very dirty, the door will not close properly when the oven is working. The fronts of neighbouring furniture may be damaged. Keep the oven join clean.
- During operation the appliance will heat up. Care must be taken to avoid touching heating elements inside the oven.
- Open the oven carefully. Steam may escape and burn anyone nearby.
- Do not pour water inside a very hot oven. The enamel may be damaged.
- This appliance must be installed correctly by a suitably qualified person, strictly following the manufacturer's instructions.
- The Manufacturer declines all liability for personal or material damage as a result of misuse or incorrect installation of this appliance.
- Heat, vapour and humidity are produced during use, avoid all kinds of personal damage and ensure that the room is suitably ventilated. If used for a prolonged period of time, additional ventilation may be necessary - consult a qualified installer if you have any doubts about the necessary volume.
INSTRUCTIONS
This User Manual must be kept for future reference and use by someone who is not familiar with the appliance.
Before using the oven, carefully clean the inside with a non-abrasive detergent and warm water. Introduce the grill and tray in their respective runners. Once the operation is complete, turn the oven on to the maximum temperature for approximately 20 minutes to remove any traces of manufacturing grease, oil or resins which may cause unpleasant odours when cooking.
WARNING: During this first heating some smoke or unpleasant odours may appear. Should this happen ventilate the room suitably until the first operation is finalised.
Once this simple operation has been carried out the oven is ready to use for cooking.
This appliance is exclusively for domestic use.
Use the oven to cook food only.
USING THE OVEN
The oven is controlled by a thermostat between 50^ and 250 ^ C, depending on the temperature required. The thermostat pilot light turns on and off to indicate the temperature control during use.
The required cooking mode is selected using the multi-functional control button. The functions that may be selected are:

A. OVEN LIGHT. Automatic when selecting the cooking mode for all models. The oven light remains on when using the oven.

B.CONVECTION MODE. Provides traditional cooking with heat from the upper and lower elements.

C. UPPER ELEMENT MODE. For gentle cooking, browning or keeping cooked dishes warm.

D.LOWER ELEMENT MODE. For slow cooking and heating food.

E. FAN-ASSISTED CONVECTION MODE. This provides convection heating of the upper and lower elements for uniform cooking.

F. GRILL. For gratinating and browning food.

G. MAXI-GRILL. As above, but the grill element provides a larger area for roasting.

H. FAN-ASSISTED GRILL. This provides fast browning so that food remains juicy. For convection baking, this is the most energy-efficient function.

- THAWING MODE.
The fan works without heat to reduce the thawing time for frozen food.

J. Pyrolytic function:
When the function set to prolytic mode, LED display "PYA".
The default temperature is 450^ . The timer can be set 1:30 or 2:00 hours.
HOW TO USE
- Stay on: For the oven to be used in the "1". the food may catch fire if the cooking time is set too long. Close supervision is necessary during toasting and the time should not be set too long.
NOTE: For cooking times which are under sixty minutes, first set to a longer time and then turn
the switch back to the time you require.
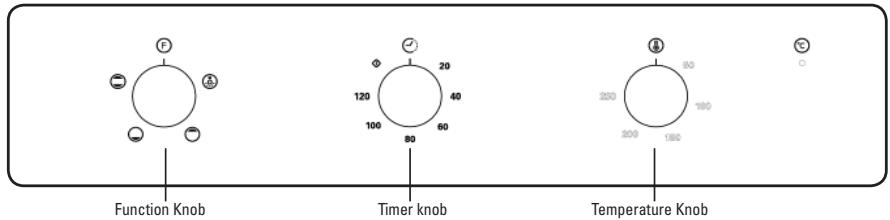
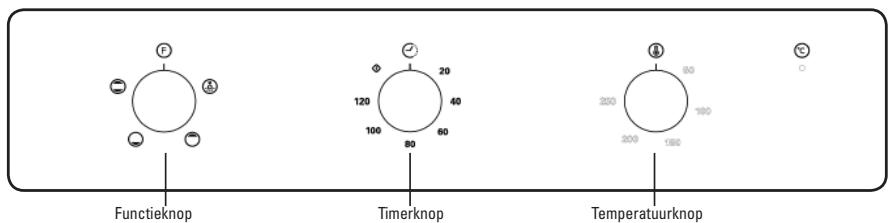
- To set functions by turning the function knob to desired level. The oven will automatically start cooking after function, time and temperature are set.
- To set the time of cooking by turning the timer knob to desired time per your food cooking guide. After the cooking time is up, the unit will "Dong" to stop.
- To set the temperature by turning the temperature knob. If the unit is not in use, always set the knobs to "0".
PRODUCT DESCRIPTION
PRODUCT DESCRIPTION
Kindly reminder: To open the oven door, always use one hand to hold the handle in the centre and do not touching the child lock stud.
PRODUCT DESCRIPTION
OPERATION INSTRUCTIONS
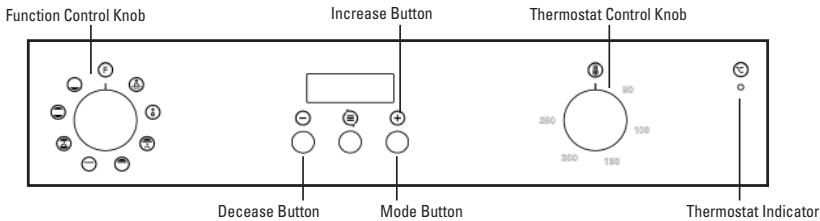
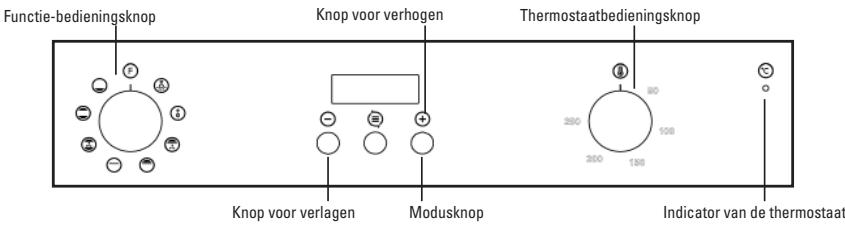
When the oven is first connected to the electrical supply, wait for the display automatically show "12.30", a beep sound once and the ". flash. Ensure the correct time of the day is set before using the oven.
please note: that is 24 hour clock, for example 2PM shown as 14.00.
To set the correct time of day
1) Press "+" - " button to adjust the hour setting.
2) Press "≡" to confirm the hour setting.
3) Press" ^+ " - " button to adjust the minute setting.
4) Press "E" to confirm the minute setting and the timer will be in standby mode.
Note: If the display does not flash, adjust the time of day by pressing the ^ 串 + ^ 串 and - buttons at the same time for more than 3 seconds.
Oven On and Off
If the timer is in standby mode, press "E" for more than 3 seconds, the timer will enter manual mode and the symbol "W" will light up continuously.
1) Set the desired cooking function and the temperature degree.
2) Set the time function, then the oven will on.
If you set Dur or End, after cooking, the oven will automatically turn off.
If you set manual or minute minder, after cooking, bring the cooking function and oven temperature
knob to "0" position. Press " " and "+" buttons for more than
3 seconds to return to standby mode.
Time function setting
In manual mode, pressing "三" can enter the time function setting, the sequence of the function setting is Manual mode. Minute minder-Dur-End-Manual mode. Then selected cooking function and ajust the cook temperature if required.
Manual mode:
In manual mode, only the day's time and the symbol "..." lights up. The cooking duration has to be controlled by the user.
Notes: In manual mode, to ensure the oven is not left on accidentally, after 5 hours no any button pressed, the timer will flash once a second to warn you the oven will enter standby mode. After a total of 10 hours, the timer will enter standby mode.
When the timer is flashing in manual mode, press any button to reset the timer if you intend to continue using the oven. Or press "E" and "+" together for more than 3 seconds to enter standby mode if oven will not be used.
Audible warning time adjustment:
This function can be used to receive audible warning at the completion of the ajusted time period.
1>Press"按钮 to select the minute minder function. The relevant"" symbol will flash.
2>Use "+" -" button to adjust minute minder. (Refer to the instructions for setting the correct time of day.) Press " " button to confirm, the " " symbol will begin to light continuously. When the " "symbol begins to light continuously, the audible warning time adjustment is done.
3>When the time is up, the timer gives an audible warning and the " " symbol begins to flash on the screen. Press any button less than 3 seconds, it will stop the audible warning and the " " symbol disappears on the screen. Audible warning time adjustment is for warning purposes only.
Press " " and "+" together for more than 3 seconds to enter standby mode if oven will not be used.
Semi-automatic programming according to cooking period:
This function is used to cook in the desired time range, The food to be cooked are put into the oven.
The oven is adjustment to the desired cooking function and temperature degree.
The maximum setting of cooking period is 10 hours.
1) Press "E" button until you see "Dur" on the timer screen. (Before setting cooking period.)
2) Use "+"--" button to adjust cooking period for the food you wish to cook. (Refer to the instructions for setting the correct time of day.) Press "E" button to confirm, the day's time will appear on the screen and the symbols "A" "W" will light on the screen. While doing this, the oven will also start to operate.
3) At the completion of the set duration, the timer will stop the oven and give an audible warning. Also, the symbol "A" will begin to flash on the screen. After bringing the cooking function and oven temperature knob to "0" position. Pressing any button less than 3 seconds, it will stop the audible warning.
Pressing "E" for more than 3 seconds set the oven to Manual mode again to use the oven.
Semi-automatic programming accroding to finishing time:
This function is used to cook according to the desired finishing time. The food to be cooked is put into the oven. The oven is adjusted to the desired cooking function and temperature degree.
1) Press "End" button until you see "End" on the timer screen. (Before setting finished time).
2) Use "+" "-" button to adjust finishing time. (Refer to the instructions for setting the correct time of day.)
3) Press " 日 " button to confirm, the day 's time will appear on the screen and the symbols "A" "W" will light on the screen. While doing this, the oven will also start to operate.
4) At the completion of the set duration, the timer will stop the oven and give an audible warning. Also, the symbol "A" will begin to flash on the screen. After bringing the cooking function and oven temperature knob to "0" position. Pressing any button less than 3 seconds, it will stop the audible warning. Pressing "E" for more than 3 seconds set the oven to Manual mode again to use the oven.
Full-automatic programming:
This function is used to cook after a certain period of time, with a certain duration. The food to be cooked is put into the oven. The oven is adjusted to the desired cooking function. The oven temperature is adjusted to the desired degree depending on the food to be cooked.
First: Press " 三 " button until you see "Dur" on the timer screen. Use "+" -" button to adjust cooking period for the food you wish to cook. Press " 三 " button to confirm, the day's time will appear on the screen and the symbols "A" will begin to continuously light on the screen.
Second: keep pressing on " " button until you see "End" on the timer screen. When you see "End" on the timer screen, Use "+" -" button to adjust finishing time, Press " " button to confirm, the day's time will appear on the screen and the symbol "A" will begin to continuously light on the screen. The symbol " " disappears until the time cooking starts.
You can set a time which can be up 23.59 hours after the time obtained by adding the cooking period to the day's time.
The oven will start operating at the time calculated by deducting the cooking period from the set finishing time, and will stop at the set finishing time. The timer will give an audible warning and the symbol "A" will begin to flash. After bringing the cooking function and oven temperature any button less than 3 seconds, it will stop the audible warning.
Pressing "E" for more than 3 seconds set the oven to Manual mode again to use the oven.
Please note:Once setting full-automatic mode, all the time can not be changed. Change time means cancel automatice programme and enter into corresponding mode. If you need to reset automatic mode, need to stop setting the current mode, to set the automatic mode according to the above steps again.
Specification
1) Long press on "+" or "-" for more than 3 seconds, the date will progressively and rapidly increase or decrease in the rate of 5 seconds.
2) When setting each of the time function, if there is none operation for 5 minutes then it will return to manual mode.
3) When setting each of the time function, pressing on "E" for more than 3 seconds can cancel current setting and enter manual mode.
4) During time function setting, pressing on "+" and "≡" for more than 3 seconds, a beep sounds it can cancel the current time function setting and enter standby mode.
5) We suggest that you run the oven elements for 15 minutes at 200 degrees to burn off any residue from their surfaces.
OPERATION INSTRUCTIONS
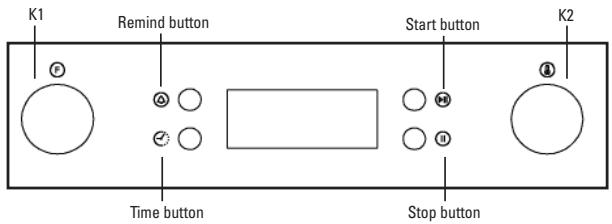
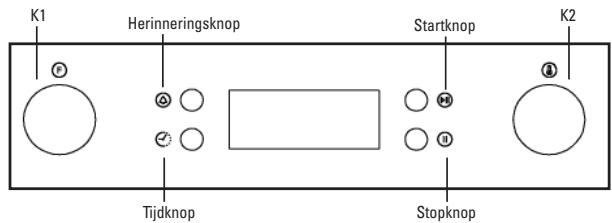
1. Clock Setting
After connection the unit to the power, the symbols 00:00 will be visible on the display.
1) Press "C", the hour figures will flash.
2) Rotate "K2" to adjust the hour figures, (Time should be within 0--23).
3) Press "O", the minutes will flash.
4) Rotate "K2" to adjust the minutes setting, (time should be within 0-59).
5) Press "O" to finish the clock settings. ":" will flash, and the time will be illuminated.
Note: The clock is 24 hours. After connected to the mains power, the clock will untimed.
2. Function Setting
1) Rotate "K1" to choose the cooking function you require. The related indicator will illuminated.
2) Rotate "K2" to adjust the temperature.
3) Press "B" to confirm the start of cooking. The corresponding icon for temperature "C" will be on.
4) If step 2 is ignored, Press "F11" to confirm the start of cooking. and the default time is 9 hours, the default temperature will display on the LED.
NOTE:
1) The step quantities for the adjustment time of the coding switch are as follow: 0--0:30min: step 1 minute 0:30--9:00hour: step 5 minutes
2) The step quantities for the adjustment of temperature is 5^ , and the radiant grilling function is 30^ .
3) Rotate "K1" to adjust the cooking time when cooking begins. Then press "P" to start cooking.
If "FID" not pressed within 3 seconds, the oven will revert back to the previous time to continue cooking.
4) Rotate "K2" to adjust the temperature when cooking begins. The related indicator will be illuminated. Then press "F10" to start cooking. If "F10" not pressed in 3 seconds, the oven will revert back to the previous temperatue to continue cooking.
3. Lamp Setting
1) Rotate "K1" to select the relevant function, then the corresponding icon will be on.
2) Press "▶" button to start cooking. Lamp icon "▶" * : "▶" will flash.
4. Inquiring function
During cooking process, you can use inquiring function, after 3 seconds return to the current working state.
1) During cooking mode, press "O" button to see the current time.
2) If the clock was set, press "C" button to ask for cooking time.
5. Child lock function
To Lock: press "P" and "I" simultaneously for 3 seconds, there will be a long "beeping" sound indicating the children-lock is on and the "B" will be illuminated.
Lock quitting: press "B" and "H" simultaneously for 3 seconds, there will be a long "beeping" sound indicating the child-lock is released.
Note: During working mode, if you want to stop cooking, press stop button quickly. Do not need to long pressing on stop button, it is invalid.
6. Reminder Function:
The oven has 9 hours reminder, this function will help to remind you to start cooking in a certain time from 1 minute to 9 hours. Only when oven in standby mode, the reminder can be set. Follow below to set the reminder:
1) Press reminder setting button "A";
2) Rotate "K2" to set the hour time of reminder. (Time should be within 0--9).
3) Press reminder setting button "O" again;
4) Rotate "K2" to set minute time of reminder. (Time should be within 0--59).
5) Press "D" to confirm setting. ". ." will be flash and the indicator for reminder "O" will light. The time counts down.
Note: The oven buzzer will sound for 10 times after the time back to the zero hour. "⑥" symbol disappears on the screen to remind you to start cooking. You can cancel the reminder during setting by pressing the stop button; After the reminder has been set, you can cancel it by pressing stop button twice.
7. Start/Pause/Cancel Function
1) If the cooking time has been set, press "FID" to start cooking. If the cooking is paused, press "FID" to resume cooking.
2) During cooking process, press "①" once to pause the cooking. Press "②" twice to cancel the cooking.
8. Energy-Saving Function
1) During in waiting state and reminding state, press "①" for three seconds, the LED display will go off and set to energy-saving mode.
2) If no operation in10 minutes under waiting state, the LED display will go off and go into energy-saving mode.
3) Under the energy-saving mode, press any key or rotate any encoder can quit the energy-saving mode.
9. Pyrolytic Function(only some modles)
This function allows you to clean thoroughly the oven cavity.
1) Rotate "K1" to select the pyrolytic function. LED will display "PYA".
2) Press "P" to confirm the cooking. And the default time is 2 hours, "PYA" will display on the LED.
3) Rotate "K1" to change the pyrolytic time. There have two levers time can be selected "1:30 or 2:00".
Note:
A) When the oven door is not closed, press start button will be invalid, LED display "DOOR", "PYA."
B) When the oven center temperature is higher than 200^ , Press cancel button can return to waiting state directly and the oven center temperature is higher than 300^ , press start button, LED display "COOL".
C) When open the door in normal working condition, the relay for heater will stop working, LED display "DOOR", the buzzer will beep continuously until the door closed or press the cancel button.
D) When the pyrolytic function finished working and oven center temperature is lower than 300^ . LED display will go off.
E) Before activating the pyrolytic cleaning function, remove any excessive spillage and make sure that oven is empty. Do not leave anything inside it(e.g. pans, baking tray, dripping pan, slider bracket etc.) as this could heavily damage them.
10. Note
1) The oven lamp will be on for all functions.(except pyrolytic function)
2) Once the cooking programme has been set and the "b" button is not pressed within 5 minutes, the current time will be displayed or turn back to waiting state. The setting program will be invalid.
3) The buzzer sounds when effectively pressed, if not effectively pressed there will be no response.
4) The buzzer will sound five times to remind you when cooking has finished.
USEFUL ADVICE
- Before cooking, make sure all oven accessories that are not required are removed from the oven.
- Pre-heat the oven to the cooking temperature before using it.
- Place the cooking trays in the centre of the oven and leave space in between when using more than one, so that the air can circulate.
- Do not fill the tray to full when preparing a juicy, fruit cake. Any fruit juice that drips from the tray will produce stains that cannot be removed.
- Do not put oven trays on the base of the oven or cover it with aluminium foil. This will cause thermal accumulation. The cooking and roasting times will not coincide and the enamel may be damaged.
- Try to open the oven door as little as possible to see the food (the oven light remains on during cooking).
Take care when opening the door to avoid contact with hot parts and steam.
COOKING INSTRUCTIONS
Read the information of the food packaging for the cooking temperatures and times. Once familiar with the performance of the appliance, the temperatures and times may be varied to adapt them to your personal tastes.
Check that frozen food is completely thawed before cooking, unless indicated otherwise.
| Type of food | Temp. °C | Runners | Cooking time in minutes Suggested | Personal |
| Cake mixture desserts in moulds | ||||
| Sponges or buns | 175 | 2 | 55-65 | |
| Cake | 175 | 3 | 60-70 | |
| Short pastry desserts in moulds | ||||
| Pie base | 200 | 3 | 08-10 | |
| Cheesecake pie base | 200 | 3 | 25-35 | |
| Fruit pie base | 200 | 3 | 25-35 | |
| Raised dough desserts in moulds | ||||
| Pie base | 180 | 3 | 30-45 | |
| Soft bread 1 kg of flour | 200 | 3 | 25-35 | |
| Small pastries | ||||
| Short pastry | 200 | 3 | 10-15 | |
| Doughnut dough | 200 | 2 | 35-45 | |
| Biscuit dough | 200 | 3 | 15-20 | |
| Lasagne | 225 | 2 | 40-50 | |
| Meats (Cooking time per cm of thickness) | ||||
| Long roasts | 200 | 2 | 120-150 | |
| Short roasts | 200 | 2 | 60-90 | |
| Meatballs | 200 | 2 | 30-40 | |
| Poultry | ||||
| Duck 1 1/2 Kg | 200 | 2 | 120-180 | |
| Goose 3 Kg | 200 | 2 | 150-210 | |
| Roast chicken | 200 | 2 | 60-90 | |
| Turkey 5Kg | 175 | 2 | 240-260 | |
| Game | ||||
| Hare | 200 | 2 | 60-90 | |
| Leg of venison | 200 | 2 | 90-150 | |
| Vegetables | ||||
| Oven-baked potatoes | 220 | 2 | 30-40 | |
| Cooked vegetable flan | 200 | 2 | 40-50 | |
| Fish | ||||
| Trout | 200 | 2 | 40-50 | |
| Sea Bream | 200 | 2 | 40-50 | |
| Pizza | 240 | 3 | 10-20 | |
| Grill | ||||
| Chops | 4 | 8-12 | ||
| Sausages | 4 | 10-12 | ||
| Grilled chicken | 2 | 25-35 | ||
| Spit-roasted veal 0,6Kg | 50-60 | |||
- The runner number is counted from the bottom of the oven up (Excluding the base of the oven as trays cannot be placed on it)
THE POSITION INFORMATION IS INDICATIVE BECAUSE THE COOKING TYPE AND TIMES CHANGE DEPENDING ON THE QUANTITY AND QUALITY OF THE FOOD.
HOW TO USE THE GRILL
Place the food to be browned on the grid or in the shallow tray. The grid has to be placed on the highest runner, whilst the tray for collecting fat should be on the lower runner. Connect the grill using the following positions of fan-assisted oven selector knob , or in the position , of the multi-function oven selection knob.
Depending on the type of food (meat, fish, poultry, etc.) it will be necessary to turn it over to expose both sides to the infra-red rays of the grill. For guidance only, we indicate some cooking times below:
| Food to be grilled | Cooking times in minutes Suggested |
| Lean or thin meat | 4-6 |
| Normal meat | 5-8 |
| Fish without scales | 8-10 |
| Fish (e.g. Trout, salmon) | 12-15 |
| Sausages | 10-12 |
| Sandwiches | 2-5 |
WARNING
- Do not use aluminium foil to cover the grill tray or heat.
- Do not wrap elements in aluminium foil or place them under the grill - the great reflective quality of aluminium may damage the grill element.
CLEANING THE APPLIANCE
IMPORTANT
As a safety precaution, before beginning to clean the oven always unplug it from the power supply or remove the appliance power lead.
Cleaning an oven that does not self-cleaning panels must be done after use, when it is switched off but still warm, not hot, so that the film of grease produced by the cooking vapours on the walls is still easy to remove, as well as the drips and splashes of fat that are not yet hard and dry.
Remove the chrome-plated wire side supports; pull the front part upwards to unattach them from the wall and remove them from the rear orifices. Clean the oven with a soft cloth soaked in a diluted ammoniac solution; rinse and dry. If there are still stains and splashes, place a damp cloth soaked in ammoniac at the back, close the door and, after a few hours, wash the oven with warm water and liquid detergent, rinse and dry carefully. To clean the shiny metal outside doors, use a soft cloth with soap and water; do not use any powdered products that contain abrasive substances.
Also avoid the use of acid or alkaline substances (lemon juice, vinegar, salt, tomatoes, etc.). Avoid using products containing chlorine, acid or abrasive substances specially for cleaning the varnished walls. Do not use thick steel wool or hard utensils, as they can damage the surface finishes.
Do not use high pressure cleaners or steam appliances for cleaning the oven.
Normally, wiping with a damp soft cloth and warm detergent is enough, but for stubborn stains the following is recommended:
VTRIFIED ENAMELLED PARTS
Only use a recommended cleaner for this type of material - avoid chloride-based products such as bleach.
INSTRUCTIONS FOR INSTALLATION
This appliance must be installed by a competent person, in accordance with the current version of the UK Safety Rules and Regulations or their European equivalent:
Urban development regulations (published by the Department of Environment).
Urban development laws (published by the Scottish Executive Development Department).
IEE wiring regulations.
Electricity in labour regulations.
PRIOR START-UP OF THE APPLIANCE
When it is unpacked, check that the following parts are with the oven:
- Instructions and Installation Manual
oven grid
1 tray - Screws and stoppers for fitting the appliance in the housing
FITTING THE APPLIANCE (see Fig. 5)
These appliances are classified as Class I.
The earth is obligatory as provided for by law. The manufacturer declines all liability in the event that the accident prevention rules have not been followed.
IMPORTANT
The adjacent piece or furniture or cupboard and all the materials used in the installation must resist a minimum temperature increase of 85^ above the ambient temperature during use of the appliance.
Certain types of vinyl or laminated kitchen furniture are particularly susceptible to damage due to decolouration at temperatures below those indicated.
If the appliance is installed without paying attention to this temperature limit or if it is placed less than 4mm from the adjacent cupboards, liability will belong to the owner.
INSTALLATION NOTES
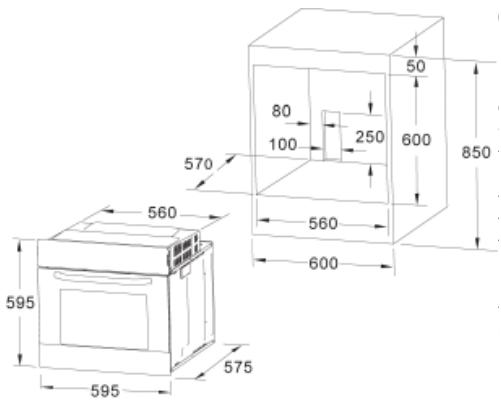
- The oven has to be installed in a standard gap of 600mm as indicated in Fig. 5, whether under a hob or in a column.
- On inserting the oven in a column, it is essential in order to ensure there is enough ventilation, to remove the rear panel of the furniture and have an opening of at least 85 - 90mm as indicated in Fig. 5.
- Check that the oven has been fixed securely in the housing. Fixing the oven into the cupboard is done using 4 screws "A" Fig.5. One in each corner of the oven door frame.
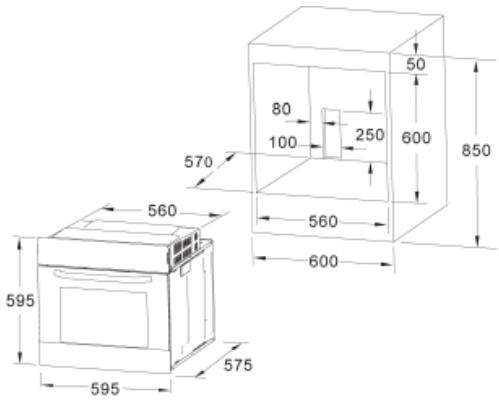
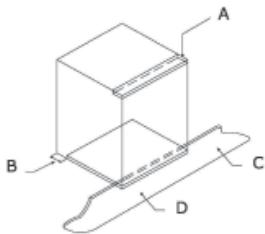
Fig. 5: Installation distanced for simple electric ovens of 60 cms wide (the shape of the upper casing may vary) and attachment to the cupboard.
A. The support runner must be removed
B. Spacing of 75 - 90mm between the wall and the rear part of the support shelf and the base of the cupboard
C. Base
D. False box front to be assembled
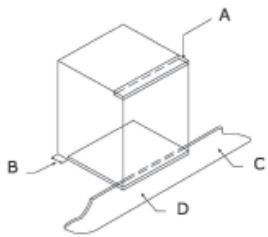
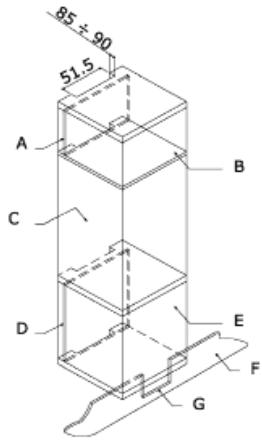
Fig. 7: Ventilation and gap requirements for the installation of e simple electric oven in a standard cooking unit.
Minimum ventilation requirements for upper, base and support shelves for the rear part of the unit.
A. Rear panel
B. Storage space
C. Remove the rear part of this section
D. Real panel
E. Storage space
F. Base
G. Minimum ventilation gap 80 cm2
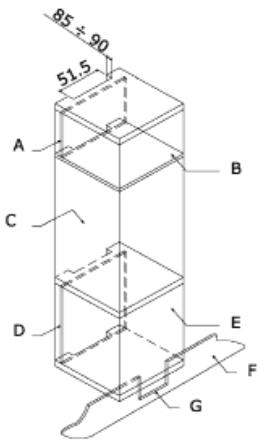
Fig. 8: Ventilation and gap requirements for the installation of a simple electric oven in an upper cupboard.
ELECTRICAL CONNECTION
Before connecting the appliance, check that the voltage marked on the specifications plate coincides with the voltage of the electricity network.
The NICEIC register is recommended for electrical installations.
WARNING - THIS APPLIANCE MUST BE EARTHED
This appliance must be wired to a 13 A bipolar automatic switch with protected socket, which has a 3mm separation between contacts and is placed in an easily accessible place next to the appliance.
IMPORTANT
The conductors of the network power supply lead are coded by colours are follows:
Green and yellow -Earth
Blue - Neutral
Brown - Live
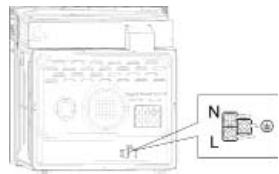
- The green and yellow conductor must be connected to the terminal marked "E" or with the symbol of the earth or which is green and yellow.
- The blue conductor must be connected to the terminal marked "N".
- The brown conductor must be connected to the terminal marked "L".
- The lead must not reach a temperature higher than 50^ above the ambient temperature at any point.
- If the power lead is damaged, it must be replaced by a special lead or unit supplied by the manufacturer or it after-sales service.
REplacement of THE NETWORK POWER SUPPLY LEAD
If it is necessary to replace the network power supply lead, proceed as follows:
- Disconnect the appliance from the power supply, unscrews the fastening screws and remove the rear panel.
- Unscrew the fastening screws and those of the terminals to free the existing lead.
- Assemble the replacement lead which must comply with the information listed in the Specifications, ensuring the correct connection of the colour codes and that all the screws are correctly tightened.
MAINTENANCE
Before carrying out maintenance, disconnect the appliance from the power supply.
During the guarantee period, if necessary all services should be commissioned to the Manufacturer's Technical Assistance Service Department. Bear in mind that intervention or repair by unauthorised personnel will invalidate this guarantee.
REPLACEMENT OF THE OVEN LIGHTBULB
Not covered by the appliance guarantee.)
The oven has a light with the following characteristics: 15 W or 25 W, 300^ and type E-14
WARNING: Disconnect the appliance from the electricity supply, remove the oven door (as described above), as well as the oven shelves.
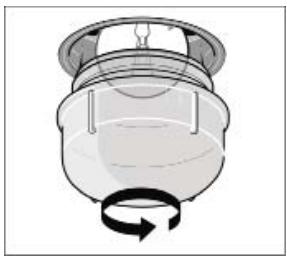
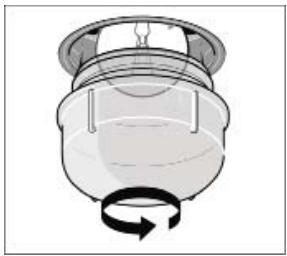
Remove the glass cover that protects the light bulb by turning it anti-clockwise. Fig. 9 (A)
Unscrew the old light bulb and dispose of it safely and ecologically, change it for one as specified in the Specifications and replace the cover.
NOTE - The glass cover may be tight and, therefore, may need a grip to release it.
CARE AND REPLACEMENT OF THE CATALYTIC COVERING
(When assembled, the covering is not covered by the appliance guarantee).
In order to keep the covering "always clean" efficiently, the oven must be heated to a minimum of 200^ whenever there are stubborn stains, so that they do not become permanent. If the covering becomes black and shiny, they must be replaced. Remove all the internal accessories to facilitate the replacement of the covering.
The replacement covering may be bought directly from the Manufacturer's Replacement Part Department (see details included in the cover). Indicate the reference numbers of the product type described in the specifications plate and/or the series number of the appliance on ordering.
SPECIFICATIONS
INTERIOR DIMENSIONS
Height: 346.5mm
Width: 457 mm
Depth: 410~mm
Useful volume: 70 litres
ELECTRICAL INFORMATION
Nominal voltage:
220V-240V\~50Hz
Power connection: 13A (automatic bipolar switch with protected socket, with 3mm separation between contacts)
POWER ABSORPTION
Top heating element 950 W
Grill heating element 2000 W
Bottom heating element 1100 W
Convection heating element 2000 W
Convection motor 33 W
Rotisserie motor 4.1 W
Cooling fan 23 W
Oven lamp 25 W
Max. power 2100W/3000W
Network power cable:
The Manufacturer declines all liability for damage caused to persons and objects due to incorrect or improper installation of the appliance.
The Manufacturer reserves the right to make any modification it believes necessary and useful to the products, without prior warning.
ISTRUZIONI PER L'UTENTE
Volume utile: 70 litri
DATI ELETTRICI
Tensione nominale:
220V-240V\~50Hz
WAARSCHUWING en VEILIGHEIDSVOORSCHRIFTEN
OMSCHRIJVING VAN HET PRODUCT
OMSCHRIJVING VAN HET PRODUCT
OMSCHRIJVING VAN HET PRODUCT
INSTRUCTIES OVER DE WERKING
WAARSCHUWING - DIT APPARAAT MOET GEAARD WORDEN
IcnoIb3yIte dyXOBky TOIbKO IJI npIroTOBHeHnI nnI.
HacpoTe duXOBoI shKaHa HnyKHyIO yHKcNIO npiroTOBHeHnI TeMnepaTpy.
MaKcImaJIbHoe BpeM npuROTOBnEHH coCTaBnEeT 10 yacob.
1) HaximmaIte KhoNkY (E), noka Ha 3Kpahe TaMepa He noBArTc HnDkaunzur (Dur). (3To cNeydt cDenatb Do HacTPOHk BpeMeHH nprirotOBHeHH.)
2) C nomoosbKHOKNOK «+» N «-» 3aJaTte BpEmn nprirotOBNeHnnpOyKTob. (Cm.nHCTpykunn no HacptpoKe hUxHOro BpEMeHHaocB.)ДЯ nOttBePckDeHnHa HxMmTE KOnIKy «)- Na 3Kpahe 6bIet OToBpaKeHo TekuJee BpEmn, a TaKke CmBolbli «A» n «M), Pprnt OToH yXOBoW uKaΦ npnCTyNTN K nprirotOBNeHIno npOdyKTOB.
3)По ncteehn 3адан Horo nepnoDA ВрemEH TaIMep octanOBHt paOby DxuBOrO uKaaIи BBy yCbNbUITE 3ByKOBoe onOBeueHne. KpmeTOR, oTo6paXaEMbHa Ha 3ekpaHe CmBON «A» NaHET MnaTb. 3aTeM yCTAHOBITE pykuy Bbl6opaФунКUIMn Ipykuy HAcTpoIHKm TEmpePATyb BNoJoxHeMe «O». HaxMITE n YdePckBaITe IIO6yI KNOIky B TeueHne MeeE 3 cekYnd - 3ByKOBoe onOBeueHne 6yEd OTKlOyuHo.
EcHn HaxaTb N ydepKnbTaB KhoNky «» B TeueHne 60one 3 cekyHd, Bbl CMOxete ChOBA nCOnb3ObaTb DxyoBOi WkaΦ B pyuHOM pexIme.
IonyaBTOMatuueckoe nporpamMnpoBaHne no BpeMeHH 3aBepeHnnproTOBHeHn npOyKTOB:
DaHHa fHyHKuNn PO3B0JnRt 3aDtB BpEm, KOrda npriTOOBHe npoYKObT DOJXHO 6bIb 3aBePseHo. NIpomeTne npOkykTB y DxHOBoW uKaH. HactpoTe dyHOBoW uKaHa h YuKxyo FHyKuNn ppiTOOBHe n TMepaTyP.
1) HaximMaTe KhoNky (三), Noka Ha 3kpaHe TaMepa He NaBHTcra INHnKaAuae «End. (3To CneDyET cDenatb Do HactpOKn BpeMeHH, KOrda pnproTOBLeHne DoJXHO 6bItb 3abepeuHo).
2) C NOMOsbU KOHNOK «+» N «-» NaCTPOJIte BpeM a3aBepWeHn pnproTOBLeHn. (Cm. nHcTpyKuIN no hAcTpoJIke HyxHORo BpeMeHi.)
3)ДиpoNTBepKdEHHaJKMHTe KhoNkY «-HaЗКраH6yETOTO6pBeKeHO TeKUyee BPEM, a TAKxe CmMBOnbl«A» n «W).ПпгэТOM dXOBoB uKaΦ pnpCTuNIT K npriuTOBJIeHnO npOdyKTOB.
4)Пи nICTeueHn 3aDaHnHO nepiNoDA BpeMeHn TaImeP OCTAHOBITpaObyDyXOBORoKFaanBbUcblbIuNTe3ByKOBoe ONOBeueHne. KpOme TOrO,Ha 3kPaHe NaHuT MgRtB CmBOJ «A). 3aTeM yCTaHOBiTpepyK bIbOpaФyHKuN I pyKу HAcTPOKn TEMpePATby B noLoKeHne «0). HaxKMITE uYedpXnBaIte loBHy KOhONI B TeueHne MeHee 3 cekyHd - 3ByKOBoE onOBeueHne 6dyET OTKIIIOUHO.
Ecnna Hnakatb Nydepkmbatb KhoNky «B» B TeueHne 6oJee 3 cekHy, Bbl CMOKeTe ChOBA nCNoIb3OaBt DxyOBoi ShKaΦ BpyuHOM pexime.
Плноctью abTomatnueckoe nporpaMMpoBaHne:
DaHHaФyHKUHnO3B0JnREteTOIbKO rTOBnTb npOyKtB B TeueHHe HuyKHO BpEMeHn, Ho n3aNyCKaTb npOeCC nprOToBnEHn C HuyKHO 3aepkKo. IomeCTte npOyKtB BduXOBoi shKaΦ. HactpoTe duXOBoi shKaΦ Ha HuyHyIO fHyKUHn nprOToBnEHn. HactpoTe temnepatypy BHYTpN duXOBOro shKaΦc oOrnaCHO peuenty nprOToBnEHn npOyKTOB.
Bo-nerpbbix: hakmmaTe KhONkY «, noka Ha 3KpaHe TaImepa He noBHTc HnDnkaCuaN «Dur», C nomooubo KhoNOK «+» N «-» 3aadJe BpEm npriOTOBENHn PNOyKTOB. Дл поТВержКнAmE KhONkY « -Ha 3KpaHe 6ydet OTObpaKeHo TekuJeeBpEma, a TAKKE cMBOJ «A».
Bo-BTOpbIX: npoJOnKaIte HaxMMaTb KONKy «E», noka Ha 3kPaHé TaImepe Hne NOBtCnIHINKauNcIe «End». KOrJa Bb YbUInTe Na 3kPaHé TaImepe HnDnKaIcuNcIe «End», hAcToPte BvEme 3aBePseHNe npriTOBOTNeHc N oMoUbIb KONKoH «+» N «-», 3aTeM dЯ NpOITBeRJdEHN HaxMMte KONKY «E» - Na 3kPaHé 6JdT eT OTObpaKeHc TekUcIee BpEMe, a TakKe CmBOL «A». CmBOL «W» He NoBHTcdo Na HauNa npOeCa npriTOBOTNeHn.
ДобавBLEвгБЕМРПОТOBENHЯ РODКТВΚ TEKUYESMYBEMEH - Вы можепerveнси задуckрпOTOBENHЯ счор do 23 yapoc 59 MHHYт ONNYEHHORO MOMENTA.
DyXOBO IkaΦ paccuTbIaet BpEm Haayana npnroTOBneHn, BByITa8 o6uee BpEm npnroTOBneHn npdyKOB IN bPemH 3aBepeHn npnroTOBneHn, Taq YoB Becpoee 6yET 3aBepeHn B3aDaHoe BpEm. 3aTeM taJImeR BbIDACT 3bYkoBE OOnBEeHHe, a CmBON «A»
Hauhet MiraTb. UctahOBnB pyKu Bbl6opa yHKcun n pyKu HactPOnIK TEmpepatybl, HAKMTE u YdepKbNAITE LIObyo KONIKy B TeueHne MeHee 3 cekynd - 3bYKOBOe ONOBEseHne 6yEdt OKJIIOUHO.
Ecnna HnackaBnyupeKmbaTb KhoNky B TeueHne 6oonee 3 cekyHb, BcmoKeTe ChOba NcnoNb3OBAb DxyOboi shKaF bpyuHOM pexime.
IopanyiCTa, 6bpaTe BHNMaHHe: ecn Bbl 3aJann HAcTPOIKBpeMeHN DnIe NOnHcTbHO ABOTMaTHueCKORO pexIMNa, INyke HeNb3r NImMeHTb. IOpMeHB HAcTPOIKB, Bbl OTMeHN ATEBaTNueCKYIO npOrpAMMy I nepeJeDte B COoTBcETbYIOuIN pexIM. EcnBbl XOTNE BblONHNTb C6OpC HAcTPOEK ABOTMaTHueCKORO pexIMNa, npeKpATNIte HAcTPOKY TeKUxNn NapaMeTPOB IN 3aHOBO HAcTPOIe ABOTMaTHueCKN peXIM CoNlacHO npBBeEHOMBy Bblse AnROPMTMy.
Oco6eHHocnHaCTpoKn
1) EcnHn Haxatb U ydepXNBATB KHONK I < < > B TcehenHe 6Oenne 3 cekyHd, HactpoJa BpeMeHN 6bETpO ybenuNbBATc NmU yEmhBuATbC suaROM b 5 cekyHd.
2) CEni npn HacTpOKe ToI INI INHOY HUKNIN BpeMeHH BbHe HauKmHae HA KOnKn B TeueHne 5 MNHyt, 3JIeKtPOnPi6Op BO3BaPaaetcB pyuHoi pekMn.
3) Ecn npn HacptpoKe ToJ mnn HNO yHKnU BpeMeHN HaxaBt YnePckNBAh KONKy «» B TceueHMe 6oee 3 cekyHd, TekuJaA hactpOka 6ydt OTMeHa, a 3NeKtpOnpnpbOp nepeiDet BpyHOr pexkIM.
4) Ecn npn HacptpoKe yHKmBpeMeHn HaaTb N ydepKmbTb KhoNk «++» N « B TeueHne 6oee 3 cekynd, To Tekyuaa HacptpoKa yHKmBpeMeHn 6ydet OTMeHeHa aJNEKtponpnbop BidaCT 3ByKOBOB CnHn I nepeiDet B pyuHOI pexHM.
5)MbyepeKomeHdyem BkIIOUHTb IyctOJ dyXOB0 shkaΦ Ha 15 MmHT pRn TEmNEpatoye 200 rpaIyCOB LcIbCSN-3TO N03BOJNT ydaIyNT oCTaKN npOdyKTOB C BHyTpErHHeN NOBepxHOCTn DYXOB0 shkaΦa.
HCTPYKUNI NO KCIJYATAUIN
1. Hacroika yacob
Pocne podkIoueHn 3eKtpoepn6opa K nctOuHnky nTahnaHa DaCnIee 6ydt OTo6paJeaHa HnDnkauaN «00:00».
1) Haxmte «» - HaheT MmraTb 3HaueHne yaca.
2)Врашайтpeуку«К2》,чTo6blHacTpOuNTbЗнayehne yaca (BДиларзоноТОdo23).
3) Haxmnte «C» - NaHET MNaTb 3HaueHne MNHyT.
4)Врашайтей ручky«К2», чтобы насточь зсанени минут (В диапазоне от 0 до 59).
5)HaaMnTe 念 ,HTO6bI 3aBepuMTb HAcTPOKU YacOB. HaKpaHe NaHcET MmRt b CMMBON «» N3aOpNTca INHDAKUNA BPEMEH。
PImmuHHe: B caxac 3neKtpoPn6Opa NcNoIb3yeTc8 24-acaoboi fopmat BpeMeHN. Pocne OTKnUoyehna 3neKtpoPn6Opa ONTcOHTNkA PIaTHNA HAcTPOJKN CaOB 6byT notePnHi.
2. HactpoikKa yHkun
1)BpaaIae pyuKy K1),TTO6bblb6pTaH NyXHyO yHKZIO pIPOTOBHeHn.3aOpITc COOTBeCTBvUoHnMHNKATOP.
2) BpaaaTe pyKy «K2», ChTo6bI HaCtpoNTb TempepaTy.
3) HAKMITE KHONKY (H), QTO6bI POITBTEPINTB HAcTPOHKY IN PnICTyNTb K pNIRTOBOTNEHNI. 3aORPTC COOTBTCTBYOuHm 3HAOK TEMNEPATyb (C).
4) EcnBb nponyctnni shar 2, haxmnte ,yTO6bl npNCTynntb K npnroTOBJIeHNIO - BpEma no yMOnuAHNO 6ydet yCTaHOBNeHO Ha 9 YacOB, a TemnepaTpya no yMOnuAHNO 6ydet OTO6paJKeHa Ha CBeToNDoHOM ducnnee.
ПРIMEΥАHΙΝΕ:
1)BpaaI pyky,Bbl ocyuieCTbIaeTe hactpoKy BpeMeHH CO CnEduoIIM WaROM: 0T 0do 030 Mm:waI 1MnHyTa;OT 0:30 do 9:00 cacoB: waI 5MnHyt.
2) 小川 hactpoikn Tempepatypb coctablanet 5^ ,Дя Инфракpacchoro рил -30°C.
3) Korga prnrotoBleHne 3anyueHo, Bpaauate pyuKy «1», cho6bHahtpOntb Bpemr prnrotoBleHne. 3aTeM haKMITE KHONIKY «H»), cho6bHaHcyb prnroTOBLeHne.
EcnB TceHne 3cekynd He HaKaTb KhoNkY DyXOBO B kAnpOJnKHT PnroTOBNeHne C npdeblduJeHnactPOK BpeMeHn.
4)Korda nprirotoblenhe 3anyuho,Bpaaate pyky «K2》,yTO6bI NaCTpOntb Tempeatpy.3aropntcaycooBTcTByUoiin uHdInkATOp.3aTeM hAKMTne KONIKY «H),yTO6bI NaAtb nprirotoblenhe.EcIn B TeueHnE 3 cekyHd He HauTaB kONKy «H」,DxHOBoi uKaΦ npdoJOnt nprirotoblenhe C npdebluye nHaCTpoNkoTtemepaTypbl.
3. Hactpoika lamnbli
1)BpaaaiTe pyky «K1》,TTo6bI bIb6paTb HuyKHyO yHKnUHO -Ha 3KpaHe NOBtC4 COOTBETCTBYIOU3HAOK.
2)HaxMnte KhoNky «P》,yTO6bI npICTyNTb K npnroTobHeHIO.3HaQOK lamBbI «:» HaHTe MInraTb.
4.Функця Справки
Ecln BO Bpem npriroTOBHeN Bbl BoCpNoB3yeTeCb yHKuIe nCpABKn,Tope3 3 cekyHbI eNkTPOnpn6Op CHOBA BEpHTcB TekyU pexm pa60tBu.
1)BpeKIMpeNpIroTOBHeHnHaXmTe KHOKNy ,YTO6bIpOcMOTpeTb TEKUSeE BpEM.
2)EcnuacbHnactpoehb,HaxMNTe KHOIIKUy 》TO6bl npocmOTpeBpemnpiroTobHeHnA.
5.Функцяблokировкnt ot deteN
BkIIOUeHne 6JIOKIOPOBKn: OJHOBpeMeHHo HaxMMte N yapedXKBaIte KHOKNK (1)N (2) B TeueHne 3 CekyHd - BblcIbIwIte D0JIrN 3ByKOBOi CNrHaN, 06O3HaJIoUe BkIOUeHne 6yHKnM 6JIOKIOPOBKn OT DeTei, a Ha 3KpaHe 3aRopntCnCMBOV (1).
OTmHa 6bOKnOBKn: OJHOBPeMeHNO HaXMMte N yapedKnBaTne KHOKNK 四 N 四 B TceHHe3 cekYnd, Bby UcNbUme ToDolrnn 3ByKOBoCnHaI, 0o3NaHaIoIu, uTo FOHKnra 6bOKnOBKn OT dTeE tOkIOueHa.
PnmueyHne:ecJbBxOTnte npepBaT npoucc pnproTOBHeNHa, KpATKOBpeMeHHO HaxMNTe KHONKY octAHOBKn. He CNeDyET DOItro yEpdXnBaTb KHONKY OCTAHOBKn -3TO HeBepHnA KOMaHJa.
6.Функцин haHOMHaHnA:
TObBb He 3abHn 3anyctntb npiroTOBHeHne,dyXOB0 WkaM oKet BbdaBaTb COOTBeTCTByIOoee HAnOMHaHHe No IcTeueHHn nepoMa BPemEHn OT 1 MMHyTb Do 9 cAcOB. HanOMHaHHe MOxHO HAcTPOHTb ToJbKO B TOM Cnyae, KOrDa DxyOB0 WkaF HaxOJTcB R pexmE OxNDAHn. TObb HAcTPOHTb HAnOMHaHHe, CJeDyIe PnpBEHbIM HNKe IHCTpykUHM:
1) Haxmte KhoNkHaCTpoKn HanomuHaHnA «O».
2)Врацайе ручky «К2», чтоби ясторь заименец саadingу вдочи наюнамен. (Занону должно биты вдаизаоне от 0 до 9).
3) Haxmnte KhoNky HaCTpoiKn HAnOMHaHnra eue pa3.
4) BpauaJIe pyuKy «K2», YTO6bI hAcTpoITb 3NaUeHne MInHyT nBdIbauNHaOMINHaHn. (3NaUeHne DoJKNHO 6bITb B duaIaONAOte OTo 059).
5)Kxaphe HaHTeMnBOMN H3aOpntCnHnIkaJNAHONMHNHIAO.3ATEm HAHTHeTcOTCETBPEMeHN.
PpimueaHHe: no nCTeueHn 3aHaHHo BpeMeHn 3ByKOBoi CnHn an npO3ByuHt 10 pa3. CmBOn «@» nCye3Het c 3KpaHa, HAnOMInaB Bam o Heo6xOdMocNt 3aNyCTNb npriTobIeHne. Bbl MoKeTe OTMeHntb NaCTpoEHoe HAnOMInaHne HaxaTneM KHOKN OCTaHOBKn: KOrda HAnOMInaHne HaCTpoEHO, ero MOxHo OTMeHntb, DBaXkbIh HaxkAB KHONKY OCTaHOBKn.
7.Функцялanycka/nay3bl/OTMeHbI
1)KordaBpemn pnproTOBHeHnHaCTpoEHO,HaxMnTe KHOKNy《》TPO6bI 3aNyCTHTb npnproTOBHeHne.EcJn pnproTOBHeHn pnpOCTaHOBHeHO,HaxMnTe KHOKNy «》TPO6bI BO3O6HOBNTb Ero.
2) Bo BPem nprirotobleny Odn pa3 haxmte KhONky [H] T06bl npnoctaHOBNT er. DBaJbI HAXMTE KHONKY [D], T06bl OTMeHTb nprirotoblenye.
8.ФункцяэКOHOMNn3Heprnn
1)Korda 3neKtpnpn6op HaxoDITcB Pexkme OxndAHnI INI 3aNPORPAAMMPOBaH Na Bblauy HANOMHaHIN, HaxmTe N ydepXnBaTKe KHONKy «II» B TeYeHne Tpex cekYHd - CBeTOmOHbIe DInCnPeN oRacHeT I nepeiDet B pexm EKOHOmN 3Heptn.
2) EcnB pexmme oKndaHnHa npotjxehnn 10 MnHyT He BbIPOJIHReTc HNKAKNX DeICTBn, CBeTOIONDhbl DncPnE NOracHet npeiDet B pexm 3KOHOMn 3HEprnn.
3)Тобы Вьлtnи 3 ржмma зкогомпн Зерги,нхмnte IIO6yIO KHOПКИУ ИП NOВЕРНTE JIO6yIO pyuKy.
HopMbI rpaOCTpOnTeBCTBa (ony6NIKOBaHbI denapTaMeHTOM OKpykaIOUeCpeB)
3aKoHbI rpaOCTpOnTeBcTBa (Ony6JIIOKOBaHbI 1OTnAHDCKIM NcOJIHNHeBbIM DeapTAmEHTOM pa3BVNTNIA
3neKtpoTeXHnueckne npaBunu INHCTNtTuTa INHKeHepOB no 3neKtpnke INeKtpOnHe
3NeKtpnueCTBO B TpyOBOM 3aKOHOaTeJIbCTBE
IPEPEDBKLIOUCHENEMDUXOBKN
Ppi paCnakOBKe npOBepbTe, HaxOJaTcN B DuxOBKe CneDyUoJne DeTANI:
-Инстукции pykoBOdCTBO NO yctaHOBKe.
- NeuHbIe peWTeKn NII
1 npoTnBeHb
BnHTbI n CTOnOpby IJRA BCTpaINBaHnA DxYOBKn B HnHy.
MOnTaK dYxOBKn (cmToPn pnc.5)
3Tn dYxOBKn KlaaccnphiunpyoTc no knaCcy I.
3a3emJIHeNe 683aTeNbHO, KaK TOrO Tpe6yEt 3aKOH. I3-ROTOBUNeB CHNMAET C Ce6B BCIO OTBcTCTBEHHOCb npn HecO6JIIODeHIN pPaBnI PpeoTbPaUeHn HecuactThbIX CnyaeB.
BAXKHOE 3AMEYAHVE:
Пиимьkaюа мeбел nbлшкаф,а тarkse Вс Матерпалы,MCNOBZyEMbI pyntaHOBK,ДOLЖнblу BlpeJxBnBaTb,Kak MHNIMYM,Nobblшени TempepaTypbI Ha 85oCВblle TempepaTypbO Okpyж�ош срд BO Врma pa
60TbIyXOBKn.
OnpeJenHbIe TINbIkyoHHO Me6enn 13 BnHIna IIN CIOcTOTO IpaCTNka OOCO yBCTBNTEnbHbK NOPBEXeHNAM B CBA3N C ObECSeBuVeBaHNem Pnpi Tempepatypax HnHex Ykaz3AHNO. EcnI DyXOBKa YctahABNbAeTc 6e3 Yceta TORE TMpepatypHoro npedena, nIe cEn OHa YcTaHaJIbAeTcHa PaCtOAnHHMeHee 4 MM OTnpIMblKaOuNX WkaΦOB,OTBeCTBeHHOCTb 3a 3TO bSydET HeCTn BlaJeNeU.
3AMEUHNIYCTAHOBKE
A. OnopHyIO HanpaBIAJIOU HUxHcHO ChrTb
B. PacCToRHe 75-90 MM MEXy CTeHKO IN 3aDHe YacCTbO OONPOHOI NOKIN OCHOBAHNEM WkaΦa
C.OCHOBAHHe
D. YctahablnBaetcdeKopaTnBnaHaKa
PNC.7: Tpe6OBaHnK B eHTnIaunN m 3a3Opam npu yCTaHOBKe pIOcTOE 3JIeKTPnueckOyXOBKn B CTaNapTHOK KYoHN OH Me6BNI.
MnHmMaJIbHbIe Tpe6oBaHnK BeHTnJIaCnI dJI BepxHei, 6a3OB0I nOnOpHOI noIOK IJIa3aDHeJ uactn DyXOBKn.
A.3aɪnɪyɪ næneB
B. Meço干什么 xpaHeHn
C.CHIMNTE 3aDHOU qACTb 3TOI CkUN
D.3aHnnaHeB
E. Meço干什么xpaHeHn
F.OCHOBAHHe
G.MunHmAlbHbI 3a3Op IJIe BENTINaUN 80 cm2
Pnc.8: Tpe6ObaHnK BENTnlauIIN 3a3Opam npu yctaHOBKe pOcToN 3JIeKTPnueckOn dYxOBKn B BepXhem 1ka-phi.
3JNEKTPNUECKNE COEDINHEHNA
PpejxeJe cem npokluaBdyxOBky, npoeBpe, TcO6bl HapnpaKeHne, yka3aHnoe Ha nacopnpTHo Ta6nueKe, CObnaJao C hapnpaKeHneHem 3eKETpnueeckoCetn.
TEXHINHECKOE OBCJNYKUBAHNE
Ipejxe MeBbInoHnTbTexHnueckoe 6cbnyKuBaHnE,OTcoeHNHTeDyXOBkyOT3neKTpOniTahnI.
B TeueHme rapaHTnHoro neprooda BCE heo6xOdnnmoe 06cnyKBaHne dONJXHO nOpyuTbcra OTDenyTexHNueCKrO 06cnyKbAHHn N3ROTOBtTeJI. POMHnte, YTO BMeuATenbCTBO NnpeMOHT co STOPOHbI HeyNIOHOMOeHnHO H aTOrO pEPcoHana pINBODNT KaHHyIMPOBaHnHo HactoJe rapaHTnH.
3AMEHA JAMIOUCKN OCBUEHNEI DXYOBKN
(Ha lamnooyu rapaHTnHa duXOBky He paCnpocTpaHAreTc)
B DnyOBKe IpeDyCMOTpeHa NaMOnOuKa co CneDyuOuIMn XapaKTePnCTnKaAMn: 15 BaTT nn 25 BaTT, 300^ Tn pe3b6bl E-14
PNEyPEXDEHNE:OTCoeHNHTyDxOBkyOT CeTN 3JeKTPnueCKOrO NiTaHn, CHIMNTE DBepuDyDxOBKn (kak OnncaHO BblSe), aTakKe IOnkN dyXOBKn.
CnHMnTe cTeKJIaHHNHy KpbIshky, 3aunuauoJyIaMnOuyK, NOBepHyB ee npOTnb Yacoboi CTpeJIkn. Pnc. 9 (A)
BbINHTte CTAPyI NaMNoKY uYtINu3NpyTE ee 6e30aChbIM O6pa3OM u6e3 Bpea OkpyKaIOSeI CpeE, BBINHTte HOBYIO, KAK yK3aHO BTexMHueCKNX ycNOBnX, I NOCTaBBTe Ha MeCTo KpbIiKy.
PIMMEUHNE - CTeKJIHHa KpblsKa MoKeT cndetb Tyro, nДЯ ChTnA MoKeT notpe6oBaTcBc yCnHne.
YxOJ 3a KaTaNITnueCKN M NOKpbITnEM I erO 3aMeHa
(Ecnn npedymoTpeHO 3TO NOKpbITne, rapaHTnHa duXOBky Ha NOKpbITne He pacnpocTaPraHReTc).
ДяTORO yTO6bI NOKpbITNe BcERd OOnuAnocB 3ΦeKtNBHO, yXOBKa DOnJHsHa HArpeBaTcB, NO KpaIHe MeP, DO 200^ B IIO6OM CnUyae, KOrDa BO3NkaIaTpyDHObIBoDNMbIe PnTHa C TEM, yTO6bI OHI He OTeANiCB HAcERda. ECIN NOKpbITNe cTaHOBnTCa YepHbIM N 3epKanblbIM, eRHO HxHHo ZameHInb. N3BJeKnTE BCE BHytpeHNue pnpHaJIeXHOCTN, yTO6bI BoIero Nepe pOn13BOJntb ZameHy nKpbTnI.
TOKpbItne Ha 3aMeHy MoKHO npNoBpeCTn HEnocpeCTBeHNBO B OTJeNE 3anaChbIX HAcTeN 3rTOBOTENe (CMOTn NOpO6Hy INHOpMaunIO, yka3aHHy Ho NOKpblTN).PnI 3aKa3e YkakInTe CnpaBOUHbIe Homepa Tnna pOdyTKa, yka3aHNbIe Ha nacnopTHoTabnue n (nn) cepHnhbHOMep dYxOBKn.
TEXHnueCKNE YCIOBnA
BHYTPEHHNE PA3MEPbl:
BbICota:346,5 MM
UnpHa:457 MM
Tny6Ha:410MM
220-240 BoIbT, 50 rep
Плпгдунчын: 13-amnepHbI abTomaHueckm BblKlnuOteB c3aunuHcHOn p03eTKoB, B KOTOPOM npEuyCMOTpeH 3azOp 3 MM MeJxdy KOHTaTAm
3HEPronOTPE6JIENHIE:
BepxHnHarpeBaTeNbHyI 950BT
HarpeBaTeIbHbI ΘeMeHT rPnla 2000 Bt
HnKnn HnpeBaTeNbHbI 1100 Bt
KoHBeKUOHbI HArpeBaTeJIbHbI 3JeMeHT 2000 Bt
KoHBeKUOnHHbI DnBraTeJIb 33BT
- REEMPLACEMENT DE L'AMPOULE DU FOUR
- DIMENSIONS INTÉRIÉUES
- GENERAL INFORMATION
- IMPORTANT NOTICE
- SAFETY INSTRUCTIONS AND WARNING
- INSTRUCTIONS
- USING THE OVEN
- HOW TO USE
- OPERATION INSTRUCTIONS
- To set the correct time of day
- Oven On and Off
- Time function setting
- Manual mode:
- Full-automatic programming:
- Specification
- Clock Setting
- Function Setting
- NOTE:
- Lamp Setting
- Inquiring function
- Child lock function
- Reminder Function:
- Start/Pause/Cancel Function
- Energy-Saving Function
- Pyrolytic Function(only some modles)
- Note
- USEFUL ADVICE
- COOKING INSTRUCTIONS
- HOW TO USE THE GRILL
- WARNING
- CLEANING THE APPLIANCE
- IMPORTANT
- VTRIFIED ENAMELLED PARTS
- INSTRUCTIONS FOR INSTALLATION
- PRIOR START-UP OF THE APPLIANCE
- FITTING THE APPLIANCE (see Fig. 5)
- INSTALLATION NOTES
- ELECTRICAL CONNECTION
- WARNING - THIS APPLIANCE MUST BE EARTHED
- REplacement of THE NETWORK POWER SUPPLY LEAD
- MAINTENANCE
- REPLACEMENT OF THE OVEN LIGHTBULB
- CARE AND REPLACEMENT OF THE CATALYTIC COVERING
- SPECIFICATIONS
- INTERIOR DIMENSIONS
- ELECTRICAL INFORMATION
- ISTRUZIONI PER L'UTENTE
- DATI ELETTRICI
- WAARSCHUWING en VEILIGHEIDSVOORSCHRIFTEN
- OMSCHRIJVING VAN HET PRODUCT
- INSTRUCTIES OVER DE WERKING
- WAARSCHUWING - DIT APPARAAT MOET GEAARD WORDEN
- Oco6eHHocnHaCTpoKn
- HCTPYKUNI NO KCIJYATAUIN
- Hacroika yacob
- HactpoikKa yHkun
- ПРIMEΥАHΙΝΕ:
- Hactpoika lamnbli
- 4.Функця Справки
- 5.Функцяблokировкnt ot deteN
- 6.Функцин haHOMHaHnA:
- 7.Функцялanycka/nay3bl/OTMeHbI
- 8.ФункцяэКOHOMNn3Heprnn
- IPEPEDBKLIOUCHENEMDUXOBKN
- MOnTaK dYxOBKn (cmToPn pnc.5)
- BAXKHOE 3AMEYAHVE:
- 3JNEKTPNUECKNE COEDINHEHNA
- TEXHINHECKOE OBCJNYKUBAHNE
- 3AMEHA JAMIOUCKN OCBUEHNEI DXYOBKN
- YxOJ 3a KaTaNITnueCKN M NOKpbITnEM I erO 3aMeHa
- TEXHnueCKNE YCIOBnA
- BHYTPEHHNE PA3MEPbl:
- 3HEPronOTPE6JIENHIE:
Brand : CATA
Model : CM760ASBK
Category : Built-in oven