
HQ738155E - Built-in oven SIEMENS - Free user manual and instructions
Find the device manual for free HQ738155E SIEMENS in PDF.

| Brand | Siemens |
| Model | HQ738155E |
| Product type | Built-in oven with gas hob |
| Gas type | Natural gas G20 (20 mbar) or LPG G30/G31 (28-30/37 mbar) - adaptable |
| Power supply | 220-240 V, 16 A, 50/60 Hz |
| Number of burners | 4 (1 auxiliary 1.0 kW, 1 semi-rapid 1.8 kW, 1 rapid 3.0 kW, 1 wok 3.9 kW) |
| Oven cooking modes | Natural convection, fan-assisted, bottom heat, grill, large area grill, fan grill, defrost |
| Oven temperature range | 50 °C to 260 °C |
| Included accessories | Grill rack, enamelled baking tray, Italian coffee maker support |
| Electronic clock | Timer, programming of cooking duration and end time |
| Oven lighting | 25 W lamp, E14 base, heat resistance 300 °C |
| Oven maintenance | Self-cleaning catalytic walls, removable door for cleaning |
| Safety | Electric ignition for burners, flame safety (if flame goes out), gas safety valve recommended |
| Gas compatibility | Natural gas, LPG (butane/propane), town gas (with adapted injectors) |
| Gas connection | G1/2 connection, adapter supplied |
| Adjustable feet | Yes, for levelling |
| Spare parts | Injectors, E14 25W bulb, burner caps and crowns, pan supports |
| After-sales service | E and FD number on rating plate (see storage compartment) |
Frequently Asked Questions - HQ738155E SIEMENS
User questions about HQ738155E SIEMENS
0 question about this device. Answer the ones you know or ask your own.
Ask a new question about this device
Download the instructions for your Built-in oven in PDF format for free! Find your manual HQ738155E - SIEMENS and take your electronic device back in hand. On this page are published all the documents necessary for the use of your device. HQ738155E by SIEMENS.
USER MANUAL HQ738155E SIEMENS
Eine Störung, was tun?
Important safety information. 20
Causes of damage 22
Your new appliance 23
The control panel 23
The hob 24
The oven 24
Accessories 24
The electronic clock 25
The storage compartment 25
Before using the oven for the first time 25
Setting the clock 25
Baking out the oven 25
Cleaning the burner caps and cups 25
Cleaning the accessories 26
How to operate your hob 26
Operating gas burners. 26
How to operate your oven 26
Switching the oven on and off. 26
How to operate your electronic clock. 27
Changing the settings 27
Cancelling settings 27
Setting the acoustic signal 27
Setting the electronic clock. 27
Setting the timer 27
Setting the automatic timer 27
Care and cleaning 27
Cleaning agents 28
Catalytic cooking compartment panels 28
Removing and fitting the appliance door. 28
Troubleshooting 29
Replacing the oven light bulb. 29
After-sales service. 30
Energy and environment tips 30
Saving energy with your oven 30
Saving energy with the hob 30
Environmentally-friendly disposal. 30
INSTALLATION INSTRUCTIONS 31
Safety precautions 31
Before installing 31
Unpacking 31
Appliance class. 31
Appliance dimensions 31
Adjacent units 31
Rating plate. 32
Guidelines for ventilation 32
Installation 32
Fitting the adjustable feet 32
Fitting the splash guard. 32
Electrical connection 33
Connecting the appliance to the power supply. 33
Gas connection 33
Gas connection on the appliance 33
Default setting of the burners 33
Accessories 33
Connecting natural gas supply 33
Connecting to liquefied gas 33
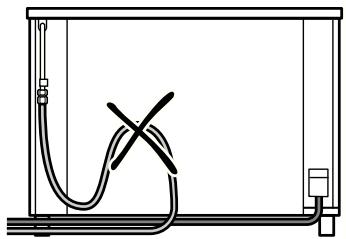
Flexible hose 34
Installing the safety valve 34
Checking for leaks 34
Initial use 34
Converting the gas type 34
Hotplate burners 34
General nozzle table 35
General nozzle table for town gas 35
Positioning and levelling 36
Positioning the appliance 36
Levelling the appliance. 36
INSTRUCTION MANUAL
Important safety information
Read these instructions carefully. Only then will you be able to operate your appliance safely and correctly. Retain the instruction manual and installation instructions for future use or for subsequent owners.
Check the appliance for damage after unpacking it. Do not connect the appliance if it has been damaged in transport.
Only allow a licensed professional to connect the appliance. Damage caused by incorrect connection is not covered under warranty. Call the after-sales service if you want to convert your appliance to a different type of gas.
This appliance is intended for domestic use and the household environment only. This
appliance must only be used to prepare food and drinks and must never be used as a heater. Do not leave the appliance unattended during operation. Only use the appliance indoors.
This appliance is not intended for operation with an external clock timer or a remote control.
This appliance may be used by children over the age of 8 years old and by persons with reduced physical, sensory or mental capacity or by persons with a lack of experience or knowledge if they are supervised or are instructed by a person responsible for their safety how to use the appliance safely and have understood the associated hazards.
Children must not play with the appliance. Children must not clean the appliance or carry out general maintenance unless they are at least 8 years old and are being supervised.
Keep children below the age of 8 years old at a safe distance from the appliance and power cable.
Always slide accessories into the cooking compartment correctly. See "Description of accessories in the instruction manual.
Close the safety valve on the gas supply line if the cooker will not be used for a prolonged period.
WHAT TO DO IF YOU SMELL GAS!
Escaping gas may cause an explosion. If you smell gas or notice any faults in the gas installation:
- Immediately shut off the gas supply or close the gas cylinder valve.
- Immediately extinguish all naked flames and cigarettes.
- Do not use any light or appliance switches and do not pull any plugs out of sockets. Do not use any telephones or mobile phones within the building.
- Open windows and ventilate the room.
- Call the after-sales service or the gas supplier.
Risk of asphyxiation!
The use of a gas cooker leads to a build-up of heat, moisture and products of combustion in the room where the appliance is installed. Ensure that the installation room is well ventilated. The natural ventilation openings must be kept open or a mechanical ventilation device
must be provided (e.g. an extractor hood). Intensive and persistent use of the appliance may mean that it is necessary to have additional ventilation (e.g. opening a window), or more effective ventilation (e.g. operating the existing mechanical ventilation device at a higher setting).
Risk of fire!
A draught is created when the appliance door is opened. Greaseproof paper may come into contact with the heating element and catch fire. Do not place greaseproof paper loosely over accessories during preheating. Always weight down the greaseproof paper with a dish or a baking tin. Only cover the surface required with greaseproof paper. Greaseproof paper must not protrude over the accessories.
- Combustible objects that are left in the cooking compartment may ignite. Never store combustible items in the cooking compartment. Never open the appliance door if there is smoke inside. Switch off the appliance and unplug the mains plug or switch off the fuse in the fuse box. Shut off the gas supply.
- Hot oil and fat can ignite very quickly. Never leave hot fat or oil unattended. Never use water to put out burning oil or fat. Switch off the hotplate. Extinguish flames carefully using a lid, fire blanket or something similar.
- The hotplates become very hot. Never place combustible items on the hob. Never place objects on the hob.
- The appliance becomes very hot and flammable materials could catch fire. Never store or use flammable objects (e.g. spray cans, cleaning agents) under the appliance or in its immediate vicinity. Never place flammable items on or in the appliance.
- When gas hotplates are in operation without any cookware placed on them, they can build up a lot of heat. The appliance and the extractor hood above it may become damaged or be set on fire. Grease residue in the filter of the extractor hood may ignite. Only operate the gas burners with cookware on them.
- The rear of the appliance becomes very hot. This may cause damage to the power cables. Electricity and gas lines must not come into contact with the rear of the appliance.
Risk of burns!
- The appliance becomes very hot. Never touch the interior surfaces of the cooking compartment or the heating elements. Always allow the appliance to cool down. Keep children at a safe distance.
- Accessories and ovenware become very hot. Always use oven gloves to remove accessories or ovenware from the cooking compartment.
- Alcoholic vapours may catch fire in the hot cooking compartment. Never prepare food containing large quantities of drinks with a high alcohol content. Only use small quantities of drinks with a high alcohol content. Open the appliance door with care.
- The hotplates and surrounding area, particularly the hob surround, become very hot. Never touch the hot surfaces. Keep children at a safe distance.
- The accessible parts become very hot when in operation. Never touch hot parts. Keep children at a safe distance.
- Empty cookware becomes extremely hot when set on a gas hotplate that is in operation. Never heat up empty cookware.
Risk of scalding!
- The accessible parts become hot during operation. Never touch the hot parts. Keep children at a safe distance.
- When you open the appliance door, hot steam may escape. Open the appliance door with care. Keep children at a safe distance.
Water in a hot cooking compartment may create hot steam. Never pour water into the hot cooking compartment.
Risk of injury!
- Scratched glass in the appliance door may develop into a crack. Do not use a glass scraper, or sharp or abrasive cleaning aids or detergents.
Incorrect repairs are dangerous. Repairs may only be carried out, and damaged power and gas lines replaced, by an after-sales engineer trained by us. If the appliance is faulty, unplug the mains plug or switch off the fuse in the fuse box. Shut off the gas supply. Contact the after-sales service. - Faults or damage to the appliance are dangerous. Never switch on a faulty appliance. Unplug the appliance from the
mains or switch off the circuit breaker in the fuse box. Shut off the gas supply. Contact the after-sales service.
- Unsuitable pan sizes, damaged or incorrectly positioned pans can cause serious injury. Observe the instructions which accompany the cookware.
- If the appliance is placed on a base and is not secured, it may slide off the base. The appliance must be fixed to the base.
Risk of electric shock!
- The cable insulation on electrical appliances may melt when touching hot parts of the appliance. Never bring electrical appliance cables into contact with hot parts of the appliance.
Penetrating moisture may cause an electric shock. Do not use any high-pressure cleaners or steam cleaners. - When replacing the cooking compartment bulb, the bulb socket contacts are live. Before replacing the bulb, unplug the appliance from the mains or switch off the circuit breaker in the fuse box.
Causes of damage
Hob
Caution!
- Only use the burners when cookware has been placed on top. Do not heat up empty pots or pans. The saucepan base will be damaged.
- Clear up spills immediately. Use deep pots for dishes with a lot of liquid. This will prevent the food from boiling over.
- Do not use roasting dishes if they must be heated using two burners. This will cause heat accumulation. The appliance could be damaged.
- Cooking on gas burners releases extra heat and moisture. Adjacent units may become damaged over time. For long cooking times, switch on the cooker hood or ventilate the room.
- Observe the manufacturer's instructions when using special ovenware. Aluminium foil and plastic containers can melt and stick on hot burners.
- Place the pot or pan centrally over the burner. This will optimise transfer of the heat from the burner flame to the pot or ban base. The handle does not become damaged, and greater energy savings are guaranteed.
- Ensure that the gas burners are clean and dry. The burner cup and burner cap must be positioned exactly.
Oven
Caution!
-
Accessories, foil, greaseproof paper or ovenware on the cooking compartment floor: do not place accessories on the cooking compartment floor. Do not cover the cooking compartment floor with any sort of foil or greaseproof paper. Do not place ovenware on the cooking compartment floor. This will cause heat accumulation. The baking and roasting times will no longer be correct and the enamel will be damaged.
-
Inserting accessories: depending on the appliance model, accessories can scratch the door panel when closing the appliance door. Always insert the accessories into the cooking compartment as far as they will go.
Water in a hot cooking compartment: do not pour water into the cooking compartment when it is hot. This will cause steam. The temperature change can cause damage to the enamel. - Moist food: do not store moist food in the cooking compartment when it is closed for prolonged periods This will damage the enamel.
- Fruit juice: when baking particularly juicy fruit pies, do not pack the baking tray too generously. Fruit juice dripping from the baking tray leaves stains that cannot be removed. If possible, use the deeper universal pan.
- Cooling with the appliance door open: only allow the cooking compartment to cool when it is closed. Even if the appliance
door is only open a little, front panels of adjacent units could be damaged over time.
- Heavily soiled oven seal: if the oven seal is heavily soiled, the oven door will no longer close properly when the oven is in operation. The fronts of adjacent units could be damaged. Always keep the oven seal clean.
- Oven door as a bearing surface: do not stand or place objects on the oven door when it is open. Do not hang objects on the oven door.
- Carrying the appliance: do not carry or hold the appliance by the door handle. The door handle cannot support the weight of the appliance and could break.
- Heavy accessories: do not pull out heavily laden accessories too far without first unloading them sufficiently. Heavy accessories will tip when pulled out. This causes pressure to be exerted on the shelf supports in the cooking compartment, which can damage the enamel. Relieve the strain on the
Your new appliance
Get to know your appliance. You will find information about the control panel and hob, as well as the oven, types of heating and accessories.
Details may vary, depending on the appliance model.
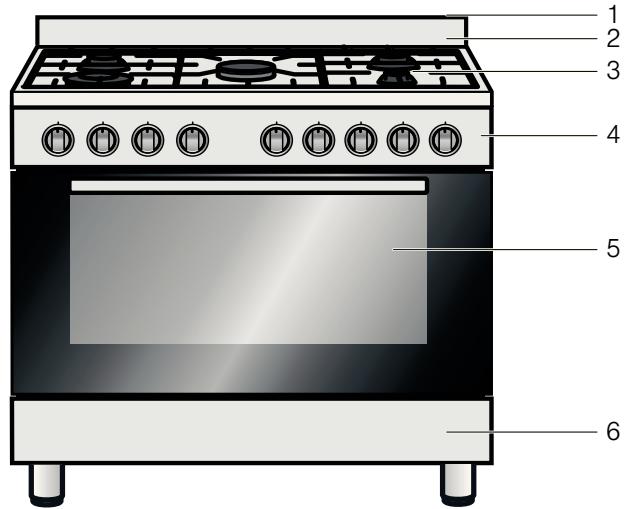
Explanation
1 Steam outlet
2 Splatter guard
3 Hob
4 Control panel
5 Oven
6 Storage compartment
The control panel
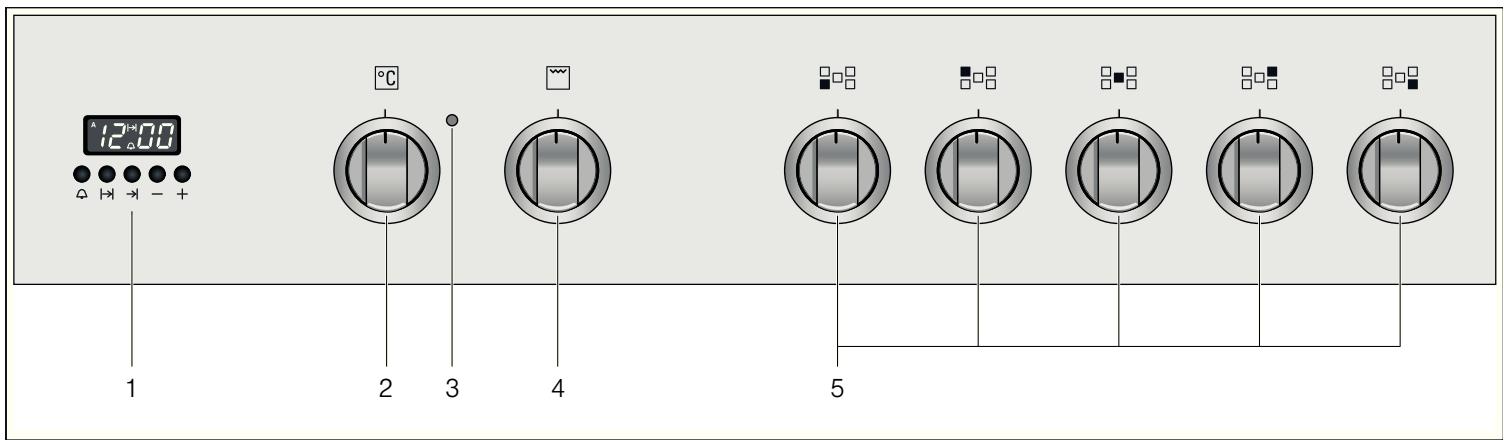
Explanation
| 1 | Electronic clock |
| 2 | Control knob for oven temperature |
| 3 | Oven indicator light |
| 4 | Control knob for oven functions |
| 5 | Control knobs for gas burners |
The hob
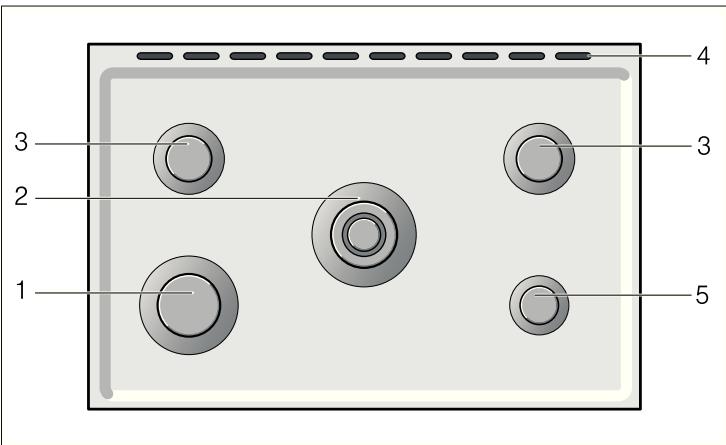
Explanation
| 1 | High output burner (3.0 kW) |
| 2 | Wok burner (3.9 kW) |
| 3 | Standard burner (1.8 kW) |
| 4 | Steam outlet |
| 5 | Economy burner (1.0 kW) |
Types of gas burner
| Gas burner | Pot/pan diameter |
| Economy burner | 12 - 14 cm |
| Standard burner | 16 - 24 cm |
| High output burner | 18 - 26 cm |
| Wok burner | 18 - 26 cm |
Control knob for hotplates
This control knob is used to adjust the heat setting of the gas burner hotplates.
The symbols above the control knob show you the gas burner to which the control knob belongs.
| Setting | Meaning |
| ● | Off |
| ◇ | Large flame, highest power |
| ◆ | Economy flame, lowest power |
Accessories
| Accessories | Description |
| Espresso attachment | |
| Attachment for an espresso maker; for placing on the economy burner. |
Optional accessories
You can purchase optional accessories from the after-sales service or specialist retailers.
Optional accessories Description
Wok attachment
Attachment for a wok, for placing on the wok burner.
When using the wok attachment, it is possible to use cooking containers with a diameter greater than 26~cm (woks, frying pans, pots, containers with a curved base, etc.).
After-sales service number: 741706
Steam outlet
Risk of burns!
Hot air from the oven escapes out of the steam outlet on the hob. Never touch the steam outlet.
Please note that, in the case of appliances with a hob cover, the burners in the oven may also only be switched on if the hob cover is open.
The oven
In order to operate the oven, you require two operating knobs: The function selector and the temperature selector.
Control knob for oven
Function selector
Set the operating mode using the function selector.
| Symbol | Meaning |
| □ | Top/bottom heating |
| □ | Bottom heating |
| □ | Grill |
| □ | Full-surface grill |
| □ | Hot air grilling |
| □ | Top/bottom heating and hot air |
| □ | Hot air |
| □* | Defrost setting |
Temperature selector
Set the temperature using the temperature selector.
| Setting | Meaning |
| ● | Off |
| 50 - 260 | Temperature range in °C |
There is a limit stop between settings 260 and o. Do not turn the knob beyond this point.
Accessories
The accessories can be inserted into the cooking compartment at 4 different levels. Always insert them as far as they will go so that the accessories do not touch the door panel. Ensure that the accessories have always been inserted into the cooking compartment correctly.
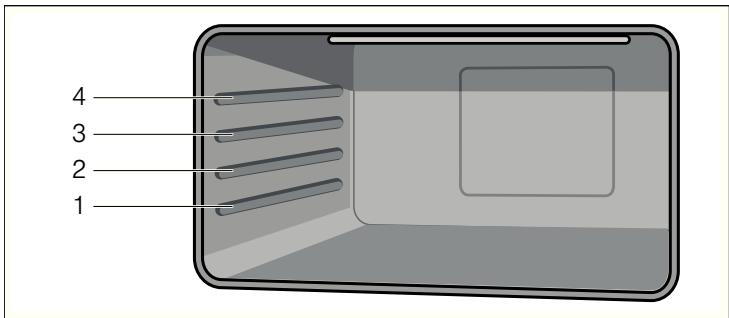
You can pull out the accessories two thirds of the way without them tipping. This allows dishes to be removed easily.
The accessories may become deformed when they become hot. As soon as they have cooled down, the deformation disappears with no effect on the function.
You can buy accessories from the after-sales service, from specialist retailers or online.
| Accessories | Description |
| Baking and roasting shelf For ovenware, cake tins, joints, grilled items, frozen meals. | |
| Enamelled baking tray For moist cakes, pastries, frozen meals and large roasts. Can also be inserted underneath the wire rack or rotary spit and used as a drip tray to collect fat. |
The electronic clock
You can use the electronic clock to control your oven. You can therefore preselect, for example, the time at which the oven is to switch on or at which time the automatic timer is to end the baking or cooking process. The electronic clock can also be used as a timer.
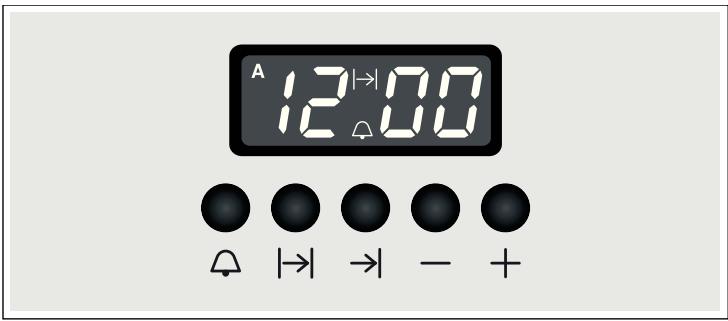
Function buttons
Select the desired function by pressing the appropriate button. Use the + and - buttons to set the cooking time and or clock time. You can read the values that you have set in the display panel.
| Symbol | Meaning | Use |
| Δ | Timer | Setting the duration |
| →| | End of operating time | Setting the time for automatic switch-off |
| |→| | Operating time duration | Setting the time until automatic switch-off |
| - | Minus | Reducing the duration or time |
| + | Plus | Increasing the duration or time |
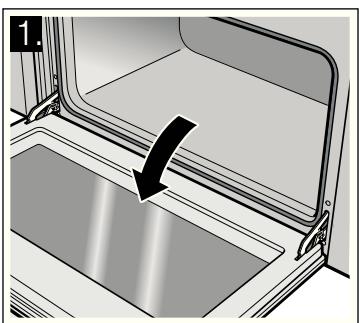
The storage compartment
Open the storage compartment by folding down the fascia panel.
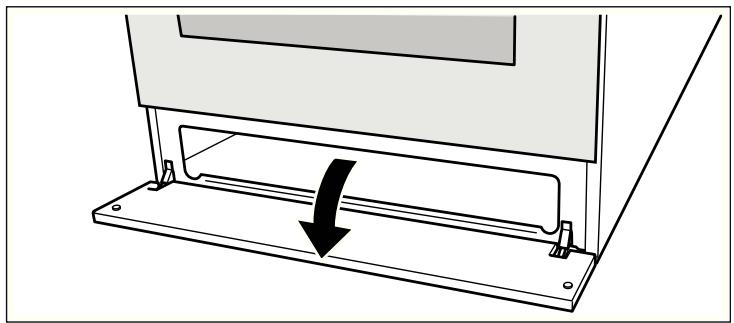
This compartment can be used to store hob or oven accessories.
Risk of fire!
Never leave combustible items in the storage compartment.
Before using the oven for the first time
In this section, you can find out what you must do before using your oven or hob to prepare food for the first time. Read the Safety information section beforehand.
Remove the appliance packaging and dispose of it appropriately.
Setting the clock
- Press the and function buttons simultaneously.
- Use the + and - function buttons to set the current time.
After a few seconds, the time is saved.
Baking out the oven
Cooking compartment initial cleaning
Remove the accessories from the cooking compartment. Completely remove any leftover packaging, e.g. small pieces of polystyrene, from the cooking compartment. Some parts are covered with a protective film. Remove this film.
- Clean the outside of the appliance with a soft, damp cloth.
- If the hook-in racks have already been fitted, unhook and remove them. For information on removing the racks, see the section "Removing and refitting hook-in racks."
- Clean the cooking compartment with hot soapy water.
Baking out the oven
To remove the new cooker smell, heat up the oven when it is empty and closed.
- Turn the function selector to the Top/bottom heating operating mode.
- Turn the temperature selector to the maximum temperature.
- Switch the oven off after 40 minutes.
Recleaning the cooking compartment
Clean the cooking compartment with hot soapy water. Refit the hook-in racks.
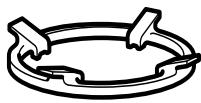
Cleaning the burner caps and cups
Proceed as follows:
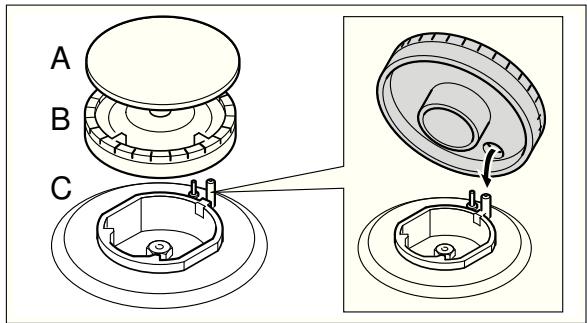
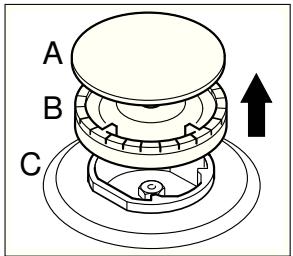
- Clean the burner lids (A) and cups (B) with water and washing-up liquid.
- Dry the parts well.
- Place each burner cup (B) on the burner (C).
- Position the burner cap (A) exactly on top of the burner cup (B).
Cleaning the accessories
Before using the accessories, clean them thoroughly using a cloth and warm soapy water.
How to operate your hob
Please note that, in the case of appliances with a hob cover, the burners may only be switched on if the hob cover is open.
Operating gas burners
Make sure that the burner lid always sits exactly on top of the burner cup. The slots on the burner cup must be open. All parts must be dry.
Ensure that the burner is not subjected to draughts caused by air conditioning systems, fans or similar appliances.
Switching on the gas burner
- Press the control knob for the required burner and turn it to position . The gas burner ignites.
- Press and hold the control knob for a few seconds until the flame stabilises.
- Adjust the burner to the desired flame setting.
| Setting | Meaning |
| ✕ | Economy flame, lowest power |
| ✕ | Large flame, highest power |
The flame is not stable between positions and . Therefore, always select a position between and .
Switching off the gas burner
Turn the control knob for the required hotplate to position
If the flame goes out
Switch off the control knob. Wait for one minute and repeat steps 1 to 3.
Risk of fire!
If the flame goes out, gas will escape. Never leave the gas burner unattended during operation. Ensure that food does not boil over and that there are no draughts when cooking.
If the gas burner does not ignite
In the event of a power cut or damp ignition plugs, light the gas burner with a gas lighter or a match.
How to operate your oven
You have the option of adjusting your oven to a range of different settings. You can control the oven using the electronic clock.
Operating modes
| Operating mode | Application | |
| Top/bottom heating | For sponge cakes in tins, bakes, lean joints of beef, veal and game. | |
| Bottom heating | For bain-marie applications such as crema catalana, or for preserving. Also improvement setting if the base is not fully baked through | |
| Grill | For individual portions or small quantities of steaks, sausages, fish and toast. | |
| Full-surface grill | For several steaks, sausages, fish and pieces of toast. | |
| Hot air grilling | For poultry and larger pieces of meat. | |
| Top/bottom heating and hot air | For cakes with very moist toppings. | |
| Hot air | For cakes, pizza and items baked on two levels, for roasting and drying. | |
| Defrost setting | For defrosting meat, poultry, fish and pastries. |
Switching the oven on and off
Switching on the oven
Always keep the appliance door closed during operation.
- Turn the function selector to the desired operating mode.
- Turn the temperature selector to the desired temperature.
The oven switches on.
The indicator lamp is lit when the oven is heating up. It goes out during heating pauses.
Switching off the oven
- Turn the function selector to the position.
- Turn the temperature selector to the position. The oven switches off.
How to operate your electronic clock
You can operate the electronic clock with one hand. After pressing the appropriate function button, set the time or cooking time with the + and - buttons. The value which is set is adopted.
You can also change or cancel your settings during operation and thereby cancel the process.
Changing the settings
- Press the appropriate function button. The corresponding symbol lights up
- Change your settings with the + and - buttons.
Cancelling settings
- Press the appropriate function button.
The corresponding symbol lights up - Press the - button until 0-00 is shown in the display panel.
- If the automatic timer was in operation, switch off the oven.
Setting the acoustic signal
You can choose between three sounds provided no programme is running.
Press the - button several times until the desired sound is reached.
The sound is adopted.
Setting the electronic clock
After the appliance has been connected to the mains for the first time or after a power cut, three zeros are shown in the display.
Setting the clock
You can only set the clock when no other function is in operation.
- Press the and function buttons simultaneously.
- Use the + and - function buttons to set the current time.
Setting the timer
The timer is a reverse counting timer which produces an audible signal once the duration set has elapsed. The timer has no influence on the functions of the oven.
Setting the duration
- Press the button.
2.Use the ^+ and - function buttons to set the duration. The symbol is shown in the display. - To show the remaining duration in the display, press the button.
An audible signal sounds once the time has elapsed.
Setting the automatic timer
The electronic clock can be used to switch the oven on or off automatically.
Automatic switch-off
Setting the operating time duration
- Turn the function selector to the desired operating mode.
- Turn the temperature selector to the desired temperature. The oven switches on.
- Press the function button.
- Use the + and - buttons to set the operating time duration. The oven starts and the A symbol and the current clock time appear in the display panel.
The operating time duration has elapsed
A signal sounds and the symbol is shown with the current clock time in the display panel.
The oven switches off.
To end the signal early, press one of the function buttons.
Automatic switch-on and switch-off
Baking or roasting starts for the set duration at a later time which you chose.
Setting the operating time duration
- Turn the function selector to the desired operating mode.
- Turn the temperature selector to the desired temperature. The oven switches on.
- Press the function button.
- Use the + and - buttons to set the operating time duration. The oven starts and the A symbol and the current clock time appear in the display panel.
Setting the end of operating time
- Press the button.
The total of the current clock time and the operation duration is shown in the display panel.
- Press and hold the button and use the + and - buttons to change the end of the operating time.
The oven switches off and starts later automatically. The A symbol and the current clock time appear in the display panel.
The operating time duration has elapsed
A signal sounds and the symbol is shown with the current clock time in the display panel.
The oven switches off.
To end the signal early, press one of the function buttons.
Care and cleaning
With good care and cleaning, your oven will remain clean and fully-functioning for a long time to come. Here we will explain how to maintain and clean your oven correctly.
Notes
-
Slight differences in the colours on the front of the oven are caused by the use of different materials, such as glass, plastic and metal.
-
Shadows on the door panel which look like streaks, are caused by reflections made by the oven light.
Enamel is baked on at very high temperatures. This can cause some slight colour variations. This is normal and does not affect their function. The edges of thin trays cannot be completely enamelled. As a result, these edges can be rough. This will not impair the anti-corrosion protection.

Risk of electric shock!
Penetrating moisture may cause an electric shock. Do not use any high-pressure cleaners or steam cleaners.

Risk of burns!
The appliance becomes very hot. Never touch the interior surfaces of the cooking compartment or the heating elements. Always allow the appliance to cool down. Keep children at a safe distance.
Cleaning agents
Damage to the various different surfaces caused by using the wrong cleaning agent can be avoided by observing the following instructions.
Do not use
for the hob
■ undiluted washing-up liquid or dishwasher detergent
- abrasive materials, scouring sponges
aggressive cleaners such as oven spray or stain remover
high-pressure cleaners or steam jet cleaners
Do not use
in the oven
harsh or abrasive cleaning agents
■ cleaning agents with a high alcohol content
- hard scouring pads or cleaning sponges
high-pressure cleaners or steam cleaners.
Wash new sponge cloths thoroughly before use.
| Area | Cleaning agents |
| Appliance exterior | Hot soapy water: Clean with a dish cloth and dry with a soft cloth. Do not use glass cleaners or glass scrapers. |
| Stainless steel | Hot soapy water: Clean with a dish cloth and dry with a soft cloth. Remove traces of limescale, grease, starch and albumin (e.g. egg white) immediately. Corrosion can form under such residues. Special stainless steel cleaning products suitable for hot surfaces are available from our after-sales service or from specialist retailers. Apply a very thin layer of the cleaning product with a soft cloth. |
| Aluminium and plastic | Glass cleaner: Clean with a soft cloth. |
| Gas hob and pan supports | Hot soapy water. Use very little water. Water must not be allowed to enter the appliance through the base of the burners. Clean boiled over liquids and spilt food immediately. You can remove the pan supports. Do not clean the pan supports in the dishwasher. |
| Area | Cleaning agents |
| Gas burners, hot-plate | Remove the burner cups and caps, clean them with soapy water.The gas outlet openings must remain free from obstruction.Ignition plugs: small, soft brush.The gas burners only work properly when the ignition plugs are clean. Dry all parts thoroughly. Ensure they are refitted correctly.The burner caps are coated in black enamel. The colour may change over time. This does not affect their operation.Do not clean the burner caps in the dish-washer. |
| Enamel surfaces(smooth surfaces) | To facilitate cleaning, you can switch on the interior lighting and detach the appliance door if necessary. Apply ordinary washing-up liquid or a vinegar solution with a soft, damp cloth or chamos leather; dry with a soft cloth. Loosen baked-on food residues with a damp cloth and detergent. We recommend using oven-cleaning gel for heavy deposits of dirt. This can be applied to the affected area. Leave the cooking compartment open after cleaning to allow it to dry. |
| Self-cleaning surfaces (rough surfaces) | Please see the notes in section: Self-cleaning surfaces |
| Door panels | Glass cleaner:Clean with a soft cloth. Do not use a glass scraper. |
| Glass cover for the oven light | Hot soapy water:Clean with a dish cloth. |
| SealDo not remove. | Hot soapy water:Clean with a dish cloth. Do not scour. |
| Shelf | Hot soapy water:Soak and clean with a dish cloth or brush. |
| Accessories | Hot soapy water:Soak and clean with a dish cloth or brush. |
Catalytic cooking compartment panels
The catalytic cooking compartment panels are coated with self-cleaning enamel.
The surfaces clean themselves while the oven is in operation. Larger splashes will only be removed after the oven has been used several times.
Self-cleaning surfaces
The side walls are covered with catalytic panelling. Never clean these surfaces with oven cleaner. Slight discolouration of the enamel does not affect automatic self-cleaning.
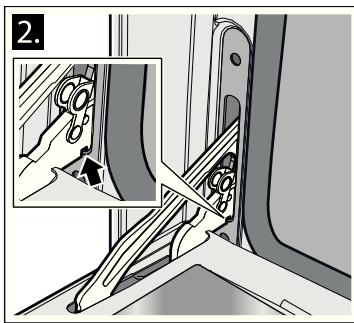
Removing and fitting the appliance door
You can remove the appliance door to clean it more thoroughly.
Removing the appliance door
Risk of injury!
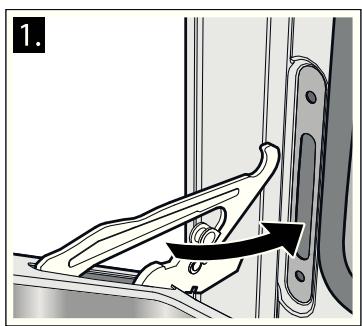
Whenever the hinges are not locked, they snap shut with great force. Make sure that, when unhooking the oven door, the locking levers are folded up completely.
-
Open the oven door completely.
-
Fold up the left and right locking levers. Make sure that, when the locking levers are folded up, you do not close the oven door. The hinges may become bent which may cause damage to the enamel.
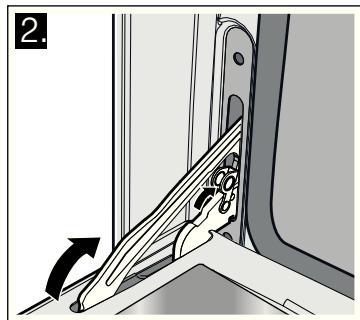
- Open the oven door at an angle. Hold it on the right and left with both hands. Close it just a little further and pull it out.
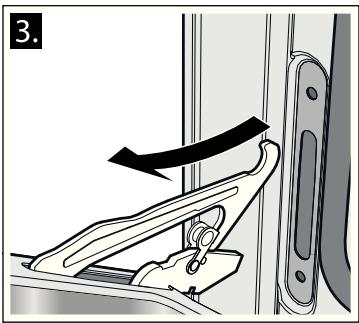
Fitting the appliance door
- When hooking in the oven door, ensure that the notch on the bottom of the hinge locks into the slot.
- Fold down both locking levers on the left and right again and close the oven door.
Risk of injury!
Do not reach into the hinge if the oven door falls out unintentionally or a hinge snaps closed. Call the after-sales service.
Troubleshooting
Malfunctions often have simple explanations. Refer to the table before calling the after-sales service, as you may be able to remedy the fault yourself.
Risk of injury!
Incorrect repairs may cause serious hazards. Repairs to the appliance may only be performed by a qualified person. If repairs are required, contact the after-sales service.
Malfunction table
| Problem | Possible cause | Remedy/information |
| The appliance does not work. | Defective circuit breaker | Look in the fuse box and check that the circuit breaker is OK. |
| Power cut | Check whether the kitchen light is working. | |
| The oven lighting has failed. | Oven light is faulty | Change the oven light bulb. (see section "Replacing oven light") |
| The gas burner does not ignite. | Power cut or damp ignition plugs | Light the gas burner with a gas lighter or a match. |
| The flame (oven) does not burn through all outlet openings. | Normal build-up of dirt | The burner must be professionally cleaned. |
| All dishes prepared in the oven may burn within a short period of time. | Defective thermostat | Call the after-sales service. |
| The door panel steams up when the oven is hot. | Normal occurrence; caused by the differ-ence in temperature. | Not possible; this has no effect on oven perfor- formance. |
Replacing the oven light bulb
If the bulb in the oven light fails, it must be replaced.
Replacement heat-resistant bulbs can be obtained from the after-sales service or from specialist retailers. Please supply your appliance's E number and FD number. Do not use any other type of bulb.
- Switch off the appliance at the circuit breaker or pull out the mains plug.
-
Open the appliance door.
-
Lay a tea towel in the cold cooking compartment to prevent damage.
- Unscrew the glass cover from the defective oven light bulb inside the cooking compartment by turning it anti-clockwise.

- Replace the oven light bulb with one of the same type.
Voltage: 230V
Power: 25 W;
Thread:E14;
Temperature resistance: 300^
- Screw the glass cover of the oven light bulb back on.
- Remove the tea towel and switch the circuit breaker back on or plug in the mains plug.
Press the function button for the oven lighting until it locks into place in order to check whether the oven lighting is working properly.
After-sales service
Our after-sales service is there for you if your appliance needs to be repaired. You will find the address and telephone number of your nearest after-sales service centre in the phone book. The after-sales service centres listed will also be happy to give you the details of an after-sales service point near you.
E number and FD number
Please quote the E number (product number) and FD number (production number) of the appliance when contacting the after-sales service. The rating plate and the relevant numbers can be found on the inside of the storage compartment flap. So that you do not have to spend time looking for it if there is a fault, you can enter the data for your appliance here now.
| E no. | FD no. |
| After-sales service |
Energy and environment tips
Here you can find tips on how to save energy when baking and roasting in the oven and when cooking on the hob, and how to dispose of your appliance properly.
Saving energy with your oven
- Only preheat the oven if this is specified in the recipe or in the operating instruction tables.
- Use dark, black lacquered or enamelled baking tins. They absorb the heat particularly well.
- Open the oven door as infrequently as possible while cooking, baking or roasting.
It is best to bake more than one cake, one after the other. The oven is still warm. This reduces the baking time for the second cake. You can also place two loaf tins next to each other. - For longer cooking times, you can switch the oven off 10 minutes before the end of the cooking time and use the residual heat to finish cooking.
Saving energy with the hob
Always use a saucepan which is the correct size for your food. A larger, less full saucepan requires a lot of energy.
Always place a suitable lid on the saucepan.
Switch to a lower heat setting in good time.
The gas flame must always be in contact with the base of the saucepan.
Environmentally-friendly disposal
Dispose of packaging in an environmentally-friendly manner.

This appliance complies with European Directive 2002/96/EC on Waste Electrical and Electronic Equipment (WEEE). The directive gives a framework for the collection and recycling of old appliances, which is valid across the EU.
INSTALLATION INSTRUCTIONS
Safety precautions
Read and store these instructions carefully. Safe use can only be guaranteed if the appliance has been installed by a professional and in accordance with these assembly instructions.
The appliance must be connected to the mains only by a licensed and trained technician.
If you wish to convert to a different type of gas, call the after-sales service.
The fitter or the installer is liable for damage or faults resulting from incorrect assembly or installation.
When installing the appliance you must observe the building regulations that are currently applicable and the regulations set
by the local electricity and gas suppliers (e.g. Germany: DVGW-TRGI/TRGF; Austria: ÖVGW-TR).
Switch off the power and gas supply before carrying out any work.
The information on the rating plate regarding voltage, gas type and gas pressure must comply with the local connection conditions.
Electrical appliances must always be earthed.
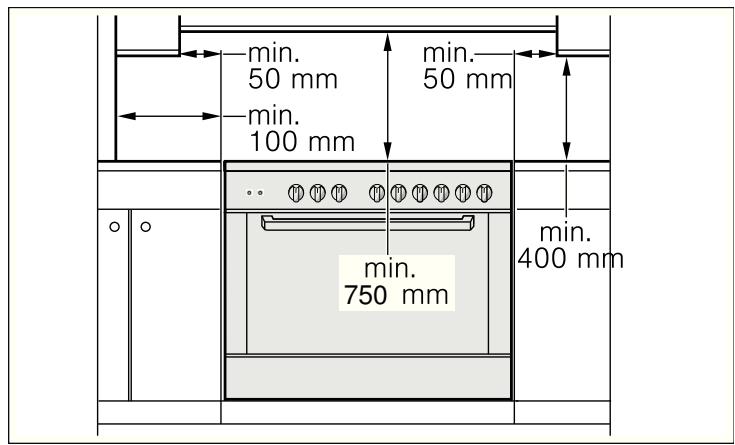
If an extractor hood is to be fitted, it must be fitted according to the associated assembly instructions. Ensure that the hood is fitted at least 750~mm clear of the hob.
This appliance must not be installed on boats or in vehicles.
Before installing
These instructions are intended for several models. Details may vary, depending on the appliance model.
Read the following information about the appliance and the guidelines for ventilation.
In this section, you will find information on
Unpacking
the appliance classes
the appliance dimensions
the distance from any adjacent furniture
the rating plate
Unpacking
Check the appliance for damage after unpacking it. Do not connect the appliance if it has been damaged in transport.
Dispose of packaging in an environmentally-friendly manner.
Appliance class
This appliance corresponds to the following appliance classes:
| Appliance class | Description |
| Class 1 Non flush-fitted cooker | |
| Class 2 - subclass 1 Cooker immediately adjacent to two units, consisting of a single unit, can also be installed so that the side walls are accessible. |
Appliance dimensions
Take note of the specified dimensions.

Adjacent units
Adjacent units must be made of non-combustible material. Adjacent unit fronts must be heat-resistant up to at least 90^ . If the appliance is installed close to other kitchen units, you must comply with the minimum distances specified in the diagram.
Rating plate
The technical data for the appliance can be found on the rating plate.
The rating plate is located on the inside of the storage compartment flap.
The setting values are specified on a label on the appliance packaging.
Enter the product number (E no.), production number (FD no.), factory settings for the type of gas/gas pressure and, if applicable, the converted gas type into the table below. The
changes made to the appliance and the type of connection are crucial for the safe and correct operation of the appliance.
| E no. | FD no. |
| After-sales service | |
| Type of gas/gas pressure | |
| Factory setting | |
| Type of gas/gas pressure | |
| Conversion |
Guidelines for ventilation
This appliance may only be set up in a sufficiently ventilated room and according to the applicable regulations and ventilation requirements.
Please note that the air volume required for combustion must not be below 2m^3 per kW of power (see kW total power on the rating plate).
For appliances with a total power of up to 11kW , it is sufficient if the room where it is to be installed has a capacity of more than 20m^3 and at least one door to the outside or a window that can be opened.
Note: In some countries, there are differing requirements concerning the minimum capacity. Your after-sales service department will provide you with information about this.
Installation
This appliance is always supplied with a set of adjustable feet and, depending on the model, with a splash guard. The appliance may also be used without the splash guard.
Fitting the adjustable feet
- Remove all parts that are not permanently fixed, especially the pan supports and burners.
- Remove the accessories from the oven.
- Tilt the appliance by lifting one side from the floor.
- Screw the adjustable feet into the mounting holes on the underside of the appliance. If you then have to pull the appliance, fully screw in the adjustable feet.
- Only finally level the appliance when the electricity and gas have been connected and all of the installation work has been completed.
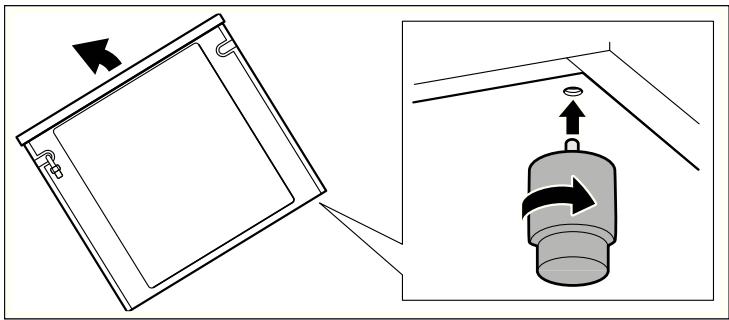
Fitting the splash guard
- Remove the packaging and the protective film from the splash guard.
- Loosen the 4 screws on the back of the appliance.
- Place the splash guard onto the screws using the slots in the splash guard provided for this purpose.
- From above, place the 2 screws provided into the holes for this in the splash guard.
- Tighten all screws firmly.
Electrical connection
Only a licensed expert may connect the appliance. The appliance must be installed according to the most recent IEE regulations (Institute of Electrical Engineers). The appliance may be damaged if incorrectly connected.
Make sure the voltage of the power supply corresponds to the specified value on the rating plate. The rating plate can be found on the inside of the storage compartment flap.
Ensure that the power supply is properly earthed and that the fuse and the wiring and piping system in the building can withstand the load from the appliance.
It is recommended that you configure the circuit for the appliance to 16 A.
When you route the cable, make sure that:
the cable is not trapped or squashed.
- the cable, for example, does not come into contact with sharp edges or cutting edges.
- the cable does not come into contact with parts that can reach temperatures of more than 50^ above room temperature.
Connecting the appliance to the power supply
The appliance corresponds to protection class 1 and may only be operated with a protective earth connection.
The appliance must be disconnected from the power supply for all installation work.
The appliance must only be connected to the power supply with the power cable provided.
Contact protection must be ensured by the installation.
Only a licensed expert may connect the appliance. He is subject to the regulations of the local electricity provider.
Power cable without a plug with earthing contact
An all-pole isolating switch with at least a 3 mm contact gap must be fitted in the installation. Identify the phase and neutral conductors in the socket. The appliance may be damaged if incorrectly connected.
Connection to nominal voltage 220-240V. Connect the wires of the mains power cable according to the colour coding: green/yellow = PE conductor 12 , blue = neutral conductor, brown = phase (external conductor).
GB, IE, NZ, IL, DK and AU
Fixed connection only.
Power cable with a plug with earthing contact
The appliance can also be connected using the enclosed plug with earthing contact to a properly installed earthed socket. The socket must be accessible after installation. If this is not the case, an all-pole isolating switch with a contact gap of at least 3mm must be included in the installation.
Gas connection
The appliance must be connected in accordance with the currently applicable regulations. Before installing the appliance, check if the local conditions (type of gas and pressure) are compatible with the appliance settings. The conditions for setting the appliance can be found on the rating plate. Connection to the gas lines and seal fitting must be carried out professionally according to the currently applicable standards.
Gas connection on the appliance
The gas connection (ISO 228 G1/2) is located at the rear left of the appliance. The following connections are provided with the appliance:
Elbow EN ISO 228 G1/2 - EN 10226 R1/2 (with flat seal)
Default setting of the burners
The burners are preset for natural gas G20 (20 mbar). A nozzle set for liquefied gas G30 31 (28 -30/37 mbar) is supplied with the appliance.
Accessories
You can buy accessories from the after-sales service, from specialist retailers or online.
Town gas nozzle G110 (8 mbar)
Town gas nozzle G120 (8 mbar)
Connecting natural gas supply
Only use connecting lines or flexible hoses which comply with the applicable regulations and which are approved for this purpose.
- Screw the adapter piece (3) and the seal (2) to the gas connection (1).
- Hold the adapter piece (3) with a spanner and screw it to a fixed connecting line (4) or a flexible gas connecting hose.
Only use approved sealing compound to seal the thread.
Connecting to liquefied gas
If you connect the appliance to liquefied gas, you must always install a suitable gas pressure regulator. Use the total gas consumption of the appliance stated on the rating plate to select a suitable gas pressure regulator.
Only use connecting lines or flexible hoses which comply with the applicable regulations and which are approved for this purpose.
- Screw the corrugated tube union (3) and the seal (2) to the gas connection (1).
- Slide a flexible gas connecting hose (5) onto the corrugated tube union (3).
3.Pull the clamp (4) tight.

Only use approved sealing compound to seal the thread.
Flexible hose
If you use flexible hoses, make sure that:
the hoses do not become trapped or squashed.
the hoses are not subject to twisting or pulling forces.
- the hoses, for example, do not come into contact with sharp edges or cutting edges.
- the hoses do not come into contact with parts that could reach a temperature higher than 70^ above room temperature.
Make sure that the full length of the hoses is accessible for inspection.
Installing the safety valve
The installation of a safety valve for opening and closing the gas supply is a compulsory requirement. Fit the safety valve between the gas supply line to the appropriate room and the appliance. Ensure unhindered access to this valve.
Checking for leaks
After connecting the gas line, check the connections for leaks using soapy water.
Initial use
Switch the appliance on as described in the instructions for use. Light all the burners and check that the flames remain stable at both the high and low settings.
Converting the gas type
If the appliance is not already set up for the existing type of gas, the appliance must be converted. The conversion to a different type of gas must be carried out by an authorised expert in accordance with the applicable regulations. The rating plate indicates the type of gas and the gas pressure which have been pre-set in the factory.
The rating plate is located on the inside of the storage compartment flap.
In order to convert to a different type of gas, the nozzles must be replaced and the low flame and primary air may have to be adjusted.
Hotplate burners
Replacing the nozzles
- Disconnect the appliance from the power supply.
- Remove the pan supports.
- Remove the burner caps (A) and burner cups (B) from the burners (C).
- Remove the nozzle (D) and replace it with an appropriate nozzle for the new type of gas (see section "General nozzle table").

- Replace the gas label with the new gas label that was supplied with the nozzle set.
- Place each burner cup (B) on the burner (C).
- Position the relevant burner cap (A) exactly on top of the cup (B).
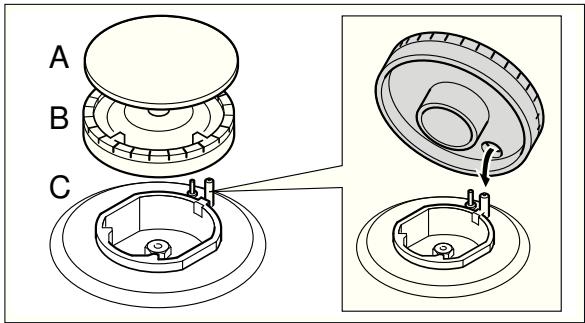
- Refit the pan supports.
Setting the minimum gas flow
- Switch on the gas burner.
- Turn the control knob for the gas burner towards the small flame setting.
-
Remove the control knob for the gas burner.
-
Adjust the internal setting screw until a stable flame is burning correctly.
Loosen the adjuster screw to increase the gas flow or tighten it to decrease the gas flow.
Check that the flame does not go out when the gas flow is quickly changed between maximum and minimum, and vice versa.
The setting is correct when the height of the small flame is approx. 3 to 4mm .
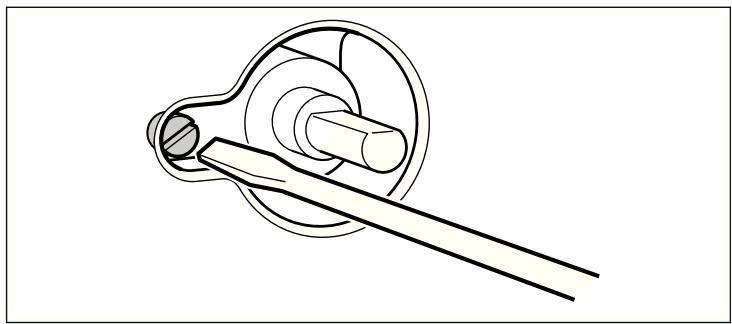
5. Refit the control knob for the gas burner.
General nozzle table
| Type of gas | mbar | kPa | Nozzle Number | Bypass | Type of burner | Power (W) | Power min. (W) | Consumption max. | ||
| G20 | G30 | G31 | ||||||||
| Natural gas - NG | 20 | 2.0 | 115 (Y) | Gap | High output burner | 3000 | 800 | 283 l/h | ||
| G20 | 97 (Z) | Gap | Standard burner | 1800 | 500 | 167 l/h | ||||
| 72 (X) | Gap | Economy burner | 1000 | 400 | 97 l/h | |||||
| 135 (S) | Gap | Wok burner | 3900 | 1600 | 359 l/h | |||||
| Liquefied gas - LPG | 28 - 30/37 | 2.8 - 3.0/3.7 | 85 | 0.45 | High output burner | 3000 | 800 | 218 g/h | 214 g/h | |
| Butane | 65 | 0.33 | Standard burner | 1800 | 500 | 131 g/h | 129 g/h | |||
| Propane | 50 | 0.30 | Economy burner | 1000 | 400 | 73 g/h | 71 g/h | |||
| G30/G31 | 100 | 0.63 | Wok burner | 3900 | 1600 | 284 g/h | 278 g/h | |||
General nozzle table for town gas
The nozzles for town gas are not supplied with the appliance.
You can order the nozzles from the after-sales service.
| Type of gas | mbar | kPa | Nozzle Number | Bypass | Type of burner | Power (W) | Power min. (W) | Consumption max. | |
| G110 | G120 | ||||||||
| Town gas | 8 | 0.8 | 260 | Gap | High output burner | 3000 | 800 | 648 l/h | |
| G110 | 185 | Gap | Standard burner | 1750 | 500 | 384 l/h | |||
| 145 | Gap | Economy burner | 1000 | 400 | 219 l/h | ||||
| 340 | Gap | Wok burner | 3700 | 1400 | 833 l/h | ||||
| Town gas | 8 | 0.8 | 240 | Gap | High output burner | 3000 | 800 | 582 l/h | |
| G120 | 175 | Gap | Standard burner | 1800 | 500 | 354 l/h | |||
| 135 | Gap | Economy burner | 1000 | 400 | 201 l/h | ||||
| 315 | Gap | Wok burner | 3900 | 1400 | 764 l/h | ||||
Nominal operating pressure
The nominal operating pressure of your appliance is:
for natural gas - NG (G20) 20 mbar / 2.0 kPa.
■ for liquefied gas - LPG (G30) 30 mbar / 3.0 kPa.
for liquefied gas - LPG (G31) 37 mbar / 3.7 kPa.
Nominal operating pressure for town gas
The nominal operating pressure of your appliance is:
for town gas (G110) 8 mbar / 0.8 kPa;
for town gas (G120) 8 mbar / 0.8 kPa;
Your appliance must be operated at these pressure values. All information on the rating plate refers to these pressure values. The manufacturer does not accept any liability for operability, power of the appliance or for other risks if the appliance is operated at pressure values other than those values specified for the appliance.
Note: If you are operating the appliance with liquefied gas, use a gas pressure regulator. The pressure regulator must be connected and maintained by a licensed technician.
Positioning and levelling
Positioning the appliance
When installing the appliance, make sure that there is enough space in the final installation location to pull the appliance forwards for cleaning and maintenance work.
The ground underneath must be hard and firm. The wall immediately behind the appliance must be made from non-flammable material, e.g. tiles.
If you need to move the appliance in order to position it, make sure that the adjustable feet are fully screwed in.
Levelling the appliance
Level the appliance once all other work has been completed.
To do this, turn the adjustable feet.
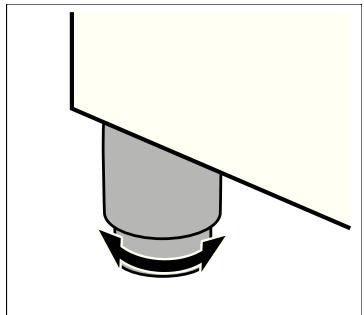
Table des matières
NOTICE D'UTILISATION 37
Le compartment de rangement
Fare for forbRANDing!
Fare for forbending!
Fare for forbranding!
Placering at apparatus
Fare for forbrenning!
Apparatet blir svært varmt. Den varme innsiden av ovsrommet og varmeelementene ma aldri berøres. La alltid apparatet avkjoles. Hold barn pa avstand.
Fare for forbrenning!
Fare for forbrenning!
Stille inn lydsignal
Fare for forbrenning!
Apparatet blir svært varmt. Den varme innsiden av ovsrommet og varmeelementene må aldri berøres. La alltid apparatet avkjøles. Hold barn på avstand.
Rengjøringsmidler
Kun fast tinkobling.
Stille inn lavest gasstrøm
- Slå på gassblusset.
- Vri dreiebryteren for gassblusset mot den lille flammen.
- Trekk av dreiebryteren til gassblusset.
- Juster den indre stillskruen til det brenner en korrekt, stabil flamme.
Kontrollera encheten after uppackning.

- Eine Störung, was tun?
- INSTALLATION INSTRUCTIONS 31
- INSTRUCTION MANUAL
- Important safety information
- WHAT TO DO IF YOU SMELL GAS!
- Risk of asphyxiation!
- Risk of fire!
- Risk of burns!
- Risk of scalding!
- Risk of injury!
- Risk of electric shock!
- Causes of damage
- Hob
- Caution!
- Oven
- Your new appliance
- Explanation
- The control panel
- The hob
- Types of gas burner
- Control knob for hotplates
- Accessories
- Optional accessories
- Optional accessories Description
- Wok attachment
- Steam outlet
- The oven
- Control knob for oven
- Function selector
- Temperature selector
- The electronic clock
- Function buttons
- The storage compartment
- Before using the oven for the first time
- Setting the clock
- Baking out the oven
- Cooking compartment initial cleaning
- Recleaning the cooking compartment
- Cleaning the burner caps and cups
- Cleaning the accessories
- How to operate your hob
- Operating gas burners
- Switching on the gas burner
- Switching off the gas burner
- If the flame goes out
- If the gas burner does not ignite
- How to operate your oven
- Switching the oven on and off
- Switching on the oven
- Switching off the oven
- How to operate your electronic clock
- Changing the settings
- Cancelling settings
- Setting the acoustic signal
- Setting the electronic clock
- Setting the timer
- Setting the duration
- Setting the automatic timer
- Automatic switch-off
- Setting the operating time duration
- The operating time duration has elapsed
- Automatic switch-on and switch-off
- Setting the end of operating time
- Care and cleaning
- Notes
- Cleaning agents
- for the hob
- in the oven
- Catalytic cooking compartment panels
- Self-cleaning surfaces
- Removing and fitting the appliance door
- Removing the appliance door
- Fitting the appliance door
- Troubleshooting
- Replacing the oven light bulb
- After-sales service
- E number and FD number
- Energy and environment tips
- Saving energy with your oven
- Saving energy with the hob
- Environmentally-friendly disposal
- INSTALLATION INSTRUCTIONS
- Safety precautions
- Before installing
- Unpacking
- Appliance class
- Appliance dimensions
- Adjacent units
- Rating plate
- Guidelines for ventilation
- Installation
- Fitting the adjustable feet
- Fitting the splash guard
- Electrical connection
- Connecting the appliance to the power supply
- Power cable without a plug with earthing contact
- GB, IE, NZ, IL, DK and AU
- Power cable with a plug with earthing contact
- Gas connection
- Gas connection on the appliance
- Default setting of the burners
- Connecting natural gas supply
- Connecting to liquefied gas
- Flexible hose
- Installing the safety valve
- Checking for leaks
- Initial use
- Converting the gas type
- Hotplate burners
- Replacing the nozzles
- Setting the minimum gas flow
- General nozzle table for town gas
- Nominal operating pressure
- Nominal operating pressure for town gas
- Positioning and levelling
- Positioning the appliance
- Levelling the appliance
- Table des matières
- NOTICE D'UTILISATION 37
- Le compartment de rangement
- Fare for forbRANDing!
- Fare for forbending!
- Placering at apparatus
- Fare for forbrenning!
- Stille inn lydsignal
- Rengjøringsmidler
- Stille inn lavest gasstrøm
Brand : SIEMENS
Model : HQ738155E
Category : Built-in oven