USER MANUAL BGS7SIL64 - BGS7SILALL BOSCH
Register your new Bosch now: www.bosch-home.com/welcome
BGS7... Relaxx'x Ultimate

BOSCH
de Gebrauchsanleitung
en Instruction manual
fr Mode d'emploi
it Istruzioni per l'uso
nl Gebruiksaaanwijzing
bg yKa3aHHa 3a yNoTpe6a
uk Ihctpykci3 ekcnnyatauii
az telimat
ka 05uGmy3o00
es Instrucciones de uso
pt Instruções de serviços
el Osnyiec xpon
tr Kullanim kilavuzu
pl Instrukcja obslugi
hu Hasznalatiutasitas
ru Hnctpykqna IIO 3Kcnnyataun
kk PnДанHyHcKaybIfbl
zh 使用说明书
th
ar


Sicherheit 2
de Gebrauchsanleitung 40
Safety information 4
en Instructions for use 43
Consignes de sécurité 5
rr Mode d'emploi 47
Normedisesecurezza 7
Istruizioni per I'uso 50
Veiligheidsvoorschriften 9
[1] Gebruiksaanwijzing 54
Consejos y advertencias de seguridad 11
es Instrucciones de uso 57
Indicações de segurarça 13
pt Manual de instruções 61
YtnoideiEic aoppaleia 15
[64] Ośnyiec Xpńoń
tr Govenlik bilgileri 17
Kullanma kilavuzu 68
Wskazówki dotyczace bezpieczeniastwa 19
PI Instrukcja uzytkowania 72
Biztonsági utmutató 21
Hu Hasznalatiutasitas 75
IpaBnlaTexnkn6e3oNaChocTn 23
fu OunicaHne npnbopa 79
Kayinci3ik HyskaIapbl 25
KK CizdiH wahcopfbIbIbI3 83
Uka3aHn3a6e3oNaChocT 27
bg cTpyKzna 3a HaunHa Ha IOn3BaHe. 86
exhika 6e3nekn 29
uk Cekunaad ninnococa. 90
tahlukesizlik 31
az təlimat. 94
yue3no6mgo 33
Ka 05uGyjoo98
安全信息 35
zh 使用說明 102
36
th 105
39.
110
de
Please keep this instruction manual. When passing the vacuum cleaner on to a third party, please also pass on this instruction manual.
Intended use
This appliance is intended for domestic use only. This appliance is intended for use up to a maximum height of 2000 metres above sea level. Only use this vacuum cleaner in accordance with the instructions in this instruction manual.
In order to prevent injuries and damage, the vacuum cleaner must not be used for:
Vacuum-cleaning persons or animals
Vacuuming up:
- hazardous, sharp-edged, hot or glowing substances.
-damp or liquid substances.
- highly flammable or explosive substances and gases.
- ash, soot from tiled stoves and central heating systems.
- toner dust from printers and copiers.
Spare parts, accessories, dust bags
Our original spare parts, original (special) accessories and original dust bags are designed to work with the features and requirements of our vacuum cleaners. We therefore recommend that you only use our original spare parts, original (special) accessories and original dust bags. This will ensure that your vacuum cleaner has a long service life and that the quality of its cleaning performance will remain consistently high throughout.
Please note:
- Using unsuitable or inferior-quality spare parts, (special) accessories and dust bags can damage your vacuum cleaner. Damage caused by the use of such products is not covered by our guarantee.
This vacuum cleaner complies with the recognised rules of technology and the relevant safety regulations.
The appliance may be used by children over the age of 8 years and by persons with reduced physical, sensory or mental capacity or by persons with a lack of experience or knowledge if they are
supervised or have been instructed on the safe use of the appliance and the have understood the potential dangers of using the appliance.
Children must never play with the appliance.
- Cleaning and user maintenance must never be carried out by children without supervision.
- Plastic bags and films must be kept out of the reach of children before disposal. Risk of suffocation.
Proper use
Only connect and use the vacuum cleaner in accordance with the specifications on the rating plate.
- Never vacuum without the dust bag or dust container, motor protection or exhaust filter. This may damage the vacuum cleaner.
Always keep the vacuum cleaner away from your head when using nozzles and tubes. This could cause injury!
- When vacuuming stairs, the appliance must always be positioned below the user.
- Do not use the power cord or the hose to carry or transport the vacuum cleaner.
For safety reasons, if this appliance's mains power cable becomes damaged, it must be replaced by the manufacturer, their after-sales service department or a similarly qualified person.
If using the appliance for longer than 30 minutes, pull out the power cord completely.
- When disconnecting the appliance from the mains, pull on the plug itself to remove it; do not pull on the power cord.
- Do not pull the power cord over sharp edges or allow it to become trapped.
- When the cable is being automatically rewound, ensure that the mains plug is not thrown towards persons, body parts, animals or objects. Use the mains plug to guide the power cord.
Pull out the mains plug before carrying out any work on the vacuum cleaner.
- Do not operate the vacuum cleaner if it is damaged. Unplug the appliance from the mains if a fault is detected.
For safety reasons, only authorised after-sales service personnel are permitted to carry out repairs and fit replacement parts to the vacuum cleaner.
- Protect the vacuum cleaner from the weather, moisture and sources of heat.
- Do not pour flammable substances or substances containing alcohol onto the filters (dust bag, motor protection filter, exhaust filter, etc.).
The vacuum cleaner is not suitable for use on construction sites.
=> Vacuuming up building rubble could damage the appliance.
- When not in use, switch off the appliance and pull out the mains plug.
At the end of its life, the appliance should immediately be rendered unusable, then disposed of in an appropriate manner.
Please note
- The mains socket must be protected by at least a 16 amp circuit breaker.
If a circuit breaker is tripped when you switch on the vacuum cleaner, this may be because other electrical appliances which have a high current draw are connected to the same power circuit.
To prevent the circuit breaker from tripping, select the lowest power setting before switching the appliance on, and increase the power only once it is running.
■ Packaging
The packaging is designed to protect the vacuum cleaner from being damaged during transportation. It is made of environmentally friendly materials and can therefore be recycled. Dispos of packaging that is no longer required at an appropriate recycling point.
Old appliance
Old appliances still contain many valuable materials. Therefore, please take appliances that have reached the end of their service life to your retailer or recycling centre so that they can be recycled. For current disposal methods, please enquire at a retailer or your local council.
Disposal of filters and dust bags
Filters and dust bags are manufactured from environmentally friendly materials. Provided they do not contain substances that are not permitted in household waste, you can dispose of them with your normal household waste.
Notes on the energy label
This vacuum cleaner is a general purpose vacuum cleaner with a primary hose.
To achieve the energy efficiency rating and cleaning effectiveness rating on carpets, please use the interchangeable universal nozzle.
To achieve the energy efficiency rating and cleaning effectiveness rating on hard floors with gaps and cracks, please use the supplied hard-floor nozzle without the clip-in edge cleaning bristles.
These calculations are based on the Commission Delegated Regulation (EU) No. 665/2013 of 3rd May 2013 supplementing Directive 2010/30/EU.
Unless otherwise stated, all the procedures referred to in these instructions were carried out in accordance with the EN 60312-1:2017* standard.
*As the motor service test is carried out with the dust collector empty, the stated motor service life must be increased by 10% for tests with the dust collector half filled.
fr
PnnpoDOnJXnteBHOCTN 3KcNpIyataun 6Oonee 30 MHyT cTeBoi Ka6eH Heo6xOaHMo NIOHOCtBu BbITraHTb.
PnOToeDHeHn Pn6opaOT 3neKtpocetn BcEgda 6epntecb pyko3a Bnky,a He 3a cTeBOk Ka6enb.
Cneinte 3a TEM, yTo6bI cTeBcN Ka6eNb He 6bl 3aJat Hn nonan Ha ocTpbie Kpa npedMeTOB.
IpepeaBtOMaTHuecknCMatbIBaHHem ceteBOrO KaebnYbEdHteCb B TOM,TOE rTO TEkep He zenPnTc3a 3nIOeJ,uaCTn Tena,KNBOTbHx INn dpyrHe o6bKeTb. OToCoEHNHTe CTeBoi Ka6eB OT 3neKtpocetn, NOTHyB 3a wTEkep.
He npIb3yItebc HeICnpaBbIM nbIeCoCOM. PnB OZHNIKHOBEHN HcNpBaBHOCTN BbIHMaIte BUNKy n3 po3ETKn.
Bo 366ekahnE onaHcOTHn Bce pAbToBn NO peMOHTy n 3ameHe DeTane NblncocA CneJeYt BbInOnHrTb TOnbKO B aBTOPn3oBAHOHN cepBnCHn CnyK6.
3auiuaiTe nblneocOT BO3eICTBnIe He5bnaropnTbHx MeTeOpONrUYeCKnx ycNoBn, BnaXHOCTN I NCTOUYHKOB TEnJa.
He noDBepraIte fHbTpbl (cMeHHbI nbIeSc6OpHNK, MOTOPHbI FnHbTp, BblnyCKHO FnHbTp n T. d.) Bo3dEChTBHIO BOCnPAmEHaIOxNxCn Hn nCnHPTOCOePkaXuN BeueCTB.
OcbI WauHcOpfblIbTexHnKa TaHbIrfaH KaFnIaIapbHa JxHe dAn Kayinci3dIK KaFnIaIapbHa caI.
BvI KpyblfblHbI Xacbl 8-deri Jxhe OdaH yJKeH 6anaIapdbIH, COhImeK KaTAP KO3fany, ce3y JxHe OJNaHy MymKiHdIKTepi IeKTeJIreH JxHe/ Hemece JxetkiNlkiTi 6jIMi JxOJK TylFaIapDbIH naJaIaHaYbIHa Tek OJapdbI Bipey KaDaIaHaFahn KaFdaIHa Hemece OCbl KpyblfblHbI Kayinci3 naJaIaHaHy HycKayIapbIMeH TaHbIC 6oLca XHe dUpbic naJaIaHa6ay caIapbIHan KaHdaI KayintepdiH opbIH aJaTbIHbIH TyciHetIH 6oLca fHa naiDaIaHaNyapbIHa 6oJaBl.
Bana napfa ocbi 6ynbIMMeH O'Hayfa pyKcAT etnEHI3.
BaIaIapra epeceKTepeiH KaIaIaIaybIHcbl3 Ta3aIay XHe aIbIH any Kbl3MeTI ywiOpbIHaJaTaBH opeKeTTepDi OpbIHdayfa pyKcat etneHi3.
Пл actкkanтap Meн
плеснкалардыбалалap колы
жетпейтih каида caltafb3
ЖэHe KOKbICKa TactaHbI3.
=>ТуншыIFy kayni yap!
Tnicti peTte naIaIaNy
IlaHcOpfbIbTbTeK3ayblITbIK TaKTaIIw6oBbIHwa KocbIn icKe KocbHbI3.
Ekukaan uan Ka6bI Hemece KOtheepic3 MToOpdbKopfay Hemece yPney cy3ricin uanHcOpmaHb3. Kip xyfbu Maunha 6ybln bketyi MymkiH
Eukkaanb6aib anbHda fOpcyHka MeN Kybipdbu shaCOPMaHbI3. KapaKat any kayni 6ap!
CaTbIaPda 1uHaCOPFaHda KypblbIfbl epaBIM naIdanaHyu b actbHdaTypybeKepe.
Xenire kocy kaBeni meH uanHTbI waHcOpfblTbI Tacy / TacbImaJday yuHn naDanaHaBbI3.
OcbI 6bIMHbIH Xeni KaBeI 6y3bIbIN 3aKbIMdAHaRan KynIe 6oNcA, KayInTePdIN naiDa 60NyBn 6oNdbPMay yuHIN OHb IbFapuybI HeMece TexHkaJIbIK bI3MeT KepcTeOpTaIbIFbHIN MaMaHApKbIb, HeMece ocblnapra YcCac apHaBI 6iJIiMi 6ap aam TaPab6HHaH aybcTbIpbNyKaXET.
Kymbic 30 MmHTTah y3ak 60nca, kcnire Kocy Ka6enIH TOIbIFMeH TapbI AnBih3.
Kocy ka6enihe emec,po3eTKaadaH TapbIn KypblfblHbI Xejldeh akbpaTbHbI3.
Kenire kocy ka6eniH etkip KbIpnapaH tapTnHa3 XaHe 6acbln KOIMaHb3.
■Keni aascbka6enb abOTOMaTbI TapbIMaca aamap, dehe Myuenepi, xaiyHaNap Hemece 3aTTap MeHen TaTbIbn KeTneiHc K03 KETk3iH3. => Kenire kocy ka6enih aia Kemerimn anapbH3.
- WaHcOpFbIbTa eTki3iTeIH XyMbIcTapdbIH 6apNbIbIH eTki3y anDbIHah JeNi aBbipIH bIrapIn aBbHbI3.
3aBIMdaIraH wAHCOPbIITbI icKe KcOaHbI3. AkayIbIK naJa 6oJca aWahbI TaTbI IN KOHbIbI3.
Kayirtepdi anbduany uuih wauCpfluTbTek ekinetti Kbi3MeT KepeCy opTaBblfraHa XeHdeyi Hemece 6bnluekepi h aybctbpbykep.
HaHcOpfblIITblyaaya paBb ecepHEn,blrfaIbIbKtah KHe Kblny Ke3depHEn KOpFaHb3.
JXahatbH HEmece KpyaMbHda ankKorObl 6ap 3aTeKtePdi cy3ire naIanaHa6BaHb3 (Wan Ka6bl, MoTOpbl Kopray cy3rci, pyyne cy3rici t.6).
ⅡHcOpblIbI KpyIbIbCTa naIaIaNMyMmH eMeC.=>KypblIbc KOBkIcTaBPbIH copy KpyIbIFb 3akblMaDaHybHa aJIbI KenyI MyMKH.
Erep JaHcOpMaHb3 ToHa3bTkblbTu b euiip an auaHbI po3eTKaDah HbIfapBbH3.
Eckipren KypblfBnapdb naaDanaBn 60ImaTbH KblbHb3, Cocbln KypblfBnbl Tnict PeTte KeDeTe Xapatyra anapblb3.
EckepiH3
Keni po3etkacbHda KeMHDe 16A caKaTHdbipfbIbI bOybl Tnic.
ErepcaTahdbipfblw KpybIbfj KocblnfaHa ictenKaIca, OHda 6ybn6aKa 3neKtp KpybIbfnap Da 6ipdien ToK xeniciHe Koxapbl KocymHMeH KocblnfaH c6e6iHe Bonyl MyMKH.
CaKTHaBbPbIbI cTEN KAYbH KpybIbHbI KOCyDAn aIbH eH TemeHri BaCKbIsha peTten CoBbH raHa XoRaBpIpaK Kyat BacckblbHa eTIH3.
Kədere xapaTy 6oNbIHwa HycKaynap
Opama
KanTama WaHcOpfbltB TaBIMaDnyda 3aKbIMdaHydAn CaKaTaN. On KopuaFah optara 3nH KeNTipMmTIH MaTPnAmpdAn JacAnFaH con YwiH OHb KdEre Japaty MymkIn.Keperi Jok opam MaTePnAmpdApH INGruNer Punkt« KaDee Japaty KyueciHIN XnHay KaJnApba H anaPbHbI3.
Eckipren Kypblfbnap
Ecky KpybIbnap iuiHne ani de xorapbl MmHdk 3aTtKeTp 6ap. Coyni H ecky KpybIbnHbI cyTuBifa Hemece Keede jkapatOpTaIbIbHa 6epiH3. Aftmbk Kaedere jkapat yonJaDpaTy pAnbI kApnataTbI caTuBbIah Hemece KOramdbKyBIMhau CypaHb3.
Cy3ri MeH WaH Ka6bH Kdere KapaTy
Cy3ri MeH raH ka6bl KOpwaH aOpTaFA 3nH KeNTipMeTlTH MaTePnaIaDapdAn kXacanFaH. ETe OHa yKoBcIb yUH TbYbIM CaIbIH a3TaeKTEp KO bOJa, OHb KaJIbINTbY yKoBcIbHa Tactay MyMKiH.
3Heprn 3tHKetKacbI TypaIbI eCKeptne
OcbI wHcOpfbIw am6e6an wHcOpfbIw anfawKbI WJahrnnen 6oJabI.
Ka3bIInrAn 3heRprn TmDinirHe Xhe KINe Tazanay cbHbHaXyTe yuHn aybcBn KocbNaTbH Am6ean fOpcyHKaHb naJdanaHbHb3.
Ka3bIiFaH 3heprnTmIMdiirHe xHe TecikTepi XHe OoBkTapbMeKaTTbEeH Ta3anay CbHb6bHaXety yIiH XNHaKTaFb KaTTb EeH CONLObcH bICbIuCbIa aIbHbI3.
Ecencep KOMHCCNHBn (EO) Nr. 665/2013 3. Mai 2013 xaphamacbHa 2010/30/EU nipeKTHBaCbHa KocalkbI 6oJFaHra Heri3denreH. Ocb HcyKaDa dAn CunatTanMaH aDicTeP DIN EN 60312-1:2017* Heri3InDe opBnDaFah.
*Erep MOTOP xMybIc ictey MEP3imH TkeCy boc sha bIbIcIbEMeOpblIHanaTbIH BOnCA, petTeTneTIH MAnDI MOTOP xMybIc ictey MEP3imH xApTbIaN ToIb Isha bIbICbIMeH TkeCy yuHbepiRhen MAnHHen 10 % XoRaIbpI petTEy Kepek.
bg
MOny kka3aHnHa 3a yNoTpRe6a,da 6bDat cxbpaHbAHn. PIn npedaaHane H npaxocMyaKaKaTa H TaTeTn Nua MoJa Da 6bDat npedaaHH nKka3aHnHa 3a No3BaHe.
I3noI3BaHe no npedHa3NaueHne
To3n ypeE npedHa3Hauen camo 3a 6bntOBA ynoTpe6a B D0mauHn ycNoBnA. To3n ypeE npedHa3Hauen 3a n3non3BaHe na HbcouHna do MaKcHmym 2000 metpa had MOpCkOTO paBnHne.
Изпonsьаитpe npaxocmyakkaкata calmВ cbotbetCTbne Cданнite haToBa yka3aHnE 3aHaunHa hynotpe6a.
3a da ce npeodtbpatrnapaHbAHnI NOBpeH, npaxocmykaKATA He Tp6Ba da Ce H3non3Ba 3a:
H3CMyKBaHe Ha npax OT Xopa HIN KHBOTHN.
BCMyKBaHe Ha:
- BpeDn 3a 3dpaBeTo, npeMeTn c ocTp n pb6OBe, ropeu nn ropau cy6ctanu.
- BnaxHHn HnTeyHn BeIeCTBa.
- lecno 3aapanmHnB3pNBn BeueCTBa n ra3OBe.
-Пeнел, садд OT каллENI peKIN Инстаци 3a ceHTpaNHO OToIIJIeHne.
- npax OT TOHEP OT npHTEpN KONnPHMaSHHH.
Pe3epBHN qactn, npHaIeKHoCTn, Top6uKn 3a npax
Haushnte opnirnhaHn pe3epBn qactn, Haushnte opnrnHaHnnpnHaJnxHCTn n cneuHnHa npnaIadJeKxHocTn KaKTo HaaHnTe opnrHaHnTOb6HuKn3a npax, cacBoPbaceHNcXapakTepeNtKnte n 3ncKBaHneta Ha Haushnte npaxOcmykaKn. IopaN ToBa BN npenOpbVbame edHnCTBeHO yOntpe6ata Ha Haushnte opnrHaHnnp3epBn qactn, Haushnte opnrHaHnnpnHaJnxHctn n CneuHaHn npnaIadJeKxHocTn Ha Haushnte opnrHaHnTOb6HuKn3a npax. Po TOnn HauNH MoKeTe da OcnHyprte Dblr nolzeEH XINBOT, KaKTo N HenpeKbChato BNCOKo KauceTBO Ha NouchTbaHeto Ha BaWata npaxOCMykaKa.
Uka3aHHe:
H3nON3BaHeToHaHenacBaunnnHnNcKokaueCTBeHH pe3epBHN qactn, npnaIaJIckHO CTn/ cneuaJIHn npNaIaJIckHOCTn nnTop6uKn 3a npax MoKeJa DOBeDe Do NOBpei Ha BaWata npaxocMkaKa KaONTO He Ce NOKpINBaT OHT HsaTa rapaHcnJ, aKO Te3n NOBpei Ca pnuHHeH ToH0 Ot n3nON3BaHeTo Ha TaKInBa PPOdykTN.
Yka3aHn3a 6e3oNaCHOCT
Ta3n npaxoMcMykaUcKa OTRObApHa npH3HaTHTe npaBnla HaTexHnKaTa Hn Ha CbOTBEtHnTe npaBnla Ha TexHnKaTa 3a6e3OpacHOCT.
UpebT MoKe Da Ce Nol3Ba OT Deca Ha Nobeue OT 8 rOdnH N OT LnCa C HamaJIeHN cN3NuYeCKN, CETNBn NN yMCTBeHcCNoCo6HoCTn NN LnIcCa Ha ONIT N / NN 3HaHnA, aKO Te 6NBaT KOHTpOlnpaHn NN Ca INHCTpyKTHpaHn OTHOCHO 6e3OpacHata yNOTpe6a Ha UpeDa N ca pa36paNN npOn3TuHaAsTe BCJeDCTBHe HA TOBa ONaCHOCTN.
- Deuata He Tp6Ba Da nrgpaT C ypeDa.
IOnuHCTBaHe H NOДРbXka OT NOTpe6HTeY He Tp8Ba Da ce H3BbPbWbAT OTea, aKO He Ce HAMnPaT NOd Ha6JIHODeHne.
Пл actmacobnte ПИNKOBe nФолna Tpr6Ba Da ce cbyxpaHЯBaT N3BbH OxbaTaHa MaIKN Deca N Da Ce n3XBbPnT.
=> CbIeCTByBa ONaCHOCT OT 3aIyUaBaHe!
KOMnTeHTha ynotpe6a
BknUoyBaHTe KbM enEeKtpueckata MpeKa n pa6oTeTe c npaxocmykaukata camo cbrnaCHO cnPmHa Ta6enka.
■HnKOra He CmUeTe 6ez Top6a 3a npax, pecn. KOtHeNep 3a npax,ФнTbP 3a 3aUnTa Ha MoToPA nIyBxaUΦnITbp.
=>YpeNbT MoKe Da ce NOBpeNi!
HnKora He cMuyete c dio3ata u Tpb6ata B 6bn30ct do rnaBata.
=> IMa onaCHOCT OTHapaHBAHe!
Ipnn3cmykBaHe Ha npaxa OCTbIb6uie ypeBt Tpr6Ba BInHaRn Da Ce HAMnpa No-HNCKO OT paBoteuia C Hero.
He n3non3BaIte Ka6ena 3a MpeXOBO 3axpaHbAbe H mKapya 3a Hocene / TpaHcnpTnpahe Ha npaxocMkaKpA. Korato Ka6eBt3a CbPb3BAe KbM eNeKTprUeCKata MpeXHa To3n YpeD cNoBpeDn, TOI TpR6Ba Da bDe NODMeHEn OT pOn1B0DInTeNn NnCny6ata ObCnyXBAe Ha KJIneHTn NnNOT dpyro LnIe C nOdo6Ha KBaIIhΦkauZn, 3a Da ce N3berHnat PnCKoBe.
I3TeTnIe DOKpa eNektpnueckna Ka6en npn pa6ota 3a NOBce oT 30 MNHyTN.
He terne 3a 3axpaHbau nka6en, a 3a uencena, 3a da n3knHouTe ypea ot mpekata.
He npekapBaIe Ka6eba 3a MpeKoBO 3axpaHbaHe np3 eOCTn Pb6OBe Hr no pHTNCkAte.
BHHMABaIe uecenbTa He ydpra Xopa, qactn OT TAnOTO, XKBOTHN HIN PpeMettn pnp ABTOMaTHHOTOpnp6bpaHe na Ka6ena.
BoTe eNeKtpnueckna Ka6en c nOmoUta Ha uencela.
Ipein BCnKn pa6oTn no npaxocmykaKaTa n3BaTe ⅢeCena oT mpekata.
- He paBOTete c nobpeDeHa npaxOcMykaKa. Ipn NOBBAHe Na HEn3npaBHOCTH NbAede Te UeNcena O T MPEXOBNA KOHTAKT.
3a 1368B4BaHe Na OHACOHTN,peMOHTNte N CMHATA Ha pe3epBHN qactn H npaxoCMyKaKaTa Tp8Ba Da ce 1368BbPbWbAT CaMOT OTOPMnHapen CEPBN3.
I Na3eTe npaxocmykaquKaTa OT BbHnN KInMaTnUHn BnHHn, Bnra n 3TOuHNu Ha TOnnHa.
He nodaBai Te B3nnaMeHReMn HnCbDpKaaunAnkoXoN BeueCTBa Ha fHntPte (Top6a 3a npax,3auiTeH fHNTbpHa MoTopa,H3dyXbau fHNTbp,H T.H.).
Ipxaxocmykaqkata He e npoxoja 3a pa6o7a Ha cTPOHTENH PNOUaKn. 3acmykBaHe HA cTPOHTENH OTnabu MoKe da DOBede do nobpeHa ypeda.
I3Klnouhe ypea n H3Ternete uencena, Korato He cmyuye.
Ine3nHteOTynotpe6Ba ypeDn Tpr6BaBbEbnHara dctaHaT HeN3nON3BaEMn, cIeT ToBA ypeBt Tpr6Ba Da ce npedae 3a YhnUoXOBAVe hcb6p3Ano NImcKBaHnrtA.
Mon, o6bphete BnmaHne
Мерковий Ковотт Ртуба да e ochrypen cnpednau3nten hai-manko 16A.
Ako npn BkIIOUBaHe Ha ypeHa npednaHTeHrT ce 3aJeHCTBA,TO npHnHata 3a TOba MoKe da b6de,ue B CbUa tene Tepuuecka Bepnra eHNOBpeMeHHo ca BkUOeHn I dpyrn EneKtpuueckn ypeHn c rJorMa o6ua KOHCyMnpaHa MOHocT.
3aDééCTbAHetO Ha NpeDnA3HtEnMa MoKe Da ce H36BerHe, KATO NpeDn BKNJIOUBaHe Ha UpeDa HAcTpOne Hau-NHcKaTc TcenH Ha MOuHocT eEBA CnED ToBb H36epete No-BnCOKa CTenH Ha MOuHocT.
Yka3aHn 3a HXBpIHeTo
Onakobka
Onakobkata na3n npaxocmykaqkata ot nobpeyno Bpeme Ha tpaHcnpTnpahe. T e hnapaBeHaOT 6laonponytn 3a OKONHata cpea MATEpHannopad ToBa MoKeJa 6bJe peuKlnpHa. N3XbBpIaTe HEnyXKnHe Bn Beue OnakOBbHnMATEpHann Ha MeCtata 3a cb6PauHa 3a ChCTeMaTa3a NOBTOPHN3PON3BaHe "3eHnA TOUka".
CtapypeD
Ctaphte ypei necto cbdbpxat Bce ooe ceHHn MATEpHann. 3a ToBa npedaite BaWata ctab pa npaXOCMykaKaHa NaBaan npoabauu HnB eHNOT OeHTPobete 3a peunknipane 3a noBtOpHo H3noJ3BaHe. NfOpMaun 3a AkTuaynHte Haunnn 3a YnuOxKabae Bne MokeTe da nonyute O BaaNn TBProBeu nn BB Baan O6unHckn CbBet.
N3xBpnaHaΦnTbpa N Top6ata 3a npax
Фнгтпe и Topбпe 3a npax ca пponЗвedeи
OT ekONORнчи Матрали. B clyaya, ue TE He
сьдьржAT cy6ctanци, 3abpaheHn 3a bntOBHTe
OTnaIbци, можete дунуншхожавATEаedno
HOPmaHNTe 6ntOBN OTnaIbци.
Yka3aHna 3a eheprnHHn eTNkET
Pn Ta3n npaxocmykaKa cTaBa Dyma 3a npaxocmykaKa c o6o npedHa3haueHne C ochOBen Mapkyu.
3a noctnaga Ha deKnapnpaHata eheprnHa efekeTHBHOCT n Klaac Ha noocntBaHe Bbpxy KnilmIM n TBbpDn NODobe, h3no3BaTe pBeBknOuBaUaTa ce yHNBEpcarNaHdO3a.
3a noctnrahe Ha deKnnapaHaTa eHepnHa
efeKTHBNOCT Naac Ha nouNCTBaHe Bbpxy TBbPdN
noOBe C cyr n npolyk, B3emTe npInoJKeHaTa
IIO3a 3a TBpDn noOBe I a N3nO3BaTte6e3
3akpenBauiye Ce hKaPaHHK.
Hape6a (EC) hom. 665/2013 ha Komcheta ot 3 Mai 2013 r. 3a donbbahe Ha DnpektnBa 2010/30/ EC.BcnKn npoceynp, KOHT He ca toHOn OnncAH B ToBa ykaahne, ca HbRpseHH na 6a3a cTanhapt EN 60312-1:2017*.
*Tb'koT TecTb3a EKcNloaTaunOHeH JxNBOT Ha MOTOPA cE h3BbPbWA pni npa3eH KOtEnhep 3a npax, NocoueHnE KcNloaTaunOHeH JxBOT Ha MOTOPa 3a npOBepKa C HAnOpONBHa PbIeN KOtEnhep 3a npax Tpr6Ba Da ce yBeInuC n 10 %
uk
Будялеса,Збергаятю Incтуркizu 3 ecknnyatauai.Якци nohooc nopetaeacbrosOBomyBnaCHNY,номусид néраатankuio Inctpykuiz 3 ecknnyatauai.
3actocybaHHa npn3haeHHaM
LepnpnaD npn3haeHn tiNbKn Dnna NobytoBoro BnKOpCTaHH. Lep npnaD npn3haeHn DnBa BnKOpCTaHH Ha BnCoTI oHaoh6iNbIbe 2000 M nad pibHEM Mopr.
BnKOpHcTObyIe nnococ BiinobiDno do ciie iHCTpykci3 ekcnnyataui.
Uo6 yHnKHyTH TpaBMaT aNoXkoJKeHb, NnOoc H MoXHa 3aCtOCOByBatn dIa:
■HnueHHNJIHOeHnTBapNH;
BCMOKTYBaHHR:
- shkiDnBnX dny 3dOpOB'ra peOboH, roctpnx, raprynx a6o po3kapeHnx npedmetiB;
- BOLONx abo piKnx peuOBnH;
-lerk03aMnCTnx a6o Bb6yxoHe6e3neuHx MaTepiJIb, 3OKpeMa ra3iB;
- noneny 3 neeien abo npncptpoB uehtpailbhoro onaenHH;
- Tohephoro nopouky 3 npntepib a6o KcepoKcib.
3anachi qactnHn, npnaadn, miwok dny nny
Haichi opriihalbi 3anuactHH, opriihalhe npinada Ta cneiialbHe 6nadhaHHa TAKOchi opriihalbi Miikn DnIy nly yroDjEHI 3 BnactNBOCTMa T BmOramn Hauixn NINOCOSB. TOMy peKomeHJyMo BHKOPHCTOByBatn BKNIOUHO Haichi opriihaihi bhi 3anuactHH, opriihaihbe npinada Ta cneiialbHe 6nlaHaHH i Haichi opriihaihiMiikn dIy nny. TaKHM qHHOM MoJHa rapaHTyBatn TprBanni Tepmin CnyxOn i BnCOky NOTyXhICTb Baaworo NINOCoca.
Bka3iBka:
3actocybaHH HeBIDNObiDHNx 3anachnx qactnH a6o npuaadra/cneuaiahoro 0bnaDHaHH i Miikib dIa Nnly Hn3bKoi kOcTI MOKe np3BeCTn Do nOwKOJXeHb BaUOro nNoOCoca, Ha KaHe NoWnIOeTbcra rapAHTir, Rkso Take NNOKOJXeHH BKNKNaHO 3actocyBaHHm NODi6HNX npOdyKTIB.
Bka3iBkn 3 Texhikn 6e3nekn
Ley nIIOcO BIDNOBIAe
3aRaJIbHO npHHTHM npaBnIaM
TcHnix 3acobTa
CTaHapTam 3 npaBn6e3neKn.
■ДiTndo8pokIB,ocobn3 φi3nHnMnCh npOzymOBnMn Baamna a6o ocobn, 非HeMaOTbIOCTaTHbOro DCBiy Ta 3HaHb, MOKytb KOpNCyBaTnCn Prniladom Nlnepi HaIydom a6o kKIO BOHn HabueHi npaBnIbHOMy KOpNCyBaHHIO NHIOOCOM Ta ycBiDOMLHOt b MoXJIHBi pN3nKn.
■ДiTЯМ 3a6OpoHeNo rpaTnC8 3 npHnAdom.
■ДiTЯМ 3a6oPoHЯ€tbcA 6e3 HaTЯDy npoBODHTN OuHSeHnA a6o 06cnyroByBaHnI npiJaDy.
Пл actNKOBi naketn Ta
Фольг Heo6xidno 36epiratn
И ytni3OByBaTN NO3a
ДосяжнICTU MaIeHbKnx
ДITEH.
=>He6e3neka 3aIINxHyTncb!
PpabunbHe BnKOpncTaHHa
■Пдкюнгелянococа дe ekeTpmoepexi ta Jnoro ekcnnyataci noBHHa 3iiHOBaTcB tInbKn BIDnoBIDNo do daHNx nacnpToHoi tabnHKu.
HikonHe BnKOpCTOByIte PInNoCoc 6e3 PInNo36IPHNka 4n KOnTeHepa DnI PnNy, 3axNCHoro Ta BnYCKHOro fInbTa.
jU 0060g860 g63y0g36m0s 86mm
3n65u lysymg6b6m36j0m 00 u6bmou 6j0mao
m306060606060606060606060606060606060606060606060606060606060606060606060606060606060606060606060606060
Ggoggno gmooy600 dbmmoo ygool o 5uoyggoo no mgoymo ooooogdo u
00605g0uus 00605uouuouu 00605uouuouu 00605uouu
Sosos6gouu5 6m30gouu2gjgm3oo.
a00800b 0000300:
Uoosocnoaoum 60fomoo, 6JUuoyoo, O30nuuuyou Omo
h305mno8o5mo uomouoamn 6fomoo, mno8o5mo
guluysdo oasluoyo ymo 65do, ou30
mmogB a30duuuyuO u mo8o5mo 4mo8o,
gudusdo h30a30duuuyuO uluuoyo yduuoyo,
coa amoob3do. yguo6 6dmo7o5y, h305
goh200 6dmo7o5mo 6dmo7o5mo
uuuovuoanm 6foyo, mno8o5mo ujluuyo,
65uoyuoyo ymo 65do, ou30 mmagB h305o
a30duuuyuoyo u no8o5mo 6do, 6305
admo 6do 6do 6do 6do u
b5do 6do 6do 6do 6do u
00000g:
msssssssssssssssssssssssssssssssssssssssssssssssssssssssssssssssssssssssssssssssssssssssssssssssssssssssssssssssssssssssssssssssssssssssssssssssssssssssssssssssssssssssssssssssssssssssssssssssssssssssssss
yusgnoomgdou doonmgo
036uun
Uysm30monomoo 6mo6gym 6m6gdu cos yuogmbdou 36mgo.
605608smo 8 molu
605608mno 8 molu
605608s 5 y3mnu
605608320luo30cu
6056030 uUgO gUgO
6056030 56 26y3mnu
6056030mmoo 56
603mdo 4dmeomnu/
605604Jm630nuo30u,
603o ofo 4dymo30s5
603o smmymou 13o 56
605608nol uodmyo3oU
605608hoo 56 4o0o3oU
605608s, oM s Uog3oB
60dmo 4dmo3oMu oua
60dmo 5o
0s3d2oU 0ssdo 056088moo5 0oyd3oJmo.
a56250000 uayyosm0o,
u30 6n8mno
oo560gssmo Uo16o3ymo
amlu66ymo oo3o0mo
o56mmooU oo3o0ou
o0n o03myymoU
o0
3mmnoomol 3m30
cos qmmomoo 2o6b00
8osyms 300uog56
6mdoyf3c0ma 0co8omol. 1nmoj60s co6hmonu
Usgm6b!
50505050505050505050505050505050505050505050505050505050505050505050505050505050505050505050505050505
a 1000000000000000000000000000000000000000000000000
5630ou 5630ou 5630ou 5630ou 5630ou 5630ou 5630ou 5630ou 5630ou 5630ou 5630ou 5630ou 5630ou 5630ou 5630ou 5630ou 5630ou 563
=>co0660860g 9gulddmnn co660660gol!
aogmou aouuugcog oouu ouu bnuuoglu
oogolou uulubm3gU.
=>sUgOmouoososogdouuogmo80g!
0000000000000000000000000000000000000000000000000000000000000000
0562 00000000000000000000000000000000000000000000000000000000000
506506 536666 505505 1066666 506666 506666 506666 506666 506666 506666 506666 506666 506666 506666 506666 506666 506666 506666 506
30 ygmo 8o 656dmo 8o yg 8o 8o 8o 8o
C666666600 gluomoo5 aammo8gol 06600, 66
aogomom 00600000 3600, 66600 hgooc00
3600
5056 5056 5056 5056 5056 5056 5056 5056 5056 5056 5056 5056 5056 5056 5056 5056 5056 5056 5056 5056 5056
y#o0000000000000000000000000000000000000000000000000000000000000000000000000000000
Jugmoosd oougongogmo 3gdgmo gugogoo 56
gdmuogon 0gogmol 0gogomoo.
aoguouo 5 gouooguo 6guyuoguo 8030
56 ydmooy6moo 008o82ymo 330uWyo.
63gntu 1uOomou 8j00b30380, ydmoo
Uwogbou ouoos 80gmoou 04600 ugoom 030300600 y300u 150m 0000000000000000000000000000000000000000
0000300 03g6uunmgo UogooU gOgOgOoUo5,05uOooMuyumgOo5.
30000666 20000666 05 03030000 030300 0a00000 (030300 0g00000, d0301 080300 0g00000) a8b030
20306uouo 560u 853g036mo u08a600mm
6666660u cou-80000000030u. Uoo8060mm 8830u 8u6063ad 8uodmoos
coo8060mu 8830u.
aammono oovogdo no gaoomgmonn 0030no, ong ouuouugu.
a yymo06o5 aomu0o 336o000y036003
0000000000000000000000000000000000000000000
006m300,yy60000800g000
a 803u mo yuymo ymyu 16A
c832mo.
o8033030, myo 333000u Hm03uU
c8303000 8030030s, 0u 80udmo00
8030000 o5u 08oo, m4 8300
Hm0ymo 0d80u d830u amdaonou U63
cmfmo 333000u
c830300u 80dmnmo 8uUdmoqmo 8mo05
c830000, myo 333000u Hm03o 8o u cdoom
d830g hgoos 8o abmmco 8o U8oog
c83030g hgoos 8o abmmco 8o U8oog
80000000000000000000000
0g0003s
0g0003s 0g0006u6u6u6u6u6u6u6u6u6u6u6u6u6u6u6u6u6u6u6u6u6u6u6u6u6u6u6u6u6u6u6u6u6u6u6u6u6u6u6u6u6u6u6u6u6u6u6u6u6u6uuo 0g0003s 0g0006u6u6u6u6u6u6u6u6u6u6u6u6u6u6u6u6u6u6u6u6uuo 0g0003s 0g0006u6u6u6u6u6u6u6u6uuo 0g0003s 0g0006 uo 0g0003s 0g0006 uo 0g0003s 0g0006 uo 0g0003s 0g0003s 0g0003s 0g0003s 0g0003s 0g0003s 0g0003s 0g0003s 0g0003s 0g
d3gmo 0568060
d3gmo 336060
d3gmo 203330
d3gmo 336060
d3gmo 336060
d3gmo 336060
d3gmo 336060
d3gmo 336060
d3gmo 336060
d3gmo 336060
d3gmo 336060
d3gmo 336060
d
GomOuos 0a 03gUsuugou Mmaou gogos
Gommoos 0a 03mou j6o2o2o2o2o2o2o2o2o2o2o2o2o2o2o2o2o2o2o2o2o2o2o2o2o2o2o2o2o2o2o2o2o2o2o2o2o2o2o2o2o2o2o2o2o2o2o2o2o2o2o
26666 030366 030400
0o5a0000000000000000000000000000000000000000000000000000000000000
003mss6o00000 50600000000000000000000000000000000000000000000000000000000000
gagggggaagggggaagggggaagggggaagaaa aas
83000000000000000000000000000000000000000000000000000000000000000000000000000000000000000000000
mog 608y2010/30/EU
y3000 3600000,6000000 6000000
70500000 36036000 6000000
8050000 6000000
EN 60312-1:2017*.
3060005 d3gol uogmbmol b5gmdmo3mds
8a0656900000000000000000000000000000000000000000000000000000000000000000000000000000000000000
zh
請妥善保存使用說明書。
aalll aolll alalll alalal alalal alalal alalal alalal
ailll iag ailll Jkiil lsl kssll sll
a a
ylll llllllll 1
g jlll l llll
2013/665 (
.EU/30/2010 2013
a
aalal alalalalalal
*1:2017-EN 60312
pge gaiy aal yai jai jai jai jaijia
aal jaiy
. 10 1
JibbI Jjia 1234567890
laolalil
j1i1ii jai iia jss
Cannal
ailll aalll llllll llll llll
y
.2jll jilj
1j#all j#all w#y#d<
JU 1
1u 1u 1u 1u 1u 1u 1u 1u
gss sss ssss (sall) gss
a a a a a a a a a a a a a a a a a a a a a a a a
aal 10
ailll l 1y ylll 1y ylll 1y ll l
Jusssu Jooay Aaiy y, aee elulol oal gge y
1 1
a aalaae aeae aee aee aee aee
aill aall bally llns
j11 17 jaaa liaa aaiall jj
2g 100000000000000000000000000000000000000000000
aaiy aay yll sylld ayalalaa yll lle dkyd s y
.
Jb blll 12000000000000000000000000000000000000000000000
1
Clllal all 1
i
aallll lalall, aallll alallll lalal, alallll lal
a a a a a a a a a a a a a a
alisiil jaiy iaii dilliy aaiall sall chibia
dallal, aulallll alalil lalol, aulallll lylge ale
o, 10
ailll lal yauuul uie 5gag ygbla jae jaaai aall
S_i
:
yj jyj yj yj yj yj yj yj yj yj yj yj yj yj yj yj yj yj yj yj yj yj yj yj yj yj yj yj yj yj yj yj yj yj yj yj yj
y
Jalalall 12
aill 0i jia piai iuiu uaiy gai lai ci
J 1
aiaaa aaiial 1gill: gaiiiaaiia
aIol all 1j Jolal b
Lal ci siw A jn no d1i Jlbi
a aal l 1
Congratulations on your purchase of the Bosch GS70 vacuum cleaner.
This instruction manual describes various GS70 models, which means that some of the equipment features and functions described may not apply to your model. You should only use original Bosch accessories, which have been specially developed for your vacuum cleaner, to achieve the best possible vacuuming results.
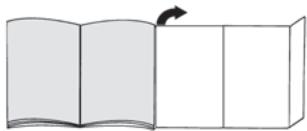
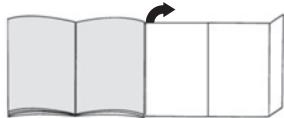
Fold out the picture pages.
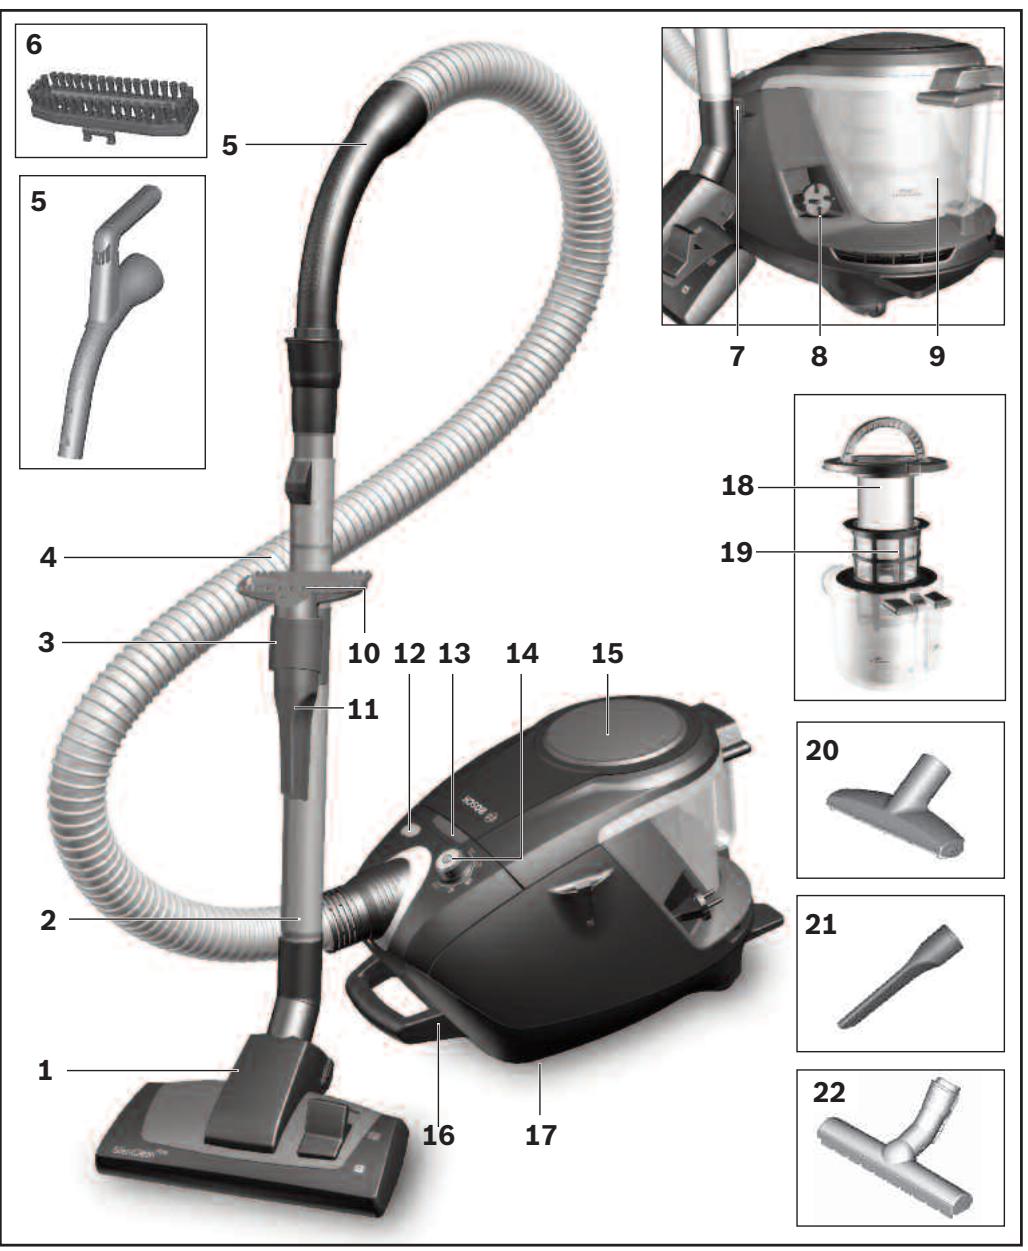
Your vacuum cleaner
1 Adjustable floor tool with accessory connection
2 Telescopic tube with sliding switch and accessory connection
3 Accessories holder
4 Flexible hose
5 Handle
6 Brush ring (to fit on the upholstery nozzle)
7 Parking aid on the side of the appliance
8 Power cord
9 Dust container
10 Upholstery nozzle
11 Crevice nozzle
12 "Clean" filter cleaning button
13 Power level indicator
14 On/Off button with electronic suction regulator
15 Appliance lid
16 Carrying handle
17 Storage aid on the underside of the appliance
18 Plate filter
19 Fluff filter
20 Professional upholstery nozzle
21 Professional crevice nozzle*
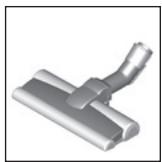
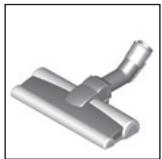
22 Hard-floor nozzle
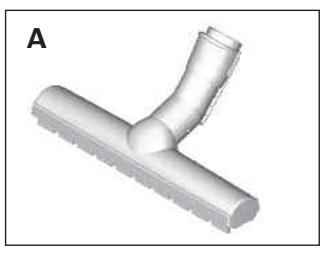
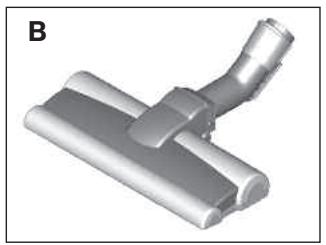
Replacement parts and special accessories
A Hard-floor nozzle BBZ123HD

For vacuuming hard floors (parquet, tiles, terracotta, etc.)
B Hard-floor nozzle BBZ124HD
With 2 rotating brush rollers For caring for expensive hard floors and for the improved collection of coarse dirt.
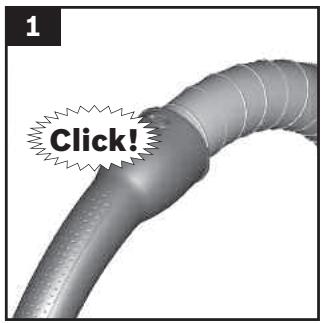
Before using your appliance for the first time
Fig. 1
- Push the handle onto the flexible hose and lock it in place.
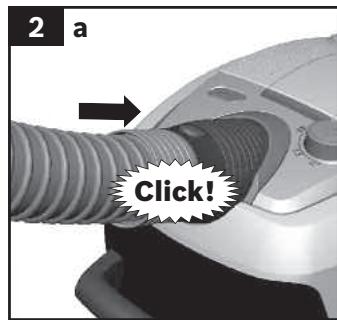
Initial use
Fig. 2
a) Push the flexible tube adapter into the air intake opening on the appliance and lock it in place. You will hear an audible 'click'.
b) To remove the flexible hose, press the two catches together and pull out the hose.
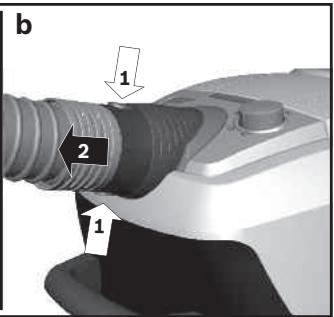
Fig. 3*
a) Push the handle into the telescopic tube. To remove it, turn the handle slightly and pull it out of the tube.
b) Push the handle into the telescopic tube until it locks into place. To release the connection, squeeze the collar sleeve and pull the handle out.
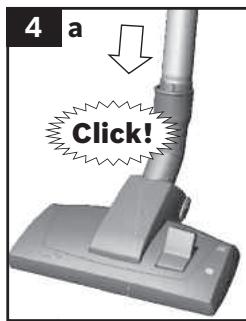
Fig. 4
a) Insert the telescopic tube into the connecting piece of the floor tool. To release the connection, turn the tube slightly and pull it out of the floor tool.
b) Push the telescopic tube into the connecting piece of the floor tool until it locks in place. To release the connection, press on the locking collar and pull out the telescopic tube.
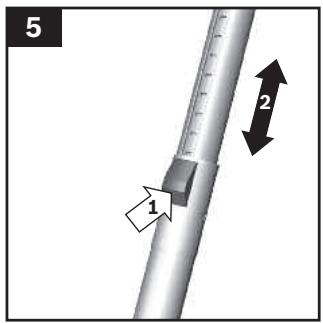
Fig. 5*
- Unlock the telescopic tube by moving the sliding switch in the direction of the arrow and adjust to the desired length. The slide resistance on carpet is at its lowest when the telescopic tube has been completely pulled out.
Fig. 6*
a) Place the accessories holder in the required position on the telescopic tube.
b) Use some pressure to insert the upholstery nozzle with brush ring and the crevice nozzle into the accessories holder from above or below.
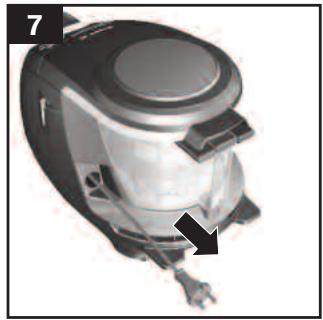
Fig. 7
- Holding the power cord by the plug, pull out to the required length and insert the plug into the mains socket.
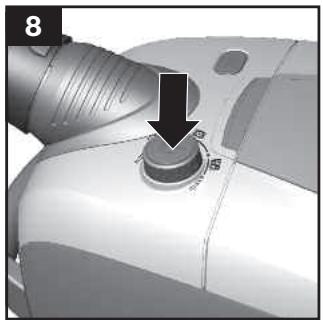
Fig. 8
- To switch the vacuum cleaner on or off, press the ON/OFF button.
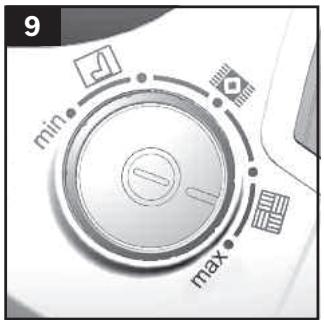
Fig. 9* Controlling the suction level
Turn the rotary control to infinitely adjust the suction level to the level required.
min - For vacuuming curtains and delicate textiles

- For vacuuming upholstered furniture and cushions

- For vacuuming delicate rugs und for daily vacuuming of lightly soiled floors

- For vacuuming durable floor coverings
max - For vacuuming hard floors and heavily soiled rugs and carpets
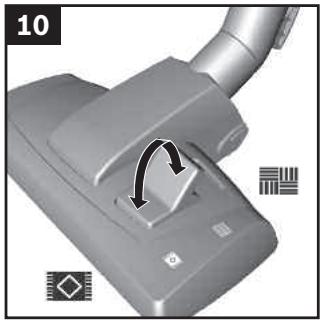
Vacuum cleaner with „ComfortSensor“
Fig. 10* Controlling the suction level
Turn the rotary control to infinitely adjust the suction level to the level required.

- For vacuuming upholstered furniture and cushions

- For vacuuming delicate rugs und for daily vacuuming of lightly soiled floors

- For vacuuming durable floor coverings
Comfort - one setting for all floors. Makes vacuuming a breeze, whatever the floor type.
max -For vacuuming hard floors and heavily soiled rugs and carpets
Vacuum cleaner with „autoControl“
Fig. 11 Controlling the suction level
Turn the rotary control to infinitely adjust the suction level to the level required.
min - For vacuuming curtains and delicate textiles

- For vacuuming upholstered furniture and cushions

- For vacuuming delicate rugs und for daily vacuuming of lightly soiled floors

- For vacuuming durable floor coverings
auto - For vacuuming hard floors and heavily soiled rugs and carpets
Vacuuming
Caution
- Floor tools are subject to a certain amount of wear, depending on the type of hard floors you have (e.g. rough, rustic tiles). Therefore, you must check the underside of the floor tool at regular intervals. Worn undersides of floor tools may have sharp edges that can damage sensitive hard floors, such as parquet or linoleum. The manufacturer does not accept any responsibility for damage caused by worn floor tools.
Fig. 12
Set the adjustable floor nozzle:
Rugs and carpets

Hard floors/parquet

If you are vacuuming up larger particles, make sure that you vacuum them up successively and carefully to ensure that the vacuum channels of the floor tool do not become blocked.
If necessary, you should raise the nozzle in order to better vacuum up the dirt particles.
Vacuuming with accessories
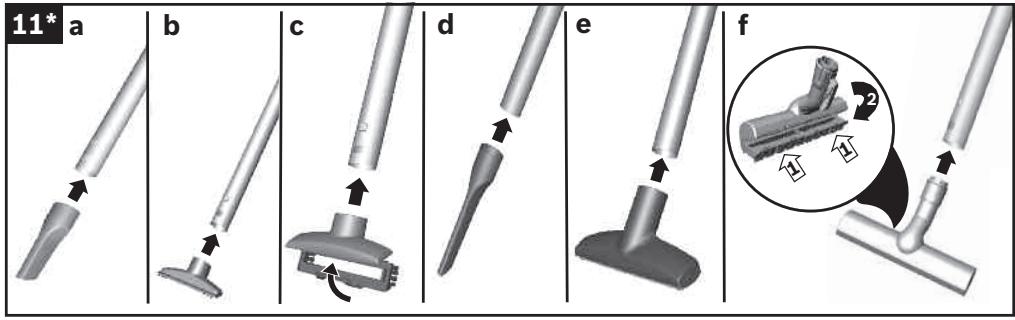
Fig. 13
Attach the nozzles to the suction pipe or handle as required:
a) Crevice nozzle for vacuuming crevices and corners, etc.
b) Upholstery nozzle for vacuuming upholstered furniture,curtains,etc.
c) Upholstery nozzle with fixed brush ring for vacuuming window frames, cupboards, profiles, etc. After use, reinsert the crevice nozzle and upholstery nozzle into the accessories holder.
d) Professional crevice nozzle
Extra-long crevice nozzle for cleaning crevices, corners and narrow spaces, e.g. in a car.
e) Professional upholstery nozzle
For gently and thoroughly cleaning upholstered furniture, curtains, etc.
For cleaning the professional upholstery nozzle, simply vacuum it using the handle.
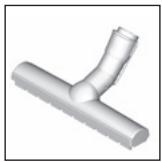
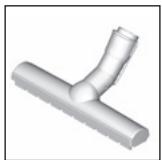
f) Hard-floor nozzle
- with clip-in edge cleaning bristles:
For gentle but effective cleaning of hard floor coverings (tiles, parquet, etc.)
- without edge cleaning bristles:
For cleaning dirt in gaps and cracks
- The edge cleaning bristles can be removed by pushing the two catches in the direction of the arrows.
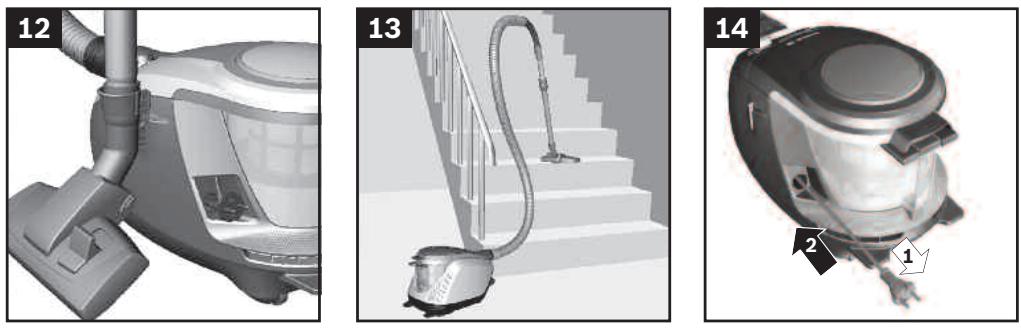
Fig. 14
You can use the parking aid on the side of the vacuum cleaner if you wish to stop vacuuming for a short time.
- After switching off the appliance, slide the hook on the floor tool into the parking aid.
Fig. 15*
When vacuuming stairs, the appliance must be positioned at the bottom of the stairs. If it does not reach far enough, the appliance can also be carried using the carrying handle.
When your work is finished
Fig. 16
- Switch off the appliance.
- Pull out the mains plug.
- Briefly pull the power cord and release. (The power cord retracts automatically).
Caution
- Please make sure that the contacts of the mains plug do not protrude out beyond the appliance. This may cause scratching/damage to furniture and doors, etc.
Turn the plug to the side if necessary.
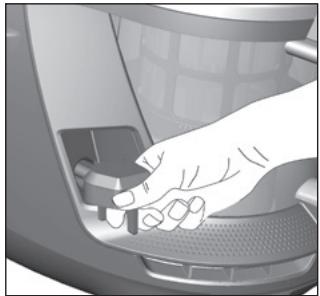
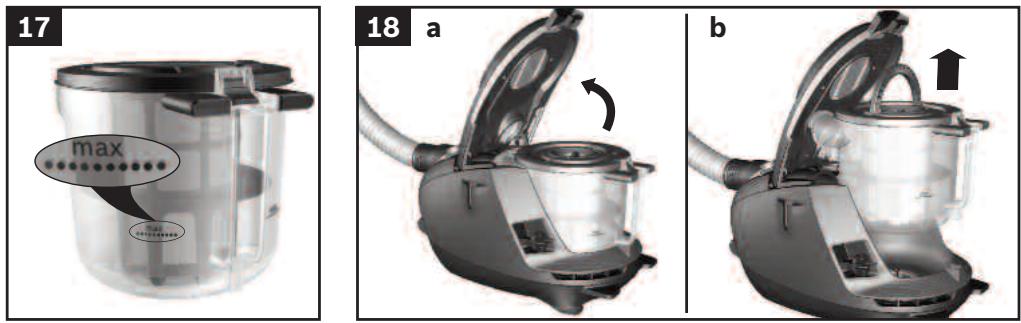
Fig. 17
- Unlock the telescopic tube by moving the sliding switch in the direction of the arrow and slide one tube into the other.
Fig. 18
To store the appliance, use the storage aid on the underside.
a) Stand the appliance up by the handle.
b) Slide the hook on the floor tool into the storage aid.
Emptying the dust container
Fig. 19
In order to achieve good vacuuming results, the dust container should be emptied after every use or, at the latest, when dust or dirt has visibly collected on the fluff filter or when dust at one point in the container has reached the height of the marking.
When emptying the dust container, always check how dirty the fluff filter is and, if necessary, clean it as detailed in the "Cleaning the fluff filter" instructions.
Fig. 28
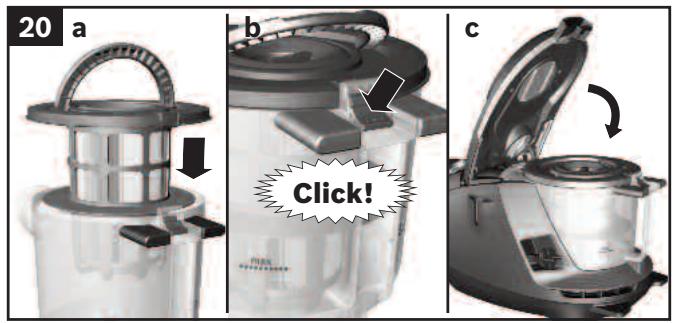
Fig. 20
a) Open the appliance lid by pulling the locking tab.
b) Use the handle to remove the dust container from the appliance.
Fig. 21
a) Release the filter unit of the dust container by pressing the release button.
b) Take the filter unit out of the dust container and empty the dust container.
Fig. 22
a) Insert the filter unit into the dust container, making sure it is correctly seated. The arrow on the filter cover must point in the direction of the locking tab.
b) Press on the container lid until you hear it click into place.
c) When reinserting the dust container into the appliance, make sure it is correctly seated. Close the appliance lid until the locking tab clicks into place again.
Caution
- If you notice any resistance when closing the lid, check that the filter is complete and that the filter and dust container are correctly seated. Cleaning and care
Filter care
Cleaning the plate filter
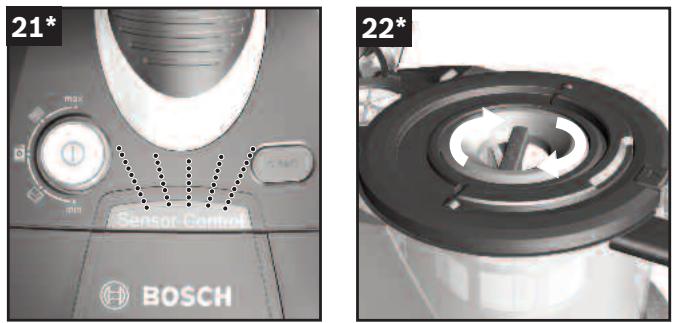
Your appliance is equipped with a "Sensor Control" Function. Fig. 23 + Fig. 25
This function constantly monitors whether your vacuum cleaner is reaching its optimum power level. The indicator light lets you know when you need to clean the plate filter, so that the vacuum cleaner can reach its optimum power level once more.
Vacuum cleaner with "RotationClean" function
Fig. 23*
The indicator lights up blue when the appliance is working at its optimum level. Once the indicator turns red and flashes, the plate filter must be cleaned. The appliance is automatically adjusted back to the lowest power setting.
Fig. 24*
- Switch the appliance off in order to clean the plate filter.
Caution: the filter can only be cleaned if the appliance is switched off.
- Open the appliance lid by pulling the locking tab.
To clean the plate filter, turn the knob at least three turns through 180^
You can also clean the filter if the suction is becoming less powerful, even if the indicator has not lit up. We recommend that you clean the plate filter each time before emptying the dust container. It must be cleaned at the latest when the "Sensor Control" indicator lights up.
If the indicator flashes three times in quick succession, even though the plate filter is clean, this is probably due to a dirty fluff filter or a blockage. In this case, the appliance automatically adjusts to the lowest power setting and the indicator lights up red permanently.
- Switch the appliance off, empty the dust container and clean the fluff filter according to the instructions in "Cleaning the fluff filter". Fig. 28
Vacuum cleaner with "SelfClean" function
Fig. 25*
The indicator lights up blue when the appliance is working at its optimum level. Once the indicator turns red and flashes, the appliance switches off automatically
Filter cleaning is activated and performed by the integrated cleaning motor.
If the appliance cleans three times in quick succession, this is probably due to a dirty fluff filter or a blockage. In this case, the appliance automatically adjusts to the lowest power setting and the indicator lights up red.
- Switch the appliance off, empty the dust container and clean the fluff filter according to the instructions in "Cleaning the fluff filter". Fig. 28
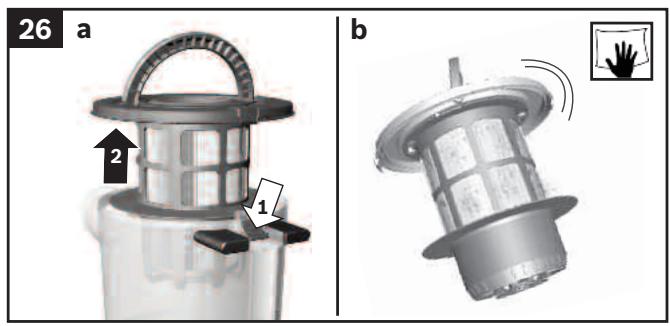
Fig. 26*
If required, you can also activate the cleaning procedure manually by pressing the "Clean" filter cleaning button when the appliance is switched on.
If suction power is reducing, you can also clean the filter even if the indicator has not lit up. We recommend that you clean the plate filter each time before emptying the dust container.
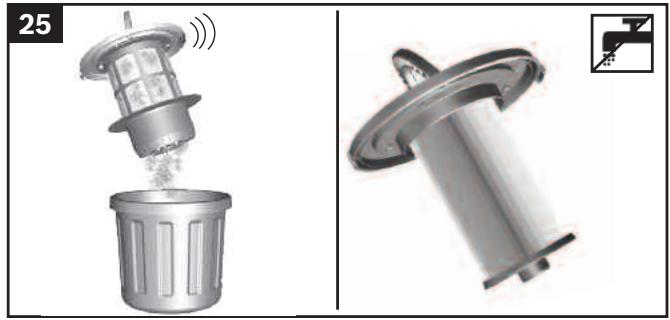
Tapping out the plate filter
Fig. 27
If the plate filter is particularly dirty, the dirt can also be tapped out.
- Tap out the filter over a dustbin.
The dirt will fall down out of the filter.
Cleaning the fluff filter
The fluff filter should be cleaned at regular intervals in order to ensure optimum operation of the vacuum cleaner.
Fig. 28
- Open the appliance lid and remove the dust container from the appliance. Fig. 20
a) Take the filter unit out of the dust container.
b) It is usually sufficient to lightly shake or tap out the whole filter unit when the dust container is emptied in order to dislodge any particles of dirt.
- If this is not sufficient, you can use a dry cloth to remove dirt particles from the fluff filter.
Cleaning instructions
Always switch off the vacuum cleaner and disconnect the power cord from the mains before cleaning the vacuum cleaner. The vacuum cleaner and plastic accessories can be cleaned with an ordinary plastic cleaner.
Caution:
- Do not use a scourer, glass-cleaning agent or multipurpose cleaning product. Never immerse the vacuum cleaner in water.
Subject to technical modifications.
fr
AvoiTe npapakalw tic oaiidec me tic eikovec!

Piypapn ouokcunc
1 Pnla daeob dnnxcn pcnnc me ouvdeon Eapntuatw
2 Tnλeokotikoc ωλνac, μe oupóevo πλκtpo kai ouvδean eaptnμatwv
3 a
4 Eukamntoc owlvac avappofo
5 Xερολβ
6 Bouptaaki (movo tonotheetae oetomio avappopnngiaokouniaqa eninawv)
7 BoIeia OaOeuaocn Otnv nLeupa Tc oukeun
8 HλeKtpiokαλδio
9 Doxio auLoync tnc okovnc
10 Tómu avappoqnq yia okuinua einnaw
11 Tómuo avappopnnc yia oKouπiμa ywivw
12 PAnkto KaOapouo Tou pIAtpou «Clean»
13 EvdeiEg Bαθμiδac iαxuδ
14 PIIktpo ON/OFF pe nkektpovikpuoiTnCduvaqnc avappopnonc
15 KaImua ouokueunc
16 Aβη μεταρορά
17 BoiEia anoKeuoc otny kTu nuepa tnc oukeunc
18 Piniδωτο φιλτρο
19ΦItpo xouδiω
20 EnayyElambdaoTómu avappoPnonc yia oKouinioa einnaw
21 Enayyελματικό οτόμιο avappóφησις γι σκουπισμα γωνιών*
22 Pελμα σκληρού δαπεδου
Avtaalaktikkaiclikooceionlaioo
Mbl paably, yTO Bbl octaHOBnIN CBOI Bbl6Op Ha nblnecoce Bosch cepnn GS70.
B 3toN HnctpykCnO nKcnnyatauinn PpeDCTaBneHb
pa3nHnBie moDeni GS70. TOnToMByo3MOxHo,
4to NekToOpble yKnHnI npHaadJeXHOCTn,
onncAnhHe 3decB, MOrY oTCyTCTBOBaTb y BaWero
np6oba. 4to6b rapaHTnpOBaT onTHMaNbHbI
pe3ynbTat y6opKn, Bm Heo6xoMDIO hNCON3bOaBt
TonbKO opRnHaNbHbIe npHaADJeXHOCTn Bosch,
pa3pa6oTaHnBie cneuaHbHO nJra BaWero nblneocca.
CoxaHnTe HcTpyKuHNo 3KcnnyatauHn. Pn nepaue nIbIeococa HObOM ByaIaNbUy He 3a6yDte nepedatb TaKxne HcTpyKuHNO 3KcnnyatauHn.
Pa3BepnHtce ctpaHnCbI c pncyHKamn!

Oncanhe np6opa
1ipekeKIOUOaEMaHacaKaIJaNcTKnNoLa/KOBpa c aanTePOMnI npHaadNeXHOCTe
2 TeneckoHuecka Tpy6ka C KhoNkoI-IO3yHKOM I aanTepom DnI npHaadNeKHOCTeI
3 DepekateIbI npHaadneKHOCTeI
4 UJnahr
5 Puyka
6 BcTaBka co ΜeTINHO (ДлЯ yctaHOBKN Ha hacay dIЯ mKarKmE6eN)
7 NapkoBka Tpy6kHa nbinecoce
8 CeTeBoKa6eNb
9 KOnTeHepdna c6opa nbln
10 HacaKaIЯMЯrKoMbeeni
11IeeneBaHacaKa
12 Khonka ouncTkHnIbTpA «Clean»
13 INDnKAtOp yPoBHa MOUHOCTH
14 BbIKIouateBc3JIeKtpoHHbIMperyIaTOpOMMOUHocTHBCaCbIbAHIN
15 Kpbioka nblneocca
16 Puyka
17 NapkoBouHbIe fNkCaTOpbl (Ha HnKHei CTopoHe nbIeCoca)
18 NaMeBHyI ΦnIbTp
19 Φιπόντρυύσας CETka
20 HacaKa dIy MaRKO Me6eN Profi
21 LJIeIeBaHacJaKa Profi*
22 LJIeTka dIa TBePbIx HAnOJIbHbIX NOKpbITn
CneuHaBhIe HocaKn
A Hacáda IaI TBépblx HanoIbblx NOKpbITN BBZ123HD
Tbinecoc c "ComfortSensor"
Pnc.10 PeryunpoBkA MoUHocTH BcAcbBaHn
IopXoJyra MaOuHocb BcAsbBaHHaNn PnaBHO yctHaBaHnBaTeCBApeHem NobOPoTHoro nepeKnUohatJe.

-ДячсКМЯгкоМeбELN NOyweK

Pnc.11' PerynnpOBKa MoIIOCTN BcacbBaHn
IopXoJ4aMaMoUcHObtBcAsbBaHnnaPiabHO yctahAbNbaeTcBpaueHem nobopoTHoro nepeKnOucaTeJe.
MHN. -ДлгчNTКЗаHabEcOKTOHKNXTEKCTINbHbIX n3dien
-ДячскМягковMeбenvиnodywek
-Дль quctkn TOnkKx KOBpoB I exeJHeBHOy y6opKn npn cna6bom 3aqr73enHH
-ДячNTКи рочьхи HanonbHx NOKpbTIN
auto -ДячNTКиТБердьх HanOЛьньх NOKрытн, aТакъс сильноЗагргзEHьх KOВрOBи KOBрбьх NOKрытн
Y6opka
BHHMaHHe
HacaKn DnI YnCTKn Iona/KoBpa NOBpeRKeHbI, B 3aBnCnMoCTN OT KaucEeTBA TBePDOr HAnonbHOrO NOKpItNa B BaWeM Dome (HaNPmep, WepoxOBaTaA, PycTOBaHnAep KepamueckaanNTKa), OnpedeneHHomy n3HocY. Po3Tomy Heo6xOJIMO perpyLnRHO npOBpeRt pa6OuyIO NOBepXHoCTb HacaKn. N3HOweHbIe, C3aoCTPNBWHmIC KaPAMn pa6Ouyne NobEPXHOCTn HacaKn Moryt pInBecTe N NOBpeKdEnHIO y3BmBIX TBepDlx HAnONbHbx NOKpItN, TakNX KAK NapkET ININ HInHoneym. POn13BOintenHe He cecET OTBETCBENHOCTn 3a BO3MOxHbIe NOBpeKdHenH, KOtOpBe Bbl3BaHbl I3HOWeHHo HacaKn DnI NaIa.
Pnc.12
Perynipobka nepekIouaemHacaKn dIy nCTkn nona/kOBpa:
ДЯ KOBPOB И KOBPOBbIX NOKpbITN =>
ДЯТВердьHанольныПOKрытNi napкета


Ecnn Tpe6yctc ydaunltb nbilecoocom 6oIbwnie cactnblc, cneinte, yto6bl oHn BCaBbIaNbc noOHDn 3a pa3 uTO6bl He 3a6bnnc kahan HacaAkn.
Pn Heo6xOaHMoCTn CneyET NODHbTa HacaKky, T06bI qactncuIgpr3n nyuwe BTRHyNcB nbineCoc.
Y6OpKa C HcNoIb3OBAHHem DOnONHHTeNbHbIX npHaadLeXHOCTe
Pnc. 13\*
YctaHOBInTe HacaIkn Ha puKy IpaIHa rIIN Tpy6Ky:
a) ΚeneBaHacaKaДЯчNTKицeNe,уг nobИТ.Д.
b) HacaKaДЯ МяrkоМe6eNДЯЧСТКМяrkOJ Me6eN,штUpNT.Д.
c) Hacadka dIraM KOr MBeBn C yctAHOBneHHoB BCTaBKO c 0eTHHO dN rHCTKN OKOHbIX paM, WkaΦOB, npOΦnneH T. D.
По Okончани ybopkn Bctabte ueenebyu hacaiky huacakny mгкоу Мбелвдржateь дп ринадnexhocte.
d) Μεπεναν Ḥαςκα Profi
Oc0beHNO DnHHaIeNEBaHacadka IJN TNCNIeNe, yrnoB nY3Knx IpomexkyTKOB,(HaNP., BABTOMo6Hne, nT.Д.
e) Hacadka dny mrgkoy me6en Profi
Длллгкои n tцateNBHOH uNCTKm MrgkO Me6eHN, wTOp n T.D.
Длл OUHCTKn HacaDNn MrgKoM6eHN Profi npocto nponblnecoctbe e.
f) Μετκα Σλη τβεριδχ Ḁποληνθήν πόκρβιτη
-cytaHabNbaEmoB BCTaBkoC oetnHO:Длlaцаушо,ноэфкгтньочNTknTbepdbx HapOnbHbIX NOKpbTIN (kaΦeIbHaŋnnTKa,napket nДр).
-6e3BCTaBKnCo 贝TINHOI:
IydaJeHn3aepra3HeHn BMeCTax CTbIKOB IN ⅢeJAX
Bctabka co 9eTINHO CHNMAETCnyTeM HaxkTN o6oNX KpePNeHn B HappaBneHn cTpeKn
Pnc. 14
BoBpemKoPOTKHXnepepbIOB BnpoUeCCSe y6OpKN nCOnb3yTe npKOBky Tpy6Kn Ha 3aJHNe cTOpOHe npN6bopa.
- ПосLE Вьклюуняпьilecoа BставTe Кюкн Исаддд УстКи пona/КOBpaВ napKOBky trpy6kn.
Pnc. 15
Pn y6opke neCTHnCbl nbinecoc Bcerda donjKe haxoINTcbc BHN3y, y hauana neCTHnCbl. Ecnn 3tOrO HeNoctaToHNO, To nbinecoc MoXHO nepeHoCnTb 3a pyuKy.
Pocne y60pk
Pnc. 16
- BbIKnIOuHTe nbIeCoc.
- BbInbTe BnKny n3 po3eTKn.
Cnerka notaHnTe 3a ceteBOI Ka6eBn I OTnyCTHeero.(Ka6eBn ABTOMaTHueCKN CMOTaETcR).
Pnc.17
HajatneHa KhoNky-nOJ3yHOK B HnapBLeHH, yka3aHNOM cTePknOi, pa3bNoKnpYte Tpy6kY n CNOxKte ee.
Pnc. 18
Дяхашийпьлесocamожнонспob30ватnapkoBOUHbIeФнкcatOpbl,pacnoLOXKeHHbIeCHN3y.
a)ПоднMuTe nbIeNcOЗа pyuKy.
a) BCTaBbTe KpHouKn HacaAkn Dna YncTk nnona/KOBpaB npakOBoUhIe nKcAtOpbl.
Onopoxhenke kontehepa dny c6opa nbinn
Pnc. 19
Длд дoc'tнженяХОршиpe3yIbTaTObJENaTeIbHo onopOxHrTB KOTHeHepДЯсбОпьИпСоакdoубКВЛIOBcMcyuae HeNo3ke, yemKoTdApbIbIINrP3bCTaHytBnDbHaФиlbtpUошeCetKe,IInIyUpoBeHbIbNBAkaKOMn6OmteKOTHEHepDAocTnHETMapKnIpOBKn. OnopOxHryKOTeHepДЯсбОпьИпсERd npObePnyTeCTeHEnB3aRp3ZhenHefiNbTpUошe cETknInpnHeO6XODMOnctOuOuMaJIteeEcoFnacHO nHCTpyKUnn«OChstKaΦinlbtpUошe cETkn》.Pnc.28
Pmc.20
a) OTkpoIe KpbIwKy nbIeNcoCa,NotAHyB 3aueNky.
b) BbHbTe KOHTeHep dIa c6opa nbIIN n3 nbIeCoc a 3a pyky.
Pmc.21
a)Pa36nokpyneФиьТрованьньбнok kOnTeHepaДЯСБОапьИ,нжавН KaHONky fHKcaUIN.
b) BbHbTe 6nok n3 KOHTeHepa dIy c6opapblnn nnOpOxHNTE KOHTeHep.
Pnc. 22
a) YctahOBHTeФnIbTPOBaIbHbIb6NOK B KOHeIeHep, pIh 3OM O6B3ATEbHO CneIHTe 3a npaBnIbHOCTbO yCTaHOBKn. CtpeKHa Ha KpbIshKe FnIbTpaDOnJXHa Noka3bIBaTb H anPaBLeHHN 3aueJKN.
b) Haxmnte Ha KpbIuKy KoHTeHepa Do e e fHKcaunco 0eJUcOM.
c) Pn yctaHOBKe KOHTeHepaIg c6opa nblnn B nbIeCoc CneIte 3a npaBnIbHOCTbIO erO nonoKHeN.3aKpOte KpbIshky PbIeNecocdo cpaBaTbBAHHa 3aueJKN.
BhimaHne
B Cnyae Bo3nKHOBeHn conpoTbneHn npn 3aKpbIbAHn KpbIxKn IpoBepbTe KOMnKeTHOCTb ΦInbTpoB n IpaBnblHOCTb nOnoKeHn ΦInbTpoB n KOHTeHepa dIg c6bpa bII.
06cnyxHBaHne qnbltpob
OuHCTKa lamEnbHoro qHbTp
Ввашем nbilecoce npedymotpehaФункци «Sensor Control».Pnc.23+ +Pnc.25
3TaФyHKUHNoNocToaHNO npOBepReT,IOCTnRaTeCnI INOTHMaNbHbYpOBeHbMoUHOCTn PbIeCoca.Pn CHJKeHHuYPOBnMoUHOCTnCBETOBOn HnDnKaTOp Yka3bBaetHa Heo6XoHmOcTb OunchKn lamEnbHorO φnhbtpa.
A KaTbI eDeH conJocbl BBZ123HD
Teric eenepdi wancopy yuhi (napket, nntka, teppakota,...)
B KaTbI eDe connocb BBZ124HD
2 aHanaTbIH KbIbIKbIK
dHreKeNHe
KbIMke KaTbI eEHepdi KUTy XHe
depei nactapblx kakcbipak any yuin.
Bipinpi naJaIaNHydAn aIbIn
Cyper 1
KontyTKaHb copy wnaHbHa caBn 6ekitih3.
Xymbictb6actay
Cyper 2
a) Copy wlaanrblbH kENTe Ky6bpnapbH KypbIbnBbHbH copy teciriine canbin 6ekitih3.
b) Copy wnaHbH any ywiH eki 6eKtiW iImeKTI KbcBn Wnahrtbl WbIrapbHb3.
Cyper 3
a) KONTyTkaHb copy/teNeckoTbIK Ky6bipda kblnxkbTbHb3. BaimaHbctb 6ocat yuiH konTyKaHb a3 6bpIn ky6bpaad TaPbIn anBbHb3.
b) KONTyTkAbH tipeNreHue TeneKoNTbIK Ky6bIpa KByIkbTbH3. BaiNaHbCTb Akybpat yuH 6ocatY TymMeuirHe 6acBn KONTyKaHb I bIyFarbpH3.
Cypet 4
a) CopbIy/TeNecOKNbKy6bIpyeH eEN conNOcbHbHIn KeTc Ky6bIpyHa caIbHb3. BaIIaNbIcIbI bOcaty yIiH Ky6bIpya 36ypbn eEN eONcNOcbHHaTapTbn aIbHb3.
b) Teneckontbik Ky6bipdbTipetyuin eén connlocbhIn KENTeKy6bipHa cainbH3.BaɪnaHbctbI aXbipaty 6oCaty tymeiwirie 6acbin Teeneckontbik Ky6bipdb WbIrapbH3.
Cyper 5
KbIbIbIMabI TyIeMeIeH TeNECKOnTbIK Ky6bp KepcetKici 6aftbIbHa XblNbItBn 6ocatbn KepeKti Y3bIHbTkI peTeH3. KInemDi XblNbTy KapcbIbFb TneECKOnTbIK Ky6bp TonbIK bIfapblFaHa de H KiWi 6oJIaDb.
Cyper 6
a) Kepek-kaapakTap TacyubicbH KepeKti opbHaTeJeckonTbIK Ky6bIpFa caIbHb3.
b) KanTaybIi ConNoHbI bICbHJxHE OiBk ConNocBImeH XoRapbIaHn HeMece TEmehHe a3acbIn KepeK-XapaKTAPtacyuBcHbIaCaJIbHb3.
Cyper 7
Xenire kocy ka6eni h aibpihan yctan kepekti Y3bHdbKka shfapbnxeni aibpih canbHb3.
Cyper 8
- WaHcOpfblWtbl Kocy/ewipy nephecin 6acbIn KocbHb3 Hemece ewiiphi3.
Cyper 9*
Pettey Tymecin 6ypan Kepekti copy KywiH 6ackbiucb3 pettey MymkiH.
MHH -Iepdenepe MeH ce3imTal 6yMbIdapda copy yuhi

-JKymcaKxHa3dapdbJxHe JkactbTkapdbI shancopy yuiH

- Ceimtan Kinemepdi Xahe WaBbH NaCTapDb KyH caBbH Ta3anay ywiH

- KaTbI eEN KAnTaMaNapbIH Ta3anay yuH
max - KaTbI eHeJepdi JxH eKaTbI NaCTaHFaH KInemepdi xHe KInemdk eHeJepdi copbn any yuih
"ComfortSensor" 6ap wahcnpfbii
Cyper 10\*
Pettey tyimecin 6yan Kepekti copy Kywiin backbiucb3 pettey MymkiH.

-Жумсakхиha3dapdbxэHe JkactbKTapdbI shaHcOpy yuHIN

-CezimTan KInemepdi Xhe WaBbH NaCTapdb Kyh caBbH Taazanay yuH

-KaTbIeDenKantamanapbH Ta3anay yuH
Comfort - 6apnbik eedeep yuih npamaetp. Bapnbik eede Typnepin wahcopyda OHai Kblkbyu yuiH.
max -KattbI eDeHepdi JxHe KaTbI nactHaHn KInemdepJxHe KInemdke DeHepdi copbn any yuin
"autoControl" 6ap wahcopfbii
Cyper 11*
Pettey Tymecin 6yan Kepekti copy Kywiin 6ackbiucb3 pettey MymkiH.
MnH -Pepdenepe MeN ce3iMTan 6yibmapda copy ywiH

-JKymcaKxHa3dapdbJxHe JkactbTkapdbI shancopy yuiH

- Ceimtan kInemepdiXahe wafbH nactapdb Kyh caibH ta3anay ywiH

- KaTbI eHeN KantTaMaNaPabH Ta3anay yuH
max - KaTbI eHeiDepeJxOHe KaTbI NaCTaHFaH kInemdepi JxHe KInemdk eHeHepdi copbn any yuih
Copy
Ha3apbIbI3da6oIcbIh
EeH connonapbl KaTb eHHeH3 canacbHa 6aBnA hCTbl (MbIcAnb, bXbIp, Depeki nnTkAnap) 6benrI npexede To3aBl. Con yuH connohbn H eterih xyEni Ktpde TeKcepy Kepe. T03bIfan, oTKip KbpNl conNo eri napKeT hemee nHoneym cnaRtbl ce3imTan KaTb EeHdi 3akBIMday MyMKIn. OHdpuyi To3bIfan eH connOcb apKbIb MyMKIn 3nHap du YwIH kayankep emec.
Cyper 12
AbyicnabIeH connonapb peTey:
■ Kinendep men Kinenmik kantamap =>

KaTbIeEN/napKeT

Erep yken 6enwekeptdi copcahbl3,Onda onapdbi 6ip bihen co hxe abaian copbhl3, aHtnece ehen connocbnh copy apacb6 bitenin kana1bl.
Kepek 6oIcna, na 6eIeKTePIn JxakcbpaK copy yuH cnloHb KeTepy Kepek 6oIaBl.
KocbIMwa Kepek-KapaTapMeH copy
Cyper 13*
COnnolapnbkepek60nca kcybipbna Hemece KONITKAFa cAnbH3:
a) Wettep men 6ypbuTapdbi wancopy ywih wettik conno, T.6.
b) KanTaybiw conlncbi KanTaybiWtBiK XnHa3dapbl, nepdenepi T.6.waHcopy yuiH.
c) Kan'taybiiu conlncbi opnatblnrah bckbnneH Tepe3e paMaIapBIn, WkaΦtapBb, npoФиIbdepi, t.6. wAHCopy yuiH.
TaindaanahFaHnAH coH oBik cOnnoCbIH XaHe KaTaybIH cOnlOcBH KepeK-kaPakTab TacybIbHa KaT aCaNbHbI3.
e) PpOoHnKanTaybI conNoocbl
Пюд КANTаыш CONNOCbI H KONTYTKaMEn WahCOpbI T3a3anAbH3.
f) KaTbI eEh CONJIOcbI
- KbiCTbpiJfAH biCKblnEH: KaTbIeH eKanTamalapbH (nnNTka, npkapT t.6.) TmIdi xHeXyMcak Ta3aay yUHH
-biCKblUcbl3:
TecikTepeMehOnbIKTapdaFbIacTa3aJayy
- blcbiutbki biCbipMaHbI KepcTeKi 6aftbHa 6acbin 7euyre 6oJaBbl
Cyper 14
KbIcKa copy y3iNICTepiHne TKaTMyemerH KypbIJfbl KaHbIHda naDnAHaMyMmKiH.
KypbIbIbHbI eipireHHe coH eHe CONNocbIHdafbI inReKTi TOKTaTy KEmeriHe XblXbITbHb3.
Cyper 15
CatbInapa Hsncopyda KpyblfBhlbCatbInap 6acBHa opHAnCTbpy Kepe. Eere 6yJxKeTeepiK 6oMmaca, KpyblfBt TTKAcbHnH cTan tacy MymKiH.
KymbICTaKeiH
Cyper 16
KypblfblHbIeWipiHi3.
- AshaHbI po3eTkadH sbIfapbHbI3.
Keni Kocy ka6eJIiHEn KbIcKa tapbI IN xi6epiH3. (Ka6eJIb abTomAtbI xINHaJaIb).
Cyper 17
KbIJIbMbMaTb TYMeUeHITeneCKONTbIK Ky6bip KepcTeKici 6aftbIHDA KbIJIbKbIbIN 6ocatBn 6ip 6ipH KbIJIbKbITbHb3.
Cyper 18
KyPbJfBHBIO KOO YIHH Kypblnft TeMHRI XaFbHbH anBIO KOO KEMERIH NaiDaIIAHbHb3.
a) KypbInfblHbI TytKaDaH yCTan TypanaHbI3.
b) Edeh connocbHdafti inrekti KOHO Kemerine XblnXblTbIHbI3.
UaH KOHTeHepiH 6ocaty
Cyper 19
KakcbcI copy hataNkeciHe xety yuiH wan bldbcih ap
wauCOpDyAH COH 6Ocaty Kepeh, eH KekimH, wan Hemece
nac wan TOpacbHnda KePiHtH pette XHNaCA Hemece
wah bldbcihbuiH iwiHeri beNriciHe xetKeHe.
Wan bIbIcH 6ocaTyda epaIbIM TaIbIK TOpIaCbIHbI NaTaTHy aPeRexCII 6akblNaHb3 da,KepeK 6OnFaHda Obl "TaNbIK TopaCbIH Ta3anay" HcykaynblbHaJda Xa3blfraHdai Ta3anaHb3.Cypet 28
Cyper 20
KybpIbI KaKNaFbIH 6yFaTTay KOybHdbcIH TaPTbIN auBbH3i.
b) ⅢaH bIbIcIH TTKa KEMeIMeH KypblfbldaH WbIfapblHbI3.
Cyper 21
a) ⅦaH KontoHeRepHH cy3riney 6nOrbH 6ocaty nepHecin 6ocatbH 6ocatbHb3.
b)Cy3rinyeBnBihwahblbcihhaHwBfapbnwah bDcBnH60CaTbHbI3.
Cyper 22
a) Cy3riny 6norbin wan bibciba cabn dpybc opHaTbJnfaHbHa hasap aydapbHbI3.Cy3i KanaarbHdaBk KepceTkbiyfartay KoBHdbcbl 6baTbHnaKepcetyi Tnic.
b)blbcikaknaftbHa on ectin xabilfahwa 6acbHb3.
c)Jha bIbIcbH KypIbnfba KaIa canyda yPbIc TpybHa Ke3 JeKti3i3i. KypIbnfKaKnaFbH 6yFaTTay KOJIbHbCbI KaIa TipeTneHwe Xa6bHbI3.
Ha3apbIbI3da60IcbIH
ErepKaNKaTbXa6ydaKapbIbIKce3iNETIH60nca, cy3rTObnkTbIfBnJHxHe CY3rMeHsaHbIcbIypcI TpybHaKc3XeKTi3HlI.
Cy3rihi kyty
KatnapbCy3riHa3anay
KpybIfblHb3 "Sensor Control" (e3iN 6aKbIay)
ФнКИЯСБIMEN Xa6dblkTaNFaH. Cypet 23 + cyper 251
OcbyfynKcHJwAHCOPBbI ONTImaNdJI Kyat dApexeCHe KTeKHeH 6aBbIaNdJI. WAmbIK KePcETKiOn TImaNdJI KAt dApexeCKe KaTtKaTeY wHIn KATnpbl cy3rHi Taaanay KepeKTirH 6inDipei.
UaHcopfblw"RotationClean"Функцясьимe
Cypet 23\*
KypblfblontnmaIblyKaatdpexecinheJeymbcicteReHde KepceTkiu KeK TycTe KaHaJbA. KepceTkiu Kb1bIy TcYte KaHaJda Ktnapbl cyiriH taanay Keyp. Kypblfbl ABOMATbIb PeTe H TeMehK Kyat bksbHa hOpanadbl.
Cyper 24\*
- KatnapbI cy3iriTa3aay yuH KpybIfbHbI oWiipiH3.
Ha3ap aydpabHb3: Cy3riH teK KaHa KpypbInrbl
euiipinreDefa Hya MymKIn 6oaNbI.
Kyblnblf KaKaNaFbHh 6yFaTTay KoBHyDlcBtH TAPbT bauHbI3.
KatnapbCy3rHi Ta3anay yuH tyTKaHb KEMiHne 3 pet 180^ 6ypaHb3.
Erep kpcetkiu xah6aca, cy3iri copy kyatbl
TEmenlenreHe de Taanayra 6oBanbl. B3 katnapbl cy3riH
wah bldbcihn ep 6ocatya dn anbIn Taanaybl ycbHaMbI3.
Bipak bykemim "Sensor Control" (cehcpdbsackapy)
Kepcetkiu xaHbInanbInOpbHanybl kaxet.
Erep KepcetKiu KaTnpabI cy3ra TaanaFahHAn coH da 3 pet XbInblbTKaca, 6YbHn Ce6e61 TaIIbK TopaBcI NaCTaHaBHn Hemece 6itEin Kanybl 6inDipei. Byn XaJaDa N KpbIbFlb ABOMaTTb PETTE h TEmeh BACkBiWtB peTTen KepcetKiu Kb3bl NTcyTe KaHaDbI.
KpybIbIbIh bIeipin an h bIbIcH 6ocatbn TaanbIK Topacabih "TaalbIK Topacabih Taanay" HcyCKaYbIFbIHDA cnnATnTafHAnaTa3aHaBb3.Cypet 23
ShaHcopfbIi "SelfClean" (e3iH Ta3aJalay) yHKnucrbcImeh
Cyper 25*
Kypblfbl ontmambl kyat dapexeicihjxMycb ic terehnde Kepcetki kIe KKT yteaHaabdi. Kepcetkii Kbbln Tcyte KaHFaHaDa kpyblfbl abtOMaTbI pETte eWedi.
Cy3rHi Ta3aIay Kocblb Kipictipireh Ta3aay MoHITopbl apKblOpblHaJaIabl.
Erep KpybIbI KbiCKa apanblkTapda yu pet e3iH Ta3anaca, 6yHbIe6be61 TanaBikTopuaCbI Ta3anaHbAraHbIHa nHeMece 6itinen KanFaHaJa xataDb. Byn XaFdaJa KpybIbI bATOMaTbI peTte EHTemE BackbIbI petten KepcetkiK bKbIbI TLYCTe XaHaDb.
KpybIbIbIh bIeipin an h bIbIcH 6ocatbn TaanbIK Topacabih "TaalbIK Topacabih Taanay" HcyCKaYbIFbIHDA cnnATnTafHAnaTa3aHaBb3.Cypet 23
Cyper 26*
Kepek 6oNa, "Clean" (ta3aIay) cy3ri ta3aIay TuMmeuHIN 6acBn ta3aIay aEciH KpyBnBkocyBb KoRHaDa konMeH 6actya 6oAbl.
ErepKepeTkiJxHa6aCae3H1 copy KAtbI
TeMeHdEnrReHde da Taanayra 6oBanJa. BiaKtnapBb cyarHi
Sha bDlbCbInep 6ocatyadn andbin Taaanaydb yCbHAmb3.
Katnapnb cy3rihi kary
Cyper 27
TbIMKaTbI NaCTaHraH XaFdaIa KaTnapbl cy3rHi Karyra 60ana#.
Cy3riHi KOkblc KOFapbIcbHda KafbIbH3.
Jac cy3riEHN TEmHeT yCeI.
Tanwibk Topwacbih Ta3anay
UHaHcOpfB1u ONtImaIbI icTeYi yJiH TaIbIK TOpIaBih KjyHenik pete Ta3anay Tnic.
Cyper 28
KypbIfbl KaKnaftbH aWbIn WaH bIdbcH KypbIfblDaH WbIfapblHb13. Cypet 20
a) Cy3riny6IorbIHwaH bIDbcIHHaH WbIFapbIHbI3.
bKaIbInTbJxagdAiaTolBikCy3iriney6nOfBihuaH bIbCbH 6ocatKan Ke3e a3 cenKInJeY HeMece KaBIn bNac6bnewkeTeipn AxkbpaTu760baJa.
Erej xetepnik 6oImaca, nac 6eIuueKtepiH tanbIK TopaHaHn AkyiH KyprA Kw6epeKti NaandaHbHb3.
Ta3aay HycKaynapbI
UHaHcOpfblWtB eP Ta3aJafAHHH coH, OHbI eWipin Xeni aIbIbH TaTbIn KOHO KepeK. UHaHcOpfblu neH nlaactIK KEPE-KapaTapdCTaHdapTTb NnactMacca Ta3apTkblbIMeH KYTy MymkiH.
Ha3apbIbI3da60IcbH:
bIckanauhybiw 3aTTeKTePdi, bIbHbHEmece AM6eGan TaapTkbiWtbi naDanaHbHb3. WaHcOpfBiWtBi ewKaauh cyra 6abtpMaHb3.
Bi3eTexnkaIbIK e3repictep eHri3y Kkblfbl6ap.
bg
PaIbAmE ce, ue n36paXTe npaxocMykaUka Ha Bosch ot cepnra TS0.
Byka3aHn 3a yonTp6a Ca npedctabEHn pa3nnuHm Moen GS70. 3atob e Bb3MOxHO He BCNUKOnscaHH xapaKTePncTHKn yfHKun Da ce OTHacr3a BaHnMoen. Tp6BaDa n3non3BaTe camOpnHaHn npnaJdneXHoCTn Ha Bosch, kOTo ca pa3pa6oTeHn CneuaHnO 3a BaWata npaxOCMykauKa, 3a Da Ce NoCTnHRe Bb3MOxHO hA-do6prr pe3yntat Ot pa6oTata C heN.
MOny yka3aHnHaTa 3a non3BaHe da 6bDat cBxpanHbAHn. Pnpi npedabaHe Ha npaxocMykaKata Ha TpeTn Iina MoN pedeAte N yka3aHnHa Ta a non3BaHe.
Mon oTbPheTe cTpaHnUte c pncyHKn!
OnncanHeHaypeda
1 npVeBknIouBaUaCe nOIOBa IIO3a C BpB3ka 3a npHnAdNeKHOCTN
2 TeneckoHnHa Tpb6a Cnnb3rau Ce eneMeHT N Bpb3ka 3a npHaadJeKHOCTN
3 Dbpxka 3a npnaIeJXHOCT
4 cmykaTeenH Mapkyu
5 pbKoXBaTka
6 BeHeu OT YeTuHa (3a NoCTaBHe Ha DIO3a 3a TaIIuIePnI*
7 nOMoUHa yAcT 3a NoCTaBraHHe Ha ypeHa Ha eHa CTpaHa
8 ka6eI 3a MpeXOBO 3axpaHbaHe
9 KOHTeHep 3a npax
10 duo3a 3a tannueper
11 JIO3a 3aФугn
12 6yToH 3a noUncTBaHe Ha qInTbpa „Clean“*
13 INDnKaun 3a HNBOTo Ha MOHOCT
14 6byToH 3a BkN./n3Kn. c eneKeTpoHe n peryNaTOp Ha cnnaTaHa n3cMyKBaHe
15 KaanKa Ha ypea
16 pbkoxBaTka 3a HocHe
17 cnonarateHNO yctpoiCTBO 3a OCTabYHe Ha donHaTa CTpaHa Ha ypeDa
18 nlaactnHuaT qntBp
19 mpekect fntbp
20 npoechoHaHaIto3a Taannepn
21 npoechoHaHa 1o3a 3a yrN
22 IIO3a 3a TBbpN IOOBH HAcTHILKN
-cbc3aKpeHenHaKpaHnHK:
UHcEHHa KOHTeHepa dna nnly
Man. 19
Uo6 OtpnMaTH XopoOnH pe3yNbTaT, 6axaHO cnoopoxHHoBATN KOthEnep NiCJ KOKHOrO np6npaHH, B 6yDb-koMcy BnuAdky - He ni3iHe, HIX KOHN DocarHe MapkyBaHH Ha CTiHcI KOHTeHepa a60 rpy6e CmTTB BuDnMo ocJe Ha pfInbTyBaBnHi ciTu DnBONKOH.
CnpoJHIOOHN KOHTeHep dIa Nnly,3aBXKn nepeBipIe TcynIb 3a6pUdHeHH fInbTpYBaIbHOi citKn dIBOLOKOH i 3a notpe6n Ounchitb II BIDNOBIIdHO do pOziny "OuNueHH fInbTpYBaIbHOi citKn"Man.28
Man. 20
a) BiKpnIte KpnIkwKy npnIaIy, notarHbwn 3a pyky-3acBy.
b) BHTaHrHtB 3 npnnaIy KOHTeHep dIy nIpy 3a donomorOIO pyKN.
Man. 21
a)Poz3nokyTeΦinbTp-cntcEmyKoTHeHepaInnny,HaTnchNyBwn Ha nepaJb po3nokyBaHHa.
b) BnIMtB fInIbTp-ChtEChy 3 KOthTeHepa IJIr PnIy Ta cIpOoKHTb KOthTeHep.
Man. 22
a) BctabTe 0inbTp-cnCTeMy B KOHTeHep dny nny, pni cOmyOBoRAKBO npocTeXte 3a II npabInbHMpo3aTuBaHHm. CptiKa Ha KpnuCi npnaJaMa Bk3ayBAty h AnpRmky pyKn-3acBya.
b)HaTnCHiTB Ha KpMkY KOHTeHepa Do cyTHoro 3Byky fikcaii.
c) BCTabnnoH KOnTeHepIy Nnny BnnnocctexTe 3a npabnbHCTIO po3aWbAHN KOnTeHepa.3akpHne KpUkny pnpnaJy do φikcaui pyuKn-3acyba.
ybara
Pid uac 3akpTTT KPNsKn Tpe6a DotpmyBaTHC BIDCTahi; PNOcIMNo nepeBipNTn, nH He 3aONOBHBcA fInbTp, Ta 3BepNtyn yBary H naPabnIbHe po3aUyBaHNH aInbTpna konTeHepa dnnny.
Dorna3a pinbtpom
OuunenHn lamenaPHO fInbtpa Baw nnooc o6naHaHn yHKnieo "Sensor Control".Man.23+Man.25
Dana fyuHKui noCTiHo BIDcTeJxU, uN DoCgRHyB nHIOOC oNTHMaIbHO rPiBn OTyXHocTI. IHNKaTOP cHrAn3ye, uN oTpi6HO OoHCTnI NaMeIepHH qInbTp, uO6 3HOBy DOcHryTH oNTMaJIbHO rPiBn notyXHocTi.
Bnctykyte pifnbtp had biipom dna CMITTA. CMITBA Bnnpa3e 3pifbtpy Bn3.
OuunenHn ciKy pInbTa
ДянHopmaьhoipo6oTNnnoocacitkyfInbTa notpi6hOperynapHOnuNCTHTN.
Man. 28
BivkpiTe Kpuu npnnaTy Ta BntaHItb i3 Hboro KOHTeHep nnny. Man. 20
a) BnMItb fiNbTp-cntEmy 3 KOHTeHepa nny.
b)3a3Bnua,uoBnDaIHTN uactOuKn 6pydy, OoctaTHbO,CnOpoxHIOUy KOnTeHep dIy nIy, nereHbKO notpucHTN a6o NoctykAtn NO Kopnyc cyIbtpy. Raio zuoro HeoCTaTHbO, uactOuKn 6pydy 3 ciTKn fIbtpy MoKHa BnDaIHTN 3a DonOMOrO cYxoro puShnka.
Iopadn 3 uHsEHHa
Ipeep NoatkOM YHsEHHN HnlocoCA 06OB'3KOBO BmKHTb NOro Ta BiD'eHNaTeB Ie ENeKtpomepexi. Hnlooc Tn pNaCTKnOBE npHaJDA MoKHa MNTBcHuaHmMmHmM 3ac6aMn DnI pAnactMaCn.
Ybara:he BnKOpNcOByHe a6pa3aNHb3ac06H, MmHi 3aco6nI dKnA oAb yHBePcAbnH MmHi 3aco6n.3a6oPoHEo 3AnyIOBAtn NnOoc y Body!
TexhiXapaKtepncTKMOkyb3miHOBaTnc8e3 nonepeJxehn.
az
Biz sizin GS70 modelinden olan Bosch tozsivuranina qarar verdiyiniz uçün sadiq.
Berk sethler / Parket =>

-oofoyfoyfofofofofofofofofofofofofofofofofofofofofofofofofofofofofofofofofofofofofofofofofofofofofofofofo
Comfort- 3600 3600 5000 0000 0000 0000 0000 0000 0000 0000 0000 0000 0000 0000 0000 0000 0000 0000 0000
a2jlu ayo0o o0o3o0u oos dmoo6o0o 00805d0g0b0g0000000000000000000000
0306uU60,autoControl"oo
Ugno 110gym30u oddmgo36n u gogmo6o
8y5300gymo6nou mny6gon 9uudmo
O36n030006yogmo6n an gymol dms.
05 -g63xjogduo o8g6dmoovg 62mgou couodg6huiuyg
30xolososdmoqgobol 0oouo30nusuog
- 00000000000000000000000000000000000000000000000000000000
-08s3oUdy6mo6bJum3o6mohdou 10000030u
30m - 4y6no 8o3o1u o doomogoo 0o0o5o0gmo
bmoohgoa uo 6doomno 0o3o0duo030u
m30
y
030n 0000000000000000000000000000000000000000000000000000000000000000000000000000000000000000000000000000
Ummoo 12
yy60008gmyo68oo0030u 5
bogohgonoo bogohossoo083gno
y_0 > 0( 0 > 0,3 > 0)


a a00b3038o, amoo 600o 800m0000 conon
Bmou 600m0000 o00m30, yomoo
o00s0000
Oo00m0000 o00m30
Oo00m0000 ooymo 600m0000 oomoo
Oo00m0000 ouymo 600m0000 ooymo
Oo00m0000 ouymo 600m30
Oo00m0000 oaoob3038o 600o 60
Oo0o moo, osos 6oogdyol 6oogdyol
yoo
0jym30000000000000
UgSoo 13
UwOg6oOn Oo30do UoJGmgoBou OoBjoo3oOn OooOoogom
OgOgM3 Doom@o5 UoBOMy6o:
a) ygogolu uoyg06o ggyogol, yogobogolus o.o. 8gogolooogol.
b) 000000000000000000000000000000000000000000000000000000000000000000000000
c) 00000000000000000000000000000000000000000000000000000000000000000000000000000000000000
d) 3603301uom5oynm 3701b020du U8p805oo 365u3300000 3603300000 3701b020du U8p805oo 3701b020du 3603300000 3603300000 3603300000 36033000
e) 36m33uom5umymo yomoo you uoyd500
6000o s3x0ou, gssgdoos o ub3. ayuyfo os
6000d3moso fo ydgwoosogol.
36m33uom5umymo yomoo you uoyd500
6000o yod6mmu oubmoo ooaaa336uoyd500
f) ySgNo 803uUs8g600
-0000000000000000000000000000000000000000000000000000000000000000000000000
oou ou 30 8uudgogmo m630 uuaafo 0ou ou aodaoyogoo oo yogjo dssosgdo
Uymo 14
8660oalu 3m3cm 3s660oal 09mol 828odmo 3630moal 0830mo 0dmoy5mo 3630mol y365
8660u 5u0o 3630oal 0830mo.
03uougadmog3ouagooosy3ouuugj6oogol u3oogho huyogon 3mogdoa3gmo
Uu#n 15
20800ou 20806oou 33o0o 500
20800ou 3300o. 00GU uu3oouo 600
3300oU 600
uuu600
00003000uunyoo0000
Uymo 16
Gosogmou Gommo.
Gosmuoo Jgmou Oo30n.
Oo5o osufoo ooo gocmoa 8oogmo 300
ooogmo bmo. (300mo
Ugmo 17
8dml030 m0s010 ul60u 0ds0m000
8dm030a2bug0o0000000
Ugmo 13
03660u aamoo3oloo3ol 08odmoos 0dmooy6mo
03660u 3000 0560u 6luo ymo 0aamoo30u
0330mo.
a) 33660000y60m0m686j5d3mol m6g606mol w60m7696.
b) 0530u u6g50u 3930 880u00000 gmaou Luy605g.
O30nUuMgOu OmMou
Uuunnnn 19
aouuuuouu, mma aouu uuuuauu uuaouu ouu6joo
s6000 aouuumnu, uuuuusmss 360060
s3600u uuuuuy6oou u8oogg gaaumnu; 360060
6000cuuumnu u8o83o5u u8o6, mccgu
3600a5cdo7dugbgaos dugglu 5600
omuuuue 56 mcuugg u8300u 560060
gudduoau uauo3o6oau umguo2
wauuuaa uuuuua uuuuuuuuuuuuuuuuuuuuuuuuuuuuuuuuuuuuuuuuuuuuuuuuuuuuuuuuuuuuuuuuuuuuuuuuuuuuuuuuuuuuuuuuuuuuuuuuuuuuuuuuuuuuuuuuuuuuuuuuuuuuuuuuuuuuuuuuuuuuuuuuuuuuuuuuuuuuuuuuuuuuuuuuuuuuuuuuuuuuuuuuuuuUU
mnuuunufuuaan

1
1 Waeepuunulululunununununununununununun
2 nannnnnnaeennnnnneaaee
3
4
5
B
7
B
g
10
11
12 "Clean"
13 1
14 1
15 du
16
17 2
18 甲
19 甲
20 W
21
22
uuaaiaaaanauaun
A Wnauwun BBZ123HD

nnnnnnnnnnnnnnnnnnnnnnnnnnnnnnnnnnnnnnnnnnnnnnnnnnnnnnnnnnnnnnnnnnnnnnnnnnnnnnnnnnnnnnnnnnnnnnnnnnnnnnnnnnnnnnnnn
B WnWnWnBBZ124HD

wannnnnnaa 2 n
nannnnnnnnnnnn
1
-
y
2
a)
b)
3
a) nuaaunauuau u waeaaan aannnnaa an aannnnnnaa
b) nuaaunauanrnnn rannnnn nnnaaannn aannn
4
a) iianuunuaanuuaanuau uannnnaanrnnnnaa anu annnnnnae
b) nianuuaudnauanwnguaanrwaanwnnaaonnnaaonnnnnaaon
5
-
6
a) 1n rnae aenrnnnne nnnnne nnnnne
b) 1
7
-
8
ON/OFF
y 9
y
-

mnnnne nnnnne nnnnne nnnnne nnnnne
unuuaaauaaeuaaennnnaaunueauu
图
mnnnnn
ComfortSensor
10+ 1
nnnnnnnnnnnnnnnnnnnnnnnnnnnnnnnnnnnnnnnnnnnnnnnnnnnnnnnnnnnnnnnnnnnnnnnnnnnnnnnnnnnnnnnnnnnnnnnnnnnnn

Tnnnnnnnnnnnnnnnnnnnnnnnnnnnnnnnnnnnnnnnnnnnnnnnnnnnnnnnnnnnnnnnnnnnnnnnnnnnnnnnnnnn

mnnnnnne nnnnnnnnnnnnnnnnnnnnnnnnnnnnnnnnnnnnnnnnnnnnnnnnnnnnnnnnnnnnnnnnnnnnnnnnnnnnnnnnnnnnnnnnnnnnnnnnnnnnnnn
autoControl
11
wuuuun uun uun uun uun uun
-

nunnnnnnnnnnnnnnnnnnnnnnnnnnnnnnnnnnnnnnnnnnnnnnnnnnnnnnnnnnnnnnnnnnnnnnnnnnnnnnnnnnnnnnnnnnnnnnn

mnnnnnne nnnnnnnnnnnnnnnnnnnnnnnnnnnnnnnnnnnnnnnnnnnnnnnnnnnnnnnnnnnnnnnnnnnnnnnnnnnnnnnnnnnnnnnnnnnnnnnnnnnnnnnnnnnnn

aunnnnnaeannnnnne
auto -
mua
- wu 100000000000000000000000000000000000000000000000000000000000000000
12
n
MNTTNTNNTNTNTNTNTNTNTNTNTNTNTNTNTNTNTNTNTNTNTNTNTNTNTNTNTNTNTNTNTNTNTNTNTNTNTNTNTNTNTNTNTNTNTNTNTNTNTNTNTNTNTNTNTNTNTNTNTNTNTNTNTNTNTNTNTNTNTNTNTNTNTNTNTNTNTNTNT
nuiy/1iin=>


Tunrnnn nn nnnn nnnnnnnnnnnnnnnnnnnnnnnnnnnnnnnnnnnnnnnnnnnnnnnnnnnnnnnnnnnnnnnnnnnnnnnnnnnnnnnnnnnnnnnnnnnnnnnnnnnnnnnnnnnnnnnnnnnnnnnnnnnnnnnnnn
nunu u aumnuau u u aulnulnnu u
muaaunuauanrnnnnae
13
i
a)
b) wunwunwnwnnnnnaa nannn nnwnnnnnaanennn nnannnnnnnnnnnnnnnnnnnnnnnnnnnnnnnnnnnnnnnnnnnnnnnnnnnnnnnnnnnnnnnnnnnnnnnnnnnnnnnnnnnnnnnnnnnnnnnnnnnnnnnnnnnnnnnnnnnnnnnnnn
c) wuuaaunauan uanunauan uanunauan uanunauan uanunauan uanunauan uanunauan uanunauan uanunauan uanunauan uanunauan uanunauan uanunauan uanunauan uanunauan uanunauan uanunauan uanunauan uanunauan uanunauan uanunauan u
d) wuuaowwuwuauwuuwauw uwwuwwuwuwuwuwuwuwuwuwuwuwuwuwuwuwuwuwuwuwuwuwuwuwuwuwuwuwuwuwuwuwuwuwuwuwuwuwuwuwuwuwuwuwuwuwuwuwuwuwuwuwuwuwuwuwuwuwuwuwuwuwuwuwuwuwuwuwuwuwuwuwuwuwuwuwuwuwuwuwuwuwuwuwuwuwuwuwuwwu
e) wuueauwuuwuuwuuwuuwuuwuuwuuwuuwuuwuuwuuwuuwuuwuuwuuwuuwuuwuuwuuwuuwuuwuuwuuwuuwuuwuuwuuwuuwuuwuuwuuwuuwuuwuuwuuwuuwuuwuuwuuwuuwuuwuuwuuwuuwuuwuuwuuwuuwuuwuuw
f) wuduswun
-uuuunnnnnaaannnnnnaaennnnnne
aannnnnne nnnn
Aa aikally baii aia 8 baii aia jia jie J (a) aia jai iai g laa ci aia iia iia iia iia iia iia iia iia iia iia iia iia iia
3\*
aal al aal al al ayyssll aygall aai aal al (a) .aygall an ayl ayyssll aygall aai aygall aal al. ayyssll aygall aygall aai aygal (b) Jall yaaell yarayill qal bai
4
a a a a a a a a a a a a a a a a a a a a a a a a a a a a a a a a a a a a a a a a a a a a a a a a a a a a a a a a a a a a a a aaa
5
jllge biall jia ayyswill sswall yaiy p 1
aigian g ig gail gail gail gail oai i y jil
aysswll sswall nsi laie jayla jswll ge asrall
laei jiall ayaa
6
a a a a a a a a a a a a a a a a a a a a a a a a a a a a a a a a a a a a a a a a a a a a a a a a a a
aLalwJ Bosch aSjla uikge i jyis GS70 1j
Jlaljllal alu Jn Jilil 1y jilil jilil jilil jilil jilil jilil jilil jilil jilil jilil jilil jilil jilil jilil jilil jilil jilil jilil jilil jilil jilil jilil jilil jilil jilil jilil jilil jilil jilil jilil jilil jilil jilil jilil
jai jai ai kai ai 150 aai i 150 bai ai y
yall
j4g21
1
1
2
Jolaloll Jolol 3
biul 4 j 5
(1) 6 2
令 Sn = 1( 2n + 1) ( 2n + 2) ,则 an = 1( 2n + 1) ( 2n + 2) = 13 + 16 + ·s + 1n + 1
9
Lgjoll 10
3a 11
*《Clean》jilai j12
13
j 14
aillb 15
Joull 16
aikall iiall ilal lsciiill 17
jil 18
yolol 19
*jdyadall cdgddal dss 20
aalal alalal lalal g aal
BBZ123HD aalld (a)

Kundendienst - Customer Service
DE Deutschland, Germany
AE United Arab Emirates,
BSH Home Appliances FZE
Round About 13,
Plot Nr MO-0532A
Jebel Ali Free Zone - Dubai
Tel.: 04 881 4401
mailto:service.uae@bshg.com
www.bosch-home.com/ae
AL Republika e Shqiperise, Albania
ELEKTRO-SERVIS sh.p.k
Rr. Shkelqim Fusha, Selite,
Pallati "Matrix Konstruktions",
Kati 0 dhe +1
1023 Tirane
Tel.: 4 2278 130, -131
Fax: 4 2278 130
mailto:info@elektro-servis.co
EXPERT SERVIS
Rruga e Kavajes,
Kulla B Nr 223/1 Kati I
1023 Tirane
Tel.: 4 480 6061
Tel.: 42274941
Fax: 4 227 0448
Cel: +355 069 60 45555
mailto:info@expert-servis.al
BSH Home Appliances Pty. Ltd.
Gate 1, 1555 Centre Road
Clayton, Victoria 3168
Tel.: 1300 369 744*
Fax: 1300 306 818
mailto:aftersales.au@bshg.com
www.bosch-home.com.au
BA Bosna i Hercegovina, Bosnia-Herzegovina
"HIGH" d.o.o.
Gradačka 29b
71000 Sarajevo
Tel.: 061 10 09 05
Fax: 033 21 35 13
mailto:bosch_siemens_sarajevo@yahoo.com
BE Belgique, Belgie, Belgium BSH Home Appliances S.A.-N.V.
Business center FPI, floor 5,
Chemi vrah Blvd. 51B
1407 Sofia
Tel.: 0700 208 17
mailto:informacia.servis-bg@bshg.com
www.bosch-home.bg
BH Bahrain,
Khalaifat Est.
P.O.Box 5111
Manama
Tel.: 017400553
mailto:service@khalaifat.com
BY Belarus, Bénapycb
OOO“BCXБbITOBaTExHnka"
ten.: 495 737 2961
mailto:mok-kdhl@bshg.com
CH Schweiz, Suisse, Svizzera, Switzerland
BSH Hausgeräte AG
Service 0.40 / +price applet
www.bosch-home.fr
GB Great Britain
BSH Home Appliances Ltd.
Grand Union House
Old Wolverton Road
Wolverton
Milton Keynes MK12 5PT
To arrange an engineer visit, to order
spare parts and accessories or for
product advice please visit
www.bosch-home.co.uk
or call Tel.: 0344 892 8979*
- Calls are charged at the basic rate, please check with your telephone service provider for exact charges
GR Greece, Eλλας
BSH Ikiakes Siskeves A.B.E.
Central Branch Service
17 km E.O. Athinon-Lamias & Potamou 20
14564 Kifisia
Tnεφωνo: 210 4277701
Tnλεφωνo:181 82
mailto:nkf-CustomerService@bshg.com
www.bosch-home.gr
HK Hong Kong, 香港
BSH Home Appliances Limited
Unit 1 & 2, 3rd Floor.
North Block, Skyway House,
3 Sham Mong Road
Tai Kok Tsui, Kowloon
Hong Kong
Tel.: 2565 6151
Fax: 25656681
mailto:bosch.hk.service@bshg.com
www.bosch-home.cn
HR Hrvatska, Croatia
BSH kuçanski ureddaji d.o.o.
Ulica grada Vukovara 269F
10000 Zagreb
Tel.: 015520888
Fax: 01 6403 603
mailto:informacije.servis-hr@bshg.com
www.bosch-home.com/hr
www.bosch-home.com/hu
IE Republic of Ireland
BSH Home Appliances Ltd.
M50 Business Park
Ballymount Road Upper
Walkinstown
Dublin 12
To arrange an engineer visit, to order spare parts and accessories or for product advice please call
Tel.: 01450 2655*
www.bosch-home.ie
- Calls are charged at the basic rate, please check with your telephone service provider for exact charges.
IL Israel,
C/S/B/ Home Appliance Ltd.
1, Hamasger St.
North Industrial Park
Lod, 7129801
Tel.: 089777222
Fax: 089777245
mailto:csb-serv@csb-ltd.co.il
www.bosch-home.co.il
IN India, Bharat,
BSH Household Appliances Mfg. Pvt. Ltd.
Arena House, Main Bldg, 2nd Floor
Plot No. 103, Road No. 12
MIDC, Andheri East
Mumbai 400 093
Toll Free 1800 266 1880*
www.bosch-home.com/in
(exclude public holidays)
IS Iceland
Smith & Norland hf.
Noatuni 4
105 Reykjavik
Tel.: 0520 3000
Fax: 0520 3011
www.sminor.is
IT Italia, Italy
www.bosch-home.com/it
KZ Kazakhstan, Ka3aKcTaH
IP Anackiy A.N. PTN-Service
Kuyshi Dina str.23/1 N3
Astana
Tel.: 717 236 64 55
mailto: ptnservice@mail.ru
Technodom Service
Utegen Batira Str. 73
480096 Almaty
Tel.: 727 258 85 44
mailto: lsr@technodom.kz
www.technodom.kz
Kombitechnocentr
Zhambyl st. 117
480096 Almaty
Tel.: 727 338 45 55
mailto:cts_pavel@bk.ru
www.cts.kz
TOO Evrika Service
Shimkent, Rskulova 22.
Shimkent 160018
Tel.: 727 252 44 63 75
mailto:evrika_kz@mail.ru
www.evrika.com
AV SERVICE
Abulhair hana Str. 51
Uralsk 090000
Tel.: 711 293 9949
mailto:oastafiev@avservice.kz
www.avservice.kz
LB Lebanon, jli
Teheni, Hana & Co
Boulevard Dora 4043 Beyrouth
P.O.Box 90449
Jdeideh, 1202 2040
Tel.: 01 255 211
mailto:Info@Teheni-Hana.com
LT Lietuva, Lithuania
Senuku prekybos centras UAB
Jonavos g. 62
44192 Kaunas
Tel.: 037 212 146
Fax: 037 212 165
www.senukai.lt
UAB "AG Service"
R. Kalantos g. 32
52494 Kaunas
Tel.: 070 055 655
Fax:037331363
mailto:servisas@agservice.lt
www.agservice.lt
Baltic Continent Ltd.
Lukšio g. 23
09132 Vilnius
Tel.: 870 055 595
Fax: 052741722
mailto:info@balticcontinent.It
www.balticcontinent.lt
UAB Emtoservis
Savanoriu pr. 1 (Centrine bustine)
03116 Vilnius
Tel.: 87 00 447 24
Fax: 05 27 373 68
mailto:svc@emtoservis.It
www.emtoservis.lt
LU Luxembourg
S.R.L. "Rialto-Studio"
yn. UyceBa 98
2012 KuniHneB
TeJ./ΦaKc:022 23 81 80
mailto:bosch-md@mail.ru
ME Crna Gora, Montenegro
Elektronika komerc
Ul. Slobode 17
84000 Bijelo Polje
Tel./Fax: 050432575
Mobil: 069324812
mailto:ekobosch.servis@t-com.me
MK Macedonia,Makeonna
GORENEC
Jane Sandanski 69 lok.3
1000 Skopje
Tel.: 022 454 600
Mobil: 070 697 463
mailto:gorenec@yahoo.com
MT Malta
Oxford House Ltd.
Notabile Road
Mriehel BKR 14
Tel.: 021 442 334
Fax: 021 488 656
www.oxfordhouse.com.mt
MV Raajyegye Jumhooriyyaa, Maledives
Lintel Investments
Ma. Maadheli, Majeedhee Magu
Male
Tel.: 0331 0742
mailto:mohamed.zuhuree@
lintel.com.mv
NL Nederlande, Netherlands
Unit F 2, 4 Orbit Drive
Mairangi Bay
Auckland 0632
Tel.: 0800 245 700*
Fax: 0800 256 535
mailto: aftersales.nz@bshg.com
www.bosch-home.co.nz
*Mo-Fr: 8.30 am to 5.00 pm (exclude public holidays)
PL Polska, Poland
SA Kingdom Saudi Arabia,
i#e//i#j//iSla//
Abdul Latif Jameel Electronics
and Airconditioning Co. Ltd.
BOSCH Service centre,
Kilo 5 Old Makkah Road
(Next to Toyota), Jamiah Dist.
P.O.Box 7997
Jeddah 21472
Tel.: 800 127 9999
mailto:palakkalin@aj.com
www.aljazeera.com.sa
SE Sverige, Sweden
BSH Home Appliances AB
Landsvagen 32
169 29 Solna
Tel.: 0771 19 70 00 local rate
Tel.: 0771 11 22 77 local rate
mailto:Bosch-Service-SE@bshg.com
www.bosch-home.se
SG Singapore, 新加坡
BSH Home Appliances Pte. Ltd.
Block 4012, Ang Mo Kio Avenue 10
01-01 Techplace 1
Singapore 569628
Tel.: 6751 5000*
Fax: 6751 5005
mailto:bshsgp.service@bshg.com
www.bosch-home.com.sg
- Mo-Fr: 8.30am to 7.00pm, Sa: 8.30am to 5.30pm
(exclude public holidays)
SI Slovenija, Slovenia
BSH Hišni aparati d.o.o.
Litostrojska 48
1000 Ljubljana
Tel.: 015830700
Fax: 01 583 08 89
mailto:informacije.servis@bshg.com
www.bosch-home.com/si
SK Slovensko, Slovakia
www.bosch-home.com/tr
BSH Home Appliances Private Limited
台北市內湖區洲子街80號11樓
11F., No.80, Zhouzi St., Neihu Dist.
Taipei City 11493
Tel.: 0800 368 888
Fax: 02 2627 9788
mailto:bshtzn-service@bshg.com
Service-General SH.P.K.
Rruga Mag Prishtine-Ferizaj
70000 Ferizaj
Tel.: 0290 321 434
Tel.: 0290 330 723
mailto:a_service@
gama-electronics.com
XS Srbija, Serbia
BSH Kucni aparati d.o.o.
15th Road Randjespark
Private Bag X36, Randjespark
1685 Midrand-Johannesburg
Tel.: 086 002 6724
Fax:0866171780
mailto:applianceserviceza@bshg.com
www.bosch-home.com/zai


de
This appliance is labelled in accordance with European Directive 2012/19/EU concerning used electrical and electronic appliances (waste electrical and electronic equipment - WEEE). The guideline determines the framework for the return and recycling of used appliances as applicable throughout the EU.
fr
((waste electrical and electronic equipment - WEEE
pωcφωso|ω.
1sUgSbSdRJwJWlgUeUuUuUg UgUgUgUgUgUgUgUgUgUgUgUgUgUgUgUgUgUgUgUgUgUgUgUgUgUgUgUgUgUgUgUgUgUgUgUgUgUgUgUgUgUgUgUgUgUgUgUgUgUgUg
Soo 1 e Su Su.
DE Garantie
GB Conditions of guarantee
For this appliance the guarantee conditions as set out by our representatives in the country of sale apply. Details regarding same may be obtained from the dealer from whom the appliance was purchased. For claims under guarantee the sales receipt must be produced.
FR Conditions de garantie
Faks :0216.528.91.88
E-posta :.boschcagrimerkezi@bshg.com
Yetkilinin imzası :
Firmanin Kasesi:
BSH Ev Aletleri Sanayi ve Ticaret A.§.
SATICI FIRMANIN
Unvani :
Adresi
Telefonu:
Faks
E-posta :
bosch-infoteam@bshg.com

