
BABYPHONE VISIO CARE III A014408 - Baby monitor BABYMOOV - Free user manual and instructions
Find the device manual for free BABYPHONE VISIO CARE III A014408 BABYMOOV in PDF.
| Product type | Audio baby monitor |
| Brand | BABYMOOV |
| Model | BABYPHONE VISIO CARE III A014408 |
| Outdoor range | 1000 m in open space |
| Technology | Digital, frequency 863-870 MHz |
| Channels | Automatic channel search, automatic switching |
| Transmitter power supply | 3 AAA batteries (not included) or 5V USB mains adapter |
| Receiver power supply | 3.7 V rechargeable lithium battery (included) or 5V USB mains adapter |
| Receiver battery life | Approximately 10 hours (depending on usage) |
| Transmitter functions | Microphone sensitivity control (5 levels + continuous), adjustable nightlight (5 levels + VOX mode), battery indicator |
| Receiver functions | Adjustable volume (5 levels + mute), vibrator, audible/visual out-of-range alarm, LED sound indicator, low battery alarm |
| Nightlight | Yes, integrated into the transmitter, adjustable intensity and VOX mode (voice activation) |
| Vibrator | Yes, on the receiver, can be activated/deactivated |
| Out-of-range alarm | Yes, audible and visual (flashing) after 30 seconds of signal loss |
| LED indicators | Power/battery charging, transmission, VOX nightlight, continuous microphone, vibrator, mute, out of range |
| Material | ABS plastic |
| Color | White (likely) |
| Transmitter dimensions | Approximately 12 x 8 x 5 cm (estimate) |
| Receiver dimensions | Approximately 10 x 7 x 4 cm (estimate) |
| Transmitter weight | Approximately 150 g (with batteries, estimate) |
| Receiver weight | Approximately 120 g (with battery, estimate) |
| Certifications | CE, compliant with standards EN 301 489, EN 300 220, EN 60065, EN 62311 |
| Maintenance | Clean with a soft, dry cloth. Do not use abrasive products or solvents. |
| Precautions | Do not use as a medical device. Do not expose to moisture or heat. Unplug during prolonged absence. |
| Spare parts | Lithium battery for receiver (replaceable), 5V mains adapters (supplied) |
| Included accessories | 2 5V mains adapters, 1 transmitter, 1 receiver, installed lithium battery, user manual |
| Warranty | 2 years (estimate, not specified) |
Frequently Asked Questions - BABYPHONE VISIO CARE III A014408 BABYMOOV
User questions about BABYPHONE VISIO CARE III A014408 BABYMOOV
0 question about this device. Answer the ones you know or ask your own.
Ask a new question about this device
Download the instructions for your Baby monitor in PDF format for free! Find your manual BABYPHONE VISIO CARE III A014408 - BABYMOOV and take your electronic device back in hand. On this page are published all the documents necessary for the use of your device. BABYPHONE VISIO CARE III A014408 by BABYMOOV.
USER MANUAL BABYPHONE VISIO CARE III A014408 BABYMOOV
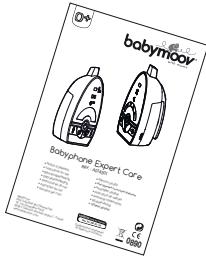
Babyphone Expert Care
Réf.: A014301
- Notice d'utilisation
- Instructions for use
Benutzungsanleitung - Gebruikshandleiding
- Instrucciones de uso
- Instruções de uso
-
Istruzioni per l'uso
-
Návod k použití
- INchtpkunno nocnojboaHIO
Hasznalatiutasitas - Instruetioni de utiliser
- Instrukcja uzytkowania
Brugsanvisining
O8nlyicxpnonc
Émetteur - Transmitter - Sender - Zender
Transmisor - Emissor - Emettitore - Vysilac
Пелератник - Adogeység - Unitate emittador
Nadajnik - Sender - Понорс
Récepteur - Receiver - Empfänger - Ontvanger Receptor - Receptor - Ricervitore - Pijilmac Peuentop - Veveogység - Unitate receptor Odbiornik - Modtager - Δéktç
NOTICE D'UTILISATION
Thank you for choosing our Baby monitor Expert Care. We recommend you read these instructions carefully in order to use your Baby monitor to best advantage and ensure it continues to operate as long as possible. If you should find a fault, however, or if you have any problem, please contact our company.
IMPORTANT : This baby monitor uses low emission power, in order to protect baby's health. The receiver and the transmitter don't communicate continuously, in order to limit the emission of radiations in the room. When baby cries, the system is activated immediately to alert parents; when the baby doesn't cry, the transmitter and the receiver communicate only each 20 seconds to check the good communication.
FUNCTIONS
- Range 1,000 m in an open space.
- Digital technology, works on the frequencies 863-870 MHz with no interference.
Automatic channel switching and searching. - Receiver fitted with a lithium battery that recharges on its base.
-
Alarms : audible, visual and vibrations on the receiver.
Volume control on the receiver. -
Gentle night light on the transmitter.
- Microphone sensitivity can be adjusted digitally on the transmitter.
- Audible and visual alarm on the receiver when the transmitter is out of range.
- Battery condition indicated on both the transmitter and receiver, and alarm when batteries need changing or recharging.
WARNING
- The Baby monitor Expert Care should not be seen as a medical device. In addition to using Baby monitor Expert Care, it is strongly recommended that an adult checks on your baby directly, on a regular basis. Premature babies or children considered to be at risk should be monitored by your pediatrician or a health professional.
- Never go away from your baby outside the house, even a short moment.
- Non-rechargeable batteries are not to be recharged.
- Rechargeable batteries are to be removed from the device before being charged.
- Different types of batteries : new and used batteries, or rechargeable and not rechargeable batteries, are not to be mixed.
- Rechargeable batteries are only to be charged under adult supervision.
- Batteries are to be inserted with the correct polarity (+/-) .
- Exhausted batteries are to be removed from the device.
- The supply terminals are not to be short-circuited.
- Always use the supplied battery for the receiver : if the battery is damaged it must be replaced by the manufacturer, the after-sales service or people with similar qualifications, in order to avoid any risk.
- For best performance of your babyphone, and to reduce any interference, we recommend you do not plug any other electrical appliance into the same socket as your babyphone. (Do not use multiple socket outlets).
PRECAUTIONS
- Use only the supplied AC adapters, use of other adapters may cause damage to the baby monitor
- When not using the monitor for as long period of time, remove all batteries from the transmitter and receiver to avoid damage due to battery leakage.
- Disconnect the AC adapter from the wall outlet when the monitor is not to be operated.
The baby monitor is best performed within a temperature range of -9^ to +50^
- Do not leave the monitor expose to strong sunlight for a long time or nearby any heat source, moisture and excessive dusty environment.
- Do not open the cabinet, no serviceable part inside.
- Waste Electrical and Electronic Equipment should be disposed of by selective collection. Do not throw electrical and electronic equipment away with unsorted household waste, but dispose of it at a selective collection point.

Within the European Union, this symbol indicates that this product can not be thrown in the garbage or together with household waste, but should be disposed of using the appropriate separate waste collection.
STANDARD ACCESSORIES
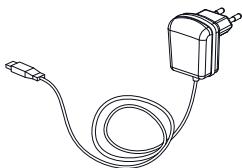
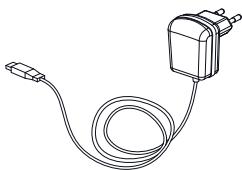
a. 5V AC adapter x 2
b. Baby unit
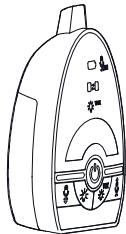
c. Parent unit
d. 3.7V Li Polymer rechargeable battery pack (installed in parent unit)
e. User manual
a.
b.

C.

d.
e.
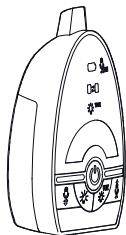
CONTROLS LAYOUT
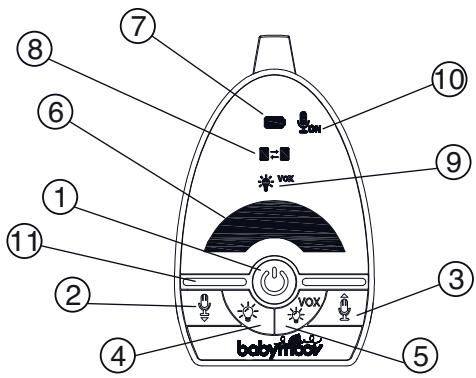
Transmitter
- Power On/Off button
2-3. Microphone Sensitivity Down adjustment button - Microhone Sensitivity Up adjustment button
- Night Light intensity adjustment button
- Night Light VOX control button Night Light
- Power On/Battery low icon
- Transmit icon
- Night Light VOX icon
- Micophone always ON icon
- Microphone
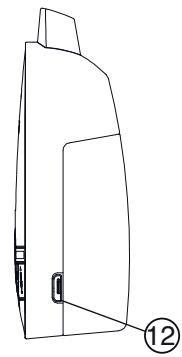
- USB port
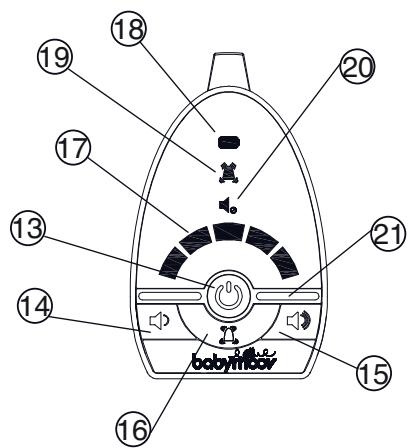
Receiver
- Power On/Off button
- Volume down button
- Volume up button
- Vibration button
- Visual level meter/Out-of-range icon
- Power On/Battery Low/Charging icon
- Vibration icon
- Speaker mute icon
- Speaker
- USB port
POWER SUPPLY
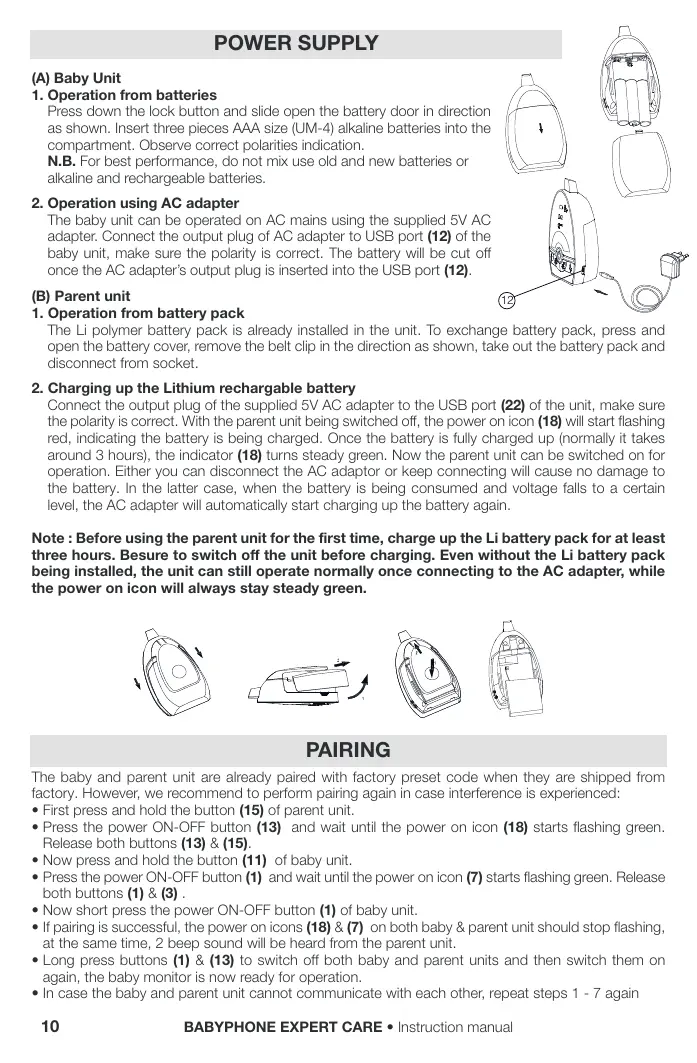
(A) Baby Unit
1. Operation from batteries
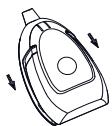
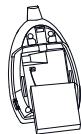
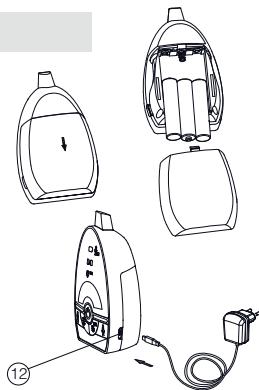
Press down the lock button and slide open the battery door in direction as shown. Insert three pieces AAA size (UM-4) alkaline batteries into the compartment. Observe correct polarities indication.
N.B. For best performance, do not mix use old and new batteries or alkaline and rechargeable batteries.
2. Operation using AC adapter
The baby unit can be operated on AC mains using the supplied 5V AC adapter. Connect the output plug of AC adapter to USB port (12) of the baby unit, make sure the polarity is correct. The battery will be cut off once the AC adapter's output plug is inserted into the USB port (12).
(B) Parent unit
1. Operation from battery pack
The Li polymer battery pack is already installed in the unit. To exchange battery pack, press and open the battery cover, remove the belt clip in the direction as shown, take out the battery pack and disconnect from socket.
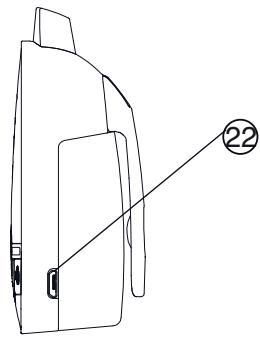
2. Charging up the Lithium rechargeable battery
Connect the output plug of the supplied 5V AC adapter to the USB port (22) of the unit, make sure the polarity is correct. With the parent unit being switched off, the power on icon (18) will start flashing red, indicating the battery is being charged. Once the battery is fully charged up (normally it takes around 3 hours), the indicator (18) turns steady green. Now the parent unit can be switched on for operation. Either you can disconnect the AC adaptor or keep connecting will cause no damage to the battery. In the latter case, when the battery is being consumed and voltage falls to a certain level, the AC adapter will automatically start charging up the battery again.
Note: Before using the parent unit for the first time, charge up the Li battery pack for at least three hours. Besure to switch off the unit before charging. Even without the Li battery pack being installed, the unit can still operate normally once connecting to the AC adapter, while the power on icon will always stay steady green.


PAIRING
The baby and parent unit are already paired with factory preset code when they are shipped from factory. However, we recommend to perform pairing again in case interference is experienced:
- First press and hold the button (15) of parent unit.
- Press the power ON-OFF button (13) and wait until the power on icon (18) starts flashing green. Release both buttons (13) & (15).
- Now press and hold the button (11) of baby unit.
- Press the power ON-OFF button (1) and wait until the power on icon (7) starts flashing green. Release both buttons (1) & (3).
- Now short press the power ON-OFF button (1) of baby unit.
- If pairing is successful, the power on icons (18) & (7) on both baby & parent unit should stop flashing, at the same time, 2 beep sound will be heard from the parent unit.
- Long press buttons (1) & (13) to switch off both baby and parent units and then switch them on again, the baby monitor is now ready for operation.
- In case the baby and parent unit cannot communicate with each other, repeat steps 1 - 7 again
OPERATION
A / Baby unit
- Long press the power ON/OFF button (1) for 3 sec to switch on the unit. The power on icon (7) should light up steady green. To turn off, long press the button (1) again.
- Place the unit about 1m from the crib with the microphone (11) facing towards the baby.
- Adjust the microphone sensitivity using the button (2) and button (3) such that the unit will be set to transmit whenever the microphone (11) picks up a sound at your desirable loudness level. The intensity of night light (6) will change during adjustment. The higher the intensity, the more sensitive is the microphone 11 to sound. There are total 5 levels of microphone sensitivity. When the maximum level is reached, further press of the button (3) will set the unit into continuous transmission mode (i.e. the unit will transmit even without detecting a sound) and the icon (10) will light up steady green.
- Once the unit is in transmit mode, the transmit icon (8) will light up green. The unit will return to standby mode a few seconds after the microphone (11) stops picking up any sound and the transmit icon (8) will go off. Except when the unit is set in continuous transmission mode, the transmit icon (8) will stay steady on.
- The night light (6) can be set permanently ON by pressing the button (4). Each press of button (4) will increase the level of light intensity (maximum 5 levels). The night light (6) can also be set to VOX (voice activated) by pressing button
- Under VOX mode, the icon (9) will light up and night light (6) will be switched on once the microphone (11) detects a sound and automatically fade off a few seconds after the sound stops.
- The condition of the battery is shown by the power on/low battery icon (7). When the battery level becomes running low, the power on/low battery icon (7) turns red. Replace with new battery or use the supplied AC adapter.
Parent unit
- Long press the power ON/OFF button 13 for 3 sec to switch on the unit. The power on icon 18 should light up steady green. To turn off, long press the button 13 again.
- Place this unit at a reasonable distance away from the baby unit to avoid feedback. Too close a distance will create a screeching sound at the speaker 21.
- Once it receives a signal from the baby unit, the visual level meter 17 will light up. The number of segments being lighted up vary along with the sound. This feature is useful in case the parents prefer to turn down the speaker volume to keep the environment quiet.
- The speaker volume can be adjusted using the button 14 and button 15. Each press of button will change the volume by 1 step which is correspondingly indicated by the visual level meter 17. There are total 5 volume levels, more segments shown in visual level meter 17 means higher volume. When the volume setting is at minimum, further press of button 14 will cause the speaker 21 to be totally muted with the icon 20 being lighted up.
- This unit is equipped with a vibration alert. Press the button 16 and the icon 19 will show up. Once the received baby's voice is loud enough, the vibrator starts to function. This feature is useful when the parent is working under noisy environment (e.g. vacuum cleaning). To save battery power, it is recommended not to use the vibration alert frequently. To switch off vibration, press the button 16 again and the icon 19 goes off.
- Once this unit is beyond the communication range of baby unit for over 30 sec, an out of range alarm will be heard together with segments of the visual level meter 17 flashing to alert the parents. The alarm sound is independent of whether the speaker is muted or not. This alarm will go off only when the parent unit falls back within the communication range of baby unit.
N.B. This alarm will also be heard in case the baby unit is switched off, or its battery has run down, or its power is cut off, or the pairing is not properly done between the baby and parent unit. - The condition of the Li battery pack is shown by the power on/low battery icon 18. When battery level becomes running low, the icon 18 turns red and an alarm will be heard, reminding the parents to charge up the battery using the supplied AC adapter.
Each time the buttons are pressed, a beep tone will be heard. To eliminate this beep tone, press and hold the button 14 for 2 sec until a second beep tone is heard. To resume the beep tone, press and hold the button 15 for 2 sec until a beep tone is heard. Whenever the unit is switched off and then on again, the beep tone will resume automatically.
TROUBLE SHOOTING GUIDE
| Problem | Possible cause | Solution |
| • Baby Unit has no Transmission | • Mic sensitivity is too low • Battery has run down or AC adapter improperly connected | • Adjust mic sensitivity higher using button 3 • Replace with new battery or check connection |
| • Transmission always on | • Mic Sensitivity is too high • Unit is set to continuous transmission mode | • Adjust mic sensitivity lower using button 2 • Set the unit to become voice activated |
| • Out-of-range alarm always on | • Baby unit's battery has run down • Distance between baby and parent unit exceeds the operating range • Pairing is not successful | • Replace with new battery or use AC adapter • Move the baby & parent unit closer together • Perform pairing again |
| • Always showing low battery alert | • Battery has run down • Battery pack is damaged. | • Recharge battery using AC adapter (parent unit) • Replace with new battery or use AC adapter (baby unit) • Replace with new battery pack |
| • Battery life is short | • Night light is permanently switched on • Vibration alert is switched on | • Switch off night light or set to VOX operate • Switch off vibration alert |
| • Communication frequently Interrupted | • Baby unit is located near other electrical appliances | • Remove the electrical appliances or re-locate the baby unit far away from source of interference or perform pairing again. |
| • Too short Communication range | • Many steel structures between baby & parent unit • Baby unit battery has run down | • Re-locate baby or parent unit • Replace with new battery or use AC adapter. |
GEBRAUCHSANLEITUNG
VOORZORGSGMAATREGELEN
MEPbI PPEIOCTOPOXHOCTN
-
IcnoIb3yIte ToIbKO aadTOpbl, BxOJaIe B COCTAB. IcnoIb3OBAHne dpyrIXaadTepoB MOKeT npBBeCTn K pONOMke paIIOHaHN Expert Care.
Korda Bby DoJrO He NpIb3yeTeCb BaWei paDIOHnHe, BByIbTe BCE 60TepeKn m3 nepaDaTnKa n peCenTopa, Tc6bN36EkaTb npToeKu 6aTaapeek. -
OTKIIOUHTe aIaANTep I3 pO3eTKn, eCIN BbI He noJIb3yTeEc bpaIIOHOHHe.
-PaiohoHn Expert Care yHKuHnpyet lyupe npri temepaType meKny 9^ n +50^
He npBepraIte PaHIOHIO Expert Care COHNUHM Iyam N He OCTabJIte pAOM C uTOHKNOM TEIIa, BO BnAAHOH NIN PbIbHOK KOMHATE.
- He pa3bIpaIte annapat : OH He coOpErkHIT
Nikakoi DeTaN, KOTOPU MOXHO NcPOnlb3OBaTb
OTdJIbHbIM 06a30Am.
- ΜηεΚτρινηκην Μ Μεκτροῦν Μόβρουδανηση Μλβλίοτις ΚεπεΚτυΒΗΜ cδρομΟ ΜΤΟύθου. He
BbI6paCbBaTae IeKTPnUeCKHe I eNekTKPOHbIbe OTOXbI c OTXoAMn MYHINuAInbHbIMn, KOtOpBeI dOJIKNbI NIOBepaTbrCa cEneTIABHOMy C6Op.
3TOT CnBON yKa3bIbAeT uepe3

BEPoneckm Co03, YTO npOdyKT He OJnJKeH 6bTb 6poUeHHbIM B yPHy NIM CMeuHaHHbC XO3aNCTBeHHbIM MycOpOM, a OJnJKeH J8JIbCBeNEKTHBbIM C6OpOM OTXoOB.
ПИНАДLEЖHOCTN
a.AanTep CA 5Vx2
b. NpepaTnuK
c. Peuentop
d.Перетаразжaelмьбатер Lithium 3,7 V (Вставленьая в peцentop)
e. CnpabOuHnK no nCNoJb3ObaHnIO
a.
b.

C.

d.
e.
CINCTEMA YNPABNEHNA
PepedaTuk
- BbIKHouateIb On/Off
2-3. KoHTpOJIb 3a TOUHOCTbI MNIKpoΦOHa - Khotnka peryunipobanha MOUHOCTN CBETNUHNA
5.Мереков OT CBETINBHKA K BKVLOUHIO RONOLA - CBETNJbHnK
7.ИЗбрахеньппань/зардka6atapen
8.ИЗобрахкепегдач - 1306paXeHne CBeTnIbHnka, cnOco6oM VOX
10.ИЗбразжени мIKpoфona
11.Mukpooh - OTBepctne USB
Peuertop
- BbIKIIOuATEJIb On/Off
- Khonka ymehbweHnrgpomKoCTn
- Khonka ybeinyehnrgpomkoctn
- Khonka Bn6paun
17.Изобрахеникоюряздостанцeн / на пасстони
18.Изобрахени пітань/зардка 6атaperи
19.ИЗобрахене Вибраци - Hemoe n3o6paqehne rpoMkoROBOpTeJia
21.Грмкогор上诉 - OTBepctne USB
NCTOCHNK NITAHNA
A /Передатчн
1. Pa6ota c 6aTapeiKaMa (He BxAoJzne)
Hakmite Ha KANOT 6NOKUPOBKN i CDBINHBe erO Kpblkky IJn OTBepCTIa 6aTaapeK. BCTaBte 3 jeNochIbe 6aTapeKNI AAA B npabelbHOI nonlaRhoCTN (+/-) .
2.Функуновобане на ceKtope (aanTeP BXoDnT BcoCTAB)
PepaTmK Moet 6bIb Ch6KeH wTeNceIeM, nCNoB3y aAnTep CA (5 V). CoeHInTE po3ETky aAnTpeBa O TBePCTne USB CC nepaTnka. BkIoUHTe aAnTep B po3ETky cEToPA. PtAhnE 6aTaapeeK 6yDet npepBaHO, KAK ToIbKO pePaTmK 6yEt NpKnIOueH K pOeTke Ha cKeTOpe.
N.B.:pacctoHnE doocraeMOCTn DInHHee, KOrda nepepaTnK pa6Otaet Ha CeKTope.
B / Peuentop
2. Functionare cu current electric (adaptor current electric furnizat)
EC DECLARATION OF CONFORMITY
Babymoov
Declare that the following product(s):
Model: Baby Monitor Expert Care
Reference: A014301
Model: BC-24D
is in conformity with the following relevant harmonised:
EMC: EN 301 489-1 V1.9.2 (2011-09)
EN 301 489-3 V1.6.1(2013-08)
Radio: EN 300 220-1 V2.4.1 (2012-05)
EN 300 220-2 V2.4.1 (2012-05)
Following the provisions of Council Directive 99/05/CE on radio equipment and telecommunications terminal equipment and the mutual recognition of their conformity.
Name: Mr Laurent Windenberger
Title: Marketing Manager
Signature:

Date: 22/09/14
- Babyphone Expert Care
- NOTICE D'UTILISATION
- FUNCTIONS
- WARNING
- PRECAUTIONS
- STANDARD ACCESSORIES
- CONTROLS LAYOUT
- Transmitter
- Receiver
- POWER SUPPLY
- Baby Unit
- Operation from batteries
- Operation using AC adapter
- Parent unit
- Operation from battery pack
- Charging up the Lithium rechargeable battery
- PAIRING
- OPERATION
- A / Baby unit
- Parent unit
- TROUBLE SHOOTING GUIDE
- GEBRAUCHSANLEITUNG
- VOORZORGSGMAATREGELEN
- MEPbI PPEIOCTOPOXHOCTN
- ПИНАДLEЖHOCTN
- CINCTEMA YNPABNEHNA
- PepedaTuk
- Peuertop
- NCTOCHNK NITAHNA
- A /Передатчн
- Pa6ota c 6aTapeiKaMa (He BxAoJzne)
- 2.Функуновобане на ceKtope (aanTeP BXoDnT BcoCTAB)
- B / Peuentop
- Functionare cu current electric (adaptor current electric furnizat)
- EC DECLARATION OF CONFORMITY
- Babymoov
Brand : BABYMOOV
Model : BABYPHONE VISIO CARE III A014408
Category : Baby monitor