VOLTA FIX - Stroller CASUALPLAY - Free user manual and instructions
Find the device manual for free VOLTA FIX CASUALPLAY in PDF.
User questions about VOLTA FIX CASUALPLAY
0 question about this device. Answer the ones you know or ask your own.
Ask a new question about this device
Download the instructions for your Stroller in PDF format for free! Find your manual VOLTA FIX - CASUALPLAY and take your electronic device back in hand. On this page are published all the documents necessary for the use of your device. VOLTA FIX by CASUALPLAY.
USER MANUAL VOLTA FIX CASUALPLAY
Keep for future reference. Read carefully.
FRANÇAIS 12
MODE D'EMPLOI
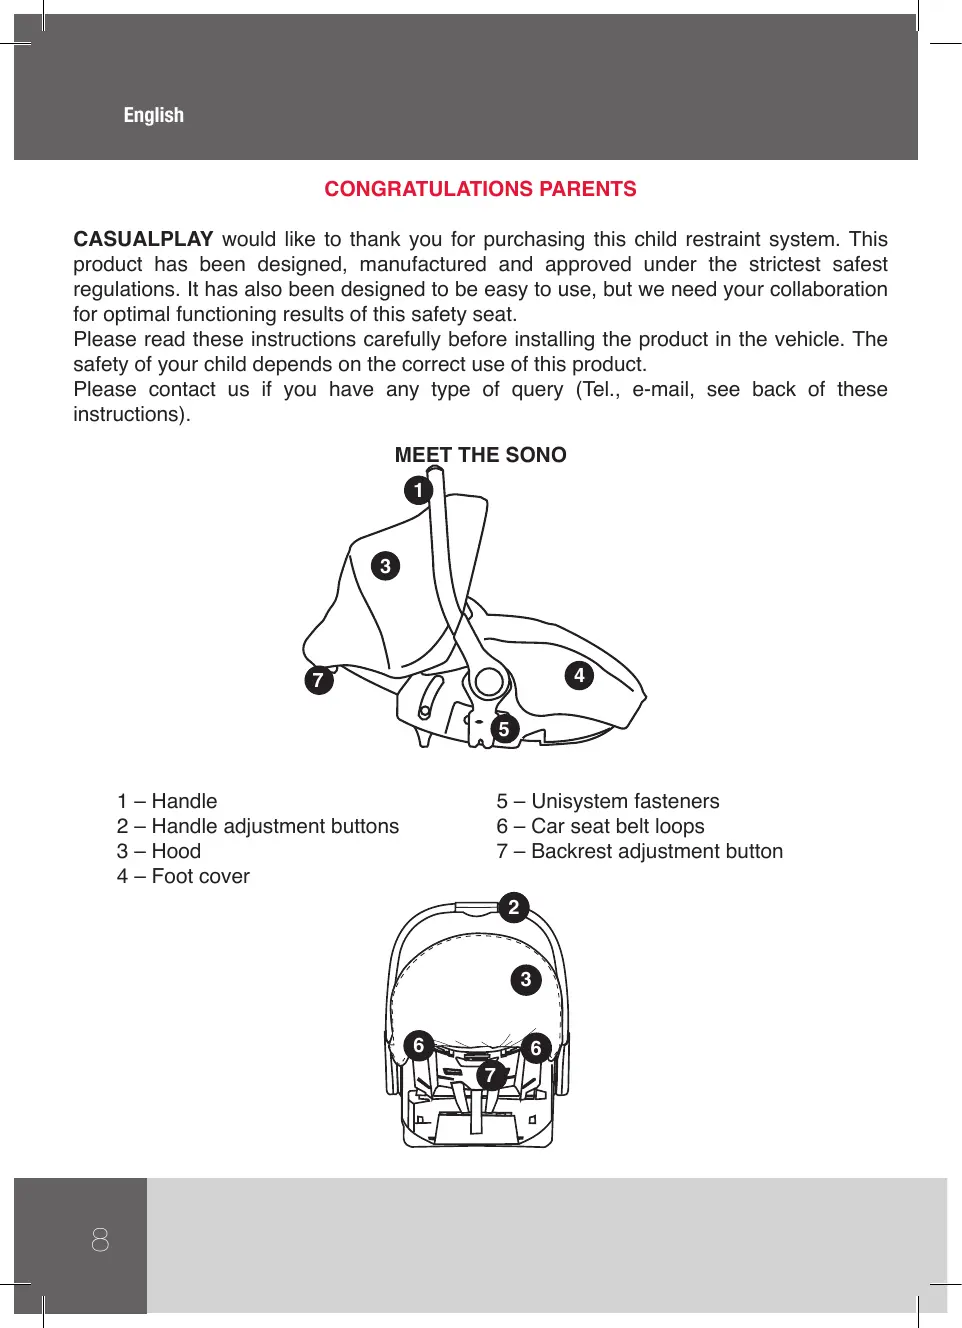
CASUALPLAY would like to thank you for purchasing this child restraint system. This product has been designed, manufactured and approved under the strictest safest regulations. It has also been designed to be easy to use, but we need your collaboration for optimal functioning results of this safety seat.
Please read these instructions carefully before installing the product in the vehicle. The safety of your child depends on the correct use of this product.
Please contact us if you have any type of query (Tel., e-mail, see back of these instructions).
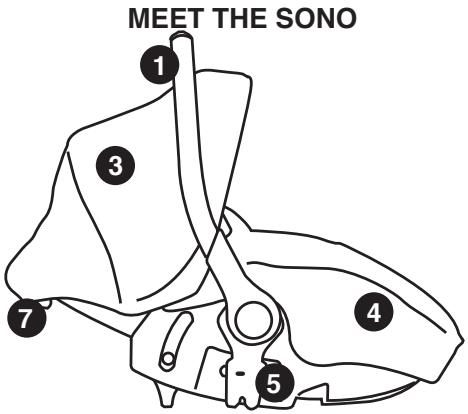
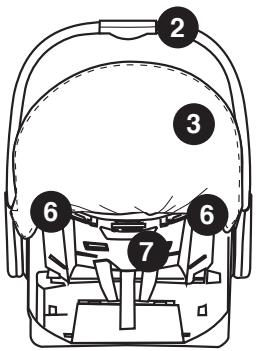
1- Handle
2- Handle adjustment buttons
3-Hood
4 - Foot cover
5 – Unisystem fasteners
6 - Car seat belt loops
7-Backrest adjustment button
IMPORTANT! KEEP FOR FUTURE REFERENCE.
READ THESE INSTRUCTIONS CAREFULLY BEFORE USING THE ARTICLE AND KEEP THEM FOR FUTURE REFERENCE. THE CHILD'S SAFETY MAY BE AT RISK IF THESE INSTRUCTIONS ARE NOT FOLLOWED.
WARNING AND SAFETY NOTES
- Sono is a child restraint system belonging to Group 0+ (up to 13kg ).
- Never install the restraint system on seats fitted with a frontal AIRBAG without disconnecting it first.
- This restraint system should always be installed facing backwards. It should be secured using the three-point seat belt of the vehicle, approved under UN/ECE-16 regulations or equivalent standards.
- The safest position for the safety restraint system is on the back seat of the vehicle.
- The original equipment must not be modified.
- After an accident the restraint system should be inspected or replaced.
- Protect all parts of the safety seat from possible damage caused by the fold down seat or doors of the vehicle.
- In sunlight the vehicle interior can reach very high temperatures. It is advisable to cover the restraint system when it is not in use, to prevent the child from possibly getting burnt.
- The straps should never be twisted.
- Always use the restraint system, even on short journeys and never leave the child unattended inside the vehicle.
- Take the restraint system out of the vehicle whenever it is not going to be used and keep it out of the reach of children.
- Any luggage or other objects that may cause injury in the event of a collision should be secured.
- In the event of an emergency it is important that the child can be unfastened quickly, for this reason the buckle must never be covered up. It is advisable to teach the child he must never play with the buckle.
- We guarantee the safety of the product when it is used by the original buyer, do not use second hand safety products or restraint systems.
- It is important that the other passengers in the vehicle also wear their seat belts, because in the event of an accident they could get flung about and injure the baby.
- Do not use the restraint system without the upholstery or with upholstery that is different from the original one.
- Regularly check the buckle, harness and other parts that may become loose or suffer from wear and tear with use.
- The upholstery should be hand washed, using a mild soap and warm water; or it can be machine washed at a maximum temperature of 30^ and without spin drying. Do not use chemical cleaners (dry cleaning).
- Make sure that the upholstery on the vehicle seat does not make it difficult to tighten the seat belt.
- Remember that you are responsible for the child's safety.
NOTE
- This is a "UNIVERSAL" restraint system. It is approved under Regulation N°44, 04 series of amendments, for general use in vehicles and will fit most, but not all car seats.
- Correct installation is possible if the vehicle manufacturer states in the instruction manual that a "UNIVERSAL" restraint system for this age group can be used in the vehicle.
- This restraint system has been classed as "UNIVERSAL" complying with stricter conditions than the previous designs that do not include this note.
- If in doubt, consult the manufacturer or retailer of the safety seat.
IMPORTANT
Appropriate use only in vehicles fitted with 3-point seat belts with or without retractor, approved under UN/ECE 16 or equivalent standard.
WARNING: Never leave the child unattended.
WARNING: Do not use the reclined cradle once your child can sit unaided.
WARNING: This reclained cradle is not intended for prolonged periods of sleeping.
WARNING: It is dangerous to use this reclined cradle on an elevated surface, e.g. a table.
- This product does not replace a cot or a bed. If your child needs to sleep, he should be placed in a suitable cot or bed.
- Do not use this product if any of the parts are broken or missing.
- Do not use accessories or replacement parts that have not been approved by the manufacturer.
NOTE: The SONO is compatible with the BASE FIX SONO.
INSTRUCTIONS FOR USE
CHANGING THE POSITION OF THE HANDLE
To change the position, press and hold button A while pressing button B. Push the handle forwards or backwards, to the required position. It will click when correctly in place. Figure 3. (fig.01)
The handle has three positions (fig.02):
A: Handle forwards for installation in the vehicle.
B: Vertical as a carrying handle.
C: Horizontal as a rocker or for installation on a pushchair.
- Lift the lever on the back of the backrest to adjust the reclining position (fig.03). It will click when the backrest is correctly locked into place.
OPENING AND CLOSING THE HARNESS BUCKLE
-
Bring the two parts of the harness chest straps together and insert them into the female part of the buckle (fig.04). Then press both until it clicks indicating it is correctly fastened (fig.05).
-
To open the buckle, press the red button.
SAFETY HARNESS
- Fasten the buckle and tighten the chest straps by pulling the end of the tightening strap (fig.06), until achieving the required fit, taking care to always leave some space.
IMPORTANT: Make sure that the harness straps are not twisted. - To loosen the harness, press the tightening button and pull the chest straps with the other hand (fig.07).
ADJUSTING THE HEIGHT OF THE HARNESS
- Find the metal plate on the lower part of the backrest of the Sono (fig.08) and release the shoulder straps of the harness. Take the shoulder straps out of the vents in the seat and the mattress pad.
- Insert the shoulder straps through the required vents (fig.09) and insert them back into the metal fork making sure that they are correctly positioned. Check that the straps are not twisted.
IMPORTANT: Where the straps come out of the backrest, they should be at the height of the child's shoulders and both at the same level (fig.10).
INSTALLING THE SONO IN THE CAR
- Set the handle to position A - fig.02.
- Fasten the buckle of the car seat belt and pass the abdominal strap through the two lower belt guides (fig.11).
- Next, pass the chest strap through the upper belt guide on the same side as the retractor (fig.12).
WARNING: Adjust the tightening of the seat belt every time you change the position of the backrest.
- Lastly, tighten the seat belt by pulling the chest strap (fig.13).
REMOVING THE UPHOLSTERY
- Remove the foot cover.
- Remove the hood.
- Unfasten the harness buckle.
- Remove the chest protector pads and the reduction cushion. Pass the harness straps through the vents in the upholstery.
- Take the upholstery off, starting with the front part.
UNISYSTEM
This exclusive fastening system means that the Sono can be used on the following pushchairs:
Avant, Livi, Kudu, Kudu 4, S4, S-Twinner.
For all of them, the installation procedure is the following:
- Put the parking brake on.
- Place the Sono on the pushchair, facing backwards.
- Line the Sono Unisystem fasteners up with the slots (fig.14).
- Press downwards until it clicks into place and a green signal appears in each of the windows on the sides of the fasteners (fig.15).
- To remove it, press and then release the red button on both fasteners (window displays red signal) and pull upwards to release it from the chassis of the pushchair (fig.16).