D-FRA-911 - Cordless phone ESSENTIELB - Free user manual and instructions
Find the device manual for free D-FRA-911 ESSENTIELB in PDF.
| Product type | Cordless phone with digital answering machine |
| Brand | EssentielB |
| Model | D-FRA-911 (BRIO Solo-R / Duo-R / Trio-R) |
| Frequency band | 1880 - 1900 MHz (DECT) |
| Outdoor range | Up to 300 meters |
| Indoor range | Up to 50 meters |
| Talk time | Up to 8 hours |
| Standby time | Up to 100 hours |
| Battery type | 2 AAA NiMH rechargeable batteries 1.2 V - 300 mAh |
| Base power supply | Power adapter VT05EEU06045: input 100-240 V, output 6 V / 450 mA |
| Display | Alphanumeric backlit LCD display |
| Phonebook | Up to 50 contacts (name and number) |
| Call log | Last 20 received calls with date and time |
| Redial list | Last 20 dialed numbers |
| Caller ID | Yes (subject to operator subscription) |
| Functions | Hands-free, intercom, 3-way conference, alarm, direct memory keys (M1, M2, keys 1, 2, 3) |
| Digital answering machine | Recording capacity: 14 minutes, customizable greetings, remote interrogation |
| Maximum number of handsets | Up to 5 handsets on the same base |
| Maintenance | Clean with a soft dry cloth, do not use aerosols |
| Safety | Do not expose to moisture, use only the supplied adapter, do not open the device |
| Warranty | Valid from the date of purchase, does not cover damage due to improper installation or normal wear |
| After-sales service | 0825 850 850 (Monday-Saturday 8am-8pm, charged call) |
Frequently Asked Questions - D-FRA-911 ESSENTIELB
User questions about D-FRA-911 ESSENTIELB
0 question about this device. Answer the ones you know or ask your own.
Ask a new question about this device
Download the instructions for your Cordless phone in PDF format for free! Find your manual D-FRA-911 - ESSENTIELB and take your electronic device back in hand. On this page are published all the documents necessary for the use of your device. D-FRA-911 by ESSENTIELB.
USER MANUAL D-FRA-911 ESSENTIELB
FR. TÉLÉPHONE SANS FIL
EN. CORDLESS TELEPHONE
NL. DRAADLOZE TELEFOON
To help you get the most out of your purchase
NL. Handleiding
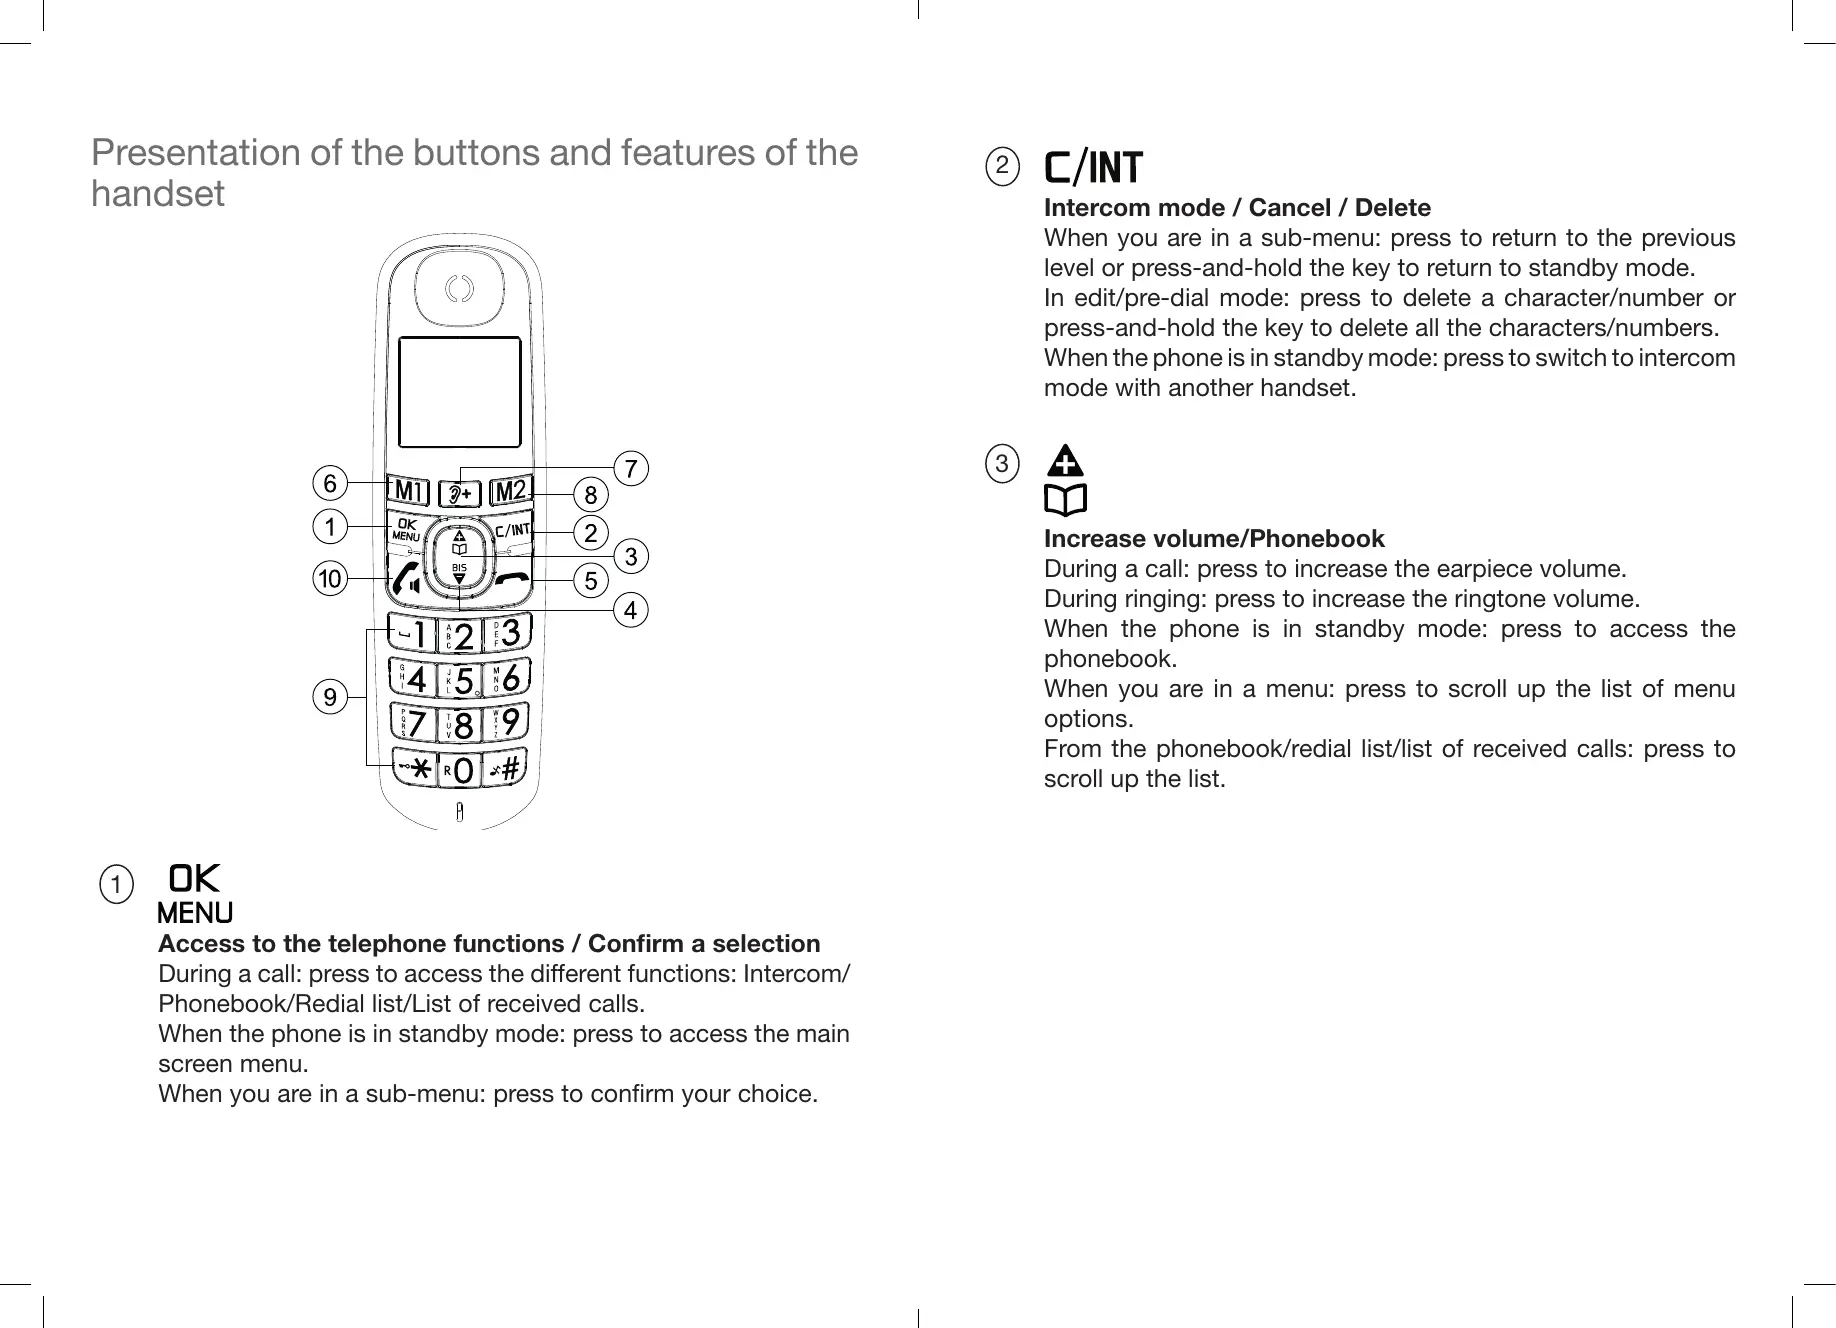
Presentation of the buttons and features of the handset
(1) OK MENU
Access to the telephone functions / Confirm a selection
During a call: press to access the different functions: Intercom/Phonebook/Redial list/List of received calls.
When the phone is in standby mode: press to access the main screen menu.
When you are in a sub-menu: press to confirm your choice.
(2) C/INT
Intercom mode / Cancel / Delete
When you are in a sub-menu: press to return to the previous level or press-and-hold the key to return to standby mode.
In edit/pre-dial mode: press to delete a character/number or press-and-hold the key to delete all the characters/numbers.
When the phone is in standby mode: press to switch to intercom mode with another handset.

Increase volume/Phonebook
During a call: press to increase the earpiece volume.
During ringing: press to increase the ringtone volume.
When the phone is in standby mode: press to access the phonebook.
When you are in a menu: press to scroll up the list of menu options.
From the phonebook/redial list/list of received calls: press to scroll up the list.
(4) BIS
Decrease the volume/Redial list
During a call: press to decrease the earpiece volume.
During ringing: press to decrease the ringtone volume.
When the phone is in standby mode: press to access the radial list.
When you are in a menu: press to scroll down the list of menu options.
From the phonebook/redial list/list of received calls: press to scroll down the list.
(5)
Answer a call/Loudspeaker
During ringing: press to answer a call.
During a call: press to enable/disable the loudspeaker.
When the telephone is in standby mode/pre-dial mode: press to answer a call.
From an entry in the radial list/list of received calls/phonebook: press to dial the number of the selected entry.
Flashing:
The indicator light of the key flashes quickly if:
- incoming call
- searching for handset
(6)
Hang up/Mute the ringtone/Switch the handset on and off
During a call: press to end the call and return to standby mode. When the phone is in standby mode: press-and-hold to turn the handset on/off.
During ringing: press to cancel the ringtone on the handset.
When you are in a menu/edit mode: press to return to the previous menu.
When you are in a menu/edit mode: press-and-hold to return to standby mode.
(7) M1
Saved number
When the telephone is in standby mode or in use: speed dial the number stored in memory M1.
(8) M2
2nd Saved number
In standby mode or in use: speed dial the number stored in memory M2.
(9) 3+
Call volume amplifier
Doubles the volume in the handset.
(10) ·s x · \#
Alphanumeric keys
When the phone is in standby mode:
-
Lock the keypad: press-and-hold the * key to enable or disable the keypad lock
-
Disable the ringtone: press-and-hold the # key to enable/ disable the ringtone
When the phone is in answer mode:
-
Dial a flash number (if provided): press-and-hold the 0 key to dial a flash (depends on your contract with your landline operator and whether it offers this feature).
-
Dial a saved number: press-and-hold key 1, 2, or 3 to dial the number assigned to the corresponding key.
Description of the base station
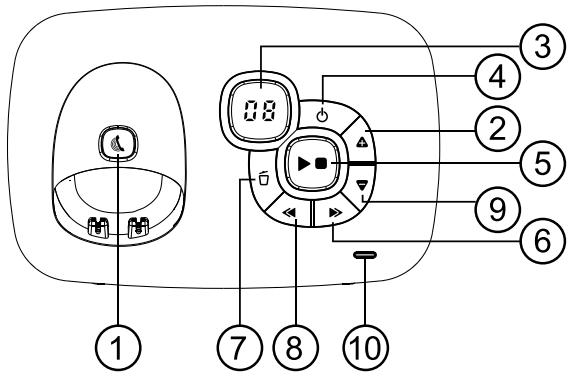
(1)
Searching for a handset
Press the key to find your handset. The handset rings for approximately 60 seconds.
Pairing the handset
Press-and-hold (5 seconds) the key to start the handset pairing mode.
(2)
Increasing the loudspeaker volume
Increases the volume in the loudspeaker (+) while playing messages.
3 Messages on the answering machine screen
0F->-- The answering machine function is disabled (OFF).
0n-> XX The answering machine function is enabled (ON) and XX messages have been recorded on the answering machine.
00 Continuously on: no messages are stored on the answering machine.
XX Flashing: XX new messages have been recorded on the answering machine.
ZZ Continuously on: the answering machine contains ZZ messages that have already been played (and no new messages).
XX/FF XX flashes alternately with FF: XX new messages have been recorded and the answering machine's memory is full.
FF Flashes: the answering machine's memory is full with already played messages; no new messages have been received.
-
-/XX XX flashes alternately with --: the time has not been set and XX new messages have been recorded.
-
- -- flashes: the time has not been set and no new messages have been received.
XX Continuously on: playing old message XX already received - Flashing: playing new message XX received.
A1/A2 Continuously on: playback of the greeting, with A1 corresponding to the greeting for the Voicemail mode and A2 corresponding to the greeting for the Greeting Only mode.
XX/An XX flashes alternately with An: a new message XX is currently being recorded.
An means that the message is currently being recorded.
rA Flashes: remote access is in progress.
LX Continuously on: indicates the current sound level, with X between 1 and 8.
(4)

Activating/deactivating the answering machine
Press to activate the answering machine feature.
Press again to deactivate the answering machine feature.
(5)

Listening to messages
Press to listen to the message
Press again to stop playing the message.
(6)

Go to next message
Press to stop playing the current message and go to the next message.
(7)

Delete current message/all messages
Press once to delete the message being played. Press-and-hold to delete all played messages.
(8)

Replay the current message/Go to the previous message
Press to re-play the current message from the beginning.
Press twice to stop playing the current message and play the previous message.
(9)

Decrease loudspeaker volume
Decreases the volume in the loudspeaker (-) during message playback.
(10)

Indicator light:
On: the handset is being charged or in use.
Flashing: receiving a call or searching for the handset.
Note: When the handset is being charged, the LED does not flash and will be constantly on, even when receiving a call.
Screen icons and symbols
The LCD screen displays various elements of information about the current status of the phone.
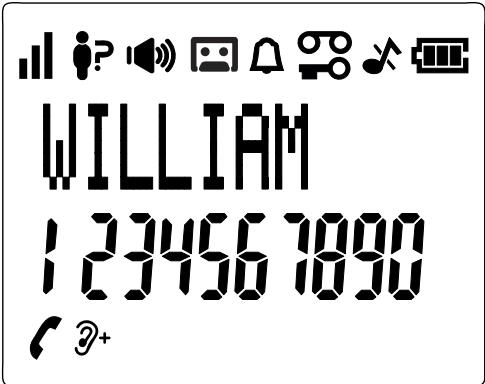

Reception quality
The number of bars is proportional to the quality of the signal. The weaker the signal, the fewer the bars displayed on the screen.
When the handset is out of range or searches for its base station, no bars are displayed on the screen.

In use
Indicates that a call is in progress.

Loudspeaker activated
Indicates that you are using the loudspeaker.

Alarm clock function
Continuously on: the alarm function is activated. Flashing: when the alarm goes off.

Answering machine
Continuously on: indicates that the answering machine is activated.
Flashing: when the answering machine has recorded new messages.

Keypad lock
Indicates that the keypad is locked.

New messages on the answering machine
Indicates that you have received new voice messages (on the operator's mailbox).
This symbol disappears when you have listened to all the new messages received. (This function depends on your telephone operator).

Ringer off
Indicates that the ringer is disabled.

Battery charge
Indicates that the batteries are fully charged.
At the start of the battery charge process, the entire icon flashes.
When the batteries are almost fully charged, only the interior of the icon flashes.

Discharged battery
Indicates that you need to charge the batteries.
Flashes when the batteries are almost discharged.

Call indicator
On when you have received a new call*.
Off when you have consulted the call log.

Volume amplifier
Indicates that the amplifier is activated.
Doubles the volume in the handset
User manual (all Brio models)
For easily getting started with your product!
You have just purchased an Essentiel b branded product and we thank you for your purchase. We devote special attention to ensure that our products are WELL DESIGNED, RELIABLE and EASY TO USE.
We hope you will be satisfied with this cordless telephone with answering machine.
safety instructions
- Check that the power supply voltage indicated on the rating plate of the power adapter matches that of your electrical system.
-
Do not use this appliance:
-
if the adapter or the power cable is damaged;
- in case of a malfunction.
-
if the appliance has been damaged in any way.
-
Use only the power adapter supplied with the device.
- Do not use the adapter provided with any other device.
- Make sure that the device is on a flat, stable surface (fabric or carpeted surfaces should be avoided, in particular).
-
Plug the power adapter into an easily accessible power outlet.
-
Make sure that the power cord cannot be crushed or pinched, especially near the plugs, outlets and the connection point to the device.
- The adapter supplied with the device is only designed for indoor use.
- Do not install your telephone near any heat sources such as radiators, hot-air outlets, an oven or any other appliances (including amplifiers) that produce heat.
- Do not expose the device or its adapter to direct sunlight or dust.
- Do not use this device or its adapter near water or sources of moisture such as bathtubs, wash basins, kitchen sinks, swimming pools, damp basements or any other damp areas.
- Do not place any naked flames (e.g. lit candles) on top of or near the device or adapter.
-
Be careful not to splash or spill any liquid on the device or its adapter and do not place any objects containing a liquid (e.g. a vase) on the device or its adapter.
-
Do not open up the device or its adapter for any reason.
- Do not use sharp objects to get inside the device or adapter.
- To prevent damage to the device, unplug it during thunderstorms or if it is not going to be used for a prolonged period.
- The device must be switched off before unplugging the cord from the adapter
- Never unplug the device by pulling on the power cord. Instead, you should grasp the power adapter.
-
This device is not intended for use by people (including children) with reduced physical, sensory, or mental abilities, or people without experience or knowledge of the system, unless they are supervised or have received prior instructions on how to use the device from a person responsible for their safety. It is advisable to supervise children to ensure that they do not play with this appliance.
-
If your device or its adapter is not working normally, and especially if it is making sounds or emitting odours that seem out of the ordinary, unplug them immediately and have them examined by a qualified repairer.
- Always unplug the device before cleaning it. Clean only with a soft, dry cloth and avoid using aerosol sprays.
- Secure access for your device: Keep your telephone as close to you as you can, given you usage of the device.
- Erase the data from your telephone before disposing of it, selling it or giving it to the After-Sales Service.
- Do not dispose of batteries in the household waste.
Precautions for use
In order to maximise the range and minimise interference, here is some advice on choosing the best location for the base station of the telephone.
- Place the base station high up in an easily accessible location without any obstacles between the handset and the base station.
- To avoid interference (crackling), the base station should be kept away from other electronic devices such as a TV, microwave oven, radio, computer, wireless device or other cordless phone.
- Do not place the base station in front of a radio frequency transmitter, e.g. the outdoor antenna of a mobile phone transmitter.
- To avoid interference, do not plug the base station into the same electrical circuit as a big household appliance. Whenever possible, plug the device or base station into a different power outlet.
If the reception quality of the handset is poor (poor sound quality, humming, etc), try moving the base station to another location in the house. Depending on where it is located or the structure of the building, the maximum range of the base station may decrease. The indoor range is normally less than the outdoor range. Read the end of this manual for more advice on improving reception quality.
product sheet
Technical characteristics
- Frequency range: 1880 - 1900 MHz
- Power outputs:
- Base station: max. 250 mW EIRP
- Handset: max. 250 mW EIRP
- Accessories provided: NiMH AAA x2 batteries 1.2 V 300 mAh
- Power Adapter Model: VT05EEU06045 Input: 100-240V-50/60Hz 0.15A max Output: 6V 450mA
- Hands-free function
- Alphanumeric backlit display
- Phonebook of 50 names and numbers
10 call ringtones - Identification of the name and number of the caller during an incoming call and in the event of a second call*
- Log of the last 20 calls received with the date and time***
- Works with 2 rechargeable NiMH batteries (provided)
Answering machine
14-minute digital answering machine
- Call screening
Voicemail mode or Greeting Only mode
- 2 greeting message options: pre-recorded or customisable
Remote activation and control
***Subject to the contract and technical availability of the service offered by the landline operator.
Technical specifications
| Outdoor range | Up to 300 metres* |
| Indoor range | Up to 50 metres* |
| Handset battery life (average values) | 8 hours talk time** 100 hours standby time** |
| Number of handsets | Up to 5 |
| Communication between handsets | Yes |
| 3-way call (1 external caller + 2 internal callers) | Yes |
| Power supply/Base station adapter/Charger | Base station adapter and charger Model: VT05EEU06045 Input: 100-240 V/50-60 Hz/0.15 A Output: 6 V DC/450 mA Use only the adapters that come with your phone. Single-phase alternating current, that excludes IT installations governed by the EN60950-1 standard. Warning: according to this standard, the network voltage is considered hazardous. |
| Telephone connection | Connection to an analogue TNV-3 telephone circuit (voltage of the telecommunications network) in accordance with the EN60950-1 standard. |
| Batteries | AAA - 1.2 V - 300 mAh (rechargeable NiMH)Use only the batteries that come with your phone.Ussing any other type of battery can cause an explosion.Dispose of your used batteries in accordance with the environmental protection rules which apply in your region. |
Operating temperatures | Between 5^ and 40^
- Variable depending on the environment.
** Times based on the initial charge of the batteries.
getting started
Inserting and charging the batteries
- Slide the battery compartment cover by pushing it downwards.
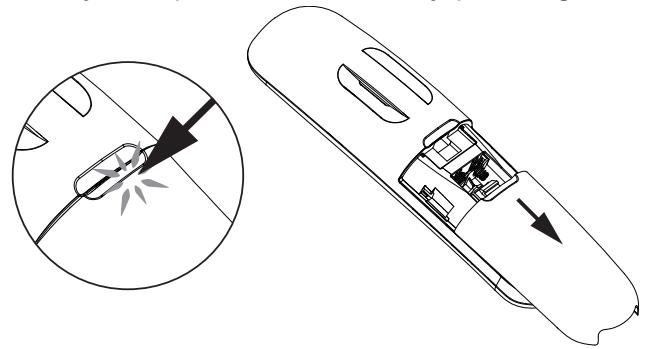
- Insert the 2 rechargeable AAA batteries supplied, as shown in the diagram. Make sure that the positive and negative ends of the batteries are pointing in the right direction.
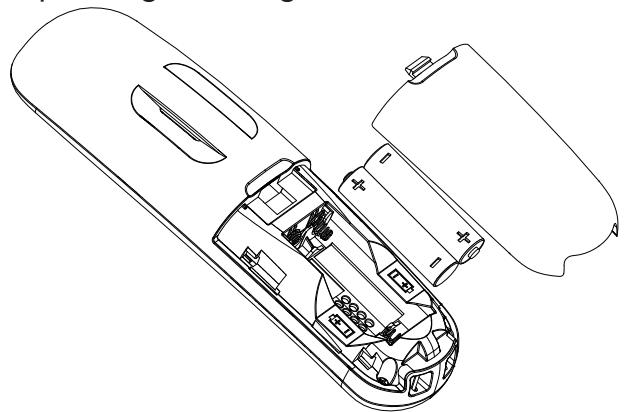
- Close the battery compartment.
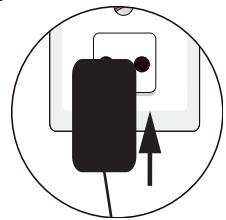
- Place the handset on the base station and leave the batteries to charge for 15 hours before first use.
- On the phone screen, the battery icon shows that it is charging and the green telephone button lights up.
- A beep sounds to let you know that the handset is correctly placed on the base station or on the charger.
Note
Use only rechargeable batteries with the same specifications as those supplied with the product.
Using non-rechargeable batteries or batteries that do not comply with the recommended models (refer to the "Technical specifications" chapter) may damage your product and are hazardous for human health.
The batteries can crack or release a corrosive liquid if they are improperly inserted, opened or exposed to heat. Do not throw the batteries into a fire: risk of explosion.
Connecting the base station
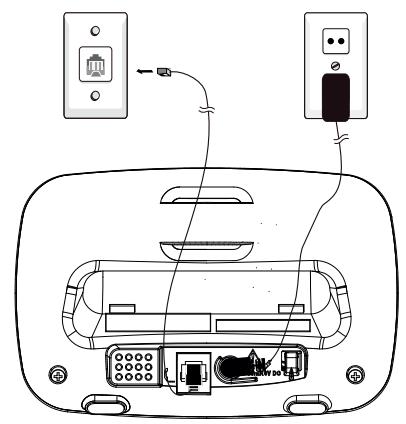
- Connect the telephone cord and the power supply under the base station as shown.
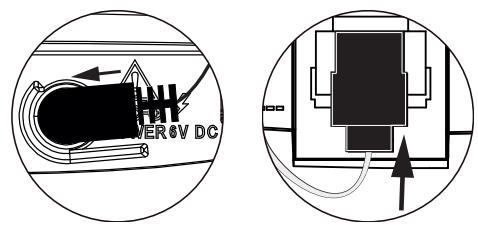
- Connect the telephone plug to the telephone wall socket.
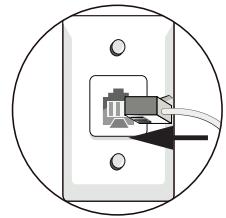
- Connect the power adapter to a 230V/50 Hz power outlet.
VoIP (Voice over Internet Protocol)
If your telephone subscription is included in your broadband offer (ADSL/Fibre hub), then you must connect the plug of the base station to the telephone connector on the back of your box. To avoid crackling on the line, you must also connect a microfilter (not supplied) which you can request from your operator (or which was supplied with your hub).
If you still have a standard telephone socket (F-010 "T" shaped socket, directly connected to the switched telephone network) in addition to your VoIP, then each of your telephones must be connected to a microfilter and not only the one connected to the modem in order to avoid any interference. To obtain additional microfilters, contact your telephone operator.
Charger connections (for the Duo/Trio models)
Connect the power adapter of each adapter to a 230 V AC, 50Hz power outlet.
list of menu Functions on the handset screen
Once the batteries are charged, the handset screen gives you access to a certain number of setting menus.
Press the key on OK to display the menu and the BIS key to display the different menus.
The C/INT key takes you back to the previous step or cancels the current action. The different menu functions are detailed later in the manual.
CALL LIST
- Displays the list of calls made to this handset.
PHONEBOOK
- Displays the list of saved names and numbers.
BASE STATION SETTINGS
BS RINGER
- Selects the ringtone of the base station.
RING VOLUME
- Adjusts the ringer volume on the base station.
DELETE HS
- Cancels the pairing between THIS HANDSET and the base station.
FLASH TIME
- Answering machine response time: Long, short or medium.
CHANGE PIN
- Locks the handset settings with a 4-digit code.
ECO MODE
- Enables or disables the Eco mode (which activates the answering machine sooner for remote access to the answering machine).
HS SETTINGS
ALARM
- For using the handset as an alarm clock.
RING SETUP
- Selects the personalised handset ringtones
TONE SETUP
- Configures the alert sounds (key beeps, out of range, low battery).
EQUALISER
- Adjusts the sound quality of the handset (bass, treble, normal).
LANGUAGE
- Changes the language of the handset interface.
RENAME HS
- Assigns a name to each handset (kitchen, office, etc).
AUTO ANSWER
- Enables and disables the automatic reply.
DATE & TIME
- Sets the format/date and time displayed on the handset.
DIRECT MEMORY (speed dial keys)
- Assigns a number to the M1 and M2 keys and to keys 1, 2 and 3 for a speed-dial call.
REGISTRATION
- Pairs THIS HANDSET with the base station. By default, the handsets supplied with the Brio Duo-R and Brio Trio-R models are already paired.
DEFAULT
- Resets all the settings.
ANS.MACHINE
MSG PLAYBACK
DELETE PLAYED MESSAGES
MEMO
- Records an audio message on the answering machine for the attention of another person (this message is not the personalised greeting).
TAM ON/OFF
TAM SETTINGS
ANSWER MODE
- Chooses between Voicemail mode and Answer Only mode.
TAM LANGUAGE
- Selects the default language of the answering machine greeting.
OGM SETTINGS
- Adjusts the greetings for the two modes (Voicemail or Answer Only).
ANS & REC
PLAY CURRENT OGM
RECORD OGM
ANSWER ONLY
PLAY CURRENT OGM
RECORD OGM
ANSWER DELAY
- Sets the number of rings before the answering machine answers the call.
REC. TIME
- Sets a limit to the duration of a message left on the answering machine (by default 120 seconds, i.e. 2 minutes).
BS SCREENING
- Enables or disables call screening.
REMOTE ACC.
- Enables or disables the ability to consult messages remotely (0000 by default).
COMPRESSION
- Adjusts the level of compression of the message sound file (to reduce its size in the memory of the answering machine).
CHANGE PIN
Changes the remote access code (highly recommended)
using your telephone
Make a call
Pre-dialling
Dial a phone number and press to start the call.
Press the C/INT key to delete the number.
Direct dialling
Press and dial the number.
Making a call using the direct memory keys
Press-and-hold the 1 / 2 / 3 key to dial the number stored in the memory. You must assign a phone number to these keys beforehand. For more details, see the "Shortcut keys" section of the manual.
Redial a previously dialled number
Press the B15 key to display the "Redial" list, then press the "Up" and "Down" keys A/B15 to select the entry from the list you want to call. Press to make the call.
Phonebook
Your handset can store up to 50 contacts (names and phone numbers). Each record can contain up to 20 digits for the telephone number and 12 characters for the name. You can assign a specific ringtone to each contact in the phonebook. Phonebook entries are stored in alphabetical order of names.
Adding a new contact to the phonebook
In standby mode:
- Press A, OR Press OK and A/BIS to select the PHONEBOOK option. Then press OK to open the phonebook.
- The ADD option is displayed. Press OK to select it.
- The NAME option is displayed. Press OK to select it.
- Enter the contact's name using the keypad keys. The corresponding letters are shown on each key. Press repeatedly to select the letter you want. After a pause of 3 seconds, the cursor automatically moves on to the next available space.
- If you make a mistake, press the C/INT key to delete your last entry.
- Press OK to confirm name entered.
- The NUMBER option is displayed. Press OK to select it.
- Enter the contact's number using the keypad keys.
- Press OK to confirm the entry of the number.
- Press OK and A BIS to select the particular ringtone to be assigned to the contact.
- Press OK to add this new contact to the phonebook.
Making calls from the phonebook
In standby mode:
Press or press OK and BIS to select the PHONEBOOK option. Then press A/BIS to select the person you want to call. Press to make the call.
For the Duo and Trio models, the phonebook, call log and last number saved for redialling features are the same on all the handsets.
Identification of your callers
If you have subscribed to the "Caller ID" option in your contract with your operator and the network transmits this information, the name or number of your caller will appear on the screen. The log stores the last 20 calls received with the date and time when the calls were received. If the caller has asked for their telephone number to be hidden, the message " PRIVATE " will appear on the screen of your handset. If the caller's telephone number is not available, the message " Unavailable " will appear on the screen of your handset.
In standby mode, if you have received three calls and have not answered them, the message " 3 NEW CALLS " appears on the screen.
View the history of received calls
All the calls you receive are saved in the call list, from the most recent to the oldest. When this list is full, the oldest call is deleted so that a new call can be recorded.
Calls that you have not answered and that you have not yet consulted are marked in the call log with the icon 已 ^ 已
- Press OK to select the CALL LIST option.
- Press the key to select the call you want.
Call a number in the call history
Repeat steps 1 and 2 of the "Access to the call list" section. Dial the required phone number and press to make the call.
Phone settings
Selecting a ringtone for internal/external calls
- Press OK followed by until the screen displays the HS SETTINGS option.
- Press OK to select it followed by BIS until the screen displays the RING SETUP option.
- Press OK to select it followed by BIS until the screen displays the EXT. RING option.
- Press OK to select it. The screen displays Melody 1 and plays the ringtone. Press A B15 to review the different ringtones. Press OK to select the ringtone of your choice.
- The screen automatically displays the INT. RING option to set the intercom ringtone. Repeat the procedure described in 4. and 5.
Adjusting the ringer volume
- Press OK and BIS to select the HS SETTINGS option.
- Press OK MENU followed by A BIS to select the RING SETUP.
- Press OK MEnu followed by A BIS to select the RING VOL.
- Press OK followed by A/BIS to select the sound level you want for the ringer (6 levels are available, including VOLUME OFF to disable the ringer).
Note: the ringer sounds at the selected level as you scroll through the list of volume levels. For the VOLUME OFF level, no ringer sounds, but the icon appears on the screen.
OK 5. Press OK MENU to confirm.
Adjusting the earpiece and loudspeaker volume
You can choose between 5 settings (VOLUME 1 to VOLUME 5).
During a call:
Press to select a setting between 1 and 5. The current volume is displayed on the screen. When you end the call in progress, the new volume setting remains in effect for subsequent calls.
Configuring the shortcut keys and the M1 and M2 keys
- Press OK followed by A BIS to select the HS SETTINGS option.
- Press OK to select DIRECTMEMORY.
- Press OK followed by to select the key you want (M1, M2, KEY 1, KEY 2 or KEY 3).
- Press OK and enter the name.
- Press OK and enter the telephone number to be stored in the memory using the keypad.
- Press OK to confirm.
Note: Press the M1 or M2 buttons to automatically call the number saved for this key.
Press-and-hold the 1 or 2 buttons or 3 to automatically call the number that has been assigned to this key.
Answering machine feature
Access the answering machine using the keys on the base station or using the handset. The answering machine has a total recording time of 14 minutes. You can also record memos for the attention of those who will be using your phone. When the answering machine memory is full, the message ANS MEM FULL is displayed on the handset screen.
Activating/deactivating the answering machine
You can activate/deactivate the answering machine feature from the base station or the handset. By default, the answering machine is activated and in Voicemail mode. A pre-recorded greeting will be played to your callers, asking them to leave a message. Even if the answering machine is deactivated, it will automatically activate in Greeting Only mode after 10 rings, so that you can activate it and adjust it remotely, if necessary.
Activating the answering machine from the base station:
-
Press the 0 key on the base station.
-
If you activate the answering machine, the icon is displayed on the handset screen.
- If you deactivate the answering machine, the icon disappears from the handset screen and the base station displays "--".
Activating the answering machine from the handset:
- Press OK MENU followed by BIS to select the ANS MACHINE option.
- Press OK MENU followed by A BIS to select TAM ON/OFF.
- Press OK to select ACTIVATE or DEACTIVATE.
-
Press UK to confirm.
-
If you activate the answering machine, is displayed on the handset screen.
- If you deactivate the answering machine, disappears from the handset screen and the base station displays "---".
Listening to answering machine messages
When receiving new messages on the answering machine, flashes on the handset screen and the base station display flashes, indicating the number of new messages received. The messages are played in chronological order, from the most recent to the oldest.
Listening to new messages from the base station:
- Press the key on the base station.
- The messages are played in chronological order, from the most recent to the oldest.
- Press the and keys to increase or decrease the volume.
Listening to new messages from the handset:
- Press OK 10 BIS 10 to select the ANS MACHINE option.
- Press OK to select MSG PLAYBACK.
- Press OK to listen to the first message and display the date and time of reception.
- While playing the messages, press the and keys to increase or decrease the volume.
- While playing the messages, press OK and BIS to perform one of the following functions: STOP, TRANSFER, PREVIOUS or DELETE.
STOP: stops playing the current message.
TRANSFER: plays the following message.
PREVIOUS: replays the current message from the beginning.
DELETE: deletes the current message and starts playing the next message.
OK 6. Press MENU to confirm.
Note: you can also use the following keys while playing messages.
- Press the 5 key to Stop playback in progress.
- Press the 4 key once to restart the current message. Press 4 twice to stop the current playback and play the previous message.
Press the 6 key to play the following message.
- Press the 2^key to delete the message that is currently playing.
Deleting all the messages from the answering machine
Deleting all the messages from the base station:
In standby mode:
- Press-and-hold the key on the base station.
- All the messages that have been played are deleted.
Note: the new messages that have not yet been played are preserved.
Deleting all the messages from the handset:
- Press OK MENU and A/BIS to select the ANS MACHINE option.
- Press OK to select the DELETE PLAYED MSG option.
- Press OK and A BIS to confirm.
- Press OK to delete all played messages.
Configuration of the answering machine
You can adjust the answering machine using the TAM SETTINGS menu.
Changing the answering machine mode
By default, the answering machine operates in Voicemail mode (ANS & REC) so that your callers can leave a message. It also has a "Answer Only" mode (ANSWER ONLY) so that your callers can listen to your greeting, but not to leave a message. The greeting prompts them to call back later.
- Press OK followed by BIS to select the ANS MACHINE option.
- Press OK to select TAM SETTINGS.
- Press OK to select ANSWER MODE.
- Press OK followed by BIS to select ANS & REC or ANSWER ONLY.
- Press OK to confirm.
Changing the language of the greeting
The answering machine plays a greeting to your callers. Your telephone is supplied with a pre-recorded greeting for the ANS & RECmode and another greeting for the ANSWER ONLY mode. You can change the language of this greeting.
- Press OK followed by BIS to select the ANS MACHINE option.
- Press OK followed by A BIS to select TAM SETTINGS.
- Press OK to select TAM LANGUAGE.
- Press OK followed by A/BIS to select the required language of the greeting. You can choose between French, English, Dutch and German.
OK 5. Press to confirm.
Recording your own greeting
You can record your own greeting for the ANS & RECand ANSWER ONLY modes. It will be played each time a call is answered by the answering machine. If your greeting is deleted, the answering machine automatically plays your phone's pre-recorded greeting.
- Press OK followed by BIS to select the ANS MACHINE option.
- Press OK to select TAM SETTINGS.
- Press OK followed by A bIs to select the OGM SETTINGS.
- Press OK followed by BIS to select ANS & REC or ANSWER ONLY.
- Press OK followed by A/BIS to select REC OGM.
- Press OK to start recording your greeting.
- The message "REC" appears on the screen.
- Press OK to stop recording and save your greeting. You can also press C/INT to stop recording without saving the greeting.
Playing and deleting the greeting
Playing the greeting
- Press OK followed by BIS to select the ANS MACHINE option.
- Press OK 2016 followed by BIS to select TAM SETTINGS.
- Press OK MENU followed by A BIS to select the OGM SETTINGS.
-
Press OK followed by A BIS to select ANS & REC or ANSWER ONLY.
-
Press OK followed by BIS to select REC OGM.
- Press UK to listen to your greeting (if you have recorded your own greeting). The message "PLAY OGM" appears on the screen.
- Press OK MENU to stop the playback.
Deleting your personalised greeting
- Follow instructions 1 to 6 in the previous section.
- Press C/INT to delete your greeting. The pre-recorded greeting is automatically reactivated.
Note: you cannot delete the pre-recorded greeting.
Changing the ring count
When in use, the answering machine activates after a ring count that can be set to between 2 and 8. The "TIME Saver" tax saving feature activates the answering machine during remote access after 2 rings if there are new messages and after 6 rings if there are no messages.
- Press OK followed by BIS to select the ANS MACHINE option.
- Press OK MENU followed by A BIS to select TAM SETTINGS.
- Press OK MENU followed by A BIS to select ANSWER DELAY.
- The possible values are: 2 RINGS, 4 RINGS, 6 RINGS, 8 RINGS or TIME SAVER.
- Press OK and A/BIS to select the response time before the answering machine takes the call.
OK 6. Press MENU to confirm.
Remote access to your answering machine
- Dial your phone number.
- Let the telephone ring until the answering machine starts. During the personalised greeting, press × and dial your remote access code (by default, your PIN code is 0000). In order to preserve your privacy, you are strongly advised to change the remote access code. Go to the following section: Change PIN code below.
You can use remote access to carry out the following actions:
| ACTION | KEY |
| Start playing the messages again | 5 |
| Stop playing the message | 8 |
| Delete the message | 2 (during playback) |
| Skip the message | 6 |
| Turn on the answering machine | 7 |
| Turn off the answering machine | 9 |
Personalise the access code (PIN) to your answering machine using remote access
- Press OK followed by BIS to select the ANS MACHINE option.
- Press OK to select TAM SETTINGS.
- Press OK followed by to select CHANGE PIN.
- You must first enter the old PIN (by default: 0000) and confirm with OK MENU
- Then enter the new 4-digit PIN code and confirm with OK MENU.
- Then confirm the new 4-digit PIN code and confirm with OK.
- A beep indicates that the new PIN code is registered.
Pairing a handset
By default, the handsets supplied with the Brio Duo-R and Brio Trio-R models are already paired with the base station. You can pair a total of five handsets with the same base station.
If, however, there is no dial tone on a handset or the network symbol no longer appears, then you must pair the handset with the base station again:
- Take the handset, which is charging, off the base station. You will find the pairing button at the bottom of the handset cradle.
- Press-and-hold the button for about five seconds. A long beep sounds and the blue LED on the base station flashes. The base station is in pairing mode.
- Press OK followed by A BIS to select the REGISTRATION option.
- Press OK MENU-
- Enter the 4 digits of your PIN code (by default, this code is 0000).
-
Press UK MENU
-
Once the handset is paired with the base station, the base station automatically assigns a number (1 to 5) to it. This number is displayed on the right of the screen. It is used for internal calls. If the pairing fails, the icon no longer appears on the handset screen.
- Repeat the pairing process for each of the handsets (no more than 5) if needed.
Reset all the settings (Default)
You can reset all of the handset settings to resolve any problem.
- Press OK followed by A/BIS to select the DEFAULT option.
- You are prompted to enter the handset PIN code (0000 by default).
- Press OK MENU-
- You are asked to confirm.
- Press OK to confirm or wait 5 seconds to cancel.
- A beep indicates that the handset has been reset.
in the event of a problem
If you have problems with your telephone, see the table below.
As soon as you notice a problem with your phone, remove the batteries from all the handsets, disconnect the base station from the mains power, reconnect the base station and reinsert the batteries in the handsets (this takes 1 minute).
| Problem | Possible cause | Suggestions |
| No dial tone when I press the button. | 1. The phone is not connected to the telephone network. 2. The adapter is not properly connected to the base station. 3. Another handset is already using the line. | 1. Check that the telephone cable is correctly connected to the base station and to the telephone wall socket. 2. Check the power supply connection. 3. Wait until the line is free. |
| The "OUT OF RANGE" message appears. | 1. The handset is out of range of the base station. 2. The base station is not connected to the mains power. | 1. Get closer to the base station. 2. Plug the base into a power outlet. |
| The screen is off. | The batteries are no longer sufficiently charged. | Recharge the batteries. |
| Your caller cannot hear you. | The microphone is muted and the MUTE feature is activated. | Reactivate the microphone. |
ANS MACHINE
| The answering machine does not record any new messages. | 1. The answering machine is deactivated. 2. You are in Greeting Only mode. 3. The memory is full. | 1. Activate the answering machine. 2. Re-program the Voicemail mode. 3. Delete messages. |
| The caller cannot leave a message. | 1. The answering machine is deactivated. 2. The answering machine memory is full. | 1. Activate the answering machine. 2. Delete the messages that you no longer want to keep. |
| Unable to get remote access to the answering machine. | 1. You have entered an incorrect PIN code. 2. You dialled your phone number too quickly. 3. The answering machine is deactivated. | 1. If you don't remember your PIN code, reset the default PIN code. 2. Firmly press each key. 3. Activate the answering machine. |
| Problem | Possible cause | Suggestions |
| While recording the greeting or playing a message on the answering machine, the ringer sounds and the recording or playback stops. | A call has been detected. | Answer the call and then start recording your greeting again. |
However, if the problem persists, call the following number for help: +33 (0)825 850 850 from Monday to Saturday from 8:00 am to 8:00 pm (call charges at applicable rates).
Before contacting technical support, please note the serial number of your phone, located under the base station, starting with S/N°: ... In addition, please contact the telephone helpline from another phone, other than the one about which you are calling, while keeping the latter close to hand in case you need to make any adjustments to it. The store where you bought your phone can also give you the information you need and provide after-sales service.
How to fix problems of poor sound quality
Telephone connected to the broadband hub
If your telephone line is provided by a broadband contract that uses the telephone line (ADSL), you must connect DSL filters to EACH telephone outlet that is connected to a telephone. The ADSL signal can cause interference, noise, grinding noises, display problems on the screen and other problems on your handsets. DSL filters will block the high DSL frequencies that cause the problems. Your broadband network operator should be able to provide you with these filters (they are generally delivered with the hub)
Distance between the handset and charging cradle
Although you are free to move about with the cordless phone, if the sound quality decreases, move closer to the telephone cradle. The range may vary depending on environmental conditions, the structure
of the walls and the duration of use. For best reception, try installing the telephone cradle higher up. If you plan to use the phone in your garden, for example, place the telephone cradle near a window.
Interference from other electronic and electrical devices
Other electronic products (802.11 wireless WIFI routers, radios, radio masts, cell phones, intercoms, CCTV screens, televisions, personal computers, small household appliances and other cordless phones, e.g. your neighbour's cordless system on the other side of the wall) may cause interference with your cordless phone. Try to position your phone as far away from these types of devices as possible.
Interference from electrical outlets
If your phone shares a power outlet with a modem or is plugged into a voltage limiter, try plugging the phone into a separate outlet. If this does not resolve the problem, move the phone away from the modem or use different voltage limiters.
If the phone is plugged into an outlet that has not been used for a while, then the problem may be with the outlet (oxidation, damaged socket that causes crackles in the earpiece, etc). Plug the phone into a socket that you know is working properly.
Telephone line problem
The problem can also come from a telephone installation which is no longer compliant, poorly fitted, damaged, etc. Test your phone in another location, e.g. the house of your neighbour or a relative. If the device works fine in the other location, then ask your telephone service provider to check your line.
EN. Environmental protection
This symbol on the product means that its processing as a waste product is subject to regulations related to electric and electronic waste (DEEE). This appliance cannot be considered as household waste and must be subject to collection specific to this waste. Waste return and collection systems are organised by local authorities (recycling centre) and retailers. By directing your appliance at the end of its useful life to the recycling sector, you will contribute to environmental protection and will also prevent harmful consequences on your health.
*EN. 2 year warranty
Warranty valid from the date of purchase (the receipt is proof of purchase). This warranty does not cover defects or damage resulting from a faulty installation, incorrect use, or normal wear and tear.