ECFWVC100 - Vacuum Cleaner ESSENTIELB - Free user manual and instructions
Find the device manual for free ECFWVC100 ESSENTIELB in PDF.
| Product Type | Cordless Floor Cleaner Vacuum |
| Brand | ESSENTIELB |
| Model | ECFWVC100 |
| Battery | Model M7, 21.6 V, 2600 mAh |
| Rated Power | 125 W |
| Charge Input | 100-240 V ~ 50/60 Hz |
| Clean Water Tank Capacity | 650 ml |
| Dirty Water Tank Capacity | 500 ml |
| Cleaning Modes | Automatic, Max, Suction |
| Self-Cleaning | Yes, via dedicated button |
| Roller Brush | Removable and washable |
| Filter | Washable HEPA |
| Solid-Liquid Separator | Yes |
| Voice Function | Yes, can be activated/deactivated |
| Display | Screen with battery, mode, and alert indicators |
| Max Tilt Angle | 140° |
| Max Water Temperature | 30 °C |
| Charging Time | 4 hours at room temperature |
| Runtime | Not specified, depends on mode |
| Weight | Not specified |
| Dimensions | Not specified |
Frequently Asked Questions - ECFWVC100 ESSENTIELB
User questions about ECFWVC100 ESSENTIELB
0 question about this device. Answer the ones you know or ask your own.
Ask a new question about this device
Download the instructions for your Vacuum Cleaner in PDF format for free! Find your manual ECFWVC100 - ESSENTIELB and take your electronic device back in hand. On this page are published all the documents necessary for the use of your device. ECFWVC100 by ESSENTIELB.
USER MANUAL ECFWVC100 ESSENTIELB
Cordless vacuum floor cleaner
natural_image
Exterior view of a white and black vacuum cleaner (no text or symbols visible)Notice d'utilisation / User guide / Bedienungsanleitung / Gebruiksaanwijzing
text_image
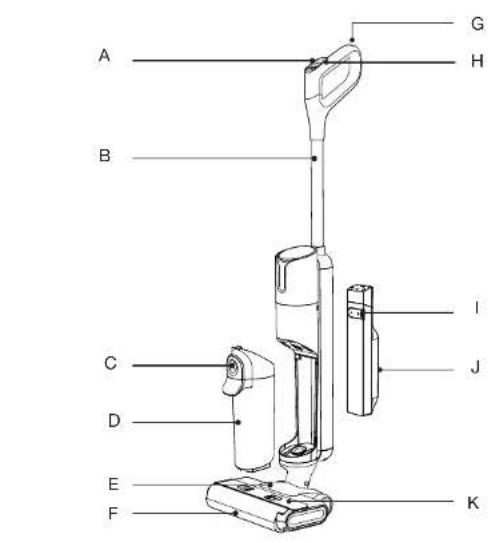
A B C D E F G H I J K


| FR EN DE NL | ||||
| Description du produit | Product Structure | Produktbeschreibung | Productomschrijving | |
| A | Bouton de changement de mode | Mode Switch Button | Modus-Umschalttaste | Modusknop |
| B | Poignée Handle Stiel Handgreep | |||
| C | Bouton de libération du réservoir d'eau sale | Dirty Water Tank Release Button | Entriegelungstaste für Schmutzwassertank | Ontgrendelingsknop voor vuilwaterreservoir |
| D | Réservoir d'eau sale | Dirty Water Tank | Schmutzwassertank | Vuilwaterreservoir |
| E | Brosse pour sols Floor Brush Bodenbürste | Vloerborstel | ||
| F | Brosse à rouleau | Roller Brush | Bürstenwalze | Rolborstel |
| G | Bouton d'autonettoyage | Self-Cleaning Button | Selbstreinigungstaste | Zelfreinigingsknop |
| H | Bouton marche/arret | On/off Button | Ein-/Ausschalter | Aan/uit-knop |
| I | Bouchon en caoutchouc du réservoir d'eau propre | Rubber Plug Of Clean Water Tank | Gummiverschluss des Frischwassertanks | Rubberen dop voor schoonwaterreservoir |
| J | Réservoir d'eau propre | Clean Water Tank | Frischwassertank | Schoonwaterreservoir |
| K | Capot de la brosse à rouleau | Roller Brush Cover | Abdeckung der Bürstenwalze | Rolborstelkap |
| Accessoires | Accessories | Zubehör | Accessoires | |
| L | Station de charge | Charging Dock | Ladestation | Oplaadstation |
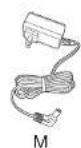
| M | Adaptateur | Adapter | Netzteil | Adapter |
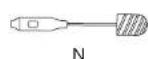
| N | Brosse de nettoyage | Cleaning Brush | Reinigungsbürste | Reinigingsborstol |
| O | Filtre HEPA x 2 | HEPA Filter x 2 | 2 x HEPA-Filter | HEPA-filter x 2 |
| P | Brosse à rouleau x 1 | Roller Brush x 1 | 1 x Bürstenwalze | Rolborstel x 1 |
text_image
Clic Cliquernatural_image
Illustration of a person using a handheld device to lift a wall-mounted device, with an inset showing the hand holding a tool (no text or symbols present)natural_image
Diagram showing a vacuum cleaner with a close-up view of its internal mechanism (no text or symbols present)natural_image
Line drawing of a mechanical device with a hand holding a circular component and an upward arrow indicating motion (no text or symbols)natural_image
Line drawing of a hand using a tool to press or install a rolled-up sheet, with a downward arrow indicating compression (no text or symbols present)natural_image
Line drawing of a mechanical component with an arrow indicating direction (no text or symbols)natural_image
Line drawing of a mechanical component with an arrow indicating direction (no text or symbols)natural_image
Line drawing of a mechanical assembly with a base and mounting bracket (no text or symbols)Rappels :
natural_image
Two line drawings of a handheld device with a power button and a base-mounted lever (no text or symbols)text_image
Technical diagram showing four steps of a hairdryer tool with labeled components and directional arrows indicating movement.Autonettoyage
natural_image
Line drawing of a vacuum cleaner with a circular head indicator (no text or symbols)natural_image
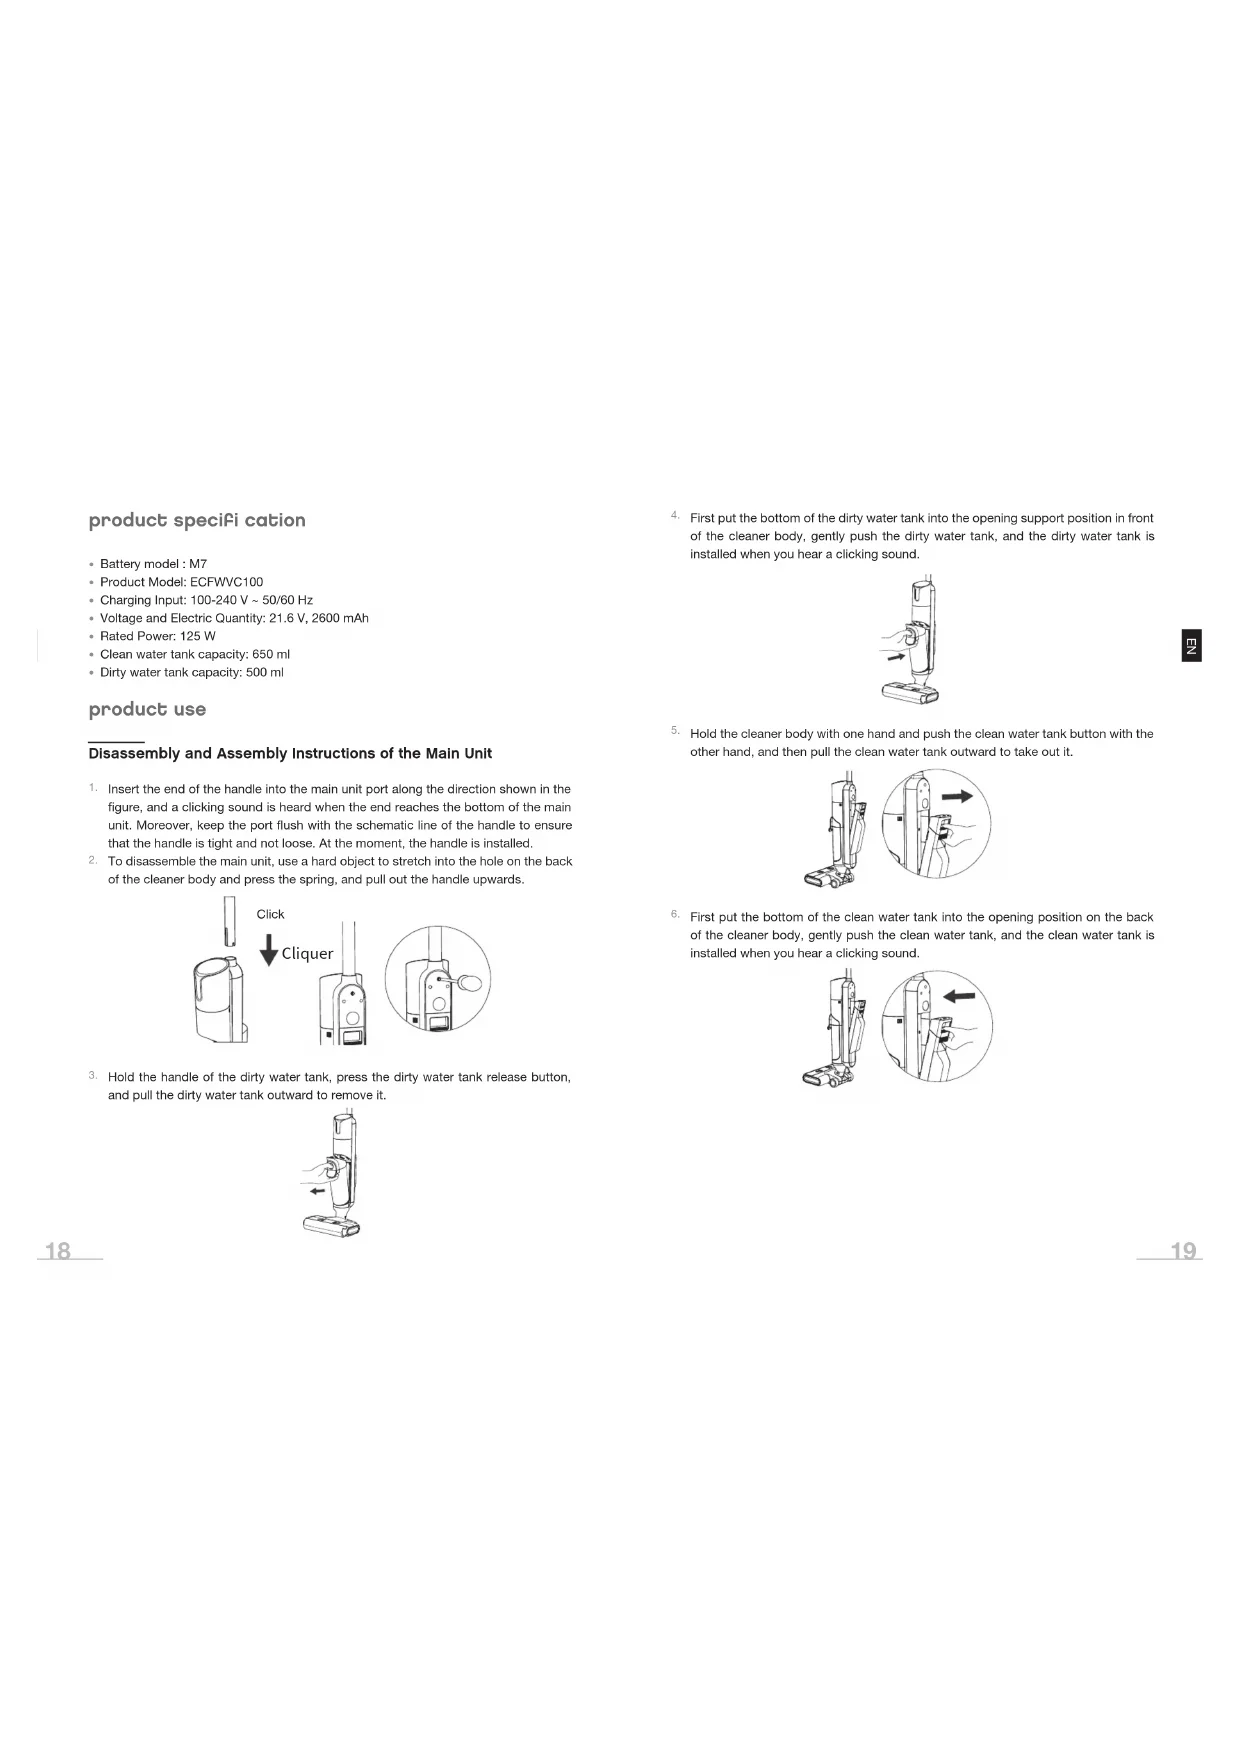
Three-step diagram showing hand positioning of a device with arrows indicating movement (no text or symbols)product specifi cation
- Battery model : M7
• Product Model: ECFWVC100
• Charging Input: 100-240 V \~ 50/60 Hz
• Voltage and Electric Quantity: 21.6 V, 2600 mAh
• Rated Power: 125 W
• Clean water tank capacity: 650 ml - Dirty water tank capacity: 500 ml
product use
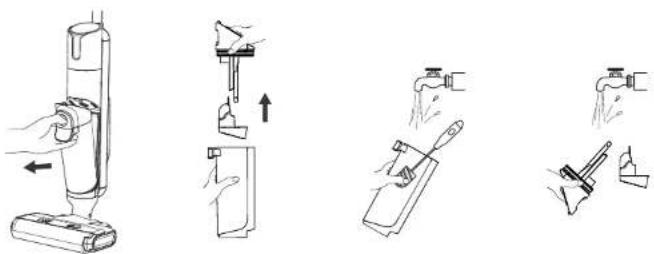
Disassembly and Assembly Instructions of the Main Unit
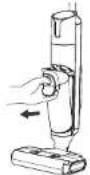
- Insert the end of the handle into the main unit port along the direction shown in the figure, and a clicking sound is heard when the end reaches the bottom of the main unit. Moreover, keep the port flush with the schematic line of the handle to ensure that the handle is tight and not loose. At the moment, the handle is installed.
- To disassemble the main unit, use a hard object to stretch into the hole on the back of the cleaner body and press the spring, and pull out the handle upwards.

text_image
Click Cliquer- Hold the handle of the dirty water tank, press the dirty water tank release button, and pull the dirty water tank outward to remove it.
- First put the bottom of the dirty water tank into the opening support position in front of the cleaner body, gently push the dirty water tank, and the dirty water tank is installed when you hear a clicking sound.

- Hold the cleaner body with one hand and push the clean water tank button with the other hand, and then pull the clean water tank outward to take out it.
natural_image
Illustration of a robotic device with a close-up view showing hand positioning and a directional arrow (no text or symbols)- First put the bottom of the clean water tank into the opening position on the back of the cleaner body, gently push the clean water tank, and the clean water tank is installed when you hear a clicking sound.
natural_image
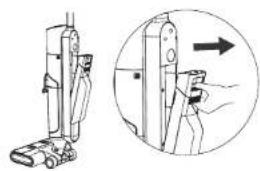
Diagram showing a vacuum cleaner with a close-up view of its internal mechanism (no text or symbols present)Disassembly and Assembly Instructions of the Roller Brush Cover
- Press the button, and pull the roller brush cover upwards to remove it.
natural_image
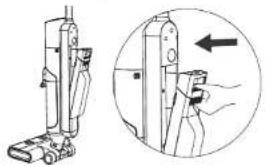
Line drawing of a mechanical device with a hand adjusting a component, showing an upward arrow (no text or symbols)- Align the roller brush cover with the floor brush, press it down, and the roller brush cover is installed when a clicking sound is heard.

natural_image
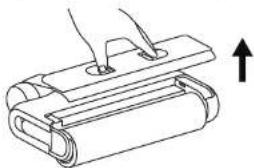
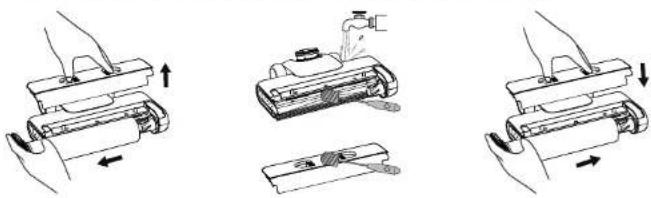
Line drawing of a hand pressing down on a rolled-up sheet of paper with a downward arrow indicating compression (no text or symbols)Disassembly and Assembly Instructions of the Roller Brush
- Grasp the side handle of the roller brush, pull it outward and remove the roller brush.
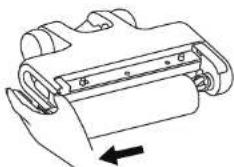
natural_image
Line drawing of a mechanical component with an arrow indicating direction (no text or symbols)- Align the right end of the roller brush with the right end of the floor brush, push it to the right, and insert the left handle into the corresponding position. At the moment, the roller bush is installed.

Operating Instructions
PREPARATION
-
Before use, please check whether the cleaner is powered. If the power is insufficient, please charge it in time and use it after fully charging.
-
The Power On defaults to the Auto mode, and the appropriate mode and function may be selected and switched according to the actual situation.
-
Add water to the clean water tank
(1) Remove the clean water tank.
(2) Open the rubber plug of the clean water tank and inject clean water to the water level. The water temperature must be below 30^ C.
(3) Close the clean water tank cover to ensure it is tight without looseness.
(4) Reinstall the clean water tank onto the cleaner body till you hear a clicking sound.
START TO WORK
The cleaner is equipped with a vertical ON button. Please tilt the cleaner for use after startup. Do not tilt it more than 140° to avoid leakage of the dirty water tank.
- Tilt the main unit and start the cleaner.
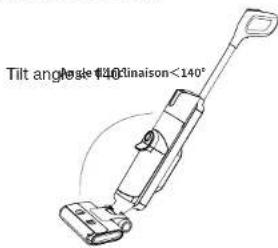
text_image
Tilt angle 140° Angle <140° Cinaison<140°Main Interface Function Display
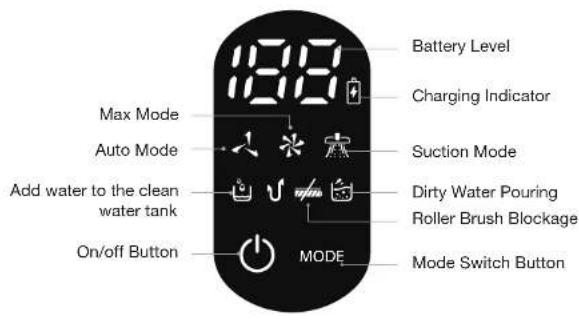
text_image
Battery Level Charging Indicator Max Mode Auto Mode Suction Mode Add water to the clean water tank Dirty Water Pouring Roller Brush Blockage On/off Button MODE Mode Switch ButtonDescription Operating Instructions
| On/off Button Press the ON/OFF button to turn the cleaner on/off. | |
| Auto Mode | Upon startup, the machine defaults to Auto mode, which is suitable for daily ground cleaning. |
| Max Mode | Press the mode switch button, and switch the mode to the MAX mode. The mode is suitable for removing stubborn stains and water accumulation. |
| Suction Mode | This mode only absorbs water and is suitable for bathrooms to absorb excess water. |
| Auto Cleaning | In the charging state, press the Auto Cleaning button, and the cleaner will automatically clean the roller brush and pipeline. |
| Low Battery Reminder | When the battery level is ≥ 20%, the charging indicator remains solid green. When the battery level is < 20%, the charging indicator flashes red at 0.6Hz until the battery is depleted, at which point the machine shuts down (reserving one cycle of self-cleaning power and maintaining a 20% reserve). |
Description Operating Instructions
| Dirty Water Pouring Reminder | If the dirty water tank is full of dirty water, the dirty water tank indicator light of the cleaner will flash, and the cleaner will automatically shut down. Please pour the dirty water, reinstall the dirty water tank onto the cleaner, and then start the cleaner. |
| Water Adding Reminder | If the water in the clean water tank is used up, the clean water tank indicator light of the cleaner will flash. Please shut down the cleaner and take down the clean water tank to add clean water. Reinstall the clean water tank onto the cleaner before starting the cleaner. |
| Roller Brush Cleaning Reminder | If the roller brush is wound by hair and other objects, the floor brush indicator light of the cleaner will flash, and the cleaner will automatically shut down. Please remove the roller brush and clean it. Then reinstall the roller brush and the roller brush cover before starting the cleaner. |
Voice off & on
Requirement: The machine has to be in upright standby before the voice can be turned off or on.
Press and hold the self-cleaning button for 3 seconds to turn on/off the voice. When the voice is turned off, the screen will display a mute status.

Long press 3s

Language Switch
Requirement: The machine has to be in upright standby before the language can be switched.
Press and hold the mode switch button for 3 seconds to enter language switch mode. The screen will display a breathing state. Press the function button briefly to switch between languages (languages available: English, German, French, Italian). After the switch is complete, wait for 3 seconds to exit the language switch mode.
Long press 3s

text_image
MODEDirty Water Pouring
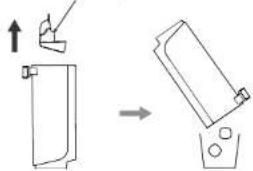
- Gently press the dirty water tank release button to remove dirty water tank.

- Hold the tank body with one hand and pull out the dirty water tank upwards with the other hand.

- Take out the solid-liquid separator, pour the solid waste into the trash can and pour out the dirty water.
Solid-liquid separator
natural_image
Diagram showing a mechanical device before and after assembly, with no visible text or symbols- Reinstall the dirty water tank onto the cleaner in place after hearing a clicking sound.

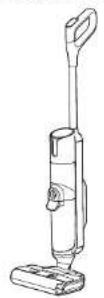
Product Charging
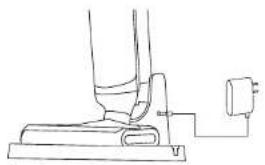
- After use, place the cleaner vertically on the charging station, insert one end of the adapter into the charging dock, and connect the other end to a socket in the home. During charging, keep the cleaner upright and close to the toe of the wall to avoid tripping and other injuries.
- The power indicator flashes during charging.
- After the charging is completed, the display screen turns off after 10 minutes.
natural_image
Line drawing of a mechanical assembly with a base and mounting bracket (no text or symbols)Reminders:
- Generally, 10-50% of the battery capacity is reserved when the product leaves the factory. It is recommended to fully charge the product when using it for the first time to ensure the effect and duration of use.
- Please fully charge the battery before use if it has not been fully charged for a long time.
- It takes 4 hours for the battery to be fully charged at room temperature. The actual charging time varies depending on the ambient temperature and voltage.
- After fully charged, if there is no other operation, the cleaner will automatically shut down and all indicator lights will be off.
- If the product is not used for a long time after purchase, please use the special charging dock provided by us to charge the battery for 3 hours every 3 months (without full charging).
maintenance and cleaning
Clean the Body
- Before cleaning, make sure that the machine is powered off.
- Wipe the body with water or neutral detergent. Before wiping, be sure to wring the cleaning cloth dry, and do not let water flow into the machine.

natural_image
Line drawings of a hand holding a power button next to a handheld vacuum cleaner (no text or symbols)Clean the Dirty Water Tank
- When the dirty water tank is full or the machine is shut down, remove the dirty water tank.
- Remove the dirty water from the dirty water tank and wash the dirty water tank with clean water.
- Wash the dirty water tank cover, HEPA filter and solid-liquid separator.
- After the dirty water tank cover and the HEPA fi liter are dried, assemble them and put them back into the machine.
natural_image
Illustration of four different hand tools or devices, showing different mechanical or electrical configurations (no text or symbols present)Auto Cleaning
- Please put the machine back to the base in time after use.
- Make sure that the water volume of the clean water tank exceeds the auto cleaning minimum water level, and the dirty water tank has no dirty water. Then press the self-cleaning button, and the machine will start auto cleaning.
- After auto cleaning, please clean the dirty water tank and dry the roller brush and HEPA filter in the air.

natural_image
Line drawing of a handheld vacuum cleaner with a circular head indicator (no text or symbols)Clean the Suction Port of the Floor Brush and the Roller Brush Cover
- Clean the suction port of the floor brush with a cleaning brush.
- Clean the roller brush cover with a cleaning brush.
- After cleaning, reinstall the roller brush and its cover onto the machine.
natural_image
Three-step diagram showing hand positioning of a device with arrows indicating movement (no text or symbols)Tips for Use
- It is recommended to clean the roller brush, roller brush cover, suction port and pipeline regularly.
- After the heavy oil stains are removed by the roller brush, it is recommended to start the auto cleaning function many times to clean the roller brush and pipeline. You can also take down the roller brush after auto cleaning and soak or wash the roller brush with warm water.
troubleshooting
Problem Possible Cause Solution
| Poor running of roller brush. | The roller brush is blocked. Please clean the roller brush. | |
| The roller brush is worn. Please contact the authorized after-sales service center to replace the roller brush. | ||
| The drive belt is worn. Please contact the authorized after-sales service center to replace the drive belt. | ||
| Abnormal operation of the vacuum cleaner. | The roller brush, roller brush cover and dirty water tank are not installed in place. | Please reinstall them. |
| The suction port or pipe is blocked. | Please clean the suction port or pipe. | |
| The dirty water tank has the specified capacity. | Please take out the dirty water tank to pour out wastewater. | |
| The filter port above the dirty water sensor is dirty. | Please clean the filter port. | |
| The HEPA fi liter is dirty or not correctly positioned. | Please clean the HEPA fi liter and position it correctly. | |
| The roller brush is entangled by objects such as hair. | Please clean the roller brush. | |
| Abnormal noise when the machine is running. | The dirty water tank has the specified capacity. | Please take out the dirty water tank to pour out wastewater. |
| The suction port is blocked. Please clean the suction port. | ||
| The floor brush is not installed in place. | Please reinstall the floor brush. | |
| No water comes out when the machine is working. | Water shortage in the clean water tank. | Add water to the clean water tank. |
| The clean water tank is not installed in place. | Please reinstall it. | |
Problem Possible Cause Solution
| The roller brush automatically stops working. | The floor brush protection device is running. | Please check whether there is any foreign matter hindering the operation of the roller brush. Remove the foreign matter and reinstall it before use. |
| Air outlet leakage. | The HEPA fi liter is not dried after cleaning. | Please dry the HEPA fi liter. |
| The HEPA fi liter is not installed. Please install the HEPA fi liter. | ||
| Water leakage at the bottom of the roller brush. | The dirty water tank or HEPA fi liter is not installed. | Please install the dirty water tank or HEPA fi liter. |
| The water pump is damaged. Please contact the authorized after-sales service center to replace the water pump. | ||
| Auto cleaning fails to start. | The machine is not correctly placed in the charging dock. | Please correctly place the machine to the charging dock and correctly connect the adapter. |
| Clean water tank leakage. | The clean water tank is damaged. | Please contact the authorized after-sales service center to replace the clean water tank. |
| No voice function. | The voice function is turned off. Press and hold the self-cleaning button for 3 seconds in the Power On state. | |
| The horn is damaged. Please contact the authorized after-sales service center to repair the horn. | ||
| The display is not lit and there is no display. | The display is damaged. Please contact the authorized after-sales service center to repair the display. | |
natural_image
Illustration of a hand using a vacuum cleaner to adjust the device (no text or symbols present)natural_image
Technical illustration of a vacuum cleaner with a close-up view showing the mechanism (no text or symbols present)natural_image
Diagram of a hand pressing down on a rolled-up rectangular object with an upward arrow (no text or symbols)natural_image
Line drawing of a hand pressing down on a rolled-up sheet with a downward arrow indicating compression (no text or symbols)natural_image
Line drawing of a mechanical component with a hand holding a sheet and an arrow indicating direction (no text or symbols)natural_image
Line drawing of a mechanical component with an arrow indicating direction (no text or symbols)Gebrauchsanweisung
VORBEREITUNG
natural_image
Line drawing of a mechanical device with a base and mounting bracket (no text or symbols)Zur Erinnerung:
natural_image
Line drawings of a hand holding a power button and a handheld device (no text or symbols)text_image
Illustration showing four different manual cleaning or cleaning techniques for a handheld device, with arrows indicating movement and component placement.Selbstreinigung
natural_image
Line drawing of a handheld device with a circular head and handle (no text or symbols)natural_image
Illustration of a robotic vacuum cleaner with a close-up view showing hand positioning and directional arrow (no text or symbols)natural_image
Diagram showing a vacuum cleaner with a close-up view of its internal mechanism (no text or symbols present)natural_image
Line drawing of a mechanical device with a hand pressing down on a flat surface, showing an upward arrow (no text or symbols)natural_image
Line drawing of a hand pressing down on a rolled-up sheet of paper with a downward arrow indicating compression (no text or symbols)natural_image
Diagram of a mechanical component with a directional arrow indicating movement (no text or symbols present)natural_image
Line drawing of a mechanical component with an arrow indicating direction (no text or symbols)Gebruiksinstructies
VOORBEREIDING
natural_image
Diagram showing a mechanical assembly process with an arrow indicating transformation (no text or symbols present)natural_image
Line drawing of a mechanical assembly with a base and mounting bracket (no text or symbols)Herinneringen:
natural_image
Line drawings of a handheld device with a power button and a mounted lever (no text or symbols)natural_image
Illustration of four different manual hand tools or tools, showing different movement and assembly states (no text or symbols present)Zelfreiniging
natural_image
Line drawing of a mechanical device with a circular head and lever mechanism (no text or symbols)De zuigopening, de vloerborstel en de rolborstelkap reinigen
natural_image
Three-step diagram showing hand positioning of battery pack components (no text or symbols)Gebruiksadvies
| Product Information for power consumption and maximum time to reach applicable low power mode | |
| Power consumption in off mode 0.0 W | |
| Power consumption in standby 0.4 W | |
| The maximum time needed to automatically reach the applicable low power mode or condition | 10 min |
| Power consumption in network standby if all wired network ports are connected and all wireless network ports are activated | NA |
All information, designs, drawings and pictures in this document are the property of SOURCING & CREATION. SOURCING & CREATION reserves all rights to its brands, designs and information. Any copy and reproduction through any means shall be deemed and considered as counterfeiting.
Protection of the environment
This symbol attached to the product means that it is an appliance whose disposal is subject to the directive on waste from electrical and electronic equipment (WEEE). This appliance may not in any way be treated as household waste and must be subject to a specific type of removal for this type of waste. Recycling and recovery systems are available in your area (waste removal) and by distributors.
By taking your appliance at its end of life to a recycling facility, you will contribute to environmental conservation and prevent any harm to your health.
Umweltschutz
\* Tested in our laboratories
Warranty valid from the date of purchase (receipt as proof of purchase). This warranty does not cover defects or damage caused by improper set up, incorrect use, or normal wear and tear of this product.
\* In unseren Labors getestet
SERVICE RELATION CLIENTS / Customer Relations Department / Kundenservice / Klantenafdeling
Avenue de la Motte
CS 80137
59811 Lesquin cedex
FABRIQUÉ EN R.P.C. / Made in China /