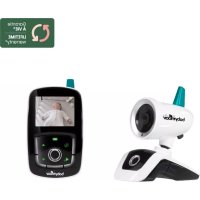
ECOUTE-BEBE VIDEO ULTIMATE CARE - Video baby monitor BABYMOOV - Free user manual and instructions
Find the device manual for free ECOUTE-BEBE VIDEO ULTIMATE CARE BABYMOOV in PDF.
User questions about ECOUTE-BEBE VIDEO ULTIMATE CARE BABYMOOV
0 question about this device. Answer the ones you know or ask your own.
Ask a new question about this device
Download the instructions for your Video baby monitor in PDF format for free! Find your manual ECOUTE-BEBE VIDEO ULTIMATE CARE - BABYMOOV and take your electronic device back in hand. On this page are published all the documents necessary for the use of your device. ECOUTE-BEBE VIDEO ULTIMATE CARE by BABYMOOV.
USER MANUAL ECOUTE-BEBE VIDEO ULTIMATE CARE BABYMOOV
Health: EN 50371 :2002
Thank you for choosing our Baby monitor High Care. We recommend you read these instructions carefully in order to use your Baby monitor to best advantage and ensure it continues to operate as long as possible. If you should find a fault, however, or if you have any problem, please contact our company.
IMPORTANT: This baby monitor uses low emission power, in order to protect baby's health. The receiver and the transmitter don't communicate continuously, in order to limit the emission of radiations in the room. When baby cries, the system is activated immediately to alert parents; when the baby doesn't cry, the transmitter and the receiver communicate only each 20 seconds to check the good communication and update information such as the room's temperature.
FUNCTIONS
- Range 1,000 m in an open space.
- 2 channels + 68 digital codes (total of 136 subchannels) to offer a high degree of protection against all kinds of interference.
- Receiver fitted with a lithium battery that recharges on its base.
- Alarms: audible, visual and vibrations on the receiver.
Volume control on the receiver and on the transmitter. - Gentle night light on the transmitter.
-
Microphone sensitivity can be adjusted digitally on the transmitter.
-
Temperature of baby's room indicated on both the receiver and transmitter and audible and visual "Temperature too high/low" alarm on the receiver (parents can adjust the temperature range).
- Distance alarm which goes on when the child moves away more than 25 metres from his parents.
- Audible and visual alarm on the receiver when the transmitter is out of range.
- Battery condition indicated on both the transmitter and receiver, and alarm when batteries need changing or recharging.
- Selectable Hi/Lo emission power on transmitter to prolong battery life and minimize radiation level.
WARNING
- The Baby monitor High Care should not be seen as a medical device. In addition to using Baby monitor High Care, it is strongly recommended that an adult checks on your baby directly, on a regular basis. Premature babies or children considered to be at risk should be monitored by your paediatrician or a health professional.
- Never go away from your baby outside the house, even a short moment.
- Non-rechargeable batteries are not to be recharged;
- Rechargeable batteries are to be removed from the device before being charged ;
- Different types of batteries : new and used batteries, or rechargeable and not rechargeable batteries, are not to be mixed ;
- Rechargeable batteries are only to be charged under adult supervision ;
- Batteries are to be inserted with the correct polarity (+/-) ;
- Exhausted batteries are to be removed from the device;
- The supply terminals are not to be short-circuited.
- Always use the supplied battery for the receiver : if the battery is damaged it must be replaced by the manufacturer, the after-sales service or people with similar qualifications, in order to avoid any risk.
POWER SUPPLY
A / Transmitter
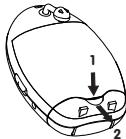
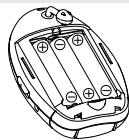
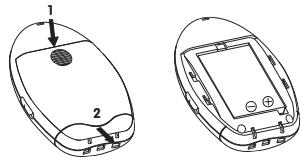
1. Operation using batteries (not supplied)
Press down the lock button and slide open the battery door. Insert three pieces AAA size (UM-4) alkaline batteries into the compartment. Observe correct polarities indication (+/-).
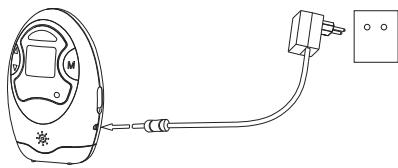
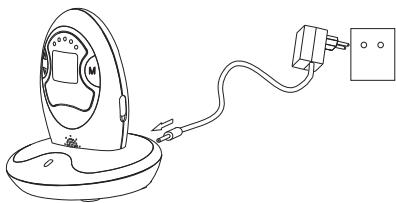
2. Operation using the (AC adapter supplied)
The transmitter can be operated on AC mains using the supplied 6V AC adapter. Connect the output plug of adapter to DC jack (7a) of the transmitter. Connect the adapter to the mains. The power supply from the battery will be cut off once the receiver is mains-operating.
N.B.: The communication range is longest when the transmitter is operated on AC mains.
B/Receiver
1. Operation from battery pack
The Li polymer battery pack is already installed in the unit.
2. Recharging and operation on the base
Before using the receiver for the first time, make sure it is turned off and recharge it on its base. The charge indicator will show a red light. Once the battery is fully charged (average time 3 hours) the indicator will turn green. The receiver is then ready to be turned on and used. If you decide to leave the receiver on its base, when it detects that the charge level is too low the base will automatically start recharging the battery.
N.B.: TO ENSURE MAXIMUM LIFE FOR YOUR BATTERY, WAIT UNTIL IT IS COMPLETELY DISCHARGED BEFORE RECHARGING IT.
CONTROLS LAYOUT
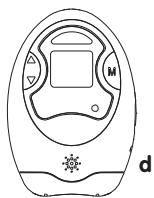
Transmitter
- Power ON/OFF and night light switch
- Up/Down button
3.Mode button - Night light
- Microphone
- Power on indicator
7a. DC jack
7b. Temperature sensor
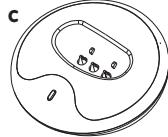
Charger
- Charging indicator
- Charging pins
- DC jack
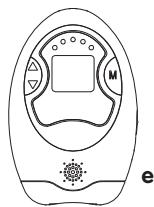
Receiver
- Power ON/OFF and vibration switch
- Up/Down button
10.Mode button - LED sound level meter
- Speaker
- Charging contacts
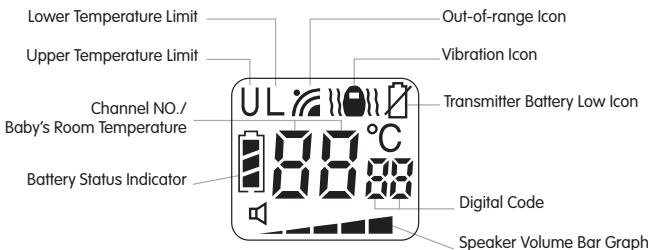
Receiver LCD Screen
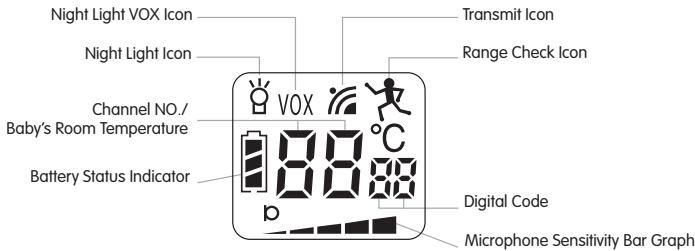
Transmitter LCD Screen
SETTINGS
| Channel and digital code setting | TRANSMITTER | RECEIVER |
| Press and hold the mode button (3) for more than 5 seconds; a beep will sound once the unit goes into programming mode. The LCD will show following: | Press and hold the mode button (10) for more than 5 seconds; a beep will sound once the unit goes into programming mode. The LCD will show following: | |
| Use selection button (2) to chose the channel and press the mode button (3) to validate your choice. The LCD will show following (here CH 2 is selected): | Use selection button (9) to select the same channel as on the transmitter and press the mode button (10) to validate your choice. The LCD will show following (here CH 2 is selected): | |
| Use selection button (2) to chose the digital code and press the mode button (3) to validate your choice. The LCD will show following (here digital code 28 is selected): | Use selection button (9) to select the same digital code as on the transmitter and press the mode button (10) to validate your choice. The LCD will show following (digital code 28 is selected): | |
| Output power setting | Use selection button (2) to chose the output power output. Hi means high power while Lo means low power and ELo means extra low power. Press the mode button (3) to validate your choice. | |
| Out of range alert | When ELo is selected, the range check ico will appear on the LCD and the receiver will provide an alarm when the distance between transmitter and receiver exceeds 25 m. | |
| Out of range alert | Otherwise, use selection button (2) to chose on or off and press the mode button (3) to validate your choice. The LCD will show following: | Use selection button (9) to chose the same setting as on the transmitter and press the mode button (10) to validate your choice. The LCD will show following: |
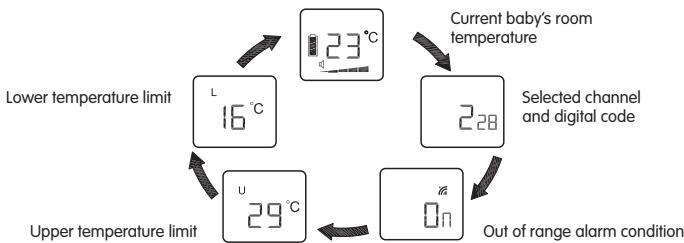
| Maximum temperature alarm U | Use the selection button (9) to choose the maximum temperature (between -3 °C and +49 °C) above which the receiver will trigger an alarm. If the off setting is selected, no maximum temperature limit will be active. Press the mode button (10) to validate your choice. U °C | |
| Minimum temperature alert L | Use the selection button (9) to choose the minimum temperature (between -8 °C and +44 °C) below which the receiver will trigger an alarm. If your selection is illogical (for example a maximum temperature lower than minimum temperature) the receiver will refuse your choice and will correct it automatically to a value 2 °C below the maximum limit. If the off setting is selected, no minimum temperature limit will be active. Press the mode button (10) to validate your choice. L °C | |
| Normal screen | L °C |
REMARKS
1. Channel and digital code choice
If in the unlikely event your next door neighbor also has the same model of baby monitor and program with the same channel and digital code, then you may need to select a new channel and digital code or otherwise you will hear each other's baby. Repeat the above steps, besure you also program the receiver with the same new channel and digital code.
2. Power choice
Note with low power, the communication distance will become shorter but the battery life can be prolonged. Besides, the level of emitted radiation is also reduced.
3. Distance alert
This distance control function may be useful to watch baby's activities in his room. The transmitter is placed on the child and if he moves away more than 25 meters, an alert will be heard from the receiver to alert parents.
N.B.: if the out of range function is already On on the transmitter, the receiver will automatically activate the distance alert (as indicated by the letter [on the LCD screen), wether the out of range setting is On or Off.
| Out-of-range alert setting in Transmitter | Out-of-range alert setting in Receiver | Remarks |
| ON | ON | Alarm function normally |
| ON | OFF | No alarm even when out of range |
| OFF | ON | Always give alarm no matter out of range or not |
| OFF | OFF | No alarm even when out of range |
| ELo | ON or OFF | Alarm sound once distance apart exceed 20-30m (provide [ ] appears on rereceiver LCD) |
4. Temperature alarm
- It is recommended to have at least ± 5^ between the settings of upper and lower temperature limit from the current temperature reading, otherwise the temperature alarm can often be heard whenever the baby's room temperature changes lightly.
- In case there is a sudden temperature change, the sensor may need to take a few minutes before it can settle to the new environment and show the correct reading on the screen.
- Caution: because of the heat produced bu the device itself, a margin of error +5^ may be noticed. Please add 5^ to the upper and lower temperature to consider this gap.
OPERATION
A / Transmitter
- Place the transmitter about 1m from the cradle, directing the microphone (5) towards the baby.
- Use the selection button (2) to adjust the microphone sensitivity (volume indicator = bar chart on the screen). The more bars you show, the more sensitive the microphone is to sounds.
-
As soon as the transmitter detects a sound, the screen lights up and the transmission symbol is displayed.
-
To check your settings, press briefly on the receiver mode button (3). The various settings will be displayed according to a cycle :
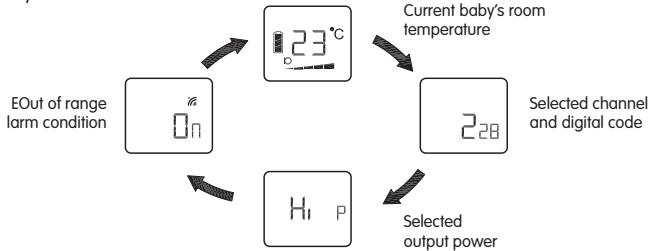
- The night light (4) can be set permanently ON by moving the power ON/OFF switch to position 8. The night light can also be set to be VOX (voice activated) by momentarily pressing the mode button (3): the VOX icon will be shown besides the icon 8. Under VOX mode, the night light will be switched on once the microphone 5 detects a sound and automatically goes off a few seconds after the microphone 5 stops picking up any sound.
- The condition of the battery is shown by the battery status indicator. When the battery power is being consumed, the segments within the battery status indicator gradually falls. Once the indicator becomes empty, it will start flashing, besides, the transmitter will also send out a signal to the receiver to alert the parents.
B/Receiver
- Place the receiver at a reasonable distance away from the transmitter to avoid feedback. Too close a distance will create a screeching sound.
- Once the unit receives a signal from the transmitter, the screen will become backlighted and LEDs in the level meter will light up. The louder the baby's voice, the more number of LED will be lighted up.
- The speaker volume can be adjusted using the Up/Down button (9). The volume bar graph in the screen will also change correspondingly. More segment of bar graph shown means higher volume from speaker. When no segment is shown on the screen, the speaker is totally muted.
- This unit is equipped with a vibrating alert. Set the power ON/OFF switch (8) to position The vibration icon will also show up in the LCD. Once the received baby's voice is loud enough, the vibrator starts functioning. To save battery power, it is recommended not to use the vibrating alert frequently.
- When the out-of-range alert function is set to On in both transmitter and receiver, once the receiver is beyond the communication range of the transmitter for over 2 minutes, an out-of-range alarm will be heard. The LED level meter starts flashing together with the out-of-range icon to alert the parents. Besides, the temperature reading will show - -^ C . The alarm and icon will go off only when the receiver falls back within the communication range of transmitter.
N.B.: This alarm will also be heard in case the transmitter is switched off, or its battery has run down, or its power is cut off, or the channel/digital code setting is different between the transmitter and receiver, or the out-of-range alert setting is different between transmitter and receiver.
- Whenever the baby's room temperature falls outside the range as preset by the upper and lower temperature limits, an alarm will be heard : the correspondingly icon (U ou L) and the current temperature reading start flashing in the screen.
- To check your settings, press briefly on the receiver mode button (10). The various settings will be displayed according to a cycle:
- The condition of the rechargeable battery pack is shown by the battery status indicator. When the battery power is being consumed, the segments within the battery status indicator gradually falls. Once the indicator becomes empty, its starts flashing and an alarm will be heard. When the receiver is switched on and
placed in the charger, the segments within the battery status indicator will flash in turn while battery is being charged. Once charging is completed, the flashing will stop and all three segments show steady up indicating the battery is full.
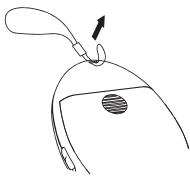
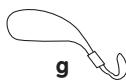
- For more convenience, the receiver can be worn around the neck with a strap (supplied).
C / Transmitter and receiver
Whenever a button is pressed, a beep will sound to confirm that your input has been recognised by the unit. The sound level of the beep and the alarm is fixed and independent of the loudspeaker volume setting.
PRECAUTIONS
- Use only the supplied AC adapters, use of other adapters may cause damage to the baby monitor
- When not using the monitor for as long period of time, remove all batteries from the transmitter and receiver to avoid damage due to battery leakage.
- Disconnect the AC adapter from the wall outlet when the monitor is not to be operated.
The baby monitor is best performed within a temperature range of -9^ to +50^ -
Do not leave the monitor expose to strong sunlight for a long time or nearby any heat source, moisture and excessive dusty environment.
-
Do not open the cabinet, no serviceable part inside.
- Waste Electrical and Electronic Equipment should be disposed of by selective collection. Do not throw electrical and electronic equipment away with unsorted household waste, but dispose of it at a selective collection point.
ACCESSORIES
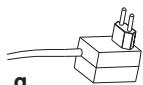
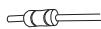
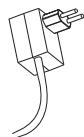
a. 6V AC adapter for transmitter
b. 6V AC adapter for rapid charger
c. Rapid charger
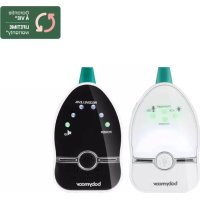
d. Transmitter unit
e. Receiver unit
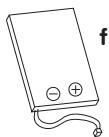
f. Li rechargeable battery pack (installed in receiver unit)
g. Hand strap
h. User manual

b
IN CASE OF PROBLEMS
| Problem | Possible cause | Solution |
| • No transmission from the transmitter. | • The microphone sensitivity is set too low. • The batteries have run out or the AC adapter is not properly connected. | • Increase the microphone sensitivity using the selection button (2). • Install new batteries or check the connection. |
| • Transmits without interruption. | • The microphone sensitivity is set too high. | • Decrease the microphone sensitivity using the selection button (2). |
| • Out-of-range alarm activated without interruption. | • The channel or digital code setting is not the same on the transmitter and the receiver. • The transmitter batteries have run out. • The out-of-range alarm setting on the transmitter is on Off but the setting on the receiver is on On. | • Set the same channel and same digital code on the transmitter and the receiver. • Replace them with new batteries or use the AC adapter. • Change the setting of the out-of-range alarm on the transmitter to On. |
| • The out-of-range alarm is activated sometimes without reason. | • Interferences with other appliances operating on the same channel. | • Change to another channel. |
| • The out-of-range alarm is never activated. | • The out-of-range setting on the transmitter and the receiver is on Off. • The out-of-range alarm setting in the transmitter is on On but the setting in the receiver is on Off. | • Change both settings to On. • Change the setting on the receiver to On. |
| • The temperature alarm is activated without interruption. | • The maximum and minimum temperature limits are too close to the current reading. | • Adjust the maximum and minimum temperature limits to obtain a difference of 5 °C relative to the current reading. |
| • The battery low warning is displayed without interruption. | • The battery has run out. • No battery inside the receiver. • The battery is damaged. | • Recharge the battery using the (receiver) charger base. Replace with new batteries or use the AC adapter for the transmitter. • Replace the battery in the battery compartment. • Replace with a new battery. |
| • The battery life of the receiver is too short. | • The night light is on permanently. | • Turn off the night light or set to VOX function. |
| • The battery life of the transmitter is too short. | • The vibration alarm is on. | • Turn off the vibration alarm. |
| • A lot of static and interference. | • The transmitter is located close to other electrical apparatus. | • Remove the electrical appliances or move the transmitter away from the source of interference or change the channel. |
| • Too short communication range. | • A large number of steel structures between the transmitter and the receiver. • The power output on the transmitter is set to Lo. • The transmitter batteries have run out. • Transmitter's range check is set to On. | • Reposition the transmitter and the receiver. • Change the power output setting to Hi. • Replace the batteries or use the AC adapter. • Set range check function to off. |
VOORZORGSGMAATREGELEN
C / Emissor e receptor
EC DECLARATION OF CONFORMITY
Babymoov
Declare that the following product(s):
Model: Babyphone High Care
Reference: A014001 / A014009
Model: BC-27
is in conformity with the following relevant harmonised:
EMC: EN 301 489-1 V1.6.1
EN 301 489-3 V1.4.1
Radio: EN 300 220-1 V2.1.1
EN 300 220-2 V2.1.1
Safety: EN 60065 :2002
Health: EN 50371 :2002
Following the provisions of Council Directive 99/05/CE on radio equipment and telecommunications terminal equipment and the mutual recognition of their conformity.
Name: Mr Laurent Windenberger
Title: Marketing Manager
Signature:

Date: 31/10/08