TRIO LIVING SMART - Strollers and baby transport systems CHICCO - Free user manual and instructions
Find the device manual for free TRIO LIVING SMART CHICCO in PDF.

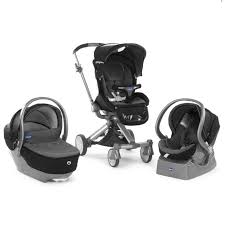
| Product type | Stroller and travel system (compatible with CHICCO carrycot and car seat with CLIK CLAK system) |
| Brand | CHICCO |
| Model | TRIO LIVING SMART |
| Recommended age | From birth to 36 months |
| Maximum child weight | 15 kg |
| Maximum basket weight | 5 kg |
| Maximum changing bag weight | 2 kg |
| Number of children | 1 child at a time |
| Use | Parent-facing or forward-facing (reversible seat) |
| Safety harness | 5-point harness (shoulder straps, waist belt, crotch strap) |
| Parking brake | STOP & GO brake on both rear wheels with color indicators (red STOP, green GO) |
| Front wheels | Swivel or fixed (selectable via foot lever) |
| Backrest adjustment | Reclining (gray button on back of seat) |
| Leg rest adjustment | Side buttons under the joint |
| Ergonomic handle | Height adjustable (8 positions) and convertible into a push bar |
| CLIK CLAK system | Direct attachment of compatible CHICCO carrycot or car seat |
| Canopy | With removable sun visor, usable summer/winter |
| Removable cover | Hand wash cold, do not bleach, do not tumble dry, do not iron, do not dry clean |
| Included accessories (depending on version) | Safety bar, rain cover, leg cover, changing bag with changing mat, comfort kit (harness covers, waist belt) |
| Maintenance | Lubricate moving parts with dry silicone oil, clean wheels, store in dry place |
| Spare parts and repairability | Only use approved CHICCO replacement parts and accessories |
Frequently Asked Questions - TRIO LIVING SMART CHICCO
User questions about TRIO LIVING SMART CHICCO
0 question about this device. Answer the ones you know or ask your own.
Ask a new question about this device
Download the instructions for your Strollers and baby transport systems in PDF format for free! Find your manual TRIO LIVING SMART - CHICCO and take your electronic device back in hand. On this page are published all the documents necessary for the use of your device. TRIO LIVING SMART by CHICCO.
USER MANUAL TRIO LIVING SMART CHICCO
UTILIZZO POLTRONCINA E SACCA
IMPORTANT - KEEP THESE INSTRUCTIONS FOR FUTURE REFERENCE
WARNING: BEFORE USE, REMOVE AND DISPOSE OF ALL PLASTIC BAGS AND PACKAGING MATERIALS AND KEEP THEM OUT OF REACH OF CHILDREN.
WARNING
WARNING: Never leave your child unattended.
WARNING: Ensure that all the locking devices are engaged before use
WARNING: To avoid injury ensure that your child is kept away when unfolding and folding this product.
WARNING: Do not let your child play with this product
WARNING: Always use the restraint system.
WARNING: This product is not suitable for running or skating.
WARNING: Check that the pram body or seat unit or car seat attachment devices are correctly engaged before use
- The stroller is intended for use with children aged between 0 and 36 months, up to 15kg of weighting
It is recommended that the backrest should be used in its most reclined position for children from birth to 6 months of age.
Only Car Seat CHICCO and/or Carrycot CHIC-Co with the CLIK CLAK fitting device can be attached to the stroller compatible.
- The parking device shall be engaged when placing and removing the children.
- Do not overload the storage basket. Maximum weight 5kg .
- Any load attached to the handle and/or on the backrest and/or the sides of the vehicle will affect the stability of vehicle.
- Do not carry more than one child at a time
- Do not use accessories, replacement parts, or any component not supplied or approved by the manufacturer/distributor.
- For car seats used in conjunction with a chassis, this vehicle does not replace a cot or a bed. Should your child need to sleep, then it should be placed in a suitable pram body, cot or bed.
WARNING: before assembly, check that the product and all of its components have not been damaged during transportation. Should any part be damaged do not use and keep out
of reach of children.
WARNING: the product must be assembled by an adult.
WARNING: the use of the crotch strap and safety harness is necessary to guarantee the safety of your child. Always use the safety harness together with the crotch strap.
WARNING: Ensure that during these operations the moveable parts of the stroller do not come into contact with your child.
WARNING: never leave the stroller on a sloped surface with a child onboard, even with the brakes applied.
WARNING: when not in use, the stroller must be kept away from the reach of children.
WARNING: This product must only be pushed by an adult.
- Ensure that the person using the stroller knows how to use it safely.
Always apply the brakes whenever the stroller is stationary.
- To avoid the risk of chocking, keep objects fitted with strings or laces out of reach of children.
- Do not use the stroller on stairs or elevators: it could cause the loss of control of the stroller.
- Pay special attention when maneuvering the stroller up or down pavements or a step.
- If the stroller is left exposed to direct sun light for a long time, allow it to cool before placing your child in it. Prolonged exposure to direct sunlight may cause the fabric to fade.
- Do not use the product if some of its parts are broken, torn or missing.
- Prevent the stroller from coming into contact with salt water. It may cause the formation of rust.
- Do not use the stroller on the beach.
CLEANING AND MAINTENANCE
The cleaning and maintenance of this product must be carried out on a regular basis by the user. The cleaning and maintenance of the stroller must only be carried out by an adult.
CLEANING
The cover can be removed (please refer to the section "removable cover").
Please refer to the care labels for instructions on how to clean the fabric parts.
Below are the cleaning symbols and their meanings:

Wash by hand in cold water

Do not bleach

Do not tumble dry

Do not iron

Do not dry clean
Use a soft cloth to clean the plastic parts on a regular basis; do not use solvents or abrasive products. Always dry the metal parts to prevent the formation of rust if the stroller has come into contact with water.
MAINTENANCE
Lubricate the moving parts, if necessary, with dry silicon oil. Periodically check the condition of the wheels and keep them clean of dust and sand. Make sure all plastic parts that slide along the metal tubes are clean and free from dust, dirt and sand; this will avoid friction that may prevent the stroller from working properly. Keep the stroller in a dry place.
OPENING INSTRUCTIONS
WARNING: when opening the stroller, ensure that your child and all other children are at a safe distance. Ensure that during these operations the moving parts of the stroller do not come into contact with your child.
- Before opening the stroller, press the side button (diagram 1A) to raise both handgrips into the right position. Make sure that the handgrips are locked in the UP position, as seen in diagram 1 B.
- Pull both the small levers on the stroller handles at the same time; the stroller will start to open (diagram 2).
- Raise the stroller to make it easier for it to open (diagram 3).
- Press the cross bar downwards with your toe so it opens completely and locks the stroller in the open position (diagram 4)
WARNING: ensure that the stroller is locked in the open position, checking that the rear cross bar is locked in place.
FITTING/REMOVING THE LINING
For practical reasons, this operation should be performed with the seat removed from the stroller.
5. Start by fitting the top part of the fabric (diagram 5A) so that it fits neatly over the back, as seen in diagram 5B. Align the fabric with the plastic structure following the coloured tail (diagram 5 C). Fasten the seat to the base using the two buttons near the rings seen in diagram 5 D, then fasten the lower ends of the seat using the buttons (A) and the velcro fasteners (B) found on the side of the structure as indicated in diagram 5 E. Fit the leg rest supports into the fabric as seen in diagram 5 F.
6. Slide the "D" rings through the slots (diagram 6)
7. Thread the lap belt into the "D" rings as seen in diagram 7.
8. WARNING: the crotch strap is fastened to the seat support and held in place by the structure. The crotch strap must be threaded through the slot in the lining to ensure correct and safe use, as seen in diagram 8. Please refer to the "Safety harness" paragraph for information on how to use the harness correctly
9. Fasten the two armrest covers in place by inserting the 3 tabs in the relative fixtures and then fastening the two metal buttons found inside the armrests (diag. 9).
SAFETY HARNESS
The stroller comes with a five-point safety harness that consists of two shoulder straps, a lap belt and a crotch strap with a buckle.
WARNING: For use with children from birth up to approximately 6 months of age, it is necessary to use the shoulder
straps, sliding them first through the two adjustment holes. 10. Slide the safety clasps into the fabric slots (diagram 10A) and check that the shoulder straps are fitted at the right height for the child: if this is not the case, adjust the height (diagram 10).
-
Place the child inside the seat, slot the 2 toothed ends into the buckle and adjust the width of the lap belt using the clasps (diagram 11).
-
To release the lap belt, press the two toothed ends together at the same time (diagram 12).
For extra safety, the stroller is fitted with D rings, which can be used to fit a separate safety harness, compliant with BS 6684 Standards. The rings are positioned inside the seat of the stroller on the left and right sides as shown in fig.7. WARNING: the safety harness must always be fastened to guarantee complete safety for your child.
WARNING: To guarantee the safety of your child, always use both the crotch strap and the safety harness.
FITTING THE SEAT IN THE PARENT-FACING POSI-TION
WARNING: The bumper bar is not used when fitting the seat in this position.
-
To fit the seat in the parent-facing position, open the seat and, using the orange arrows on the seat as reference (diagram 13 A) slide it onto the hooks (diagram 13 B and C) found on the stroller structure as seen in diagram 13 D.
-
Press the seat downwards until you hear it click and lock into place (fig 14).
WARNING: Check that the pram body or seat unit attachment devices are correctly engaged before use.
WARNING: After removal of the safety harness (e.g. for washing), ensure that the harness is reassembled correctly using the anchorage points. The harness must be re adjusted. To ensure that the harness is adjusted correctly, fitting your child and securely closed, pull firmly on the end of the harness (on the underside of the seat).
FITTING THE SEAT IN THE FRONT-FACING POSITION
-
To fit the seat in the front-facing position, open the seat and, using the orange arrows on the seat as reference (diagram 15A) slide it onto the hooks (diagram 15B and C) found on the stroller structure as seen in diagram 15D.
-
Press the seat downwards (fig 16A) until you hear it click and lock into place (fig 16B).
WARNING: Check that the pram body or seat unit attachment devices are correctly engaged before use.
REMOVING THE SEAT
It is not necessary to remove the stroller lining to remove the seat.
- Press the orange button on the back of the backrest and lift the seat upwards (diagram 17).
- Press the grey button on the stroller backrest to adjust the inclination until you find the position you need (diagram 18). Release the button and the backrest will click into the closest lock position. Simply push the backrest upwards to raise it.
WARNING: these operations can become more difficult when the child is sat in the seat.
ADJUSTING THE LEG REST
- Press the two buttons on the inside of the leg rest side fixture (diagram 19) to adjust the leg rest to the required position.
REMOVABLE BUMPER BAR
- To remove the bumper bar, press the two buttons found under the armrests (diagram 20) and pull the bar towards you. Open one side of the bumper bar only to seat the child in the stroller more easily.
WARNING: Always restrain the child using the safety harness. The bumper bar is NOT a child restraint device.
WARNING: Never use the bumper bar to lift the stroller up with the child sitting in it.
ERGONOMIC HANDGRIP
- Press the button on the handgrip to rotate the handgrip into the required position, according to the height and position most suited to the user (diagram 21).
The handgrip can be adjusted to 8 different positions. - WARNING: when using the stroller, the handgrips must not be in the DOWN position (diagram 22 A). Make sure that the handgrips are locked in the UP position, as seen in diagram 22 B.
PARKING BRAKE
The parking brake is applied to both rear wheel at the same time. To make it easier to use the stroller, a special STOP & GO braking system has been installed, indicated by the coloured stickers on the rear brake lever.
- To put on the brakes, press the right lever downwards (diagram 23). A red STOP sticker will appear and the opposite lever will move upwards.
- To release the brakes, press the left lever downwards (diagram 24). A green GO sticker will appear and the opposite lever will move upwards.
WARNING: Always apply the brakes whenever the stroller is stationary. Never leave the stroller on a sloping surface with a child inside, even with the parking brake ON.
WARNING: After applying the brake lever make sure that the brakes are properly applied on both of the rear wheel units.
SWIVEL WHEELS
The stroller has swivel/fixed front wheels. It is recommended to use the fixed wheels on particularly uneven ground. It is recommended to use the swivel wheels on normal road surfaces as it makes it easier to handle.
- To switch the front wheels to swivel mode, press the front lever down with your front, as seen in diagram 25. To switch back to fixed mode, pull the lever up with your foot. Whatever the current position of the wheel, it will lock in a straight position.
WARNING: Both wheels must be blocked or released at the same time.
WARNING: when opening the stroller, ensure that your child and all other children are at a safe distance. Ensure that during these operations the moving parts of the stroller do not come into contact with your child. The stroller can be closed when in either parent-facing or front-facing mode. The instructions to follow are the same for both user modes. If you wish to reduce the space the closed structure takes up, it is recommended to close the structure with the seat fitted in the front-facing position.
- Raise the side compasses and fold the hood (diagram 26).
- Pull both the small levers on the handles; keep them raised whilst you use your toe to pull the rear cross frame upwards (diagram 27).
-
Grasp the closure handle and pull it upwards until the stroller locks into a closed position (diagram 28).
-
To decrease the space the closed stroller takes up, recline the backrest as flat as possible (diagram 29 A - front-facing diagram 29 B - parent-facing).
- Now fold the handgrips forwards (diagram 30). When the stroller is closed and locked in place, it will stand up on its own
WARNING: You must always remove the joainable handle (if fitted) before closing the stroller.
REMOVABLE COVERS
Open the stroller slightly with the safety harness unfastened:
- Release press stud A and the velcro fastener B as indicated in diagram 31.
- Raise the leg rest, release the buttons on the seat and slide the lining off, paying attention to the harness straps (diagram 32 A); remove the lining from the backrest by pulling it upwards after undoing the side Velcro fasteners (diagram 32 B).
USING THE CHILD CAR SEAT AND CARRYCOT
The CHICCO strollers which use the CLIK CLAK system on the armrests allow you to fasten the carrycot and/or child seat to the stroller frame without any need for additional fixtures.
Please consult the relative instructions for information on how to fit and remove the carrycot or child seat.
33. Before fitting the child car seat or carry-coat, remove the armrest covers completely starting with the two metal buttons on the inside of the armrests and then sliding out the 3 tabs from their relative fixtures (diag. 33 A and B). WARNING: only the CHICCO child seats and carrycots which are fitted with the CLIK CLAK system can be fitted onto the stroller. Before using the stroller in combination with the carrycot or child car seat, always check that the hook-on system is correctly closed and locked in place. ONLY USE ACCESSORIES FITTED WITH THE RELATIVE CLIK CLAK DEVICE.
34. WARNING: Incorrect fastening of the accessory to the stroller frame can cause the fastening system to malfunction, making it impossible to remove it. In this case you can manually release the accessory by using a screwdriver on the levers under the armrests which can be reached through the relative slot (diagram 34).
ACCESSIONS
WARNING: The accessories described below are not necessarily present on some versions of the product. Please read the instructions relative to the accessories fitted on the type of stroller you purchased carefully.
JOINABLE HANDLE
- To fit the joinable handle, press the two central levers inwards at the same time (see diagram 35 A) and connect the hooks A and B into the relative holes (diagram 35 B), until you hear them click into place.
- To remove the joinable handle, press the two central levers inwards at the same time (see diagram 36 A) and slide the handle upwards (diagram 36 B).
WARNING: before using the product in the "joined handle" mode, always check that it has been fitted correctly.
WARNING: You must always remove the joinable handle before closing the stroller.
WARNING: never use the joangible handle to lift the stroller up with the child sat in it.
COMFORT KIT
The Comfort Kit comes with 2 shoulder strap pads and a wide abdominal strap. Use of the abdominal strap is highly
recommended when using the stroller in parent-facing mode, i.e. when the child is still rather small.
-
Slide the shoulder pads onto the straps as seen in diagram 37 G.
-
Slide the crotch strap into the relative opening (diagram 38 A) and the lap belt buckle into the side slots (diagram 38 B)
WARNING: use the clasps to adjust the width of the lap belt as necessary.
WARNING: the safety harness must always be fastened to guarantee complete safety for your child.
TRANSFORMABLE HOOD
-
The seat has two fixtures on the sides of the seat base which can be used to fit the hood. To assemble the hood, insert the hook-on system into the fixtures, as seen in diagram 39. As the hood is connected to the seat, you don't need to turn it around when you switch between the front-facing and parent-facing modes.
-
To open the hood, press the front arch forwards and fasten it in place using the side compasses as seen in diagram 40.
-
The hood has an extractible mesh feature to help protect your baby from excessive sunlight.
-
Open the side zips (diagram 42) to remove the rear flap and turn the hood into a summer sun-hood.
-
To remove the hood, take hold of it near the connector fixtures and simply pull it upwards, sliding the fasteners upwards (diagram 43).
WARNING: The hood must be fitted correctly on both sides of the stroller. Check that it is securely fastened.
FULL-COVER RAIN HOOD
A rain cover can also be fitted onto the stroller.
- Fasten the rain cover in place threading the buttons into the slots on the sides of the hood, as seen in diagram 44.
When you have finished using it, allow it to dry properly (if it is wet) before you fold it away. The rain cover can be used in either parent-facing or front-facing mode.
WARNING: Use only the raincover supplied or approved by the manufacturer.
WARNING: Do not use the rain cover if the stroller is not fitted with the hood or sun canopy to prevent the risk of suffocation.
To prevent the risk of overheating or suffocation, never leave the stroller under the sun with the rain cover fitted to it.
LEG COVER
- To fit the leg cover, fasten the snap-button, found on the back of the leg cover, to the lower section of the seat leg rest (diag. 45).
The leg cover can be used in two different modes (section 46 and 47). - Thread the top part of the leg cover under the bumper bar and fasten in the highest position inserting the buttons into the slots on the side wings of the seat (diagram 44 B).
- The leg cover can be folded back over the bumper bar and buttoned in place using the slots, as seen in diagram 47.
ITEM BASKET
The stroller comes with a practical item basket.
- To fit the basket onto the stroller, connect the clasps A on the basket to the two hooks on the front section of the stroller, and connect the 4 rings to the relative hooks B (diagram 48).
WARNING: Do not overload the basket with weights of over 5 kg. You must remove all contents from the basket before you close it.
BAG
Some versions of the stroller come with a practical carry-all bag, which includes a changing mat.
-
Fit the bag onto the stroller as seen in diagram 49.
-
The bag can be used in two different ways. Option 1 (medium size): Clip the shoulder strap clasps to the rings on the sides, as seen in diagram 50A, and fold back the flap.
Option 2 (large size): Clip the shoulder strap clasps to the rings on the end, as seen in diagram 50B.
WARNING: do not overload the bag with weights of over 2 kg.
WARNING: exceeding the above indicated limit, with the bag attached to the handles, may compromise the stability of the stroller and cause it to topple over.
Important note: the images and instructions contained in this handbook refer to one version of the stroller; some components and functions described herein may vary according to the version of the stroller you have purchased.
FOR UK MARKET ONLY: COMPLYTO BS 7409 WARNING: A CHILD'S SAFETY IS YOUR RE-SPONSIBILITY.
Children should be harnessed in at all times and should never be left unattended. The child should be clear of moving parts while making adjustments. This vehicle requires regular maintenance by the user. Overloading, incorrect folding and the use of non-approved accessories may damage or break this vehicle.
WARNING: When used as a pram body, remember that:
-
The depth of the pram body measured from the top of the mattress to the top of the side of the body at, or at any position within 300mm from, the harness attachment points, should not be reduced to less than 140mm when the mattress is in position;
-
The mattress purchased separately should conform to BS 1877 : Part 10.
SAFETY HARNESS - For extra safety the stroller is fitted with "D" rings, which can be used to fit a separate safety harness, compliant with BS 6684 standards.
The rings are positioned inside the seat of the stroller on the left and right sides as shown in fig. 16.WARNING: when using this product in the car, use the lap belt assembled on the carrycot frame only.
AVISO IMPORTANTE
IMPORTANTE - GUARDAR ESTAS INSTRUCCIONES PARA REFERENCIA FUTURA ATENCION: ANTES DEL USO QUITAR Y ELIMINAR LAS BOLSAS DE PLASTICO Y TODOS LOS ELEMENTOS QUE FORMEN PARTE DE LA CAJA DEL PRODUCTO Y MANTENERLOS FUERA DEL ALCANCE DE LOS NINOS.
ADVERTENCIAS
SNIMATELNE OCHRANNÉ MADLO
TONOETHsH TOY KAoIeMATOIPOs TH MAMA
MEPbI I PEPDOCTOPOXHOCTN
BHIMAHINE! HnkoIa He octabJIte pe6eHka 6e3 npncMoTpa.
BHIMAHHE:pepe nCnoB3ObaHnem nporyIIOUHO KOnAACKy6eDITbCyr,TO BCE MexaHn3MbI 6e30NaCHOCTn PpaBnJbHo CcEJIHeHbl.
BHIMAHHE! Bo BpempaKpbTn nncklaDbBaHn n3dEeNn CneDInTe, yTO6bpe6EhOK HaxoDnIcna Ha 6e3OpacHom pactoHnn. 3To npedOTBpaTNT erO TpaBMnpOBaHne.
BHIMMAHIE! He pa3peuaiTe pe6eHky nIgpaTb C daHHbIM N3dJIeNEM.
BHIMAHHE!O6ra3aTeJbHo nCNoJIb3yIte cnCTeMbI yIepKINBaHnpe6EhKa.
BHIMAHINE:He napeBo3nTe B nporylouHOn KOJRACKeJeTe,ecInBbIdoJXHbI6xKaTbnn ecIn BblCTOHTeHaKoHbKaX.
BHIMAHIE!peed nauaIOM nCNoB3OBAHnYb6eNTecbBTOM,TO MExaHn3M KpeJIeHnIAJIbKn,IPoRyIoUHOrO CnDEHnIaNN aTOKpeCna npaBnBHo 3aΦNKCuPOBaH.
- IcnoIb3OBAtB npOryNoHyU KOJIaCKy dIa nepeBozKN Detey B Bo3paCTe OT 0do 36 mecaueB, Bec pe6EHaKe He DoJKeH npeBbIwaTb 15 Kr.
- Пи пеberOЗke Дeteи в Bo3paCTe OT poK-DeHnI N Do 6 MecaueB CnIHkA DoJIxHa 6bITb NOJIHOCTbIO ONUSeHa.
BHIMAHHE! ToIbKO DetCKne ABTOKpeCnAnIIN JIOBKn CHICCO, Cna6KeHHbe CneuaJIbHbIMM MexAHN3MaMn CLIK CLAK, Moryt npNKpENJIaTbcra K DetCKO pOrgyNoHou KOJAcke.
- UCTPOINCTBO TOPMOXENH NHEO6XODIMO 063aTeJIbHO 3aDeIeNCTBOBaTb B MOMENT YCaXINBaHNH INI IN3BLeueHENH pe6EHNka.
ГузВКорзИнке HeДолженьпевыштБ5Kr
- Любов Гуз, Робveшени Ha ручкх, на Спунке И/NИЗ Ha БOKOBых частя Коляст,
Может Наршть се устийност.
- He caɪntb B kɔjʌcky 6oJIe oʊnHO pe6ëHka.
- He ykpenlaTb Ha nporylouchno KojIace akceccyapbl, 3anaChble qactn i KOMNoHEnTbI dpyrnx npOn3BODnteNei nn HeoDo6peHHbe npOn3BODnteMe.
- YctahOBHeHHoe Ha KojIcky DeTCKOE aBOTo
KpeCNo Ha 3aMeHaeT CObO KOnIb6eBn IIN KpOBaTKy. EcIn peBeHOK HxJdaetcBO CHe, erO CNeDuYeT NepeHecTn B KOJIaCKy IIN HOBoPoxKeHHbIX, B KOJIb6eBn IIN B KpOBaTKy.
BHIMAHHE: nepec6bopkoyubenbcy, yto n3dene n BCE ero kOMnOHeTbI He nobpeKdeHb BCNEcTBne TpaHCnpOpTPOBKn. B npOTNBHom Cnyae He NpJb3OBaTbCn3deneM n depKaTb erO BdJIOn OT deTei.
BHIMAHIE: yto6bI oBecneuHb 6e0nac-HocTb BaWemy pe6Ehky, Heo6xOJIMO Bcerda npicTeRnBaTb erO pemHem 6e0nacHoCTN u pa3JeNTeJIbHbIM pemHem MeKdy Hor. Bcerda nCIOJIb3OBAtB ONDOBpeMeHHO pa3JeNTeJIbHbI pemHb MeKdy Hor n pemHb 6e0nacHOCTN.
BHINMAHNE: CneDnte, yTo6bI npB vBInoJIHeHnOpeaCNI no perynipOBaHnIO npOryIoUHOH KOJRAckN eE MOBnIbHbIe qactN He KaCaJIncb K pe6eHKy.
BHIMAHHE: HnKoIa He octabJrTe nporyloUHYIO KOJIACKy C hXOJaIcMcB Hei pe6eH-KOM Ha hakIoHNo IIOCKOCTN, daJe eCNI BbBBeTI TOPMO3.
BHHIMAHHE:HeKaTntbKoJIaCKyNoJIeCTHnIe n3ckJaIaTOpY:ecTbBepoRTHOCTb yIpyCTNtBe.
BHIMAHINE:ДерхитeporpyоунуколясkyВдалиOTдeTe,kordaBbléHoнпльзутecb.
BHIMAHNE:KoJycka npeHa3HaueHa dIy IIOJIb3OBAHnI TOJIbKO B3POCJIbIMN LIuCaMn.
ToIbKO B3PocBtie OJIKHbI OCyIeCTBJIaTb C6Opky daHHoro n3dennia.
- Y6eIITbC, yTO IINuca, KOtOpbIe NcNOJb3yIOT npOryNoUChyIO KOnAcky, yMeIOT NnB3OBaTbC4 pa3dJIteJIbHbIM pemHjem 6e3OpaCHOCTN.
- Исторы Торpoшоне усторость Кождь паз, когда Ви оctаимлаве即时 Кожяк.
-Чтоблpeбенok He 3aДушпся, He ДаВаTe emИ He OCTabлЯte prДOM C HIM ПeДмТы C BepEВКamN.
-БыткраинЕВИМаTeьнБИМп ри ПОдьeme
ИлспсуckeСТpoТу.apa ИлсОСТупeнБКИ.
- Ecln nporylouhna KOLIaCKa B TeueHne IInTeIbHO rBpeMeHN HaxOINlaCb NOD COJHcEM, npexJe yem ycAnTb B Hee pe6EHa KaIOJXdnte, noka OHa He OCTbIHet. IInTeIbHoe HaxOxJdeHne NOD CoINHcEM MOKeT 13MeHnTb CBET MaTePnaIaOB IN TkaHeN KOJIaCKn.
- He noIb3OBAbTcBnI3dJIeIMe,ecNn OTdJIbHbIeero qactn IIOJOMaHbI,pa3OpBaHbI nIINOTcyTCTBYIOT.
- Ппенихаяніte Колясky OT сол\'ehоь Воры,Так Кад Она может Bbl3BaTb ОрраЗоваиме ржавчины.
- He nCnoJIb3yIte KOJЯСу Na ПЯЖe.
COBETbI IO YXOdy IN TEXOBCLYJXUBAHIO
3TO n3eJeHyKdaetcB NeproIOJNUeCKOM TexO6CnyKbBAHN.0nepaunio no yxodyn E TExO6CnyKmbAHNIO DOnJIHHb npONBOuNTb TOJIbKO B3POCblte.
yXoD
C nporylouHoi KOJIaCKn MOJHXO CHaTb yexoI (cneyTe yka3aHnM, OINcaHbIM B rnaBe "CHATNE YACTN").
Uactn n3 TkaHn UcCTNTb, PnpIepKINBaCb VHCTpyKuN Ha 3TNIKTkXPO CTIPKe.
Hnke npBBeHebI yCNoBhIe 06o3HaYeHnI PO CTnpKe Inx paSwnΦpOBKa:

PcHnA CTnPKa B Tepnlo Boe

He 0t6eIiBaTb XIopcoIepKzauIm BueIeCTBOM

He npimehaTb cyuKy b6apa6aHa

TnaxchenzeapeseHo

Cyxay uictska 3anpeueena
PeryIaRHO OuHuaTe NlaCTIKOBbIe qactn BnaXHoT TpIaNKO, He nCIONb3yra pactBOpIn IINn abpa3NbHbIe cpeCTBA.
Ecim Ha metanlneCKMe cactn 3ndenna nonana Boda, He-OBxOJIMo BbItepeTb e, TcObI He dOnyCTnTb Obpa3OBAHne pKjaBUNHbl.
yXoA
PnI Heo6xOJIMOCTN BbIOnHJrTe CMA3Ky PNOBHXhXtAteTc CYXM CNlIOKHOOBM MAcNOM. PeIOnIOUeCK NpOBeRpeTKe KONeCA Hn3OHOC, ONUaIe NT pNIIu N necka. 6JeDntCeB BOTCYTBNI PbIIN TpR3N I N ECKa HA nIACMCCOBBX KOMIOHEHTAX, KOToPiE NepEMeUaOTc NO MetaJIInueckm Tpy6am. TakIM Obpa3OM, MOJHo n36ExKaTb TpeHnIA, KOTOpoe OTpNiTaTe bHO B3DeCTByET Ha NCpPaBHy opa08Tu KONAKn. XpaHNTe KONACKy B CYXMO MeCTe.
PACKPBITNE
BHIMAHINE: pRn BbIOpINHeHH NToI OpeaUN CNeJIte 3a Tem, Tc06b I BaW peB6eHK IN DpyIe DetN HaxOdiJINCb Ha 6e3OJaCHOM paCtOHH. CNeIte PpR N ToM, Tc06b I POJDbXHKnHbeAactNI KOLAKCN He kacaiNC peB6eHaK.
1.Пелед packKbTiHem KOLIACKN NOIDHIMITE obe pyukn B pa6oOee noLoJKeHHe, Haxa Hb 60KObIe KHONK (pnc.1A). IpoBepTe, YTO pyukn 3abokIOkpObaHb IB BEPXHE mnoJokHeHn, KaK pOKa3aHOHa pnc.1B.
2.ПOTЯНITEОнOBРЕМЕнHO 3aЗоелКIN,pacnoLOXeHbIeHa pyuKax KOJIЯСКИ -ОHA NaUHET paCkPbIiBaTbCЯ (pIc.2).
3.ПОДНМЛТЕ.KOLЯСКУВЕХ,ЧТобл.NOMOЧБЕМСРКРБТСВ(пс.3).
4. Hängmiete Ha 3aDnHIO KpECTOBiHy NOCOM HOGI BHN3 JIy 3aBepwHn paKpbITM I OLOKIpOBAHn KOJIaCKn B paKpbITOM pONJoxEHn (pinc. 4).
BHIMAHHE:Y6eJNTecbB TOM, YTO, YTO KOLNA 3aΦHKIOBAHBA B PAKpbITOM NOJOKeHN, PNOBepINB 6IOKIPOBKy 3aDHeN KPECTOBHNI.
HADEBAHNEI CHRTNEOBUBKIN
Длгбоьшeroуюбстba pekomehnyem BblIOHЯть 3TN DeICTBnI, CHAB CINDEHNE C KOLACKN.
5. Hanébte 6nbkby, hauhna C bexn che yactn (pnc. 5 A), taK yTO6bI c3aI OHa 6blya HATryTa, ka KIOKA3aHO ha pncyHke 5B.
B COOTBETCTBNI C ΒUbEThbIM XBOCTIKOM BbIPOBHЯITE O6NBky C pIIaCTIKOBM KAPKacOM (PNC.5C). PnKpKeNTNE CsENHeN K OCHOBAHIO, 3aTeChyB DBe KHONKn, paCnOJIoKeHHBe O3JIe KpyTOB HA pcNUcYHke 5D, BCne4 3a TImN HATnHHTNe HxNHMe quaTch
CnDHeHn, 3aTeRhyb nKHOJIKaMn (A) nIINyUyKaMn (B), paacnoJIOKeHNbIMc6Oky Kapkaca, KaK nOka3aHo ha pUCyHke 5 E. HApEnbte oOBKy Ha noDIOxKy, KaK nOka3aHo ha pUCyHke 5 F 6. PpOpyCTtne KOJIbca B fOpMe «D» B COOTBeTcBHyUOuNpe npope3n (pnc.6)
- Пюданту пяон ремь в кольca «D», Кад поka3aHo на рсунcke 7.
8.BHIMAHHE!NoaCHOpeMeHBzakpeJIeK KOIope CnDEHIN, HneOdBHXOB3AHNOc KAPKaCOM.ДЯ npaBUNbHOrN HaJeXHO rNCIOJIb3OBAHIn Heo6XoJIMO pONyCTNTb NaXOBbY peMeHB NpOpe3b O6NBk, KaK NOKa3aHo Ha PncyHKe 8. PtpaBUNbHOe NcIOJIb3OBAHInpeMHeN 6e3OnaChOCTn ONCaHOB n NaparpaPe «PemHI 6e3OnaChOCTn'.
9.3aKpeNtB DBA qeXHa Na IoIIOKOTHnIK, BCTaNB BhauJaE 3
3bIcKa B nPeDHa3NaHeHHeBJe IINHX MeCTa N a3TeM pIcTErHyB
IVx DByMa MEtaJIJIneCKIMn KONPiKaMn, paCIOLOKeHHbIMN
BHYTpn POIIOKOTKHKOB (pnc.9).
PEMHN BE30NACHOCTN
JETCKA PPOGYUOCHNA KONKCA CHAOXeka CHCTEMOY UDEPKBBAHRA B PNTN TOUKCA, COCTOUIE N3 DBYX JAMOK, NOICHORO PEMHNA INAXOBO TPEMH C3ACTEKKO.
BHIMAHHE: npi nepebo3ke Detey Bo3pactom npimepno do 6 Mecaueb He06xOJIMO NCIOJIb3OBaTb JAMKn.
- PpOeHbTe 3aCTeKJN 6e3oNaChOCTN B CnEuaJIbHbIe TkaHeBbIe nTlN (PmC. 10 A) n pOBeBpe, tOcBJA JMaIKHa HxOJINCb Ha HAn6Obe yOboHbI BcOTe IaB aWte OpeBENKa: B pOToVBHOM cnuae oTpErynpyreI IN bCtOry (PmC. 10 B).
11.Посnode TOTO,Кар рбевенokБудETУсжЕн,Вставлг.TВИNTKIN B3aTeXeKуN OТРeГуЛPyteНеобхODIMyOДиHInY NOrCHOrO pemH.N cnoMouIbO 3aTeXeK(pM.1C).
- Tc06bI paucenHb noaCHOH pemeHb, HauKMITE oJHOBpeMeHHO c60ky Ha IBe BVILKn (pnc. 12). Tc06bI o6eChneHTb 60bnyyo 63oNaCHoTH, Ha npOryNoOH KOJIaKe MMeOKTOT "D"-obpa3hble KoiLbca, KOtOpbe IO3BOLJaOT npCooEINHTb DOJONHInTeHbI bH pemeHb 63oNaCHoCTn, COOTBTCTBYUOuIDn Hopme BS 6684. KoIbHa yctaHOblNeBb BYTpnu CUnHeNn KoiLackn Ha npABOi N neBOI CTOpOHe, KAK nokAa3aH na PmCyHke 7.
BHIMAHINE:ДЯ obecneueHnE 6e3oNaCHOCTN BaWero pe6eHka Heo6xOdIMO BcERda NcPONb3OBaTb PEMHnI 6e3oNaCHOCTN. BHIMAHINE:ДЯ obecneueHnE 6e3oNaCHOCTN pe6eHka Heo6xOdIMO OJHOBpeMeHNo IcPONb3OBaTb naxObYi peMeHn I nePMHn 6e3oNaCHOCTN.
BHIMAHIE! Nocne cHrTnRA pemHe 6e3oNaChOCTn (HaNP, dN TcnpK) n NOBTOHO INX YCTAHOBKN CNEyET y6eDnTBcR, UTO OHn PnABINbHO 3aKePnEJIbBO BC XepN pTeyCMOTpeHHbIX Mectax. NIOBTOHO yCTAHOBENHbIe pemHN TpeyJO TOHO peYInpOBKn. UToBb I npOBePTb PnABINbHOe 3aKePnEJIhne pemHk (Ha 3aJHn IOBepxHOCTn CnDEHbA), CNEyET yCaJNTb peEkeHb, pNtCerHTb ETo E aTEM CINbHO NOTHyTb 3a KOHeuHy oAcTb pemHn.
YCTAHOBKA CINDEHNA HANPOTNB MAMBI
BHIMAHINE: B 3ToI MOiNΦiKauzn He npEynCMOTpeHo nC- nOJIb3OBaHne pyKn.
- 10To6bI yCTaHOBnTb CnDEHnE B nONoKeHnN «HaNPOTNB MAmbl》,OTKpOITe CnDEHnE N BCTaBBTe erO,opNEHTINpyac Hb opaHKeBBe bCTpeJIk (Pnc.13 A),KOTOpbe paACNoJKeHb Ha camOM CnDEHn,B cNeuaJIbNb bCtePckHn (Pnc.13 B n C) Ha Kapkace KOnAaCKn,Kak NOKa3aHo hApNCyHke 13D.
14.ПурOTOLKHITE CINDEHNE BHN3,IOLJKeH pa3daCTbCЯ ueIeK, noTbEprXdaIoUH erO bIoKnIPOBky (pIc.14).
BHIMAHHE: nepeid nCpOlb3ObaHnEM 13dEInaB MOnDnHKaZmKoJIaCKn BcERda npOBepaTe IpaBnJIbHOCTb MOHTaJa CcINHKn.
YCTAHOBKA CINDEHNA C BVDOM HA DOPOGY
- UTObI yCTAHOBITb CINHeHn B IONIOJeHN H N C BIVOM Ha DOpOry), OTKPOITE CINHeHn E BCTABBe TEO, oPneHTNpYcBcHa OPaHKeBHe B CTpeKN (pnc. 15 A), KOTOPhe paCnIOJeHNbHa cAMOM CINHeHn, B CNEIaIbNbHe bCTeKHN (pnc. 15 B n C) Ha
kapkace KOJIACKN, KaK POKa3aHo Ha pucynke 15 D.
- PtoTOKHnTE CnDEHne BHN3, (PNC. 16A) DOnJKeH pa3daCTbC8
ueHnok, noTBeRkDaOuIeN erO 6NoKIpOBky (PNC. 16B).
BHIMAHNE: nepeD nCpONb3ObaHnem N3dJIeN B MoNiΦK
kaun KONaCKn BcERda npoBepaTe IpaBnIbHoCTb MOtTaKa
CnIHKn.
CHATNE CNDENHNA
JIaToro, UTO6bI CHaTb CnJeHMe, Het HeO6XoDmOCTn CHImaTb C Hero OOBky.
- HaxMMTE Ha opaHxkeByIO KHOJKNy I03aDN CINHNKn IN npiNoDHHMTE cNIDEHNE (pnc. 17).
PERYJIMPOBKA CINHKN
- Haximma Ha cepyio KhoNky, paacnoIooKeHHyio Ha cinnHe KOJnACKM, MOXHO peYInPOBaB ee hakNOH (pinc. 18). Ipn otNyckaHm N KhoNk CINnKa 6IoKpyeTc B 6IinKaJWe mNoIooKeHH. TOb6i NoHrTa CInnHK, DoCTaTOOHO NoDToJIKNHyb ee BBepex.
BHIMAHINE:cpe6eHKOM,haxoJauMcB KOLIaCKe,yka3aHHbIe onepaun MOyT 6bIb 3aTpduHeHbI.
PEYIINPOBKA IOHOJKNI
BHVAMHIE: neped nCpONb3OBAHnEM nIeDnIA B MoDnKauNi CcPLOuHOy PuyKn" BCERda npOBepaTne npaBnHbHOCTbe yctaHOBKn.
BHIMAHINE: yTO6bI 3aKpBITb KOJIaCKy, HeO6xOJIMo BbHyTb CoeINHITeINbHyIO pyuKy.
BHIMAHNE: 3anpeuetaetcI cnoIb30aBt coeINHteblHyo pykU IJI NOHNAMN KONJCKN C NIDJUIM B HeI peBeHKOM.
KOMNJIEKT «KOMΦOPT»
KOMJIENK T KOMFOT B KJIHOUaET B CEB6 2 HANMOHNYKA N KOPIbI bAJe Na HJXBOT. NOKpbIbAJe Na HJXBOT OOCO peKOMEHyETC B NLOJOEHNi HAnPOTNIMaMbl, D MAFJEHbKNJ DETeI.
- NaHeBte NaJIIMOCHNKN HaJIAMK, KAK NOKa3HO H aPcYNHKe 3
He n3noJI3BaIte XIMMueCKO uCTeHe.
NoctCTBaIe nepINOduHNO pIaTMcOBITE qAchTcBnXHaMeKa KbPna, He nI3noN3BaITe pa3TBOPHTeINI INI a6pa3iNBHN cpeCTDa CneI eBETyAnen KOtAKTeC bO BA HInmATEHIO NO DCyUbaIe T metaIHTe qAChTc, da Ja I3oEHTe Ocbp3aYBaHeto H naBxa.
IOPDpBxKKA
PnH Heo6xOJMOCT CMA3BaIte DVBKHeUITE Ce YaCTN CbC CyXa CINIKHOBA CMA3A.Ke PNOIOuHNo PnpOBeRbAte CTeNEHTHa NT3HOCEOHCT HA yMNTe NOTCTPAHReBtOCTaTbLITOT OT npAX I pBCk. POYCTBAAIE BHNMaTeJIHOCTABUITE OT npAX INI3cBtOT BCNUKII PIACTMACOBIN YACTN, KOINTO CE NITb3rAT NO TpBb1TE, 3a Da npeDtBPATINE PneKdEBPeMeHHOTO IM N3HOCBaHE N BLOUABeHE A EKCnloaTALIOHNHTe XapakTePNCtIKN. CbXpaHRABaHE KONIKKAATA H CYXO MACTO.
OTBAPRAHE HA KOJINKATA
BHIMAHIVE: OtbapnIte n 3aTbapnIte KOJIuKata cmo KOraTo 6be6eTO ce HAMnpa Ha NOCTaTbHo pao3ToHne OT He. IpeNi Da npICTbNITE KbM Te3n OpeaunCe y6BeTe, Ye noDVBHKHTe qACTn HA KOJIuKATA Ce HAMnpaT daJeue O T JILOTO Ha 6be6eTo.
1.Предида OTBOPINTE KONIчКATA BdINHHTe ИДБerte ДьЖКВ
ВрабоTOH NOLOJOSEKHe KATO HATINCHETСТРANHINITE CBTOH
(ФИг.1A).Поверете ддам дьЖКte Can pRaBInHO 6bOKiPaHn
В NOLOJOSEHMeTO, NOKa3AnHO HaФИ.1B
2. Hanchete e ndnOBpemehno dbata 6ytoha, pa3nIOJxKeHbBpy npbcknte, n KOJIuKkata ue 3aONouhe da ce OTbapr (fniR.2).
3.ИЗдрпайтЕ Дьхкinte Harope,здулеснite OTВаряНTo (Фиг.3).
4. HatINCHETe C KPAK B TOOKaHa Na KpBCTOCBaHe Ha TtpBOnIte 3a da 3abBpWTe OTbAPrHTo Ha KOJIuNcKaT u Da y 6IoKnipate B OTOBPeHO NONOJKeHene (FInr.4).
BHIMAHHE:Пюверетдами Крьстовindатona opa e HeNoDvBxH0 3aKoHTpeHa.
IOCTABRHE IN CBAJARE HA TANIUEPRATA
3a BaWe yIeNeHHe Bn npENoBpUbAme Da I3BbPbBaTe Ta3N Opeaunca CbC CBaleHa CeJaKa.
- NocTabete Taunuepneta, Tnpbo Tpr6ba Da cBbnahe rohpata act Ha nptata (firr. 5 A), 3a da Mojke da 3aeme ot3ad nolnokehne, nokazaho Ha fynupa 5 B. V3pabHete Taunuepneta c nlaactMacobata qact, KaKTo ce Bwnka Ha fnr. 5 C. DnKcnpaIte CeDankata Kbm uacnto, Kato 3akonjuerte DbeTe konpeta, pa3nolnoxehn do DBaT a Kpbra, nokazahn Ha fnr. 5 D, cJeT oBa 3akpenete OJlnHata qact HA cedankata, 3akonuabaikn konhetata A andenBaikn nehtata B, pa3nolnoxehn otkbm pamata, KaKTo e Nokazaho Ha fnr. 5 E. NocTabete NoJNOKKATA 3a kpaetata BA tonuepneta KaKTo ce Bwnka Ha fnr. 5 F.
6.3aKoJIyaiTe npbCTeHInTe c fOpMa Ha «D» B nIiNtTe (fHr. 6)
7.ПпдзгИТКоланТрябВаДмИнепeзДваТпьстЕсфогmaН«D».
8. BHIMAHHE: KonaHbT, KOITo MmHaba Mexky kpaYeTaTa, e 3akpeNeH KbM wacnTO. 3a npaBnHOTo My n3NoN3BaHe e HeO6XoJIMO TOI DA mMHe pRe3 NnHa Ka3noJoxhen Bbpxy TaInuCePnra, KaKTo e NOKa3Ho Ha fNpya 8. PpaBnHOTO n3No3HBe HA npEJaNa3HnTe KOaHn e OINCaHO B pa3dEn «PpeJa3n KonoHn.
9. 3aKpeneTe TaTIeepnTaHa NIOJaKaBTHINuTE, KaTO PbBO NOCTaBte TpIte E3HcETa Ha MeCTa HIM, a CJIeT OTO 3aKOJaHe TE BbTeMeTAHIN KONHTa, pa3NIOJKeHbBbBbTpEHIoHCTTa HA TaTIeepnTa.
(φn.9)
KOLAHN 3A BE3ONACHOCT
KoJIHcKaT e Cha6IeHa cBc CICTEMA OT nppeJna3HN KOJaHn CbC 3axBaUaHe B 5TOckN - NO eIN Ha paMeHuTa, eINH OKOJI KpCbTe N eINH MeKJy KpaETaC kTaTapaMa.
BHIMAHHE:Ппи Deca Na Bb3pact Do 6 Meceua n3IO3BaHeto Na ppeNa3HnTe KOnaHN 3a paMeHcTa e 3aDbJXInTeIHO.
10.ФИКСИРЕКТAPAMITEBcOTBEThNITeHINIHA TaHINIEPERaTHa (ФИг.10A).HARnACETe KONAHNTe CnOpeD pAmEHaTa Haa 6eBeTo Taka, Ye da Ca yDObHn (ФИг.10B).
11.CneI Kato CnoKoTBe 6e6Te ONoCTABe T3aKOpUaTIte KONaHITc N cNOMaTHa Na KaTApAMTe NaCTPOJIe 7MPOUHATA Na KONaHa OKOJI KpBCTa HaDeTeTO (fur.11C).
12.3a daocbo6oJnteKoJaHaOKOIO KpbCTa,HaTNCHTe eHOBpeMeHHo DBeTe CTpaHNHn 3aKOpHaNkN (ΦmR.12).
BHIMAHIE: 3a da rapahntipate cyrhpocTta H a baweto dee e heo6xmoH BHNarHa a3n013BaTe pneDna3hInte KOHAn.
BHIMAHHE! Ako npedn3HnTe KOJANHc 6bnIcBcJIaHN (Ha nPnMep, 3a da 6bDat m3pAnH), e Heo6XoDIMO Da ce yOeJInTe, ye B MOMEtA ca npabINHO MOHTnpAHn in 3axBAHATn B TOOKITE 3a fKmCJPAHe. TpeBaDa nn HarnACite HAHOBO CnopeD p5CTa H deTeTo. 3a da ce y6eJInTe, ye npedn3HnTe KOJANH Ca 3axBAHATn pnpBUNHO andpAO 3a dHaTn IOBbPxHOCT Na cEJaKLkata, cJeN KATO NOCTABHnDeTeTo n Ra 3aKOnPaeTe, e Heo6XoDMIO Da npBtHHe TE CINHO KpaIzTa tA IM.
MOHTAX HA CEДAJIKA T A CPEU Y IOCOKATA H A DVBIXEHME
BHIMAHHE:Пи раим КОнфуразьп He e npedBVDeHo n3- non3BaHETo Na npedna3Hn OrapaHUnTeI.
- 3a Ma MOnTIpaTe cedAnKATA cpeUy NocOKaTa Ha DvNKeHne e Heo6xOIMo Da Ra pa3TbOpITe I da YI NOCTABITE KaKTO coAT opAnHexBeNTc TpeIKn (fNr. 13 A), HargnaBaN KyaBbpy XuHtobete (fNr. 13 B n C), pa3nIoJoxHeHa paMaT, KaKTo Ce BvNka Ha fNr. 13 D.
- HatncheTe haIOny IOKaTo UyeTe KNIK. CeaJIkaTa e MOHTpaHa (Φnrg. 14).
BHIMAHINE:Преду Дди ИЗнолбате Идението ВБВ Берспая «ЛЯТHA КOLИКА» BHIMATEIINO роверете дал седалка т epabuHIO MOHTIIPAHA.
MOHTAX HA CEAJAKATA IIO IOCOKA HA DBUXKEHMETO
He cyuHTm mexAHiHm cnoc6oM

He npacyBaTu

He niDaaBAtn ximiuHn nuCTci
PeyyIpaH Ouyuaiye PnactKOBi YactInH BONTOO raHcipKOIO He BVkOpncTObYIOU pO3HNHHIKn a6o a6p3aNBHI 3ac06n.
BCTAHOBJIENHRCUNIHHN HABINPOTMAMN
YBAΓA! Y ciŋ MoɪnФɪkaɪi He ěpeɪdʒaʊeHo BɪkɒpɑstənHЯ pyкn.
- Ⅲo6 BCTaHOBnTn CUNHnB NIOJooHeHHI 念 HABnpOTn MAMIN, BIDKpRnTe CUNHnI B CTABTE IORO, OPIHTyOuMbC Ha NOMAPAnHeBc TprIKn (MaN. 13 A), kI po3TaWobAh iHa cAMOMy CUNIHnH, HaNcejuaHbN CTPrxNkHi (MaN. 13 B) H a KapKaci Bi3Ka, JIK NOka3Ho H a MaJIOnHy 13 C.
- Пожтовхиить сдингь Виз до Клацни, до пдтевжу为其оBrokoyанн (MaI. 14).
YBATA! Ipepe BUNKOPCTAHNRM BINPO6y B KOHΦIRpyaui npOryIaIKOBORIO B3ka 3aBxDi nepeBepiTe npaBnBnM MOHTAK CNIIHNA.
BCTAHOBJIENHNAIINHNOXOJYPYXU
- 106 BCTaHOBtN CnHnB nIOJooKeHHi «NO XoOy
pyx》,BidkpiNte CnIHHn I BCTaTe NOrO,OpIeHTyUOnCb Ha nomapAnhueBtcrePikn(MaN.15A),KIpo3TaWobAHi Ha camOMy CnIH,B cneiaJbHi CtpnxH(MaN.15B)Ha KapKaci B3ka,Ka NKo3aHO H a MaJIOnHKY 15C.
16.ПоштOBxHITb CINIHн Bn3 (MaI.16A)do Klaцанн, 90 NiTBePdKyE noTO6NoKYBaHnna (MaI.16B).
YBAI! Npeep BnKOpNCtAHHM BnPo6y B KOhFiRpyaui npOryJHKOBORi Bi3a 3aBxDn NpeepBirPeTne npabInbHm MOHTAK CINIHn.
3HATTTCNIIHH
Дяг toro, zu6 3nTn CnDinHn, Hemae Heo6xidnocti 3Himata n 3 hboro 06buky.
- HatncnItb Ha nomapaHcyeB Kyonky no3aDy cnHKn i noniHimitb cnDInHHa (MaI. 17).
PERYIIOBAHHHAXNJY CINHKN
- HatackaOnH a cipy KhONKy, po3taWobaHy ha cnHui b3ky, moXHa peryIbOAti II Haxn 3a 6aXaHnM (MaJ. 18). PInp BiDnyCkAHHI KHONKc CNIHKA 6NOKyETbCBA Hai6bnKuOMy N0JoxeHHI. IIO6 NiHHTn CnHKY, DoCTaTHbO npoTbOxHyTt II Broy.
YBAΓA! PeryniobanHЯ моve 6byt KjIbka ycknaHene,Якsoy Bi3ky 3haxoDntbCnTnHa.
PERYIIOBAHHONOPN DJIH H
19.ДявBSTaHOBNEHHЯОпиДЯнгВбжанeNoIPOJeHHЯHaTnCHITbHaDbI KhoNkPo,po3aTsoBaiHycepeuHiHaWapHipaОпиДЯнHir(Man.1).
3HIMHHBAMNEP
- 3xHrtn 3axnchni 6amnp, HATNCihtb Ha Dbi KhoNkni, kI 3hXoADTcBpi NIDPiDOKiTnHKAMn (Man. 20) iNotarHt6 6amnp do ce6e. BiKpnIte 6amnp 3 odHiieCTopoHN, 3O6 nonerWHTn nocayDu TINHH B npORyHNKOBu B1zck. YBAfA! O6ob'3KOBO pnicTe6aJIte DTINHy peMeHmN 6e3neKn. Bamnp HE E pncTPOEM dIy UTPMUYBANH dITnHn. YBAfA! HIKOni He NIKOPCtOBYte 6amnp dI na IINrTaT npOryJNkoBOrBI3Ka 3dtInHOU.
EPROHOMIyHA PEYJIOBAJIbHA PYKA DOUBLE TWIST
-
Hatnckaohny KhoNky, po3taoobaHny ha puCyi, moXHa 6eptaTIn b, BCTaHObIOUOHy y3pyHne dIy Bac noLoXeHnHa iHa 3pyHni BcOTi (MaI. 21). PyKu moXHa BCTaHOBnTu y 8 pi3HHx noLOXeHnX.
-
YBAFG!ПдчacвИКОпСТАнУРУЧаке NOВИнHA 3HAoxOДИСЯВ HINKHbOMY NOLOJOKeHHI (MaJ. 22 A). Po6oуNoLOJOHcEу PUYK - BEPXHE, YA KOKa3aHOHa MaJIOnHcy 22 B.
CTÖRHKOBE ΓAJIbMO
CToRHKOBe ralmbO OndHouacHO Die Ha 06nDbA 3aHix KOleca B1kza. ThiOp cNoPcTHTN BInKOpCTAHN B1kza, nepeD6aueHa raIbMIBha CnTeMa STOP & GO, nomiHa konBoPobOMn HAKneikamn Ha BaXeJx 3aHbOro raJIbMa.
- 106 npnbBcTn B iio rAblMo Bi3ka, HaTncHbTB Hn3 npabn BaxJIb (mam. 23). ABtOMaTHUO 3'YABnEbCz qepBOHa hakLeiKa STOP, i npotinexHo po3aWoBaHN BaXInbPiNCKaY E Bropy.
24.Ⅲo63HrtnB13ok 3raIbMa,HaTnCHiTB BHN3 BaXinb IIBORO konICHO6NOKy (MaJ.24).ABtOMaTHNO 3'ABnHEc8cA cepBOHa HakNeIka GO,IpOtonEkeHPO3taWOBAHnBaXInbPiCKaKyE BROPY.
YBAG! BnKOpncTObyIe raIbMbHn npCtpi KooKeH pa3, KOJI N Bu 3ynHnaTe B3OK. HikOJI He 3aIIuMaTe B3OK 3 dITHOU Ha noXInnIO NOBepxHi, HabIt bp npu 3aIiHOMy ranBMI. YBAG! Iicla HaTcHeneHa BaXilb raIbMbHoro npICCTPOIO nepeKoHaTEcA, UO raJbMa npBaBnIbHO cnpaIouBAI na H BCix rpynx 3aHIX KOJIc.
JIABAOUKOJECA
Bi3OK OchaueHn nepeHIMn KOlecamn, Aki MoKHa BnKOpOCTOByBatn B NOBOPOTHomy a60 3a6bLOKOBaHOMy CTahi. Ha HepiBHXN NOBEXPXHx (ue6bH, rpyHToBA dopora I T.I.) doCilbHO BnKOpTcBOyBatn 3a6bNOKOBaHI Koneca, TOMy 10BoHraPahTHybNotpi6Hy nIabHicb pyx. NObopOTHi KONEA peKomeHdyOtbcn DnI 6IbnWoI MaHeBpeHoCT Bi3ka HA HoPMaJIbHn DOp03i.
- Ⅱo6 nepedhi koneca Bilbno NOBepTaanncr, HATNCHtB HNIO HA nepedHI BaxJIb, KOKa3aHO Ha MAnOHky 25. Ⅱo6 3a6nKoyBaTHn nepedHI koneca, NiDiIMtB HOrOHO BaxJIb Bropy. He3anExHo bID nIoNoXeHHn Koneca, BOHO 6yde 3a6nKoBOAHO B pRmOMy nonoXeHHI.
YBAΓΑ! Bci Kojela NOBVHHi 6byTn OJHOuacHo a6o 3a6JokOBaHi, a6o po36JIokOBaHi.
AKCKLACTNI B3OK
YBAIg! Pnpi BIKOHaHHi cHx di nepeKoHaTecs, 00 Ba7a dInTHa n IHsi dITn nepe6byaIOb Ha 6e3neuHn BiCTAH. CTeXte, oio nd uac xnx onepaui pyxomi acTuHn npOryraHKOBOrO b3Ke h ToPcAUNC dTIHNH.
BizOK moKHa cKlaCTn B nIooJeHHI IIOxOdy pyxy> a60 'Habipotn MAM#. B 060 BInapJkax BnKOpNCTOByETcB Onda i Ta JnpoeUpy. 106 3MeHUnTn Ra6apuTn Bi3ka, peKoMeHnyETcBc KNaJaTn IOno TaK, 106 CnDinHn 3hAxOdiNoCb IIO XOdy pyxy>.
26.Пдимimitsбihuizpkyi i cknaiditb kaiowoh (maJ.26).
-
NotarHitb Bropy o6nDba 3aTbOpHnx rayka, kki po3-taUoBaHa Na pykXax; TpyMNUOuIN iX yCbOMy NIOJoxEHNI, p03eHITb 3aDnHO xPcTeOBnHy, nPoWTOBxHyBwN II Bropy HOCKM HOrn (Man. 27).
-
Bi3bMitbcra 3a pyKoRTky cKaJaHnI i NotTHiT bI Bropy do NOBHorO cKaJaHnI i 6JOkyBaHnI Bi3ka (MaI. 28).
29.卍63mehuNTn rabapntn CKnaedeHOro B1kA,peKoMeHHyTebC HaxuHTn CnMHky B roHpTaIaBHe nOIOKeHHa (MaN 29 A - eNo xOdy puyx),MaN 29 B-《HABNPOTMaMn》
- BiDknHbTe BnpePe npKu (MaN, 30). TaKIM YHNOHOM, CKnAaNeHm BiKo 6yde camOCTiH O yTpMByaTncr y BepTNKaJIbHOMy pIoNoJoxehHI.
- OdaHriTb HanaMoUHnKn Ha JIaMKn, JaN POKa3aHO Ha MaJIIOHky 37.
38.ПOTaRrHtBpozdiJIOBpemiHdIgHcpeiaIbHnO tBip (MaI.38A)IpraJxKpyoarCHOpeMeHb6iHi npop- iXi (MaI.38B).
YBAΓA! 3a Heo6xHocTi BiDpeRyIHOte WpRHy NOrCHOrOpemHe 3a DOIpOMOIO npJIKN.
YBATA! Uo6 raptaHTBaTn 6e3neKy BaSiI dITnHi, Heo6xIDHO 3aBjKn i o60B'3KOBO BIKOPNCTOBaTn po3dIOBni peMHJ DnH I pemeHI 6e3NeKn.
KAPIOJOH JITO / 3NMA
- CnDInHNa OcShaune He DbOMa MexaHImMaMn 3uEnneHHa, RkO pOtaWobAHi 3 60KB i cNyKatB dNr KpIINHeH N KaIOUoHa. Ioo npNkrPiHTN KaIOUoH O KoKpACA, BCTaBe raHuN B MeXAHIM 3uENHeHHA, NK POKa3aHO Ha ManIOHKY
- Y 3aKpInneHOMy Do CuniiHnna CAnHi KaNHOoh MoKe BUNKOPINCTOByBATNCRA K B KOHcIrpyauii IIO XoHy pyxHyTAKI B KOHcIrpyauii IABHpOTn MaMnI, pniCbomy HemaE Heo6XiHDocTi NObepatn Ito.
- 106 p06p3kpnN kAnIOuOH, npOHTOBXHITb BNEpeI nepeHJy u3aΦICyTE II DOMa bIuHMM UINPKYJMa, IK 3o6paKeHO HA MJIOnHKY 40.
- KaHIOsoH OCSaUeHn BVCyBHOO cItoKIO, RaKa DOnOMa-raE 3axNCTnDnTHy BiD NaHdMIPHOrCBiTna.
- ⅡI6 3HnTn 3aHnHnHaNnAky i nepetBopunn KAnIOuOH B IJIthni coHnce3axmChn TeHt, PO3Ce6HItb 3aHnH 3AMOK-6JNCKABky (MaI. 42).
43.ДиязHTTЯКAnIOUHOAДОCTaTHbO NiIdTeHytM IYoro BROPуdoMexahi3mIB KpIIneHHaI nOTIM npOBeCTn cami MeXahi3MMBROPy(Man.43).
YBAΓA! KpinJIeHnHa KaIIOsoHa Heo6xIDHO BVKoHaTn 3O6ox
CTOPIN npOryJnHKOBOro Bi3ka. IpeBipTe HadiHicTb NOrO 3aKpInJIeHHra.
HAKINDA BID DOU
m = 311
1a 1000
aolllll aolss lglg s j aas no sllll jlae wllj
J( 0,1)
o 1000
Gaiwioi
Cllllig: cull lIe bcl cww 2: aee
jaiwo JSi jloai aobij Jqoiwi ayii
.1sllgsslll 10
ggl lgl aal Jabll 151.11000000000000000000000000000
000g00gJ000
aIg qill iia joe puc no sll lnn gaoill aoe plall Jai
1c elioaL clc. aLi gJgJgJg: Jaiil Jaii Jaijai
Jalabslg jolio 12345678901123456789011234567890112345678901123456789011234567890112345678901123456789011234567890112345678901
Lgic gieinu 2 cglg j o Lgai aojg jolll Jolal pjnl
Jolw Jolal jolal jolal aojj Jolai w Jjbal aoLw Jolai
gogggo
Jusell laloe pall sic a wio o sio lc Jbll j no Si aii
aaii jaii iiaii 1 aie gaiyaiyaiyai yai
iillie gaoaaiy jiaaa
JisLgosiwi aie, pili oic Jcayell gosiwoj 1o 5i
C.
- g : 为零, y S 且 y S S L ,则 y L L .
ssii aalwll joljolwglx alwglg eall Jabll Caw
Laiyaiyaiyaiyaiyaiyaiyaiyaiyaiyaiyaiyaiyaiyaiyaiyaiyaiyaiyaiyaiyaiyaiyaiyaiyaiyaiyaiyaiyaiyaiyaiyaiyaiyaiyaiyaiyaiyaiyaiyaiyaiyaiyaiyaiyaiyaiyaiyaiyaiyai
gai jy jj 1i i jai Jabi Ie i jai Jabi jai
aio 1yall egill iio
015g aiaLw clog gao zao 2x 2x 2x 2x
S OBC = S COD + S_ BOC
jill uag. IgIc no Jgjjlg abg a, jgl agaall aic jst ilsiily clrc
aill 1gll lglll glll
LgWLaeg
aai 1
-
-
-
-
-
-
-
-
-
-
-
-
-
-
-
-
-
- 1.
-
-
-
-
-
-
-
-
-
-
-
-
-
-
-
-
jolilil jlc ayell Joeiwi
aillg ailll lalac u cai
Joo aalllg aaiillllclaloc pai j bnnnnaaiai iis
bié jiu
b1 = 2,b2 = - 4
Jg j 1
Jusell jgoj gla aiaoalglj81 aaii sic Jwlll ao 10
[\therefore \log = {\log }{2}{\log }{2}]
- CH = 且 CH 与 C = C
aio olo Jooeiwi

ai a ai 的最小值为 k .


5g ≤ x ≤ 8
j1j

a aaa a a a a a a a a a a a a a a a a a a a a a a a a a a
1
111101344g>99
aJJIJIJIJIJIJIJIJIJIJIJIJIJIJIJIJIJIJIJIJIJIJIJIJIJIJIJIJIJIJIJIJIJIJIJIJIJIJIJIJIJIJIJIJIJIJIJIJIJIJIJIJIJIJIJIJIJIJIJIJIJIJIJIJIJIJIJIJIJIJIJIJIJIJIJIJIJIJIJIJIJIJIJIJIJIJIJIJIJIJIJIJIJIJIJIJIJIJIJIJIJ
0gJJI)1i gai aai 1Li gai jai ai Jai ai jai ai jai ai (15A ojaiJI)
.15DgJgJgJgJgJgJgJgJgJgJgJgJgJgJgJgJgJgJgJgJgJgJgJgJgJgJgJgJgJgJgJgJgJgJgJgJgJgJgJgJgJgJgJgJgJgJgJgJgJgJg
(16BaaSaaSaaSaaSaaSaaSaaSaaSaaSaaSaaSaaSaaSaaSaaSaaSaaSaaSaaSaaSaaSaaSaaSaaSaaSaaSaaSaaSaaSaaSaaSaaSaaSaaSaaSaaSaaSaaSaaSaaSaaSaaSaaSaaSaaSaaSaaSaaSaaSaaSaa
a aalaaalalalalalalalalalalalalalalalalal
a2 = 12 - a1 = 45,b2 = 12 - b1 = 56,c2 = 12 - c1 = 67
1
yssll Jnssic aess yloal lslal
(17 0gJ)
ybjll iinno j
(23 aygall) jaiygi ygi ygiell alieill glc baiyll clc ayalaloyal (23
Lc21 g a i l all alllg jog ay Logjog" STOP" 1r3d aa jgs
(24)
JcIgaiIaII aieiI gajigai logigjogwG"G0"siiaai jy
Jilc haw lcl aayll jj 8. aggill ic lai 151 Jlce i
ailll 1511111111111111
4.2.1.1 3
Jll Jlqieiwi ci iaii/4sglil aiIa aLoI cIe 0g0 aell j!
aaii aaggallalallllaleellol oeg aayw lacye wic aiil
aIgllgglal aaij Ic aell asJagwsi gacjll aie Lgllaeiwl
15c lao: 1awl 1aill c. aegill alll aoLo81 oLall
aLi aaii g aaiolal 111111111111111111111111111
aeggJ CULS Logo aaiinno aagog g alloJI ciai: cloa: alleI goe: cluc
14.15
aaiiagllgogglojnlelljgl
a
Jalalal Jalalal jol
aeg a5yill 81 j no slll jy jolll oio g aee y
ol34g 1021 ol34y yyy 115 15 ggy aay yiy jy Lai
ySg aagaaaegaaeaegeaaee
aalooag aayllglicilll Laii Liig 1ollyao
.(26gajll) aaggl aaawgl golj yaaal jyagai (26
jai aieeagll maiyegg jayaiw. iLwaiI Lc nssnssnssnss
.27 8gssll) Looos wjy jlc81 gns ae bds
Lgaiiig aeyll iie jil jil lc21 jil jil c21 128
(28 aJgJ1) pL J
J! Jy jy yj yj b jc. aie o aLoo Jai Jai Jai 129
J-29B aJgJg. gLiJI oLJI ly JI-29A aJgJI) aJgJI
PQ = 103L
Loicic aaslg ayjell aai. (30 aygall) pOoi jll jnai all Jus, liu se clc (30
aaiog aieo j65
()
S_ ACD = 12 · CD · AB = 12 × 2t × 5
1.5,5
3188888888888888888888888888888 8gBgSll BgSll BgSll BgSll BgSll BgSll BgSll BgSll BgSll BgSll BgSll BgSll BgSll BgSll BgSll BgSll BgSll BgSll BgSll BgSll BgSll BgSll BgSll BgSll BgSll BgSll
20 1 L aI l I I I I I I I I I I I I I I I I I I I I I I I I
iig jgall iwo gl no flll (32A oog) jaoj Joc slicx
(32B a gJgJgJgJgJgJgJgJgJgJgJgJgJgJgJgJgJgJgJgJgJgJgJgJgJgJgJgJgJgJgJgJgJgJgJgJgJgJgJg
JgdsI JdaJIyJyJyJyJyJyJyJy
CCHCCO
1gj 1Jaeiuiu Jiaai Lg juaia aee Jie Jcdo JyI y
S_5 = 1 + 5 + 5 + 5 + 26 = 40
aJUUUUUuSogUgUdUlaHJUwUcLg...SjlaJIJIhLaJeIJIeJI
Jbc JcJcJcJcJcJcJcJcJcJcJcJcJcJcJcJcJcJcJcJcJcJcJcJcJcJcJcJcJcJcJcJcJcJcJcJcJcJcJcJcJcJcJcJc
g iio 100000000000000000000000000000000000000000000000
(Bg 33Aa)gl:SLQo aIi111111111111111
JolSJJnssll alljIjplgall g, jll saa
"ILS 15" pIbI bOJIJI Ic CHICCO oJg JclLo sJi
pLi j y o Lai SsLJI: iLc. aill g y aill JIqwiJi.
0gjll lgl cwl11 Jlaai jai j aai aai bia i 5jll
"ILS LLS"
pLJI:UJI JSLgJI Lc UaLal Ijolbl l jSs aaii 134
oio yioi ci, aIbI oio g. pJIOIOIOIOIOIOIOIOIOIOIOIOIOIOIOIOIOIOIOIOIOIOIOIOIOIOIOIOIOIOIOIOIOIOIOIOIOIOIOIOIOIOIOIOIOIOIOIOIOIOIOIOIOIOIOIOIO
Sscjcii jcii ci 00gai iieil ieaiiaiaiaiaiaiaiaiaiaiaiaiaiaiaiaiaiaiaiaiaiaiaiaiaiaiaiaiaiaiaiaiaiaiaiaiaiaiaiaiaiaiaiaiaiaiaiaiaiaiaiaiaiaiaiaiaiaiaiaiaiaiaia
(34 0gJJI)Igjolal jaiJI gJbJC LgJI JgJJI
L
iilll l 10000000000000000000000000000000000000000000
aaii aill lgl gag bgsgll clll alldll olae
法一:
jieiell jieiJI JieiJI JieiJI JieiJI JieiJI JieiJI JieiJI
BgA JzjJl Jlsj.10cJl jSjPj (35A oJgJJI)Je
.5i ci gaaagaaa (35B aagaa) Lgga aaaa
JyjSJIyIJIgJLJIJIJIJIJIJIJIJIJIJIJIJIJIJIJIJIJIJIJIJIJIJIJIJIJIJIJIJIJIJIJIJIJIJIJIJIJIJIJIJIJIJIJIJIJIJIJIJIJIJIJIJIJIJIJIJIJIJIJIJIJIJIJIJIJIJIJIJIJIJIJIJIJIJIJIJIJIJIJIJIJIJIJIJIJIJIJIJIJIJIJIJIJIJIJIJIJIJIJIJIJ
(36B oJgJJI)
aaii iiaaa aiee aeae eaeae
aillg kie iic lois Jolal oles aJl:
Jalllg aell gge laaall oolll plssw ic Lel eilis8y:
[\log \left( {x - 1}\right) = \frac{2}{x} + 1]
"Kit Comfort"
37aLalSlaIbIaIyIaIyIaIyIaIyIaIyIaIyIaIy
(38)
(38Bog-1)
i1i1i1i1i1i1i1i1i1i1i1i1i1i1i1i1i1i1i1i1i
JaIaIaIwJyJiaIaIbJIoJiaOJyJUaeiwhjua
Jue:1111
jLcogUJiipasimuueWvclgJcLcugggoLugcg2oall39
golS Jgglj 11111111111111111
gaaal 1aegagagagagagagagagagagagagagagagagagagagagagagagagagagagagagagagagagagagagagagagagagagagagagagagagagagagagagagagag
aJ 1
abwglccil no 511gloxl gololgclgclc aiaaill (40
40g 1 glaolal 122g
gajlljioJaljGaiJWaiJiaS,ijaoa a
42
(42)
pIaIg IaIg SLoI aIg aIg IaIg aIg aIg aIg aIg aIg aIg aIg aIg aIg aIg aIg aIg aIg aIg aIg aIg aIg aIg aIg aIg aIg aIg aIg aIg aIg aIg aIg aIg aIg aIg aIg aIg aIg a
( 43b5 + 2b4) ,128b3 + 2b + 11,128b2 + 2b + 11,
jllolgclh
b1 = b2 = 0, b3 = - 12,b5 = 0
aiee eae 44
Sglalgglgslalj j JaeWJ 44ogol
Loligg,bluogslglldlglaeiulscaijsglaLb
= 1 2 _3L
iilllissgsslllsljlsbllnsyoggsbgsjLaeimss
gaaa wla aalaaeell s yaeel lcyall gollllloe iwi
glial 15g jS clllloio yIyIyIyIyIyIyIyIyIyIy
aaii i aiee eiee eae eae eae eae eae eae eae eae eae
a,b,c,d,e,f,g,h,i,j,k,l,m,n,p,q,r,s
S OBC = S COD + S_ BOC
45
(450g) 2021高考考角
(47g46a3a1l)
46
aaiiiaaiiaaiicgglccoggglgglgglgglgglg
(46g
47
47
jolcxl Jolalw
jolckl Jod aLac aluw ojo aoeill
J 148
B LlI 1 a2r21 Clll 1 1 1 1 1 1 1 1 1 1 1 1 1 1 1
(48)
AJI 1234567890
aJell 1 JdALW
+ = 2
gagaaagaaagaaafaoaogjolalbtaaLacaa aIcIaaglln
A
49.123, all 105a7d111111111111 (49)
alts laj (laugio po) jgl aai bll jia jbi jaoi 50
aLcLpa.50AogalgLoLgLoLgOgOgOgOgOgOg
LcoggclalbIgaiS10pJUuIugglilcdal>la:(sP)
.50Baagallalol
152cannnnnngnnnnnnnnnnnnnnnnnnnnnnnnnnnnnnnnnnnnnnnnnnnnnnnnnnnnnnnnnnnnnnnnnnnnnnnnnnnnnnnnnnnnnnnnnnnnnnnnnnnnnn
jglccuLolalIocaleoagaaatgjjololijLaigjelljj
d( x,y) = 3
102000000000000000000000000000000000000000000
Jgglg aaliso Lio Igagog sgl gll alIgIg sljX jx jx jx
logiiil


ARTSANA S.P.A.
ARTSANA GERMANY GMBH
Borsigstrasse 1-3
Prospect Close - Lowmoor Road Business
Park Kirkby In Ashfield
Nottinghamshire - Ng17 7Lf
England U.K.
01623 750870 (office hours)
www.chicco.co.uk

ARTSANA SPAIN S.A.U.
C/Industria 10
Pol. Industrial Urtinsa
28923 Alcorcon (Madrid)-Spain
902 117 093
www.chicco.es

ARTSANA PORTUGAL S.A.
Uner Plaza No. 4/1 Kat 12
Kozyatagi - Kadikoy
34710 Istanbul - Turkey
02144442444
www.chicco.com

ARTSANA POLAND Sp.zo.o.
Aquarius, UI. Połczyńska 31 A
01-377 Warszawa
+48 22 290 59 90
www.chicco.com

ARTSANA BRASIL LTDA.
Rua Major Paladino, N^128
Galpao 18
Dec V. Ruben Dario 1015
Colonia Lomas De Providencia 44647
Guadalajara, Jalisco-Mexico
018007028983
www.chicco.com.mx

ARTSANA ARGENTINA S.A.
Uruguay 4501
Victoria Cp(1644)
San Fernando-Buenos Aires-Argentina
0810-888-2442
www.chicco.com.ar

ARTSANA INDIA PRIVATE LIMITED,
7Th Floor, Tower B, Paras Twin Towers,
Golf Course Road, Sector 54
Gurgaon - 122002
Haryana, India
(+91)(124)(4964500)
www.chicco.in

ARTSANA S.p.A.
22070 Grandate (CO) - Italy
Tel. (+39) 031 382 111
Fax (+39) 031 382 400
www.chicco.com

NOTE


NOTE