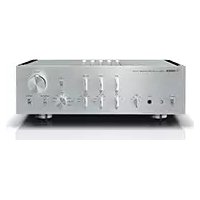
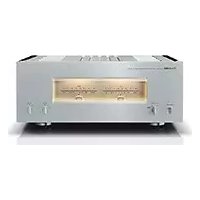
USER MANUAL R-S300 YAMAHA
1 To assure the finest performance, please read this manual carefully. Keep it in a safe place for future reference.
2 Install this sound system in a well ventilated, cool, dry, clean place - away from direct sunlight, heat sources, vibration, dust, moisture, and/or cold. For proper ventilation, allow the following minimum clearances around this unit.
Top: 30~cm (11-3/4 in)
Rear: 20~cm (7-7/8 in)
Sides: 20~cm (7-7/8 in)
3 Locate this unit away from other electrical appliances, motors, or transformers to avoid humming sounds.
4 Do not expose this unit to sudden temperature changes from cold to hot, and do not locate this unit in an environment with high humidity (i.e. a room with a humidifier) to prevent condensation inside this unit, which may cause an electrical shock, fire, damage to this unit, and/or personal injury.
5 Avoid installing this unit where foreign object may fall onto this unit and/or this unit may be exposed to liquid dripping or splashing. On the top of this unit, do not place:
- Other components, as they may cause damage and/or discoloration on the surface of this unit.
- Burning objects (i.e. candles), as they may cause fire, damage to this unit, and/or personal injury.
- Containers with liquid in them, as they may fall and liquid may cause electrical shock to the user and/or damage to this unit.
6 Do not cover this unit with a newspaper, tablecloth, curtain, etc. in order not to obstruct heat radiation. If the temperature inside this unit rises, it may cause fire, damage to this unit, and/or personal injury.
7 Do not plug in this unit to a wall outlet until all connections are complete.
8 Do not operate this unit upside-down. It may overheat, possibly causing damage.
9 Do not use force on switches, knobs and/or cords.
10 When disconnecting the power cable from the wall outlet, grasp the plug; do not pull the cable.
11 Do not clean this unit with chemical solvents; this might damage the finish. Use a clean, dry cloth.
12 Only voltage specified on this unit must be used. Using this unit with a higher voltage than specified is dangerous and may cause fire, damage to this unit, and/or personal injury. Yamaha will not be held responsible for any damage resulting from use of this unit with a voltage other than specified.
13 To prevent damage by lightning, keep the power cable and outdoor antennas disconnected from a wall outlet or this unit during a lightning storm.
14 Do not attempt to modify or fix this unit. Contact qualified Yamaha service personnel when any service is needed. The cabinet should never be opened for any reasons.
15 When not planning to use this unit for long periods of time (i.e. vacation), disconnect the AC power plug from the wall outlet.
16 Be sure to read the "TROUBLESHOOTING" section on common operating errors before concluding that this unit is faulty.
17 Before moving this unit, press to turn off this unit, and then disconnect the AC power plug from the wall outlet.
18 Condensation will form when the surrounding temperature changes suddenly. Disconnect the power cable from the outlet, then leave this unit alone.
19 When using this unit for a long time, this unit may become warm. Turn the power off, then leave this unit alone for cooling.
20 Install this unit near the AC outlet and where the AC power plug can be reached easily.
21 The batteries shall not be exposed to excessive heat such as sunshine, fire or the like.
22 Excessive sound pressure from earphones and headphones can cause hearing loss.
As long as this unit is connected to the AC wall outlet, it is not disconnected from the AC power source even if you turn off this unit by or set it to the standby mode by button on the remote control. In this state, this unit is designed to consume a very small quantity of power.
WARNING
TO REDUCE THE RISK OF FIRE OR ELECTRIC SHOCK, DO NOT EXPOSE THIS UNIT TO RAIN OR MOISTURE.

This label is required to be attached to a product of which the temperature of the top cover may be hot during operation.
CONTENTS
INTRODUCTION
USEFUL FEATURES 2
SUPPLIED ACCESSORIES 3
CONTROLS AND FUNCTIONS 4
Front panel 4
Front panel display 6
Rear panel 7
Remote control. 8
Using the remote control 9
PREPARATION
CONNECTIONS 10
Connecting speakers and source components. 10
Connecting the FM and AM antennas 12
Connecting power cable 12
BASIC OPERATION
PLAYING AND RECORDING 13
Playing a source 13
Adjusting the tonal quality. 14
Recording a source 16
Using the sleep timer 16
FM/AM TUNING 17
Automatic tuning 17
Manual tuning. 18
Automatic station preset (FM stations only) 19
Manual station preset 20
Recalling a preset station 21
Clearing a preset station 21
Clearing all preset stations 22
Receiving Radio Data System information
(FM stations only) 23
TP Search function (FM stations only) 24
PLAYING BACK TUNES
FROM YOUR iPhone/iPod/
BluetoothTM COMPONENT 25
Using a Universal Dock for iPod. 26
Using a Wireless System for iPod 27
Using a Bluetooth Wireless Audio Receiver 28
ADVANCED OPERATION
SETTING THE OPTION MENU FOR EACH INPUT SOURCE. 30
Option menu items. 30
ADVANCED SETUP 32
Changing the ADVANCED SETUP menu parameters. 32
TROUBLESHOOTING 33
SPECIFICATIONS. 38
USEFUL FEATURES
This unit allows you to:
| Improve sound quality by using the Pure Direct function | → | p. 14 |
| Play back music from your iPhone/iPod* or Bluetooth component* | → | p. 25 |
| Listen to FM and AM radio stations | → | p. 17 |
| Receive and display Radio Data System information | → | p. 23 |
| Boost bass sounds by connecting a subwoofer | → | p. 10 |
| Use this unit's remote control to operate a Yamaha CD player | → | p. 8 |
| Save power by using the automatic power down function | → | p. 32 |
- Optional Yamaha product required
iPhone, iPod
iPhone, iPod, iPod classic, iPod nano and iPod touch are trademarks of Apple Inc., registered in the U.S. and other countries.
Bluetooth™
Bluetooth is a registered trademark of the Bluetooth SIG and is used by Yamaha in accordance with a license agreement.
- indicates a tip for your operation.
- Some operations can be performed by using either the buttons on the front panel of this unit or those on the remote controls. In case the button names differ between this unit and the remote controls, the names of the buttons on the remote controls are given in parentheses.
- This manual is printed prior to production. Design and specifications are subject to change in part as a result of improvements, etc. In case of differences between the manual and the product, the product has priority.
SUPPLIED ACCESSORIES
Please check that you received all of the following parts.

Remote control
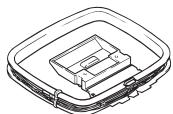
AM loop antenna
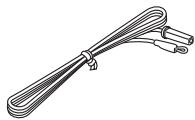
Indoor FM antenna
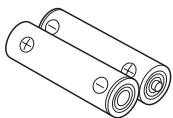
Batteries (x2)
(AA, R6, UM-3)
Notes on remote control and batteries
- Do not spill water or other liquids on the remote control.
- Do not drop the remote control.
- Do not leave or store the remote control in the following conditions:
places of high humidity, such as near a bath
places of high temperatures, such as near a heater or stove
places of extremely low temperatures
- dusty places
- Use AA, R6, UM-3 batteries for the remote control.
- Insert batteries according to the polarity markings (+ and -).
- Change all batteries if you notice the operation range of the remote control narrows.
- If the batteries run out, immediately remove them from the remote control to prevent an explosion or acid leak.
- If you find leaking batteries, discard the batteries immediately, taking care not to touch the leaked material. If the leaked material comes into contact with your skin or gets into your eyes or mouth, rinse it away immediately and consult a doctor. Clean the battery compartment thoroughly before installing new batteries.
- Do not use old batteries together with new ones. This may shorten the life of the new batteries or cause old batteries to leak.
- Do not use different types of batteries (such as alkaline and manganese batteries) together. Batteries that look the same may have a different specification.
- Before inserting new batteries, wipe the battery compartment clean.
- Dispose of batteries according to your regional regulations.
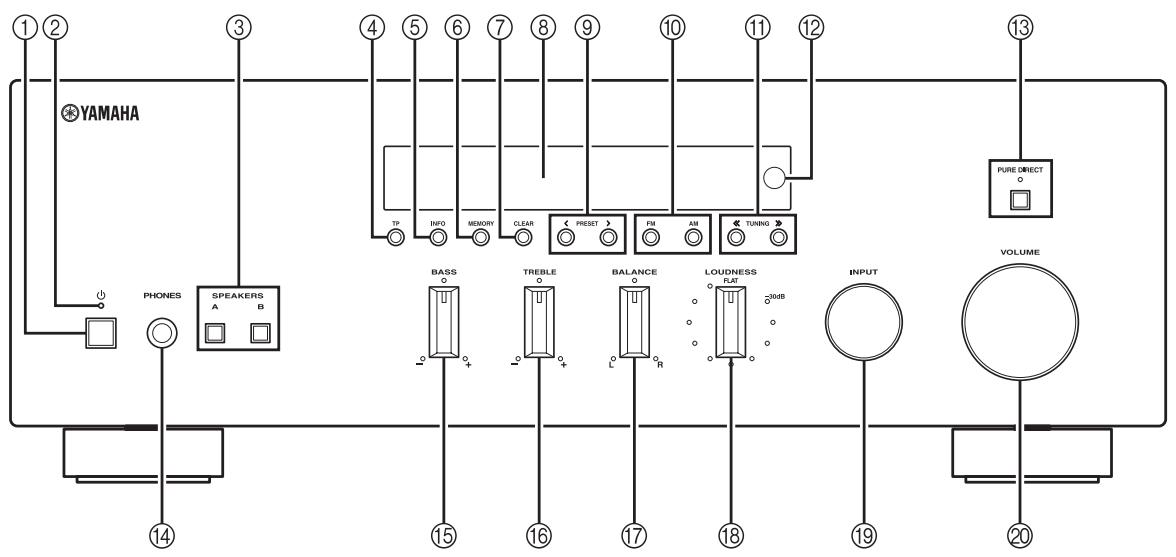
Front panel
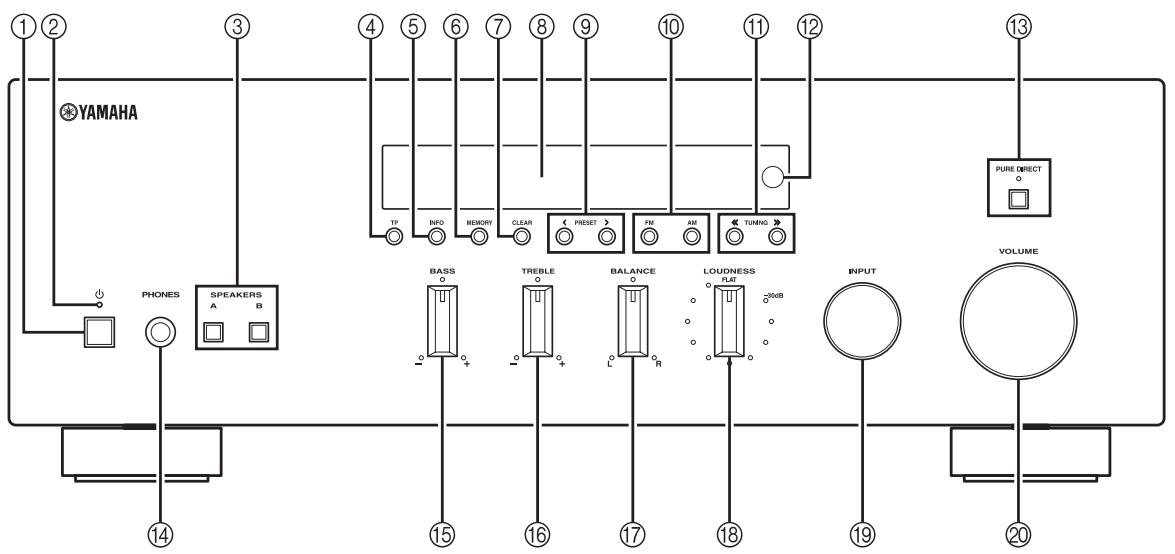
① (power)
Turns on and off the power of this unit (see page 13).
On position: Pushed inward
Off position: Released outward
Note
This unit consumes a small amount of power even when turned off or when in standby mode.
② Power indicator
Lights up as follows:
Brightly lit: Power is on
Dimly lit: Standby mode
Off: Power is off
Note
If an iPhone/iPod is charged while this unit is in standby mode, the power indicator lights up brightly.
③ SPEAKERS A/B
Turns on or off the speaker set connected to the SPEAKERS A and/or SPEAKERS B terminals on the rear panel each time the corresponding button is pressed (see page 13).
④ TP
Searches automatically for a station that provides traffic program (TP) broadcasts (see page 24).
⑤ INFO
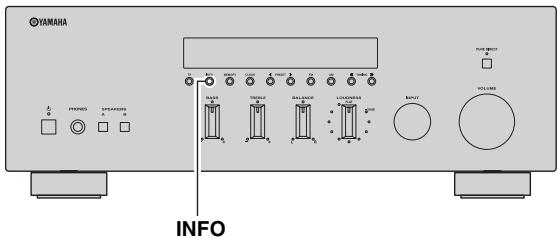
Turns on and changes the Radio Data System display mode when TUNER is selected as the input source (see page 23).
Changes the playback information displayed about the song playing on the iPhone/iPod when DOCK is selected as the input source (see page 26).
Note
Playback information can only be displayed for an iPhone/iPod that is connected using a Universal Dock for iPod.
(6) MEMORY
Stores the current FM/AM station as a preset when TUNER is selected as the input source (see page 20).
⑦ CLEAR
Cleared the current FM/AM preset station when TUNER is selected as the input source (see page 21).
⑧ Front panel display
Shows information about the operational status of this unit.
(9) PRESET /
Selects a preset FM/AM station when TUNER is selected as the input source (see page 21).
FM, AM
Sets the FM/AM tuner band to FM or AM when TUNER is selected as the input source (see page 17).
⑪ TUNING /
Selects the tuning frequency when TUNER is selected as the input source (see page 17).
Remote control sensor
Receives infrared signals from the remote control.
PURE DIRECT and indicator
Allows you to listen to a source in the purest possible sound (see page 14). The indicator above it lights up and the front panel display turns off when this function is turned on.
14 PHONES jack
Outputs audio to your headphones for private listening.
Note
Press SPEAKER A/B so that the SP A/B indicators turn off before you connect your headphones to the PHONES jack.
15 BASS control
Increases or decreases the low frequency response. The center position produces a flat response (see page 14).
16 TREBLE control
Increases or decreases the high frequency response. The center position produces a flat response (see page 14).
17 BALANCE control
Adjusts the sound output balance of the left and right speakers to compensate for sound imbalances caused by speaker locations or listening room conditions (see page 14).
18 LOUDNESS control
Retains a full tonal range at any volume level to compensate for the human ears' loss of sensitivity to high and low-frequency ranges at a low volume level (see page 15).
19 INPUT selector
Selects the input source you want to listen to.
② VOLUME control
Increases or decreases the sound output level.
Note
This does not affect the output level of the REC jacks.
Front panel display
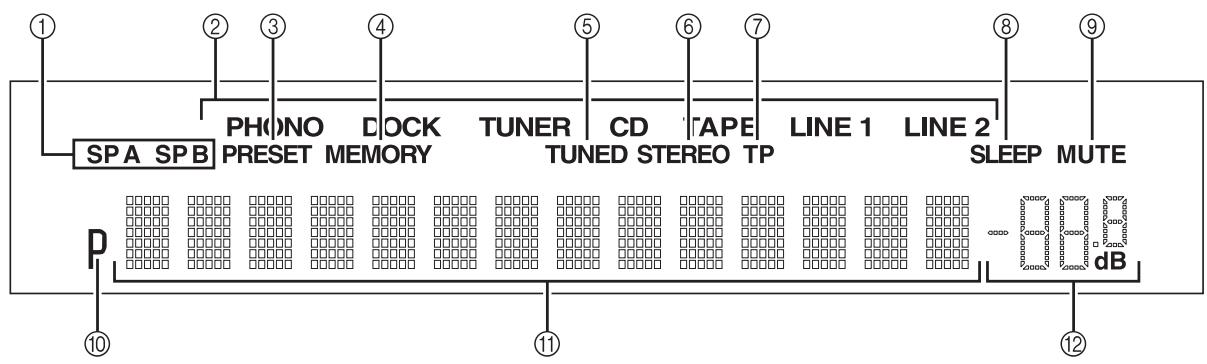
① SP (SPEAKERS) A/B indicators
Light up according to the set of speakers selec
Both indicators light up when both sets of speakers are selected.
Light up brightly to indicate the input source that is currently selected.
(3) PRESET indicator
Lights up when you recall a preset radio station. Blinks while the automatic station preset feature is scanning for FM stations to register as presets.
④ MEMORY indicator
Lights up or blinks when an FM/AM station is being stored as a preset.
⑤ TUNED indicator
Lights up when this unit is tuned in to an FM or AM station.
⑥ STEREO indicator
Lights up when this unit is receiving a strong signal for an FM stereo broadcast.
⑦ TP indicator
Lights up when this unit is tuned in to a Traffic Program (TP) station. Blinks when searching for a TP station.
SLEEP indicator
Lights up when the sleep timer is turned on.
MUTE indicator
Blinks while the MUTE function is turned on.
10 P indicator
Lights up when a preset number is selected. Blinks while you are registering a preset radio station.
Shows information when adjusting or changing settings.
Volume indicator
Displays the current volume level.
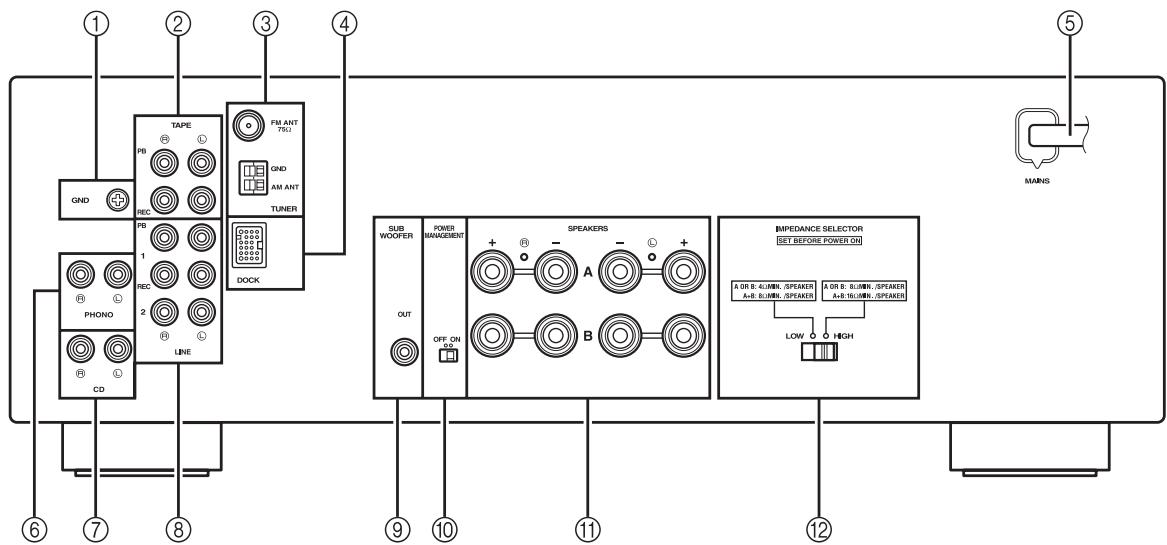
Rear panel
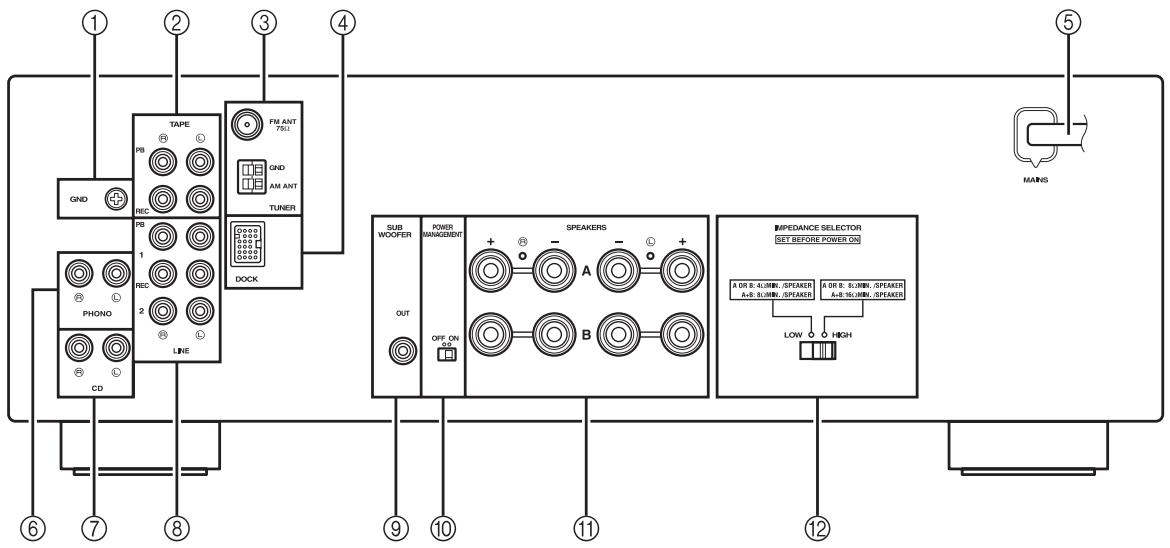
① GND terminal
Used to connect a turntable (see page 10).
② TAPE jacks
Used to connect a tape deck (see page 10).
③ Antenna terminals
Used to connect FM and AM antennas (see page 12).
④ DOCK jack
Used to connect an optional Yamaha Universal Dock for iPod (such as the YDS-12), Wireless System for iPod (YID-W10), or Bluetooth Wireless Audio Receiver (YBA-10) (see page 25).
⑤ Power cable
For connecting this unit to an AC wall outlet (see page 12).
⑥ PHONO jacks
Used to connect a turntable (see page 10).
⑦ CD jacks
Used to connect a CD player (see page 10).
LINE 1-2 jacks
Used to connect audio components (see page 10).
SUBWOOFER OUT jack
Used to connect a subwoofer with built-in amplifier (see page 10).

The SUBWOOFER OUT jack attenuates signals over 90Hz
10 POWER MANAGEMENT switch
Used to enable or disable the automatic power down function. When this function is enabled, this unit automatically enters standby mode if it is not operated for a certain amount of time (3 settings are available; see page 32).
11 SPEAKERS terminals
Used to connect speakers (see page 10).
⑫ IMPEDANCE SELECTOR switch
Used to select the impedance setting (see page 11).
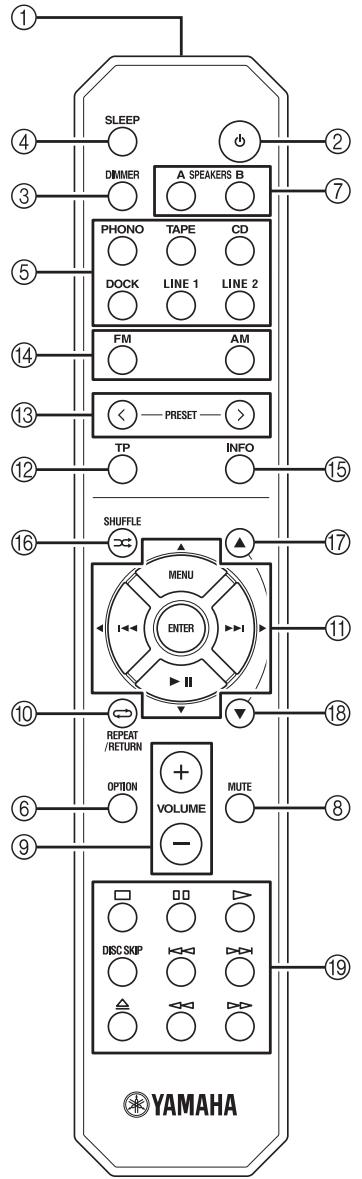
Remote control
This section describes the function of each button on the remote control used to control this unit or a Yamaha CD player.
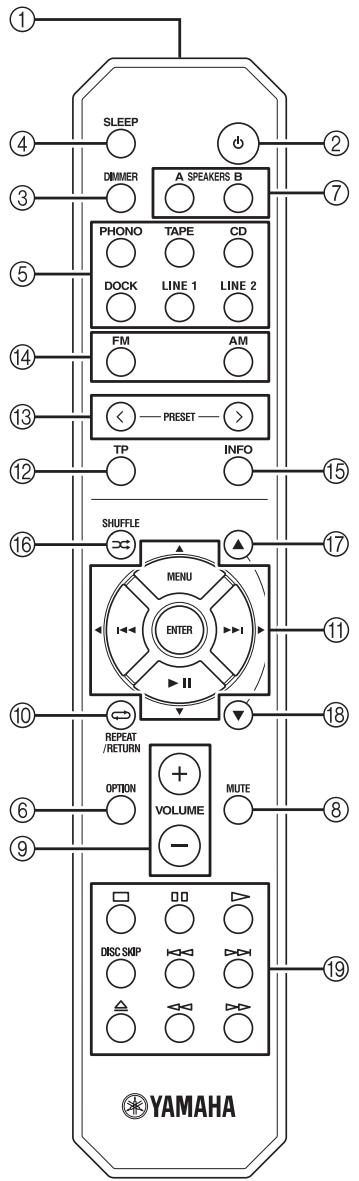
Common controls
The following buttons can be used no matter which input source is selected.
① Infrared signal transmitter
Sends infrared signals.
② (power)
Turns this unit on, or sets it to standby mode.
Note
This button functions only when the (power) button on the front panel is in the on position.
③ DIMMER
Changes the brightness level of the front panel display. Choose brightness from 3 levels by pressing this button repeatedly.

This setting is retained even if you turn off this unit.
④ SLEEP
Sets the sleep timer (see page 16).
Select the input source you want to listen to.

- The input source names correspond to the names of the connection jacks on the rear panel.
- To select TUNER as the input source using the remote control, press FM or AM.
(6) OPTION
Turns the OPTION menu on and off (see page 30).
⑦ SPEAKERS A/B
Turns on and off the set of speakers connected to the SPEAKERS A and/or SPEAKERS B terminals on the rear panel of this unit when the corresponding button is pressed.
MUTE
Mutes the sound output. Press again to restore the sound output to the previous volume level.
⑨ VOLUME +/-
Increases or decreases the sound output level.
Note
This does not affect the output level of the REC jacks.
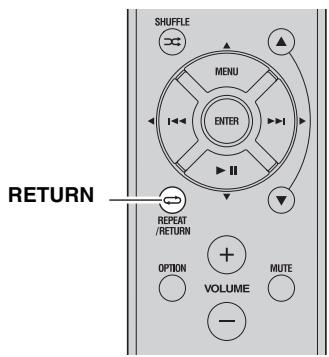
10 RETURN
Returns to the previous menu or ends the menu display when using the Option menu (see page 30).
11 / / / / ENTER
Selects and confirms items in the Option menu (see page 30).
FM/AM controls
The following buttons can be used when TUNER is selected as the input source.
12 TP
Searches automatically for a station that provides traffic program (TP) broadcasts (see page 24).
13 PRESET</>
Selects a preset FM/AM station when TUNER is selected as the input source (see page 21).
⑭ FM, AM
Selects TUNER as the input source and sets the FM/AM tuner band to FM or AM (see page 17).
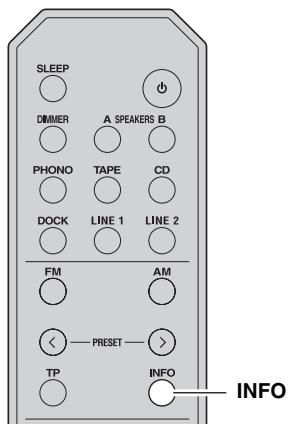
15 INFO
Turns on and changes the Radio Data System display mode when TUNER is selected as the input source (see page 23).
iPod controls
The following buttons can be used when DOCK is selected as the input source for listening to an iPhone/ iPod. For more information, see page 25.
10 REPEAT
11 MENU/IOI/KI/DI/ENTER
15 INFO
16 SHUFFLE
17
18
Yamaha CD player controls
The following buttons can be used to control a Yamaha CD player when CD is selected as the input source.
Yamaha CD player control buttons
- Stops playback
- Pauses playback
- Starts playback
DISC SKIP Skips to the next disc in a CD changer
- Skips backward
- D>> Skips forward
Ejects the disc
Rewinds playback
- Fast-forwards playback
Note
Even when using a Yamaha CD player, certain components and features may not be available. Refer to your component's owner's manual for more information.
Using the remote control
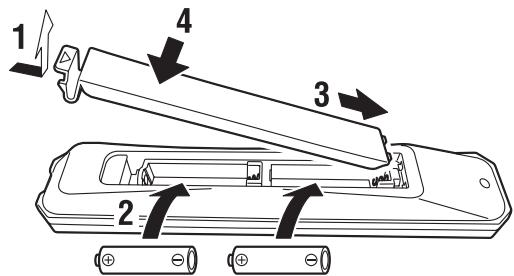
■ Installing batteries
AA, R6, UM-3 batteries
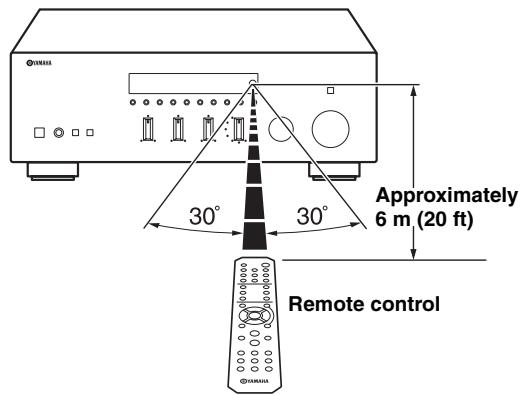
Operation range
The remote control transmits a directional infrared beam. Be sure to aim the remote control directly at the remote control sensor on the front panel of this unit during operation.
Connecting speakers and source components
CAUTION
- Do not connect this unit or other components to the main power until all connections between components are complete.
- All connections must be correct: L (left) to L, R (right) to R, “+” to “+” and “-” to “-”. If the connections are faulty, no sound will be heard from the speakers, and if the polarity of the speaker connections is incorrect, the sound will be unnatural and lack bass. Refer to the owner’s manual for each of your components.
- Use RCA cables for audio components (except for speaker connections and DOCK jack connections).
- The IMPEDANCE SELECTOR must be set to the appropriate position before connecting speakers. See page 11 for details.
- Do not let bare speaker wires touch each other or any metal part of this unit. This could damage this unit and/or the speakers.
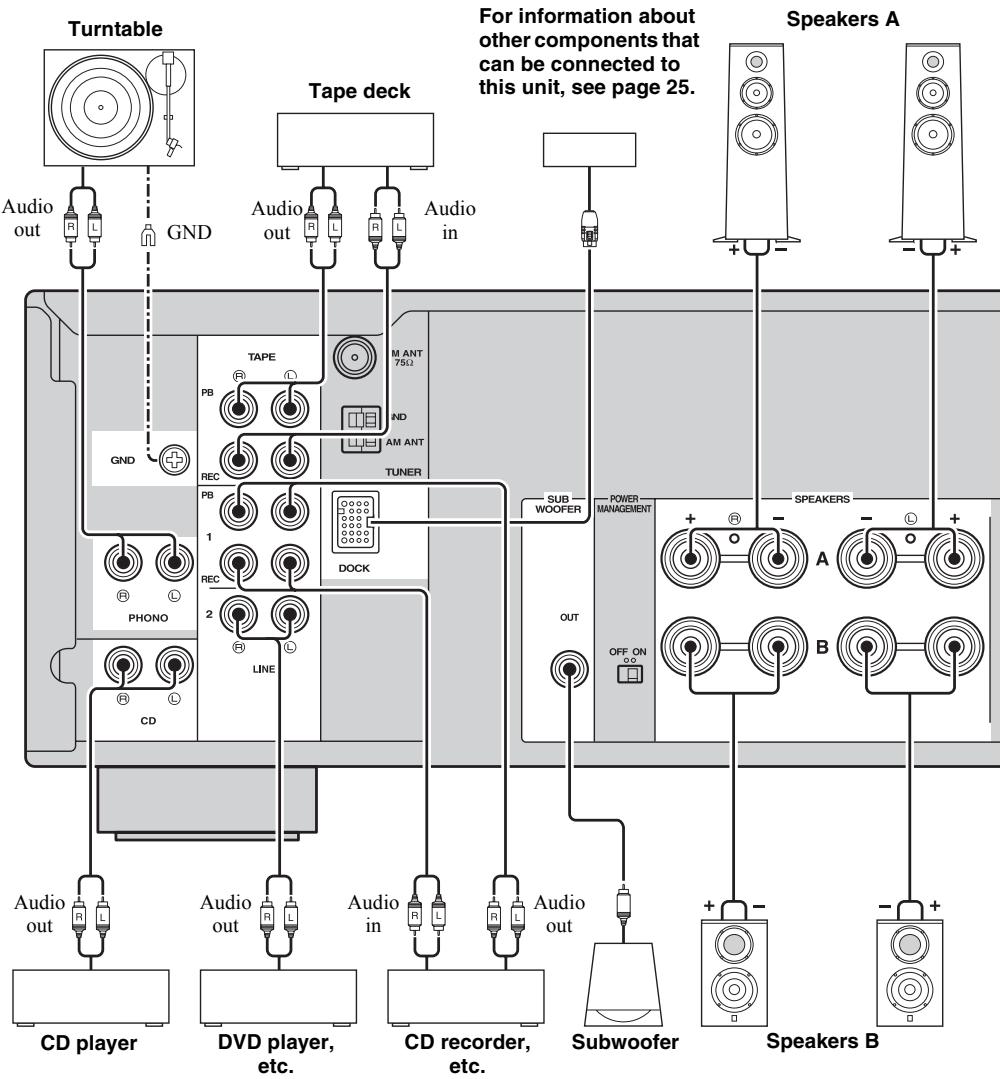

- The PHONO jacks are designed for connecting a turntable with an MM cartridge.
- Connect your turntable to the GND terminal to reduce noise in the signal. However, for some turntables, you may hear less noise without the GND connection.
IMPEDANCE SELECTOR switch
CAUTION
Do not change the IMPEDANCE SELECTOR switch while the power of this unit is turned on, as doing so may damage the unit.
If the unit fails to turn on, the IMPEDANCE SELECTOR switch may not be fully slid to either position. If this is the case, remove the power cable and slide the switch all the way to either position.
Select the switch position (LOW or HIGH) according to the impedance of the speakers in your system.
| Switch position | Impedance level |
| HIGH | ·If you use one set (A or B), the impedance of each speaker must be 8 Ω or higher.
·If you use two sets (A and B) simultaneously, the impedance of each speaker must be 16 Ω or higher.
·If you make bi-wire connections, the impedance of each speaker must be 8 Ω or higher. See page 11 for Bi-wire connection. |
| LOW | ·If you use one set (A or B), the impedance of each speaker must be 4 Ω or higher.
·If you use two sets (A and B) simultaneously, the impedance of each speaker must be 8 Ω or higher.
·If you make bi-wire connections, the impedance of each speaker must be 4 Ω or higher. See page 11 for Bi-wire connection. |
Connecting speaker cables
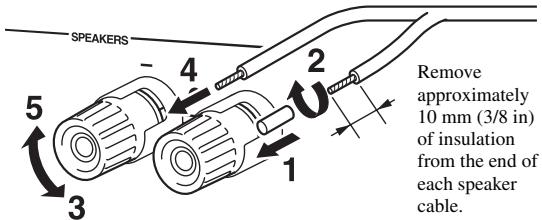
Note
When inserting speaker cables into the speaker terminals, insert only the bare speaker wire. If insulated cable is inserted, the connection may be poor and sound may not be heard.
Bi-wire connection
Bi-wire connection separates the woofer from the combined midrange and tweeter section. A bi-wire compatible speaker has four binding post terminals. These two sets of terminals allow the speaker to be split into two independent sections. With these connections, the mid and high frequency drivers are connected to one set of terminals and the low frequency driver to another set of terminals.
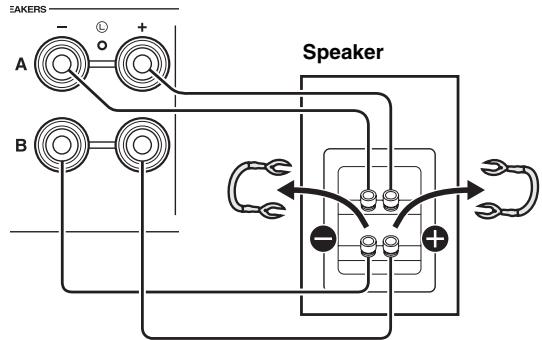
This unit
Connect the other speaker to the other set of terminals in the same way.
CAUTION
When making bi-wire connections, set the IMPEDANCE SELECTOR switch to HIGH or LOW depending on the impedance of your speakers:
8 or higher: HIGH
4 or higher: LOW
See page 11 for more information about the IMPEDANCE SELECTOR switch.
Note
When making bi-wire connections, remove the shorting bridges or cables on the speaker.

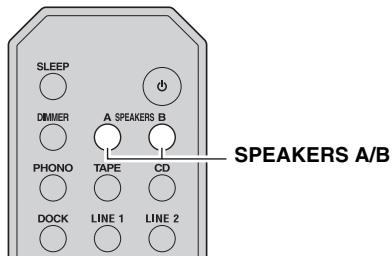
To use the bi-wire connections, press SPEAKERS A and SPEAKERS B on the front panel or on the remote control so that both SP A and B light up on the front panel display.
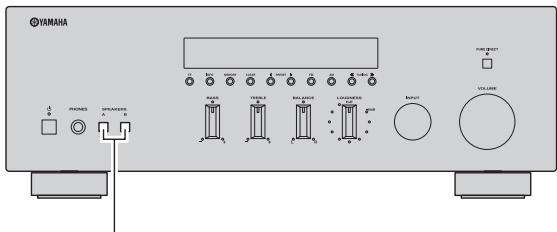
SPEAKERS A/B
Connecting the FM and AM antennas
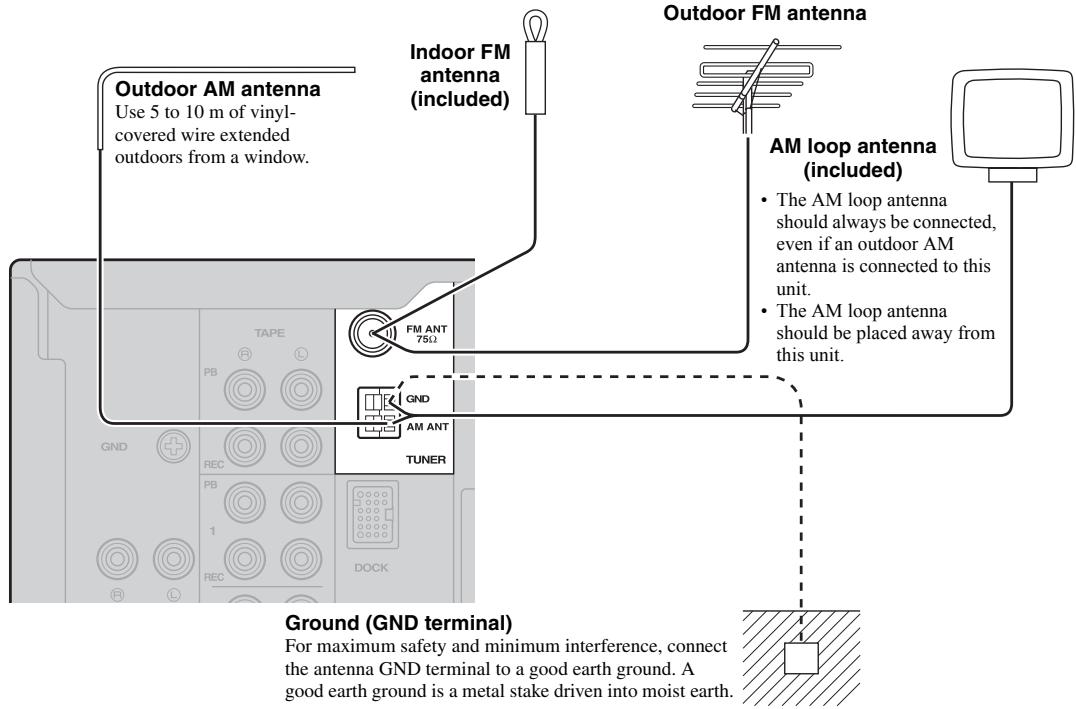
Indoor antennas for receiving FM and AM broadcasts are included with this unit. In general, these antennas should provide sufficient signal strength. Connect each antenna correctly to the designated terminals.
Note
If you experience poor reception quality, install an outdoor antenna. Consult the nearest authorized Yamaha dealer or service center about outdoor antennas.
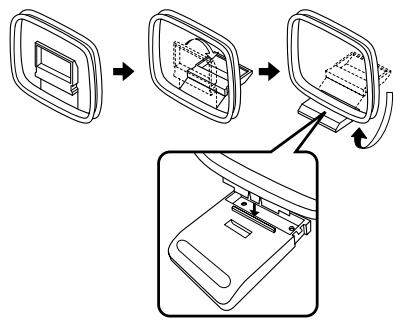
Assembling the supplied AM loop antenna
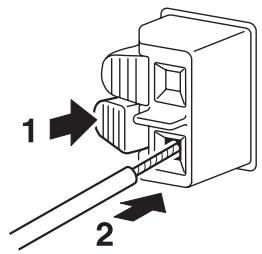
Connecting the wire of the AM loop antenna
Connecting power cable
Plug the power cable into the AC wall outlet after all other connections are complete.

PLAYING AND RECORDING
CAUTION
Extreme caution should be exercised when you play back CDs encoded in DTS.
If you play back a CD encoded in DTS on a CD player that does not support DTS, only noise will be heard, and this noise may damage your speakers. Check whether your CD player supports CDs encoded in DTS. Also, check the sound output level of your CD player before you play back a CD encoded in DTS.
Playing a source
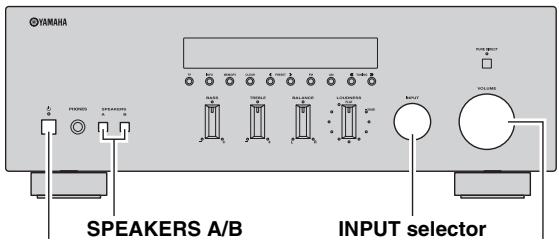
(power)
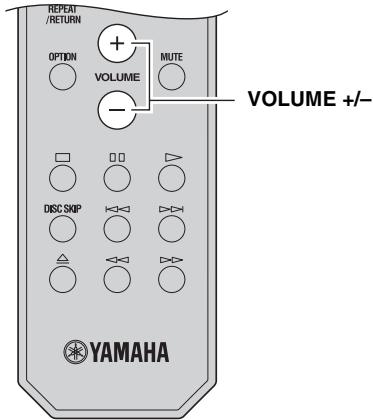
VOLUME
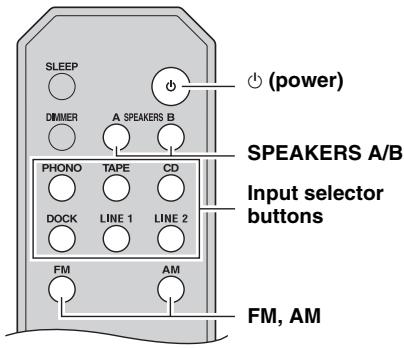
1 Press (power) on the front panel inward to turn on this unit.
2 Rotate the INPUT selector on the front panel (or press one of the input selector buttons or FM or AM on the remote control) to select the input source you want to listen to.
3 Press SPEAKERS A and/or SPEAKERS B on the front panel or on the remote control to select speakers A and/or speakers B.
When speaker set A or speaker set B are turned on, SP A or SP B is displayed on the front panel display accordingly (see page 6).
Notes
- When one set of speakers is connected using bi-wire connections, or when using two sets of speakers simultaneously (A and B), make sure SP A and SP B are displayed on the front panel display.
- When listening with headphones, turn off the speakers.
4 Play the source.
5 Rotate the VOLUME control on the front panel (or press VOLUME +/- on the remote control) to adjust the sound output level.

You can adjust the tonal quality by using the BASS, TREBLE, BALANCE and LOUDNESS controls, or the PURE DIRECT switch on the front panel (see page 14).
6 When finished listening, press (power) on the front panel outward to turn off this unit.

If (power) on the remote control is pressed while the (power) button on the front panel is in the on position, this unit enters standby mode. Press (power) again to turn this unit on.
Adjusting the tonal quality
Using the PURE DIRECT switch
Routes input signals from your audio sources so that the input signals bypass the BASS, TREBLE, BALANCE and LOUDNESS controls, thus eliminating any alterations to the audio signals and creating the purest possible sound. The PURE DIRECT indicator lights up and the front panel display turns off after a few seconds.
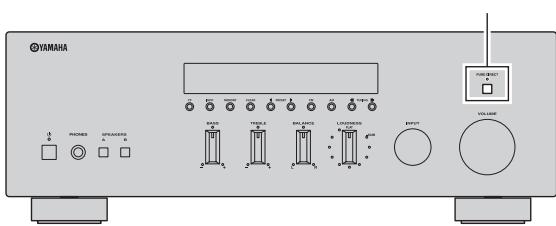
PURE DIRECT switch
Notes
- The BASS, TREBLE, BALANCE, and LOUDNESS controls do not function while the PURE DIRECT feature is turned on.
- This setting is retained even if you turn off this unit.
Adjusting the BASS and TREBLE controls
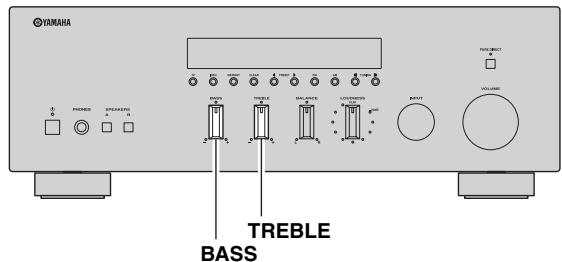
The BASS and TREBLE controls adjust high and low frequency response.
The center position produces a flat response.
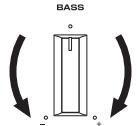
BASS
When you feel there is not enough bass (low frequency sound), rotate clockwise to boost. When you feel there is too much bass, rotate counterclockwise to suppress.
Control range: -10dB to +10dB (20 Hz)
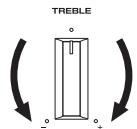
TREBLE
When you feel there is not enough treble (high frequency sound), rotate clockwise to boost. When you feel there is too much treble, rotate counterclockwise to suppress.
Control range: -10dB to +10dB (20 kHz)
Adjusting the BALANCE control
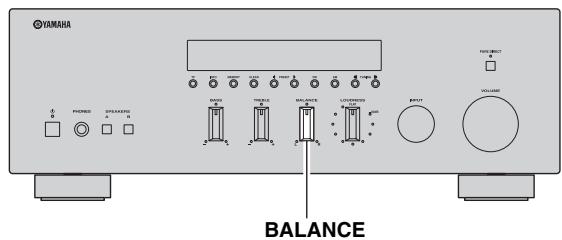
The BALANCE control adjusts the sound output balance of the left and right speakers to compensate for sound imbalance caused by speaker locations or listening room conditions.

Adjusting the LOUDNESS control
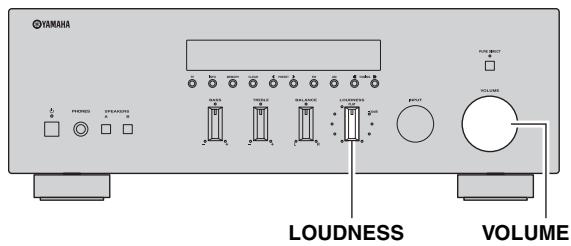
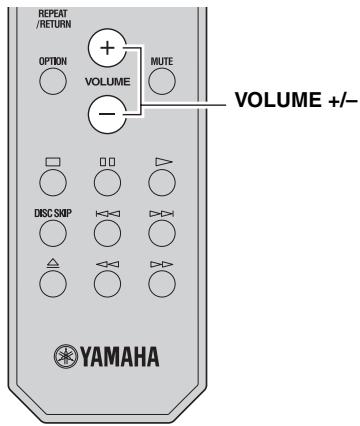
Retain a full tonal range at any volume level, thus compensating for the human ears' loss of sensitivity to high and low-frequency ranges at low volume.
CAUTION
If the PURE DIRECT switch is turned on with the LOUDNESS control set at a certain level, the input signals bypass the LOUDNESS control, resulting in a sudden increase in the sound output level. To prevent your ears or the speakers from being damaged, be sure to press the PURE DIRECT switch after lowering the sound output level or after checking that the LOUDNESS control is properly set.
1 Set the LOUDNESS control to the FLAT position.
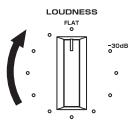
2 Rotate the VOLUME control on the front panel (or press VOLUME +/- on the remote control) to set the sound output level to the loudest listening level that you would listen to.
3 Rotate the LOUDNESS control until the desired volume is obtained.
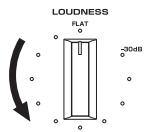
中
After setting the LOUDNESS control, enjoy listening to music at your preferred volume level. If the effect of the LOUDNESS control setting is too strong or weak, readjust the LOUDNESS control.
Recording a source
Notes
- The audio from the current input source is output to the TAPE REC and LINE 1 REC jacks. When TAPE is selected, audio is output to the LINE 1 REC jacks only. When LINE 1 is selected, audio is output to the TAPE REC jacks only.
- This unit must be turned on in order to record.
- The VOLUME, BASS, TREBLE, BALANCE and LOUDNESS controls and the PURE DIRECT switch have no effect on the source being recorded.
- Check the copyright laws in your country before recording from records, CDs, radio, etc. Recording copyright-protected material may infringe on copyright laws.
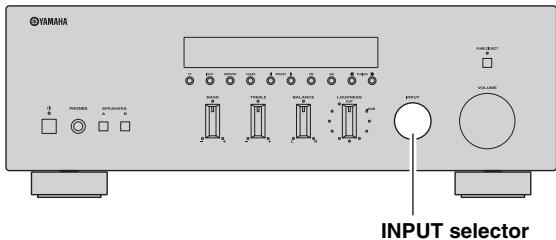
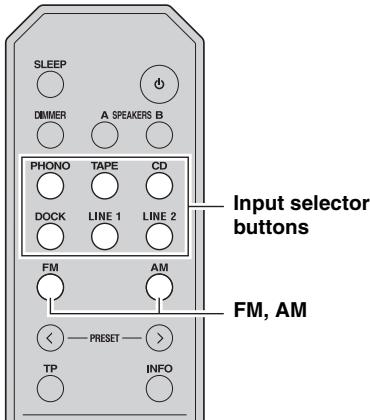
1 Rotate the INPUT selector on the front panel (or press one of the input selector buttons or FM or AM on the remote control) to select the source you want to record.
2 Play the source and begin recording using the recording device connected to the REC jacks (TAPE and/or LINE 1) on the rear panel. See page 10.
Using the sleep timer
Use this feature to automatically set this unit to standby mode after a certain amount of time. The sleep timer is useful when you are going to sleep while this unit is playing or recording a source.
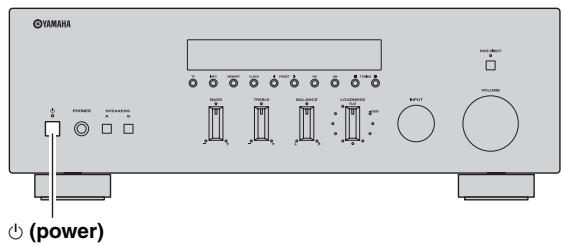
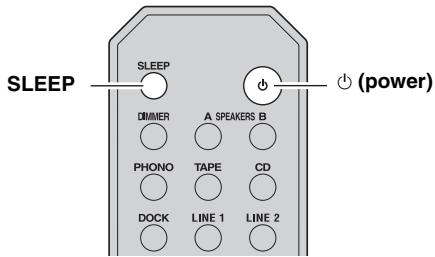
Note
The sleep timer can only be set with the remote control.
1 Press SLEEP repeatedly to set the amount of time before this unit is set to standby mode.
Each time you press SLEEP, the front panel display changes as shown below.

The SLEEP indicator blinks while setting the amount of time for the sleep timer.

If the sleep timer is set, the SLEEP indicator on the front panel display lights up.

To cancel the sleep timer, do one of the following:
- Select "Sleep Off".
- Press (power) on the remote control to set this unit to standby mode.
- Press (power) on the front panel to turn off this unit.
FM/AM TUNING
There are 2 tuning methods; automatic and manual. Select either method according to your preference and the strength of station signals.
Automatic tuning
Automatic tuning is effective when station signals are strong and there is no interference.
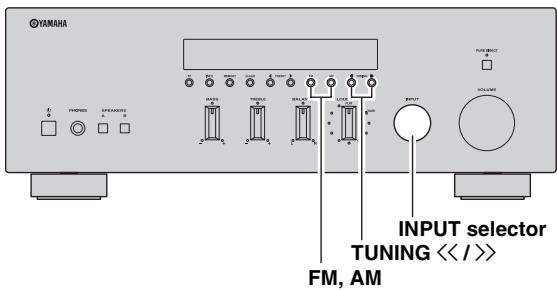
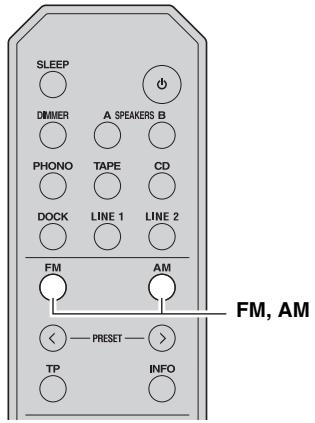
1 Rotate the INPUT selector on the front panel (or press FM or AM on the remote control) to select TUNER as the input source.
Note
If you press FM or AM on the remote control to select TUNER as the input source, the corresponding band is also selected, therefore you may skip step 2.
2 Press FM or AM on the front panel (or FM or AM on the remote control) to select the reception band (FM or AM).
FM or AM is displayed on the front panel display.
3 Press and hold TUNING / on the front panel for more than 1 second to begin automatic tuning.
Press to tune in to a higher frequency. Press to tune in to a lower frequency.
Notes
- When you tune in to a station, the frequency of the station is displayed on the front panel display.
- If the tuning search does not stop at the desired station because the station signals are weak, try using the manual tuning method.
Auto Mute feature
When listening to an FM radio station, the output will automatically be muted when the radio signal is weak if the station was tuned in to by:
using the automatic tuning feature
- recalling a preset that was registered using the automatic preset registration feature
If you want to listen to a station that has a weak signal, tune in to the station manually.
Manual tuning
Manual tuning is effective when station signals are weak.
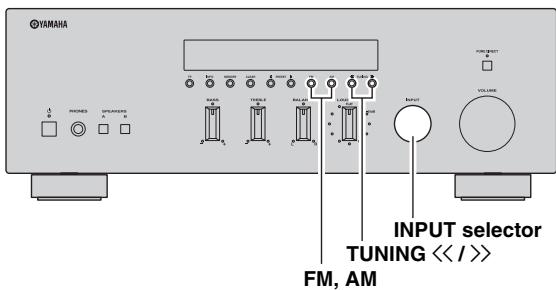
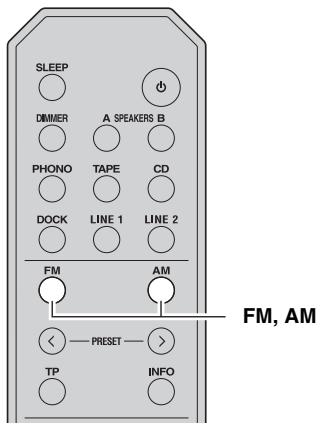
1 Rotate the INPUT selector on the front panel (or press FM or AM on the remote control) to select TUNER as the input source.
Note
If you press FM or AM on the remote control to select TUNER as the input source, the corresponding band is also selected, therefore you may skip step 2.
2 Press FM or AM on the front panel (or FM or AM on the remote control) to select the reception band (FM or AM).
FM or AM is displayed on the front panel display.
3 Press TUNING / on the front panel to manually tune in to the desired station.
Note
When you tune in to a station, the frequency of the received station is shown in the front panel display.
Improving FM reception
If the signal from the station is weak and the sound quality is not good, set the FM band reception mode to monaural mode to improve reception.
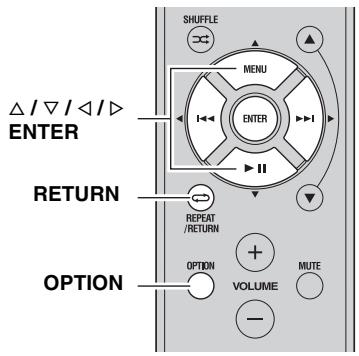
1 Press OPTION on the remote control when this unit is tuned in to an FM radio station.
The Option menu for TUNER is displayed (see page 30).
2 Press / on the remote control to select "FM Mode", and then press ENTER.

To cancel the operation and return to the Option menu, press RETURN on the remote control.
3 Press / on the remote control to select "STEREO" (automatic stereo mode) or "MONO" (monaural mode).

- When MONO is selected, FM broadcasts will be heard in monaural sound.
- When STEREO is selected and an FM station with a stereo broadcast is tuned in, the broadcast will be heard in stereo.
4 To exit the Option menu, press OPTION or RETURN on the remote control.
Note
The STEREO indicator on the front panel lights up while listening to a station in stereo.
Automatic station preset (FM stations only)
You can use the automatic station preset function to automatically register FM stations as presets. This function enables this unit to automatically tune in to FM stations that have a strong signal and store up to 40 of those stations in order. You can then easily recall any preset station by selecting its preset number.
Notes
- If a station is registered to a preset number that already has a station registered to it, the previously registered station is overwritten.
- If the station you want to store is weak in signal strength, try using the manual preset tuning method.

FM stations registered as presets using the automatic preset registration feature will be heard in stereo.
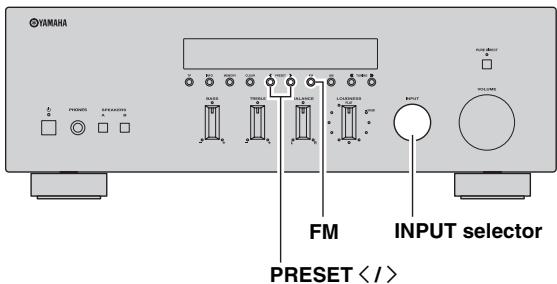
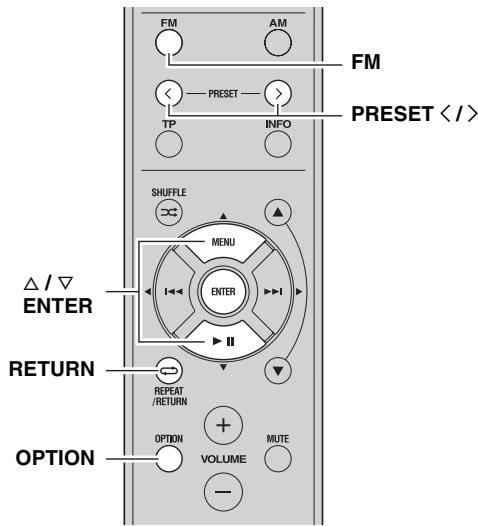
1 Rotate the INPUT selector on the front panel (or press FM on the remote control) to select TUNER as the input source.
Note
If you press FM on the remote control to select TUNER as the input source, the corresponding band is also selected, therefore you may skip step 2.
2 Press FM on the front panel (or FM on the remote control) to select FM as the reception band.
FM is displayed on the front panel display.
3 Press OPTION on the remote control.
The Option menu for TUNER is displayed (see page 30).
4 Press / on the remote control to select "Auto Preset", and then press ENTER.

This unit starts scanning the FM band about 5 seconds later from the lowest frequency upwards.

- Before scanning begins, you can specify the first preset number to be used by pressing PRESET / on the front panel (or PRESET / or / on the remote control).
- To cancel scanning, press FM or AM on the front panel (or FM or AM or RETURN on the remote control).
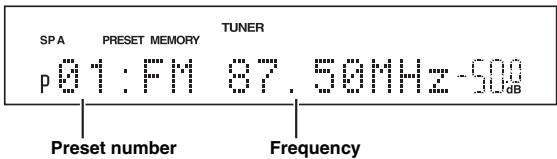
When presets are registered, information is displayed on the front panel display as shown in the illustration above.
When scanning is complete, "FINISH" is displayed and then the display returns to the Option menu.
To return the display to the original state, press OPTION or RETURN on the remote control.
Manual station preset
You can manually register up to 40 FM/AM stations (40 total). You can then easily recall any preset station by selecting its preset number.

When stations are registered manually, the FM Mode setting (mono or stereo) at the time of registration is also registered.
Confirm the FM Mode setting (see page 18) before registering stations manually.
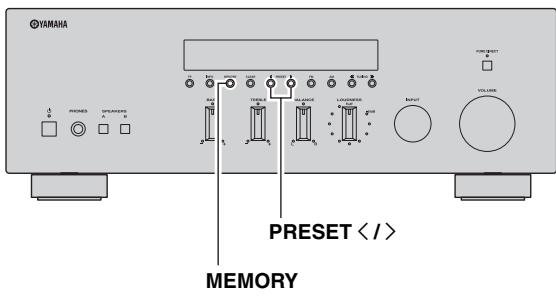
1 Tune in to the desired FM/AM station.
See pages 17 and 18 for tuning instructions.
2 Press MEMORY on the front panel.
"MANUAL PRESET" is displayed briefly on the front panel display, and then the preset number to which the station will be registered is displayed.


By holding down MEMORY on the front panel for more than 2 seconds, you can skip the following steps and automatically register the selected station to an empty preset number (i.e., the preset number following the last preset number used).
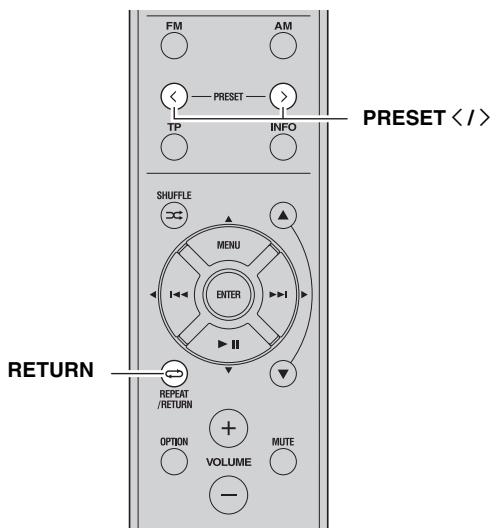
3 Press PRESET < / > on the front panel (or PRESET / on the remote control) to select the preset number to which the station will be registered.
When you select a preset number to which no station is registered, "EMPTY" is displayed. When you select a preset number to which a station has already been registered, the frequency of the station is displayed.
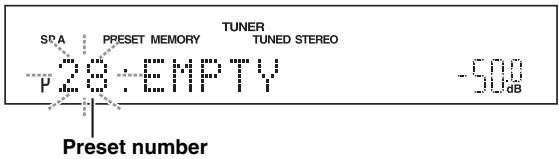
4 Press MEMORY on the front panel.
When registration is complete, the display returns to the original state.

To cancel registration, RETURN on the remote control or do not perform any operations for about 30 seconds.
Recalling a preset station
You can recall preset stations that were registered using automatic station preset or manual station preset.
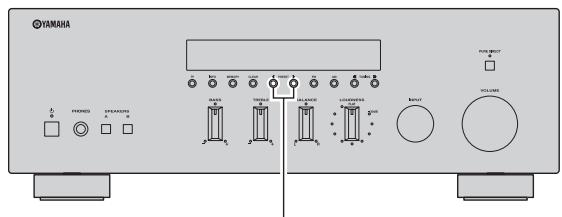
PRESET<1>
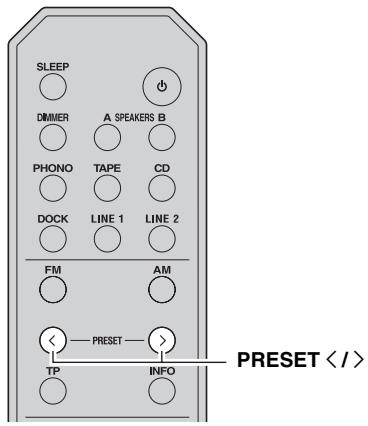
1 Press PRESET / on the front panel (or PRESET / on the remote control) to select a preset number.
中
- Preset numbers to which no stations are registered are skipped.
- "NO PRESETS" is displayed if no stations are registered.
Clearing a preset station
Follow the steps below to clear a preset station.
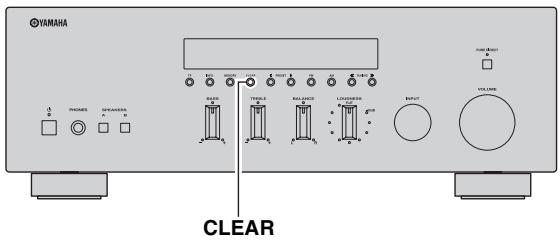
1 Select the desired preset station number.
See "Recalling a preset station" on page 21.
2 Press CLEAR on the front panel.
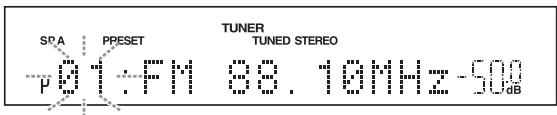
The selected preset number flashes on the front panel display.
#
To cancel clearing the preset station, press RETURN on the remote control or leave this unit without any operations for about 30 seconds.
3 Press CLEAR on the front panel to confirm.
"PXX: CLEARED" (XX indicates the preset number) is displayed on the front panel display, and then the display returns to its original state.
Clearing all preset stations
Follow the steps below to clear all preset stations.
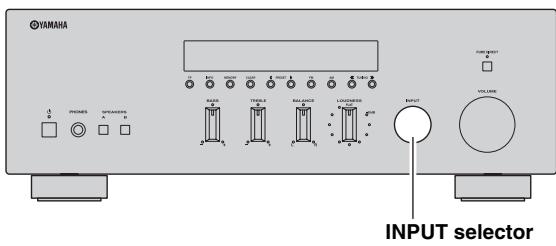
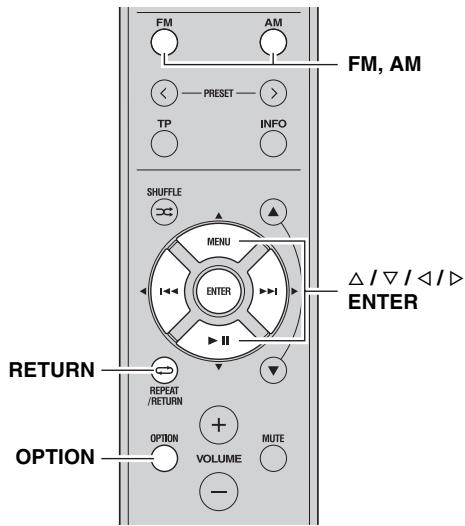
1 Rotate the INPUT selector on the front panel (or press FM or AM on the remote control) to select TUNER as the input source.
2 Press OPTION on the remote control.
The Option menu for TUNER is displayed (see page 30).
3 Press / on the remote control to select "Cir All Preset", and then press ENTER.


To cancel the operation and return to the Option menu, press RETURN on the remote control.
4 Press on the remote control to select "YES", and then press ENTER.


To cancel without clearing the presets, select "NO".
When all presets have been cleared, "PRESET CLEARED" is displayed, and then the display returns to the Option menu.

5 To exit the Option menu, press OPTION or RETURN on the remote control.
Radio Data System is a data transmission system used by FM stations in many countries. This unit can receive four types of Radio Data System data information: Program Service, Program Type, Radio Text, and Clock Time.
1 Tune in to the desired Radio Data System broadcasting station.
2 Press INFO on the front panel (or INFO on the remote control) repeatedly to select the desired Radio Data System display mode.
| Choice | Description |
| PRG SERVICE
(Program Service) | Default setting. This unit displays the name of the Radio Data System program currently being received. |
| PRG TYPE
(Program Type) | This unit displays the type of the Radio Data System program currently being received. |
| RADIO TEXT
(Radio Text) | This unit displays about the Radio Data System program currently being received. |
| CLOCK TIME
(Clock Time) | This unit displays the current time. |
| FREQUENCY
(Frequency) | This unit displays the frequency of the current station. |
When you select "PRG TYPE", the following program types can be displayed.
| Program type | Description |
| NEWS | News |
| AFFAIRS | Current affairs |
| INFO | General information |
| SPORT | Sport |
| EDUCATE | Education |
| DRAMA | Drama |
| CULTURE | Culture |
| SCIENCE | Science |
| VARIED | Light entertainment |
| POP M | Popular music |
| ROCK M | Rock music |
| M.O.R. M | Middle-of-the-road music (easy listening) |
| LIGHT M | Light classics |
| CLASSICS | Serious classics |
| OTHER M | Other music |
Notes
- It may take a while for this unit to receive all of the Radio Data System data from the station.
- If the signals being received are not strong enough, this unit may not be able to utilize the Radio Data System data. In particular, the "RADIO TEXT" mode requires a large amount of data and may not be available even when the other Radio Data System display modes are available.
- If reception is poor, set FM Mode to "MONO" (see page 18).
- If the signal is weakened by external interference while this unit is receiving the Radio Data System data, the reception may be cut off unexpectedly.
- When the "RADIO TEXT" mode is selected, this unit can display program information using a maximum of 128 alphanumeric characters, including the umlaut symbol. Unavailable characters are displayed as " _" (underscore). The displayed information scrolls continuously.
TP Search function (FM stations only)
This unit can automatically search for Radio Data System stations that provide traffic programs (TP).
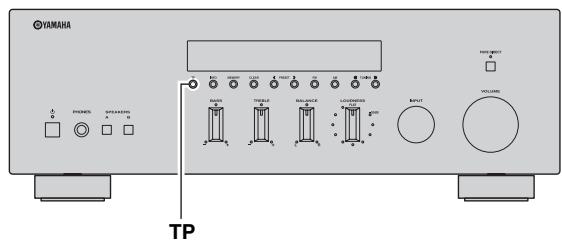
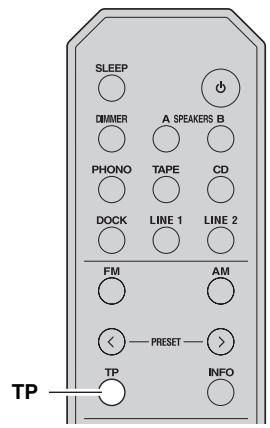
1 Press TP on the front panel (or TP on the remote control) to search for a TP station.
"TP SEARCH" is displayed on the front panel display for about 3 seconds, and then the unit starts searching.

When a TP station is received, the TP indicator lights up and the unit stops searching.
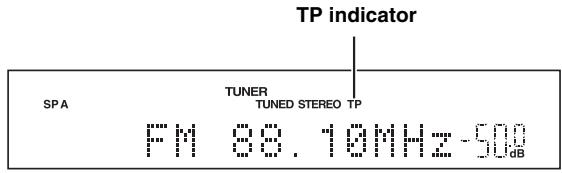

To search for the next TP station, press TP again.
Notes
- Press TP during TP search to cancel.
- If no TP Stations are found, "TP NOT FOUND" is displayed on the front panel display and this unit returns to the state before searching.
PLAYING BACK TUNES FROM YOUR iPhone/iPod/
Bluetooth™ COMPONENT
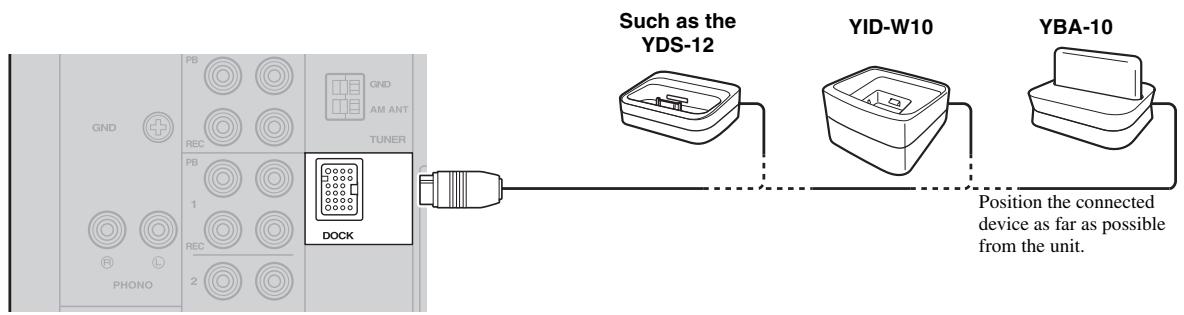
Once you have connected an optional Yamaha Universal Dock for iPod (such as the YDS-12), Wireless System for iPod (YID-W10), or Bluetooth Wireless Audio Receiver (YBA-10) to the DOCK jack on the rear panel of this unit, you can enjoy playback of your iPhone/iPod or Bluetooth component using the remote control supplied with this unit.
| Universal Dock for iPod | Wireless System for iPod | Bluetooth Wireless Audio Receiver |
| Model
(As of July 2010) | ·YDS-12
·YDS-11
·YDS-10 | YID-W10 | YBA-10 |
| Operated by | ·Remote control
·iPhone/iPod connected to the dock | ·iPhone/iPod connected to the YID-W10 transmitter
·Remote control | Bluetooth components |
| Supported iPhone/iPod
(As of July 2010) | ·iPod touch ·iPod mini
·iPod (4th Gen/
5th Gen/
classic) ·iPhone 3G
·iPod nano | ·iPod touch ·iPhone
·iPod (5th Gen/
classic) ·iPhone 3GS
·iPod nano | |
| Remarks | ·iPhone/iPod charging also supported.
·The YDS-10/YDS-11 does not support iPhone connection. | iPhone/iPod charging also supported. | |
CAUTION
To prevent accidents, unplug the power cable of this unit before connecting a Universal Dock for iPod, a Wireless System for iPod or a Bluetooth Wireless Audio Receiver.
Note
If the iPhone connected to the YID-W10 receives a call while this unit is in standby mode, the unit turns on automatically and the ringtone is heard through this unit. If you do not want this unit to turn on when a call is received, set the iPhone to silent mode.
Using a Universal Dock for iPod
Controlling your iPhone/iPod
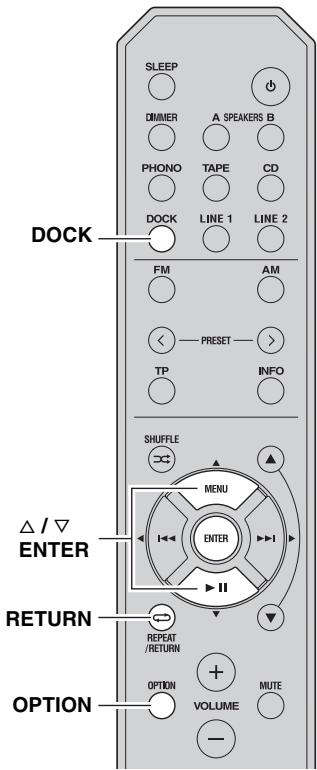
After setting your iPhone/iPod in your dock, rotate the INPUT selector on the front panel (or press DOCK on the remote control) to select DOCK as the input source to play your iPhone/iPod.
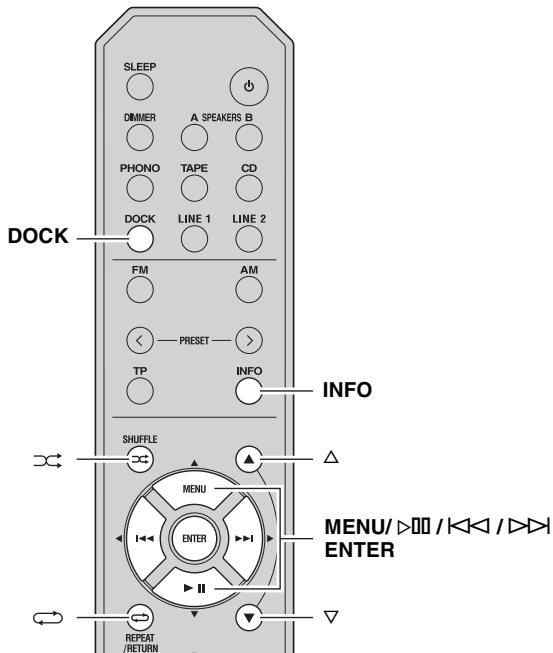
While viewing the information displayed on your iPhone/iPod, use the following remote control buttons to operate (playback, pause, skip, etc.) your iPhone/iPod.
| Remote control | Operation |
| MENU | Displays the menu. |
| ENTER | • If an item is selected: Confirms the item and displays the next screen.
• If a song is selected: Plays the selected song. |
| △ | Scroll up. |
| ∇ | Scroll down. |
| ▷○○ | • If a song is playing: Pauses the song.
• If a song is paused: Plays the song. |
| ▷○ | • If a song is playing or paused: Skips to the beginning of the next song.
• If pressed and held: Searches forward. |
| ◁◁ | • If a song is playing or paused: Skips to the beginning of the current song.
• Pressing repeatedly skips one song backwards with each press.
• If pressed and held: Searches backward. |
| ▷← | Switches between shuffle modes (Off → Songs → Albums → Off). |
| ← | Switches between repeat modes (Off → One → All → Off). |
| INFO | Switches between items displayed on the front panel display of this unit (Song number and elapsed time → Songs → Artists → Albums → Song number and elapsed time). |
Note
Some shuffle modes and repeat modes may not be available depending on the model or the software version of your iPhone/iPod.
#
When this unit is turned on or is in standby mode, your iPhone/iPod can be charged automatically if it is connected to a Universal Dock for iPod. If an iPhone/iPod is charged while this unit is in standby mode, the power indicator lights up brightly.
Using a Wireless System for iPod
By connecting a Wireless System for iPod to this unit, you can play songs on your iPhone/iPod and listen to them using a wireless connection.

You can use the remote control to control the iPhone/iPod. For more information, see page 26.
Note
When playing an iPhone/iPod using a Wireless System for iPod, playback information is not displayed on the front panel display.
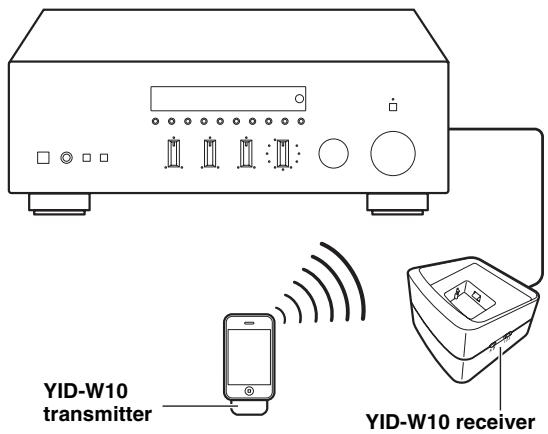
Establishing a wireless connection
Once the iPhone/iPod is connected to the YID-W10 transmitter and playback begins, it takes about 5 seconds for audio to be heard. During this time the wireless connection between the YID-W10 transmitter and receiver is established.
The status of the wireless connection between the YID-W10 transmitter and receiver is indicated by the respective indicator.
| Status of Connection | YID-W10 transmitter indicator | YID-W10 receiver indicator |
| No connection | Off | Off |
| Confirming connection | Green, flashing | Blue, flashing |
| Connected | Green, lit | Blue, lit |
Controlling this unit with your iPhone/iPod
-
When playback begins on an iPhone/iPod that is connected to a YID-W10 transmitter, and if the YID-W10 transmitter is within range of the YID-W10 receiver, this unit performs as follows:
-
If this unit is already turned on when playback begins: The input source switches to DOCK.
-
If this unit is in standby mode when playback begins: This unit turns on and the input source switches to DOCK.
-
In the following situations, the wireless connection between the transmitter and receiver is disconnected. After 30 seconds this unit automatically enters standby mode.
-
The iPhone/iPod is not operated for about 30-120 seconds after the playback is paused.
- The sleep timer of the iPhone/iPod is activated.
- The iPhone/iPod is disconnected from the YID-W10 transmitter.
- The iPhone/iPod battery level decreases to a level where it cannot provide enough power to the YID-W10 transmitter.
- The YID-W10 transmitter is moved outside of the wireless communication range of the YID-W10 receiver.
- Communication between the YID-W10 transmitter and receiver becomes disrupted due to interference from other wireless LAN devices, cordless telephones, microwave ovens, etc.

These features can be disabled by setting "Interlock" to "OFF" in the Option menu (see page 31).
- Adjusting the volume on the iPhone/iPod also adjusts the volume of this unit. The iPhone/iPod can increase the volume to up to 0 dB (or the value set for the "MaxVol" setting in the Option menu). To further increase the volume, adjust the volume using this unit's VOLUME control or the remote control.

- When this unit is turned on or is in standby mode, your iPhone/iPod can be charged automatically if the YID-W10 transmitter connected to your iPhone/iPod is stationed in the YID-W10 receiver. If an iPhone/iPod is charged while this unit is in standby mode, the power indicator lights up brightly.
- Refer to the operating instructions of the YID-W10 for more information.
Using a Bluetooth Wireless Audio Receiver
Note
This unit supports A2DP (Advanced Audio Distribution Profile) and AVRCP (Audio and Video Remote Control Profile) of the Bluetooth profile.
Pairing Bluetooth™ components
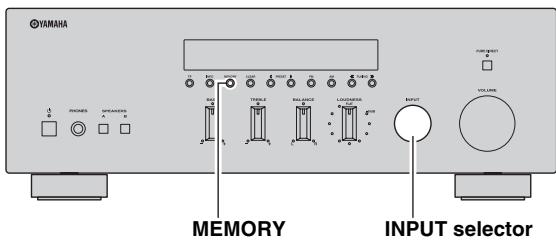
Be sure to pair the Bluetooth Wireless Audio Receiver and the Bluetooth component when connecting for the first time or when settings have been deleted.
Refer to the operating instructions of your Bluetooth component as necessary when carrying out pairing.
Note
The Bluetooth Wireless Audio Receiver can be paired with up to eight Bluetooth components. When the ninth device is paired, the pairing settings for the device which has not been used for the longest period of time will be deleted.
1 Rotate the INPUT selector on the front panel (or press DOCK on the remote control) to select DOCK as the input source.
2 Turn on the Bluetooth component you want to pair and set it to pairing mode.
3 Press OPTION on the remote control. The Option menu for DOCK displayed (see page 30).
4 Press / on the remote control to select "Pairing", and then press ENTER. "Searching..." is displayed and pairing begins.

To cancel pairing, press RETURN on the remote control.
5 Make sure the Bluetooth component recognizes the Bluetooth Wireless Audio Receiver.
When the component is recognized, it will be displayed in the Bluetooth component list, for example as "YBA-10 YAMAHA".
6 Select the Bluetooth Wireless Audio Receiver from the Bluetooth component list, and enter a pass key "0000" using the Bluetooth component.
When pairing is complete, "Completed" is displayed on the front panel display.
To exit the Option menu, press OPTION on the remote control.

When the input source is set to DOCK, you can also begin pairing by pressing and holding MEMORY on the front panel (or ENTER on the remote control).
Playing back Bluetooth™ components
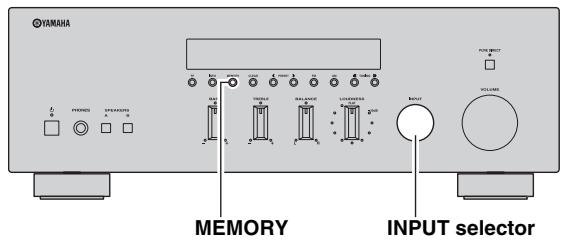
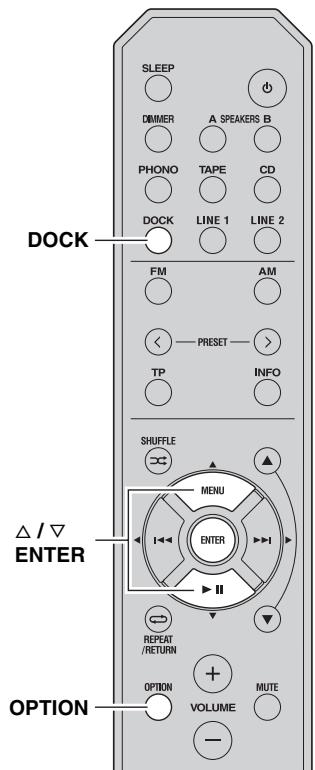
When pairing is complete, carry out the following procedure to achieve a wireless connection between this unit and the Bluetooth component.
When the wireless connection is complete, you can enjoy playback from Bluetooth components.
Note
Depending on the Bluetooth component, a wireless connection is established automatically or when the Bluetooth component is operated. In these cases, it is not necessary to carry out the following procedure.
1 Rotate the INPUT selector on the front panel (or press DOCK on the remote control) to select DOCK as the input source.
2 Press OPTION on the remote control. The Option menu for DOCK displayed (see page 30).
3 Press / on the remote control to select "Connect", and then press ENTER.
When wireless connection is complete, "Connected" is displayed on the front panel display.
To exit the Option menu, press OPTION on the remote control.

Note
"Not found" is displayed if there is a connection error. Check that the following conditions have been satisfied, and try to establish a wireless connection again.
- Both this unit and the Bluetooth component are paired.
- The Bluetooth component is switched on.
- The Bluetooth component is within 32 feet/10 meters of the Bluetooth wireless audio receiver.
4 Operate the Bluetooth component for playback.
While the Bluetooth component is playing, "BLUETOOTH" is displayed on the front panel display.

Note
To disconnect a wireless connection, repeat these steps and select "Disconnect" in step 3.
#
When the input source is set to DOCK, you can also establish a wireless connection by pressing MEMORY on the front panel (or ENTER on the remote control).
The Option menu allows you to configure various settings for each input source and recall those settings automatically when an input source is selected. Also, you can view the signal information for certain input sources.
The procedure for setting the Option menu items is described below.
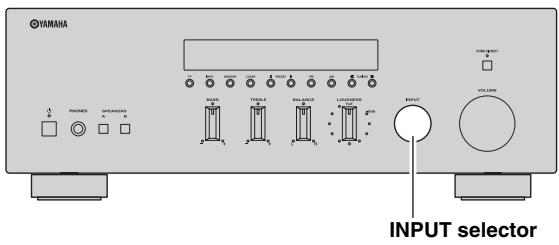
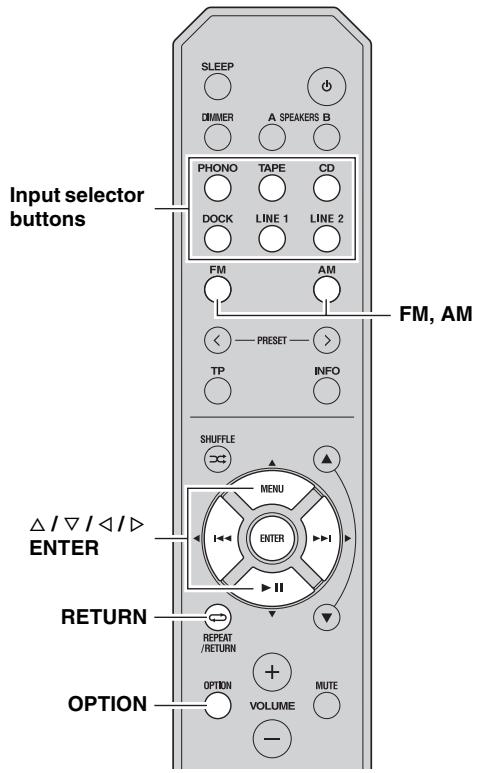
1 Rotate the INPUT selector on the front panel (or press one of the input selector buttons or FM or AM on the remote control) to select the desired input source.
2 Press OPTION on the remote control.
Note
If the input source is changed while the Option menu is displayed, the front panel display exits the Option menu and the display for the selected input source is displayed.
3 Press / on the remote control to select the desired menu item, and then press ENTER.
4 Press / / / on the remote control to change the settings.
中
For certain menu items, you must press ENTER to save the new setting.
5 To exit the Option menu, press OPTION on the remote control.
To return to the previous menu, press RETURN on the remote control.
Note
If / / / on the remote control or other buttons do not work after closing the Option menu, rotate the INPUT selector on the front panel (or press one of the input selector buttons or FM or AM on the remote control) to select the current input source again.
The following menu items are provided for each input source.
| Input source | Menu items |
| PHONO, CD, TAPE, LINE 1-2 | Volume*1 |
| TUNER (FM/AM) | | FM Mode, Auto Preset, Clr All Preset |
| DOCK (iPhone/iPod) | | Interlock*2 |
| DOCK (Bluetooth) | | Connect, Disconnect, Pairing |
Notes
1 "Volume" is a common menu item for all input sources.
2 “Interlock” is displayed in the Option menu only when using a Wireless System for iPod.
Details of the menu items are as follows. The configuration will be reflected to the input source currently selected.

The default settings are marked with 空 ^ 中
Volume
Submenus: MaxVol,IniVol
Adjustable range (MaxVol): -30.0dB to +15.0dB, +16.5dB (5.0 dB step)
Adjustable range (IniVol): Off, Mute, -89.5dB to +16.5dB (0.5 dB step)
Sets items for volumes.
MaxVol (Maximum volume)
Sets the maximum volume level so that the volume will not be accidentally increased above a certain level. For example, you can adjust the volume between -89.5dB and -5.0dB (or Mute) when you set this parameter to -5.0dB . The volume can be increased to the maximum level when this parameter is set to +16.5dB (default).
IniVol (Initial volume)
Sets the volume at the time this unit is turned on. When this parameter is set to "Off", the volume level used when this unit was set to standby is applied.
Note
If "MaxVol" is set to a value lower than the "IniVol" setting, the setting for "MaxVol" overrides the "IniVol" setting. For example, if you set "MaxVol" to -30.0dB and "IniVol" to 0.0dB , the volume is automatically set to -30.0dB the next time this unit is turned on.
FM Mode
Choices: STEREO*, MONO
Sets the FM broadcast receiving mode (see page 18). "FM Mode" is displayed in the Option menu only when TUNER is selected as the input source.
Auto Preset
Automatically detects FM radio stations and registers them as preset stations (see page 19). "Auto Preset" is displayed in the Option menu only when TUNER is selected as the input source.
Crl All Preset
Cleared all preset stations (see page 22). "Clr All Preset" is displayed in the Option menu only when TUNER is selected as the input source.
Interlock
Choices: ON*, OFF
When an iPhone/iPod is connected to this unit wirelessly using a Wireless System for iPod, the iPhone/iPod can be used to turn this unit on, set it to standby mode or select DOCK as the input source.
"Interlock" is displayed in the Option menu only when using a Wireless System for iPod and DOCK is selected as the input source.
ON This unit responds to certain iPhone/iPod operations.
OFF Enables this feature.
Connect/Disconnect
Connects to or disconnects from a Bluetooth component (see page 29).
"Connect/Disconnect" is displayed in the Option menu only when DOCK (Bluetooth) is selected as the input source.
Pairing
Pairs the Bluetooth Wireless Audio Receiver and a Bluetooth component (see page 28).
"Pairing" is displayed in the Option menu only when DOCK (Bluetooth) is selected as the input source.
Change the initial settings to reflect the needs of your listening environment.

The default settings are marked with **.
APD (Automatic Power Down) TIMER
Choices: 4H (4 hours), 8H^* (8 hours), 12H (12 hours) When the POWER MANAGEMENT switch on the rear panel of this unit (see page 7) is set to ON, this unit automatically enters standby mode if it is not operated for the specified amount of time.
Note
When the POWER MANAGEMENT switch is set to OFF, "APD TIMER -OFF" is displayed.
INITIALIZE
Choices: NO*, YES
Resetssall parameters to their factory presets.
- Select NO to cancel without resetting all parameters to their factory presets.
- Select YES to reset all parameters to their factory presets.
Note
If "YES" is selected the parameters are reset the next time you turn on the power of this unit.
The ADVANCED SETUP menu is displayed in the front panel display.

- Audio output is muted while setting parameters in the ADVANCED SETUP menu.
- While setting parameters in the ADVANCED SETUP menu, most controls on the front panel are disabled; only (power), the INPUT selector and INFO are operational.
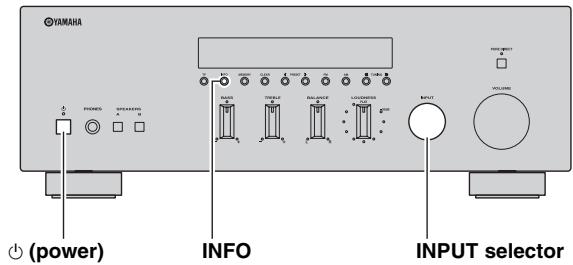
1 Press and hold INFO on the front panel, and then press (power) inward.
This unit turns on, and the ADVANCED SETUP menu is displayed on the front panel display.
2 Rotate the INPUT selector on the front panel to select the parameter you want to change.
See "ADVANCED SETUP menu parameters" on page 32 for a complete list of available parameters.
3 Press INFO on the front panel repeatedly to change the selected parameter setting.
To change other settings, repeat steps 2 and 3.
4 Press (power) on the front panel outward to turn off this unit to confirm your setting.
Note
The settings you made take effect the next time you turn on this unit.
TROUBLESHOOTING
Refer to the chart below if this unit does not function properly. If the problem you are experiencing is not listed below or if the instructions below do not help, turn off this unit, disconnect the power cable, and contact the nearest authorized Yamaha dealer or service center.
General
| Problem | Cause | Remedy | See page |
| This unit fails to turn on. | The power cable is not connected or the plug is not completely inserted. | Connect the power cable firmly. | — |
| The impedance setting is incorrect. | Set the impedance to match your speakers. | 11 |
| The protection circuitry has been activated because of a short circuit, etc. | Check that the speaker wires are not touching each other and then turn the power of this unit back on. | 10 |
| The IMPEDANCE SELECTOR switch on the rear panel is not set to either end. | Set the IMPEDANCE SELECTOR switch to either end when the power of this unit is turned off. | 11 |
| This unit has been exposed to a strong external electric shock (such as lightning or strong static electricity). | Turn off this unit, disconnect the power cable, plug it back in after 30 seconds, then use it normally. | — |
| No sound | Incorrect input or output cable connections. | Connect the cables properly. If the problem persists, the cables may be defective. | 10 |
| No appropriate input source has been selected. | Select an appropriate input source with the INPUT selector on the front panel (or one of the input selector buttons or FM or AM on the remote control). | 13 |
| The SPEAKERS A/B switches are not set properly. | Turn on the corresponding SPEAKERS A or SPEAKERS B. | 13 |
| Speaker connections are not secure. | Secure the connections. | 10 |
| Output has been muted. | Turn off the mute. | 8 |
| The MaxVol or IniVol setting is set too low. | Set the setting to a higher value. | 30 |
| The component corresponding to the selected input source is turned off or is not playing. | Turn the component on and make sure it is playing. | — |
| The sound suddenly goes off. | The protection circuitry has been activated because of a short circuit, etc. | Check that the IMPEDANCE SELECTOR switch is set to the correct position. | 11 |
| Check that the speaker wires are not touching each other and then turn the power of this unit back on. | 10 |
| This unit has become too hot. | Make sure the openings on the top panel are not blocked. | — |
| The automatic power down function has turned this unit off. | Change the automatic power down setting (“APD TIMER” in the Advanced Setup menu) to a longer setting, or disable the automatic power down function by setting the POWER MANAGEMENT switch on the rear panel to OFF. | 32 |
| Only the speaker on one side can be heard. | Incorrect cable connections. | Connect the cables properly. If the problem persists, the cables may be defective. | 10 |
| Incorrect setting for the BALANCE control. | Set the BALANCE control to the appropriate position. | 14 |
| There is a lack of bass and no ambience. | The + and – wires are connected in reverse at the amplifier or the speakers. | Connect the speaker wires to the correct + and – phase. | 10 |
TROUBLESHOOTING
| Problem | Cause | Remedy | See page |
| A “humming” sound can be heard. | Incorrect cable connections. | Connect the audio plugs firmly. If the problem persists, the cables may be defective. | 10 |
| No connection from the turntable to the GND terminal. | Make the GND connection between the turntable and this unit. | 10 |
| The volume level is low while playing a record. | The record is being played on a turntable with an MC cartridge. | The turntable should be connected to this unit through the MC head amplifier. | — |
| The volume level cannot be increased, or the sound is distorted. | The component connected to the TAPE REC or LINE 1 REC output jacks of this unit is turned off. | Turn on the power of the component. | — |
| The sound is degraded when listening with the headphones connected to the CD player or the tape deck connected to this unit. | The power of this unit is turned off, or this unit is set to standby mode. | Turn on the power of this unit. | 13 |
| The sound level is low. | The loudness control function is operating. | Turn down the volume, set the LOUDNESS control to the FLAT position, and then adjust the volume again. | 15 |
| Using the BASS, TREBLE, BALANCE and LOUDNESS controls does not affect the tonal quality. | The PURE DIRECT switch is turned on. | The PURE DIRECT switch must be turned off to use those controls. | 14 |
Tuner
| Problem | Cause | Remedy | See page |
| FM | FM stereo reception is noisy. | The particular characteristics of the FM stereo broadcasts being received may cause this problem when the transmitter is too far away or the antenna input is poor. | Check the antenna connections.
Try using a high-quality directional FM antenna. | 12 |
| Switch to monaural mode. | 18 |
| There is distortion, and clear reception cannot be obtained even with a good FM antenna. | There is multipath interference. | Adjust the antenna position to eliminate the multipath interference. | — |
| The desired station cannot be tuned in with the automatic tuning method. | The signal is too weak. | Try using a high-quality directional FM antenna. | 12 |
| Try using the manual tuning method. | 18 |
| Radio Data System information does not appear. | Radio Data System information is not provided by the radio station. | | — |
| The signal is too weak. | Use a high-quality directional FM antenna. | — |
| FM/AM | NO PRESETS is displayed. | No preset stations are registered. | Register stations you want to listen to as preset stations before operation. | 19 |
| AM | The desired station cannot be tuned in with the automatic tuning method. | The signal is weak or the antenna connections are loose. | Tighten the AM loop antenna connections and orient it for the best reception. | — |
| Try using the manual tuning method. | 18 |
| Automatic station preset does not work. | Automatic station preset is not available for AM stations. | Use manual station preset. | 20 |
| There are continuous crackling and hissing noises. | The noises may result from lightning, fluorescent lamps, motors, thermostats or other electrical equipment. | Try using an outdoor antenna and a earth ground.
This will help somewhat, but it is difficult to eliminate all noise. | — |
| There are buzzing and whining noises. | A TV set is being used nearby. | Move this unit away from the TV set. | — |
iPhone/iPod
The following messages may be displayed on the front panel display in certain situations.
| Message | Status/Cause | Remedy | See page |
| Connect error | There is a problem with the signal path from your iPhone/iPod to the unit. | Turn off the unit and reconnect the Universal Dock for iPod to the DOCK jack of the unit. | 25 |
| Remove your iPhone/iPod from the Universal Dock for iPod and then place it back in the dock. | 25 |
| Unknown iPod | The iPhone/iPod being used is not supported by the unit. | Connect an iPhone/iPod supported by the unit. | 25 |
| Connected | Your iPhone/iPod is properly placed in the Universal Dock for iPod. | | — |
| Your iPhone/iPod is properly placed in the Wireless System for iPod and connected with this unit via wireless transmission. | | 27 |
| Disconnected | Your iPhone/iPod is removed from the Universal Dock for iPod. | | — |
| Your iPhone/iPod is disconnected with this unit via wireless transmission. | | — |
| The wireless connection is poor. | Place the YID-W10 receiver as far away from this unit as possible. | 25 |
| Problem | Cause | Remedy | See page |
| When using the Universal Dock for iPod:Your iPhone/iPod is not being charged even though it is connected to the Universal Dock for iPod. | This unit is not turned on. | Turn on this unit or set it to standby mode. | 4,8 |
| The iPhone/iPod is not connected securely. | Connect the iPhone/iPod securely to the Universal Dock for iPod. | — |
| When using the Wireless System for iPod:Your iPhone/iPod is not being charged even though the YID-W10 transmitter connected to your iPhone/iPod is stationed in the YID-W10 receiver. | This unit is not turned on. | Turn on this unit or set it to standby mode. | 4,8 |
| The YID-W10 transmitter is not stationed securely in the YID-W10 receiver. | Station the YID-W10 transmitter connected to your iPhone/iPod securely in the YID-W10 receiver. | — |
The following messages may be displayed on the front panel display in certain situations.
BluetoothTM
| Message | Status/Cause | Remedy | See page |
| Searching... | The Bluetooth Wireless Audio Receiver and the Bluetooth component are in the process of pairing. | | — |
| The Bluetooth Wireless Audio Receiver and the Bluetooth component are in the process of establishing a connection. | | — |
| Completed | The pairing is completed. | | — |
| Canceled | The pairing is canceled. | | — |
| Connected | The connection between the Bluetooth Wireless Audio Receiver and the Bluetooth component is established. | | — |
| Disconnected | The Bluetooth component is disconnected from the Bluetooth Wireless Audio Receiver. | | — |
| Not found | The Bluetooth component is not found. | During pairing:
- pairing must be performed on the Bluetooth component and this unit simultaneously. Check if the Bluetooth component is in pairing mode.
During connecting:
- check if the Bluetooth component is turned on.
- check if the Bluetooth component is within 10 m (32 feet) of the Bluetooth Wireless Audio Receiver. | — |
| Pairing may not have been achieved. | Try pairing again. | 28 |
Remote control
| Problem | Cause | Remedy | See page |
| The remote control does not work nor function properly. | Wrong distance or angle. | The remote control will function within a maximum range of 6 m (20 ft) and no more than 30 degrees off-axis from the front panel. | 9 |
| Direct sunlight or lighting (from an inverter type of fluorescent lamp, etc.) is striking the remote control sensor of this unit. | Reposition this unit. | — |
| The batteries are weak. | Replace all batteries. | 9 |
SPECIFICATIONS
AUDIO SECTION
- Minimum RMS output power (8Ω, 20 Hz to 20 kHz, 0.04% THD) 50 W + 50 W
- Dynamic power per channel (IHF) (8 / 6 / 4 / 2) 70/77/89/100 W
Maximum power per channel [Europe model only] (1 kHz, 0.7% THD, 4 Ω) 55 W
- IEC power [Europe model only] (1 kHz, 0.04% THD, 8 Ω) 52 W
Power band width (0.06% THD, 25 W, 8 Ω) 10 Hz to 50 kHz
- Damping factor (SPEAKERS A) 1kHz,8 150 or more
Maximum effective output power (JEITA) [Asia and Central/South America models only] (1kHz,10% THD, 8) 85 W
- Input sensitivity/Input impedance
PHONO (MM) 3.5 mV/47 kΩ
CD, etc. 200 mV/47 kΩ
Maximum input signal PHONO (MM) (1kHz,0.003% THD) 60 mV or more CD, etc. (1kHz,0.5% THD) 2.2 V or more
Output level/Output impedance CD, etc. (Input 1 kHz, 200mV REC 200 mV/1.0 kCD, etc. (Input 1 kHz, 200mV,8 PHONES 340 mV/470
Frequency response CD, etc. (20 Hz to 20 kHz) 0 ± 0.5 dB CD, etc., PURE DIRECT on (10 Hz to 100 kHz) 0 ± 1.0 dB
- RIAA equalization deviation
PHONO (MM) ± 0.5 dB
- Total harmonic distortion
PHONO (MM) to REC
(20 Hz to 20 kHz, 3 V) 0.025% or less
CD, etc. to SPEAKERS
(20 Hz to 20 kHz, 25 W, 8 Ω) 0.015% or less
- Signal to noise ratio (IHF-A network)
PHONO (MM) (5 mV input shorted) 87 dB or more
CD, etc., PURE DIRECT on
(200 mV input shorted) 100 dB or more
- Residual noise (IHF-A network) 30 V
- Channel separation CD, etc. (5.1 kΩ input shorted, 1/10 kHz) ....... 65/50 dB or more
- Tone control characteristics
BASS
Boost/Cut (50 Hz) ±10 dB
Turnover Frequency 350 Hz
TREBLE
Boost/Cut (20 kHz) ±10 dB
Turnover Frequency 3.5 kHz
Continuous loudness control Attenuation (1 kHz) -30 dB
- Gain tracking error (0 to -99 dB) 0.5 dB or less
FM SECTION
Tuning range [U.S.A. and Canada models] 87.5 to 107.9 MHz [Asia and Central/South America models] 87.5/87.50 to 107.9/108.00 MHz [Europe, Russia and Australia models] 87.50 to 108.00 MHz
- 50 dB quieting sensitivity (IHF, 1 kHz, 100% MOD.)
Mono 3.0 μV (20.8 dBf)
- Signal to noise ratio (IHF)
Mono/Stereo 74 dB/70 dB
Harmonic distortion (1 kHz)
Mono/Stereo 0.3%/0.3%
AM SECTION
Tuning range [U.S.A. and Canada models] 530 to 1710kHz [Asia and Central/South America models] 530/531 to 1710 / 1611kHz [Europe, Russia and Australia models] 531 to 1611kHz
GENERAL
These symbols on the products, packaging, and/or accompanying documents mean that used electrical and electronic products and batteries should not be mixed with general household waste.
For proper treatment, recovery and recycling of old products and used batteries, please take them to applicable collection points, in accordance with your national legislation and the Directives 2002/96/EC and 2006/66/EC.
By disposing of these products and batteries correctly, you will help to save valuable resources and prevent any potential negative effects on human health and the environment which could otherwise arise from inappropriate waste handling.
For more information about collection and recycling of old products and batteries, please contact your local municipality, your waste disposal service or the point of sale where you purchased the items.
These symbols are only valid in the European Union. If you wish to discard these items, please contact your local authorities or dealer and ask for the correct method of disposal.
Note for the battery symbol (bottom two symbol examples):
This symbol might be used in combination with a chemical symbol. In this case it complies with the requirement set by the Directive for the chemical involved.
ATTENTION : VEUILLEZ LIRE CE QUI SUIT AVANT D’UTILISER L’APPAREIL.
⑨ Prise SUBWOOFER OUT
Buchse SUBWOOFER OUT
VerwendeneinesBluetooth Wireless Audio Receiver
Hinweis
Manuell stationsinstalling
Manuella stationsinstalling ar effektivn Near stationssignaler ar svaga.
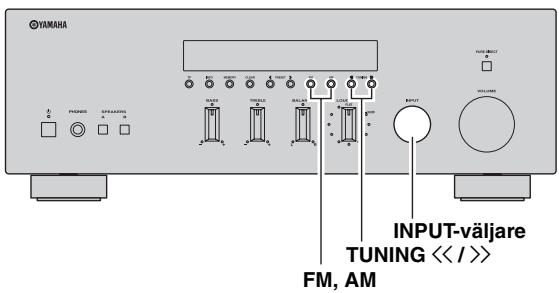

1 Stalla in önskad FM/AM-station.
Alternative: STEREO*, MONO
Alternative: ON*, OFF
Alternative: NO*, YES
Collegamento bi-wire
Paraocularly, the eye is directed to the right.
Notas
HcnoJIb3OBaHHe IyIbTa DY 9
IIOIFTOTOBKA
ПОДКЛЮЧЕня 10
ПОДКЛЮУЕНDE ИИHAМИКOB И KOMПОHEТOB HCTOчнIKOB 10
IopKJIIOUeHHe aHTeHH IaIIaIa3OHa FM n AM .... 12
IoiKJIIOUeHHe Ka6eJIa IITaHnI 12
OCHOBHbIE ΦYHKLIM
BOCIPON3BEDEHNEI 3AINCb ....13
BocpoH3BeDeHHe 3ByKa HcToHHka 13
HacrpoKa Tem6pa 14
3aHcB c HcToUHnKa 16
HcIOJIb3OBAHHe TaHMepa cIIIeero peKHaMa ...16
HACTPOIKA IINIIA3OHA FM/AM ....17
ABTOMaTHuecka HaCTpoiKa 17
Puynay hac troika 18
ABTOMaTHuecka IpeyctaHOBKa cTaHiiN (TOJIbKO IIJr CTAHII B DHaIa3OHe FM) ....19
PyuHaI IpeDyctaHOBKa cTaHnI . 20
BbI3OB IIpeDyctaHOBJeHHOcTaHINN 21
YdaJIeHHe cTAHIN H3 cIIncKa IpeDyCtAHOBOK ....21
Плная очinctа спнда пелустановok ...22
Прием Инфорmaцин Radio Data System (TOЛько ДЯ CTанчиВ ДИпаэоhe FM) 23
ФункиюпонскаТР(TолькоДлястанiiв Диандаэон FM) 24
BOCIPPOIN3BEDEHENE KOMIO3HIIH N3 KOMIOHEHTA iPhone/iPod/
B luetoothTM 25
IcnoB3ObaHne YHHBepcaJIbHOJ IOK-cTaHINn IJa iPod 26
IcIIb3OBAHHe 6ecIIpoBOHOH ChCTeMbI IJIa iPod 27
IcnoJIb3OBAHne 6ecIIpoBoDnHoro BluetoothayIOpeCnBepa 28
DOnOJIHnTEJbHbIeΦYHKUIM
HACTPOIKA MEHIO OPTION JIA KAKJIOFO ICHOTUHKA BBOIDA ....30
30
JOIOJHHTEJIbHbIE HACTPOIKN 32
I3meHeHHe IapaMeTpOB MeHIO ADVANCED SETUP 32
ДОПОЛНТЕЛБHAИ NHФOPMALIWA
YCTPAHEHNE HENCIPIPABHOCTEI ....33
TEXHNUECKHEXAPAKTEPHCTUKH 38
ПОЛЕЗHBIEФУHKЦИОHAЛьHBIEBO3MOXHOCHTI
C IIOMOIJIbIO 3TOTO aIIIapata MOXHO BbIIIOJIHITb OINCAHHBe HNKe JeIeCTBHa:
- I36eRaIte IonoIaIaNII BOnIbI HJIIN IpyrIX KJIKOcTeH Na IIyIbT N
He poHnTe IyJIbT IY.
He xpaHHTe H He octABJIAIHTe IyJBt IY B TaKHX MeCTax:
C BbICOKO BJIaJXHOCTbIO, HApIPmEp, PIAOM C BaHHoH;
C BbICOKoTEmIepaTypoi,HaIIpHmep,pJOMcO6OrpeBaTeJIeM HJIN IIeYbIO;
C O UeHb HN3KHMn TeMIIepaTpaMn;
c6oJIbIIOJ KOHueHTpaIneI IIJIIN.
-ДлЯпьтадунсioльзутseбатаэкTNIIa AA, R6, UM-3.
BCTaBbTe 6aTapeKn B COOTBeTCTBHH C MTeKAMH IOJIpaHocTH (+H -)
-Пиу meyehbiiHnHpa6Oeero nHaIIa3OHa IIyIbTa IY 3aMeHHte Bce 6aTapeKn.
- EcII 6aTapeiKn pa3pIaTcR, HeMeJIeHHO H3BJIeKHTe Hx H3 IIyIbTa IY, YTO6bI H36ExaTb B3pbBa HIN yTeKN KNCJIoTbI.
- O6hApyKbYteUky KnIckOCTNa 6aTaapeKax, HEmJIeHNO I36abBtEcB OTaIKX 6aTapeek, HN B KOem CJIyae He IIpHKacAocb K bItEKeIIeMy BeIeCTBy. EcIN BbITeKIIee BeIeCTBO IIOJaIO Ha KOKy, B ΓIa3a IIIN pot, IIpOMoTe MeCTo IIOIaIaHIn BOIO N HEmJIeHNO 6bPaHTecb K Bpaay. IpeI yctAHOBKO HObIX 6aTapeek TIIaTeJIbHO OvHCTHrE OTcEK IIJIA 6aTapeek.
He HcIOJIb3yIte CTapbIe 6aTapeHKN BmecTe C HOBbIMN. 3TO MOKeT IIpHBeCTH K COKpaIIeHHIO cPoka CIyJXbI HOBbIX 6aTapeek HIN K IIpoTeKaHHIO CTapbIX 6aTapeek.
- He hCIOJIb3yIte pa3JIINHbIe TNIbI 6aTapeeK OJIOHBpeMeHHO (HaIIpHMeP, IeJIIOUHbIe H MapraHIeBbIe). IIOXoJHe BHeIIHe 6aTapeiKN MOrTy HMeTb pa3HbIe XapaKTepHCTHKn.
- Ipeje yctaHOBko HOBbIX 6aTaapeek NaHcSto IIpoTpHte OTcEK JIJa 6aTaapeek.
- YTHJIN3HpyIte 6aTaapeiKn corglaCHO mecTHOMy 3aKOHOJaTeJIbCTBY.
3JIEMEHTbI UYPABJIECHNIMФYHKUHOHAJIbHbIE
BO3MOXHOCTN
Фронтайна панень
① (NHTaHne)
BkJIOUaET H OTKJIOUaET IINrAHNHe aIIIapaTa (CMOTpHTe cTp.13).
② HndnkaTop nItaHna
INIIKauIaOcuIeCTBJIeTcraONHcaHHbIM HnJKe o6pa3OM:
Jrpkoe cBueHHe: IIITaHHe BKJIIOUeHO
TyckJIOe cBueHHe:peXIM OxNlaHnA
BbIKJIOueH: IIITaHHe OTKJIIOyeHO
PpMueaHne
Пир зарякke iPhone/iPod, korда aninapaT haoДИТСВ ржиме OЖидань, ИндіКаTop пИтань 6уETApK CBeHTbCЯ.
③ SPEAKERS A/B
BkJIOUeHHe HIN BbIKJIOUeHHe KOMJIJEKTa DHHAMHKOB, IIOJKJIOUeHHORO Ka3BeMaM
SPEAKERS A n/IIIN SPEAKERS B Ha 3aJHei
IIaHeJIH, KaJbIpa3 IIpN HaKaTHN
COOTBeTCTByIOIIe KHOIIKN (CMOTpIte cTp.13).
④ TP
ПюнзвоДиТ abTomatHuecKи ПОнс CTaHи,пЕрдIoIuXx IpoIpyAMMy IopOxHbIX COo6IeHn(TP) (cMOTpHTe cTp.24).
⑤ INFO
BkIIOUeHHe H N3MeHeHHe peXHaMa OTo6paKeHnra Radio Data System, ecJIN HCTOuHHKOM BBOJa BbI6paTUNER (cMoTpHte cTp.23).
I3MeHHeHn DaHHbIX BOCIIPOH3BVeHnO KOMIO3HnHa iPhone/iPod,ecJIIN B KaueCTBe HcTOUHnKa BBOJa BbI6paH DOCK (CMOTpHrTe cTp.26).
PnmeaHne
IaHHbIe BOCIIPOH3BEJeHnO OTO6paJxAOTcT OToJIbKO IJIa YcTpoIcTB iPhone/iPod, KOtOpBIE IOIKJIIOUeHbI C IIOMOIbHO YHNBePcaJIbHO JOK-CTaHINN IJIa iPod.
(6) MEMORY
CoxpaHHeHne TeKyuIeFM/AM-CTaHIIIN B KaUecTBe IIpeIyucTaHOBKn, ecJIIN IcTOUHHKOM BBOJa BbI6paH TUNER (cmOTpHte cTp.20).
⑦ CLEAR
YJaJIeHHe TeKyuIeF FM/AM-CTaHIINB KauYeCTBe IIpeIyUcTaHOBKn,ecIIH NcTOuHnKOM BBOJa BbI6paH TUNER (cmOTpHTe cTp.21).
OTo6paKaTcI INΦopMaIIg O HacTpOJIke I H3MeHeHHI IapaMeTpOB.
⑫ HndkaToprpoMkoCTn
OTo6paKaTcra HOpMaIIa O TeKUeM yPoBHe rPOMKOCTH.
3aДнЯ панель
① Pa3beM GND
NcIIOJIb3yIOTcIJIIIOJIKIIOUeHnI IPOIHrpbIbTeJIa (CMOTpIte cTp.10).
② THe3da TAPE
IcnoJIb3yIOTcI IJIa IIOKJIIOUeHnMa rgHnTOΦOHHOJekn (CMOTpIte cTp.10).
③ Pa3bembl aHTeHH
HcIOJIb3yIOTcIJIaIOJKJIIOUeHHaHTeHH IHaIIa3oHOB FMnAM (cmOTpHTe cTp.12).
④ THe3do DOCK
NcIOJIb3yIOTcJIIaIOKJIIOUeHnI IOIOJIHNTeJIbHOYHHBepcaJIbHOJIOK-CTaHnIYamaHa JIOI iPod (TaKo KaY YDS-12), 6ecIPOBOJHOcnCTeMbIIOKJIIOUeHnIy I Pod (YID-W10) HIN6ecIPOBOJHO Bluetooth-ayIohepcHBepa (YBA-10) (cmOTpHTe cTp.25).
⑤ Ka6eIb nHTaHnA
IIJIIOIKJIOUeHnAaIIIapataKpo3EKe cETN IIepeMeHHOrTo TOKa (CMOTpHTe CTrp.12).
⑥ THe3da PHONO
IcIOJIb3yIOTcIJIIIOJIKJIIOUeHnI IPOINrPbIBaTeJIa (CMOTpIte cTp.10).
⑦ THe3da CD
NcIIOJIb3yIOTcIJIa IIOJIKJIIOUeHnI IPOIHpBbAteJIa KOMIIaKT-ⅡNcKOB (CMOTpHTe cTp.10).
⑧ THe3da LINE 1-2
NcIOJIb3yIOTcIJIIOIKJIOUeHnA yIHOKOMIIHOHeTOb (CMOTpHTe cTp.10).
⑨ THe3do SUBWOOFER OUT
IcIIIOJIb3yeTcraIIJIIOIKJIIOUeHnIca6ByΦepa co BCTpoEHbIM yCHJIInTeJIeM (CMOTpHTe cTp.10).
#
THe3IO SUBWOOFER OUT ocla6JIaET cHHaJIbI 6oJIee 90Hz
10Переклоча Teь POWER MANAGEMENT
NcIIOJIb3yeTcraJIYBKJIIOUeHnHIIINBbIKJIOUeHnH cyHKIINaBTOMaTHueCKOFOOTKJIIOUeHnIHITaHH.
EcJIN 3TaФyHKIIINB KJIIOUeHa,JaHHbI aIIIapaT aBTOMaTHueCKN IpeEJIET B pEXHM OxHJaHN IIO IIPOIIECTBHN HeKOTOPOROBpEMEH6e3JeCTBnA (IOCTyIHbI 3 BapNaHTa HAcTpOIKN; cMOrPtTe cTp.32).
① Pa3beMbI SPEKERS
IcIIIOJIb3yIOTcR IJII IIOKJIIOUeHnI INHaMnKOB (CMOTpIte cTp.10).
12Переклочасть IMPEDANCE SELECTOR
IcIIIOJIb3yeTcIJIa BbI6opa HAcTpoEK COIIpOTHBJIeHnA (CMOTpHTe cTp.11).
NyIbT dy
B 3TOM pa3IeJIe OIIHcAHbI ΦyHKIIN BCEx KHOIOK IIyIbTa IY IJIaHaHOrO aIIIapAta IJIN IIPOIHrpIBaTeJIKOMIIaKT-ⅡNCKOB Yamaha.
O6uHe 3JemeHbI ynpaBHeHnA
IpeuHcJIeHHbIe HNKe KHOIIKn HcIOJIb3yIOTcH He3aBnCHMo OT BbI6paHHoro HcTOUHHKa BBOJa.
Ipeepa CHHraJIOB INHpaKpaChOM IHaIa3OHe.
② (Ntahne)
BkHIOueHHe daHHOrO aIIIapaTa HJIN IpeBoID erO B peKHM OxHuaHn.
PpmeaHne
3Ta KHOIIKa JeIcTByeT, TOJIbKO ecJIN KHOIIKa (IHTaHHe) Ha pOHTaJIbHOI IIaHEJIN BKJIIOUeHa.
③ DIMMER
I3MeHeHne IApKoCTn HcHJIeA pPoHTaJIbHOH IIaHeJIN. IOBTOpHO HaXHMaER 3Ty KHOIIKy, MoXHO BbI6paTb OINH H3 3ypOBHeJ ApKoCTn.

3Ta HacTpoKa coXpaHHTcraJaKe B cIyUae BbIKJIOueHnHa yctPoCTBa.
④ SLEEP
YcTaHOBKa TaHMepa cIIeIePo peKHMa (CMOTpHTe Ctrp. 16).
⑤ KhoNKn BbIbopa nCTOuHnKa
Bb6op HcToUHnKa BBOJa, KOtOpbI Tpe6yeTc npocJyIaTb.

- Ha3BaHnHa HcTOUHHKOB BBOda COOTBeTCTBYIOT HAnMeHOBAHnMa CoeHNHTeJIbHbIX pa3beMOB Ha 3aJHe IaHeJIi.
- YTO6bI BbI6paTb TUNER IIJIa HcToUHnKa BBOda IIpru yIIpaBJIeHHn aIIIIapaTOM C IMOIOIbIO IIJIbTa IIcTaHIIIOHOHOrO yIIpaBJIeHHn, HaIXMITE Ha IIJIbTe KHOIIKy FM IIIN AM.
(6) OPTION
BkJIIOUeHHe H BbIKJIIOUeHHe MeHIO OPTION (CMOTpHTe cTp.30).
⑦ SPEAKERS A/B
BkJIOUeHHe N BbIKJIIOUeHHe Ha6Opa IINHaMnKOB, IIOJKIIOUeHHbIX K pa3bEmaM SPEAKERS A H/II IN SPEAKERS B Ha 3aDHei PaHeJN 3TOrO aIIIapata, IIpH hKaTHN COOTBeTCTByIOJIe KNHOIIKN.
(8) MUTE
ПиглшенизУк.НаЖмITEепа3,ТTo6bI BOCCTaHOBHTb 3ByK Ha IIpeXHem yPoBHe rPOMKOCTH.
⑨ VOLUME +/-
YBeJIHHeHHe HJIn yMeHbIIeHHe yPOBHa rPOMKoCTn 3ByKa.
Примеанne
HeBIIaIeTHa yPoBeHb rPOMKocTH 3ByKa IJIa THe3I REC.
RETURN
Bo3BpaT B IpeIbIyIuI pa3JeJI MeHIO HJIN cKpbITHe MeHIO BO BpemHaIOJIb3OBAHHaMeHIO Option (CMOTpHTe cTp. 30).
11 / / / ENTER
Bb6Op HnHa3NaueHHe ΘJIeMeHTOB MeHIO Option (CMOTpHTe cTp. 30).
3JIemEtbI ynpaBHeHnFM/AM
IpeueHcJIeHHbIe HnKe KHOIIKN HcIIIOJIb3yIOTcR, KOrJa B KaueCTBe HcTOUHNKa BBOJa BbI6paH TUNER.
12 TP
IIpoH3BOJNT aBTOMaTHUeCKn IIOHcK cTaHIIH, IIpeJaIOIINX IIPOrpaMMy IOpOxHBIX COo6IeHHN (TP) (cmOTpHTe cTp. 24).
13 PRESET
Bb6op IIpeUyctaHOJIeHHOI FM/AM-cTaHIIIN,ecIIHCTOUYHKOM BBOJa BB6paH TUNER (cMoTpHrTe cTp.21).
⑭ FM, AM
Bb6op 3NaueHnTUNER IIJIa HcToUHnKa BBOJa IIpeKJIIOUeHHe FM/AM-TIOHEpaB IIHaIIa3OH FM IIIM AM (cMOrPtHe cTp.17).
15 INFO
BkIIOUeHHe I N3MeHeHHe peKHMa OTo6paKeHHa Radio Data System, ecJIN HcTOUHNKOM BBOJa BbI6paH TUNER (cmOTpHTe cTp.23).
3nemtebyynpaBlenia iPod
IpeuHcJIeHHbIe HnKe KHOIIKn MOxHo
HIOJIb3OBAtB, KOJa B KaYeCTBe HcToUHnKa BBOda
JIII pOscIJyIINBaHnI iPhone/iPod BbI6paH DOCK.
IOnIOJIHNTeJIbHbIe CBeJeHnCmOTpHTe Ha cTp. 25.
10 REPEAT
11 MENU/ /K/ /ENTER
15 INFO
16 SHUFFLE
17
18
UnpaBJIeHne npOnIrpbIbATEJIem KOMnAKT-ДИСКOB Yamaha
CJeIyIOIIHe KHOIIKN MOryT 6bITb HcIOJIb3OBAHbI JIJIy InpaBJIeHn IIPOINrPBbATEJEM KOMIIaKT-JIckOB Yamaha, KOrJa B KaueCTBe HcTOUHnKa BBoJa BbIpaH KOMIIaKT-JIck.
19 KhoNk ynpaBHeHnI npOnrpbBaTeJeM KOMNaKT-ДИСКOB Yamaha
OctaHOBkaBOcIpOn3BeJeHn
- PpnoocTaHOBKa BOCIIPOIN3BeJeHHN
Haayao BoCippon3BeJeHnna
DISC SKIP IepexoI K cJIeIyIOIeMy IINcKy B IpepeKJIIOUaTeJIe KOMIIaKT-ⅡNCKOB
- KAn IepexoHaazd
- D>> IpepxoBnpeep
H3BJIeueHHe JnIcKa
- IpeMeOTka Haazad
- D>> IpeMeTka BIIepeI
PpMeyaHne
IaJKe IINIOJIb3OBAHH INoIHpBbATEJIa KOMIIaKT-JHCKOB
YamaHa MOrYT 6bITb HEIOCTyIHbI HeKOTOpbIE KOMIOHOHTbI H
fYHKIIHN. IIOJOHNTEJIbHbIe CBeJEHHNcM.B IHCTpyKIIHN IO
3KCIJIyataIHIN IOIKJIOHYaEMTO KOMIOHEHTa.
IcnoJb3OBAHne npJIbTa Dy
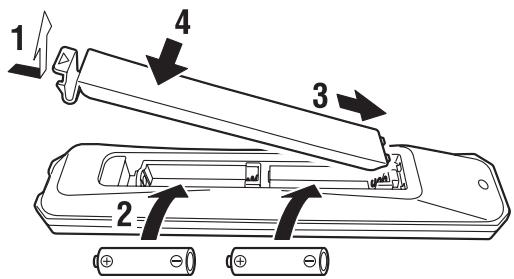
UcTaHOBka 6aTapeek
BatapeuKn AA, R6, UM-3
Pa6oyn dnaana3OH
\PyJIbT 日 IpeJaaetHaIpaBJIeHHbIe HnΦpakpaChbIe JyH.
PInyIpaBJIeHHcIIMOIIbIO IyJIbTa 日 YO6Ba3aTeJIbHO
HaIpaBJIaHTe erO Ha ceHCOP 日 ,pacIOIOKeHHbI Ha
IpeJeHe IIaHeJIIN DaHHoro aIInapaTa.
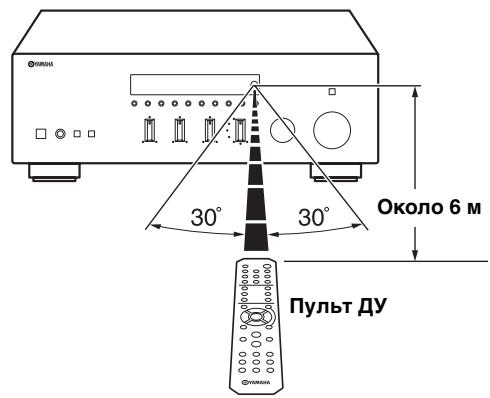
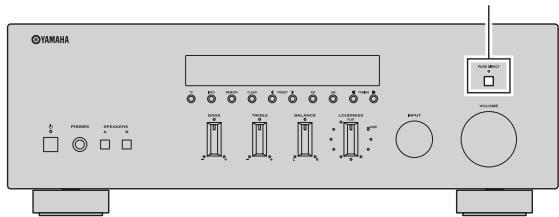
IpeekJIIOUaTeIb PURE DIRECT
PpIMeuaHn
- PerugiaTopbI BASS, TREBLE, BALANCE n LOUDNESS He 6uyt fynkuiHnpoBaTb, Ioka aKTHBnpoBaHa fynkui pure DIRECT.
- Θанстюка coхраится дже в слуаь Быкlioуеня устюква.
HacrpoKa c nOmoBypeRyJrTopoB BASS u TREBLE
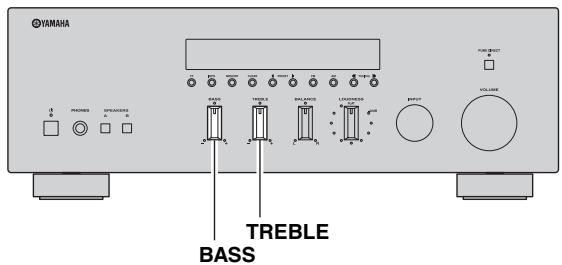
C IOMOIIbI OpeRyJIaTOpOB BASS N TREBLE OcyIeCTBJIaTeTcH aCtPoIKa TeM6pa B OBJaCTN BBICOKHX Hn3KHX YaCTOT.
B IeHTpaJIbHOM IOJIIOJKeHHN OeScIeYHBaEtcra IIIOCKaXapaKTePncTHKa.
BASS
EcJIN KaKcETcra, YTO 6acOB (HN3KOuAcTOTHO 3Byka) HeIOCTaTOUHO, yCHJIHTb HX MOXHO BpaIeHHeM peRyJIaTOP aIO YacOBo CTrpeJIke. EcJIN 6acOB CJINIIKOM MHORO, JIIA Hx yMeHbIeHnI IOBePHTe peRyJIaTOP B IIpOTHBIOJOJXHOM HAIpaBJIeHnI.
Pn HacrpoKe 3NaeHnTaMepa CIIIeRo peKHa HndKaTOp SLEEP IpoJIoJkaet Mrratb.

A B T O M a T H u e c k a h a c t p o i k a 3 0 0 0 0 0 0 0 0 0 0 0 0 0 0 0 0 0 0 0 0 0 0 0 0 0 0 0 0 0 0 0 0 0 0 0 0 0 0 0 0 0 0 0 0 0 0 0 0 0 0 1 K O R I N O C T y I I A I O I I N E O T P a I N O C T a H I N C H H A J I B I N O C T a T O U H C H J B H B I N O T C Y T C T B Y I O T I NOM E X H.

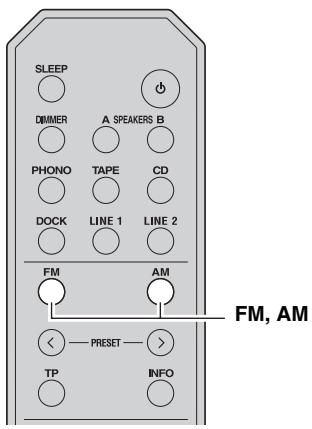
BbI3OB IIpeDyCTaHOBJIeHHOcTaNCHIN
MoxHO BbI3bIbA Tb CTAHIN H3 CINNcKa IIpeYcTaHOBOK, COCTaBJIeHHORO BpyHyIO HJN aBTOMaTHUeCKH.
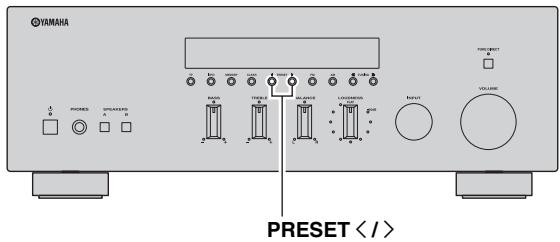
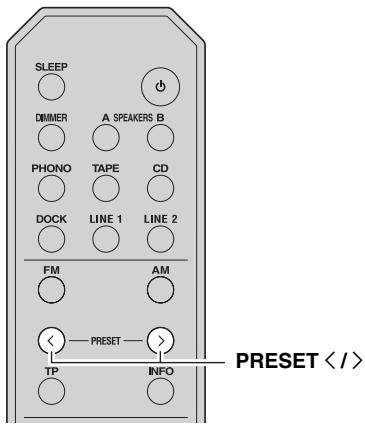
1 1yTo6bI BbI6paTb HOMep npEpyctaHOBKN, BocnoJIb3yIteCb KhoNkAmn PRESET / Ha nepeJHei NaHei (HIn PRESET / Ha nyIbTe D).

- Homepa IIpeIyucTaHOBOK,IIJI KOTOpbIX yJKe coXpaHeHbI cTAHIHH,6yIyT IIPOIIyIeHbI.
- EcJIn coXpaHEnHHbIX cTaNIIH NeT, Na 3KpaH e6yIeT oTo6paKaTbcN HINHkAtoP "NO PRESETS"
YdaJIeHne cTaHcIu n3 cnNcKa npEduCTaHOBOK
IyuaJIeHnCtAHuHn H3 cHnCKa IIpeUcTaHOBOK BbIOJIHNTe IpeueHCJIeHHbIe HNKe JeIcTBnI.
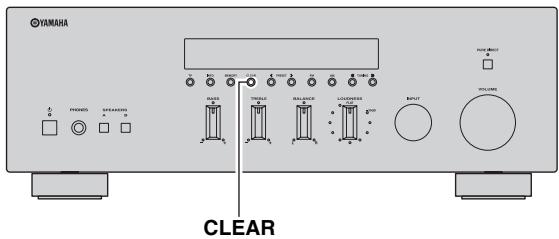
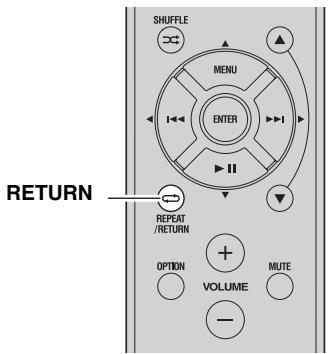
1 BbI6epNTe Homep XeJaemOn npedyctaHOBJIeHHo paHocTaHcN.
CMOTnTE pa3JeJ "BbI3OB IIpeYcTaHOBJIeHHoI cTaHIIIN" Ha cTp. 21.
2 HaxmTe KhoNky CLEAR Ha φpoHTaJIbHoi nAHeJn.
Bb6paHHbH HOMep IpeIyctaHOBKn Ha IIHCIIJIe 0pOHTaJIbHOIIaHeJIIN HAHTeMHRaTb.
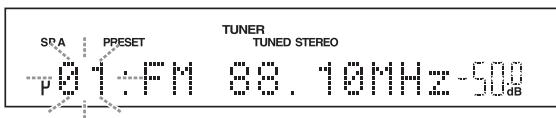

YTo6bI OTMeHHTb yJaJIeHHe paJIOcTaHINn H3 cINsKa IIpeyctaHOBOK, HaxKMITE KHOIIky RETURN Ha IyJIbTe IY HJIN BO3dEpxKHTecb OT JIO6bIX OIIepaIIM cJaHHbIM aIIIapATOM IIpH6JIN3HTeJIbHO Ha 30ceKHyI.
3 YTo6bI nOdTBepdntb Bbl6Op, haxMnte KhoNky CLEAR Ha φpoHTaIbHoi NaHeJI.
"PXX: CLEARED" oTo6pa3nTcHa nIncIIie IpeIeHne IIaHeJIi (XX O3Haayet HOpem IIpeIyctaHOBKN), a 3aTeM IIncIIie BepHeTcB HxCOJHoe COCTOAHHe.
IJIyOuHCTKN CINNcKa IpeYucTaHOBOK BbIIIOJIHNTe IpeYeHCJIeHHbIe HnKe JeIcTBnJ.
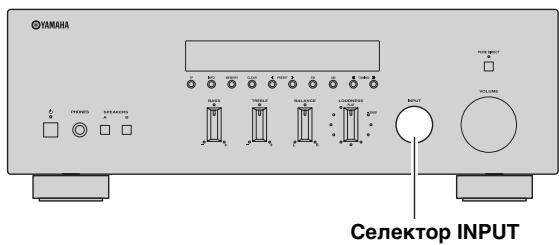
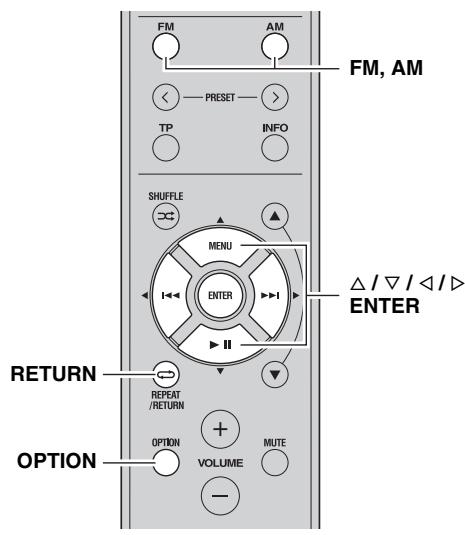
1ДЯ ВьбopaВKaueCTBe NCTOChNka BBOda TUNER nCnoIb3yIe CeJIeKTop INPUT ha nepeDne NaHEn (Jn6o KhoNky FM nJn AM Ha npJIbTe D).
2 HaxmTe KhoNky OPTION ha npIbTe Dv. OTo6paKaetcMaHIO Option IJIa peXHaTUNER (cmOTpIte cTp. 30).
3 KhoNkamn Ha npIbTe Dv / BbIbepnTe "Cir All Preset", a 3aTeM HaxMnte KhoNky ENTER.


YTO6bI OTMeHHTb OIIePaIHHIO H BepHyTbCBA MeHIO Option HaKMITE KHOIIKY RETURN HA IIyJIte IY.
4 Khonkamn Ha npIbTe Ny / BbIbepnte "YES", a 3aTeM haxmnte KhONky ENTER.


YTO6bI OTMeHnTb OUHCTky CINhKa IpeJyuctaHOBOK, BbI6epHTe "NO".
IocJIe OUHCTKn CINHcKa IpeDyCtAHOBOK oTo6pa3HTcN HHHKaTOp "PRESET CLEARED", a 3aTeM INcIIeB BepHeTcNa Ha 3KpaH MeHIO Option.

5 Дя Вьхова n3 MeHIO Option haxmTe KhoNky OPTION nIи RETURN ha nyIbTe Dv.
Прием Информаци Radio Data System (Толъко对于我们CTанць в диапазоне FM)
Radio Data System - 3TO cnCTema IIpepaH INHOpMaIIHH, HcIOJIb3yemaj FM-paIIOCTaHIIMM MHOrHX CTpaH. 3TO yCTPOINCTBO IIOJIePKIBaET IIpHEM INHOpMaIIHN Radio Data System YeTbIpex TIIIOB: KOJ OTO6paXeHnBOCIIPOIN3BOIMoI IIporpAMMBI, TII IIporpAMMBI, PaIHOTeKCT, BpeM.
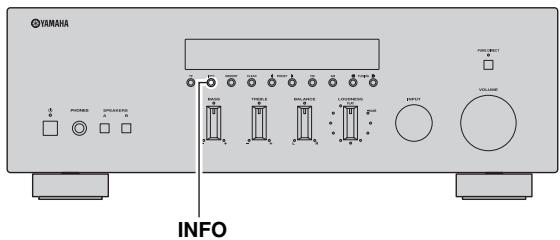
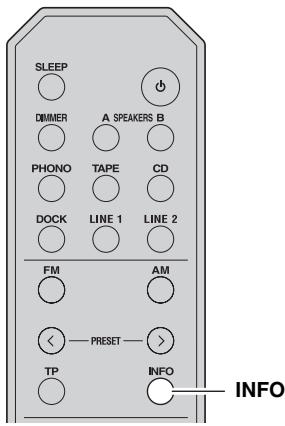
1 HactpoIteCb Ha NyxHyIO paHIOCTaHcIIO, KOtOpA OcyuceTBJIeT TpaHCJIaIIO B CnCTeme Radio Data System.
2 HaxmMaTe KhoNky INFO Ha pOHTaJIbHOI naHeJn (HIn INFO Ha nyJIte DY), YTo6bl BbIbpaTb HyxHbI pExHM OTo6paXeHn Radio Data System.
BOCПОН3BEДЕΗΝΕ KOMПОЗИЦИ N3
KOMHOHEHTA iPhone/iPod/Bluetooth™
IocJIe IIOKJIHOueHnI IOIOJIHNTEJIbHOYHNBepcaJIbHOJOK-cTaHIIINYamaHa IJIa iPod (taKoI, kaK YDS-12), 6ecIpiOboHNO cHCTeMbI IJIa iPod (YID-W10) IIIN 6ecIpiOBOHOrO Bluetooth-ayHopeCHeBepa (YBA-10) K rHe3dy DOCK Ha 3aIHeI PaHEJIIN daHnOro aIIIapata, MOxHO ocUIIeCTBHTB BOCIIPOH3BeJeHne c iPhone/iPod HIn KOMIIHOENTa Bluetooth IIpr IIOMOII INyIbTa JY, IIOCTABJIeMORBO B KOMIIJEKeTc c JaHHbIM aIIIapatom.
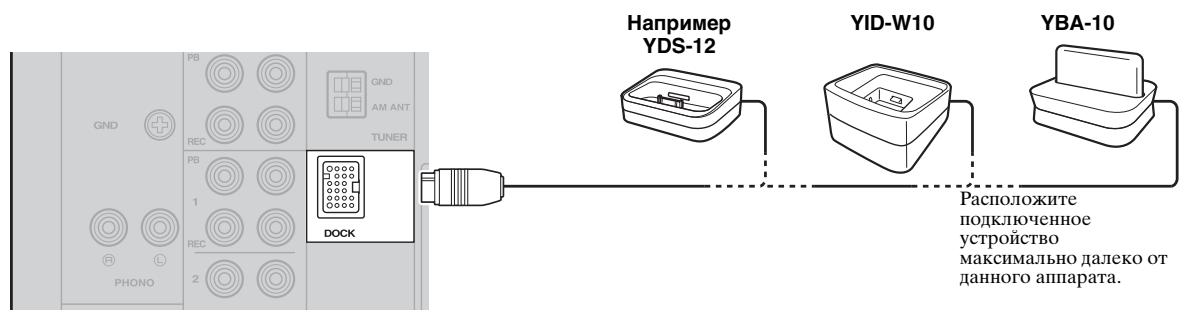
YTo6bI BbIHTN H3 MeHIO IapaMeTpOB,HaKMHTe Ha IIyJIbTe IINCTaHIUNHO YIIpaBJIeHNKHOIIKY OPTION.


EcHn HCTOuHHKOM BBOJa BbI6paH DOCK, MoxHo TaKKe Naatb ObeJeuHeHne B IaPy IyTeM HaKaTHN yIepXaHH KHOIIKN MEMORY Ha φpoHTaJIbHOI NaHeJIN (HJN ENTER Ha IIyJIte N).
Bocnpou3BeJeHne KOMnOHeHTOB BluetoothTM
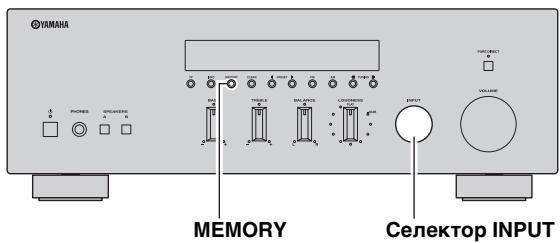
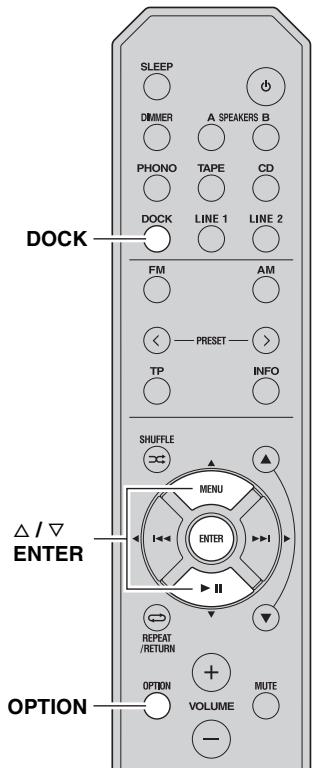
IocJIe 3aBepHHeHnO6bEJHHHeHnB npay BbIIOJIHnTe OINcaHHbIe HNKe IeJCTBnI JJIcO3JaHn
6ecIIPOBOIHORIOIKJIIOUeHnMeKJy daHHbIM aIIapatom N KOMIOHEHTOM Bluetooth.
IocJIe yCTaHOBJHn6ecIIPOBOIHORIOIOJKJIIOUeHnMoKHO HaHaTb BOCIpON3BeJeHne N3 KOMIOHEHTOB Bluetooth.
PpmeaHne
B 3aBnHMoCTH OT KOMIOHOENTa Bluetooth 6ecIPOBOJHOE IIOIKJIOUeHHe yCTaHaBJIbBAETc aBTOMaTHUeCKN HJIN BO BpEmr fYHKIIIOHNOHPoBaHnKOMIOHOHTa Bluetooth. B 3THX cIJyuaX Het HeO6xoIMoCTH BBIOJIHHrTb OINCaHHUO HJKe IpoIeDpy.
1ДЯ Bby6opa B KaueCTBe NcTOUHmka BBOda DOCK nCnoJb3yIte CeIeKTop INPUT Ha φpoHTaJIbHOJ nAHeJN (nJn KhONKy DOCK Na npJIbTe D).
2 HaxmTe KhoNky OPTION Ha nyIbTe Dv. OTo6pa3HTcMa MeHIO Option IJIpeXHa DOCK (cmOTpHte cTp. 30).
3 Khonkamn Ha npIbTe Dy / BbI6epnte "Connect", a 3aTe m HaxMnte Khonky ENTER.
IocJIe 3aBepHHeNHy yCTaHOBJIeHnI
6ecIIPOBOJHOrIOIOKJIIOUeHnHa IINCIJIee
fpoHTaJIbHOI IIaHEJIN OTO6paXaETcHaIINCb
"Connected?
YTo6bI BbHnTH H3 MeHIO IapaMeTPOB, HaxMmTe Ha IIyJIbTe INcTaHIIuOHHO yIpaBJIeHnKHOIIKy OPTION.

PpMeyaHne
Пи ВОЗнИКНOBЕHIN OПИБКПОДКЛЮУЕHЯ Н IДСПЛЕ
OTОБРАЗNTСАДПИСь "Not found". Пповерпгу БВИОЛПЕНUE
ОПИСАНHBIX HNЖE Tpe6OBaHIN И ПОПБТАЛТЕСь CHOBA
CO3ДАТБ BCSEПОВОДHOE ПОДКЛЮУECHUE.
-Дааньи anIIapat И KOMIOHeT Bluetooth o6beHHeBIBI npy.
- KOMIOHEHT Bluetooth BKJIHOyeH.
- Komnohent Bluetooth haxoHITcB IIpeJeJax 10 M ot 6ecnpoBOHOro Bluetooth-ayHopeceHBepa.
4 BocnpoIm3BeDeHne n3 kOMnOHeHTa Bluetooth.
Пи ВОпрИЗБeДЕнИ ИЗ KOMПОЕНТaBluetooth Ha Испліee ФpoNTаьHoI ПАнeЛn oTo6paЖаETСЯHaIIINcь “BLUETOOTH”

PpMeeaHne
YTo6bI pa3OpBaTb 6ecIIpoBOdHoe IOJKJIIOUeHne,IOBTOpHTe IpeueHcJIeHHbIe HnKe JeIcTBnI H bIb6epHTe "Disconnect" B IIare 3.

EcJH NCTOCHHKOM BBOJa BbI6paH DOCK, MoKHO TaKKe co3aTb 6ecIIPOBOHOe IIOJKJIIOUcHHe IyTeM HaKaTHa KHOIIKN MEMORY Ha φpoHTaJIbHOI NaHEJIN (NJH ENTER HA IIYJIbTe IY).
HACTPOIKA MEHIO OPTIONДЛЯ KAXДОTO NCTOчнka BBODA
C IIOMOIbIO MeHIO Option MOxHO H3MeHbT pa3JIuHbIe IapAMeTpbl JIA KaKJIOrO HCTOuHHKa BBOJa H BbIbBAbTB 3TH IapAMeTpbl aBTOMaTHueCKn IIpN BbIbOpE HxHOrO HCTOuHHKa BBOJa. KpOME TORO, MOxHO IIPOCMaTPBaTB CBeDeHnO O CNHaJIe JIA HeKOToPbIX HCTOuHHKOB BBOJa.
PioeIypa HacTpoKKn IapametPoB MeHIO Option oINcBiBaETcaJaIee.
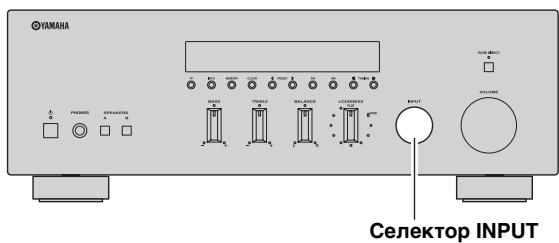
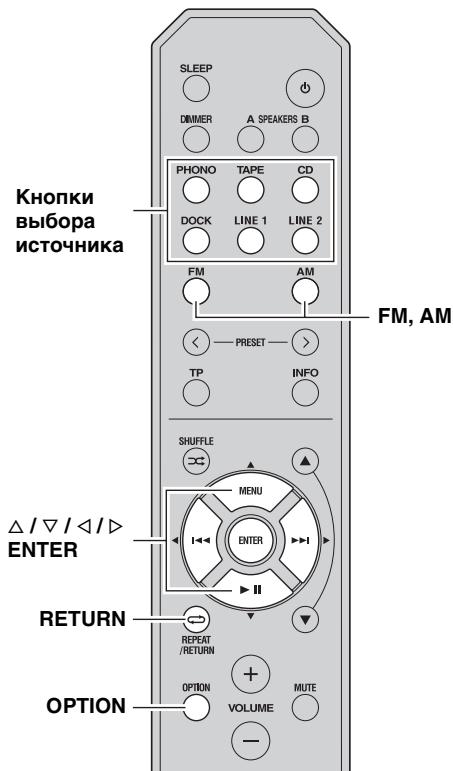
1 4To6bI BbIbpaTb HxHbI NCTOCHN K BBOda, NOBepHnTe CeJIeKTOp INPUT Ha nepeDHei NaHeJN (JIbO OJHy I3 KHOJOK BblOpa NCTOCHNka IIIN KHOJKN FM JIn6o AM Ha nyIbTe D).
2 HaxmTe KhoNky OPTION Ha nyIbTe y.
PpimeyaHne
EcHn HcToHHK BBOJa H3MeHHTc8, KOrJa OTo6paKaaTeC MeHIO Option,Ha IINCIJIe ePPOHTaJIbHOI IIaHEJIN MeHIO Option 6yIDet cKpbITOn I OTo6pa3HTc8 IINCIJIe BbIbpaHHOrO HcToHHKa BBOJa.
3 KhoNkAmn / Ha npIbTe Dv Bbl6epnte HxHbI NyHKT MeHIO, a 3aTEM HaXMMTE KhoNkY ENTER.
4 KhoIkaMn / / / Ha npIbTe y N3MeHInTe 3HaueHnna napaMeTpOB.
#
B HeKOTOpbIX IyHKTx MeHIO IJIA COxpaHeHHa HObIX 3HaueHHI IapAmetpoB HxKHO HaKaTb KHOIIKy ENTER.
5ДЯВьixoJaI3MeHIOOptionHaXMMTe KhoNky OPTIONHa npNbTe DY.
YTo6bI BepHyTbcB IpeBldyHn pa3JeI MeHIO HaKmTe Ha IIJbTe Iy KhoNky RETURN.
PpMueaHne
EcJINIIOcJIe 3aKpbITnMa MeHIO Option KHOIIKN / / / HJIN IpyTHe KHOIIKN Ha IIyIbTe IY He yHKnIOHOHPyIOT, IOBepHNTE CeJIeKTop INPUT Ha IpePeIHHe IaHEJIIN (JINI HaxMMTe OJHy N3 KHOIIOK BbIbOpa IcTOUHHKa HJIN KHOIIKN FM JIn6o AM Ha IIyIbTe IY), YTO6bI IOBtOPHO BbIbPaTB TeKyuIIIN HcTOUHHK BBOJa.
Злем entbl MeHIO Option
JIa KaJIOrO HcTOUHnKa IIpeIcTaBJIeHbI IIpeYncJIeHHbIe HNKe 3JIeMeHTbI MeHIO.
| Истонник Ввoda | Эльеньibles Meню |
| PHONO, CD, TAPE, LINE 1-2 | Volume*1 |
| TUNER (FM/AM) | | FM Mode, Auto Preset, Clr All Preset |
| DOCK (iPhone/iPod) | | Interlock*2 |
| DOCK (Bluetooth) | | Connect, Disconnect, Pairing |
PpIMeuaHn
^1 "Volume" - ΘTO ΜΟΠΗ ΘΙΑΜΕΜΤ ΜΕΗΟ ΠΙΑΒ CΒΕΧ ΚΗΤΟΥΝΚΟΒ ΑΝΓΗλΙΟβ.
2 ΘЛемERT "Interlock" OTOБражаетсь МЕню Option TOЛько прп НСПОЛьЗОВАнн Б ecП罗BOДНСЧТЕМы ДЛЯ iPod.
Hnke IaetcIIOIpo6Hoe OINcaHne 3JIeMeHTOB MeHIO. OINcbIBaemar KOHfHypaIIra OTHOCHTcK TEkyIeMy BbI6paHHOMy HCTOuHHKy BBOJa.

3HaueHnI IapametpoB IIO yMOJIyauHHIO O6O3haueHbI CHMBOJOM“*
Volume
Поdmсн: MaxVol,IniVol
Dnana3OH
perynipobkn -30,0B 1o +15,0B, +16,5B*
(MaxVol): (c ⅢaROM B 5,0ДБ)
Dnana3OH
perynipoBKn Off*, Mute, -89,5Ib Io +16,5Ib
(InIVol): (c ⅢaROM B 0,5 Ib)
Hacrpoika 3naeHHI rpoMKoCTH.
MaxVol (maKcHMaJIbHaJrPOMKOCTb)
YcTaHOBbKaMaKcHMaJIbHOrO 3HaueHnrypOBHnIgPOMKoCTNaKHM O6pa3OM, YTO6bl IprOMKOCTb HeJIb386blIO IOBbICNTb CUYaAHBM O6pa3OM BblIeONpeJeHHORo yOBHn. HAprrMeR, rPOMKoCTMoJxHO peyJIiPoBaTb B IppeJIax-89,5 Db -5,0 Db(IIIN IIPIHJIyIHITb), ecIN 3HaueHne 3TORO IIpaAMetpaPaBBHeTcra-5.0dB'FpOMKoCTMoXHO IOBbICNTb JOMaKcHMaJIbHOrO yOBHn,ecIN IIJaIe 3TORO IIpaAMetpaUcTaHOBJieHO 3HaueHnE +16,5 D (IO yMOJIuaHHIO).