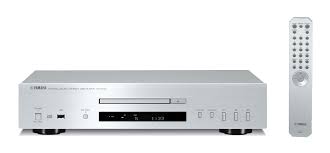
CD-S700 - CD Player YAMAHA - Free user manual and instructions
Find the device manual for free CD-S700 YAMAHA in PDF.
User questions about CD-S700 YAMAHA
0 question about this device. Answer the ones you know or ask your own.
Ask a new question about this device
Download the instructions for your CD Player in PDF format for free! Find your manual CD-S700 - YAMAHA and take your electronic device back in hand. On this page are published all the documents necessary for the use of your device. CD-S700 by YAMAHA.
USER MANUAL CD-S700 YAMAHA
VISIBLE AND INVISIBLE LASER RADIATION WHEN OPEN. AVOID EXPOSURE TO BEAM.
ADVARSEL
SYNLIG OG USYNLIG LASERSTRALING VED ABNING. UNDG UDSETT ELSE FOR STRALING.
ADVARSEL
SYNLIG OG USYNLIG LASERSTRÄLING NAR DEKSEL ÅPNES. UNNGÅ EKSPONERING FOR STRÄLEN.
WARNING
SYNLIG OCH OSYNLIG LASERSTRÄLNING NÄR DENNA DEL ÄR ÖPPNAD. BETRAKTA EJ STRÄLEN.
VARO!
AVATTAESSA OLET ALTTIINA NAKYVALLE JA NAKYMATTOMALLE LASER SÄ TEILYLLE. ALAKATSO SATEESEEN.
VORSICHT
1 To assure the finest performance, please read this manual carefully. Keep it in a safe place for future reference.
2 Install this sound system in a well ventilated, cool, dry, clean place - away from direct sunlight, heat sources, vibration, dust, moisture, and/or cold. Allow ventilation space of at least 10cm (3 15/16 in) on the top, 10cm (3 15/16 in) on the left and right, and 10cm (3 15/16 in) on the back of this unit.
3 Locate this unit away from other electrical appliances, motors, or transformers to avoid humming sounds.
4 Do not expose this unit to sudden temperature changes from cold to hot, and do not locate this unit in an environment with high humidity (i.e. a room with a humidifier) to prevent condensation inside this unit, which may cause an electrical shock, fire, damage to this unit, and/or personal injury.
5 Avoid installing this unit where foreign objects may fall onto this unit and/or this unit may be exposed to liquid dripping or splashing. On the top of this unit, do not place:
- Other components, as they may cause damage and/or discoloration on the surface of this unit.
- Burning objects (i.e. candles), as they may cause fire, damage to this unit, and/or personal injury.
- Containers with liquid in them, as they may fall and liquid may cause electrical shock to the user and/or damage to this unit.
6 Do not cover this unit with a newspaper, tablecloth, curtain, etc. in order not to obstruct heat radiation. If the temperature inside this unit rises, it may cause fire, damage to this unit, and/or personal injury.
7 Do not plug in this unit to a wall outlet until all connections are complete.
8 Do not operate this unit upside-down. It may overheat, possibly causing damage.
9 Do not use force on switches, knobs and/or cables.
10 When disconnecting the power cable from the wall outlet, grasp the plug; do not pull the cable.
11 Do not clean this unit with chemical solvents; this might damage the finish.
12 Only voltage specified on this unit must be used. Using this unit with a higher voltage than specified is dangerous and may cause fire, damage to this unit, and/or personal injury. Yamaha will not be held responsible for any damage resulting from use of this unit with a voltage other than specified.
13 To prevent damage by lightning, keep the power cable disconnected from a wall outlet or the unit during a lightning storm.
14 Do not attempt to modify or fix this unit. Contact qualified Yamaha service personnel when any service is needed. The cabinet should never be opened for any reasons.
15 When not planning to use this unit for long periods of time (i.e. vacation), disconnect the power cable from the wall outlet.
16 Install this unit near the wall outlet and where the power cable can be reached easily.
17 Be sure to read the "TROUBLESHOOTING" section in this manual on common operating errors before concluding that this unit is faulty.
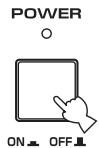
18 Before moving this unit, press POWER to turn off this unit and then disconnect the power cable from the wall outlet.
19 The batteries shall not be exposed to excessive heat such as sunshine, fire or like.
20 VOLTAGE SELECTOR (Asia and General models only) The VOLTAGE SELECTOR on the rear panel of this unit must be set for your local main voltage BEFORE plugging into the wall outlet. Voltages are: AC 110/120/220/230-240 V, 50/60 Hz
As long as this unit is connected to the wall outlet, it is not disconnected from the AC power source even if you turn off this unit by POWER.
WARNING
TO REDUCE THE RISK OF FIRE OR ELECTRIC SHOCK,DO NOT EXPOSE THIS APPLIANCE TO RAIN OR MOISTURE.
LASER SAFETY
This unit employs a laser. Due to possible eye injury, only a qualified service person should remove the cover or attempt to service this device.
DANGER
This unit emits visible laser radiation when open. Avoid direct eye exposure to beam. When this unit is plugged into the wall outlet, do not place your eyes close to the opening of the disc tray and other openings to look into inside.
The laser component in this product is capable of emitting radiation exceeding the limit for Class 1.
CONTENTS
INTRODUCTION
FEATURES 2
SUPPLIED ACCESSORIES 2
CONTROLS AND FUNCTIONS 3
Front panel 3
Front panel display 4
Remote control. 5
Installing batteries in the remote control 6
Using the remote control 6
PREPARATION
CONNECTIONS 7
Connecting your amplifier. 7
Connecting the supplied power cable 8
Connecting USB devices 8
OPERATION
BASIC OPERATION. 9
Starting playback 9
Pausing playback 10
Stopping playback 10
Turning off the power 10
Playing back a desired track 10
To improve audio quality (PURE DIRECT mode) 10
Skipping to the beginning of a desired track 11
Advancing or reversing playback rapidly. 11
Changing front panel display 12
Changing the brightness of the front panel display 12
Repeating a selected item 13
Repeat A-B 14
PROGRAM PLAY 15
Stopping program playback 16
Clearingprogrammedtrack. 16
ADDITIONAL INFORMATION
NOTES ABOUT DISCS/MP3, WMA FILES....17
TROUBLESHOOTING. 19
SPECIFICATIONS 20
About this manual
indicates a tip for your operation.
- In this manual, audio CDs are referred to as "Audio CD", MP3/WMA discs as "Data Disc", and MP3/WMA files stored on the USB device as "USB".
- This manual is printed prior to production. Design and specifications are subject to change in part as a result of improvements, etc. In case of differences between the manual and the product, the product has priority.
FEATURES
Optical Digital Output
Coaxial Digital Output
CD-R, CD-RW Disc Playability (For details, refer to page 17.)
MP3, WMA Disc Playability
MP3, WMA File Playability Stored on USB Device
Program Play (Audio CD only)
Random-Sequence Play
Single Track/Entire Disc Repeat Play
Repeat A-B Play (Audio CD only)
Adjustable Display Information and Brightness
PURE DIRECT Function
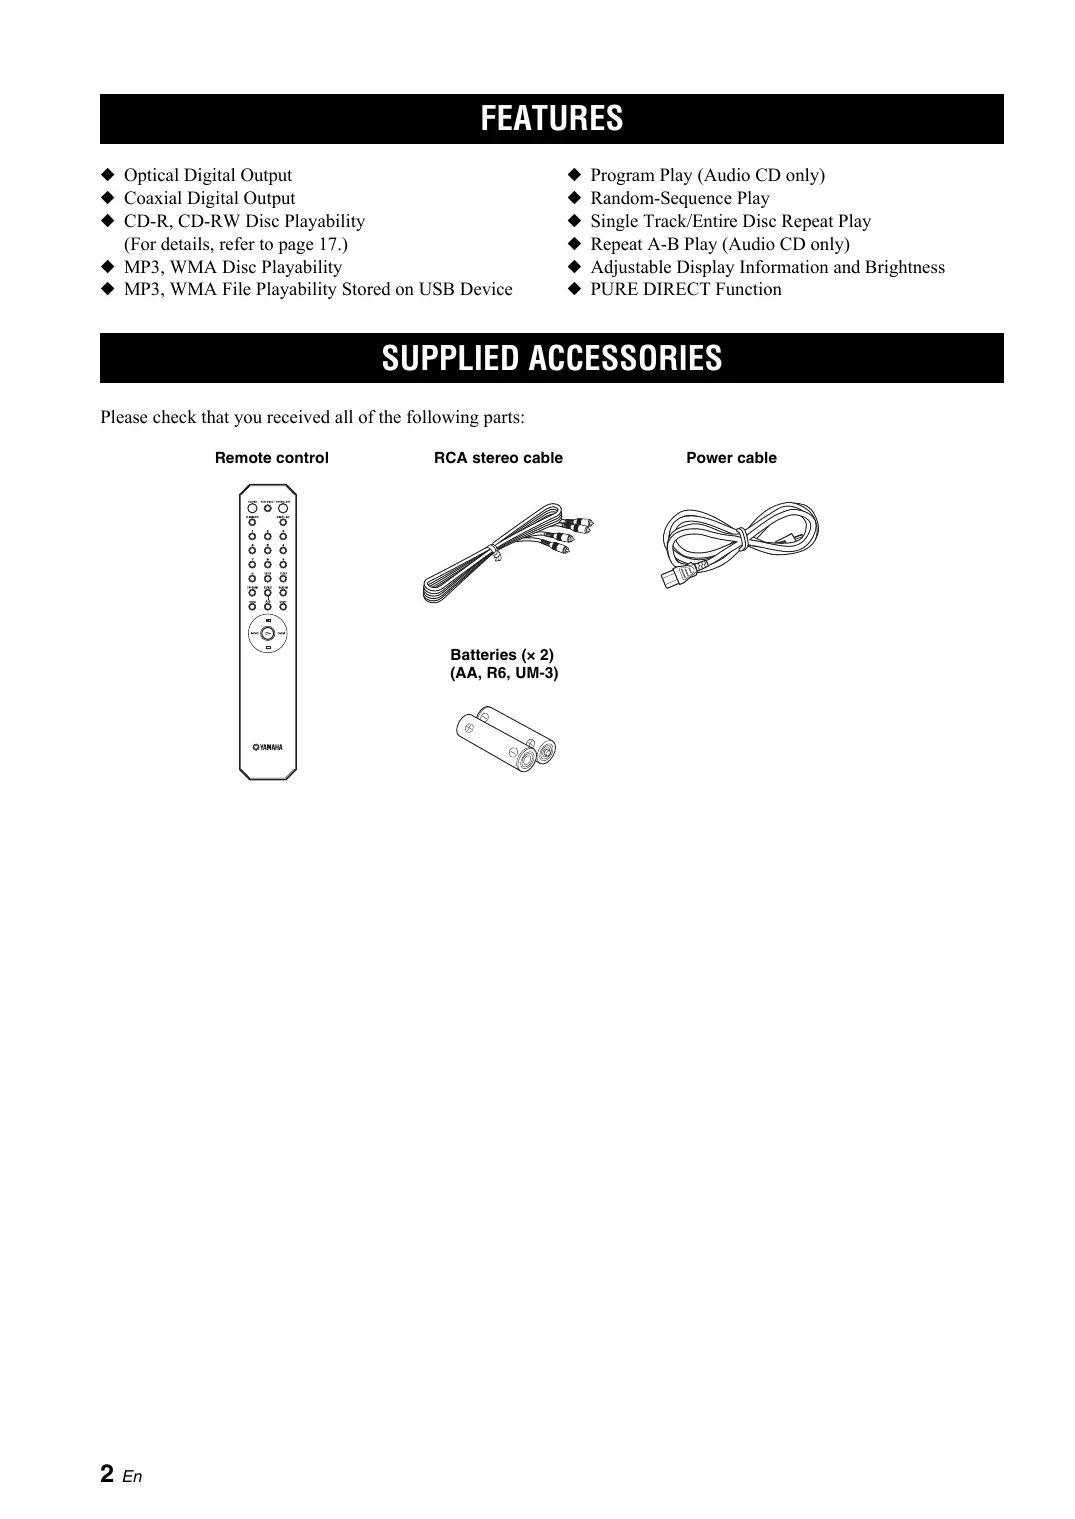
SUPPLIED ACCESSORIES
Please check that you received all of the following parts:
Remote control
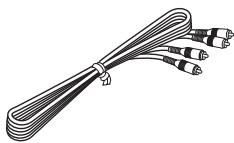
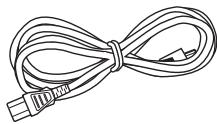
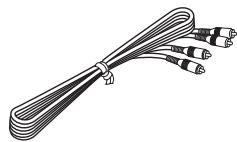
RCA stereo cable
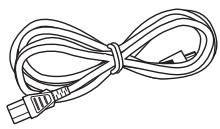
Power cable
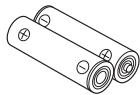
Batteries (× 2) (AA, R6, UM-3)
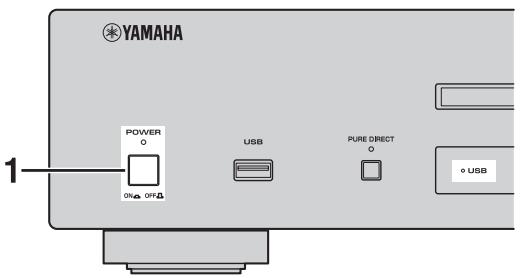
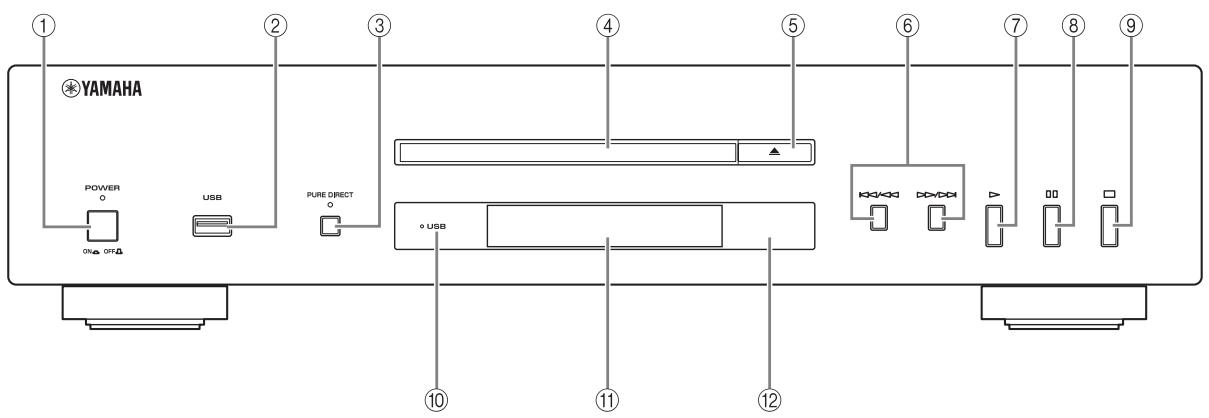
Front panel

① POWER
Press to turn the power to ON/OFF.
#
The POWER indicator above lights up when this unit is turned on.
② USB port
Connect your USB device. See page 8 for details.
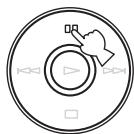
③ PURE DIRECT
Turn PURE DIRECT mode on or off to improve audio quality.
#
The PURE DIRECT indicator above lights up when this unit is in PURE DIRECT mode. See page 10 for details.
④ Disc tray
Load a disc.
⑤ (Open/Close)
Open or close the disc tray.
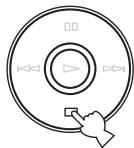
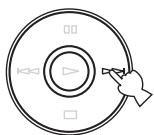
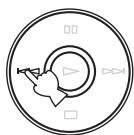
⑥ / (Skip/Search backward),
/> (Skip/Search forward)
/ : Skip to the next track.
:Skip back to the beginning of the current track.
( twice):Skip to the previous track.
Press and hold / < or / to search backward/ forward.
#
Each time you press and hold / or / , the search speed increases by 2 levels.
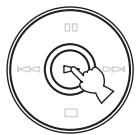
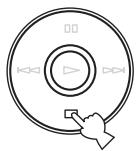
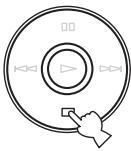
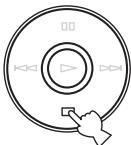
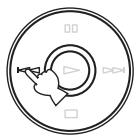
(Play)
Start playback.
(8) (Pause)
Pause playback. Press or to resume playback.
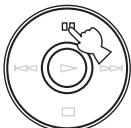
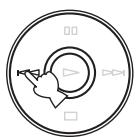
(9) (Stop)
Stop playback.
USB indicator
Lights on/off when this unit is in USB/disc mode, and blinks when this unit is reading the USB device.
① Front panel display
Shows the current status of this unit.
Remote control sensor
Receives signals from the remote control.
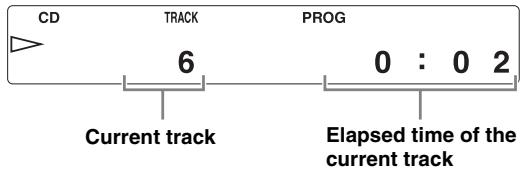
Front panel display

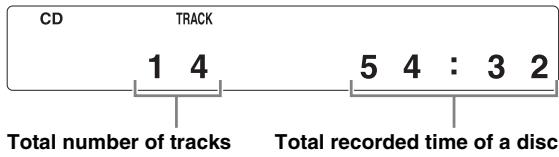
Audio CD
① Lights up the icon for the selected playback mode.
② Shows the time displays. (Refer to page 12.)
③ Shows the track number selected or being played back.
④ Shows the file number.
⑤ Lights up when this unit is in disc mode (refer to page 9) and also when an Audio CD is recognized on the tray.
⑥ Lights up when MP3 file is played back.
⑦ Lights up when WMA file is played back.
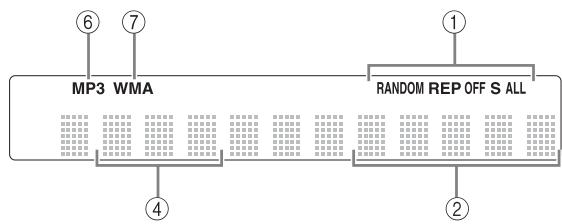
Data Disc USB
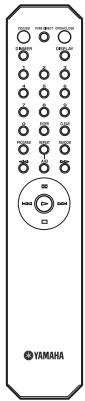
Remote control
① Infrared signal transmitter (p. 6)
Send infrared signals to this unit.
② CD/USB (p. 9)
Switch between disc mode and USB mode.
③ DIMMER (p. 12)
Select brightness level for the front panel display.
④ Numeric buttons (p. 10)
Select a track directly.
⑤ PROGRAM (p. 15)
Turn program mode on or off.
(Search backward/forward) (p. 11)
Search tracks backward/forward.
⑦ Skip backward/forward) (p. 11)
Skip to the next/previous track or skip back to the beginning of the current track.
⑧ OPEN/CLOSE (p. 9)
Open or close the disc tray.
PURE DIRECT (p. 10)
Turn PURE DIRECT mode on or off.
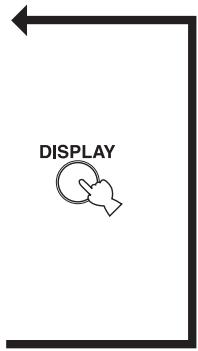
10 DISPLAY (p. 12)
Switch the time display.
⑪ ENTER (p. 15)
Confirm the track number when this unit is in program input mode.
⑫ CLEAR (p. 16)
Clear programmed track.
13 REPEAT (p. 13)
Repeat playback of a single track or all tracks.
14 RANDOM (p. 13)
Set random-sequence play.
15 A/B (p. 14)
Set repeat A-B.
(16) (Pause) (p. 10)
Pause playback.
17 (Play) (p. 9)
Start playback.
18 (Stop) (p. 10)
Stop playback.
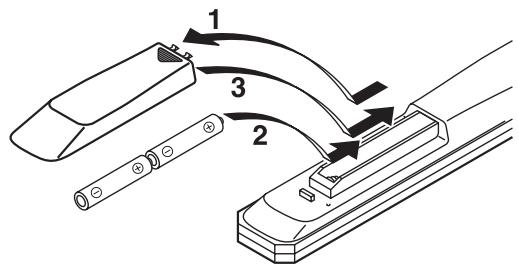
Installing batteries in the remote control

1 Press the part and slide the battery compartment cover off.
2 Insert two supplied batteries (AA, R6, UM-3) according to the polarity markings (+ and -) on the inside of the battery compartment.
3 Slide the cover back until it snaps into place.
Notes on batteries
- Change both batteries when the operation range of the remote control decreases.
- Use AA, R6, UM-3 batteries.
- Make sure that the polarities are correct. See the illustration inside the battery compartment.
- Remove the batteries if the remote control is not to be used for an extended period of time.
- Do not use old batteries together with new ones.
- Do not use different types of batteries (such as alkaline and manganese batteries) together. Read the packaging carefully as these different types of batteries may have the same shape and color.
- If the batteries have leaked, dispose of them immediately. Avoid touching the leaked material or letting it come into contact with clothing, etc. Clean the battery compartment thoroughly before installing new batteries.
- Do not throw away batteries with general house waste; dispose of them correctly in accordance with your local regulations.
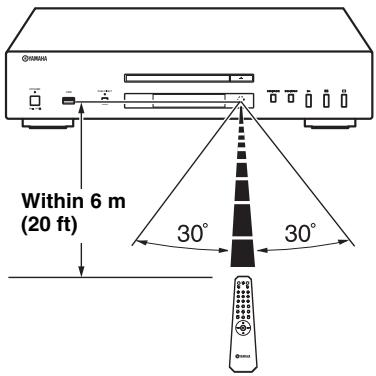
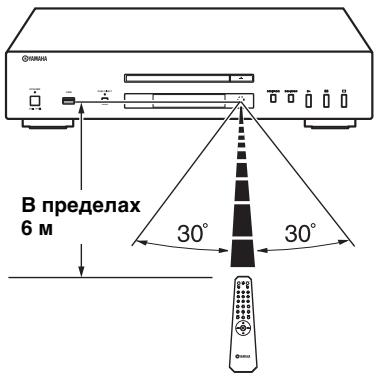
Using the remote control
The remote control transmits a directional infrared beam. Be sure to aim the remote control directly at the remote control sensor on the front panel of this unit during operation.
Handling the remote control
- The area between the remote control and this unit must be clear of large obstacles.
- Do not spill water or other liquids on the remote control.
- Do not drop the remote control.
-
Do not leave or store the remote control in the following types of conditions:
-
high humidity, such as near a bath
- high temperature, such as near a heater or a stove
extremely low temperatures -
dusty places
-
Do not expose the remote control sensor to strong lighting, in particular, an inverter type fluorescent lamp; otherwise, the remote control may not work properly. If necessary, position the unit away from direct lighting.
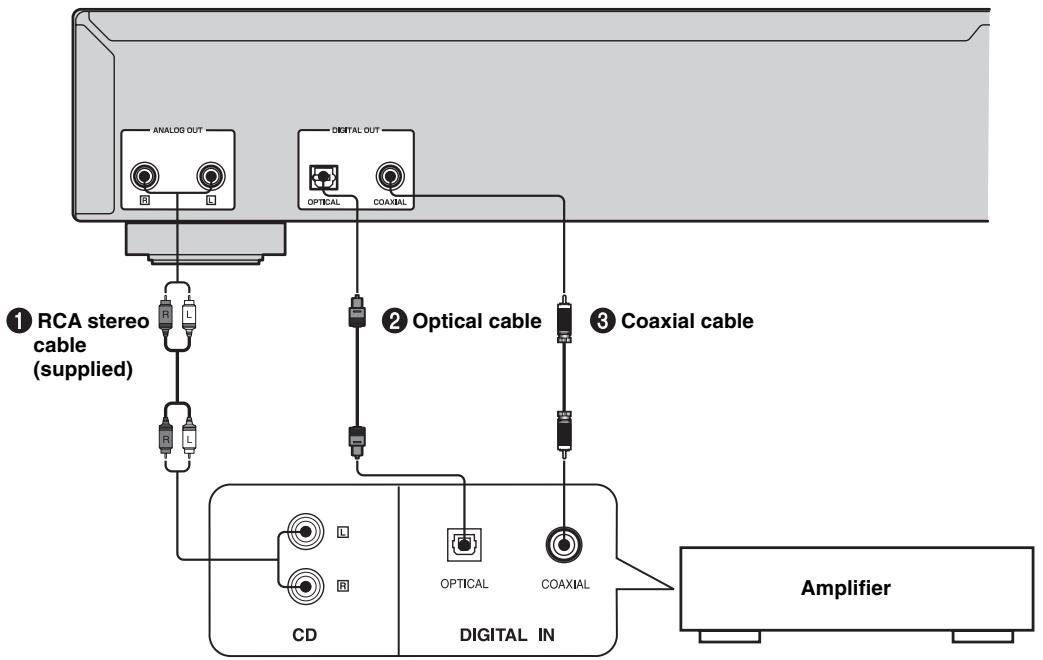
CONNECTIONS
Connecting your amplifier
CAUTION
- Before making any connection, switch OFF the power to the unit, the amplifier and any other component.
- Connections should be made to the correct input terminals of the amplifier or another component.
- If the placement of this unit causes noise to another equipment, such as a tuner, move them further away from each other.
- The digital output is turned off when this unit is in PURE DIRECT mode.
To connect this unit to your amplifier, choose one of the ways listed below.
When the ANALOG OUT terminals of this unit are used ( 1 )
Connect these terminals to the CD (or AUX) terminals of the amplifier by using a supplied RCA stereo cable. For details concerning these connections, refer to the operation instructions of the amplifier being used.
- Be sure that the left (L) and right (R) of these terminals are connected to the corresponding (left and right) terminals of the amplifier or other component.
When the DIGITAL OUT (OPTICAL) terminal of this unit is used (2)
Connect this terminal to the optical input terminal of an amplifier with a commercially available optical cable.
- Use a reliable optical cable.
When the DIGITAL OUT (COAXIAL) terminal of this unit is used ( ③ )
Connect this terminal to the digital input terminal of an amplifier with a commercially available coaxial cable.
Connecting the supplied power cable
To the wall outlet with the supplied power cable
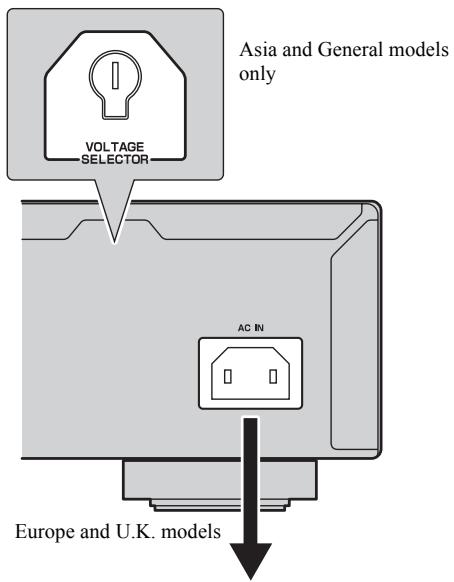
VOLTAGE SELECTOR
(Asia and General models only)
The VOLTAGE SELECTOR on the rear panel of this unit must be set for your local main voltage BEFORE plugging the supplied power cable into the wall outlet.
Improper setting of the VOLTAGE SELECTOR may cause damage to this unit and create a potential fire hazard.
Rotate the VOLTAGE SELECTOR clockwise or counterclockwise to the correct position using a straight slot screwdriver.
Voltages are as follows:
AC 110/120/220/230-240 V, 50/60 Hz
Connecting this unit to the wall outlet
Plug the supplied power cable into the AC IN on the rear panel of this unit and then plug the power cable into the wall outlet after all other connections are complete.
Connecting USB devices
This unit has a USB port and can access MP3 or WMA files saved on your USB device. Connect your USB device to the USB port on the front panel of this unit.
CAUTION
Do not disconnect your USB device while playing back from the USB device, or when the USB indicator blinks.
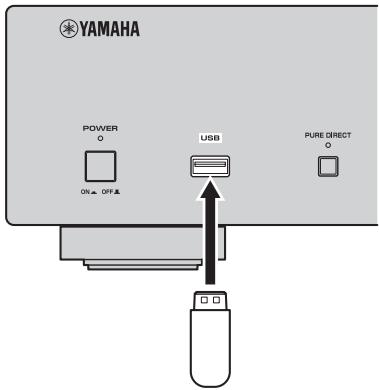
Supported USB devices
This unit supports USB mass storage class devices (e.g., flash memories, card readers or portable audio players) that use FAT16 or FAT32 format.
Notes
- Some devices may not work properly even if they meet the requirements.
- Do not connect devices other than USB mass storage class devices: USB chargers, USB hubs, PCs, external HDD, etc.
- When you insert two or more memory cards at the same time into a card reader connected to the USB port on this unit, only one of the memory cards is recognized.
- Yamaha and suppliers accepts no liability for the loss of data saved on the USB devices connected to this unit. As a precaution, it is recommended that the files are made backup copies.
- Playability of and power supply to all kind of USB devices are not guaranteed.
This manual describes how to operate this unit by using the remote control. To operate this unit from the front panel, use the corresponding buttons on the front panel. The Audio CD, Data Disc and USB icons indicate music data formats that can be used in the operation.
BASIC OPERATION
1 Press POWER to turn on the power.
2 Press CD/USB to switch between disc mode and USB mode.

When USB mode is selected, the USB indicator lights up, and when disc mode is selected, the USB indicator lights off.

This setting is retained even if you turn off this unit.
Starting playback
Playing back discs
Audio CD
Data Disc
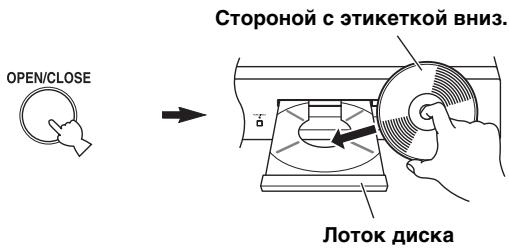
1 Press OPEN/CLOSE to open the disc tray, and load a disc.
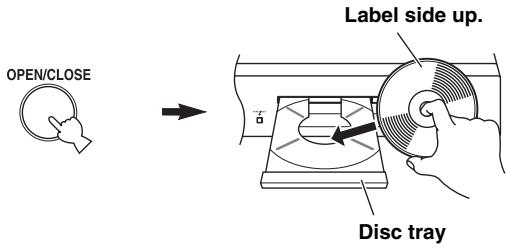
Notes
- When you load a disc, set the disc on the inside of the disc guides (4 marks on the disc tray).
- The disc may not be read correctly, if it is set incorrectly. In this case, open the disc tray and set the disc again.
2 Press OPEN/CLOSE to close the disc tray.


You can also close the disc tray by pressing , a numeric button, or by pressing the front edge of the disc tray gently. If the tray is closed in one of these ways, playback starts automatically.
3 Press to start playback.
For an Audio CD, playback starts from the first track, and for a Data Disc, in alphanumeric order by filename.
Display information in step 2 Audio CD

Data Disc
Playing back USB devices
USB
Connect your USB device to the USB port on the front panel. (For details, refer to page 8.)
When USB mode is selected (USB indicator lights up), first filename is displayed in the front panel display (refer to page 12), and playback starts automatically in order by date and time of creation if playable files are in the USB device.
To disconnect USB devices
Press to stop playback, and then disconnect the USB device.
Note
Do not disconnect your USB device while playing back from the USB device, or when the USB indicator blinks.
Pausing playback
Audio CD
Data Disc
USB
Press [I].
To resume playback, press again (or press ).
Stopping playback
Audio CD
Data Disc
USB
Press
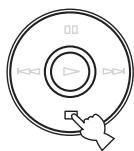
If you press again, playback starts from the first track.
Turning off the power
Press POWER again.
If you turn off the power when disc mode is selected, the next time you turn the power on, playback starts automatically of the disc on the tray. If you turn off the power when USB mode is selected, playback will start automatically of the USB device connected.
Playing back a desired track
Audio CD
Select a desired track by using the numeric buttons.
Example: To select track number 12 Press "1", and then press "2".


Following information is displayed.
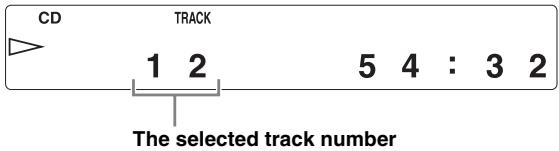
Playback starts in 2 seconds.
Note
This operation is not available for Data Disc and USB.

You can also select and playback a desired track during playback.
To improve audio quality (PURE DIRECT mode)
Audio CD
Data Disc
USB
Press PURE DIRECT.
PURE DIRECT

This unit is set to PURE DIRECT mode.
- The PURE DIRECT indicator lights up.
- The digital output is turned off.
- The front panel display is turned off and only the minimum required indicators and messages are displayed during playback.
Note
Connect using the ANALOG OUT terminals when you use PURE DIRECT mode (refer to page 7).

- Press PURE DIRECT again to turn off PURE DIRECT mode.
- This setting is retained even if you turn off this unit.
Skipping to the beginning of a desired track
| Audio CD | Data Disc | USB |
To play back from the beginning of the next track, press once.
To play back from the beginning of the current track, press once.
To play back from the beginning of the previous track, press twice.

- These operations can also be performed for Data Disc/USB.
- These operations can also be performed when the unit is paused.
- These operations can also be performed using 1 < 1 / < 1 and / on the front panel.
Advancing or reversing playback rapidly
| Audio CD | Data Disc | USB |
To advance rapidly, press once during playback.

To reverse rapidly, press < once during playback.

To resume playback, press at the desired point.


- These operations can also be performed for Data Disc/USB.
- The sound can be heard (although slightly garbled) during these operations in either direction. This is convenient for locating a precise position within a track, or for reviewing the contents quickly. Sound may not be heard depending on the MP3/WMA file.
Each time you press or , the search speed increases by 2 levels. - These operations can also be performed pressing and holding ( \left| \left| \left| \left| \left| \left| \left| \left| \left| \left| \left| \left| \left| \left| \left| \left| \left| \left| \left| \left| \left| \left| \left| \left| \left| \left| \left| \left| \left| \left| \left| \left| \left| \left| 1\right\rangle \right\rangle \right\rangle \right\rangle \right\rangle \right\rangle \right\rangle \right\rangle \right\rangle \right\rangle \right\rangle \right\rangle \right\rangle \right\rangle \right| \right| \right| \right| \right| \right| \right| \right| ) or ( \rightarrow > > > > > > > > > > > > 0.5523678945678945678945678945678945678945678945678945678945678945678945678945678945678945678945678945678945678
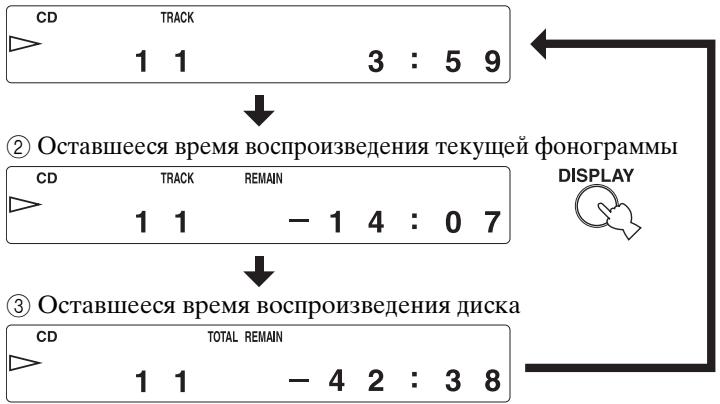
Changing front panel display
When playing back an Audio CD
Audio CD
You can select the following front panel displays (① - ③) by pressing DISPLAY.
① Elapsed time of the current track (Default)


② Remaining time of the current track


③ Remaining time of the disc

When playing back a Data Disc or USB device
Data Disc
USB
You can temporarily display the filename by pressing DISPLAY.
These front panel display examples are for an MP3 file.
① Elapsed time of the current track


② Filename*


Returns to the normal display after displaying a filename.
- 28 characters maximum
Note
This unit can only show alphanumeric characters.
Changing the brightness of the front panel display
Press DIMMER to change the brightness level for the front panel display.
DIMMER

Each time you press DIMMER, the brightness level changes in the following order:
Max (brightest) Level1 (default) Level2 Level3 (darkest) Max
Notes
- Brightness is slightly decreased during playback, except when the level is set to maximum.
- Brightness may temporarily be decreased for some operations, except when the level is set to maximum.
- This setting is retained even if you turn off this unit.
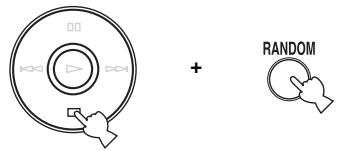
You can play back the tracks in random sequence.
Note
These operations can also be performed for Data Disc/USB.
To perform random-sequence play
Press , and then, RANDOM.
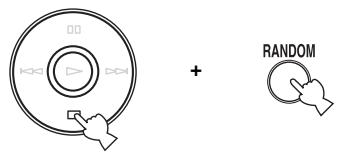
To cancel random-sequence play
Press
REPEAT PLAY
Repeating a selected item

You can play back a single track or all tracks repeatedly by pressing REPEAT during playback. The repeat playback mode changes each time you press REPEAT.

S (Single repeat)
A single track is played back repeatedly.
ALL (Full repeat)
All tracks (the entire disc) are played back repeatedly.
Note
These operations can also be performed for Data Disc/USB.
Repeat play also works for program play and random-sequence play.
Repeat A-B
Audio CD
You can repeat a specified section of a track by pressing A/B during playback to set two points (start and end points).
1 Press A/B to select the start point of repeat play.
2 Press A/B to select the end point of repeat play.
The selected section is played back repeatedly.
To cancel repeat A-B
Press A/B again to make "A-B" disappear from the front panel display.
Notes
- You cannot set repeat A-B from one track to another track.
- This operation is not available for Data Disc and USB.
- If you stop playback by pressing , repeat A-B is canceled.
- You cannot use repeat A-B when this unit is in PURE DIRECT mode.
PROGRAM PLAY
Audio CD
You can customize the playback order of up to 50 tracks stored on an Audio CD. This operation is not available for Data Disc and USB.

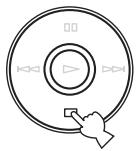
1 Press to stop playback.

2 Press PROGRAM.
This unit is set to program input mode.
3 Program a desired track by pressing the corresponding numeric button and ENTER.

+

ENTER
Following information is displayed. When you press "6":

When you press ENTER:

Repeat this operation to program more tracks.
You can select the same track again.
Note
Pressing PROGRAM in program input mode exits to normal playback mode, though programmed tracks are stored.
4 Press to start program play.
Following information is displayed.
Stopping program playback
Press
To restart program play, press after pressing PROGRAM.
Playback starts from the first programmed track number.
Clearing programmed track
There are several methods, as described below.
Clearing the last programmed track Press CLEAR during program input mode.

Following information is displayed.

The last programmed track is cleared.
Clearing all programmed tracks Press CLEAR after exiting program input mode.

Following information is displayed.

All programmed tracks are cleared.
The display is turned off after 2 seconds.
Note
Switching to USB mode, opening the disc tray or switching off the POWER clears all programmed tracks.
NOTES ABOUT DISCS/MP3, WMA FILES
Discs playable with this unit
Audio CD Data Disc
This player is designed for playing back compact discs bearing the marks shown below. Never attempt to load any other type of disc into the unit. The unit can also play back 8-cm (3-inch) compact discs.

... Compact discs (digital audio)
The most popular discs for commercially available audio CDs.

CD-R,CD-RW digital audio discs
Music CDs made by copying onto a CD-R or CD-RW (including MP3 or WMA format files).
Notes
- Be sure to use a CD-R or CD-RW disc made by a reliable manufacture.
- Be sure to use a CD-R or CD-RW disc which has at least one of the following phrases on the disc or disc case. FOR CONSUMER
- Be sure to use a finalized CD-R or CD-RW disc.

CD-TEXT discs
The discs recorded with text data such as album titles, track titles and artist names. Though these discs can be played back with ordinary CD players, the text data is not displayed.

ct disc player may not be able to play back somecs or discs on which recording was not made
To prevent a malfunction of this unit:
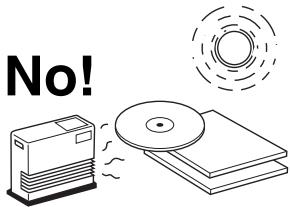
- Do not use any nonstandard shaped disc (heart, etc.) available on the market because it might damage the unit.

- Do not use a disc with tape, stickers, or paste on it. If you use such a disc, the disc may get stuck in the unit, or damage to the unit may result.
About MP3 and WMA files
Data Disc USB
You can play back MP3 and WMA files recorded on a CD-R/CD-RW and those stored on a USB device.
MP3
MP3 is a standard technology and format for compressing an audio sequence into a small-sized file. However, the original level of sound quality is preserved during playback.
The playable formats are:
MPEG-1 Audio Layer-3
Bitrate*: 32-320 kbps
Sampling frequency: 44.1/48/32 kHz
MPEG-2 Audio Layer-3, 2
Bitrate*: 8-160 kbps
Sampling frequency: 24 / 22.05 / 16kHz
MPEG-2.5 Audio Layer-2
Bitrate*: 8-160 kbps
Sampling frequency: 12 / 11.025 / 8kHz
- Variable bitrate is supported.
WMA
"WMA (Windows Media Audio)" is a Microsoft file format for encoding digital audio files similar to MP3 though can compress files at a higher rate than MP3. The playable formats are:
Version 8
- Version 9 (Standard and variable bitrates are supported. Professional and Lossless are not supported.)
High Profile
Bitrate*: 32-320 kbps
Sampling frequency: 48 / 44.1 / 32kHz
Mid Profile
Bitrate: 16-32 kbps
Sampling frequency: 22.05 / 16kHz
- Both constant and variable bitrates are supported.
Notes
- Playback for Data Disc starts in alphanumeric order.
- Playback for USB starts in order by date and time of creation.
Copyright-protected WMA (DRM) files cannot be played back by this unit. - The disc must be ISO9660 compatible.
- Text data contained in files is not displayed on this unit.
- The maximum file and folder numbers are as follows.
| Data Disc | USB | |
| Maximum file number | 512 | 999 |
| Maximum folder number | 255 | 255 |
| Maximum file number per folder | 511 | 255 |
Notes about handling compact discs
- Always handle a disc with care so that its surface is not scratched.
- Compact discs are not subjected to wear during playback, but damage to the disc surface when the disc is being handled can adversely affect the disc playback.
- Be sure to use a felt-tip pen or similar writing tool when writing on the label side of the disc. Do not use a ballpoint pen, pencil, or other hard-tipped writing tool, as these may damage the disc and may adversely affect the disc playback.
- Do not warp discs.
- When a disc is not being used, remove it from the unit and store in an appropriate case.
- When removing or storing a disc, be careful not to scratch the playing surface.
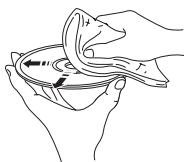
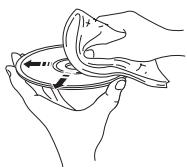
- Compact discs are not affected by small particles of dust or fingerprints on their playing surface, but even so they should be kept clean. Wipe by using a clean, dry cloth.
Do not wipe with a circular motion; wipe straight outward from the center.
- Do not try to clean the disc's surface by using any type of disc cleaner, record spray, anti-static spray or liquid, or any other chemical-based liquid because such substances might irreparably damage the disc's surface.
- Do not expose discs to direct sunlight, high temperature or high humidity for a long period of time, as these might warp or otherwise damage the disc.
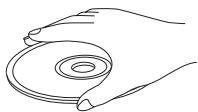
To play back an 8-cm (3-inch) CD
Place it in the inner recessed area of the disc tray. Do not put a normal (12-cm) CD on top of an 8-cm (3-inch) CD.
TROUBLESHOOTING
If the unit fails to operate normally, check the following points to determine whether the problem can be corrected by the simple measures suggested. If it cannot be corrected, or if the problem is not listed in the Problems column, disconnect the power cable and contact your authorized Yamaha dealer or service center for help.
| Problems | Possible Causes | Solutions | Refer to page |
| This unit fails to turn on. | The power cable is not connected to the AC IN inlet on the rear panel or not plugged in the wall outlet. | Connect the power cable firmly. | 8 |
| The disc tray does not close completely. | A foreign object is obstructing the tray. | Carefully check the disc tray and remove the foreign object. | — |
| Disc playback does not start. | The disc is damaged. | Check the disc carefully; replace it if necessary. | — |
| There is moisture on the laser pickup. | Wait 20 to 30 minutes after switching on the unit ON before trying to play back a disc. | — | |
| The disc is loaded upside down. | Reload the disc with the label side up. | 9 | |
| The disc is dirty. | Clean the disc. | 18 | |
| The format of the MP3 or WMA file is not compatible with this unit. | Replace the disc with a correctly recorded disc playable with this unit. | 17 | |
| The CD-RW (ReWritable) disc is not recorded correctly. | Replace the disc with a correctly recorded disc playable with this unit. | 17 | |
| The disc is a non-standard disc not playable with this unit. | Replace the disc with a correctly recorded disc playable with this unit. | 17 | |
| This unit is in USB mode. | Switch to disc mode by pressing CD/USB. | 5, 9 | |
| USB playback does not start. | Improper USB device connections. | Connect the USB device again. | 8 |
| The format of the MP3 or WMA file is not compatible with this unit. | Replace the file with a correctly recorded file playable with this unit. | 17 | |
| This unit is in disc mode. | Switch to USB mode by pressing CD/USB. | 5, 9 | |
| Playback is delayed, or begins at the wrong place. | The disc may be scratched or damaged. | Check the disc carefully; replace it if necessary. | 18 |
| No sound. | Improper output cable connections. | Connect the cables properly. If the problem persists, the cables may be defective. | 7 |
| Improper amplifier operation. | Set the amplifier controls to the correct input selection. | — | |
| Sound of a component connected to the DIGITAL OUT jacks is not played. | PURE DIRECT is turned on. | Turn PURE DIRECT off. Or make an analog connection. | 10 |
| Sound “skips”. | This unit is being subjected to vibrations or impacts. | Relocate this unit. | — |
| The disc is dirty. | Clean the disc. | 18 | |
| Sound “hums”. | Improper cable connections. | Securely connect the audio cables. If the problem persists, the cables may be defective. | 7 |
| Noise from a nearby tuner. | The tuner is too close to this unit. | Move the tuner and this unit farther apart. | — |
| Noise from inside of the disc tray. | The disc may be warped. | Replace the disc. | — |
TROUBLESHOOTING
| Problems | Possible Causes | Solutions | Refer to page |
| The remote control does not work or function properly. | Wrong distance or angle. | The remote control functions within a maximum range of 6 m (20 ft) and no more than 30 degrees off-axis from the front panel. | 6 |
| Direct sunlight or lighting (from an inverter type of fluorescent lamp, etc.) is striking the remote control sensor of this unit. | Reposition this unit. | — | |
| The batteries are weak. | Replace all batteries. | 6 |
SPECIFICATIONS
Audio Section
Frequency response. 2 Hz - 20 kHz, ± 0.5 dB
Harmonic distortion ^+ noise (1kHz) . 0.002 % or less
S/N ratio 110 dB or more
- Dynamic 100 dB or more
Output voltage (1 kHz, 0 dB) 2.0 ± 0.3 V
Laser Diode Properties
Material . GaAlAs
Wavelength 790 nm
Laser Output. max. 1.23 W^
This output is the value measured at a distance of about 200mm from the objective lens surface on the Optical Pick-up Block.
General
Power requirements U.S.A. and Canada models.. AC 120 V, 60 Hz
Australia model AC 240 V, 50 Hz
Europe and U.K. models AC 220-240 V, 50 Hz
Asia and General models.....AC 110-120/220-240 V, 50 / 60Hz
Korea model AC 220 V, 60 Hz
China model.. AC 220 V, 50 Hz
Power consumption 16 W
- Dimensions (W × H × D) 435 × 96 × 300 mm
Weight 6.2 kg
Please note that all specifications are subject to change without notice.
Limited Guarantee for European Economic Area (EEA) and Switzerland
Thank you for having chosen a Yamaha product. In the unlikely event that your Yamaha product needs guarantee service, please contact the dealer from whom it was purchased. If you experience any difficulty, please contact Yamaha representative office in your country. You can find full details on our website (http://www.yamaha-hifi.com/ or http://www.yamaha-uk.com/ for U.K. resident).
The product is guaranteed to be free from defects in workmanship or materials for a period of two years from the date of the original purchase. Yamaha undertakes, subject to the conditions listed below, to have the faulty product or any part(s) repaired, or replaced at Yamaha's discretion, without any charge for parts or labour. Yamaha reserves the right to replace a product with that of a similar kind and/or value and condition, where a model has been discontinued or is considered uneconomic to repair.
Conditions
- The original invoice or sales receipt (showing date of purchase, product code and dealer's name) MUST accompany the defective product, along with a statement detailing the fault. In the absence of this clear proof of purchase, Yamaha reserves the right to refuse to provide free of charge service and the product may be returned at the customer's expense.
- The product MUST have been purchased from an AUTHORISED Yamaha dealer within the European Economic Area (EEA) or Switzerland.
- The product must not have been the subject of any modifications or alterations, unless authorised in writing by Yamaha.
- The following are excluded from this guarantee:
a. Periodic maintenance and repair or replacement of parts due to normal wear and tear.
b. Damage resulting from:
(1) Repairs performed by the customer himself or by an unauthorised third party.
(2) Inadequate packaging or mishandling, when the product is in transit from the customer. Please note that it is the customer's responsibility to ensure the product is adequately packaged when returning the product for repair.
(3) Misuse, including but not limited to (a) failure to use the product for its normal purpose or in accordance with Yamaha's instructions on the proper use, maintenance and storage, and (b) installation or use of the product in a manner inconsistent with the technical or safety standards in force in the country where it is used.
(4) Accidents, lightning, water, fire, improper ventilation, battery leakage or any cause beyond Yamaha's control.
(5) Defects of the system into which this product is incorporated and/or incompatibility with third party products.
(6) Use of a product imported into the EEA and/or Switzerland, not by Yamaha, where that product does not conform to the technical or safety standards of the country of use and/or to the standard specification of a product sold by Yamaha in the EEA and/or Switzerland.
(7) Non AV (Audio Visual) related products. (Products subject to "Yamaha AV Guarantee Statement" are defined in our website at http://www.yamaha-hifi.com/ or http://www.yamaha-uk.com/ for U.K. resident.)
- Where the guarantee differs between the country of purchase and the country of use of the product, the guarantee of the country of use shall apply.
- Yamaha may not be held responsible for any losses or damages, whether direct, consequential or otherwise, save for the repair or replacement of the product.
- Please backup any custom settings or data, as Yamaha may not be held responsible for any alteration or loss to such settings or data.
- This guarantee does not affect the consumer's statutory rights under applicable national laws in force or the consumer's rights against the dealer arising from their sales/purchase contract.
Information for Users on Collection and Disposal of Old Equipment and Used Batteries


Pb
These symbols on the products, packaging, and/or accompanying documents mean that used electrical and electronic products and batteries should not be mixed with general household waste.
For proper treatment, recovery and recycling of old products and used batteries, please take them to applicable collection points, in accordance with your national legislation and the Directives 2002/96/EC and 2006/66/EC.
By disposing of these products and batteries correctly, you will help to save valuable resources and prevent any potential negative effects on human health and the environment which could otherwise arise from inappropriate waste handling.
For more information about collection and recycling of old products and batteries, please contact your local municipality, your waste disposal service or the point of sale where you purchased the items.
[Information on Disposal in other Countries outside the European Union]
These symbols are only valid in the European Union. If you wish to discard these items, please contact your local authorities or dealer and ask for the correct method of disposal.
Note for the battery symbol (bottom two symbol examples):
This symbol might be used in combination with a chemical symbol. In this case it complies with the requirement set by the Directive for the chemical involved.
ATTENTION : VEUILLEZ LIRE CE QUI SUIT AVANT D’UTILISER L’APPAREIL.
ACCESSIONES FOURNIS 2
COMMANDES ET FONCTIONS. 3
Panneau avant 3
(16) (Pause) (p. 10)
18 (Arreter) (p. 10)
WIEDERHOLTE WIEDERGABE
(6) / (Hoppa over/Sok bakat), / (Hoppa over/Sok framat)
/ : Hoppa till nasta spar. / : Hoppa tillbaka till borjan av aktuellt spar. / (två ganger): Hoppa till foregående spar.
Tryck och häll / eller / intryckt for att soka bakat/framaat.
#
⑧ OPEN/CLOSE (sid. 9)
ALL (Full repetering)
IIPIHADJIEXKHOCTU. 2
OPTAHbI YIIPABJEHnI
ФУHKИИ.. 3
Pepednnae 3
IinpiJei IepenHe IIaHeJI. 4
IyIbT IY 5
UcTaHOBka 6aTapeek B IyIbT IY. 6
HcnoJIb3OBaHHe IyIbTa DY 6
PONDROTOBKA
COEINHEHNA 7
IoiKJIIOUeHHe yCNJIInTeJI. 7
ПоДКЛЮЧЕНЕ ПИЛЯГАМORO Ka6eJIЯ ПИТаHIN.. 8
Подклочене устpoиCB USB. 8
PA6OTA
OCHOBHOE YIIPABJEHHE. 9
3aIyck BocIpOn3BeJeHn. 9
Piy3a Bocippon3BeJeHnra 10
OctaHOBka BocIpOn3BeJeHHra 10
BbIKJIIOUeHHe IITaHHra 10
BocnpOn3BeJeHHe HxJHoI ΦoHOrpaMMbI ....10
YJyHHeHKeKaueCTBa3ByaHHa (peKIMPURE DIRECT) 11
IepexoK Naayly HyxHoi ΦOHOrpAmMbI 11
BbIcTpa IIpOKpyTKa BIIepeN HIN Ha3a.. 11
I3meHeHHe OTo6paXeHnHa IInCIIJIeepedHe IIaHeJI. 12
I3MeHeHHe IrpKocTH IHCIIJIe IepdHe IIaHeJI. 12
BOCIPON3BEDEHNE BCJUYAHHOM IOPRAKE.13
IIOBTOPHOE BOCIPON3BEJEHNE ....13
BO3MOXHbIe HENCIIPABHOCTNI CIOCObI INx YCTPAHEHnI.19
TEXHINUeCKNE XAPAKTEPHKII....20
O6 3tOM pyKOBoDCTBe
- CHMBOJI -O6O3Haayet COBET IO IOBOy OIIepaHn.
BДaHHompykoOIOCTBeMy3bIkaJIbHbIeKOMIIaKT-ⅡNcKN06O3HaUaIOTcKa“Audio CD”,IINcKN,coIepJkaIiHeΦaJIbIMP3/WMA,KaK“DataDisc”,aΦaJIbIMP3/WMA,xpaHЯIiNeCsHa yctpoIcTBeUSB, KaK“USB”. - ΘTo pyKOBoIcTBO OTIIeYaTaHO IIO IIPOIN3BOIcTBA aIIIapata. KoHCTpyKIIuN I TeXHHueckne XapaKTepHcTHKN MOryt 6bITb YacTHUHO H3MeHeHb I Bpe3yJIbTaTe YCOBepIeHcTBOBaHN I T.I. B cJIyuae pa3JIuHm MeJdy pyKOBoIcTBOM I aIIIapatOM IpnOpHTet HMeet aIIIapat.
ФУHKЦИОHAЛьнBLE BO3MOЖHOCTN
ΠινροBoOΙΟΝΥηχΕΝΚΗ BbIXoI
KoakcaJbHbI ΠΦpOBoB bIXoJ
Bo3MOxHocTb BOCIIPOIN3BeIeHNHa IIcKOB CD-R, CD-RW (PiOIOpo6Hee cm. cTp. 17.)
Bo3MOxHOCtB BocIpOHN3BeJeHnI INCKOB MP3, WMA
Bo3MOxHocTb BOCIIPOHN3BeHeENHaaJIOB MP3, WMA,xpaHraIINXcH aYcTpoNCTBe USB
Погамнhoe BOCINpoH3BeIeHne (ToJIbKO Audio CD)
BocpoIN3BeDHe B CJIyuaHOM IopRKe
Повторhoe BOCINPON3BeIeHne OДнОйфОнограмMbI/BceroДИСКА
Повторhoe BocIpOn3BeIeHHe A-B (ToJIbko Audio CD)
Bo3MOxKHOCTb HAcTPOiKN OTo6paKaEMoH NaHcIIJIe HnOpMaUNN HApKoCTH HcIIJIeA
_YHKIIIA PURE DIRECT
ПРИЛАЕМБIE ПИнадлжховп.
Y6eIHTecb B HauJIuHnH IpeueHcJIeHHbIX HnKe KOMIOHeHTOB.
Nybld
CtepeofoHnueeckn Ka6ebb RCA
KaBeJb NITAHIN

BaTapeKn (× 2) (AA, R6, UM-3)
Передна панень.
① POWER
HaKMHTe IJIa BkJIIOUeHnra (ON) HJIN BbIKJIIOUeHnra (OFF) IIITaHHa.
#
BbIepaIOJIOKeHHb IHHaTop POWER 3aRopaetc, ecHn aIInapAT BKJIIOyeH.
② Nopr USB
BkIIOUeHHepeXHMaPURE DIRECTJIyJyuIeHnKauecTb3ByuHaHH.
#
BbIIeONHcAHbI INHINKaTOP PURE DIRECT3aropaetc, KOrJa aIIIapat HaxOHTcB BpeKHePURE DIRECT. IIOJpO6Hee cm. cTp. 11.
④ЛЮТOKДИСКА
3arpy3ka nicska.
3aynck Bocpon3BedeHn.
⑧ (nay3a)
IIpnoctaHOBka BOCIpOn3BeJeHnHa. HaxMHTe KHOIky HIN Ⅱ,YTO6bI BO3O6HOBHTb BOCIpOn3BeJeHne
(9) (ctron)
OcTaHOBka BOCIpOn3BeJeHnI.
10 HdkaTop USB
Инд IpHT IIpy HaxOJIeHn aIIIapaTbpeKIme USB, He rOpHT B peKIme INska H MnHaertpn CHTbIBaHHn aIIIapaTOM daHHbIX yCTpoIcTBaUSB.
1 DnCpIe nepeDne naneJN
OTo6paXeHHe TeKyuIero coCtOaHHa aIIapapa.
⑫ CencopDy
Pnem CnHaJIOB OT NylbTa DY.
HaCtpoIka npKocTH nncIIe IpepeHne IaHeJI.
④ LünpöBbIe KHOJIKN (CTp. 10)
Bb6op fohorpaMMbHaHpiMyIO.
⑤ PROGRAM (ctp. 15)
BkJIIOueHHe HJIN BbIKJIIOueHHe IporpaMMHOro peKIma.
(6) <1/1> (NONC Ha3aD/BnepeD) (CTp. 11)
⑧ OPEN/CLOSE (cTp. 9)
OTkpblte H 3akpbItne JIoTka IInca.
PURE DIRECT (ctp. 11)
BkJIOueHHe HJIIN BbIKJIOueHHe peKHMa PURE DIRECT.
10 DISPLAY (ctp. 12)
IpeKJIIOUeHHe OTo6paXeHNbVpeMeHN.
⑪ ENTER (ctp. 15)
ПоТВерждени Homepa ФОногрмьI, KOrДa anIIapaT HaxOДNTсВ peЖИme BBOДа IIporpamMbI.
⑫ CLEAR (ctp. 16)
YJaJIeHHeΦoHOrpaMMbI H3 IIpOprpaMMbI.
13 REPEAT (ctp. 13)
Повтоpeн He BocPOn3BeIeHn OndHn HJIh BCex ΦOHOrpaMm.
14 RANDOM (cTp. 13)
YcTaHOBKa BOCIIPOH3BeIeHHaB CJIyauHOM IIOpeK.
15 A/B (ctp. 14)
YcTaHOBkA IOBTopa A-B.
16 (nay3a) (ctp. 10)
PnnoctaHOBKa BocIpOn3BeJeHn.
17 (Bocnpoun3BeJeHne) (CTp.9)
3aIyck BocIpOn3BeJeHn.
18 (cton) (ctp. 10)
OctaHOBkaBOcIpOn3BeJeHnI.
yctahOBka 6aTaapeek B nyIbT dy
1 Haxmte yactb KpbIshKn OTceKa dJa 6aTaapeek n CdBnHbTe ee.
2 BcTaBbTe DBe npuIaraeMbIe 6aTapeKn (AA, R6, UM-3), co6JIIOdA NOJIrpHocTb (+ n -), yKa3aHHyO Ha BHyTpEHHeY qAcTn OTceKa dJa 6aTapeek.
3 CdBnHbTe KpbIiKy Ha MeCTo.
Приимецян oбатейкax
- Pn yMeHbIeHHn pa6Oyero IHaIIa3OHa IIyJIbTa IY 3aMeHHTe o6e 6aTapeKn.
- IcnoJIb3yIte 6aTaapeKn AA, R6, UM-3.
- Y6eIHTecb B CO6JIIOJEHH HIOJIaPHOCTH. CM. pHCyHOK Ha BHyTpeHHe YACTH OTcKa IJIa 6aTaapeek.
EcINIpyIbT IY He 6yIeT HcIOJIb3OBaTbcB TeYeHHe IJIHTeJIbHO BpeMeHH, H3BJeKHTe 6aTaapeKeKn.
He HcIOJIb3yIte cTapyUO 6aTapeKy BMeCTe c HOBOI.
He HcIOJIb3yIte pa3JIuHbIe TnIIbI 6aTaapeek OJHOBpeMeHHO (HaIIpIMep, IIeJIoUHbIe I MapraHIeBO-UIHKOBbIe). BHNMaTeJIbHO O3HAKOMbTEc b c HfOpMaIneH Ha yIIaKOBKe, IOCKOJIbKy 3TH pa3HbIe TnIIbI 6aTaapeek MOryT HmEt b OINHaKOByIO φOpMy I IBeT. - EcJIN 6aTapeKn IIpoTeKJIIn, HeMeIJIeHHO yTHJIIN3HpyIte Hx. He IprHKacaiTecb K IIpoTeKIIeMy BeIeCTBy H He IOnIyCsKaIte erO KOHTaKTA c OJeXJIoH T.I. IpePc YcTaHOBKOH HObIX 6aTapeek TIIaTeJIbHo OUnCTHtE OTceK IJIa 6aTapeek.
He BbI6paBbIaHte 6aTapeIKN BmEcTe C 6bITOBbIMN OTXOJaM; yTHJIN3HpYnTe HX B COOTBeTCTBHH C IIOCTaHOBJIeHNMa MeCTHBIX opraHOB yIpaBJIeHN.
IcnoJb3OBaHne npJbTa Dv
IyIbT IY Ipeepaet HappaJIeHHbIe HHppaKpaChbIe JIyH.
Pn ynpabJIeHHN c IIOMOIbIy IIJbTa YO6BaTeJIbHO HaIIpaBJIaIe ero Ha ceHcop Y, paIOJOxKeHHbI Ha IIpeEHN IIaHeJIIn daHHoro aIIIapata.
O6paueHne c npjltom dy
MeknyIyJBtOMIYHJaHHbIMaIIIapaTOM He J0JIxHO6bITbIpeIIrTCTBn.
- I36eIaTe IonoIaHnH BOIbI IJIN IpyTHX KIIKOCTe H aIyIbT Y.
He poHnIte IyJIbT IY.
He xpaHHTe H He ocTbJIaIte IyIbT IY B cJeIyIOIIHX MeCTax:
-MecTax C BbICOKO BJIaXHOCTbIO,HaIIpIMeP, pIOM C BaHHoH
-MecTax C BbICOKO TeMIIePaTyPOH,HaIpyMEp,pAOM C O6oRpeBaTeJIeM HJIN IIeYbHO
- B OуeHb XOJIoIиHbIX MecTax
- B 3aIIbJIeHHbIX MeCTax
He IIOBepraTe ceHcOp IY BO3JeIcTBHIO apKOro CBeta, B YAcTHOcTH, BO3JeIcTBHIO cBeTa IyopeceHTbIX JAmII HHBepTOHOro TnIIa. To MoKeT IIpHBecTN K HeIIpaBnJIbHO pa6Ote NJIbTa IY. IIpn HeO6XODMocTH paCIOJIOKe tae anIapat Ha paccToHHN OT IIpMaORo CBeta.
1 OtkpoIte loToK dNcKa c NOMOu bIO KHOJIKN OPEN/CLOSE n 3aRpy3nTe dNcK.
PpmeaHn
- YctaHabJIHbAte IIcK TaK, YTO6bI OH pacIOJIarJAcBHyTpH HApPaBJIaIOIIx IIcKa (4 OTMeTKn Ha JIoTKe IIcKa).
- Ecjin nck yctahOBJIeH HeIpaBnJIbHO, OH MOKeT 6bITbHeIIpaBnJIbHO IIpoYtAH. B 3TOM cJIyae OTKpoIte JIoTOK nCKa H3aHOBO yCTaHOBHTe nCK.
2 Haxmnte KhoNky OPEN/CLOSE, yTo6bl 3aKpbITb ITOk DnCKa.

OPEN/CLOSE
中
JIoTOK IINCKa MoKHO TaKKe 3aKpbIbT, HaxKa B KHOIIKy OINy INIΦpObBIX KHOIIOK INIIN CJIeRka HaxKa B HApeIHH KOHeI JLOT Ka IINcKa. EcIN 3aKpbIT JIoTOK OINHM I3 ΘTHX cIOco6OB, BOCIpOnIHBeHHe NaHHeTc aBTOMaTHUeCKN.
3 HaxmTe KhoNky ,YTo6bHaaytB BocnpOn3BeDeHne.

BocpoH3BeJeHne IINCKOB Audio CD NaHHaETcC IepBOJ FOHOrpaMMbI, a INCKOB Data Disc B aJIΦaBHTHO-ⅢΦpOBOM IOpraKe IIO HMeHH ΦaJIa.
OTo6paKaaET HnΦopMaunIO B IIare 2
Audio CD

O6uee KoiuecTBO
foHOrpamM
ObseBpMa3aHnCnDncka
Data Disc

06eeKoJIueCTBOpaIIOB
Bocnpon3BeJeHne c yctpoiCTB USB
USB
BcTaBbTe yCtpoCtBO USB B nopT USB Ha nepedHei NaHei. (PoiDpo6Hee cm. cTp. 8.)
Pn Bb6opepeKIma USB (3aRopaeTcHINkAToP USB)Ha HncIJIepepeHne HaneJIIn OTO6pa3HTcpeB0e HMa paJIa (cm. cTp. 12), 3aTeM aBTOMaTHueCKn HaUHeTcBocIpOn3BeJeHne B IOPJKe CO3dAHnHfAaJIIOB C UyeTOM JaTbI H BpeMeHN (ecJIHa ycTPONCTBe USB HmeIoTcF aJIbI, KOTOpbIE MOXHO BOCIIpON3BeCTH).
OToeHHeHne yctpoIcTB USB
HaKMHTe ,YTO6bI OCTaHOBHTb BOCIpON3BeJeHHe, a 3aTeM OTcoEINHNTE yCTpoiCTBO USB.
PpmeaHne
He oTcoeHnHnTe ycTpoiCTBO USB BO BpeMn BocIIpOH3BeIeHnIc ycTpoiCTBa USB HIN KOrJa Mmraet HHdkaTop USB.
Пay3a BocnpOn3VeDeHnA
Audio CD
Data Disc
USB
Haxmnte KhoNky II.
TO6_bl BO3O6HOBHTB BOCIPON3BeJeHHe, eIe pa3 HaKMHTe KHOIIKy [NJIIN KHOIIKy
OcTaHOBKa BocPOn3VeDeHnA
Audio CD
Data Disc
USB
Haxmnte Khonky
EcIIeIe pa3 hKaTb KHOIIky ,BocIpOn3BeJeHHe NaHHeTc C IepBOH OOHOrpaMMbl.
BbIKJIOUeHne NITaHn
CHOBA HaxmTe KhONky POWER.
EcJIN BbIKJIIOUHTb IITaHHe, KOrJa aIIIapaT HaxoJNTcB PpeKHMe IINsKa, TO IIpi cJIeIyIOIeM BKJIIOUeHNIIITaHnA bTOMaTHUeCKn HaUHeTcB BOCIpOHN3BeIeHHe HaxoJNIIeTOcR B JLOTKe IINcKa. EcJIN BbIKJIIOUHTb IITaHHe, KOrJa aIIIapaT HaxoJNTcB PpeKHMe USB, TO IIpi cJIeIyIOIeM BKJIIOUeHNIIITaHnA bTOMaTHUeCKn HaUHeTcB BOCIpOHN3BeIeHHe IIOKJIIOUeHHORo yCTpOcTBA USB.
Bocnpo3BeDeHne HxKHOJ pOHOrpaMMbl
Audio CD
C nOMOuI zuΦpoBbIX KHOIOK BbIepeIte HxKHyU ΦOHOrpamMy.
YTo6bHaayatb BocnpOn3BedeHne c Haayala TeKyuee fOHOrpaMMbl, OINH pa3 HaxMnte KHOKNy.
YTo6bI HaataB BocnpOn3BeDeHne c Haayala npdeIdyuei e OHOrpaMMbl, Dba pa3a HaxMnte KhoNky.
中
- ΘTH OIIepaIHH MOKHO TaKKe BbIIOJIHNb IIpiB BOCIIPOIN3BeJeHNN Data Disc n USB.
- ΘΤΗ ΜΟνηραμήν ΜΟχΟ Μακχε Βαῦποχιην Ḍόν Βον Βρεμίηληγβί.
- 3TH OIIepaIIM MOXHO TaKKe BbIIIOJIHHTc IIMOIIbIO KHOIOK //HHa D>>D>> Ha IIpeJeHHe IaHeJIH.
HaKIMa KHOIIKy DISPLAY, MoKHO BbI6paTb BapHaHTbI OTo6paXeHn IHHΦOpMauHn Ha IINcPiJee IpeJHei IIaHeJI (1) - ③.
① IcTeKIIeBpeMBoCpOHN3BcEHeHH TeKUIIeJ OHOrpaMMbI (IO yMOJIuaHNO)
Bocnpon3BeDeHne Data Disc uIn yctpoIcTbA USB
Data Disc USB
Mожно ВрemeHHO OTO6pa3ntb ИмЯ Файla, Нжав КнОПКу DISPLAY.
PpIMepbI INcIIJIe IpeJeHn IaHeJIIN IIpNBHeHbI JIA MP3.
① HcTeKIIeBVPemBOCpON3BeJeHnN TeKUeI OHOrpaMMbI

* He 60JIe 28 CHMBOJIOB
PpimueaHne
HaIINIIe IaHHoro aIIIapata MoryT OTO6paKaTaBc TOnJIbKO aJIΦaBHTHO-ⅡHΦpOBBle cHMBOJIbI.
I3MeHeHne IApKoCTn DIncPJIe IpeEdHei PaHeJIi
YTo6bl n3MeHnTb yPoBeHApKocTn dncJIpe nepeDHe naneIu, nCnoJIb3yIte Khonky DIMMER.

DIMMER
KaJIbIpa3IprnHaJkaTnKNHOIIKN DIMMER ypoBeHb IapKoCTn 6yJeT N3MeHrTcBc CJJeYIOUIMM O6pa3OM:
MaKcHMaJIbHbIyOpBeHb(cambIЯpkn)→
YpOBeHb1 (IIO yMOJTuHaHHIO) YpOBeHb2
YpoBeHb3 (darkest) MaKcHMaJIbHbIypoBeHb
PpmeaHn
Яркoc'tь ДИСПЛЕЯ HeCKOЛБКУМЕнБИАЕТСВ ВВpeя BOCIIPOH3BeDEHЯ,ecJIToJbKOHe yCTaHOBJIeMaKcHmAJbHbIypoBEHbЯPKoCTH.
-ЯркocтьДИСПЛЕМоКНО HeCKOJIbKOуMeHbIHTbДЛВыПОЛHeHнЯ HeKOTopbIX OIIepaIи,ecJINTOJIbKO HeyCTaHOBJeMaKCHMaJIbHbIуPoBeHЯркocTn.
-Данная Habстpoиka coxpaHЯETся Джжп ВьIKIOUeHHn anIInapata.
BOCIPON3BEDEHNE BCJYUHOM IOPRAKE
Audio CD
Data Disc
USB
MOxHOBbIIOJIHHTb BOCIIPOH3BeJeHHeΦOHOrpaMMBCJyuaHOMIOpIKe.
PpmeaHne
3TH OIIepaIHH MOKHO TaKKe BbIIIOJIHNtB IIpi H BocIIpOIH3BeJeHHN Data Disc H USB.
Bocnpon3BepeHne B cIyuaHOM npAdke
HaKMMTe KHOIIky , a3aTeM KHOIIky RANDOM.
OTMeHa BocnpoIN3BeDeHnB CJIyauHOM nopAKe
HaKMMTe KHOIIKy
ПОВТOPHOE BOCПОН3BEДЕНЕ
Ha daHHOM annapaTe MoXHo BOCpON3BOdntb DnCKN
Audio CD Data Disc
IaHHbI IPOHrpBIBaTeJIb pa3pa6OtaH JIIA BOCIIPOH3BEJeHnKOMIIaKT-ⅡNCKOB, IIOmeYeHHbIX CJeIyIOUIMNH CmBOJIaMn. He IIbITaHTecb 3aIpy3HTb B aIIIapAT IINCKN IpyTH NIIOB. 3TOT aIIIpaT MoKeT TaKke BOCIIPOH3BOIDTH KOMIIaKT-ⅡNCKN DHaMeTpOM 8 cm.

...KomnaKT-dnCKN(uΦpOBbIe ayDnOuNCN)
Ha6oJIe paIpoCTpaHeHbIeIOCTyIHbIe B IpoJaKe My3bIkaJIbHbIe KOMnAKT-JINCKH.

...UuΦpoBbIe ayDIOncKn CD-R,CD-RW My3bIkaJIbHbIe KOMIIaKT-JINcKn, co3JaHHbIe IyTeM KOIInpoBaHnHa JaNcKn CD-R HJIn CD-RW (BKJIIOuaJ paJIbI φOpMaTa MP3 HJIn WMA).
PpIMeuaHn
- IcIIIOJIb3yIte IINCKN CD-R HJIN CD-RW TOJIbKO OT HaJExKHbIX IPOH3BOJInTeJeI.
- Истору Стату Толы Ктошко CD-R НДС-DR-WR, на улakовке KOTOPbIX НДС на саMOM ДИСКЕ ИМЕТСАОДHA ИЗ сддУЮПИХ наДИПИСЕ. FOR CONSUMER FOR CONSUMER USE FOR MUSIC USE ONLY
IcnoJIb3yIte ToJIbKO fHaJIH3nPoBAHHbIE JINCKN CD-R HJIN CD-RW.

...Dnckn CD-TEXT
HnK,Ha KOTopbIX COJepKHTcTeKCTOBa HΦOpMaIINa, TaKaJ KaK Ha3BaHHaJIb6OMOB,ΦOHOrpamM H NcIOJIHNTeJeI.
TaKHe IINCKHMOKHO BOCIIpON3BOJNTbHa O6bIYHBIX IPOIHrPbIBaTeJIAX KOMIIaKT- IINCKOB, HO TeKCTOBa HnΦopMaIIHA HNX OTO6paKaTbcS He 6yJeT.
PpimeyaHne
HaДaHHom IpOINrpbIbATEJIE KOMIIaKT-ДИСКOB He yДаCTcB BOCIIPOH3BecTH HeKOTOpbIe JINCKN CD-RW HJIH JINCKN C HeIIpaBnJIbHO BbIIIOJIHeHHO3aIIINcbIO.
Bo n36exaHne nobpeXdEHHaHOro annapata He BbINOJIHnTe cIeDyUOxN DeiCTBn:
He HcIOJIb3yIte IINCKH HeCTaHIIapTHOJΦOpMbI (BΦOpMe cepIIa H T.I.),IOCTUYHbIe B IIpoJaKe,IOCKOJIbKYHX HcIOJIb3OBaHHe MOKET IIpNBecTHN KIOBpeXJeHHIO aIIIpaTa.

He IcIIOJIb3yIte JINCK N C KJIeIKoJ JeHTOn, HAKJIeIKaMn HJN CJIeAMH KJIeR Ha IOBepXHOCTH. TaKHe IINCK MOryt 3aCtprb B aIIIapaTe HJN IIpNBecTH K erO IOBpeJDeHHIO.
O paaiax MP3 u WMA
Data Disc USB
Mожно BOCПОнЗВЕСТи ФайЛБI MP3 И WMA, 3aПИСаннБIE He Na IINCKaX CD-R/CD-RW, a TaKxe Ha yCtpoиCTbax USB.
MP3
MP3- 一 0 HcIOJIb3yeMaayTexHOJIOTnHΦopMaT cKaTHy ayINoIaHHbIX B aJl He6OJIbIIOrO pa3Mepa. Ppi BocIpOn3BeDeEHNN COxpaHAreTcN HCxoIbI ypOBeHkauEcTbA 3ByaHHia.
BocpoH3BODmBIE φopMaTbI:
- O6paIIaITeTc b cIINCKOM aKKypaTHO, YTO6bI He IIOIapAIIaTb ero IOBepxHocTb.
KOMIIaKT-JINCKHNe H3HaIIINBAIOCTCB IIPOIeCEBOCIIPOIN3BeJeHHN,OJHaKO IIOBpeXJDeHHeIOBepXHOCTNHINCKaMOKeT He6JIaFOIIpHrTHOTOPa3HTbcra Ha BOCIIPOIN3BeJeHHN.
-ПивыллгИннннннннннннннннннннннннннннннннннннннннннннннннннннннннннннннннннннннннннннннннннн
-Дe рацллгЖе�ТКЕТа,ОБЯЗTeЛьно
HcIOJIb3yIteФJlOMaCTep HINII IOJIObHbI IINIIYUHIN
HnCTpyMeHT. He IcIOJIb3yIte JIAI YTOrO IIIaPHKOBYIO
pyKу,КapaHdAIII HINIpyrOII INIIYUHIN IIHCTpyMeHT
C TBePbIM HAKOHeYHHKOM,IIOCKOLbKY 3TO MOKeT
IpNBecTHN K IIOBpeXJdeHNIO INCKa H He6JIaROIIprYTHO
ckaKeTcH Ha erO BOCIIPOH3BVeJedHNH.
He crH6aIte IINck.
EcHnIckHe HcIIIOJIb3yeTcH,IN3BJIeKHTeeroH3 aIIIapaTaHIOJIOXHTe BIOIXOJaIHHyTJIpaR.
-ПиИЗВЛeЧЕн ИхpaHeHnДИСКа6уДБTe OCTOPOKHbI,ЧTOбI He IIOBpeIHTb erO pa6OуI OIOBepxHOCtB.
Пьль И OTпесаТКИ Пальпев На paбочи Поверхнocтн He пиBOДТ K IOВpeждEHNO КOMПаKT-DИСКа,ОДHAKO pa6OчЯ ПOBерхнocть ДИСКа Bce paBHO DoJIЖHA OCTaBaTbCS YHCTOn. ПpoTHpaIte ДИСК YHCTOn,сухо TkaHbIO. ПpoTHpaIte ДИСК He KpyRObIMH ДВHXKeHЯМH, a OT ЧЕНТРа К КразМ.
He IIbIaTteCb OYHCTHTB IOBepxHOCTb IINcKa c HcIOJIb3OBAHNEM OYHCTHTeJIe JINCKOB JIIOBOTO THIIa, CIIpeEB JIIa3aIIINCH, aHTNCTaTHueCkHX CIIpeEB HJIN KJIKoCTe, a TaKKe JIOb6bIX IpyrIX JNJKOCTe Ha XHMNUeCKO OCHOBE, IIOCKOJIbKY 3TO MOXeT IIpHBecTH K HeO6paTHMOMy IOBpeXJDeHHIO IOBepxHOCTH INcKa.
HeIOJIbEprAHTeIINCKN BO3JeHCTBnIO IIPrMbIX COJIHeuHBxIJuYe, BbICOKOITeMIIepaTpyBi INJIN BJIaXHOCTN B TeYHeHNe IJIInTeJIbHO BpeMeHH, IIOCKOJIbKy 3TO MOKeT IIpHBeCtN K JeOpMaIHIN HJIN IpyROMy IOBpeKJDeHNIO IINcKa.
3anpeueho!

Bocnpo3BeHHe KOMNaKT-DnCKOB DnaMeTpom 8cm
YcTaHOBHTe IINCK BO BHyTpEHHIOU yIy6JIeHHYIO YacTb JIoTKa IINcKa. He pacIIIOJIarAte O6bIuHbI (JHaMeTpOM 12 cm) KOMIIaKT-ⅡNCK IIOBepx KOMIIaKT-ⅡNcKa IHaMeTpOM 8 cm.
BO3MOXHbIE HENCIPABHOCTN IN CNOCObI INX YCTPAHEHnI
EcIn B pa6oTe aIInapaTa OTMeuAOTcH HeNCpabHocTH, IpOcMoTpHe CJIeIyIOUHe IYHKtB. Bo3MOxHo, HeNCpabHocTh 6e3 Tpyda yIaCTcra YcTpaHHTb C IIOMOIbIO IpEJIIOKeHHbIX cIIOcoOB. EcIn ycTpaHHTb HeNCpabHocTh He yIaETcRA HIN ecJIn ee Het B cTOJIbCe "HeNCpabHocTh", OTcoEINHnTe Ka6JIb IIITaHnI N o6paHTteCb 3a IIOMOIbIO K aBTOpH3OBAHHOMy IINJIepy Yamaha HJIb B cepBHCbI ΒeHTp.