USB 1.1 - Professional audio equipment BEGLEC - Free user manual and instructions
Find the device manual for free USB 1.1 BEGLEC in PDF.
| Product type | Professional CD/MP3 player with USB ports |
| Brand | BEGLEC |
| Model | USB 1.1 |
| Power supply | AC 100-240V, 50/60Hz, 13W |
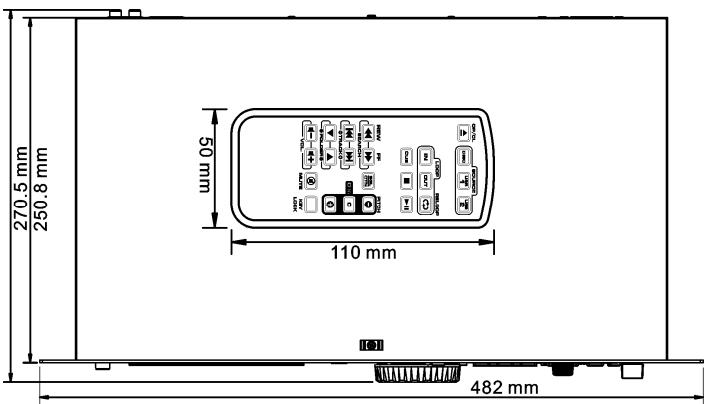
| Dimensions (W x H x D) | 482 x 88.8 x (see image) mm |
| Weight | 4.35 kg |
| Supported audio formats | CD-DA, CD-R, CD-RW, MP3 (CBR/VBR), WAV |
| USB storage media | USB flash drives, USB hard drives (FAT/FAT32) |
| Audio outputs | Balanced XLR, unbalanced RCA/Cinch |
| Playback functions | Random play (total/folder), perfect loop, pitch bend, key lock, auto cue |
| Anti-shock buffer | 20 seconds (CD), 100% (USB) |
| Display | Alphanumeric LCD screen with ID3V2 tags |
| Remote control | Infrared included |
| Provided software | Track-Indexer for Windows (free) |
| Operating temperature | 5°C to 35°C |
| Maintenance and cleaning | Soft, slightly damp cloth; avoid benzene, thinner |
| Safety | Grounding required; do not open; use same fuse |
| Spare parts and repairability | Fuse replaceable by qualified technician; firmware update via USB |
| General information | Professional audio equipment for DJs, bars, dance schools |
Frequently Asked Questions - USB 1.1 BEGLEC
User questions about USB 1.1 BEGLEC
0 question about this device. Answer the ones you know or ask your own.
Ask a new question about this device
Download the instructions for your Professional audio equipment in PDF format for free! Find your manual USB 1.1 - BEGLEC and take your electronic device back in hand. On this page are published all the documents necessary for the use of your device. USB 1.1 by BEGLEC.
USER MANUAL USB 1.1 BEGLEC
Copyright © 2010 by BEGLEC NV
t Hofveld 2C ~ B1702 Groot-Bijgaarden ~ Belgium
Reproduction or publication of the content in any manner, without express permission of the publisher, is prohibited.

Version: 1.0
JBSYSTEMS
THE POWER SOURCE FOR DJ'S


EN - DISPOSAL OF THE DEVICE
Dispose of the unit and used batteries in an environment friendly manner according to your country regulations.
FR-DECLASSES L'APPAREIL
Thank you for buying this JB Systems® product. To take full advantage of all possibilities, please read these operating instructions very carefully.
FEATURES
- The ultimate tool for bars, dance schools, studios, shops but also for DJs, plays: Audio-CDs, but also CDs and USB-mass storage (USB-stick or hard drive) containing MP3 and WAV-files!
- The alphanumeric LCD display supports ID3V2 tags (song title, artist, album, genre & bitrate)
Full MP3Playback,supports both CBR and VBR bitrate modes. - Full featured database lookup system: lightning fast selection of the desired tracks while the previous song is still playing! You can search on title, artist, genre, album or simply based on tracks/folders!
- Free Windows Track-Indexer software available via download!
- Jog wheel for pitch bending and precise 1/75sec frame search, also on MP3
-
Improved random function with 2 different mode:
-
Total random: plays tracks, randomly selected from the complete USB-mass storage
- Directory random: plays only tracks from a selected directory on the USB-mass storage (perfect for background music in shops, bars, ...)
- IR-remote with loop, speed control, track search/select, volume, ... perfect for dance schools!
Balanced XLR-outputs + traditional RCA/cinch outputs. - Anti-shock Memory 20 seconds on CD, 100% anti-shock on USB-mass storage
- Seamless loop (IN/OUT/RELOOP) with stutter & real-time loop edit function
Key Lock (Master tempo)
Real-time cue ("Cue on the fly") - Instant start & auto cue function (-48dB)
- Pitch ranges: +/-4% +/-8% +/-16% , also on MP3
Full automatic beat counters - 4 different speed scan
- Reads CD-DA, CD-R, CD-RW
- Selectable elapsed, remain and total remain time display
- Single/continuous play
BEFORE USE
- Before you start using this unit, please check if there's no transportation damage. Should there be any, do not use the device and consult your dealer first.
- Important: This device left our factory in perfect condition and well packaged. It is absolutely necessary for the user to strictly follow the safety instructions and warnings in this user manual. Any damage caused by mishandling is not subject to warranty. The dealer will not accept responsibility for any resulting defects or problems caused by disregarding this user manual.
- Keep this booklet in a safe place for future consultation. If you sell the fixture, be sure to add this user manual.
- To protect the environment, please try to recycle the packing material as much as possible.
Check the contents:
Check that the carton contains the following items:
USB1.1 player
- Operating instructions
- Pair of cinch cords
- IR-Remote controller
1 power cord
SAFETY INSTRUCTIONS:

CAUTION
RISK OF ELECTRIC SHOCK DO NOT OPEN

CAUTION: To reduce the risk of electric shock, do not remove the top cover. No user-serviceable parts inside. Refer servicing to qualified service personnel only.

The lightning flash with arrowhead symbol within the equilateral triangle is intended to alert the use or the presence of un-insulated "dangerous voltage" within the product's enclosure that may be of sufficient magnitude to constitute a risk of electric shock.

The exclamation point within the equilateral triangle is intended to alert the user to the presence of important operation and maintenance (servicing) instructions in the literature accompanying this appliance.

This symbol means: indoor use only
This symbol means: Read instructions
This symbol means: Safety Class I appliance
- To prevent fire or shock hazard, do not expose this appliance to rain or moisture.
- To avoid condensation to be formed inside, allow the unit to adapt to the surrounding temperatures when bringing it into a warm room after transport. Condense sometimes prevents the unit from working at full performance or may even cause damages.
- This unit is for indoor use only.
- Don't place metal objects or spill liquid inside the unit. No objects filled with liquids, such as vases, shall be placed on this appliance. Electric shock or malfunction may result. If a foreign object enters the unit, immediately disconnect the mains power.
- No naked flame sources, such as lighted candles, should be placed on the appliance.
- Don't cover any ventilation openings as this may result in overheating.
- Prevent use in dusty environments and clean the unit regularly.
- Keep the unit away from children.
- Inexperienced persons should not operate this device.
Maximum save ambient temperature is 40^ . Don't use this unit at higher ambient temperatures. - Minimum distances around the apparatus for sufficient ventilation is 5cm .
- Always unplug the unit when it is not used for a longer time or before you start servicing.
- The electrical installation should be carried out by qualified personal only, according to the regulations for electrical and mechanical safety in your country.
- Check that the available voltage is not higher than the one stated on the rear panel of the unit.
- The socket inlet shall remain operable for disconnection from the mains.
- The power cord should always be in perfect condition. Switch the unit immediately off when the power cord is squashed or damaged. It must be replaced by the manufacturer, its service agent or similarly qualified persons in order to avoid a hazard.
- Never let the power-cord come into contact with other cables!
- When the power switch is in OFF position, this unit is not completely disconnected from the mains!
- This appliance must be earthed to in order comply with safety regulations.
- In order to prevent electric shock, do not open the cover. Apart from the mains fuse there are no user serviceable parts inside.
- Never repair a fuse or bypass the fuse holder. Always replace a damaged fuse with a fuse of the same type and electrical specifications!
- In the event of serious operating problems, stop using the appliance and contact your dealer immediately
- Please use the original packing when the device is to be transported.
- Due to safety reasons it is prohibited to make unauthorized modifications to the unit.
INSTALLATION GUIDELINES:
- Placing and using the unit for long periods near heat-generating sources such as amplifiers, spotlights, etc. will affect its performance and may even damage the unit.
- Take care to minimize shocks and vibrations during transport.
- When installed in a booth or flight case, please make sure to have good ventilation to improve heat evacuation of the unit.
- To avoid condensation to be formed inside, allow the unit to adapt to the surrounding temperatures when bringing it into a warm room after transport. Condense sometimes prevents the unit from working at full performance.
- Choose the place where you put your installation very carefully. Avoid presence of heat sources. Avoid places with vibrations or places that are dusty and humid.
- The player will work normally when installed on a surface with max. 15^ inclination.
- Be very careful while handling CDs, do not touch them with wet or dirty hands.
- Discs that are dirty must be cleaned with special designed cloth and cleaning products.
- Do not use CDs that are badly damaged (scratched or deformed) they can damage your appliance.
- To prevent fire or shock hazard, do not expose this appliance to rain or moisture.
- In order to prevent electric shock, do not open the top cover. If a problem occurs, contact your dealer.
- Do not place metal objects or spill liquid inside the player. Electric shock or malfunction may result.
- This player uses the semiconductor laser. To allow you to enjoy music at a stable operation, it is recommended to use this in a room of 5^ - 35^ .
- The compact disc player should not be adjusted or repaired by anyone except properly qualified service personnel.
- This unit may cause interference to radio and television reception.
CLEANING THE PLAYER:
Clean by wiping with a polished cloth slightly dipped with water. Avoid getting water inside the unit. Do not use volatile liquids such as benzene or thinner which will damage the unit.
CONNECTIONS
- Use the supplied cinch cables to connect the audio outputs of the player with the CD or line inputs on your mixing unit.
- For long audio lines or professional applications you can also use the balanced XLR-outputs.
- Connect the mains cable.
CONTROLS AND FUNCTIONS
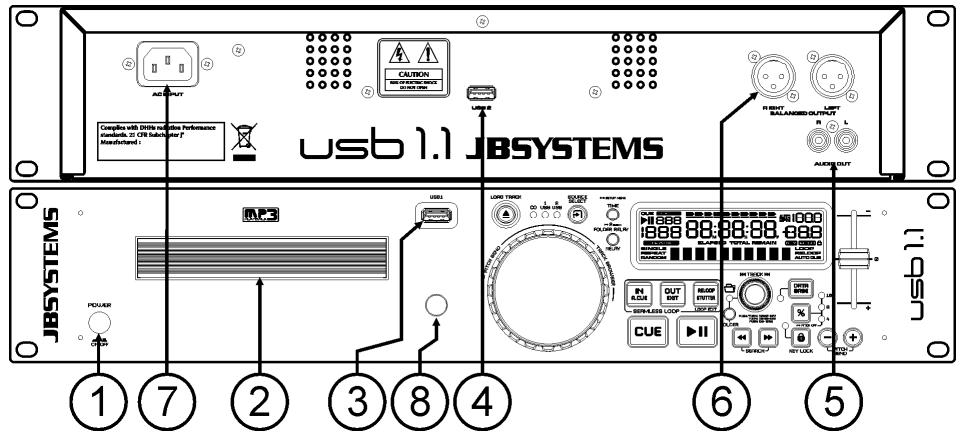
- POWER ON/OFF switch: switches the player on and off.
-
DISC TRAY: Use the OPEN/CLOSE button to open disc tray and put the CD in place.
-
USB 1 connection: this is the first (type-A) USB-connection, used to connect any USB mass storage device that was formatted in FAT or FAT32. By default this input is used to connect an occasional USB-drive like USB-sticks etc.
- USB 2 connection: this is the second (type-A) USB-connection, used to connect any USB mass storage device that was formatted in FAT or FAT32. By default this input is used to connect a hard disk.
- UNBALANCED AUDIO output: Output for the audio signals from the player. Use the supplied cinch/cinch cable to connect this output to a CD/line input of your mixing unit.
- BALANCED AUDIO output: the same audio signal as on the cinch outputs (5) but balanced output via XLR-connectors. To be used in case of long audio lines: use optional good quality XLR/XLR cables for optimal performance!
- MAINS input: connect the player to the AC mains, using the supplied power-cord.
- IR-receiver: make sure that this IR-receiver is not covered, otherwise your wireless remote will not work properly!
-
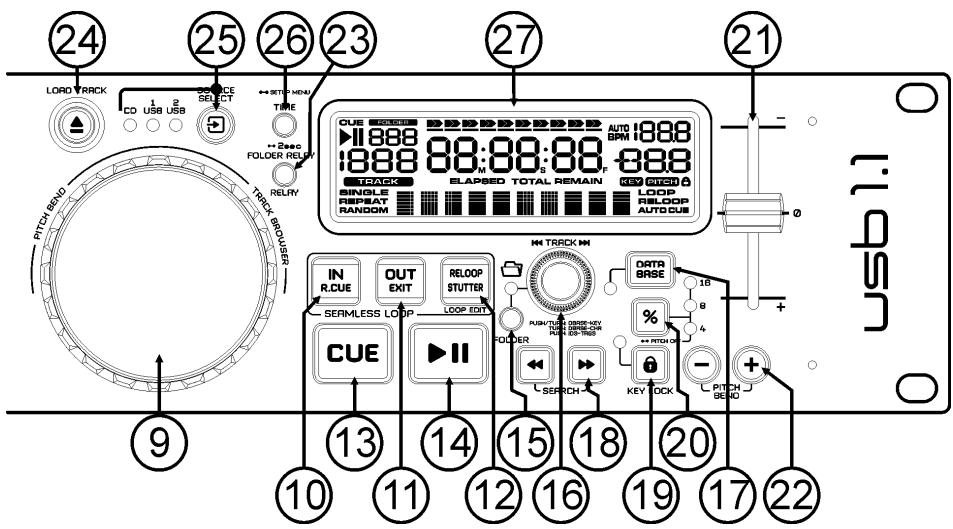
JOG WHEEL: This jog wheel serves 3 functions depending on the mode you are working in.
-
The jog wheel acts as a slow frame search (1/75sec) control when the CD is not playing but either paused or set to a cue point. To set a new cue point, spin the wheel then press PLAY or LOOP IN when you have determined the proper position. Press CUE to return to the "CUE POINT".
- If the track is playing the jog wheel temporarily bends the pitch of the music by rotating the wheel clockwise to speed it up or counterclockwise to slow it down. The amount of pitch change is determined by the speed of rotation.
-
During DATABASE lookup mode, the jog wheel is also used to browse the tracks at high speed.
-
LOOP IN button: Allows you to set the cue point without stopping the playback (CUE ON THE FLY). This button also sets the beginning of a seamless loop.
-
LOOP OUT button: Used to set the endpoint when looping music. The player starts to loop seamlessly until you press this button again to exit. When a loop is programmed but not active you can also restart the loop. The point where you press the button will be memorized as the new end point of the loop. In loop edit mode pressing the OUT button stops the loop editing and saves the new loop endpoint.
-
RELOOP/STUTTER button: This button has 3 functions:
-
RELOOP: When a loop was programmed and you have hit the OUT button, press the RELOOP button to enter the loop again. To exit the loop press the OUT button. (begin and end points of the loop are unchanged)
-
STUTTER: When a loop is playing you can press this button to restart the loop at once. You can also press this button when a track is not playing in loop. Every time the RELOOP/STUTTER button is pressed, it will restart the music from the preprogrammed cue point. The stutter effect adds extra creativity to your performance.
-
ENTER EDIT LOOP MODE: When a loop is programmed (LOOP IN and OUT/EXIT buttons are on) you can enter loop edit mode by pressing the RELOOP/STUTTER button until the display shows the time of the current loop endpoint: use the JOG-WHEEL to adjust the endpoint.
-
CUE button: Pressing the CUE button during playback provides an immediate return to the position at which play was started. Playback starts immediately from the programmed cue point for as long as the CUE button is pressed. The player jumps back to the cue point as soon as the CUE button is released. Also with the unit in pause mode (Play/Pause button blinks) the jog wheel is used to set a different start point. By pressing "PLAY/PAUSE" or "LOOP IN" button followed by "CUE", you can confirm this new cue point.
-
PLAY/PAUSE button: every time you press the PLAY/PAUSE button the player changes from play to pause or from pause to play. The button blinks as long as the player is set to pause.
-
FOLDER button: changes the function of the TRACK knob (16) while the search key is set to "Std" (standard track/folder search without Track-Indexer database).
-
While the LED is off: the TRACK knob is used to browse the tracks of the selected folder.
-
While the LED is on: the TRACK knob is used to browse the folders on the USB-drive.
-
TRACK knob: this knob has different functions (also see the chapter "HOW TO USE"):
-
CDs or no Track-Indexer database: depending on the status of the FOLDER button (15) you can browse tracks or folders on the CD or USB-device. To increase search speed on USB-devices with a lot of folders/tracks, you can also turn the JOG-WHEEL (9) while you keep the TRACK knob pressed.
-
Track-Indexer database search: (press the DATABASE-button (17) and desired search key)
-
Turn the knob to select the first character of the string you're looking for, after that use the JOG-WHEEL to search for the desired track.
-
Press the knob while you turn it to change the search key in the database, you can search the keys:
-
Art: search for "artist names" in alphabetical order (default search key)
- Alb: search for "album names" in alphabetical order
- Gen: search for "Genres" in alphabetical order
-
Std: don't use the Track-Indexer database system, just folders and tracks manually.
-
During playback: press the knob to see the different ID3-tags on the display:
-
Press 1x: Artist name of the current track is shown
- Press 2x: Album name of the current track is shown
- Press 3x: Genre of the current track is shown
-
Press 4x: Bitrate information of the current track is shown
-
Setup menu active: while the setup menu is active (see TIME button (26)) turn the knob to browse the menu, press the knob to select a menu option to change it. Please refer to chapter "SETUP MENU" for more information.
-
DATABASE / NEXT TRACK button: a very important button if you want to find your next track easily and fast, even while the previous track is still playing! This button works in two different ways:
-
NEXT TRACK function: will be used while searching on CDs and mass storage devices that don't have the "Track-Indexer database system" files installed. You can only search on track and folder numbers.
-
DATABASE function: will be used while searching mass storage devices that have the "TrackIndexer database system" files installed. You can alphabetically search on artist, track title, genre or album. Very fast and no need for you to know where your files are located! Once you have found the desired song, just press the LOAD-button (24) to load the track. For both functions, please refer to chapter "HOW TO USE" for more information.
-
SEARCH buttons: used to search quickly inside a track.
-
KEY LOCK Button: (Master tempo) activates the Pitch Lock function. This function allows you to make adjustments to a tracks speed using the SPEED-fader without altering the tonal pitch.
- PITCH button: press this button to turn the speed function on. Press several times to select one of the 3 different pitch ranges (+/-4%, 8%, 16%). Press this button +/- 2seconds to turn the speed function off.
- PITCH slider: Press the PITCH button, so the pitch range LED is lit. The speed can be adapted up to +/- 16% by moving the fader. The speed will not change when the pitch range LED is off.
-
PITCH BEND buttons: The speed rises while the "+" button" is pressed and returns to the original pitch when the button is released. The speed drops when the " - button" is pressed and returns to the original pitch when the button is released. These buttons can be used to synchronize the beats of 2 tracks.
-
RELAY button: you can select 2 different random play functions.
-
Total random: press the RELAY button shortly until the word "RANDOM" in the LCD-display is lit. The player now plays tracks, randomly selected from the complete USB-mass storage.
-
Directory random: you can choose to play only tracks from a certain directory: first you have to select this directory, then press the RELAY button for 2 seconds until the word "RANDOM" in the LCD-display starts blinking. The player 1 now plays only tracks from the selected directory. (avoids mix-up of 2 completely different music styles: perfect for bars, clubs, restaurants, ...) See chapter "HOW TO USE" for examples.
-
OPEN/CLOSE/LOAD TRACK button: used for two different functions.
-
Load a track from USB-drive: when the DATABASE/NEXT TRACK-button (17) is used to lookup the next track, just press the LOAD TRACK button to load the selected track.
-
Load/eject CDs: press this button to open and close the disc tray. This button is disabled during playback. If the tray is not closed after 60sec. It will close automatically to prevent damage.
-
SOURCE SELECT switch: use this button to select the desired audio source: CD, USB1 or USB2. You can only select another source while the player is in stop or pause.
-
TIME Button: has different functions:
-
Change time display: The TIME button switches between elapsed playing time, remaining time in a selection and total remaining time of the disc. (standard = remaining /track) The "total remaining time of the disc" is not available on MP3-tracks.
- Open setup menu: press the ENTER button for about 3seconds.
-
Close setup menu: press the ENTER button shortly to leave setup.
-
LCD DISPLAY: Shows all important information needed during playback. Refer to the next chapter for more information.
LCD DISPLAY
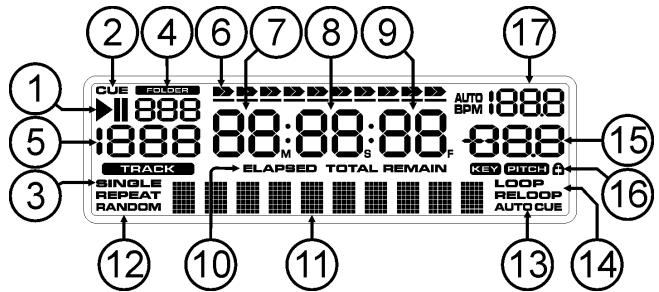
- PLAY/PAUSE indicators: displays the status of the player.
- CUE: appears when the master cue point is programmed.
- SINGLE: appears when the unit is set to play just one track at a time. When it is not shown, the player plays continuously through all tracks.
-
FOLDER/SEARCH KEY indicator: the information depends on the lookup mode you selected.
-
Standard lookup: (no Track-Indexer database) the current folder number is shown.
-
Database lookup: the current search key (Art, tit, Alb or Gen) is shown.
-
TRACK indicator: shows the number of tracks available in your current selection.
-
Standard lookup: (no Track-Indexer database) the track numbers in the current folder are shown.
-
Track-Indexer lookup: the track numbers that correspond to your Track-Indexer pre-selection.
-
TIME BAR: shows either remaining or elapsed time. Starts flashing at the end of each track to alert the user to take action.
-
MINUTE: Shows "minutes" time information of current track.
- SECOND: Shows "seconds" time information of current track.
- FRAME: Shows "frame" time information of current track. (1 frame = 1/75th sec.)
- ELAPSED, REMAIN: indicates that the time shown on the display is the elapsed or remaining time for the playing track.
Note: for MP3 files it's not possible to show the total remaining time for all tracks on the CDROM.
-
ALPHANUMERIC DISPLAY: Shows the names of folders and ID3-tags of MP3 tracks.
-
RANDOM: Is lit while the player is set to "total random" mode, blinks while the player is set to "directory random" mode.
- AUTO CUE: appears when the "auto cue" function is active.
- RELOOP/RELOOP: LOOP shows when a loop is programmed. When a loop is programmed and currently playing, the RELOOP indicator is flashing.
- PITCH DISPLAY: shows the actual percentage of speed change, selected with the SPEED slider (21).
- Padlock: is shown when the pitch lock function (Master Tempo) is active.
- BPM DISPLAY: shows the output of automatic beat-counter, measured in beats per minute.
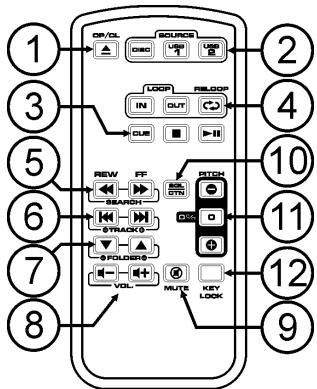
IR-REMOTE CONTROLLER
- OPEN/CLOSE-button: same functionality as the OPEN/CLOSE-button (24) on the player.
- SOURCE Buttons: same functionality as the SOURCE SELECT-Button (25) on the player.
- CUE/STOP/PLAY Buttons: same functionality as the CUE/PLAY/PAUSE Buttons (13+14) on the player. STOP-button stops completely, also track/folder navigation is reset.
- LOOP Buttons: same functionality as the LOOP IN/OUT/RELOOP Buttons (10 + 11 + 12) on the player.
- SEARCH Buttons: same functionality as the SEARCH Buttons (18) on the player.
- TRACK Buttons: same functionality as the TRACK-knob (16) on the player with folder switch off.
- FOLDER Buttons: same functionality as the TRACK-knob (16) on the player with folder switch on.
- VOLUME Buttons: used to change the output volume.
- MUTE-button: switches the output volume on/off.
- SGL/CTN-button: same functionality as the single/continuous option in the setup menu.
- PITCH Buttons: with the +/-buttons you can change playback speed, maximum speed change is set with the PITCH-button (20) on the player: one of the speed range LEDs on the player must be lit!
- KEY LOCK-button: same functionality as the KEY LOCK-button (19) on the player.
SETUP MENU
To increase flexibility some parameters of the USB1.1 can be changed in the setup menu.
- To enter the SETUP menu, press the TIME button (26) for about 3seconds.
- Use the TRACK knob (16) to browse the different menu options of the main menu.
-
Press the TRACK knob (16) to select the menu option you want to change:
-
Use the TRACK knob (16) to change the parameters of the selected menu option.
- If the menu option has submenus, use the JOG-WHEEL (9) to browse these.
- Press the TRACK knob (16) again to return to the main menu.
To save your settings: choose menu option 7 (EXIT & SAVE) and press the TRACK knob (16)
- SLEEP TIME: to extend the lifetime of the laser, the unit goes automatically to sleep mode while not used for 15 minutes (default). In this menu option you can change, the time it takes to enter sleep mode:
Turn the TRACK knob (16) to select the desired time: "No SLEEP" 120 minutes. Press the TRACK knob (16) to save the new value and return to the main menu.
- Line Setup: you can configure how the text line shows information that is longer than 10 characters. You can choose 3 different modes + some extra fine-tuning:
There are 3 submenus: turn the JOG-WHEEL (9) to select a submenu.
Submenu 1-L1 Mode:
Turn the TRACK knob (16) to select the desired setting:
- L1 Mode = 1: text line scrolls and waits for a certain time before scrolling starts again. You can set the waiting time in submenu2.
- L1 Mode = 2: text line scrolls only one time, then stops.
- L1 Mode = 3: text line scrolls continuously.
Submenu 2 - start/stop waiting time for scrolling:
Turn the TRACK knob (16) to select the desired value:
Dis. = 0.5s 12.0s waiting time in seconds.
Submenu 3 - scrolling speed:
Turn the TRACK knob (16) to select the desired value:
- Run = 50 → 2000ms: 50ms = fast speed / 2000ms = slow speed
Press the TRACK knob (16) to save the new values and return to the main menu.
-
SGL/CONT: You can choose between "single track mode" and "continuous play".
-
Continuous play: the complete CD/USB-drive will be played without interruption. (used in pubs)
-
Single track: player stops at the end of each track and waits at the beginning of the next track. (mostly used by deejays)
Turn the TRACK knob (16) to select the desired mode. Press the TRACK knob (16) to save the new value and return to the main menu. -
AUTOCUE MODE: while switched on the player stops at the end of each track and waits at the first music note of the next track. This means that badly indexed CDs will not interfere with the instant start capabilities of the player, a very useful feature for deejays!
-
Firmware version / upgrading: use this option to check and/or upgrade the firmware versions.
Turn the TRACK knob (16) to select the 3 firmware parts:
o CON: xx: shows the version of the control firmware
DSP:xx:shows the version of the DSP firmware
SER: xx: shows the version of the servo firmware
Upgrade: blinks when the unit is ready to check if there are new firmware versions available. See "FIRMWARE UPRADING" for more information.
Press the TRACK knob (16) to return to the main menu.
- Load defaults: If you really messed up things, you can still reload the default setting!
While "Load Defaults" is shown on the display: press the TRACK knob (16) to load the defaults.
- Exit & Save: if you want your changes to the setup menu to be permanently saved (also after switching the unit off) you MUST use this option!
Press the TRACK knob (16): the display shows "Saving" and exits the setup menu.
FIRMWARE UPGRAING
We strongly suggest to regularly check the USB1.1 product page on www.jbsystems.be to see if new firmware updates are available. Upgrading firmware should always be done very carefully!
- Download the file containing the upgrade file(s)
- Read the instructions and follow them strictly, otherwise you could damage your equipment...
- Put the files on an EMPTY (important!) USB-stick.
- Press the TIME button (26) for about 3seconds to enter the setup menu.
- Use the TRACK knob (16) to browse to menu option "5. Version".
- Turn the TRACK knob (16) until the display shows "Upgrade".
- Use the SOURCE SELECT button (25) to select USB1 input (3).
- Insert the USB-stick with firmware files in USB1-input (3)
Upgrading will start automatically: WAIT (!) until the upgrading process is finished. NEVER turn the player off while upgrading the software!!! - If the display asks you to turn off the unit: turn the unit off, wait 3 seconds and turn it back on.
- Check if the software version corresponds to the version marked in theREADME file that came with the update.
INSTALLING THE TRACK-INDEXER SOFTWARE
The USB1.1 works perfectly without the Track-Indexer database files but if you want to search your tracks easily and lightning fast than you should install the Track-Indexer software on your computer! Please note that the program currently only works under Windows (XP, Vista, Win7). To be sure that you always have the latest version, you can download the software from the USB1.1 product page on our website. Installing the program is very easy: just double-click the file and follow the instructions on your screen.
USING THE TRACK-INDEXER SOFTWARE
Each time you add or remove tracks from your USB hard disk, you must run the TRACK-INDEXER software again to update the Track-Indexer database files!
After the installation you will see a new program directory called "JB". In this directory you will find 2 files:
Uninstall (to uninstall the software)
- DbBuilder (to start the software)
- Connect your USB-hard drive to your PC and check which drive letter was assigned to it.
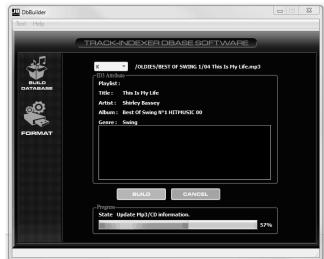
- Click on the Track-Indexer icon to start the software: the main screen is shown.
- In the upper center choose your USB-drive.
- Press the BUILD-button.
The software starts scanning the USB-drive for compatible audio files and extracts the ID3-tags to build the Track-Indexer database files, needed to speed up the search function on the player. Once the progression bar on the bottom is full, the datab
short summary is shown.
- The program wrote the Track-Indexer files (file extensions: .DBH + .dat + .DBX) to the USB-drive so now you can remove it from your PC and connect it to the USB1.1.
To achieve the best results, please always use the latest version of the Track-Indexer database software. You can find the software version at the bottom left of the "About" screen.
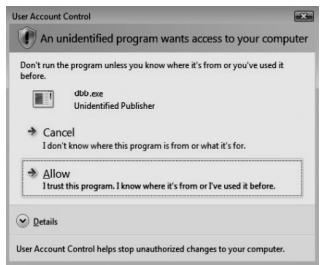
! IMPORTANTMESSAGEFORVISTAUSERS !
Many Vista users will not be able to run the Track-Indexer software. This problem is caused by the UAC (User Account Control) limitation, a security option limiting the user privileges in Vista. To overcome this problem, right-click the Track-Indexer program icon and choose "Run as administrator" in the popup menu. Windows will respond with the window shown on the right: just click "Allow".
HOW TO USE ...
Most of the common functions are explained in the previous chapter "controls and functions" In this chapter we talk about the functions that need a little more explanation.
SOME GENERAL FUNCTIONS:
SEARCH A TRACK WITH THE TRACK-INDEXER SYSTEM:
Important: before you can use the Track-Indexer system, you should scan your USB-drive so it contains the necessary database files.
You can choose the search-key at any moment by pressing the TRACK-knob (16) while you turn it. You can search for Art(artist), tit(title), Alb(album) or Gen(genre).
- Press the DATABASE-button (17) to start the lookup function the first character of the list you want to search is blinking in the display.
-
Turn the TRACK-knob (16) to change the first character.
-
Selected search-key is "tit": turn the JOG WHEEL (9) to browse the list of titles, starting with the selected first character.
-
Selected search-key is NOT "tit": see the example below for search-key = Art(artist)
-
First turn the JOG WHEEL (9) while you keep the TRACK-knob (16) pressed to browse the list of artists, starting with the selected first character.
-
Once you have selected the desired artist, stop pressing the TRACK-knob (16) while you continue turning the JOG WHEEL (9): now you can browse all the titles from this artist, in alphabetical order.
-
Once you have found the right track: press the LOAD TRACK-button (24).
SEARCH A TRACK WITHOUT THE TRACK-INDEXER SYSTEM:
Press and turn the TRACK-knob (16) to select Std(standard lookup system). If the USB-drive has no Track-Indexer files, the player automatically selects the standard lookup system. You have Two options:
Option 1:
Simply use the combination of FOLDER-button and TRACK-knob to browse the different directories.
Option 2:
- Press the DATABASE-button (17) to start the lookup function both the FOLDER and TRACK displays start blinking.
- Turn the TRACK knob (16) to browse the folders. (when the folder LED = on, you will see the folder names while browsing)
- Turn the JOG WHEEL (9) to browse the selected folder at high speed.
- Once you have found the right track: press the LOAD TRACK-button (24).
Remark: if you want to browse you folders/tracks at high speed, you can use this method:
- Browse folders: turn the JOG-WHEEL while you keep the TRACK-knob pressed (folder LED = on)
- Browse tracks: turn the JOG-WHEEL while you keep the TRACK-knob pressed (folder LED = off)
- SLEEP MODE:
When source select is set to CD, the CD player automatically shuts off the transport and laser after about 5~120 minutes (selectable in the setup menu), while in pause or cue mode. This extends the life of your motor drive and laser. During sleep mode the display shows the word "SLEEP". To wake up the player, just press the cue or play button, the display turns to normal and is ready to receive instructions.
- TOTAL RANDOM ON A USB-drive:
This is the simple random function where any track on your USB-drive can be played randomly:
- Open the fader for the USB1.1 on your audio mixer.
- Press the SOURCE SELECT-button (25) to choose one of the USB-drives.
- Press the RELAY-button (23) shortly until the word "RANDOM" in the display is lit.
- Press the PLAY-button to start random playback.
SMART FOLDER RANDOM ON A USB-drive:
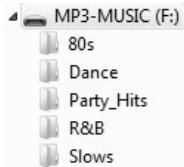
This is the "smart" random function where you have full control over which folder you want to play in your random selection. If you put your tracks in different directories, sorted by genre, you can make a random of only 1 music genre, perfect for background music in restaurants, shops, clubs & bars without a dj:
- Open the fader for the USB1.1 on your audio mixer.
- Press the SOURCE SELECT-button (25) to choose one of the USB-drives.
- Press & turn the TRACK-knob (16) to select the "Std" search-key.
- Choose the directory you want to play files from in random order.
- Press the RELAY-button (23) for about 2 seconds until the word "RANDOM" in the LCD-display starts blinking.
- Press the PLAY-button to start random playback only from the selected folder.
- PITCH BENDING:
This function is used to synchronize the beats of two tracks. This can be done in two ways:
- PITCH BEND buttons: The speed increases or decreases respectively as long as the PITCH BEND+ or PITCH BEND- buttons are pressed.
- JOG WHEEL: During play mode the JOG WHEEL will temporarily bend the pitch of the music by turning the JOG WHEEL clockwise to speed up or counterclockwise to slowdown. The rotation speed the JOG WHEEL determines the percent of pitch bend.
- CD-TEXT:
Not only MP3 files can show the track name on the display. Some normal audio CDs use CD-TEXT to show the track names. Also some CDR burning software (ex. Nero) can add CD-TEXT to a normal audio CD. When the USB1.1 detects these CD-TEXT data, the display will show them automatically.
- PLAYING/RECORDING CD-R and CD-RW:
Apart from normal audio CD's the USB1.1 can play both CD-R (CD recordable) and CD-RW (CD rewriteable). Please note that you should always use the "disc at once" and "track at once" disc writing options! Although the USB1.1 is capable of reading CD-R and CD-RW recorded at higher speeds, we suggest not using recording speeds more than x12 to increase readability. Always buy good quality brands for CD-R and CD-RW!
If the disc is multi session, it will only play the first session:
- if the first session is CD-DA you can only play CD-DA tracks.
- if the first session is MP3 you can only play MP3 files.
ABOUT LOOPS:
- CREATE A LOOP:
While a track is playing, press the LOOP IN button to program the start point of the loop. Now press the OUT button to program the endpoint of the loop. The seamless loop starts playing at once. (With some practice you will be able to create perfect loops!) While the loop is playing, you can press the OUT button again to exit the loop and continue the rest of the track.
It is possible to program a new loop, even when the current loop is still playing. While the loop is playing, simply press the LOOP IN button to set the starting point of the new loop. Now enter the endpoint by pressing the OUT button. Your new loop is programmed and playing.
- RESTART A LOOP:
This can be done in 3 ways:
- When a loop is programmed and you left it by pressing the OUT button, just press RELOOP to restart the loop.
- When a loop is programmed and you left it by pressing the OUT button, just press OUT again to restart the loop. The point where you pressed OUT is now programmed as the new endpoint of the loop.
- When the loop is still playing, press the RELOOP button to restart the loop immediately. You can repeat this several times to create a "Stutter" effect.
- EDIT A LOOP:
When a loop is programmed, press the RELOOP/STUTTER button for about 2 seconds to enter "loop edit" mode. While the loop is seamlessly playing, the display shows the time information of the loop endpoint. Use the jog wheel to set the new loop endpoint. To make things very easy you can hear your modifications to the loop endpoint continuously. When the loop is perfect, press the LOOP OUT button to save the new loop endpoint.
SPECIFICATIONS
Power Supply:
Power Consumption:
Output level (+/-0.5dB @ 1kHz, 0dB)
Frequency resp. (+/-0.4dB / +/-0.2@0dB)
THD + noise (@ 1kHz, 0dB):
S/N Ratio (@ 1kHz, 0dB (IHF-A weighted):
CD Short access time (next track):
CD Long access time (track 1 20 ):
CD Electronic tracking:
MP3 FORMAT:
Possible file extensions:
ISO9660:
Joliet:
CD-ROM sector format:
USB file system:
Max. Hard disk capacity:
Max.Folders:
Max. Tracks / Folder:
Max Files:
MP3 FORMATS:
MPEG1 Layer3 (ISO/IEC11172-3):
Bitrates:
Bitrate modes:
MPEG2 Layer3 (ISO/IEC13818-3):
Bitrates:
Bitrate modes:
MPEG2,5 Layer3:
Bitrates:
Bitrate modes:
Dimensions:
Weight:
AC 100-240V 50/60Hz
13W
CD: 2.0Vrms
CD: 17-20.000Hz
CD: 0.008%
CD: >126dB
<2sec
<4sec
Full automatic digital tracking
.m3\~.MP3\~.mP3\~.Mp3
max. 63 character style
max. 63 character style
mode-1 only
FAT 12/16/32
500GB
CD:255
CD:255
CD:999
USB: 1.85Vrms
USB: 17-16.000Hz
USB: 0.007%
USB: >85dB
tracking
CD:255
CD:255
CD:999
USB:999
USB:999
USB: 9999 (Track Indexer software)
mono / stereo sampled at: 32 - 44,1 - 48kHz
32 - 320 Kbps
CBR (Constant Bitrate), VBR (Variable Bitrate) or Xing
mono / stereo sampled at: 16 - 22,05 - 24kHz
32 - 160 Kbps
CBR (Constant Bitrate), VBR (Variable Bitrate) or Xing
mono / stereo sampled at: 8 - 11,025 - 12kHz
32 - 160 Kbps
CBR (Constant Bitrate), VBR (Variable Bitrate) or Xing
482(W) x 88.8(H) x see drawing (D) mm
4,35kg
Every information is subject to change without prior notice
You can download the latest version of this user manual on our website: www.beglec.com
MODE D'EMPLOI
- REDÉMARRER UNE BOUCLE:
Tracking electronique CD:
FORMAT MP3:
Extensions possibles:
ISO9660:
Joliet:
CD-ROM sector format:
CD:2.0Vrms USB:1.85Vrms
CD: 17-20.000Hz USB: 17-16.000Hz
CD: 0.008% USB: 0.007%
CD: >126dB USB: >85dB
<2sec
<4sec
Full automatic digital tracking.
.mp3\~.MP3\~.mP3\~.Mp3
max. 63 character style
max. 63 character style
mode-1 only
FAT 12/16/32
500GB
CD:255 USB:999
CD:255 USB:999
CD: 999 USB:9999(Software indexeur de pistes)
mono / stereo sampled at: 32 - 44,1 - 48kHz
32 - 320 Kbps
CBR (Constant Bitrate), VBR (Variable Bitrate) ou Xing
mono / stereo sampled at: 16 - 22,05 - 24kHz
32 - 160 Kbps
CBR (Constant Bitrate), VBR (Variable Bitrate) ou Xing
mono / stereo sampled at: 8 - 11,025 - 12kHz
32 - 160 Kbps
CBR (Constant Bitrate), VBR (Variable Bitrate) ou Xing
- Run = 50 → 2000ms: 50ms = snel / 2000ms = traag
TIJDELIJKSE SNELHEIDSAANPASSING: (pitch bend)
ISO9660: max. 63 character style
Joliet: max. 63 character style
CD-ROM sector format: mode-1 only
USB file system: FAT 12/16/32
Max. Hard disk capacitit:
Max.Folders: CD:255 USB:999
Max. Files per Folder: CD: 255 USB: 999
Max. Files: CD: 999 USB: 9999 (Track Indexeringssoftware)
MP3 FORMATS:
MPEG1 Layer3 (ISO/IEC11172-3): mono / stereo sampled at: 32 - 44,1 - 48kHz
Bitrates: 32-320Kbps
Bitrate modes: CBR (Constant Bitrate) or VBR (Variable Bitrate) or Xing
MPEG2 Layer3 (ISO/IEC13818-3): mono / stereo sampled at: 16 - 22,05 - 24kHz
Bitrates: 32-160Kbps
Bitrate modes: CBR (Constant Bitrate) or VBR (Variable Bitrate) or Xing
MPEG2,5 Layer3: mono / stereo sampled at: 8 - 11,025 - 12kHz
Bitrates: 32-160Kbps
Bitrate modes: CBR (Constant Bitrate) or VBR (Variable Bitrate) or Xing
- Run = 50 → 2000ms: 50ms = schnell / 2000ms = langsam
ISO9660: max. 63 character style
Joliet: max. 63 character style
USB file system: FAT 12/16/32
Max. Hard disk capacity: 500GB
Max.Folders: CD:255 USB:999
Max Tracks pro Folder: CD: 255 USB: 999
Max. Files: CD: 999
MP3 FORMATE:
MPEG1 Layer3 (ISO/IEC11172-3): mono / stereo gesampelt bei: 32 - 44,1 - 48kHz
Bitrates: 32-320Kbps
Bitrate modes:
MPEG2 Layer3 (ISO/IEC13818-3):
Bitrates:
Bitrate modes:
MPEG2,5 Layer3:
Bitrates:
Bitrate modes:
Abmessungen:
Gewicht:
CBR (Constant Bitrate) or VBR (Variable Bitrate) oder Xing
LIMPIANDO SU REPRODUCTOR:
CD:2.0Vrms USB:1.85Vrms
CD:17-20.000Hz USB:17-16.000Hz
CD: 0.008% USB: 0.007%
CD: >126dB USB: >85dB
<2seg
<4seg
CD: 999 USB: 9999 (Track Indexer software)