TMC 200 - Professional audio equipment BEGLEC - Free user manual and instructions
Find the device manual for free TMC 200 BEGLEC in PDF.
Document temporarily unavailable
The manual is currently being transferred to our new server. It will be accessible again in a few hours. Thank you for your patience.
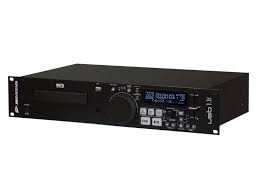
| Product type | Professional CD player for DJ with MP3 player |
| Brand | BEGLEC |
| Model | TMC 200 |
| Power supply | AC 100-240V, 50/60Hz |
| Power consumption | 13W |
| Output level | 2.0V +/-0.5dB @ 1kHz, 0dB |
| Frequency response | 17-20.000Hz (+/-0.4dB) |
| Total Harmonic Distortion + Noise | 0.006% @ 1kHz, 0dB (20kHz LPF) |
| Signal-to-Noise Ratio (IHF-A) | >130dB @ 1kHz, 0dB |
| Supported audio formats | CD audio, CD-R, CD-RW, MP3 (32-320kbps, CBR and VBR) |
| MP3 compatibility | MPEG1 Layer3 (32/44.1/48kHz), MPEG2 Layer3 (16/22.05/24kHz), MPEG2.5 Layer3 (8/11.025/12kHz) |
| Maximum number of files/folders | 999 MP3 files, max 255 folders per CD |
| Scratch functions | Yes, via Jog Wheel touch wheel |
| DSP effects | Echo, Flanger, Filter, Brake (with manual control or BPM sync) |
| Loops | Up to 4 endless loops per track, real-time editing |
| Cue points | Up to 2000 cue points and loops in permanent memory |
| Pitch range | +/-4%, +/-8%, +/-16%, +/-100% (up to +/-16% in MP3) |
| Audio outputs | RCA Cinch stereo, coaxial S/PDIF digital output |
| Additional connections | Relay (for fader start or alternating playback) |
| Shock protection | 60 seconds buffer protection |
| Economy function | Automatic sleep after 15 minutes of inactivity |
| Cleaning | Soft, slightly damp cloth, avoid solvents |
| Operating conditions | Indoor only, max temperature 40°C |
Frequently Asked Questions - TMC 200 BEGLEC
User questions about TMC 200 BEGLEC
0 question about this device. Answer the ones you know or ask your own.
Ask a new question about this device
Download the instructions for your Professional audio equipment in PDF format for free! Find your manual TMC 200 - BEGLEC and take your electronic device back in hand. On this page are published all the documents necessary for the use of your device. TMC 200 by BEGLEC.