
A4 COMFORT - Laminator GEHA - Free user manual and instructions
Find the device manual for free A4 COMFORT GEHA in PDF.
| Product Type | Laminator |
| Brand | GEHA |
| Model | A4 COMFORT |
| Power Supply | 220-240 V ~ 50/60 Hz |
| Current | 1.5 A |
| Power Consumption | 300 W max |
| Pouch Thickness | 80 to 125 microns |
| Max Document Size | A4 |
| Preheating Time | Approximately 3 to 5 minutes |
| Laminating Speed | Approximately 300 mm/min |
| Max Document Thickness | 0.6 mm |
| Laminating Mode | Hot and cold |
| Indicator Lights | Red (heating), blue (ready) |
| Anti-Jamming System | ABS (release lever) |
| Temperature Setting | Temperature regulator |
| Cleaning | Soft cloth, no abrasive products |
| Safety | Do not immerse, do not open the housing |
| Warranty | 24 months |
Frequently Asked Questions - A4 COMFORT GEHA
User questions about A4 COMFORT GEHA
0 question about this device. Answer the ones you know or ask your own.
Ask a new question about this device
Download the instructions for your Laminator in PDF format for free! Find your manual A4 COMFORT - GEHA and take your electronic device back in hand. On this page are published all the documents necessary for the use of your device. A4 COMFORT by GEHA.
USER MANUAL A4 COMFORT GEHA
Congratulations on your purchase of the laminator. Now you can protect your favourite photos, recipe cards, letters and legal size documents as well as other types of thin objects up to A4 size in a waterproof, airtight seal. Follow the instructions for proper use and keep this book for future reference.
IMPORTANT SAFETY NOTES
- Read all instructions.
- Do not touch hot surfaces.
- To protect from risk of electrical hazards, do not immerse cord, plugs, etc. of the appliance in water or other liquid.
- Closely supervise if necessary when any appliance is used by, or close to, children.
- Unplug from the outlet when not in use and before cleaning. Allow to cool before putting on or taking off parts, and before cleaning the appliance.
- Do not operate any appliance with a damaged cord or plug or after the appliance malfunctions, or has been damaged in any manner. Return the appliance to the nearest authorised service facility.
- The use of accessory attachments not recommended or sold by the appliance manufacturer may cause injuries.
- Do not use outdoors.
- Do not use appliance for other than intended use.
- Turn the laminator off when not in use for prolonged periods of time.
- The socket-outlet should be installed near the equipment and should easily be accessible.
- Do not laminate sheets containing metal or conductive materials.
- A short power cord is provided with this appliance to reduce hazards resulting from becoming entangled in, or tripping over, a longer cord. Extension cords may be used if care is exercised in their use. If an extension cord is used, the following must apply:
a. The marked electrical rating should at least be as high as the electrical rating of the appliance.
b. The extension cord should not drop over the counter top or table top where it can be pulled on by children or tripped over accidentally.
- We do not recommend laminating any type of self-developing photo.
- Any photo to be laminated must be dry before processing.
- Do not laminate any documents that appear thick or heavy, as they will get stuck in the laminator. If this occurs, please contact your local service centre for servicing.
- This product bonds the laminate sleeve to the items processed. It is a permanent seal and cannot be removed.
- We do not recommend laminating any collector's items of value or any item you may wish to remove at a later date. Do not attempt to laminate coins or thicker items.
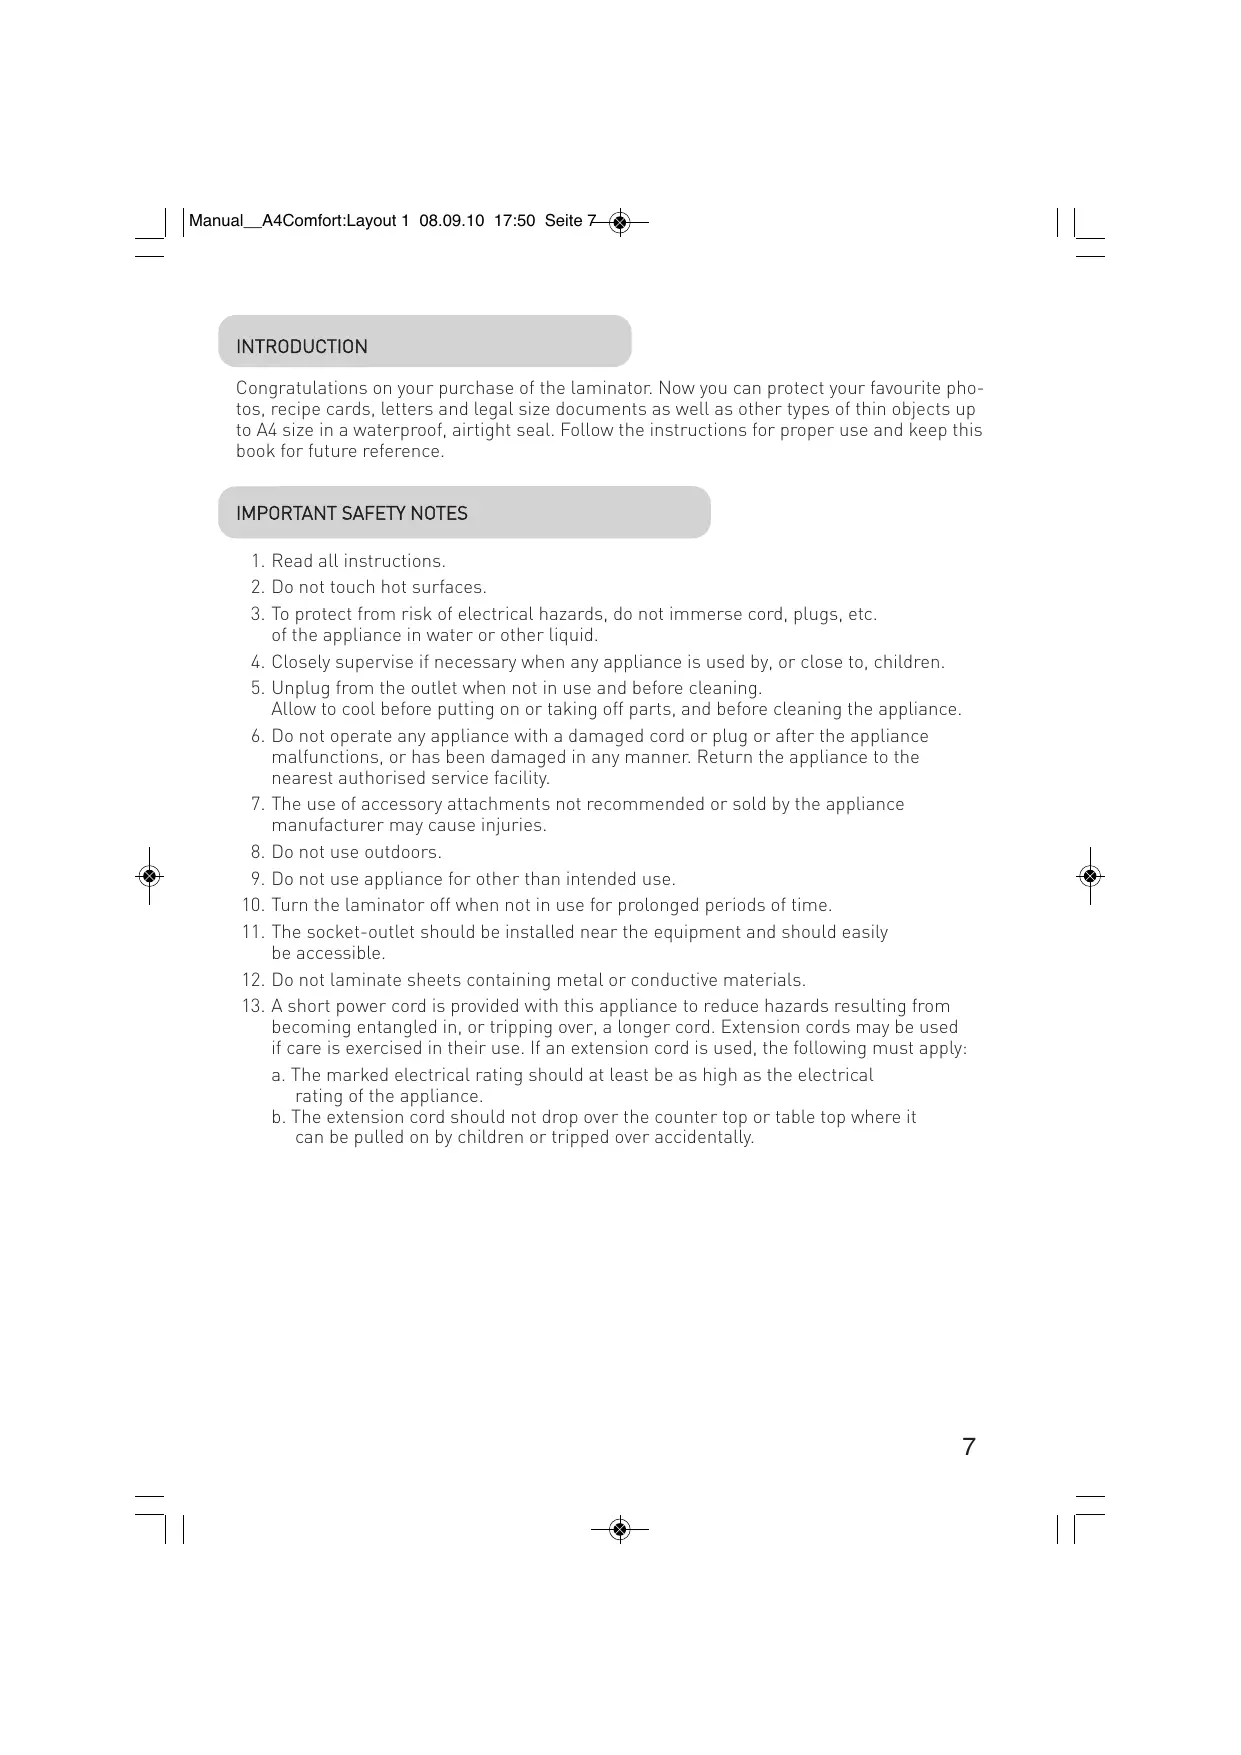
fig.1
1 Housing
2 Indicator
3 Anti-block system (ABS)
4 Rear Exit
5 Laminating insert
6 Power switch
7 Temperature adjustor
- Using the temperature adjustor, select the desired temperature.
-
Start the device by pressing the power switch.
-
a) If you have set the device to hot laminating (80 mic. or 100-125 mic.), the red indicator light is on. The laminator is heated up. As soon as the red indicator light is off and the blue indicator light is on, the device is ready for hot laminating. It takes about 3 to 5 minutes for the device to heat up to the required temperature.
b) If you have chosen cold laminating (Cold), the blue indicator light is on immediately and the device is ready for operation. If you wish to cold laminate with the hot laminator, turn the temperature adjustor to "Cold" and wait 3 hours until the laminator has cooled down. As soon as the red indicator light is off and the blue indicator light is on, the device is ready for cold laminating. -
Place the item to be laminated into the laminating sleeve, centring it within the sleeve. Please make sure your document or picture is positioned as close to the sealed edge as possible.
-
The laminator does not require the use of a carrier in order to operate.
- The laminator can laminate pouches from 80 microns to 125 microns. It works with most types of heat-sealing laminating pouches.
- Insert the sealed edge of the laminating sleeve straight into the CENTRE of the laminator opening.
- Remove the sleeve from the rear of the machine after it has stopped moving.
- Some types of paper do not laminate evenly, or appear somewhat cloudy. In such cases, the lamination can be fed through the machine a second time and the lamination process may be repeated.
- If the item to be laminated is jammed in the device, press the ABS lever backwards and pull out the item by hand.
CARE AND CLEANING
Only authorised service teams should perform any servicing other than cleaning and user maintenance. Do not immerse in water.
To reduce the risk of fire or electrical shock, do not remove the base. No user serviceable parts are inside. Repair should be done by authorised service personnel only.
- Keep your hands and the cord away from hot parts of the appliance during operation.
- Never clean with scrubbing powders or hard implements.
- Wipe clean with a soft cloth.
TECHNICAL DATA
Voltage
Current
Power
Film thickness
Max. document size
Warm-up time
Laminating speed
Max. document thickness
220V-240V,50/60Hz
1.5 A
max. 300 W
80-125 microns
A4
approx. 3-5 mins
approx. 300mm / min
0.6 mm
DISPOSAL
The crossed out wheelie bin symbol on this product is to remind you that electrical products should not be disposed of with household waste.
Please dispose of in a responsible manner at an approved waste or recycling facility.
WARRANTY
The warranty period for your appliance is 24 months.
It is essential that you retain your proof of purchase and the original packaging.
Should any problem arise with your appliance, please contact your dealer.
INTRODUZIONE
AaBaaalaaaalaaalaaalaaalaaalaaalaaalaaalaaalaaalaaalaaalaaalaaalaaalaaalaaalaaalaaalaaalaaalaaalaaalaaalaaalaaalaaalaaalaa
a 1
1gSj j 333 jieell 1ge .4a5i i jy jiaic g aaiiui uie jieall ayai i Jgauu .0
jgl jgsbliuie jlae 1
j 1
jla jna jra jra jra jra jra jra jra jra jra jra jra jra jra jra jra jra jra jra jra jra jra jra jra jra jra jra jra
Lil
aiee e aeg aee
A
.
-
-
-
-
-
-
-
-
-
-
-
-
-
-
-
-
-
- 1.
-
-
-
-
-
-
-
-
-
-
-
-
-
-
-
-
aljgbi jialolaiiswipie ic jglilgibj.1.
Jg 11
Aali 1gai jao gie gai jai jai jai 2.14
ailllll lallll olae al. y jaiill 1 Jslll jia 1 Jn Jn Jn Jn Jn Jn Jn Jn Jn Jn Jn Jn
:Jgbl Jusu JUsu
a 1
j = 1
jia jia jia jia jia jia jia jia jia jia jia jia jia jia jia jia jia jia jia jia jia jia jia jia jia jia jia jia jia jia jia jia jia jia jia jia jia jia jia jia jia jia jia jia jia
A
jgl 1120
.
jglll gss jgl 1. klll jgs jgsgai j jSsIgai gaiiill lalll gai
ailll lll l l 1000000000000000000000000000000
iill 15 j 5y y. aikl alrall srrll g kkiill gilj
1
j 1
jlll lss sss sss sss sss sss sss

C. l1 : l2 = 1
2
3
4
5
6
S_ OBC = 12 · CO · BC = 12 × CD × 5
aJalll aJy jai 1
Lall, 1
j 1
a 1
(1) plu (Cold)
a a a a a a a a a a a a a a a a a a a a
JiLsKaiy, yjLjLjRjRjRjRjRjRjRjRjRjRjRjRjRjRjRjRjRjRjRjRjRjRjRjRjRjRjRjRjRjRjRjRjRjRj
ac( b + c)
aasall aslaw
aannnnae
jssss
aill a
aill
jglsln
aaii aalil gaiy jg 1n yalil giaall nai ai bai pgi iiall alll aylae jra
aillge bala jy jall no yalil jno aannia 5r jll alj
S OBC = S AOB + S_ BOC
- 0 ≤ x ≤ 2,1. 3
jll 11
jie jie jie jie jie jie jie jie jie jie jie jie jie jie jie jie jie jie jie jie jie jie jie
BBEDEHNE
I03dpaBnlem Bac c nokynkO 3Toro IaMHaTopa, c nomooIIO KOTOPORo Bbl CMO-KeTe 3aneuatbBaTcBOn IIO6mble fOTOrpaqnn, nncbMa n DOKyMeHTbl, a TaKke ToHKne o6BeKtBI Do BeINuHbI A4 B BOHOePpOHuaEmyIO n repMeTuHyIO O6IoOky. Co6IIOdaIte yka3aHna DaHHoro pykoBoDCTBa IIO EKcNlyaTaUuN u COxpaHnTe erO dIra CnpaBOK B 6dyuem.
BAXHbIe YKA3AHnI NO TEXHnke Be3ONACHOCTN
- BHIMaTeIbHO npOuHTaIe pyKOBoDCTBO NO 3KcIIyatauIN I Bce yKa3aHnA.
- CneiTe 3a Tem, yTo6bI He npKacatbcra K rOpaym NOBepxHOCTaM.
- Hnkorga He norpykaite Ka6eb CeTeBO r nHaHna, ceTeBO uTencel b T.D. B BOy u nn dpyrne KnIOKCTN. B npOTNBOM cIyae IMeETcOnaCHOCTb ydapa 3JIeKTpUueCKIM TOKOM.
- Bydte Oco6eHHO BHIMaTeIbHbI, KOrDa yCTpoiCTBO IcNoJIb3YeTcA DeTbMn IIN B6JIn3N OT dTei.
- OToeHNHnIte yCTPOINCTBO OT CeTn, KOrTa B HEm HeM HeT Heo6XoDnMOCTn INpePeTeM, KaK YnCTNTb erO. DaIte emy OxJaNDtbcra, IpexKeJe Yem BCTaBnTb INN BBiHmAtb Yactn INN YnCTNTb yCTPOINCTBO.
- He nCnoJb3yIte yCTpoNCTBO npn 06HApUkeHnn NOBpeKdEHHa Ka6eHa cTeBOrO nITAHn nn CeTEBO rTEnCeJI, ecn yCTpoNCTBO nOKa3bIBaET c6On nn KaKIM-Jn6o 06pa3OM NOBpeKdEHO. OTHeCnTe erO Ha peMOHT B 6JInKaaIShuYIO dOnyuSeHHyO cnJx6y cepBnCHORO o6cnykuaHHa.
- Пп примениnpинадлжност,在КOTOPье He peKOMeHIOBaHbI INN He npdIoJoxHeI npOn3BOДnTeJIeM,MOKeT cyuEcTBOBaTb OnaCHOCTb TpaBMnpoBaHnY.
- He nCnoJb3yIte yCTpoIcTBO NOI OTKpbITbIM He6OM.
9.ИспόльзуTe yCTpoIcTBО ИСКЛЮЧТЕЛБНО NO Ha3HaueHиI. - OTKJIIOUaIte yCtpoIcTBo, KOrDa B HEm HeT HeO6XoDmOCTn IJInTeJIbHoe Bpemr.
- UcpoiCTBO HUxHO NOIDKJIIOuATb NO BO3MOXHOCTn B 6IINKaJyU OTeNCEJbHyO pO3eTKy, KOtopa DOnkHa 6blTb IerKo DoCTynHa.
- He lamHHpyte IuctOB, KOToPbIe CoepXaT MeTaJI NII IN npOBoJxue MaTePnAJIbI.
13.ДпгдOTВрашеняОпаСHOCТЗAnyTaTbCSИNCSNOTKHHTbCЯ6eJIb, yCTpoIcTBO OCHaSeHO OTHCOnTeJbHO KOpOTKm Ka6eJIem. Пи пименуdlnHnTeJЯCo6JIoDAaTe CLEdYIOJIne yKa3aHnI:
a. Yka3aHHbIe IydInHntelbHOrO Ka6eIaJIeKtpuYeCKne HOMHaIbHbIe DaHHbIe DOJIKHbI IO MeHbIeMpe COOTBeTCTBOBaTb 3JIeKTPuYeCKIM NaCnOpTHbIM DaHHbIM yCTpOINCTBa.
b. YdHnHtBbHbI Ka6bI He DoJIkeH CBeWbTaBc8 Co CTOna NIIu WkaΦa, rDe dEt MoRIn 6bl NotaHyTb 3a Hero, a dpyrne cNOTKHytbc8 o6 Hero.
OBPAUHNE C UCTPOICTBOM
- He pekomeHdyetcnaMHHPOBaTb camOppoBnIooiuecfoTOrgpaΦn.
- FOToIpaΦnI nepeI IaMnHnpOBaHne MOnJXbI 6bITb cyxIMN.
- He lamHHpyte ToIcTbe IIN TaeKJIbIe DOkymeHTbl, TaK KaK OHN MOryT 3aCTpAeB LAMnHaTope. Ecnu yTO-H6yDb 3aCTpAeHET B UcTPOiCtBe, 06paauTeCb 3a peMOHTOM B MeCTHyO dOnyUeHHyO Cnyx6y CePBnCHORo 06cLyXnBaHnJ.
- LaMnHaTop npOuHo HakJleuBaeT lammHpyUOyU pIeHky Ha nOkpbIbAemoe n3dJIeN. POn3Ke ydaJIITb lammHpyUOyU pIeHky HeBO3MOxHO.
- He pekomeHdyetcI naMHnHPOBaTb ceHHbIe npedMeTb KoJIJIeKUHOHPOBAHn nnu n3dEIny, KOTOpBIE Bbl npi Heo6xOJIMOCtN pO3Ke XOTeIN 6bl cHOBa OCBO6OHTb OT nIeHNK. HeJIb3a naMHnHPOBaTb MOHeTb I TOJICTbIe npedMeTb C NOMOUsbIO 3TOrO yCTpojNCTBa.
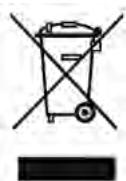
pnc.1
1 Kopnyc
2 INHdkaTophble JAmnoquK
3ПрOTиBO6JIOKINPOBOUHoe yCTpoIcTBO (ABS)
4 BbIO
5 BbOJ lamHHpyemoro n3dennr
6 BbiklouateJIb 3JIeKtpoNTaHnIa
7 Tepmoperyjatop
- Bb6epnte Ha pepyaTope Tempeatypbl Tpe6yemyu yctaHOky.
- AkTbBpyuTe yCtpoNCTBO HaKaTneM DByxN03nOHHOro nepeKJIouaTeJIA.
3.a) EcnBbBb6paHn pexm ropayero lamHHnpobAHna
(80 Mic. ун 100-125 Mic.), to 3aropaetca kpacna JAMnOuKa.
UcpoNCTBO HaxoDntcB a3e pa3oRpeBa. KaK Tolbko KpacHaj IaMNoKa IorachET n 3aRopNTcCnHra, yctpoNCTBO rTOBO dIra rOpJero IaMHHropOBAHna. DnI npOrpeBa ycTpoNCTBa Tpe6yeTcO kOJO 3-5 MInHyT.
b) Ecni Bbi Bb6paJIn peKIM XOJODHOro JAMHHPOBaHn (Cold),
TO 3aropaeTcCnHJa lamnoUka, u yCTpoiCTBO HaxoDHTCB COCTOHN IROTBHOCTN. EcIn Bam Heo6xoDnMo npOBecTN XoJOnHoe lamHHnpOBaHne Ha ropayem lamHaTope, TO nobepHnte peryIantop TeMnepaTpybIB noloxHe "Cold" n noJoxdnte npimepHo 3 Yaca, noka yCTpoiCTBO He oxlaIITcK. Korda noracHet Kpacna J lamnoUka n 3aRopNTc CnHja, yCTpoiCTBO HaxoDHTCB COCTOHN IROTBHOCTN.
-
BctaBbTe npeDMeT lamHnHPOBaHnB O6ONoUky dIy lamHnHPOBaHnI bblpoBHaIte ero B Hei no cHTpy. CneIte 3a TeM, yTO6bI DOKymeHT nn HTO HaxOdnlncb KaK MoXHo 6bnke K CBapuBaemOn KpOMKe.
-
Дял зтою ламнотopa He tpe6yeTc npimHeHnЯ oboloukn ДяnpotяKKn (Carrier).
- Ламинатор может образаыразь ообolyочи дя ламиноровая толцниоу 80-125 мкп и Функционует с бльшенивом ообolyоче дя горачero ламиноровая.
- BBeIte cBapuBaemyo Kpomky oboIoouKn IlaamHnpoBaHn npraMo B CEPEdINHy BBOda Ha IaMHaTope.
- Bo3bMnte lamHnHpoBaHHbI npeMet IO OKOHuaHN IpOcecca IaMHnHpOBaHN Ha o6paTHoN cTOpOHe yCTpoiCTBa.
- OnpeJeHHe copTa 6yMaIr He IaMnHpyOTcra paBHomepHo n KaKytcR HeCKoJIbKO TycKnblIM NII MyTbIMN. B 3ToM cIyuae MoXHO yUyWntb pe3yIbTaT IaMnHIpOBaHH, NOBTOPH pONyCTNB IaMnHIpOBaHHbID OkymeHT Yepe3 IaMnHaTOP.
- Ecnn lamnHpyemoe n3dJeIne octaoocb BycTpoiCTBe, To notaHyB pbuar ABS Ha3aD, pyKoB bItaunTe 3TO n3dJeIe.
CHCTKA I YXOJ
PemontbIe pa60TbI, BbIXoJaIe 3a paMkn HOpMaJIbHOJ YnCTKn I yXOJa, MOryT BbIOJIHrTaTOJIbKO DOnyUeHHoC nLyX6oBcEPBunCHoro O6ClyKINBaHN.
Hnkorga He norpykaTe yctpoiCTBO B Ody. Hnkorga camn He otKpbIbAte dHnIe yctpoiCTBa. IHaue cyuieCTByeT OAnCHOCTb NoXapa n Ydapa 3JeKTpUneCKIM TOKOM.
B yctpoinCTbe HET qacte, KOtOpbIe MOrT O6ClyKuBaTcR N0JIb3OBATeIeM CaMOCToTJIbHO. PemOH TBCERda HUxHNO nOpuyaTb DOnyUSeHHo CnyXBe cepBnCHOrO 6ClyKuBaHnIa.
- Пи рабоTe yctpoiCTBa-depXnTe pyknи Ka6eIb ceTeBOrO nITaHnR BdAJIeKe OT ropaynx YacTeN yctpoiCTBa.
- HnKoIa He nucntte yctpoiCTBO nopOswKom dIy nuCTKN, wa6epom nnckpe6kom.
- IcnoJb3yIte IJIa YIcSTKU yCTpOJCTBa TOnbKO MrgKyIO TkaHb.
TEXHNUECKNE DAHHbIE
HanpxkHe
Tok
IopTe6JMaMA MOHOCTB
TolunHa nIeHKn
MaKc. pa3Mep DOkymeHTa
ДиTeIbHocTb pa3OrpeBa
Kopocstb lamnHnpoBaHna
MaKc. TOniUnHa DOKyMenta
220-240B,50/60T
1,5A
MaKc. 300 Bt
80-125 MmKpoH
A4
npn6JI.3-5 MNHyT
npn6JI.300MMMnH
0,6 MM
YTNIN3AUH
CnMBOI C nepeuepKHytBM Mycopooc6OpHnKOM yKa3bIbaeT Ha TO, YTO 3JIeKTpnuYeCKne yCTpoiCTBa He IIOJNeJxAT yCTpaHeHIO BMeCTe C HopMaJIbHbIM DomaUHM MycOpOM.ДЯ 3KoJIoRnueeCKN uHCTOy TynlI3aunn Ipocm cdaBaTb 3TO yCTpoiCTBO B DoNyUeHNHbI pyHKT c6Opa ceHHbIX MaTePnaIaNob.
TAPAHNTY
TapaHTnHbI cPoK Ha BaWe yCTpoiCTBO coCTaBlaer 24 Meca.
063aTeIbHO COxpaHnTe KBrTaHcIIO O NOKynKe n yNaKOBky 3aBOda-n3rOToBnteJIa.
Ppi npo6lemax c yctpoinCTBOM o6paaaiTeCb K CBOemy TOPROBOMy areHTy.
INLEDNING
Brand : GEHA
Model : A4 COMFORT
Category : Laminator