
A4 BASIC - Laminator GEHA - Free user manual and instructions
Find the device manual for free A4 BASIC GEHA in PDF.
| Product Type | Laminator |
| Brand | GEHA |
| Model | A4 BASIC |
| Maximum Document Size | A4 |
| Pouch Thickness | 80 to 100 µm |
| Preheat Time | Approximately 3-5 minutes |
| Laminating Speed | Approximately 230 mm/min |
| Max. Document Thickness | 0.6 mm |
| Power Supply | 220-240 V, 50/60 Hz |
| Power Consumption | Max. 265 W |
| Current | 1.1 A |
| Laminating Modes | Hot and Cold |
| Special Features | ABS release button, indicator light |
| Care and Cleaning | Soft cloth, do not immerse, do not open |
| Safety | Hot surfaces, unplug before cleaning, do not use if cord is damaged |
| Repairability | Repairs only by authorized service, no user-serviceable parts |
| Warranty | 24 months |
Frequently Asked Questions - A4 BASIC GEHA
User questions about A4 BASIC GEHA
0 question about this device. Answer the ones you know or ask your own.
Ask a new question about this device
Download the instructions for your Laminator in PDF format for free! Find your manual A4 BASIC - GEHA and take your electronic device back in hand. On this page are published all the documents necessary for the use of your device. A4 BASIC by GEHA.
USER MANUAL A4 BASIC GEHA
LAMINATOR
Home & Office
A4 Basic
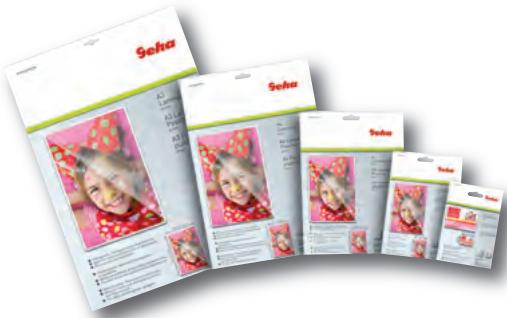
Laminierfolien Laminating Pouches
natural_image
Symbol of a trash bin crossed with a diagonal line, no text or numbers presentGARANTIE
Congratulations on your purchase of the laminator. Now you can protect your favourite photos, recipe cards, letters and legal size documents as well as other types of thin objects up to A4 size in a waterproof, airtight seal. Follow the instructions for proper use and keep this book for future reference.
IMPORTANT SAFETY NOTES
- Read all instructions.
- Do not touch hot surfaces.
- To protect from risk of electrical hazards, do not immerse cord, plugs, etc. of the appliance in water or other liquid.
- Closely supervise if necessary when any appliance is used by, or close to, children.
- Unplug from the outlet when not in use and before cleaning. Allow to cool before putting on or taking off parts, and before cleaning the appliance.
- Do not operate any appliance with a damaged cord or plug or after the appliance malfunctions, or has been damaged in any manner. Return the appliance to the nearest authorised service facility.
- The use of accessory attachments not recommended or sold by the appliance manufacturer may cause injuries.
- Do not use outdoors.
- Do not use appliance for other than intended use.
- Turn the laminator off when not in use for prolonged periods of time.
- The socket-outlet should be installed near the equipment and should easily be accessible.
- Do not laminate sheets containing metal or conductive materials.
- A short power cord is provided with this appliance to reduce hazards resulting from becoming entangled in, or tripping over, a longer cord. Extension cords may be used if care is exercised in their use. If an extension cord is used, the following must apply:
a. The marked electrical rating should at least be as high as the electrical rating of the appliance.
b. The extension cord should not drop over the counter top or table top where it can be pulled on by children or tripped over accidentally.
HOW TO USE THE APPLIANCE
- We do not recommend laminating any type of self-developing photo.
- Any photo to be laminated must be dry before processing.
- Do not laminate any documents that appear thick or heavy, as they will get stuck in the laminator. If this occurs, please contact your local service centre for servicing.
- This product bonds the laminate sleeve to the items processed. It is a permanent seal and cannot be removed.
- We do not recommend laminating any collector's items of value or any item you may wish to remove at a later date. Do not attempt to laminate coins or thicker items.
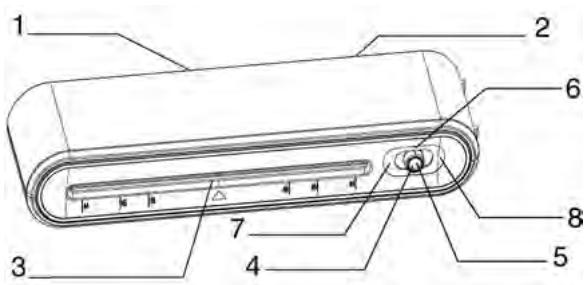
Fig. 1
1 Pouch exit
2 ABS Anti Blockage button
3 Pouch entrance
4 Sliding switch
5 Operating indicator for hot/cold lamination
6 OFF - turn off
7 COLD - cold lamination
8 HOT - hot lamination
- If you wish to use the device for hot laminating, push the sliding switch to the right. The red indicator light is on.
- When the blue light comes on, the machine is ready for hot pouches lamination (fig. 1). The warm-up time takes approx. 3-5 minutes.
- Place the item to be laminated into the laminating sleeve, centring it within the sleeve. Please make sure your document or picture is positioned as close to the sealed edge as possible.
- The laminator does not require the use of a carrier in order to operate.
-
The laminator can laminate pouches from 80 microns to 100 microns. It works with most types of heat-sealing laminating pouches.
-
If you want to use cold pouches when the laminator is in cold condition, please push the sliding switch to the left position, the Red light comes on at the same time, and it is ready to laminate with cold pouches.
-
If you want to use cold pouches when the laminator is in hot condition, please push the sliding switch from the right position to the left position, and wait for approx. 3 hours until the LEDs turn from blue to red.
- Insert the sealed edge of the laminating sleeve straight into the CENTRE of the laminator opening.
- Remove the sleeve from the rear of the machine after is has stopped moving.
- Some types of paper do not laminate evenly, or appear somewhat cloudy. In such cases, the lamination can be fed through the machine a second time and the lamination process may be repeated.
- If there is a jam, please press the ABS button located at the back of the machine. The laminator will stop then. Please pull out the laminating pouches with one hand slowly.
CARE AND CLEANING
Only authorised service teams should perform any servicing other than cleaning and user maintenance. Do not immerse in water.
To reduce the risk of fire or electrical shock, do not remove the base. No user serviceable parts are inside. Repair should be done by authorised service personnel only.
- Keep your hands and the cord away from hot parts of the appliance during operation.
- Never clean with scrubbing powders or hard implements.
- Wipe clean with a soft cloth.
TECHNICAL DATA
| Voltage | 230 V-240 V, 50/60 Hz |
| Current | 1.1 A |
| Power | max. 265 W |
| Film thickness | 80-100 microns (8 1/4" x 11 3/4") |
| Max. document size | A4 |
| Warm-up time | approx. 3-5 mins |
| Laminating speed | approx. 230 mm/min |
| Max. document thickness | 0.6 mm |
natural_image
Symbol of a trash bin crossed with a diagonal line, no text or labels presentDISPOSAL
The crossed out wheelie bin symbol on this product is to remind you that electrical products should not be disposed of with household waste.
Please dispose of in a responsible manner at an approved waste or recycling facility.
WARRANTY
The warranty period for your appliance is 24 months.
It is essential that you retain your proof of purchase and the original packaging.
Should any problem arise with your appliance, please contact your dealer.
INTRODUZIONE
natural_image
Symbol of a trash bin crossed with a diagonal line, no text or labels presentGARANZIA
natural_image
Simple line drawing of a trash bin with crossed lines indicating no waste or discharge (no text or symbols)GARANTÍA
INTRODUCTION
natural_image
Simple line drawing of a trash bin with crossed lines indicating no waste or discharge (no text or symbols)GARANTIE
OMGANG MET HET APPARAAT
natural_image
Symbol of a trash bin crossed with a diagonal line, representing waste sorting or disposal (no text or labels)GARANTIE
natural_image
Symbol of a trash bin crossed with a diagonal line, no text or numbers presentالمعطيات التقنية
- / 0, فولت ۲۵.-۲۲.
1.1Amir
۲۷۵
1.0-8
3
حوالي ٢٠-٥ دقائق
حوالي ٢٣٠ مم/د
م.١٩
الجهد الكهرباني
الteryار
الاستطاعة
سماكة الصفيحة
natural_image
Symbol of a trash bin crossed with a diagonal line, representing waste sorting or disposal (no text or labels)GARANTI
natural_image
Simple line drawing of a trash bin with crossed lines indicating no waste or discharge (no text or symbols)ΕΓΓΥΗΣΗ
natural_image
Simple line drawing of a trash bin with crossed lines indicating no waste or restriction (no text or symbols)GARANTI
natural_image
Symbol of a trash bin crossed with a diagonal line, representing waste sorting or disposal (no text or labels)GARANTIE
natural_image
Simple line drawing of a trash bin with crossed lines indicating no waste or discharge (no text or symbols)GWARANCJA
natural_image
Simple line drawing of a trash bin with crossed lines indicating no waste or discharge (no text or symbols)保修
您的机器保修期为24个月。
请您务必保管好购买凭证和原厂包装。
如果对机器有问题,请向您的经销商咨询。
Brand : GEHA
Model : A4 BASIC
Category : Laminator