
DVS 4232 - Audio Amplifier MAGNAT - Free user manual and instructions
Find the device manual for free DVS 4232 MAGNAT in PDF.
| Product type | Audio amplifier with multimedia player |
| Brand | MAGNAT |
| Model | DVS 4232 |
| Output power (RMS) | Subwoofer: 40 W, Front/center speakers: 3 x 15 W |
| Maximum power (peak) | 200 W |
| Dimensions (W x H x D) | 970 x 200 x 130 mm |
| Weight | Approximately 6 kg |
| Power supply | 230 V ~ 50 Hz |
| Power consumption | 150 W (max) |
| Audio inputs | 2x optical, 2x coaxial, AUX (cinch), TV (cinch) |
| Outputs | Subwoofer (cinch), Composite video (cinch) |
| Playback media | USB, SD/MMC/MS (audio, video, images) |
| Supported audio formats | MP3, WMA, etc. (not specified) |
| Listening modes | Stereo, Vocal, Pro Logic (Movie/Music) |
| Remote control | Yes, with lithium battery (CR2025) |
| Display | LED, OSD menu |
| Cleaning | Dry cloth, no solvents |
| Safety | Overvoltage and electrostatic discharge protection |
| Repairability | Do not open, consult a specialist |
| Included accessories | Remote control, battery, video cable, coaxial cable, stereo cable, wall mount, manual |
Frequently Asked Questions - DVS 4232 MAGNAT
User questions about DVS 4232 MAGNAT
0 question about this device. Answer the ones you know or ask your own.
Ask a new question about this device
Download the instructions for your Audio Amplifier in PDF format for free! Find your manual DVS 4232 - MAGNAT and take your electronic device back in hand. On this page are published all the documents necessary for the use of your device. DVS 4232 by MAGNAT.
USER MANUAL DVS 4232 MAGNAT
thank you for choosing the Magnat DVS 4232.
Please read the following information carefully before starting to use your DVS 4232.
CONTENT
Safetey precaution 16
Instructions for disposal 16
Description of the unit 17
Description of the remote 18
Connections 19
System basic operation 20
System Setup 21
Language Setup 22
Video Setup 22
Speaker Setup 23
Digital Setup 23
Memory cards 24
Maintenance & troubleshooting 25
Specifications 26
SAFETY PRECAUTION

This symbol warns the user that high voltage is used within the device which can result in electric shock.

This symbol makes the user aware that there are important notes in the enclosed instruction manual which must be observed.

CAUTION
RISK OF ELECTRIC SHOCK DO NOT OPEN

Warning: Do not open! Risk of electric shock! To reduce the risk of fire or electric shock, do not expose this unit to rain or moisture.
- Please read the instruction manual carefully before use and keep it in a safe place.
This device is only intended for use with 230V / 50Hz AC voltage. - Only operate the device at an ambient/room temperature between 0^ and 40^ .
- The ventilation slots should not be covered by any items (e.g. curtains, newspaper, etc.) in order to ensure sufficient ventilation for the device. Please do not position any sources of heat, such as radiators, ovens, naked flames or other devices that generate heat in close proximity to the device.
- The device and the remote control should not be exposed to dripping or splash water or high levels of humidity.
No objects filled with liquids, such as vases, shall be places on the unit.
In the event of contact with moisture or liquids remove the mains adapter immediately.
Only clean the device using a dry cloth. - Do not use any cleaning agents or chemical solvents when cleaning, as these could damage the surface of the device.
- Only open the device to remove the packaging foam from the end tubes.
- The mains cable must always be operational. The device should not continue to be operated if there is visible damage to the mains cable. Adamaged cable should not be repaired, but must be replaced.
- Do not connect or remove the mains cable with damp hands.
Always refer to a qualified specialist for any maintenance or repair work.
If the device is not going to be used for a prolonged period, it should be switched off at the mains. - Please remove the mains plug in the event of thunderstorms.
INSTRUCTIONS FOR DISPOSAL
In accordance with European Directive 2002/96/EC all electrical and electronic appliances must be disposed of separately via local collection points. Please observe the local regulations and do not dispose of your old appliances with normal household waste.
FRONT VIEW
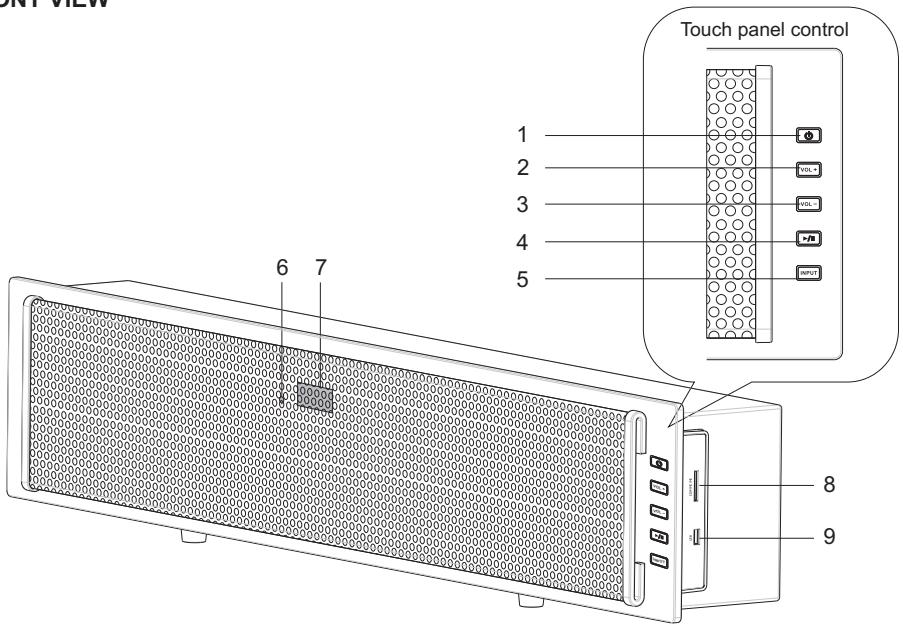
Note: The touch screen panel requires large area of sensible contact, we recommend user to use thumb to operate the panel for better control.
BOTTOM VIEW
- Standby button
- Master volume up button
- Master volume down button
- Play/Pause button
- Input select button
- Remote sensor
- LED Display
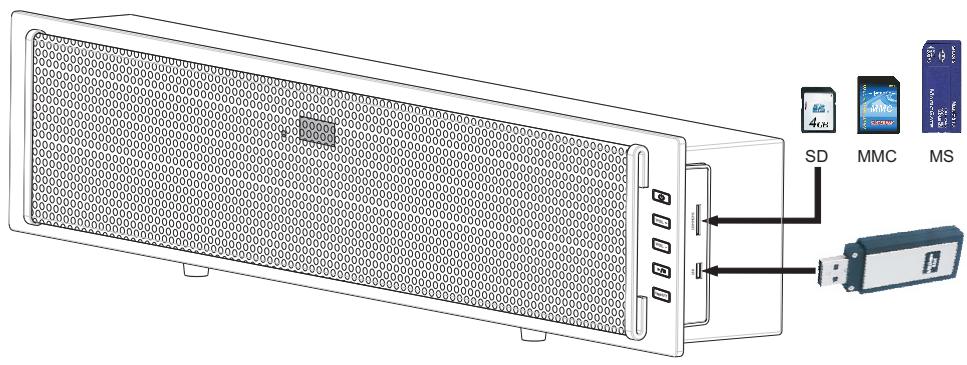
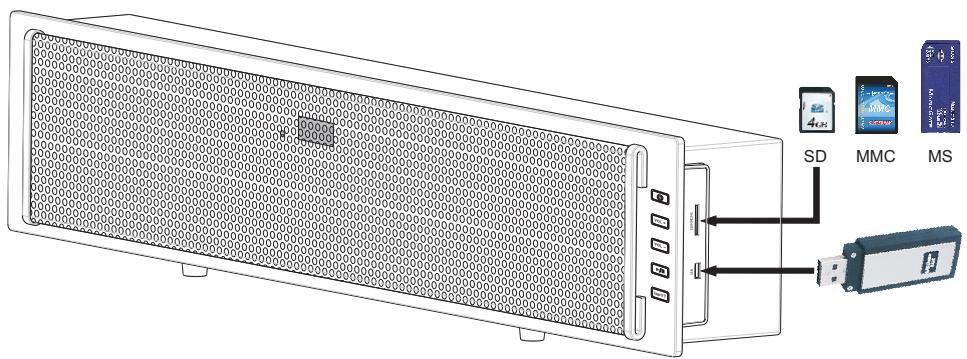
- SD/MMC/MS card reader
- USB Connector
- AC Cord
-
Main Power Switch
-
Fuse
- Video Output Connector
- Subwoofer Output Connecto
- Aux Input Connector
- TV Input Connector
- Coaxial1 Input Connector
- Optical1 Input Connector
- Optical2 Input Connector
- Subwoofer Output Switch(ON/OFF)
21.Wall Mount Bracket -
Coaxial2 Input Connector
-
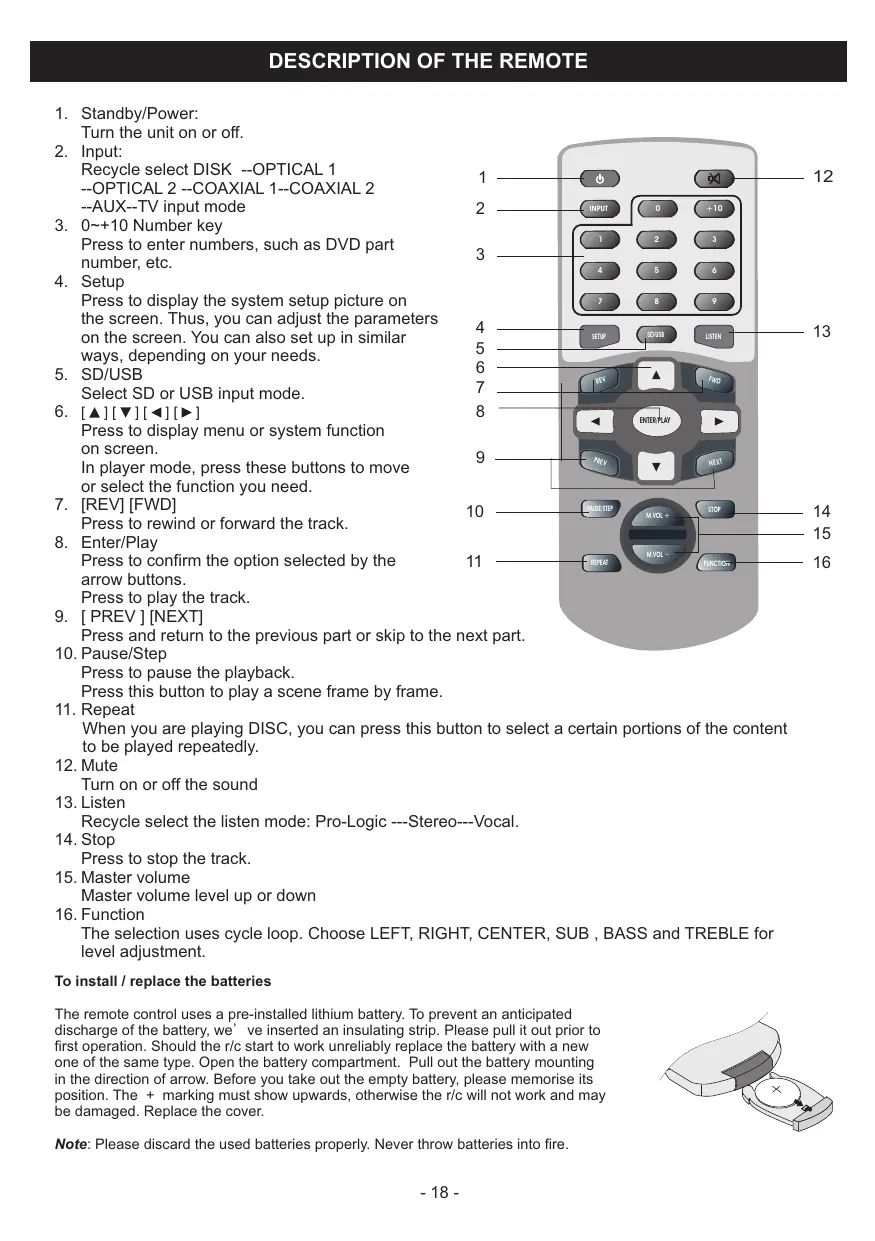
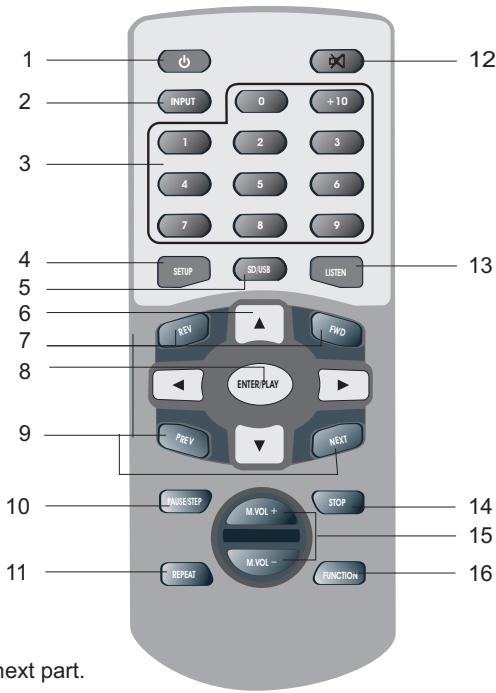
Standby/Power:
Turn the unit on or off.
- Input:
Recycle select DISK --OPTICAL 1
--OPTICAL 2 --COAXIAL 1--COAXIAL 2
--AUX--TV input mode
- 0 +10 Number key
Press to enter numbers, such as DVD part number, etc.
- Setup
Press to display the system setup picture on the screen. Thus, you can adjust the parameters on the screen. You can also set up in similar ways, depending on your needs.
- SD/USB
Select SD or USB input mode.
- [▲][▼][<][>]
Press to display menu or system function on screen.
In player mode, press these buttons to move or select the function you need.
- [REV] [FWD]
Press to rewind or forward the track.
- Enter/Play
Press to confirm the option selected by the arrow buttons.
Press to play the track.
- [PREV] [NEXT]
Press and return to the previous part or skip to the next part.
- Pause/Step
Press to pause the playback.
Press this button to play a scene frame by frame.
- Repeat
When you are playing DISC, you can press this button to select a certain portions of the content to be played repeatedly.
- Mute
Turn on or off the sound
- Listen
Recycle select the listen mode: Pro-Logic ---Stereo---Vocal.
- Stop
Press to stop the track.
- Master volume
Master volume level up or down
- Function
The selection uses cycle loop. Choose LEFT, RIGHT, CENTER, SUB, BASS and TREBLE for level adjustment.
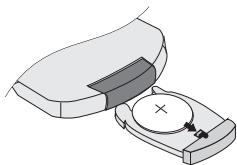
To install / replace the batteries
The remote control uses a pre-installed lithium battery. To prevent an anticipated discharge of the battery, we've inserted an insulating strip. Please pull it out prior to first operation. Should the r/c start to work unreliable replace the battery with a new one of the same type. Open the battery compartment. Pull out the battery mounting in the direction of arrow. Before you take out the empty battery, please memorise its position. The + marking must show upwards, otherwise the r/c will not work and may be damaged. Replace the cover.
Note: Please discard the used batteries properly. Never throw batteries into fire.
CONNECTIONS
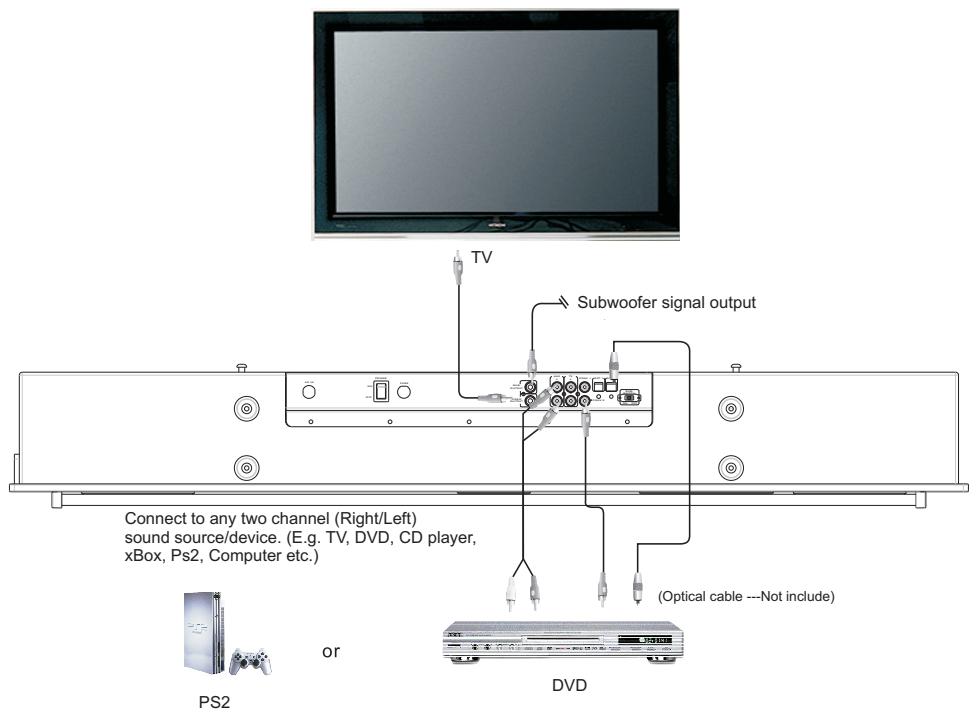
Connect to USB and SD/MMC/MS card.
Note:
- Do not connect the power cord into an AC outlet until all connections are made and are correct.
- Please turn on the unit before turn on the external active subwoofer.
- Please turn off the external active subwoofer before turn off the unit.
1. ON/OFF
Plug in the power cord to the outlet, switch the MAIN POWER to ON position at the back of the unit, the unit goes into standby mode, the LED displays "HELLO". Press STANDBY button on the front panel or on the remote control to start the operation of the system. The system will automatically detect any input signal. If there is no signal present, the LED will display "NO SIGNAL".
- Note: After shut off the unit, please wait at least 3 seconds before turn on it again.
2. INPUT MODE
The system is not connect the USB or SD memory card:
Press INPUT button on the front panel or on the remote control to cycle through the selections:
OPTICAL 1 --OPTICAL 2 --COAXIAL 1--COAXIAL 2--AUX--TV--USB/SD/MS/MMC input mode.
The system is connect the USB memory card:
Press INPUT button on the front panel or on the remote control to cycle through the selections: OPTICAL 1 --OPTICAL 2 --COAXIAL 1--COAXIAL 2--AUX--TV--USB input mode.
The system is connect the SD memory card:
Press INPUT button on the front panel or on the remote control to cycle through the selections:
OPTICAL 1--OPTICAL 2--COAXIAL 1--COAXIAL 2--AUX--TV--SD input mode.
The system is connect the USB and SD memory card:
Press INPUT button on the front panel or on the remote control to cycle through the selections:
OPTICAL 1 --OPTICAL 2 --COAXIAL 1--COAXIAL 2--AUX--TV--USB input mode. The system
will select the USB input signal preference, then you can press USB/SD button to select the SD signal.
3. LISTENING MODE
Press LISTEN button on the remote control to cycle through the listening modes:Stereo--Vocal--Pro-Logic.
4. VOLUME ADJUSTMENT
(1) Master volume adjustment
Master volume is controlled by the MASTER VOLUME +/- button on the remote control or VOL +/VOL - button on the front panel.
(2) Subject volume adjustment
Press FUNCTION button repeatedly to recycle select subject volume : TREBLE --BASS --FL --FR --CENTER --SUBWOOFER. Then press MASTER VOLUME button to control subject volume level up or down.
5. MUTE
Press the MUTE button on the remote control, the system goes into mute mode. Press MUTE button again to disable the mute mode. The mute function will also be canceled automatically by pressing the MASTER VOLUME +/- buttons.
6. SELECT SUBWOOFER OUTPUT
To connect an external active subwoofer, connect the monaural input jack of your subwooer to the SUBWOOFER OUTPUT jack of this unit. If a subwoofer is connected the unit, switch the SUB.SWITCH at the rear panel in OFF position.
(The system default SUB. SWITCH in ON position.)
The system can connect your TV use video output connector on the rear panel.
Using the system setup menus:
- Press the SETUP button on the remote control to display the SETUP menu as shown below.
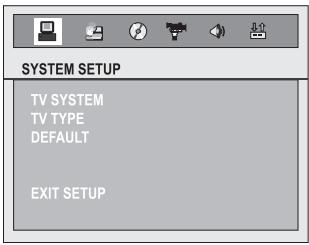
- Use the [][] buttons to select one of the SETUP options, highlight your desired selection with in each SETUP menu and press ENTER/PLAY button to confirm.
- To exit the menu and go to another SETUP menu, use [][] button to select EXIT SETUP.
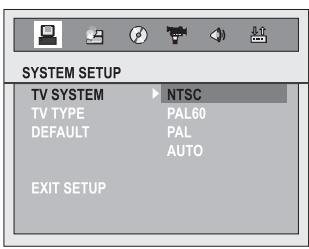
System Setup
Use [][][][] buttons to select the highlighted mark to the option to be set, and use ENTER/PLAY button to confirm.
- TV SYSTEM: To be selected in accordance with the color system of the TV to be connected.
a) NTSC: For NTSC zone, you can select "NTSC". (Used in the USA, Canada and Japan)
b) PAL 60: For PAL 60 uniform zone, you can select "PAL 60".
c) PAL: For PAL uniform zone, you can select "PAL". (Used in Western Europe)
d) AUTO: For multiple zone, you can select "AUTO".
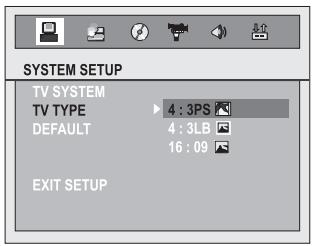
- TV TYPE:
a) 4:3PS (full-image scanning): available of the TV with average dimension. When a wide-screen picture is played, the left and right sides of the picture will be deleted and the picture will be seen on the screen.
b) 4:3LB (mailbox): please choose this option for a TV with average dimensions. When the wide-screen picture is played, you will see black rims on the top and bottom of the TV screen.
c) 16:09 (wide screen): choose this option if the system connects to a wide-screen TV.
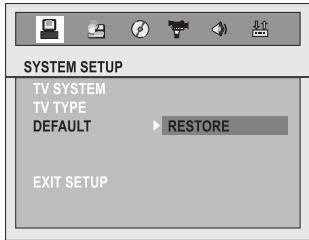
System Setup
DEFAULT: All functions resume initial statuses if you choose this option.
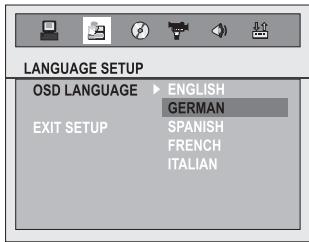
Language Setup
Select the language here, which is to be used for the screen display of the menus and the status information.
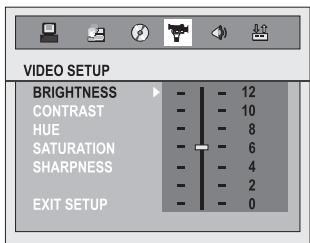
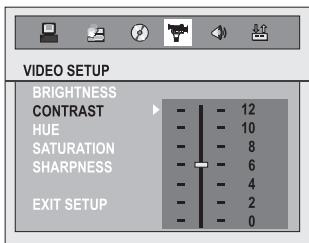
Video Setup
Here you can regulate the different parameters of the image representation. Please select the desired function, then press ENTER and adapt the value with the [][] -keys according to your desire.
Speaker Setup:
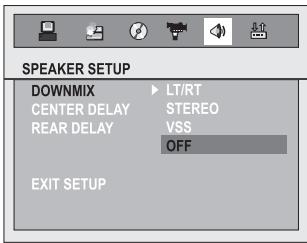
Downmix
a) LT/RT: you can select this option to decrypt the signal so as to present a vivid theater effect, provided that your DISC contains PRO LOGIC Dolby stereo effect.
b) STEREO: at 5.1 sound channel output, the audio outputs to 5 speakers and a sub-woofer. At 2 sound channel output, the audio outputs to left and right speakers.
c) VSS(Virtual circumferential sound): if you play a DISC with 5.1 sound channel mechanism, the main amplifier outputs virtual circumferential effect.
d) OFF: when select OFF, becomes 5.1 output mode.
Center Delay
This option allows you to set intermission delay time.
Note: available only at 5.1 sound channel mode.
Rear Delay
This option allows you to adjust the setup of circumferential delay time.
a) LINE OUT: To zip the inputted signals linearly. The volume is low and, therefore, you should use this option at nighttime.
b) RF REMOD: Volume is high and is suitable for daytime.
Dynamic Range
You can change the zip mode to LINE OUTPUT in order to adjust linear zip radio and obtain the zip effects for different signals. If you choose FULL, the peak value of audio signal is minimum, and becomes maximum if you choose off.
Note: This option is available only when the system is set as "5.1 sound channel".
Dual Mono
This option allows you to set the output methods for the left and right audio signals. There are 4 modes: stereo, left sound channel, right sound channel, and mixed sound channel, to be selected according to the AC-3 KARAOKE mode.
Prologic
a) MOVIE MODE: This option allows you to set Dolby Pro Logic II sound mode is movie.
b) MUSIC MODE: This option allows you to set Dolby Pro Logic II sound mode is music.
c) OFF: Turnoff the Dolby Pro Logic II sound mode.
Playing audio, picture and video files stored on memory cards:
Turn the system On as usual.
- Insert your flash memory card containing MP3 audio/JPEG files into the memory card slot. Note: The card only be inserted one way, push it in as far as, it will go until it locks in place.
The system will read the information on the card. If the system connected TV, the screen show as following:
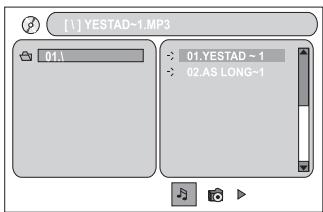
Play MP3 audio file

Show JPEG picture file
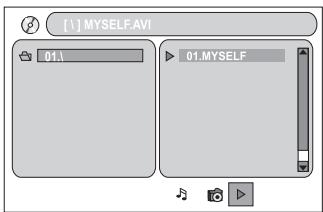
Play AVI video file
- Press the ENTER/PLAY button on the remote control to begin playback. Or press [▶/■] button
on the front panel to begin playback.
Press [▶/■] button on the front panel to pause playback, press it again to resume playback. - Press PREV or NEXT button repeatedly during playback to skip to the previous or next track.
- Press REV or FWD button to fast reverse or fast forward.
(Fast forward): FF 2X FF4X FF8X FF20X PLAY
(Fast reverse): FR 2X FR4X FR8X FR20X PLAY
- Press STOP button to stop playback.
Press REPEAT button repeatedly to select one of the following repeat modes:
REP ONE FOLDER REPEAT REP ALL PLAY
Note: When playing SD/MMC, press the SD/USB button to select USB read mode, press the
SD/USB button again to resume the previous mode.
| ISSUE | CAUSED BY | SOLUTION |
| No sound from system | 1. System does not connected with power. 2. The power does not switch on. | 1. Check with the power plug. 2. Make sure the power switch at the back pane is on. |
| No sound effect from speaker when choose DVD/5.1 output mode | Confirm DVD player is set up for 5.1 output | Setup the DVD to output audio in 5.1 |
| Distortion occurred when in high volume | The sound device has high level signal output | Turn down the master volume of the system |
Note A:
The proper combination of input and output mode (Both the Active Subwoofer and the supply source, i.e CD, MP3, VCD, DVD...) will produce optimize sound quality. Please refer to both Instruction Manual.
Some DVD device has high level signal output. When the Master Volume is turn high until the distortion occurs, please turn down the Master Volume to prevent damaged to the speaker unit and amplifier.
Note B:
When this product is subjected to strong external interference (mechanical shock, excessive static electricity, abnormal supply voltage due to lighting, etc.) or it is operated incorrectly, it may malfunction. If such a problem occurs, please do the following to reset the system.
- Set the system to STANDBY mode and turn the POWER on again.
- If the system is not restored using the previous operation, turn off the MAIN POWER switch, unplug the power cord plug for few minutes and try to on it again.
The product has self-protection act when shocked by static electricity, and all functions can be used normally re-start.
OUTPUT POWER:
Subwoofer (RMS) 40 W
Front-/ Center-Speaker (RMS) 3x 15
Maximal Output Power (peak) 200 W
Dimension (W x H x D) 970 x 200 x 130 mm
SCOPE OF DELIVERY:
Remote control 1 Stk.
Button-type battery 1 Stk.
RCA video cable (yellow) 1 Stk.
RCA coaxial cable (orange) 1 Stk.
RCA stereo cable 1 Stk.
Wall mount brackets 2 Stk.
User manual 1 Stk.
Subject to technical Change
Chere cliente, cher client,
INSTRUCTIONS POUR LA MISE AU REBUT
Center Delay / Rear Delay
Dimensioni (L x A x P) 970 x 200 x 130 mm
- STANDBY/POWER:
BkIIOUaET N BbIKIOUaET npn6Op. - INPUT:
При NOВTOPHOM Нажати можно Вьбрасы мөхду --DISK --OPTICAL 1 --OPTICAL 2 --COAXIAL 1 --COAXIAL 2 --AUX --TV в качесе вхда.
- KlaBnUn c uncpamm MeJy oT 0 do +10.
BvOJuHp.
- SETUP:
Ioka3bIbaet Bam MeHIO hAcTroPoiKn Ha IoDKIIIOUeHHOM 3KpaHe. C eTo NOMOUsIO Bbl MOxETe IpoUN3BecTN HAcTroPoiKy CnCTEmbl.
- SD/USB:
Bb6npaet Mejdy BocnpOn3BeJeHneM HocnteJe namrTn USB nn SD.
- [▲][▼][▲][▶]:
C NOMOJIbIO 3TIX KJIaBNI BbI MoKTe DIBrAITbcRA MEKJy MeHIO YCTPOICTBa.
- [REV] [FWD]:
YckopeHHa nepeMOTka Bnepedd nnHa3a.
- ENTER/PLAY:
Bo3MOxHocTb IcNoIb3OBAHnH HocHTeNeI NaMrtu (USB n KApTbSD/MMC/MS).
BhImaHne!
Hn B KOem cIyae He BCTaBnIe CeTeByIO BuJIky Bpo3eTKy, Noka He 6ydy T BblONHeHbI HaIneKaUIM O6pa3OM BCE OCTaJIbHbIe IOnKIIuOHeHIn.
Ipejde yem BBectn B 3KcPiyaTaunio BHeuHn ca6Byep, Heo6xOJIMO BKIOChTb np6Op.
Pepkde yem OTKIOHTb np60p, cneyET BbIKIOHTb 3TOT ca6Byep.
1. ON/OFF
YctaHOBNTe CeTeBOy BbIKIouateJIb Ha o6paTHoN CTOpOHe npi60paB aNoIOJxHne "ON". Pn6bOp HaxoITcRA TeNEPB B pexKIMe OxuHaH (Standby), Ha CBeTOINODHom INHdkaTOpE BbcBceHNaBaETcR "HELLO". HaxMITE Standby-KnaBnUHa cAMOM npi6ope IIn Ha Nylte DnCTaHIOHNOHOrO ynpaBHeHnI TOr, YtOb6bl BkIIOnuHTb ycToPcTBo. CnCTema pacno3Haet JIO60I NOCTyaIooHn BXoHOB CNrHaN. Ecn nCrlHaN He noCTyNaET, 3axnraetc BcTeOINODHaadPiNcB "NO SIGNAL".
Bhumaue: Pocne Bbkiuoyehn npubopa Heobxodumo ndooxdamb He mehee 3 cekyhd, npexde yem EKIOUchmb ezo CHOba.
2. BblOBP BXOda (IOBTOPHOE HAXATNE KJIABUNIN INPUT) :
Систema He сбязанс hoicntelma namrtn USB nii SD:
Hajtmite klabu y INPUT ha npibope nii ha npbte Dv dny Bb6opa Bxoda:
OPTICAL 1--OPTICAL 2--COAXIAL 1--COAXIAL 2--AUX--TV--USB/SD/MS/MMC.
Систema CB3aHa c KapToi namrtn USB:
Hajtmite klabu y INPUT ha npibope nii ha npbte Dv dny Bb6opa Bxoda:
OPTICAL 1--OPTICAL 2--COAXIAL 1--COAXIAL 2--AUX--TV--USB.
Систema CB3aHa c KapToi namrtn SD:
Hajtmite klabu y INPUT ha npibope nii ha npbte Dv dny Bb6opa Bxoda:
OPTICAL 1--OPTICAL 2--COAXIAL 1--COAXIAL 2--AUX--TV--SD.
Систema CB3aHa c KapTamy namrtn USB n SD:
Hajtmite klabu y INPUT ha npibope nii ha npbte Dv dny Bb6opa Bxoda:
OPTICAL 1--OPTICAL 2--COAXIAL 1--COAXIAL 2--AUX--TV--USB input. Д�� кapсьмета obtuho bivbpaet bXod dny USB. Посlete зтогу bby moxe Te bivbpa TB Kappomoubu Klabu uIN USB/SD.
3. BNDblPEXKMOB INPOCJUYUNBAHNA:
Hakmnte KlaBnuy LISTEN dIy nepeKluoyehn Mekdy pa3JIuHbIMn peKImaMn npocIyUWBaHn: --Stereo --Vocal --Pro-Logic.
4. PEGYUNPOBKA YPOBHA:
(1) YctaHOBka o6IeTo yPoBnI rPOMKoCTn: YpoBeHb rPOMKoCTn yCtahAbNlBaETc npi nOmoI KnaBnM NASTER VOLUME +/- ha nyIbTe DnCTaHIOHnOуnpaBJIeHnI nn KnaBnV VOL +/VOL napeDne I naHeI npi6opa.
(2) CnepaunbnaHay yctanOBka ypOBH: HaxaTmEKNabuNFunction npo3BOOnTCBbl6Op MeJdy CneDyUOuMm ypOBHm : TREBLE--BASS--FRONT-L--FRONT-R--CENTER--SUBWOOFER. CootBeTcTBouuN ypOBeNb yctanABnBaETc3aTeM npri NMOOu KNabuN MASTER VOLUME +/-.
5. MUTE:
HajatneM KlaBnM MUTE Ha nyIbTe Dy OTKJIouaETc 3ByK CNCTeMbI, pRi NIOBTOPHOM HajaTNI 3ByK CHOBA BKLIOUaETc. Be33ByKOBo PekIM BblKlIOUaETc TaKKe I npi HajaTNI KlaBnM MASTER VOLUME + / -
OCTabJIaEM 3a cOboI npaBO Ha TexHnueeCKne I3MeHeHnY.
D
Congratulations! You have made a wise selection in becoming the owner of a Magnat equipment. Due to high quality Magnat products have earned an excellent reputation through the western world. And this high quality standard enables us to grant a 2-years warranty for Magnat products. The equipments are checked and tested continuously during the entire production process. In case you have problems with your Magnat equipment, kindly observe the following:
- The 2-years guarantee period commences with the purchase of the component and is applicable only to the original owner.
- During the guarantee period we will rectify any defects due to faulty material or workmanship by replacing or repairing the defective part at our discretion. Further claims, and in particular those for price reduction, cancellation of sale, compensation for damages or subsequent damages, are excluded. The guarantee period is not altered by the fact that we have carried out guarantee work.
- Unauthorized tampering with the equipment will invalidate this guarantee.
- Consult your authorized dealer first, if guarantee service is needed. Should it prove necessary to return the component to the factory, please insure that the component is packed in original factory packing in good condition the quality control card has been filled out and enclosed with the component, your enclose your receipt as proof of purchase.
- Excluded from the guarantee are: • Illuminates • Wear parts • Batteries • Shipping damages, either readily apparent or concealed (claims for such damages must be lodged immediately with forwarding agent, the railway express office or post office). • Scratches in cases, metal components, front panels, etc. (You must notify your dealer directly of such defects within three days of purchase.) • Defects caused by incorrect installation or connection, by operation errors (see operating instructions), by overloading or by external force. • Equipments which have been repaired incorrectly or modified or where the case has been opened by persons other than us. • Consequential damages to other equipments. • Reimbursement of costs, without our prior consent, when repairing damages by third parties.
GARANTIEKARTE WARRANTY CARD
Typ/Type
Name and address of the dealer/stamp
Käufer/Customer
Name/Name
Straße/Street
PLZ, Ort/City
Land/Country
Kaufdatum/buying date
No warranty without receipt!
Magnat®
Lise-Meitner-Str. 9 D-50259 Pulheim Germany
Tel. +49 (0) 2234 / 807 - 0 Fax +49 (0) 2234 / 807 - 399


- CONTENT
- SAFETY PRECAUTION
- CAUTION
- INSTRUCTIONS FOR DISPOSAL
- To install / replace the batteries
- CONNECTIONS
- Note:
- ON/OFF
- INPUT MODE
- LISTENING MODE
- VOLUME ADJUSTMENT
- MUTE
- SELECT SUBWOOFER OUTPUT
- System Setup
- Language Setup
- Video Setup
- Speaker Setup:
- Downmix
- Center Delay
- Rear Delay
- Dynamic Range
- Dual Mono
- Prologic
- Playing audio, picture and video files stored on memory cards:
- Note A:
- Note B:
- OUTPUT POWER:
- INSTRUCTIONS POUR LA MISE AU REBUT
- Center Delay / Rear Delay
- BhImaHne!
- BblOBP BXOda (IOBTOPHOE HAXATNE KJIABUNIN INPUT) :
- BNDblPEXKMOB INPOCJUYUNBAHNA:
- PEGYUNPOBKA YPOBHA:
- MUTE:
- D
- GARANTIEKARTE WARRANTY CARD
- Magnat®
Brand : MAGNAT
Model : DVS 4232
Category : Audio Amplifier