
MC 1 - Audio Amplifier MAGNAT - Free user manual and instructions
Find the device manual for free MC 1 MAGNAT in PDF.
| Product type | Audio amplifier / SACD/CD receiver |
| Brand | MAGNAT |
| Model | MC 1 |
| Output power (nominal, 4 Ohms) | 2 x 80 W (20 Hz - 20 kHz, THD < 1.0%) |
| Output power (nominal, 8 Ohms) | 2 x 60 W (20 Hz - 20 kHz, THD < 1.0%) |
| Peak power (1 kHz, 4 Ohms) | 2 x 150 W |
| Frequency response | 5 Hz - 100 kHz (-3.0 dB); 20 Hz - 20 kHz (-0.5 dB) |
| Signal-to-noise ratio (CD/Aux/Line/Tape) | 95 dB |
| Signal-to-noise ratio (Phono) | 85 dB |
| Input sensitivity (AUX/Line/Tape) | 250 mV / 33 kΩ |
| Input sensitivity (Phono MM) | 5 mV / 47 kΩ |
| Bass adjustment | ±10 dB / 100 Hz |
| Treble adjustment | ±10 dB / 10 kHz |
| FM tuner: frequency range | 87.5 - 108 MHz |
| AM tuner: frequency range | 531 - 1602 kHz |
| Dimensions (W x H x D) | 360 x 110 x 400 mm |
| Weight | 8.9 kg |
| Maximum power consumption | 200 W |
| Standby power consumption | 1.4 W |
| Mains voltage | 230 V / 50 Hz |
| Audio inputs | CD, TUNER, PHONO (MM), TAPE, AUX, LINE (3.5 mm jack) |
| Outputs | Speakers (4-8 Ohms), headphone (3.5 mm jack), REC (fixed), digital coaxial and optical |
| Special features | SACD/CD player, RDS tuner, 80 radio presets, Sleep function, Direct Sound Mode (DSM), A-B repeat |
| Included accessories | Remote control, batteries (2x AA), power cord, AM loop antenna, FM indoor antenna |
Frequently Asked Questions - MC 1 MAGNAT
User questions about MC 1 MAGNAT
0 question about this device. Answer the ones you know or ask your own.
Ask a new question about this device
Download the instructions for your Audio Amplifier in PDF format for free! Find your manual MC 1 - MAGNAT and take your electronic device back in hand. On this page are published all the documents necessary for the use of your device. MC 1 by MAGNAT.
USER MANUAL MC 1 MAGNAT
Important notes for installation
Mode d'emploi
DSM Direct Source Modus
Line in (Front Panel)
CD/Aux/Line/Tape 95 dB
Phono 85 dB
12 Safety precautions
12 Instructions for disposal
13 Operational elements and connections
13 Front panel
14 Remote control
15 Rear/connections
15 Installation
15 Speakers
15 Antennas
15 Auxiliary audio devices
15 Initial operation
15 Remote control
16 Functions of the MC 1
16 Functions of the CD player
16 Functions of the tuner
17 RDS (Radio Data Service) functions of the tuner
17 Sound settings
18 Sleep function
18 Other important information
18 Specifications
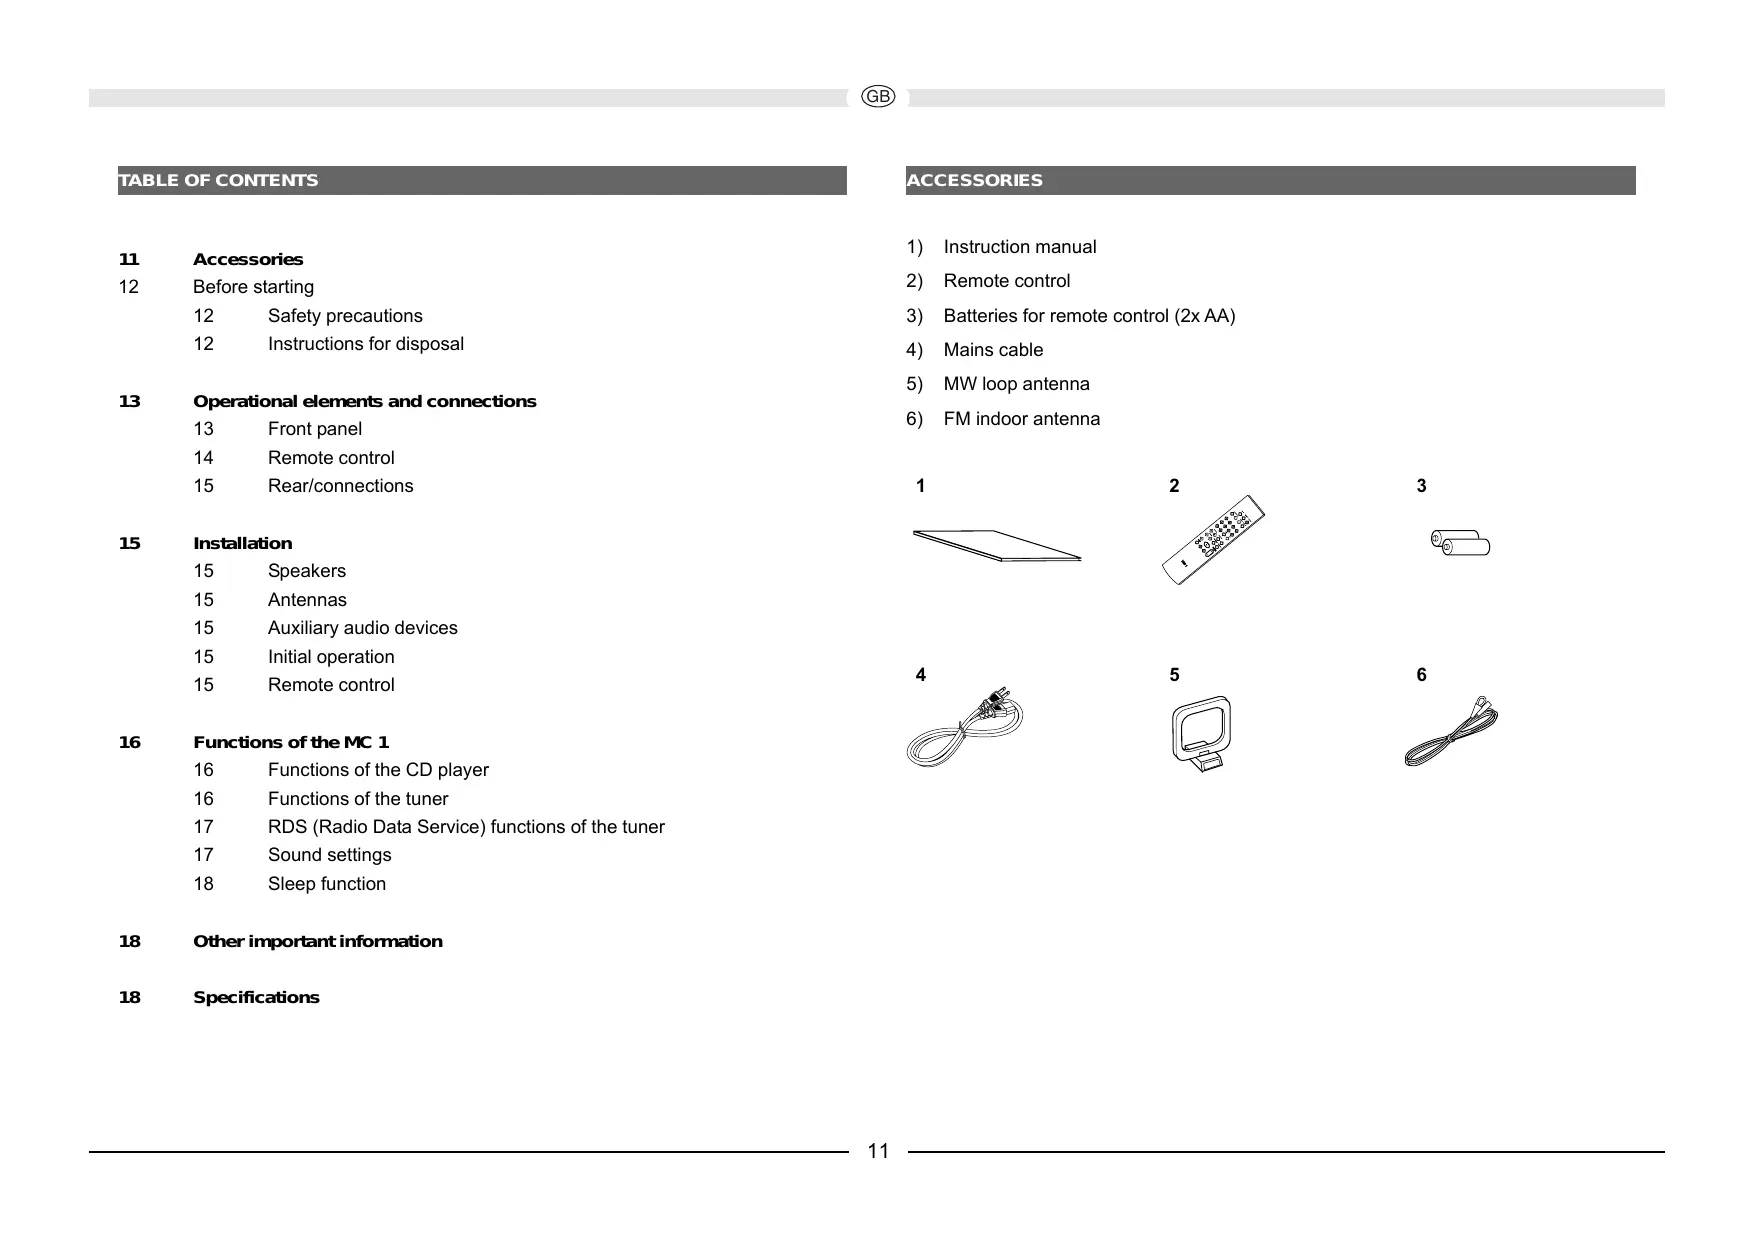
ACCESSORIES
1) Instruction manual
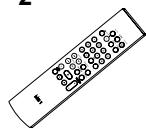
2) Remote control
3) Batteries for remote control (2x AA)
4) Mains cable
5) MW loop antenna
6) FM indoor antenna

2

3

4

5

6
BEFORE STARTING
Dear customer,
Thank you for choosing the Magnat MC 1 SACD/CD Receiver.
Please read the following information carefully before starting to use the MC1.
IMPORTANT SAFETY PRECAUTIONS
- Please read the instruction manual carefully before use and keep it in a safe place
- This device is only intended for use with 230V / 50Hz AC voltage.
- Only operate the device at an ambient/room temperature between 0^ and 40^ .
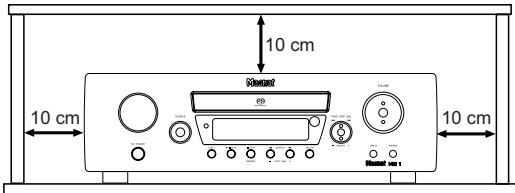
- Make sure there is sufficient ventilation for the device. There must be a minimum gap of 10cm between objects to the side, to the rear and above the device:
- The ventilation slots should not be covered by any items (e.g. curtains, newspaper, etc.) in order to ensure sufficient ventilation for the device. Please do not position any sources of heat, such as radiators, ovens, naked flames or other devices that generate heat in close proximity to the device.
- The device and the remote control should not be exposed to dripping or splash water or high levels of humidity.
- No objects filled with liquids, such as vases, shall be places on the unit.
- In the event of contact with moisture or liquids remove the mains adapter immediately.
- Only clean the device using a dry cloth.
- Do not use any cleaning agents or chemical solvents when cleaning, as these could damage the surface of the device.
- Never open the device.
- The mains cable must always be operational. The device should not continue to be operated if there is visible damage to the mains cable. A damaged cable should not be repaired, but must be replaced.
- Do not connect or remove the mains cable with damp hands.
- Always refer to a qualified specialist for any maintenance or repair work.
- If the device is not going to be used for a prolonged period, switch it off by using the power switch (2) located on the rear of the device (see the section entitled "Rear/connections").
-
Please remove the mains plug in the event of thunderstorms.
-
Only connect the device using a 3-pin power cable with ground wire (earth)! This is part of the original accessories. Only use this original accessory for the power supply or a power cable that has been examined with regards to its safety (e.g. with aTÜV or VDE certificate).
- The safety function of the power cable's earthed plug should not be impaired in any way. The earthed plug has two contacts as well as a protective earth contact (i.e. a total of 3 contacts). The protective earth contact is important for operational safety and it must be in contact with the protective earth contact of the wall socket which supplies the device with electricity. If the earthed plug of the supplied power cable is not applicable with the socket (power supply) in your country, please refer to a qualified technician to exchange the cable.

This symbol warns the user that high voltage is used within the device which can result in electric shock.

This symbol makes the user aware that there are important notes in the enclosed instruction manual which must be observed.

Warning:
Do not open! Risk of electric shock!
To reduce the risk of fire or electric shock, do not expose this unit to rain or moisture.

This symbol informs the user that there is a class 1 laser operating inside the device which does not pose any hazardous threat outside the device.
INSTRUCTIONS FOR DISPOSAL
In accordance with European Directive 2002/96/EC all electrical and electronic appliances must be disposed of separately via local collection points. Please observe the local regulations and do not dispose of your old appliances with normal household waste.
OPERATIONAL ELEMENTS AND CONNECTIONS - FRONT PANEL
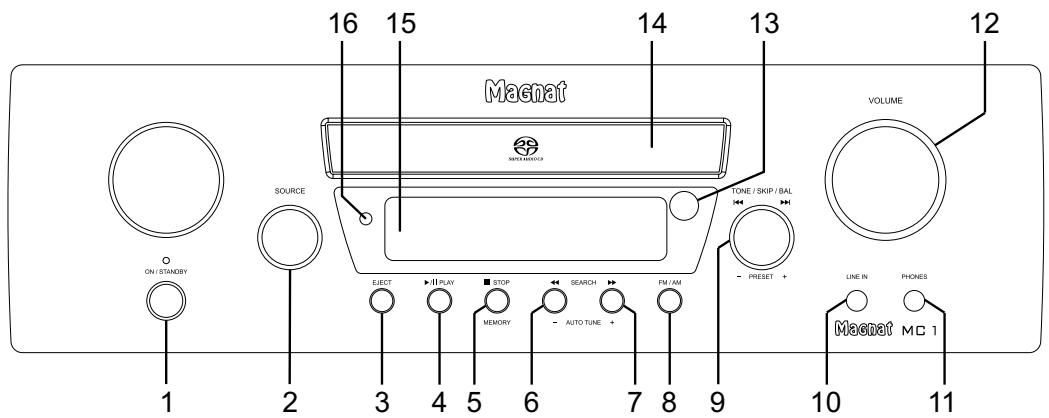
1 Power
Switches the device on when it is in the standby mode. If the LED does not illuminate, actuate the power switch located on the rear of the device. Conversely the device can be switched from power operation to the standby mode.
2 Input selector switch
Used for selecting the input source (CD, TUNER, PHONO, TAPE, AUX, LINE). This is indicated on the display (15) briefly.
3 Eject
Opens or closes the CD compartment.
4 Play/Pause CD
Starts or pauses the playback from a CD.
5 Stop/Memory
CD operation: Stops a CD that is playing.
Radio operation: Opens the internal memory for the station presets.
6.7 Search/Auto tuning
CD operation: Briefly pressing this button activates the search function (forwards/backwards); pressing the button again will stop the search function.
Radio operation:
Brief press: Changes the receiving frequency in 50kHz increments (manual station search)
Press and hold: Searches for the next station on the selected band (automatic station search)
8 FM/AM
Switches between FM stereo, FM mono and AM (only mono).
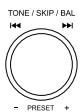
9 Tone/Skip/Balance/Preset
CD operation: Turning the knob selects the next and previous tracks.
Radio operation: Turning the knob calls up the station presets.
The bass, treble and balance can be adjusted by pressing the knob (display: BASS, TREBLE, L/R). The respective
setting can be adjusted by turning the knob. DSM (Direct Sound Mode) can also be switched on, which deactivates any sound settings.
10 Line-in
3.5 mm stereo input jack for an auxiliary audio device (e.g. MP3 player, etc.).
11 Headphones
3.5 mm stereo output jack for headphones. The speakers are deactivated when this jack is used. Set the volume to a low level when connecting headphones.
12 Volume knob
Adjusts the volume. The knob needs to be turned through approximately two revolutions to alternate between minimum and maximum volume. The volume is shown on the display (15). (VOL 00 - VOL 40/max)
13 Sensor for the remote control
Please aim at this sensor when using the remote control.
14 CD compartment
Insert the CD into the compartment with the label facing upwards.
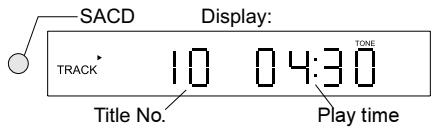
15 Display
Displays the settings you have made.
16 SACD display
Indicates whether an SACD has been inserted.
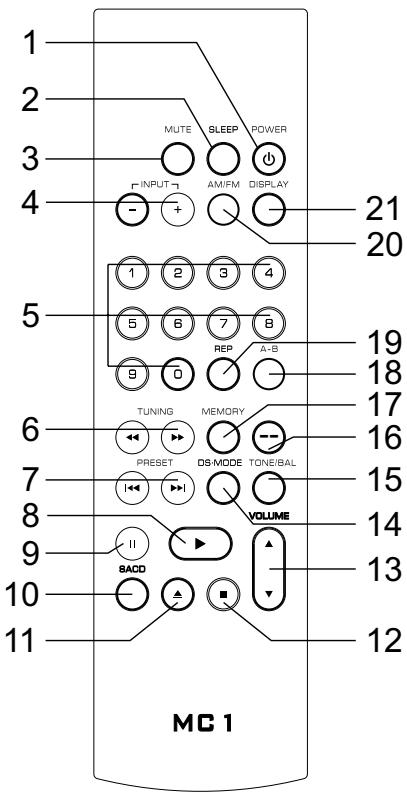
OPERATIONAL ELEMENTS AND CONNECTIONS - REMOTE CONTROL

1 Power
Switches the device on when it is in the standby mode. If the LED does not illuminate, actuate the power switch located on the rear of the device. Conversely the device can be switched from power operation to the standby mode.
2 Sleep
This button activates the sleep mode. The switch off time is reduced in 10 minute intervals each time this button is pressed
(display). To deactivate the mode press this button repeatedly until 00 appears in the display.
3 Mute
Switches the sound on and off.
4 Input (input selection)
The input source can be alternated by repeatedly pressing this button (CD, TUNER, PHONO, TAPE, AUX, LINE). The source is shown in the display.
5 Numerical buttons
CD operation: Direct selection of a track. Radio operation: Direct selection of a preset station. In combination with the -- button (16): Direct input of a station frequency.
6 Search/Tuning
CD operation:
Briefly pressing this button activates the search function (forwards/backwards); pressing the button again will stop the search function.
Radio operation:
Brief press: Changes the receiving frequency in 50kHz increments (manual station setting)
Press and hold: Searches for the next station on the selected band (automatic station setting)
7 Skip/Preset
CD operation:
Skipping to the next or previous track.
Radio operation:
Skipping forwards/backwards to the nearest station preset.
8 Play
Plays the CD if there is one located in the CD compartment.
9 Pause
Pauses a CD or resumes playback from a paused CD.
10 SACD
Switches between the SACD and CD layer if an SACD has been inserted. (only possible for SACD hybrid discs)
11 Eject
Opens the CD compartment.
12 Stop
Stops CD playback.
13 Volume
Increases () or decreases () the volume.
14 DS Mode
This displays the DSM (Direct Sound Mode). This switches the device to linear operation without equalisation. The DSM can be switched using the PRESET buttons (7). If the DSM mode is switched off, the message "TONE" appears in the display.
15 Tone/Balance
Alternates between the settings for bass, treble and balance. The respective setting can be altered using the PRESET buttons (7).
16 -- button
This button allows you to manually enter the station frequency with the numerical buttons.
17 Memory
You can call up the internal station memory using this button.
18 A-B
Selects points A and B for A-B repeat playback.
19 Repeat
Selects the repeat function during CD playback.
20 AM/FM
Selects between AM, FM mono and FM stereo during radio operation.
21 Display
Alternates between the time display and the selected input source. The selected RDS function is also displayed during radio operation.
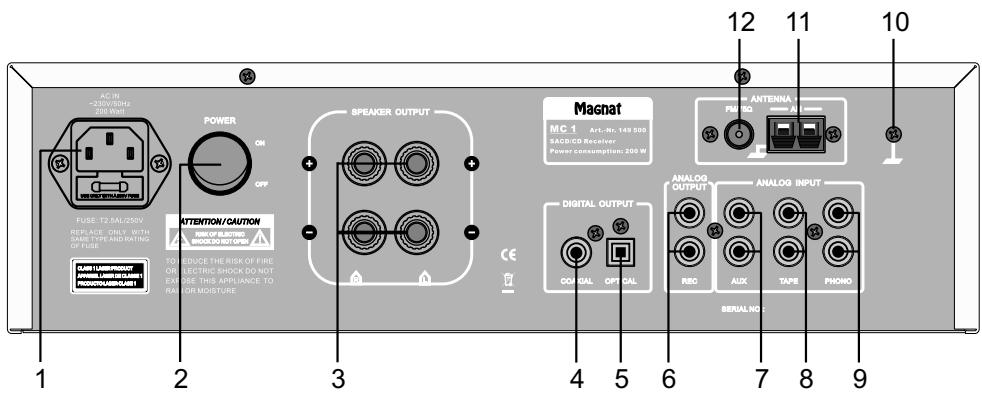
OPERATIONAL ELEMENTS AND CONNECTIONS - REAR / CONNECTIONS
1 Mains connection
For connecting the supplied mains cable.
2 Power switch
Switches the device on and sets it in the standby mode. If the switch is set to the "OFF" position, the device is disconnected from the mains supply.
3 Speaker terminals
For the connection of stereo speakers with an impedance rating of 4-8 ohms (the correct polarity must be taken into account).
4/5 Digital outputs
For the connection of external devices (e.g. Minidisc recorder) via a coaxial (4) or optical (5) digital output.
6 REC output
Fixed level output e.g. for the connection of a tape recorder.
7 AUX input
This is where an auxiliary CD player or tuner can be connected.
8 TAPE input
For the connection of a cassette recorder or a tape recorder.
9 PHONO input
Low level input with RIAA equalisation for record players with a magnetic system (MM).
10 Earth for phono cable
This is where the earth connection of the phono cable is screwed.
11 AM antenna connection
For connecting the supplied AM loop antenna.
12 FM antenna connection
For connecting the supplied FM indoor antenna or a house antenna.
INSTALLATION
Place the device on a firm, even surface while paying attention to the minimum distances.
SPEAKERS
The stereo speakers (impedance of 4 to 8 ohms) are connected to the rear as follows:
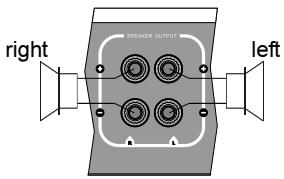
Only use high-quality audio speaker cables with a conductor cross section of min. 1.5 - 2.5mm^2 . Strip approx. 10mm from the cables and twist the ends. Loosen the terminal screws one after the other and insert the stripped ends into the holes. Re-tighten the terminal screws. Make sure you pay attention to the correct polarity.
You can also use prefabricated cables with 4mm banana plugs or forked fittings.
ANTENNAS
Connect the FM indoor antenna or a house antenna (provides better reception) to the rear of the device (12), as well as the MW loop antenna (if required).
AUXILIARY AUDIO EQUIPMENT
Auxiliary audio devices (MP3 players, record players, etc.) are to be connected to the appropriate sockets before starting to use the MC 1.
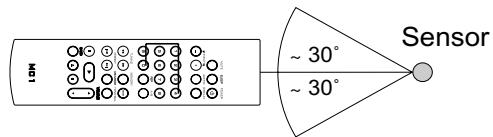
REMOTE CONTROL
When using the remote control aim it at the infrared sensor on the MC 1 (front panel/13).
FUNCTIONS OF THE MC 1
FUNCTIONS OF THE CD PLAYER
Playing a CD
- Open the CD compartment by pressing the EJECT button.
- Insert the CD into the compartment (with the label facing upwards).
- Close the compartment by pressing the EJECT button.
- Press PLAY to listen to the first track on the CD.
Pausing a CD
- Press the PLAY(PAUSE) button to pause the CD.
- Press this button again to resume playback of the CD.
Selecting the track directly
- Turn the TONE/SKIP knob clockwise to select a higher track.
- Turn the knob anti-clockwise to select a lower track.
- Press the PRESET buttons on the remote control.

Searching within a track
- Press the right/left search button to search forwards/backwards within a track respectively. Briefly pressing this button activates the search function;
pressing the button again will stop the search function.
- Press the TUNING buttons on the remote control.


Stopping playback from a CD
Press one of the STOP buttons.

CD repeat mode
The repeat function can only be activated via the remote control.
Repeating a track:
Start the CD. The REP button repeats the current track. The following appears in the display:

Repeating the entire CD:
Start the CD.
Press the REP button twice.
The following appears in the display:

Repeating from point A to point B:
Start the CD.
Press the A-B button at point A, allow the CD to play until it reaches point B and then press the A-B button again.
Stopping the repeat function:
Press the REP button repeatedly until none of the above symbols are illuminated in the display.
FUNCTIONS OF THE TUNER
Selecting the tuner band
- Select TUNER as the audio source using the SOURCE (MC 1) or INPUT button (on the remote control).
- Select AM mono, FM mono or FM stereo using one of the FM/AM buttons.
Automatic station search
- Select TUNER as the audio source and choose the band (see above).
- Use the AUTO TUNE buttons on the front of the MC 1 or the TUNING buttons on the remote control.


Manual station search: Briefly pressing these buttons increases or decreases the tuning frequency by 50kHz .
Automatic station search: Pressing and holding these buttons searches for the next or previous station on the band.
Direct station selection
This function can only be accessed via the remote control.
1st Example:
Setting the station to FM 107.10 MHz. Select TUNER and FM.
Press the "--" button on the remote control. Press the numerical buttons in succession to enter 1, 0, 7, 1, 0.
2nd Example:
Setting the station to FM 91.40 MHz. Select TUNER and FM.
Press the "--" button on the remote control. Press the numerical buttons in succession to enter
9, 1, 4, 0.
Oo
③ ② ⑧
Station presets
- A total of 80 FM and AM stations can be stored in the memory.
- Select the desired station (FM or AM). Open the memory using the MEMORY button on the front panel or on the remote control.
- Choose the desired station number using the TONE/SKIP button on the front panel or via the numerical buttons on the remote control.
- The station number and MEM flash in the display.
- Press one of the MEMORY buttons again to store the station.
- The station number stops flashing and MEM disappears.
- Repeat this procedure to store other stations.
Selecting the preset stations
- Press the SOURCE button and select TUNER as the audio source.
- Turn the TONE/SKIP knob on the front panel or press one of the PRESET buttons on the remote control to select the desired station number.
The memory slot can also be selected directly by using the numerical buttons.
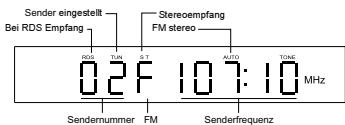
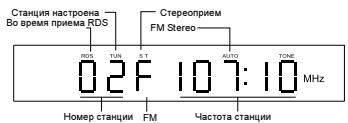
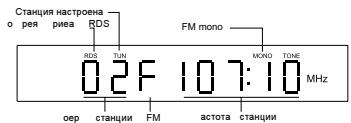
Display during radio operation
FM stereo:
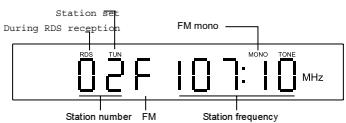
FM mono:
RDS (RADIO DATA SYSTEM) FUNCTIONS OF THE TUNER
RDS is a system which provides information about FM stations that is broadcast together with the station's signal. The MC1 can present this information (about the station, broadcast, etc.) in the display. The RDS functions can be set via the DISPLAY button on the remote control.
RDS functions of the MC 1
- PS (Program Service Name): Displays the name of the programme.
- PTY (Program Type Identification): Displays the type of programme.
- RT (Radio Text): Displays all information for the programme.
- CT (Clock Time): Time
Display sequence when repeatedly pressing the DISPLAY button: PS, PTY, RT station frequency, CT.
If one of these functions is not supported despite reception of an RDS signal, "NONE" will appear in the display.
Messages on the display (with examples)
- When searching for a radio station with an RDS signal, RDS is displayed in red in the display.
- The display shows the station frequency and, if available, the number of the station's preset:

PS: The station name is displayed after approx. 5 seconds:

PTY: This is displayed, if available, by pressing the DISPLAY button:

RT: Press the DISPLAY button again.

Pressing the button again will display the station frequency and another press will display the CT (time).

SOUND SETTINGS
Setting the volume
The volume can be adjusted by using the VOLUME regulator on the front panel or on the remote control. VOL and a value between 00 and MAX (40) then appears in the display.
MUTE on the remote control
The sound can be deactivated using this button. MUTING flashes on the display.
The sound can be reactivated by pressing this button again or by altering the volume.
Adjusting the bass/treble
Repeatedly press the TONE/SKIP/BAL button on the front panel of the MC1 or
TONE/BAL on the remote control until BASS or TRE appears in the display.
Adjust the tone by turning the TONE/SKIP/BAL knob on the front panel or by using the PRESET buttons on the remote control.
DSM Direct Source Mode
Switches off the tone regulator. This can be selected by using the TONE/SKIP/BAL button on the front panel or by using the DS-MODE button on the remote control and it can be switched on and off using TONE/SKIP/BAL or PRESET. (DSM ON = tone regulator off).
Adjusting the balance
The balance setting is selected in the same way as the tone regulator. Press the corresponding button repeatedly until L00 - 00R appears in the display. The balance can be adjusted to the left or right by using TONE/SKIP/BAL or PRESET; for example, when adjusting the balance to the left: L10 - 00R.
SLEEP FUNCTION
This function enables you to set a time after which the device will switch off automatically and change to the standby mode.
- Press the SLEEP button on the remote control. The following appears in the display:
SLEEP 00
- Press the SLEEP button again and the following will be displayed:

- You can reduce the switch-off time in 10-minute intervals by using the SLEEP button. The sleep mode is deactivated at SLEEP 00.
- After the time has been set the display automatically reverts back to its previous status. However, confirmation that the sleep mode is active is visible in the display.
OTHER IMPORTANT INFORMATION
Headphones
- You can connect headphones with a 3.5 mm stereo jack to the socket located on the front of the MC 1.
- Before doing this set the volume to VOL 00.
- The sound from the speakers is automatically disconnected when headphones are inserted.
- Please note that listening to music at high volume via headphones can cause irreparable damage to your hearing!
Line in (front panel)
- This is used for connecting an audio source with a 3.5mm stereo jack.
The other analogue connections on the rear of the MC 1 are designed for RCA cables. If you should have any further queries, please refer to the operating instructions for the respective device.
Phono input
The MC 1 has a high quality phono preamplifier with RIAA equalisation. Only record players with a magnetic system (MM) or a moving coil system with high level output (high output MC) may be connected here.
Most of these devices have an additional earth wire. Please connect this to the rear of the MC 1 using the screw (10) in order to minimise the degree of humming.
SPECIFICATIONS
Amplifier
| Power output: | ||
| Rated power | 20 Hz – 20 kHz, THD < 1.0%, 4 ohm | 2 x 80 w |
| 20 Hz – 20 kHz, THD < 1.0%, 8 ohm | 2 x 60 w | |
| Pulse power | 1 kHz, 4 ohm | 2 x 150 w |
| Frequency response: | ||
| 5 Hz – 100 kHz (-3.0 dB) | ||
| 20 Hz – 20 kHz (-0.5 dB) | ||
| Phono | 20 Hz – 20 kHz (-1.0 dB) | |
| Signal to noise ratio: | ||
| CD/Aux/Line/Tape | 95 dB | |
| Phono | 85 dB | |
| Input sensitivity/impedance: | ||
| AUX/Line/Tape | 250 mV/33 kOhm | |
| Phono | 5 mV/47 kOhm | |
| Equalisation: | ||
| Bass | ±10 dB/100 Hz | |
| Treble | ±10 dB/ 10 kHz | |
| FM Tuner | ||
| Frequency response: | 87.5 – 108 MHz | |
| Signal to noise ratio: | ||
| Mono | 75 dB | |
| Stereo | 70 dB | |
| Harmonic distortion: | ||
| Mono | <0.25% | |
| Stereo | <0.50% | |
| AM Tuner | ||
| Frequency response: | 531-1602 MHz | |
| Signal to noise ratio: | 40 dB | |
| Miscellaneous | ||
| Dimensions (whexd): | 360 x 110 x 400 mm | |
| Weight: | 8.9 kg | |
| Electricity consumption:: | ||
| Max | 200 W | |
| Standby | 1.4 W | Subject to technical change. |
SOMMAIRE
19 Accessoires
INSTRUCTIONS POUR LA MISE AU REBUT
DSM Direct Source Mode
Line in (panneau frontal)
Line in (Pannello frontale)
20 Hz - 20 kHz, THD < 1.0%, 8 Ohm 2 x 60 W
Potenza ad impulsi 1 kHz, 4 Ohm 2 × 150 ~W
Gamma di frequenza:
5 Hz - 100 kHz (-3.0 dB)
20 Hz - 20 kHz (-0.5 dB)
Phono 20 Hz - 20 kHz (-1.0 dB)
CD/Aux/Line/Tape 95 dB
Phono 85 dB
DSM (Direct Source Mode)
Line in (panel frontal)
20 Hz - 20 kHz, THD < 1.0%, 8 ohmios 2 x 60 W
Potencia de pulsacion 1 kHz, 4 Ohm 2 × 150 ~W
CD/Aux/Line/Tape 95 dB
Phono 85 dB
44 Ipeed BkIIOUeHnEM
44 Yka3aHnno6e3oNaChocTn
44 Yka3aHnno yTuInn3aU
45 ΘnementbI ynpaBneHn pa3beMbl
45 PerednnaHeIb
46 IyIbT dNCTaHcUHOHOro ynpabJIeHnA
47 3aHna cToPOHa/pa3bEmbl
47 yctaHObKa
47 HAMK
47 AHTehHbI
47 DononHnTeIbHbIe ayDnOnpBopbl
47 BkIIOueHne
47 IyIbT dIcTaHcUOnHOrO ynpaBHeHn
48 ΦyHKuIN MC 1
48 ΦyHKuIN npOnrpbBaTeIa CD
48 ΦyHKnTIOhepa
49 ΦyHKUIN RDS (Radio Data Service) TIOhepa
49 PerynipoBaHne 3ByaHna
49 3a6binaHn
50 PpOue BaxHbIe yKa3aHnIa
50 TexHnueckne daHHbIe
PIMHADNEKHOCTN
- RykoBoDCTBO no 3KcnJyatauH
- /3. Пильт Дuctанционно улравлени в Комплжту с батуейков.
- ceteBOM ka6eIe
- PAmOuHa aHTeHHa dIana3oHa MeTpObIx BOnH
- BHyTpEnHra aHTeHHa dnaana3oHa YKB


NEPED BKJIIOUeHnEM
YbaxaemblnokynateJIb!
3NEMEHTbI YIPABNEHn I PA3bEMbl - NEPEDHRA NAHEJIb

1 Power
BkIIOUaET yCTPOIcTBO, ecn OHO haxoIITcB B pexIMe OxuJaHna. Ecn CBETOIOJ He IropNT, HxKHO BkIOUHTb ceTeBOB bIKIOUaTeJIb Ha 3aDHeI CTOpOHe yCTPOIcTBA. HAObOpOT, yCTPOIcTBo MOxHObpeKlIOUHTb N3 peKIMa Power B pexIM OxuJaHna.
2 NepekIyauTeIb BXoIhblX
MCTOUYHKNOB
Для Вьбopa BXODHORO nCTOчнka (CD, TUNER, PHONO, TAPE, AUX, LINE).Они Ha HeKOTOpoe BpeMЯ BbIbOДЯТСЯ HaДИСПЛeE (15).
3 Eject
OTkpblBaet ⅢJN 3aKpbIbAeT IOTOK JnA CD.
4 Play/Pause CD
HaHnaeTcnnn octaHaBnBaETcBocpon3BeJeHne CD.
5 Stop/Memory
Pabota c CD: OctaHaBnBaet BocnpoN3BoDЯIcNc CD.
Pao: OtkpbIbAe TByTppeHHee 3anOMHaUcEe ycTpoiCTBO dJa npedBapnteJbHOH NaCTPOIKN cTaHcN.
6,7 Search/Auto tuning
Pa60a c CD: HkaTna Ha KhoNky DocTaToUH NoHaHa Na BnpeJ/Ha3aJ, eue Ondo HkaTne ocTaHaBInBaet Nonck.-PaNo:
KopotKoe HaxaTne: 13MeHReT
YactOty npnema Waaramn B 50 KΓu
(pyuHON NOCK CTAHm)
IpoDOnKnteNbHoe HaxKaTne: Iuet CJeNyUoUyO CTaHcUHO B BbIbpaHHom DnaNa3OHe YAcTOT (ABTomAtnueckm NONCK CTaHcU)
8 FM/AM
Pon3BODnT nepeKnIoueHne MeKdy FM stereo, FM mono n AM (ToNbko mono).
9 Tone/Skip/Balance/Preset
Pabota c CD: PocpeDCTBOM NOBOPaHbAHHa MoXHo BbIbHpTa CNeDuOuNc N ppeBdUyUe KOMNo3n.
Pao: PocpeDCTBOM NOBOPaUNBaHn MOxHO Bbl3BaTb npeDbapntelbHo HAcTpoEHhble CTAHm.
Nocne HaxkataHa KhoNky MoXHo peryIinpoBaTb 6acbl, BbICOKne yactoTbI n 6aJaanC (DnCpIeB: BASS, TREBLE, L/R). NocpeDCTBOM NOBopauHbAHn MOxHO N3MeHrTa COOTBeTCTByUOuNe HaCTpOKn. Kpome TORo, MoXHo BKJIIOuHTb peKm DSM (Direct Sound Mode), KOtOpbl OTKJIIOUaET JIObYIO HaCTpOKn 3ByaHn.
10 Line-in
Bxod dIy KOthakTHoro WTekepa 3,5 MM Ctepeo dIy DOONHHTeNbHO aYdIOuNcTOUHnka MP3-npOurPbIBaTeNb nT.n.).
11 Hayushniku
BbIXoJ DnIa KOtAeTHOrO 7TeKepa 3,5 MM Ctepeo OT HayuHnKOB. PpN IcNoJIb3OBAHN HAYUHnKOB DnHaMnKc camocToTaeJIbHO OTKIOuAOTcR. Ecnn Bbl NODKnIOuAeTe HAYuHnKn, ycTaHOBtpe rPOMKOCTb Ha Hn3KNyypoBeHb.
12 Peryljatop rpoMkoctn
Perynpyet rpoMkoCTb. IJpeRyInpOBaHnra rpoMkoCTn CmHIMMaJIbHO JDo MaKcImMaJIbHOHyXHo npIMePo 2 o6oPoTa. Pn3TOM nOKa3aHnra rpoMkoCTnBbIOaTcHa dncnnne (15). (VOL 00- VOL 40/max)
13 DaTnK dIaNCTaHNoHHoro
ynpabJIeHnIa
YTo6bI NcNoJIb3ObaTb nyIbT
DnCTaHcUHOHHoro ynpabJIeHnra,
CJIbTECb IM B 3Ty TOkKy.
14 JIoTOKdJa CD
Ha DnCnIe ee BbIOaTc TaHHbIe O npOn3BeJeHHbIX HactpoiKaX.
3JEMENTbI UYPABJIEHN I PA3bEMbl - NjIbT INCTAHcHNOHHOY UYPABJIEHN
1 Power
BkIIOUaET yCTpoIcTBO, ecn OHO haoOnTCB B pexKMe OxNdaHna. Ecn CBToOno He rOpNT, HxKHO BkIIOuNTb CeTeBOB bIKIOUaTeNb Ha 3aDHe CTOpOHe yCTpoIcTBA. HAObOpOT, yCTpoIcTBO MOxHo nepeKIOUHTb N3 peKIma Power B pexIM OxNdaHna.
2 Sleep
3ta KhoNka aKTHBUN3npyeT peXIM OxNdaHn. NocIe KaJDoRo HaxKaTnHa KhoNky IepNoD BpeMeHn Do MOMeHTa
BbIKIOHEn yMeHbwaETcHa 10 MNHyT (DnCnIeN). DnO TKNIOHEn pEXKMa HAXIMaTe Ha KHOKnY Do Tex nop, noka Ha DnCnIee He NoaBtca 00.
3 Mute
OTKJIIOHaET n CHOBA BKNIOaEt 3ByK.
4 Input (BbI6op Bxoja)
Iocne kaxdoRo haxKaTna Ha 3Tu KhONky npOn3BOoNTcR nepexoHa pyrOy ayDnOuCTouHnK (CD, TUNER, PHONO, TAPE, AUX, LINE). HOpmaun o6 nCTouHnke BbIOoNTcRa DaNCnnee.
5 KhoNk c uΦpamn
Pa6oTa c CD: Ppmao BbI6op KOMnO3nCn.
Papn: Ppam Bbl6op
PpeBapntbHo HAcTpoEHHO
CTaHcN. Bmecte c KhoKo-- (16):
PpAm BBOd YactOTb CTaHcN.
6 Search/Tuning
Pa60a c CD: Haxatna Ha KhoNky doCTaTOUHO dIg Hauana NOuCKa (Bnepei/Ha3aI), eIe OJHo Haxatne octaHaBJIbAe T nonck.
Papio:
KopoTkoe Haxatne: N3MeHReT YacToTy npnema 5aRamB 50 KfU (pyHna HacTroPka CtaHcun)
PpOOnKInTeIbHoe HaxKaTne: NcIeNyUoSyU OCTaHcUIO B BBbIbpaHHOM dHaNa3OHe YAcTOT (aBtOMaTHuecka HaCTPOkA cTaHcUN)
7 Skip/Preset
Pabota c CD: IepexoK cIeJyUoSei nn ppebIduuJe KOMnO3nui.
Papio: IepexoNT Bpea/Ha3aK cJeyuueH actpoeHHO CTaHmN.
8 Play
EcnB Notke HaxoDntc CD, nocne HaxKaTnHa 3Ty KONky HaunHaetc erO BOCPon3BeDeHne.
9 Pause
OctaHaBInBaET BOCpOn3BOJaUncr CD HnB03o6HOBJIeTe erO BOCpOn3BeDeHne.
10 SACD
Ecn Ha Notke HaxoHntcra SACD, npOn3BoOHT nepeKluOHeHne MeJdy cIIOAMN SACD n CD. (Bo3MOxHo TOnbKO B Cnyae C rI6pUHbIMn DnCKaMn SACD.)
11 Eject
OTkpblBaetIIOKdNc CD.
12 Stop
OctaHaBnBaeT Bocnpoun3BeJeHne CD.
13 Volume
YBeJIuHbAe (▲)IIN yMeHbShaet (▼) rPOMKoCTb.
14 DS Mode
HnDkaCn yDSM (peKIM Direct Sound). Takm o6pa3oM ycTpoiCTBO nepeKJIouaetcna HnHeNHyo pa6Oty 6e3 peryInpOBaHn 3ByaHn. IpeKJIoueHne Ha DSM MoKeT
PpOu3BODHTbcra c NOMOuIbIO KHOJOK PRESET (7).EcI npEeKIM DSM OTKIoueh,Ha DnCJIpe BbIBoDITcra coo6ueHne "TONE"
15 Tone/Balance
Bb6op MeJdy perynipobAHnem 6acOB, BbcOKnx qactOT n 6aHaHca. C NOMOJIbHO KHOJOK PRESET (7) MoKHO U3MeHrTb KOHKpeTHyU HaCTpoKy.
16 -- Khonka
3Ta KhoNka DeJaet BO3MOXhBIM BBOd YactOTbI CTaHcUN C NOMOuBHO KHOJOK C Unpamn.
17 Memory
C NOMOUIBIO 3TOI KHONKMOXHO BbI3BaTb DaHHbIe I3 BHyTppeHHei PAMrTN DJIaCTAHcN.
18 A-B
OTMeHaet ToUKn A n B IJn IOBtopa BocnpOn3BeDeHnA-B.
19 Repeat
Bb6op FyHKuIN IOBTopa npn Bocnpo3BeDeHm CD.
20 AM/FM
Bb6op B pexnme paanno Mejdy AM, FM mono n FM stereo
21 Display
Bb6op mexdy Hndkaunei yacob Bb6paHHoro BXoHoro nCTouHnka. BpeKme paNIO HnduNPuyetc N Bb6paHHa fynkunra RDS.

3JIEMEHTbI UYPABJIEHn I PA3bEmbl - 3ADHRA CTOPOHA/PA3bEMbl
1ПоdkнioченkeKceTn
Дя NOДКПЮЧЕНь BXODЯцero B KOMПЛКET cTeBOrO kaБел.
2 CeteBoB bblKluOuataTeIb
BkIIOyaeT yCTpoiCTBO n IpebeOHT ero B pexKIM OxNJaHn. Ecnn BbIKIIOyateJIb HaxOHTcB NIOLOKeHN "OFF", yCTpoiCTBO OTdJeHo OT cETn.
3. Pa3bembl DnnoKJIIOUeHn
dHAMKOB
Для рдкнчeyня napbl ctepeoINHAMIKOB CIMNEpaHCOM B 4-8 Om cyueTom npaBnIbHoN pOJIpHocTn.
4/5 UndpOBBie BbIXoDbI
ДлnoДкюченBHEUHINx yCTpoIcTB (Hanp., yCTpoIcTba 3aNCSMHNiNcKOB)Yepe3 KoakCnAJIbHbI (4)JInOnTtueckn (5)uΦpOBoB BbIXoD.
6 BbIXoRREC
BbIXoJcNoCTOaHHbIM yPoBHem,HaNP. JnnoKIOUeHn KaccetHOrO MaHHTofoHa.
7 BxO AUX
Códa MoXHo NODKJIIOUHTb, HAnp., DOnOJIHNITeNbHbY CD-npOINrPbIBaTeNb HJIN TIOHEp.
8 BxoT TAPE
ДЯ NOДКЛЮЧЕНИ KACCETHOROMarHHTOФОHA JIIN JeHToCHOROMarHHTOФОHa.
9 BxoI PHONO
Bxod C Hn3Km ypOBHem c KoppeKuJeR IAA nI npOnrpbIbATEne nnactnHOc MaHHTHOcTeMoI (MM).
OctaHOBka Bocnpoun3BeDennca CD
Pexmm noBtopa (repeat) CD
IobTOp BocnpOn3BedeHn MoXHO BKIOuATb TOnbKO CnybTa DY.
- NobTOp BOCnpon3BedeHnOdHOn KOMnO3nU:
Haatab Bocnpoun3BedeHne CD. Nocne Haxkata Ha KhoNky REP TeKyuza KOMnO3uZna NOBTopraTeC. Ha Dincnlee NoaBnaTeC:

- NobTOp BocPon3BeHeHnB Cbero CD: Haatb BocPon3BeHeHne CD. HaxaTb Ha KOnKy REP Dba pa3a. Ha dinCnnee noRbIeTc:
ALLO
IOBTOP BOCpOIN3BeDEnHn OT TOkN A Do ToKn B:
Haatab Bocnpon3BeJeHne CD.
B ToUke a HaxKaTb KOnkY A-B, nOcNe
3TorO CD dOnJKeH DoToUKn B,
3aJaTb 3Ty TOUky NOBTOpHbIM
HaxKaTneM KOnKn A-B.
OctaHOBITb NOBTOP BOCnpon3BeDeHNA:
HaximmaTe Ha KhoNky REP Do tex nop, Ioka Ha DnCnIee He NcYe3HyT BCE npNBeDeHHbIe BblIe CmMBOJI.
ФУHKLIMTNTOHEPA
Bb6op padnoana30Ha
C nomoubIO SOURCE (MC 1) nIIN INPUT (nylbT DY) Bbl6epnte KaueCTBe aydnoonctOuHnka TUNER.
BbIepeTe c nOmoIbIO OndHn I3 KHOJOK FM/AM B KaueCTBe padnoDnaIana30Ha AM mono, FM mono nn FM stereo.
ABTomatnueckn nonck ctaHmN
BbIbePte TUNER KaueCTBe ayDIOINCTOCHNka IN Dnna3OH (CM. Bblwe).
BocnoIb3yITeCb KhoNkamn AUTO TUNE Ha nepeHne naneMc 1 nn KhoNkamn TUNING Ha nyIbTe Dv.


PyHoi nonck cTahm: KopotKoe HaxaTne Ha KHONk yBelenuBaet nIn yMeHbwaet qactoty Ha 50 Kt. ABTomatueckn nonck cTahm: IpoDOnjxnteIbHoe HaxaTne Ha KHONk npINBOJNT K NOnCKy CJeDyUoSei cTahm Bblse nN HNXe no qactote.
PpAMoB BbIbOp cTaHcMn
3TaФyHKUЯ DOCTyINHa TOJIbKO C nyIbTa DY.
- npimep: Ctaunna Ha FM 107,10 Mf. BbipabTUNER n FM.
HaKMTe Ha KhoNky"--"Ha npIbTe Ny. C NOMOuBIO KHOPOK C uNΦpamn nocJeIOBaTeJbHO BBeIte 1,0,7,1, 0.
2. npimep: CtaHnna Ha FM 91,40 Mf. Bb6paTb TUNER FM. Haxmte Ha KhoNky --" Ha nyIbTe dY. C nOMOsbKHO KHOOK c uΦpamn nocJeDoBaTeNbHO BBeInte 9, 1, 4, 0.

Прееварптульная NaCTPОДКa CTaHцИ
BBeCTn B naMaTb MOxHO B 06UeI CLOXHOCTe 80 CTaHcN I DaNa3OHOB FM n AM.
- HacptpoTe HyxHyTO cTaHcIIO (FM nAM). OtkpoTe naTb c NOMOuBIO KhoNkIMEMORY Ha nepeDHei NaHeJI nn nyIbTe DY.
- BbIepeIte JKeJaemBn Homep cTaHcnn C nOMOuBIO KHOJKN TONE/SKIP Ha nepeDHeN naHeJI NmC nOMOuBIO KHOJOK C uOpPam Na NyIbTe DY.
Homep cTaHcnn n CnMBoJ MEM MuraIOT Ha ducnJIee.
- CHOBA HαKMnTe Ha OndHy n3 KHOHOK MEMORY,HTo6bI BBecTn CTaHcNIO B nAmrTb.
Homep cTahun nepectaet MraTb, a CmboJ MEM rachet.
- Nobtopne npoceDpy, yTo6bI BBecTN B namrBdpyrnCtAHcH.
Bb6op npedBaupTeJbHo
HacTpoEHHO CTaHcUN
Haxmnte Ha KhoNky SOURCE yctaHOBnTe B KaueCTBe aydnoIcTOchNKa TUNER.
-ПовернiteperуларTOP TONE/SKIPHa nepeHne naneHnHaKmnte OndHy n3 KhoNOK PRESET Ha npIbTe Dy, YTO6bl BbI6paTb HxKhBn Homep CTaHcIN.
CTaHcNIO B nAMrTMOxHOBbIpaTb HnIpyMyc NOMOuB KHOJOK C cnppamn.
HnDkaunBaBpeMa pa6bIpaNo
FM stereo:
FM mono:
ФУHKLIMN RDS (RADIO DATA SERVICE) TIOHEPA
RDS - 3TO CnCTema, c NOMOJIbIO KOtOpoi BO Bpemr NepeJaU B dHaNa3OHe YKB BmecTe C cnHajLOM CTaHcIMN nepeJaETcra DOnONHITeNbHaer INΦopMaIg. Ha MC 1 3Ta INΦopMaIg (o CTaHcIMN, nepeJaue n T.D.) MOKeT BBIODHTbcra Ha DnCnIe. ΦyHKlIMRDS MOXHO yCTaHaBnBaTb C nOMOJIbIO KHOJKn DISPLAY Ha NyIbTe DY.
Функцин RDS MC 1
- PS (Program Service Name): Пokedаьает НаЗване CTaHци.
- PTY (Program Type Identification): Показывает Тип посядун.
- RT (Radio Text): Пokedуов Всесошень CTAHUN.
CT (Clock Time): Bpemr
IocneIOBATEJIbHOCTb NOKa3a npn IocNeIOBATEJIbHOM HaxaTm Ha KHOJky DISPLAY:PS,PTY, yactota cTaHcMn RT,CT.
EcnH HeCMOTpa Ha CnHaJ RDS OHa n3 3TNX FyHKcNt CTAHcne HnOndepKNaBaETC, Ha DnCnPee NOBnAeTc coo6ueHHe "NONE".
Coo6eHna DnCnJIe (c npMepamn)
- Ecnn Bby nuiTe cTaHnIO C cnHaIOM RDS, Ha dncnlee noka3bIbaetcKpaChbI CNMBoR DRS.
-Диспл征 noka3bIbae T acToTу CTaHcNn N,ecIn NMeetC,3aDaHHbI HOMep CtaHcNn.

PS:Примерночepe3 5cekyндНаинaelT NOKa3bIbTaBcHа3BaHneCTaHцИ:

PTY: Noka3bIbaetc, B cnlyuae haJIInyra, nocne haxaTna Ha KhoNky DISPLAY.

RT: Eue pa3 HaKaTb Ha DISPLAY.

Eue Ondo HaxaTne BbIOuNT YacToTy cTahun, a eue Ondo-CT (BpeM).

Pexim DSM (Direct Source Modus)
OTknHouaET perynIaTOp 3ByaHn. Bbl6npaetcC nOmoUbIO KhoNk TONE/SKIP/BAL Ha nepeDnei naHei nn KhoNk DS-MODE Ha nyIbTe Dy n BKIIHOaETcB/ByIKHouaETcC nOmoUbIO TONE/SKIP/BAL nnr PRESET. (DSM ON = PeryIaTOp 3ByaHn BblKn.).
PerynnpoBaHne 6anaHca
Line in (nepehnaheJIb)
OTHOWeHHe CnHaJ/7uM:
Mono 75d6
Stereo 70dB
O6uN Ko3ΦΦnIeH T HeJIHeHbIX NcKaJehN:
Mono <0,25%
Stereo <0,50%
MB-TIOHEP
BO3MOXKHbI TEXHNUeCKNE I3MEHEHNA

Congratulations! You have made a wise selection in becoming the owner of a MAGNAT HiFi equipment.
The equipments are checked and tested continuously during the entire production process. In case you have problems with your MAGNAT HiFi equipment, kindly observe the following:
- The warranty period commences with the purchase of the component and is applicable only to the original owner.
- During the warranty period we will rectify any defects due to faulty material or workmanship by replacing or repairing the defective part at our discretion. Further claims, and in particular those for price reduction, cancellation of sale, compensation for damages or subsequent damages, are excluded. The warranty period is not altered by the fact that we have carried out warranty work.
- Unauthorized tampering with the equipment will invalidate this warranty.
- Consult your authorized dealer first, if warranty service is needed. Should it prove necessary to return the component to the factory, please insure that the component is packed in original factory packing in good condition the quality control card has been filled out and enclosed with the component your enclose your receipt as proof of purchase.
- Excll from the warrty are: . Illuminates · Valves · Batteries · Wear parts · Shipping damages, either readily apparent or concealed (claims for such damages must be lodged immediately with forwarding agent, the railway express office or post office). · Scratches in cases, metal components, front panels, etc. (You must notify your dealer directly of such defects within three days of purchase.) · Defects caused by incorrect installation or connection, by operation errors (see operating instructions), by overloading or external force. · Equipments which have been repaired incorrectly or modified or where the case has been opened by persons other than us. · Consoquential damages to other equipments. · Reimbursement of cools, without our prior consent, when repairing damages by third parties.

Toutes nos felicitations!
No warranty without receipt!
Magnat®


- DSM Direct Source Modus
- Line in (Front Panel)
- Operational elements and connections
- Installation
- Functions of the MC 1
- Other important information
- Specifications
- ACCESSORIES
- BEFORE STARTING
- IMPORTANT SAFETY PRECAUTIONS
- INSTRUCTIONS FOR DISPOSAL
- OPERATIONAL ELEMENTS AND CONNECTIONS - FRONT PANEL
- Power
- Input selector switch
- Eject
- Play/Pause CD
- Stop/Memory
- Search/Auto tuning
- Radio operation:
- FM/AM
- Tone/Skip/Balance/Preset
- Line-in
- Headphones
- Volume knob
- Sensor for the remote control
- CD compartment
- Display
- SACD display
- OPERATIONAL ELEMENTS AND CONNECTIONS - REMOTE CONTROL
- Sleep
- Mute
- Input (input selection)
- Numerical buttons
- Search/Tuning
- CD operation:
- Skip/Preset
- Play
- Pause
- SACD
- Eject
- Stop
- Volume
- DS Mode
- Tone/Balance
- -- button
- Memory
- A-B
- Repeat
- AM/FM
- Display
- Mains connection
- Power switch
- Speaker terminals
- 4/5 Digital outputs
- REC output
- AUX input
- TAPE input
- PHONO input
- Earth for phono cable
- AM antenna connection
- FM antenna connection
- INSTALLATION
- SPEAKERS
- ANTENNAS
- AUXILIARY AUDIO EQUIPMENT
- REMOTE CONTROL
- FUNCTIONS OF THE MC 1
- FUNCTIONS OF THE CD PLAYER
- Playing a CD
- Pausing a CD
- Selecting the track directly
- Searching within a track
- Stopping playback from a CD
- CD repeat mode
- Repeating a track:
- Repeating the entire CD:
- Repeating from point A to point B:
- Stopping the repeat function:
- FUNCTIONS OF THE TUNER
- Selecting the tuner band
- Automatic station search
- Direct station selection
- Station presets
- Selecting the preset stations
- Display during radio operation
- FM stereo:
- FM mono:
- RDS (RADIO DATA SYSTEM) FUNCTIONS OF THE TUNER
- RDS functions of the MC 1
- Messages on the display (with examples)
- SOUND SETTINGS
- Setting the volume
- MUTE on the remote control
- Adjusting the bass/treble
- DSM Direct Source Mode
- Adjusting the balance
- SLEEP FUNCTION
- OTHER IMPORTANT INFORMATION
- Headphones
- Phono input
- SPECIFICATIONS
- Amplifier
- SOMMAIRE
- Accessoires
- INSTRUCTIONS POUR LA MISE AU REBUT
- Line in (panneau frontal)
- Line in (Pannello frontale)
- DSM (Direct Source Mode)
- Line in (panel frontal)
- Ipeed BkIIOUeHnEM
- ΘnementbI ynpaBneHn pa3beMbl
- yctaHObKa
- ΦyHKuIN MC 1
- PpOue BaxHbIe yKa3aHnIa
- TexHnueckne daHHbIe
- PIMHADNEKHOCTN
- NEPED BKJIIOUeHnEM
- 3NEMEHTbI YIPABNEHn I PA3bEMbl - NEPEDHRA NAHEJIb
- NepekIyauTeIb BXoIhblX
- MCTOUYHKNOB
- 6,7 Search/Auto tuning
- Hayushniku
- Peryljatop rpoMkoctn
- DaTnK dIaNCTaHNoHHoro
- ynpabJIeHnIa
- JIoTOKdJa CD
- 3JEMENTbI UYPABJIEHN I PA3bEMbl - NjIbT INCTAHcHNOHHOY UYPABJIEHN
- Input (BbI6op Bxoja)
- KhoNk c uΦpamn
- Papio:
- -- Khonka
- 1ПоdkнioченkeKceTn
- CeteBoB bblKluOuataTeIb
- Pa3bembl DnnoKJIIOUeHn
- dHAMKOB
- 4/5 UndpOBBie BbIXoDbI
- BbIXoRREC
- BxO AUX
- BxoT TAPE
- BxoI PHONO
- OctaHOBka Bocnpoun3BeDennca CD
- Pexmm noBtopa (repeat) CD
- ALLO
- ФУHKLIMTNTOHEPA
- Bb6op padnoana30Ha
- ABTomatnueckn nonck ctaHmN
- PpAMoB BbIbOp cTaHcMn
- Прееварптульная NaCTPОДКa CTaHцИ
- Bb6op npedBaupTeJbHo
- HacTpoEHHO CTaHcUN
- HnDkaunBaBpeMa pa6bIpaNo
- ФУHKLIMN RDS (RADIO DATA SERVICE) TIOHEPA
- Функцин RDS MC 1
- Coo6eHna DnCnJIe (c npMepamn)
- Pexim DSM (Direct Source Modus)
- PerynnpoBaHne 6anaHca
- Line in (nepehnaheJIb)
- MB-TIOHEP
- Magnat®
Brand : MAGNAT
Model : MC 1
Category : Audio Amplifier