
CENTER CHANNEL - Center channel speaker KLIPSCH - Free user manual and instructions
Find the device manual for free CENTER CHANNEL KLIPSCH in PDF.
| Product type | Center channel speaker |
| Brand | KLIPSCH |
| Model | CENTER CHANNEL |
| Speaker technology | Klipsch Tractrix® Horn |
| Internal wiring | Bandwidth Balanced™ Monster® |
| Connection terminals | Two pairs (high and low) with gold-plated metal jumpers |
| Bi-wiring | Possible (remove jumpers) |
| Bi-amping | Not recommended |
| Adjustable foot | Yes, for upward or downward tilt |
| Grille | Magnetic, removable |
| Recommended placement | Centered above or below the TV screen, preferably at the same level |
| Maintenance | Regular dusting, cleaning with a dry cloth |
| Grille cleaning | With a vacuum brush |
| Safety | Follow instructions: do not use near water, do not block vents, etc. |
| Warranty (United States and Canada) | 5 years for manufacturing defects, 2 years for electronic components |
| Supplied accessories | Adjustable foot with lock nut, domed and flat self-adhesive pads |
| Accepted connector types | Bare wire, pins, spade connectors |
| Recommended wire gauge | At least 2 mm² (16 AWG) |
Frequently Asked Questions - CENTER CHANNEL KLIPSCH
User questions about CENTER CHANNEL KLIPSCH
0 question about this device. Answer the ones you know or ask your own.
Ask a new question about this device
Download the instructions for your Center channel speaker in PDF format for free! Find your manual CENTER CHANNEL - KLIPSCH and take your electronic device back in hand. On this page are published all the documents necessary for the use of your device. CENTER CHANNEL by KLIPSCH.
USER MANUAL CENTER CHANNEL KLIPSCH
IMPORTANT SAFETY INSTRUCTIONS
- READ these instructions.
- KEEP these instructions.
- HEED all warnings.
- FOLLOW all instructions.
- DO NOT use this apparatus near water.
- CLEAN ONLY with dry cloth.
- DO NOT block any ventilation openings. Install in accordance with the manufacturer's instructions.
- DO NOT install near any heat sources such as radiators, heat registers, stoves, or other apparatus (including amplifiers) that produce heat.
- DO NOT defeat the safety purpose of the polarized or grounding type plug. A polarized plug has two blades with one wider than the other. A grounding type plug has two blades and a third grounding prong. The wider blade or the third prong are provided for your safety. If the provided plug does not fit into your outlet, consult an electrician for replacement of the obsolete outlet.
- PROTECT the power cord from being walked on or pinched, particularly at plugs, convenience receptacles, and the point where they exit from the apparatus.
- ONLY USE attachments/accessories specified by the manufacturer
- USE only with a cart, stand, tripod, bracket, or table specified by the manufacturer, or sold with the apparatus. When a cart is used, use caution when moving the cart/apparatus combination to avoid injury from tip-over.
- UNPLUG this apparatus during lightning storms or when unused for long periods of time.
- REFER all servicing to qualified service personnel. Servicing is required when the apparatus has been damaged in any way, such as power-supply cord or plug is damaged, liquid has been spilled or objects have fallen into the apparatus, the apparatus has been exposed to rain or moisture, does not operate normally, or has been dropped.

This symbol indicates that there are important operating and maintenance instructions in the literature accompanying this unit.

This symbol indicates that dangerous voltage constituting a risk of electric shock is present within this unit.
WARNING: To reduce the risk of fire or electrical shock, do not expose this apparatus to rain or moisture.

CAUTION RISKOF ELECTRICSHOCK DONOTOPEN

WARNING: Voltages in this equipment are hazardous to life. No user-serviceable parts inside. Refer all servicing to qualified service personnel.
CAUTION: Changes or modifications not expressly approved by the manufacturer could void the user's authority to operate this device.
ABOUT YOUR KLIPSCH PURCHASE
Thank you for your purchase of a Klipsch center channel. After reading this manual and connecting your system, you will hear the result of over 55 years of stringent engineering and class-leading research and development. Like all Klipsch products, your center channel features Klipsch Tractrix Horn-loaded Technology—the guiding design for the first Klipschorn developed in 1946 and for every product that has followed. Horn-loading allows your speakers to deliver high sensitivity, low distortion, flat frequency response and wide dispersion, which translates to unequaled power, detail and dynamics, the hallmarks of "The Klipsch Sound." Please be sure to fill out the warranty card at the back of this manual or online at www.klipsch.com so we are better able to serve you. Again, thank you for choosing Klipsch and we hope that your speaker brings life to your music and movies for many years.
UNPACKING
The easiest way to remove the speaker from its carton is to turn the open side of the box down so that it is resting on a table or the floor, with the flaps spread out and away. Then pull the box straight up and off. Remove any packing material from the speaker and grille, place it back in the carton, and store in case you ever need to ship the loudspeaker. Align the magnetic posts on the inside of the grille with the screws on the front of the speaker and it will snap into place.
PLACEMENT
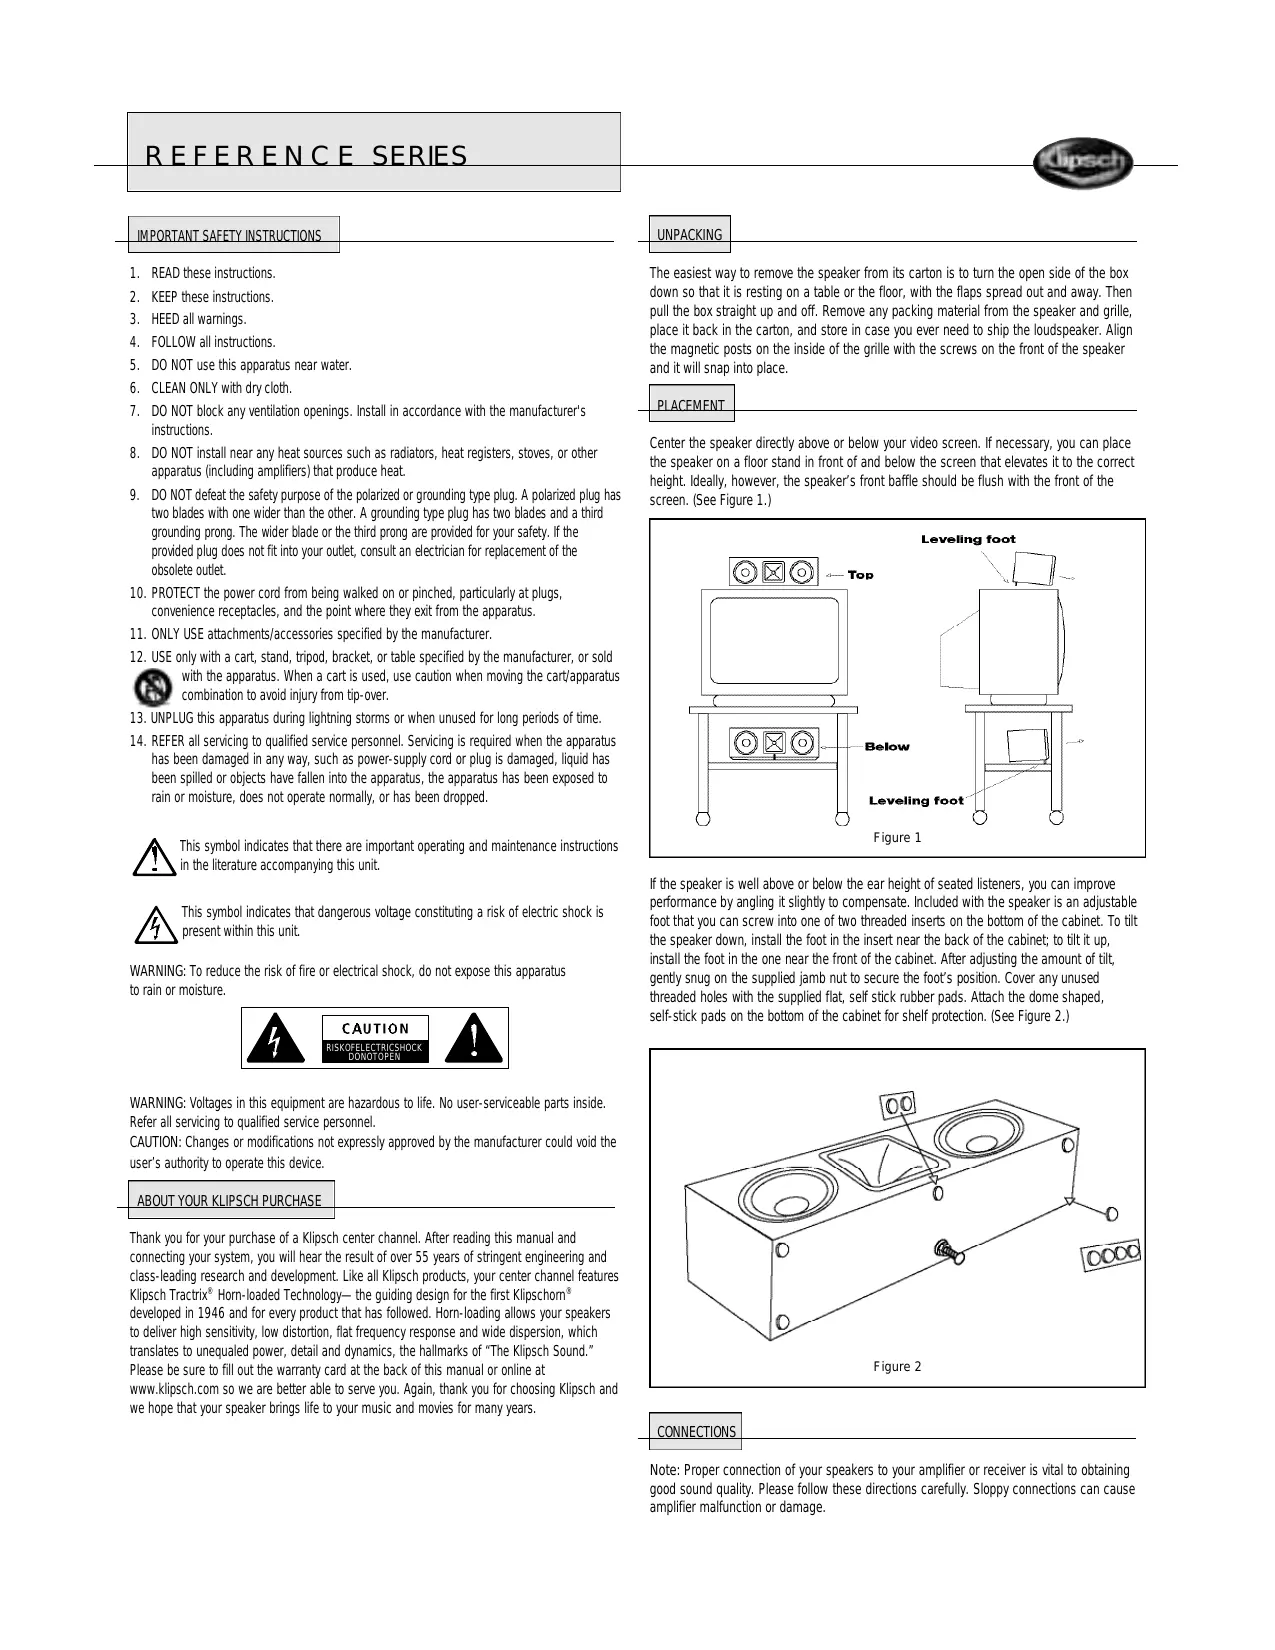
Center the speaker directly above or below your video screen. If necessary, you can place the speaker on a floor stand in front of and below the screen that elevates it to the correct height. Ideally, however, the speaker's front baffle should be flush with the front of the screen. (See Figure 1.)
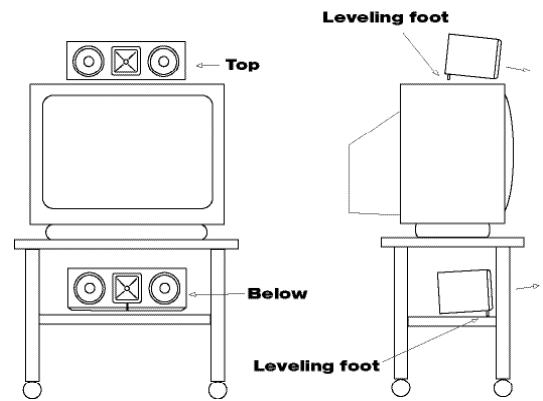
Figure 1
If the speaker is well above or below the ear height of seated listeners, you can improve performance by angling it slightly to compensate. Included with the speaker is an adjustable foot that you can screw into one of two threaded inserts on the bottom of the cabinet. To tilt the speaker down, install the foot in the insert near the back of the cabinet; to tilt it up, install the foot in the one near the front of the cabinet. After adjusting the amount of tilt, gently snug on the supplied jamb nut to secure the foot's position. Cover any unused threaded holes with the supplied flat, self-stick rubber pads. Attach the dome shaped, self-stick pads on the bottom of the cabinet for shelf protection. (See Figure 2.)
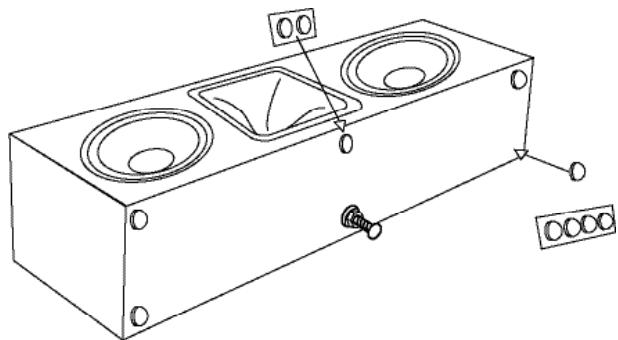
Figure 2
CONNECTIONS
Note: Proper connection of your speakers to your amplifier or receiver is vital to obtaining good sound quality. Please follow these directions carefully. Sloppy connections can cause amplifier malfunction or damage.
Klipsch Reference Series speakers are wired internally with Bandwidth Balanced™ Monster® Cable. Bandwidth Balanced technology employs multiple gauges of high-purity copper wire, carefully selected and wound to ensure optimum signal transfer at all frequencies. You will obtain best performance from your speakers if you connect them to your amplifier or receiver with Monster Cable or similar quality wire available from your dealer. We recommend that you use 16-gauge or heavier stranded copper wire. Use a lower gauge (heavier) wire for longer runs to reduce the amount of amplifier power lost due to the wire's resistance.
On the back of each speaker are two sets of binding posts, one feeding the tweeter and the other the woofers. For conventional wiring, these sets are connected together with gold-plated metal straps, which must be removed for bi-wiring or blamping. We will explain ordinary single-wiring first and then the alternatives. All the information regarding single-wiring also applies to bi-wiring.
BUT FIRST: TYPES OF CONNECTORS
Bare wire. Pull the two conductors apart for about an inch and strip approximately 1/4-inch of insulation from the end of each. (A wire stripper will simplify this, but you can use an ordinary pocket knife to cut around and through the insulation down to the wire.) Twist the strands of wire on each individual conductor tightly together. Loosen the nuts on a pair of binding posts until the holes through the metal posts are exposed, then insert the bare wire through the holes. Screw the nuts down finger-tight on the wire. Make sure that no strands of wire are touching from one binding post to the other or to any strands from the other conductor. Failure to observe this precaution at either end of the connection can result in amplifier malfunction or damage.
Pins. Many pre-made speaker cables are terminated with metal pins. Loosen the nuts on a pair of binding posts until the holes through the metal posts are exposed, then insert the pins through the holes. Screw the nuts down finger-tight on the pins — do not overtighten. Make sure that there is no metal-to-metal contact between the two pins or binding posts. Failure to observe this precaution at either end of the connection can result in amplifier malfunction or damage.
Spade lugs. Some speaker cables are terminated with U-shaped connectors called spade lugs. Loosen the nuts on a pair of binding posts and slip the spade lugs around the metal posts. Screw the nuts down finger-tight on the lugs and inspect to ensure they have remained firmly in place. Make sure that there is no metal-to-metal contact between the two lugs or binding posts. Failure to observe this precaution at either end of the connection can result in amplifier malfunction or damage.
OTHER TYPES OF SPECIALTY CONNECTORS ARE AVAILABLE TO FACilitATEHOOKING UP YOUR SPEAKERS. PLEASE CONSULT YOUR AUTHORIZED KLIPSCH DEALER FOR SUGGESTIONS AND FURTHER DETAILS.
SPEAKERS TO AMPLIFIER: KEEPING IT STRAIGHT
One of the most important things about hooking up your speakers is keeping them in the same polarity, or phase. If they are connected out of phase, bass and sound imaging will
be degraded. The easiest way to ensure that your speakers are wired in phase is to always connect the positive and negative output terminals on your amplifier or receiver to the matching input terminals on your speakers: positive ("+ ", color-coded red) to positive and negative ("- ", color-coded black) to negative. (See Figure 3.)
Most pre-terminated speaker cables have color-coded connectors that make it easy to match output and inputs correctly. If yours do not, or if you are making your own out of paired, two-conductor wire, look for identifying marks on the insulation of the two conductors. Normally there will be printing, a stripe or a molded ridge along one of the conductors.
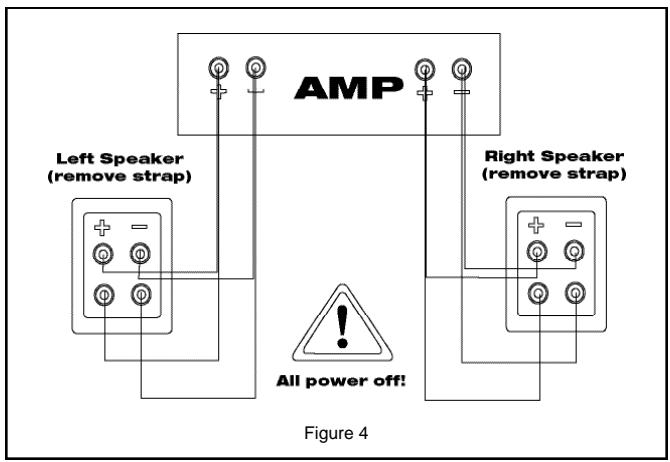
Bi-wiring - In bi-wiring, separate cables are connected from the amplifier or receiver output terminals to the speaker input terminals for the tweeter and woofers. (See Figure 4.) This results in lower electrical resistance between the amplifier and speaker than single-wiring with the same gauge cable. In some cases bi-wiring may be preferable to single-wiring with lower-gauge cable, which will be thicker and probably less flexible. To bi-wire your Reference Series speakers, loosen the nuts on the binding posts and remove the metal straps linking the woofer and tweeter terminals. Observing proper polarity, connect one cable to the tweeter binding posts (upper) and another to the woofer binding posts (lower). Run both cables back to your amplifier or receiver and attach them to the same channel. (Do not, for example, attach one to an A speaker output and the other to a B speaker output on an amplifier or receiver with A/B speaker switching.) Amplifiers may be severely damaged if straps are not removed.
Bi amplification, the tweeter and woofers are driven by separate amplifiers fed from the same preamplifier output. We do not recommend bi amplifying any of our speakers, since in general it will produce no benefit that could not be obtained simply by using a single larger amplifier and may cause severe sound degradation if not done properly. If you do bi amplify, use the same model amplifier for the tweeter and woofer sections (to prevent frequency-response errors caused by different amplifier gains) and be sure to remove the straps linking the two sets of input terminals on the speaker. Amplifiers may be severely damaged if straps are not removed.
BASS MANAGEMENT SETTINGS
Surround-sound receivers and processors use what is known as bass management to ensure that low frequencies in the various channels are sent to speakers that can handle them well and away from small speakers that cannot. Any of the Klipsch Reference Series center-channel speakers can be set to Large in your receiver or processor's speaker setup menu if necessary. But if your system includes a good powered subwoofer or floorstanding left and right front speakers, you probably will get better overall performance by using the Small setting for the center.
CARE AND CLEANING
The only thing you should ever need to do to your speakers is dust them occasionally. Never apply any abrasive or solvent-based cleaner or any harsh detergent. You can clean the grilles with the brush attachment of a vacuum cleaner.
WARRANTY - U.S. AND CANADA ONLY
The Warranty below is valid only for sales to consumers in the United States or Canada. KLIPSCH, L.L.C. ("KLIPSCH") warrants this product to be free from defects in materials and workmanship (subject to the terms set forth below) for a period of five (5) years from the date of purchase. During the Warranty period, KLIPSCH will repair or replace (at KLIPSCH's option) this product or any defective parts (excluding electronics and amplifiers). For products that have electronics or amplifiers, the Warranty on those parts is for a period of two (2) years from the date of purchase.
To obtain Warranty service, please contact the KLIPSCH authorized dealer from which you purchased this product. If your dealer is not equipped to perform the repair of your KLIPSCH product, it can be returned, freight paid, to KLIPSCH for repair. Please call KLIPSCH at 1-800-KLIPSCH for instructions. You will need to ship this product in either its original packaging or packaging affording an equal degree of protection.
Proof of purchase in the form of a bill of sale or received invoice, which is evidence that this product is within the Warranty period, must be presented or included to obtain Warranty service.
This Warranty is invalid if (a) the factory-applied serial number has been altered or removed from this product or (b) this product was not purchased from a KLIPSCH authorized dealer. You may call 1-800-KLIPSCH to confirm that you have an unaltered serial number and/or you purchased from a KLIPSCH authorized dealer.
This Warranty is only valid for the original purchaser and will automatically terminate prior to expiration if this product is sold or otherwise transferred to another party.
This Warranty does not cover cosmetic damage or damage due to misuse, abuse, negligence, acts of God, accident, commercial use or modification of, or to any part of, the product. This Warranty does not cover damage due to improper operation, maintenance or installation, or attempted repair by anyone other than KLIPSCH or a KLIPSCH dealer which is authorized to do KLIPSCH warranty work. Any unauthorized repairs will void this Warranty. This Warranty does not cover product sold AS IS or WITH ALL FAULTS.
REPAIRS OR REPLACEMENTS AS PROVIDED UNDER THIS WARRANTY ARE THE EXCLUSIVE REMEDY OF THE CONSUMER. KLIPSCH SHALL NOT BE LIABLE FOR ANY INCIDENTAL OR CONSEQUENTIAL DAMAGES FOR BREACH OF ANY EXPRESS OR IMPLIED WARRANTY ON THIS PRODUCT. EXCEPT TO THE EXTENT PROHIBITED BY LAW, THIS WARRANTY IS EXCLUSIVE AND IN LIEU OF ALL OTHER EXPRESS AND IMPLIED WARRANTYES WHATSOEVER, INCLUDING BUT NOT LIMITED TO, THE WARRANTY OF MERCHANTABILITY AND FITNESS FOR A PRACTICAL PURPOSE. Some states do not allow the exclusion or limitation of incidental or consequential damages or implied warranties so the above exclusions may not apply to you. This Warranty gives you specific legal rights, and you may have other rights, which vary from state to state.
WARRANTY OUTSIDE THE UNITED STATES AND CANADA
The warranty on this product if it is sold to a consumer outside of the United States or Canada shall comply with applicable law and shall be the sole responsibility of the distributor that supplied this product. To obtain any applicable warranty service, please contact the dealer from which you purchased this product, or the distributor that supplied this product.
IMPORTANT CONSIGNES DE SECURITÉ
À PROPOS DE VOTRE ACHAT DE PRODUIT KLIPSCH
ÜBER IHR KLIPSCH-PRODUKT

CAUTION
RISKOFELECTRICSHOCK DONTOPENET
Register your new Klipsch product now at www.klipsch.com!
Cut along dotted line and mail.
For multiple speaker purchases, please fill out only one warranty card.
Name:
Street Address:
City/State/Zip:
Home Phone:
Work Phone:
E-mail Address:
Would you like to receive the latest product updates and news via e-mail? Yes No
Model and serial number must be included to honor your warranty card. For multiple speaker purchases, please fill out only one warranty card.
Model Serial Number
Model Serial Number
Model Serial Number
Model Serial Number
Model Serial Number
What store did you purchase your Klipsch products from?
Store Name: State:
How did you hear about Klipsch? Audio/Home Theater Magazine Other Magazine TV
Radio Newspaper Trade Show Friend Retail Dealer Direct Mail
Have you purchased Klipsch products before? Yes No
If yes, what products?
Product Name(s):
When do you hope to purchase additional loudspeakers? 6 mos. -1 yr. 1-2 yrs.
How likely are you to consider Klipsch products for your upcoming purchases?
Very likely Somewhat likely Doubtful
If doubtful, why? Don't carry product I'm looking for Too expensive
Klipsch dealer too far away Other
Please tell us about you!
Married Single Student Male Female
Age: 15-17 18-24 25-35 36-45 46-55 55-64 65+
Annual Household Income: Under 25,000 25-35,000 35-50,00050-75,000
75-100,000100,000+
Make sure you return your warranty card so that we may keep you up-to-date on new Klipsch products and promotions. If you have any questions, contact your local authorized Klipsch dealer.
For your records:
Model:
Date Purchased:
Indianapolis, N 46268 USA
3502 Woodview Trace, Suite 200
Kapisch Audio Technology
Stamr Herre
Paaee
FIRSTCLASS
Pace