R1 PLUS - Stroller HARTAN - Free user manual and instructions
Find the device manual for free R1 PLUS HARTAN in PDF.


User questions about R1 PLUS HARTAN
0 question about this device. Answer the ones you know or ask your own.
Ask a new question about this device
Download the instructions for your Stroller in PDF format for free! Find your manual R1 PLUS - HARTAN and take your electronic device back in hand. On this page are published all the documents necessary for the use of your device. R1 PLUS by HARTAN.
USER MANUAL R1 PLUS HARTAN
6 Lock-type-swivel wheel
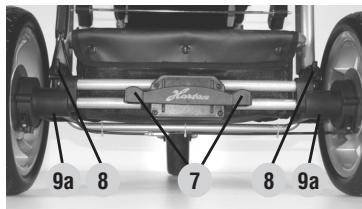
7 Parking brake
8 Adjustable suspension system
9 Readjustment of hand brake
9a Silently adjustable hood
10 Silently adjustable hood
Sun canopy
12 Hood and safety bar
13 Tilt-adjustable backrest
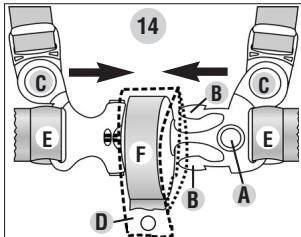
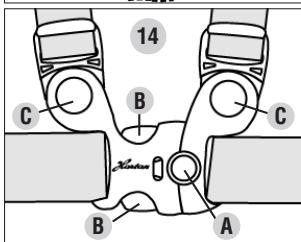
14 Safety belt
15 Adjustable footrest
16 Footrest extension
17 18 Fall-out protection
19 Automatic lock for upper section
Congratulations on your purchase
You want your baby to feel safe and secure, that's why you have purchased a 'Oko-Tex' high-quality product. You have made an excellent choice. 'Oko-Tex' products are manufactured with the greatest possible care and monitored constantly by rigorous quality control assuring that your pram will provide life-long satisfaction. The textiles used for our products have been tested for harmful substances (chemical residues) according to the industry's own 'Oko-Tex-Standard 100' to guarantee that all the fabric parts of your pram are safe for your baby.
Please do not use this pram before reading the instructions carefully, and keep these instructions for queries or future reference. Your child's safety may be affected if you do not follow these instructions.
If you do not understand the instructions or if you require more detailed information, contact your dealer.
Please ensure that other users are also informed about the functions of the carriage and the notes on safety.
For the safety of your child
WARNING! Before use, conduct an initial check of the carriage, and do not use it if it is damaged or if parts are torn or broken.
WARNING! Never leave your child unattended in the pram.
WARNING! Before using the pram, make sure the catches are locked in place and the carriage top is secured properly.
WARNING! Negotiating stairs or steps as well as overloading may damage the pram and endanger your child.
WARNING! When parking the pram, make sure the brake is engaged.
When using public transport, ensure the pram stands safely.
WARNING! A pram, stroller or carrycot is not a substitute for a cradle or a bed. It is intended to be used exclusively as a means of transport.
WARNING! Using this pram while jogging, skating, etc. can be dangerous and is therefore not allowed.
WARNING! Do not allow children to play either near or with the pram.
WARNING! Use the safety belt for your child.
WARNING! Shopping bags must not be hung on the handle as this may affect the stability of the pram.
WARNING! This model has been designed for 1 child.
WARNING! A second child seat is not allowed for this model.
WARNING! The carriage top, the seat unit, and the carrycot may not be used as a child car seat in vehicles.
WARNING! For safety reasons, only use Hartan accessories and replacement parts.
Instructions
Unfolding the pram
By pushing the lock buttons 4, unfold the upper section to bring the handle in horizontal position. Pull handle 1 upwards until handle catch 2 has engaged.WARNING! Before using the pram, make sure all catches are locked.
Folding the pram
Turn safety turn-lock 3 inward until the handle's catch 1 has released. Push handle downwards to fold the pram. By pushing the lock buttons 4, fold the handle's upper section inward.
WARNING! We recommend proceeding with caution when folding and unfolding the chassis, and adjusting the backrest, as there is a risk that you do yourself an injury such as jamming your limbs, fingers, etc.
Height adjustment of handlebar
Press the two handle-folding lock buttons 4 to bring the upper section of the handlebar 1 in the desired position.
Changing of wheels
Release the parking brake. Push the button 5 to release the retention, and pull off the wheel. Push the wheel right to the axle's stop, then depress the button. Make sure, all wheels are held in place properly.
Lock-type-swivel wheels
Turn the cap 6 so that the red point is visible to pre-select the straight-line motion mode, which will be activated the moment the wheels point in forward direction. Turn the cap 6 so that the green point is visible to release the swivel lock. To remove the wheel, release the push-button in the centre of the cap 6 and pull the wheel off the holding device. To assemble the wheel, insert the fastening pin in the holding device, and depress the push-button inside the cap, which is indicated by a click sound.
Parking brake
Push the red brake button 7 to engage the brake. Having parked the pram, try to push it to check the brake. Push the green brake button 7 to release the brake. WARNING! Make sure the brake is always closed when placing the baby in the carriage or taking it out of it.
Readjustment of hand brake
Readjust the hand brake by means of the cable adjusting barrel 9 (above). A different brake effect on the two rear wheels can be corrected by means of the cable adjusting barrel 9a (below).
Adjustable suspension system
By turning the selector 8, a "hard" or "soft" position can be selected for suspension.
Sun canopy
Press the two front hood bows 10 together to adjust the hood. Adjusting the hood can be effected silently. By taking off the rear hood section 11, the hood can be converted into a sun canopy by means of a zip fastener.
Hood and safety bar
By pressing the bayonet joint 12, the hood or the safety bar can be pulled out. When inserting it, make sure the safety bar locks into place correctly and be careful not to pinch any of the fabric parts. By pressing the buttons, the safety bar position can be changed.
WARNING! The hood bar 10 of the stroller and the safety bar are not suitable for carrying the pram.
Adjusting the backrest
By lifting the back clip 13 at the rear, the backrest can be adjusted from sitting to reclining position in close steps. WARN-ING! When adjusting the backrest, take care that no movable parts jam the baby's limbs, or fingers, etc. Finally, make sure the backrest has reengaged properly.
Safety belt
WARNING! Use the safety belt 14 for your child. Always use the crotch belt D in combination with the waist strap E. Remember to tighten the seat belt when it slacks, which is done by means of the adjuster buckles. For reasons of safety, pass the belt buckle through the shackle F when closing the safety belt. Unfasten the belt: To unfasten the belt, press the red point A and the two latches B as well. To unfasten the shoulder straps, press the buttons C.
Adjusting the footrest
By pressing the two red safety buttons 15 at the same time, the footrest can be lowered. When lifting it, adjustment of positions is effected automatically. The footrest can be lengthened. To do this, pull the two red pins 16 and turn the footrest by 180^ .
WARNING! In case the carrycot is attached to the frame, the footrest should always be in horizontal position, as an additional protection preventing it from slipping out. Secure the carrycot according to the operating instructions.
Automatic lock for upper section 19
Place the carrycot or stroller unit upon the chassis in a way that the two lateral pins engage in the respective slots on each side. Then push the upper section right up to the stop. The catching pins on both sides engage automatically, which is indicated each time by a click sound.
WARNING! By pulling the upper section horizontally, check before use whether it is fixed correctly! If the red safety point can still be seen, the upper-section lock has not yet completely closed! Pull the locking lever downwards until it snaps into place to open the lock and to remove the upper section.
Fall-out protection
WARNING!
As an additional protection preventing the baby from falling out of the carriage, secure the hood to the metal back. To do this, join the two grommets 17 to their respective turn-lock fasteners, and the hook lock 18 to the metal ring on the back plate as well.
Suitability for your child
The R_1 plus stroller unit is designed to carry a child from the age of 6 months, and up to 15kg in weight.
WARNING!
Only use this seat unit when your child is able to sit independently. The R_1 plus stroller is not suitable for children under the age of 6 months except in connection with an appropriate carrycot.
All the materials we use can easily be cared for.
Care of the fabric parts
Clean soiled fabrics when dry using a clothes-brush or lukewarm water (then use hair dryer). Do not rub fabrics extensively. Remove tenacious stains using a soft detergent. All removable fabric parts may be machine washed in lukewarm water at a gentle setting and reduced agitation, at 30^ . Let's say you have encountered a heavy rain shower. Dry your carriage with the hood still on in a dry and airy room using a cloth. This prevents marking as well as the underlining fabrics from moist soaking in through the seams. As a guaranteed protection against rain, we recommend that you use our rain cover, which is either included or can be purchased at your dealer's. Our fabrics have quite a number of distinctive features. However, they are very sensitive to excessive sunlight. That's why you should park your carriage in the shade whenever possible.
Care of the chassis
The chassis requires regular care. You should clean and slightly lubricate the wheel axles at a regular 4-weeks interval. Use a silicone based lubricant spray for all moving plastic parts to maintain them in an operative condition. Keep all coated and chrome-plated metal parts in dry condition, and use a finish restorer or chrome paste if necessary. Remove smaller chassis paint damages by means of a touch-up applicator. Do not use high-pressure cleaners when cleaning your carriage, due to risk of damaging the ball bearings of the wheels (greased) and other functional parts (grinding and creaking noise). Wheels: When using pneumatic wheels, make sure they have got enough air in the tire. Specified tire inflation pressure should be between 1.2 and 1.5bar max. WARNING! Max. tire pressure will be reached quickly. Overpressure may result in accidents and personal injuries. Replace worn plain wheel bearings and springs in time. Whenever possible, do not park carriages using pneumatic tired wheels for a longer period of time on light PVC or linoleum as rubber tires may rub off on the floor covering. Little stones in the thread, etc. may just as well damage the floor covering. When parking the carriage in the blazing sun or cramming it in the boot at temperatures of above 40^ , the semi pneumatic tires may flatten or become deformed.
Tire air loss
Tires tend to lose air over time. When blowing up a flat tire, inflate it only halfway first, and make sure the tire is evenly seated, to avoid "wobble". Then continue to inflate it to the proper pressure.
Quality agreement
2 YEARS WARRANTY
This product is guaranteed for a period of 2 years by your contract partner. For possible submission of proof, please keep your receipt, the completed warranty card as well as the hand-over check bearing your signature for the length of the warranty period. These documents must be submitted to qualify for service under the warranty.
IN CASE OF WARRANTY CLAIM
This product is warranted against defects in materials and workmanship that existed at the time it was handed over.
THIS WARRANTY DOES NOT COVER ....
We disclaim liability for defects in the object of purchase that are beyond our control. This especially applies to:
natural wear and tear (wear-related defects) and defects due to excessive stress
■ consequential defects, originally caused by neglect of defects/damages but developing into conditions necessitating a more difficult repair
defects due to improper or inappropriate use (see Instructions)
defects due to incorrect assembly or operation
defects due to negligent handling or lack of maintenance of the product
defects due to improper alteration of the product.
WARRANTYCLAIM-YESORNO?
Rust: To provide a proper basic protection of the chassis, it has undergone a rust-proofing treatment. However, rust-stains may be found when lacking maintenance. This case will not be covered by the warranty.
Scratches: Scratches caused by wear and tear will not be covered by the warranty.
Mould formation: Fabric parts, having become wet, should be dried properly to prevent mould formation (see Instructions). Mould formation will not be covered by the warranty.
Bleaching of the fabrics: We confirm that the fabrics comply with the established standards. It cannot be ruled out that colours of the fabrics may fade while the parts are exposed to direct sunlight, washed too frequently, come into contact with sweat and detergents, or suffer abrasive wear (especially on those parts where the pram is handled). Consequently, colour fading is excluded from the warranty. It is unavoidable that colours sometimes differ slightly from one individual batch to the next, which is why this case will not be covered under the warranty.
Knob formation on fabrics: We recommend that you apply general clothes care. As with woollen sweaters, the knobs can easily be removed by using a clothes-brush or burling machine.
Tearing of seams, fabrics, press studs : At the time of purchase, please check carefully that all the fabric parts, seams and snap fasteners have properly been sewn and fastened. In case of a possible complaint concerning seams/defective snap fasteners, a claim must immediately be reported to your dealer after the defect has been discovered.
Wheels: As wheels used on prams will not be balanced, they may show slight run-outs ("wobbles"). Worn tires will be regarded as natural wear and tear. No claim can be raised if your pram, using pneumatic tired wheels, has a "flat". This will be attributed to extraneous causes — a small hole caused by a pointed object, or pushing the pram about when it has not got enough air in the tire. This case will not be covered by the warranty.
Quality agreement
WHAT TO REMEMBER WHEN BUYING YOUR PRAM
Check that your pram is complete when it is handed over and no parts are missing. Check the function of all parts and confirm this by signing the hand-over check.
WHAT TO DO IN CASE OF A COMPLAINT
Call your dealer, from whom you bought the pram, to file the complaint and to discuss how to handle the matter. In case of defects concerning safety regulations, your complaint must be filed at your dealer within a 30 days period from the date the defects have occurred, otherwise these defects will not be warranted for. When handling your warranty claims, we will apply product-specific depreciation rates. We refer you to our general terms and conditions displayed at our premises.
USE, CARE AND MAINTENANCE
To maintain the original quality of your pram as a means of transportation for your child, it requires care and maintenance according to the instructions.

1 Guidon
Protection anti-chutes
not applicable
- Function check
Folding mechanism
checked/OK
not applicable
Road behaviour
checked/OK
not applicable
Wheels
checked/OK
not applicable
Adjusting mechanism
checked/OK
not applicable
Brakes check
checked/OK
not applicable
Suspension check
checked/OK
not applicable
- Intactness
Frame check
checked/OK
not applicable
Fabric check
checked/OK
not applicable
Plastic parts check
checked/OK
not applicable
I have checked the product and have ascertained that it is supplied complete, has no external, visible faults and that all functions are intact.
I have received sufficient information concerning the product and its functions before purchase and have been instructed on care and maintenance.
Übergabe-Protokoll
Acceptance Certificate
Name / Name:
StraBe / Road:
Stoff-Farbe (Design): Colour of fabric (design):
Zubehor / Accessories:
Kaufdatum / Date of purchase:
Salesperson (name in block letters)
Note: signing this acceptance certificate does not restrict the legal rights of the purchaser.
Handler / Dealer: