HOMEGUARD MS8000 - Home Security System MARMITEK - Free user manual and instructions
Find the device manual for free HOMEGUARD MS8000 MARMITEK in PDF.

User questions about HOMEGUARD MS8000 MARMITEK
0 question about this device. Answer the ones you know or ask your own.
Ask a new question about this device
Download the instructions for your Home Security System in PDF format for free! Find your manual HOMEGUARD MS8000 - MARMITEK and take your electronic device back in hand. On this page are published all the documents necessary for the use of your device. HOMEGUARD MS8000 by MARMITEK.
USER MANUAL HOMEGUARD MS8000 MARMITEK
SECURITY SYSTEM WITH BUILT-IN TELEPHONE DIALLER
USER MANUAL 3
SECURITY SYSTEM WITH BUILT-IN TELEPHONE DIALLER
SAFETYWARNINGS
- To prevent short circuits, this product should only be used inside and only in dry spaces. Do not expose the components to rain or moisture. Do not use the product close to a bath, swimming pool etc.
- Do not expose the components of your systems to extremely high temperatures or bright light sources.
- In case of improper usage or if you have altered and repaired the product yourself, all guarantees expire. Marmitek does not accept responsibility in the case of improper usage of the product or when the product is used for purposes other than specified. Marmitek does not accept responsibility for additional damage other than covered by the legal product responsibility.
- This product is not a toy. Keep out of reach of children.
- Do not open the product (battery panel excepted): the device may contain live parts. The product should only be repaired or serviced by a qualified repairman.
- Keep batteries out of the reach of children. Dispose of batteries as chemical waste. Never use old and new batteries or different types of batteries together. Remove the batteries when you are not using the system for a longer period of time. Check the polarity (+/-) of the batteries when inserting them in the product. Wrong positioning can cause an explosion.
- Only connect the adapter to the mains after checking whether the mains voltage is the same as the values on the identification tags. Never connect an adapter when it is damaged. In that case, contact your supplier.
1. FUNCTIONS SUMMERY
After entering your PIN code, use the keys to program the following:
'1' + 'ARM' (on KR21E) + any random key: log-on your remote control (see chapter 7).
2^ + ^ and * telephone number' ^+ #': +1 2 or 3: telephone numbers (see chapter 6).
3^ + ^ activate siren, #: set silent alarm (see chapter 9).
'4': decide number of beeps (1, 2 or 3) after message (see chapter 6).
'5': enter new PIN code (see chapter 5).
^ 6' + '^*' : activate PIR, # ' : switch PIR off (see chapter 10).
^ 7' + ' : delay alarm, #: set instant alarm (see chapter 8).
'#': activate alarm (see chapter 11).
^ : de-active alarm (see chapter 11).
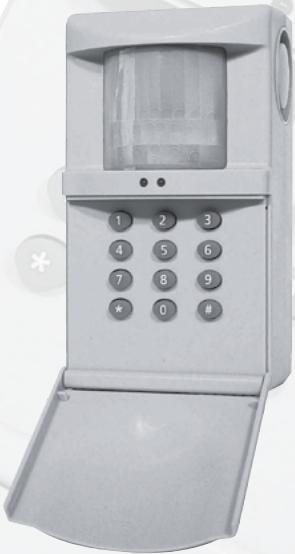
2. IMPORTANT FUNCTIONS AND CONTROLS:
1. Keyboard:
Open the cover by pulling the front panel forward.
2.Passive Infrared Sensor (PIR):
Detects motion within a 6 meter range at an angle of 180^ , 12 meter straight forward.
3. Siren:
Built-in 90dB(A) siren is triggered by an alarm and can be switched of (silent alarm) via the keyboard after entering your personal access code (PIN).
4. Battery compartment:
Contains a back-up battery in case of a power failure or tampering. For longer back up times a 9V alkaline (approx.10h) or Lithium battery (approx. 30h) can be used. Battery lifetime is reduced each time the power is switched off or the power adapter is disconnected from mains. If the HomeGuard is disconnected from mains for a longer period of time on purpose, remove the battery first.
5. Status indicators:
red: - On continuously when the alarm is activated.
- flashes after the alarm has been triggered.
- is off when the alarm is de-activated.
green: - flashes when the device is being programmed.
- flashes when the device is being turned on (time delay).
- On continuously when the device is on.
6. Telephone input:
Connects the HomeGuard to the public telephone network with the supplied cable.
7. Power supply:
Only use the supplied 12V power adapter.
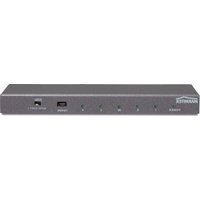
8. External alarm connector:
This input allows you to connect any external alarm device with a non-powered NO (Normally Open) or NC (Normally Closed) connector. E.g. smoke alarms, magnetic door-window connectors, flood and temperature detectors, etc. There may be multiple sensors connected to the HomeGuard (serial for NC, parallel for NO alarm connectors). This allows you to turn your HomeGuard into a complete security system with built-in telephone dialler. To connect any external security device, use the supplied cable with mini-plug or install an equivalent jack plug on these devices.
3. WIRELESS KEY FOB REMOTE CONTROL KR21E
- ARM: Will put the HomeGuard into the armed position. The alarm is instant or delayed. Delayed arming allows you to leave the room within 30 seconds or enter the room and switch off the alarm within 15 seconds after entering. The factory default is instant arming (no delay). To change this setting please refer to Delay Arm (8).
- DISARM: Switches off and resets the HomeGuard.
- PANIC: If pressed simultaneously will cause an alarm instantly.
-
Lights On/Lights Off: These buttons are not used with HomeGuard.
-
LED indicator: Indicator flashes if remote transmits a command. If indicator does not flash or lights up weakly, replace the batteries. The battery holder is located inside the remote. The back of the remote can be easily opened using your fingernails or a small screwdriver. Only use two 3V lithium batteries model CR2016. Push the ARM key for more than 3 seconds and release the button; the indicator blinks. If batteries are replaced, you have to reregister with the base station (refer to installation).
4. SELECTING A SUITABLE LOCATION
The base station has a so-called passive infrared element that detects any change in temperature within its range. A certain amount of heat related to human beings is detected for an alarm. However to achieve the best performance of your HomeGuard, note following installation recommendations before installing:
a. It should be located at approx. 170-180cm height on a fixed vertical surface e.g. wall or cupboard
b. Choose a location where an intruder may pass the monitored area at all time in an early stage of intrusion.
c. Choose a location near to a wall outlet and telephone socket.
d. The sensor should not be placed above or near heating elements or in front of air-conditioners.
e. Do not mount the sensor on a metal surface or next to electrical equipment such as TV sets or computers.
Caution:
a. Radio equipment (e.g. wireless headphones or loudspeakers) working on a frequency band of 433MHz will not create a false alarm, however, these devices will limit the RF range of the remote control considerably.
b. Pets, e.g. dogs or cats, may trigger the alarm, and should therefore not be kept in the same room as where the activated sensor is mounted.
5. PIN CODE SETTING:
Your HomeGuard can be operated and programmed by using a so-called PIN code (Personal Identification Number). The factory default code is: [0000]. To avoid unauthorised use, enter your own PIN code.
Note: Choose a code you will easily remember, since the HomeGuard will recognise this code only for further operation.
- Enter your current PIN (Personal Identification Number). If you have never changed this code before, the factory default code is [0000]. You will hear three high tones and one low tone as confirmation. The green indicator will start flashing.
- Press 5 on the keyboard of the HomeGuard: One low tone is given for confirmation.
- Enter a new 4-digit PIN code: You will get three high tones and one low tone as confirmation and the indicator stops flashing.
6.PROGRAMMING OF TELEPHONE NUMBERS.
You may select up to three telephone numbers to be contacted if the alarm is triggered. These numbers may include mobile (GSM) numbers, however you are not allowed to use national emergency numbers from e.g. police, paramedical, etc. The numbers you chose should be have well informed people, instructed by you and able to help in case of an alarm (e.g. neighbours, friends, relatives or your own mobile).
To enter telephone numbers:
- Enter your PIN (Personal Identification Number). Factory default is [0000]: You will hear three high tones and one low tone as confirmation. The green indicator starts flashing.
- Press 2 on the keyboard of the HomeGuard: One low tone is given for confirmation.
- Press the [^*] button: One high tone is given for confirmation.
- Enter the first telephone number you selected (max. 16 digits). If a dialling pause is required (e.g. with a certain type of PABX between 0 and the number you want to dialled in order to obtain an outside line) press another [^] for a one second pause. One high tone is given for confirmation of each number entered.
- Press #: One high tone is given for confirmation.
- Press 1 to place the telephone number you just entered in memory location 1. One short low tone is given and the green indicator stops flashing. Repeat this procedure with the two other selected telephone numbers by pressing 2 and 3 for placing these in memory positions 2 and 3 respectively. Note: All three numbers should be entered. You may enter the same number more than once.
Call Identification:
If you select telephone numbers of people who's number has been entered by more than one HomeGuard, you can transmit an extra audible signal with the pre-recorded message in order to identify the HomeGuard calling. The factory default is one beep at the end of the message.
To change the number of beeps (1, 2 or 3):
- Enter your PIN
- Press 4 on the keyboard
- Press 1, 2 or 3 for the required number of identification beeps.
7. REGISTERING REMOTE CONTROLS
HomeGuard can be remotely controlled by up to 4 radio remotes (1 piece KR21E supplied). For security reasons, each remote selects a unique code (1 out of 65.536) after the battery has been installed. Before using HomeGuard, the base station has to learn this specific code from each remote:
-
Enter your PIN (Personal Identification Number). Factory default is [0000] see (5): You will hear three high tones and one low tone as confirmation. The green indicator starts flashing.
-
Press 1 on the keyboard of the HomeGuard: One high tone is given for confirmation.
- Press the ARM button on your remote: One low tone is given for confirmation.
Repeat step 1-3 for a second up to fourth remote if required. - Press any button on your HomeGuard keyboard to finalise the registration procedure: One short low tone is given and the green indicator stops flashing.
If no successive commands are entered within a period of 15 seconds, the base station returns to normal operation. To restart the registration you start the procedure from step1.
8. DELAY ARM
The alarm mode may be activated by either the remote control or by the keyboard. If the remote control is used, the HomeGuard arms and disarms instantly. If you require a delay, in order to allow yourself to leave or enter the room before arming or disarming the HomeGuard, you may set the HomeGuard to Delay Arm:
- Enter your PIN (Personal Identification Number). Factory default is [0000]: You will hear three high tones and one low tone as confirmation. The green indicator starts flashing.
- Press 7 on the keyboard of the HomeGuard: One low tone is given for confirmation.
- Press [ * ] for Delay Arm or # for Instant Arm: One tone is given for confirmation and the indicator stops flashing.
9. SIREN
Your HomeGuard is equipped with a built-in siren. This siren will frighten intruders so they'll leave the house. If you require a so-called silent alarm (without siren), you can change the factory default:
- Enter your PIN (Personal Identification Number). Factory default is [0000]: You will hear three high tones and one low tone as confirmation. The green indicator starts flashing.
- Press 3 on the keyboard of the HomeGuard: One low tone is given for confirmation.
- Press [ * ] for Siren On or # for Silent Alarm: One tone is given for confirmation and the indicators stops flashing.
10. DE-ACTIVATING THE BUILT-IN MOTION SENSOR:
If you prefer to operate the HomeGuard only by means of the external alarm connector rather than the built-in motion sensor, you can de-activate the PIR:
- Enter your PIN (Personal Identification Number). Factory default is [0000]: You will hear three high tones and one low tone as confirmation. The green indicator starts flashing.
- Press 6 on the keyboard of the HomeGuard: One low tone is given for confirmation.
- Press [ * ] for activating the PIR or # for de-activating the PIR: One tone is given for confirmation and the INDICATOR stops flashing.
11. OPERATING INSTRUCTIONS:
Arm-Disarm
The HomeGuard may be armed and disarmed by the remote control or keyboard.
To activate the security system from the keyboard (always delayed):
Enter your PIN (Personal Identification Number). Factory default is [0000]: You will hear three high tones and one low tone as confirmation. The green indicator starts flashing. Press # in the keyboard: You will hear one low tone as confirmation and the RED indicator lights up, the GREEN indicator will flash during the delay (30 seconds). After 30 seconds the HomeGuard is armed and will generate one low tone for confirmation.
To disarm the HomeGuard via the keyboard:
- Enter your PIN code: 4 short tones will be generated as confirmation.
- Press [^] : One short tone will be generated and the RED indicator will go out.
To arm and disarm the HomeGuard with the remote control:
- Press ARM to activate the alarm
- Press DISARM to de-activate the HomeGuard. If you use the remote, the arming and disarming may be instant of delayed, depending on the settings of the HomeGuard.
To generate a panic call: press both PANIC buttons at the same time.
To reset the alarm:
If an alarm has occurred it can be reset by:
- The person called pressing 0 on the telephone dialer just after the beep(s) in the message.
- Disarming the system on the keyboard by entering your PIN followed by [ * ]
- Pressing DISARM on the remote control.
Alarm message:
During an alarm the telephone dialler will dial the first number. It will start transmitting the pre-recorder message as soon as the last digit has been dialled. The message lasts 9 seconds and will be repeated twice. The pre-recorded message is followed by a beep. After this beep the system will wait for call confirmation which can be given by pressing 0 on a DTMF (touch tone) telephone. In case the confirmation is not received, the HomeGuard will start dialling the second number and follow the same procedure. If the second person does not give confirmation, the third number will be dialled.
NOTE:
Instruct the person who's number has been entered to give the confirmation 0 just after the beep(s). Since telephone answering machines or voice mail facilities will not generate the confirmation, these will be ignored. It is recommended to do a test with the people involved in order to let everyone get acquainted with the system.
12. FREQUENTLY ASKED QUESTIONS
The base station does not react at all, the green indicator is not on
Check the power supply and/or the replace the back-up battery.
The telephone dialler does not dial out
Check that the telephone plug is connected properly Check that the telephone outlet is responding to a normal analogue telephone.
False alarms
Reposition the HomeGuard, away from heating elements, direct sunlight, etc. Check that no pets can trigger the alarm.
Limited range of the remote
Check the condition of the battery and replace the battery if required. Check if no other devices interfere on the same frequency e.g. wireless headphones etc.
PIR or siren do not respond
Check that PIR or SIREN has been activated.
The sensor HomeGuard does not react to the remote
Follow the registration procedure in order to lock in the remote. Check that the indicator on the remote comes on. If not, replace the battery
Any other malfunction
Disconnect the HomeGuard from mains and back-up battery. This will reset the HomeGuard. Re-install the HomeGuard according to the instruction manual.
Do you still have questions? Please check out www.marmitek.com for more information.
13. TECHNICAL DATA
MS8000
| Power supply: | 230VAC 50 Hz, 9V PP3 back-up battery 12 hours stand-by time. |
| Internal siren: | 95 dB(A). |
| Remote control: | Max. 4 to log-on. |
| Telephone number selector: | Built-in; max. 3 numbers of max. 16 digits. |
| PIR range: | 180° - 6 meter, straight forward - 12 meter (PIR can be switched off) |
| RF receiver frequency: | 433,92 MHz. |
| Operating temperature: | -10°C till +50°C (operation). -20°C till +70°C (storage). |
KR21E
Power supply: 2x CR2016 3V Lithium batteries.
Range: Till 20m free field, till 10m through walls and ceilings.
Dimensions: 38x57x12 mm.
RF transmitter frequency: 433,92 MHz.
RF power: 10mW.
Operating temperature: -10°C till +50°C (operation).
-20°C till +70°C (storage).
Specifications may be modified without prior notice.
14. OPTIONAL ACCESSORIES
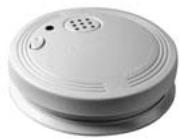
WirelessSmoke Detector SD90
The Marmitek Smoke Detector will make sure you are warned in case of a fire. When you're at home, the built-in siren will be triggered. Combined with your security system the internal siren and the telephone dialler will be activated. This gives you an optimal warning. If you are away from home, you will receive a warning via your mobile phone.

Environmental Information for Customers in the European Union
European Directive 2002/96/EC requires that the equipment bearing this symbol on the product and/or its packaging must not be disposed of with unsorted municipal waste.
The symbol indicates that this product should be disposed of separately from regular household waste streams. It is your responsibility to dispose of this and other electric and electronic equipment via designated collection facilities appointed by the government or local authorities. Correct disposal and recycling will help prevent potential negative consequences to the environment and human health. For more detailed information about the disposal of your old equipment, please contact your local authorities, waste disposal service, or the shop where you purchased the product.
HOMEGUARD MS8000 ALARMANLAGE MIT INTEGRIERTEN TELEFONWAHLGERAT
SICHERHEITSHINWEISE
RF Empfangsfrequency: 433,92 MHz
RF Sendefrequency: 433,92 MHz
RF Leistung: 10mW
VEILIGHEIDSWAARSCHUWINGEN
Ga na of de PIR of SIRENE is ingeschakeld.
De sensor reageert nicht op de afstandsbediening
DECLARATION OF CONFORMITY
Hereby, Marmitek BV, declares that this HomeGuard is in compliance with the essential requirements and other relevant provisions of the following Directives:
Directive 1999/5/EC of the European Parliament and of the Council of 9 March 1999 on radio equipment and telecommunications terminal equipment and the mutual recognition of their conformity
Council Directive 89/336/EEC of 3 May 1989 on the approximation of the laws of the Member States relating to electromagnetic compatibility
Council Directive 73/23/EEC of 19 February 1973 on the harmonization of the laws of Member States relating to electrical equipment designed for use within certain voltage limits
DECLARATION OF CONFORMITY
Marmitek is a trademark of Marmidenko B.V. HomeGuard MS8000™ is a trademark of Marmitek B.V. All rights reserved.
Copyright and all other proprietary rights in the content (including but not limited to model numbers, software, audio, video, text and photographs) rests with Marmitek B.V. Any use of the Content, but without limitation, distribution, reproduction, modification, display or transmission without the prior written consent of Marmitek is strictly prohibited. All copyright and other proprietary notices shall be retained on all reproductions.