
M60 - Lawn mower MOUNTFIELD - Free user manual and instructions
Find the device manual for free M60 MOUNTFIELD in PDF.

User questions about M60 MOUNTFIELD
0 question about this device. Answer the ones you know or ask your own.
Ask a new question about this device
Download the instructions for your Lawn mower in PDF format for free! Find your manual M60 - MOUNTFIELD and take your electronic device back in hand. On this page are published all the documents necessary for the use of your device. M60 by MOUNTFIELD.
USER MANUAL M60 MOUNTFIELD
SAKERHETSFORESKRIFTER
A) BRUKSANVISNING
pning at annat hall.
D) HUOLTO JA SAIYTYS
D: Start/Stopp-wire + Koblingswire ()
E: Gaswire () + Koblingswire ()
F: Elkabel () + Variatorwire (*)
VARIATORHÄNDTAG (*)
D) VEDLIKEHOLD OG LAGRING
1) Read the instructions carefully. Get familiar with the controls and proper use of the equipment. Learn how to stop the engine quickly.
2) Only use the lawnmower for the purpose for which it was designed, i.e. for cutting and collecting grass. Any other use can be hazardous, causing damage to the machine.
3) Never allow children or people unfamiliar with these instructions to use the lawnmower. Local regulations may restrict the age of the operator.
4) Never use the lawnmower:
-
When people, especially children, or pets are nearby.
-
If the operator has taken medicine or substances that can affect his ability to react and concentrate.
5) Remember that the operator or user is responsible for accidents or hazards occurring to other people or their property.
B) PREPARATION
1) While mowing, always wear sturdy footwear and long trousers. Do not operate the equipment when barefoot or wearing open sandals.
2) Thoroughly inspect the area where the equipment is to be used and remove all objects which may be thrown by the machine or damage the cutter assembly and the engine (stones, sticks, metal wire, bones, etc.)
3) WARNING: DANGER! Engine fuel is highly flammable:
- Store fuel in containers specifically designed for this purpose.
- Refuel using a funnel and outdoors only. Do not smoke while refuelling or whenever handling the fuel.
- Add fuel before starting the engine. Never remove the cap of the fuel tank or add fuel while the engine is running or when the engine is hot.
- If fuel is spilled, do not attempt to start the engine but move the machine away from the area of spillage and avoid creating any source of ignition until the fuel has evaporated and the vapour dispersed.
- Replace all fuel tanks and containers caps securely.
4) Substitute faulty silencers.
5) Before use, always inspect the machine, especially the condition of the blades, and check that the screws and cutting assembly are not worn or damaged. Replace worn or damaged blades and screws in sets to preserve balance.
6) Before mowing, attach the discharge opening guards (grass-catcher or stone-guard).
C) OPERATION
1) Do not operate the engine in a confined space where dangerous carbon monoxide fumes can collect.
2) Mow only in daylight or good artificial light.
3) If possible, avoid operating the equipment in wet grass.
4) Always be sure of your footing on slopes.
5) Walk, never run and do not allow yourself to be pulled along by the lawnmower.
6) Mow across the face of slopes, never up and down.
7) Exercise extreme caution when changing direction on slopes.
8) Do not mow on slopes of more than 20^ .
9) Exercise extreme caution when pulling the lawnmower towards you.
10) Stop the blade if the lawnmower has to be tilted for transportation when crossing surfaces other than grass, and when transporting the lawnmower to and from the area to be mowed.
11) Never operate the lawnmower with defective guards, or without safety devices, such as the stone-guard and/or grass-catcher, in place.
12) Do not change the engine governor settings or overspeed the engine.
13) On power-driven models, disengage the drive clutch before starting the engine.
14) Start the engine carefully, following the instructions and keeping feet well away from the blade.
15) Do not tilt the lawnmower when starting the engine. Start the engine on a flat surface that is free of obstacles and tall grass.
16) Do not put hands or feet near or under rotating parts. Keep clear of the discharge opening at all times.
17) Never pick up or carry a lawnmower while the engine is running.
18) Stop the engine and disconnect the spark plug wire:
- Before carrying out any work underneath the cutting deck or before unclogging the chute;
- Before checking, cleaning or working on lawnmower;
- After striking a foreign object. Inspect the lawnmower for damage and make repairs before restarting and operating the lawnmower;
- If the lawnmower starts to vibrate abnormally (find and remove the cause of the vibration immediately).
19) Stop the engine: - Whenever you leave the lawnmower unattended. Remove the key from models with electric starters.
- Before refuelling.
- Every time you remove or replace the grass-catcher.
- Before adjusting the grass cutting height.
20) Reduce the throttle before turning off the
engine and turn the fuel off when you have finished mowing, following the instructions in the engine handbook.
21) When mowing, always keep to a safe distance from the rotating blade. This distance is the length of the handle.
1) Keep all nuts, bolts and screws tight to be sure the equipment is in safe working condition. Regular maintenance is essential for safety and performance.
2) Never store the equipment with fuel in the tank inside a building where vapour may reach a flame or a spark or a source of extreme heat.
3) Allow the engine to cool before storing in an enclosed space.
4) To reduce the fire hazard, keep the engine, exhaust silencer, battery compartment and fuel storage area free of grass, leaves, or excessive grease. Do not leave containers with grass cuttings in rooms.
5) Check the stone-guard and grass-catcher frequently for wear and deterioration.
6) If the fuel tank has to be drained, this should be done outdoors and when the engine is cool.
7) Wear strong work gloves when removing and reassembling the blade.
8) Keep the blade balanced during sharpening. All operations on the blade (dismantling, sharpening, balancing, remounting and/or replacing) require a certain familiarity and special tools. For safety reasons, these jobs are best carried out at a specialized centre.
9) For reasons of safety, do not use the equipment with worn or damaged parts. Parts are to be replaced and not repaired. Use genuine spare parts (blades should always bear the symbol ). Parts that are not of the same quality can damage the equipment and be dangerous for your safety.
E) TRANSPORTATION AND HANDLING
1) Whenever the machine is to be handled, raised, transported or tilted you must:
- wear strong working gloves;
- grasp the machine at the points that offer a safe grip, taking account of the weight and its distribution.
- use an appropriate number of people for the weight of the machine and the characteristics of the vehicle or the place where it has to be placed or collected.
THE ENVIRONMENT
In order to protect the environment, we recommend that the following points should be given special consideration:
Always use pure unleaded petrol.
Always use a funnel and/or a petrol can with a level control to avoid spillage when refilling the fuel tank.
- Do not fill the fuel tank completely.
- Do not overfill with engine and/or transmission oil.
- When changing the oil, ensure that all the used oil is collected. Avoid spillage. Take the used oil to a recycling unit.
- Do not dispose of used oil filter in a rubbish bin. Take it to a recycing unit.
- Do not dispose of used lead-acid batteries in a rubbish bin. Take them to a battery collection point for recycling (applies to battery-powered machines and machines with battery start).
- Replace the silencer if faulty. When carrying out repairs, always use original spare parts.
- If the machines was originally equipped with a catalyser which is now faulty, a new one must be fitted when the silencer is replaced.
Always seek professional help when the carburettor requires adjustment.
- Clean the air filter according to the directions.
- When, after many years of service, your machine needs to be replaced or is no longer required, we recommended that the machine is returned to your distributor for recycling.
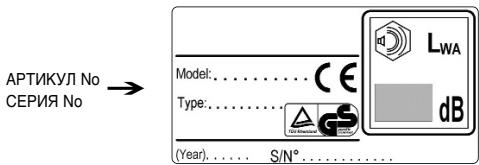
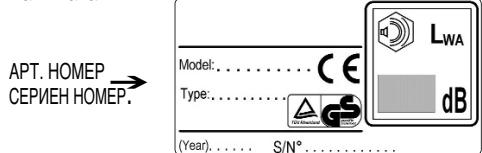
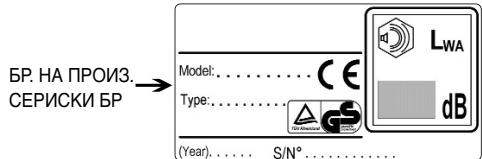
PRODUCT IDENTITY
The identity of the product is determined by the article and serial numbers of the machine.
These can be found on the label fixed to the chassis of the machine:

Use this identification whenever you contact a service workshop or buy replacement parts.
As soon as possible after buying the machine, write the above numbers on the back page of this booklet.
The manufacturer reserves the right to make changes to the product without prior notice.
IMPORTANT
For the instructions relative to the engine and the battery, please read the relevant instruction handbooks.
Equipment which is marked with an asterisk (*) comes as standard in certain models or countries. Certain models do not have throttle control. The engine's speed is set for optimal function and minimal exhaust emissions.
SYMBOLS
The following symbols can be found on the machine to remind you of the care and attention that are required during use.
The symbols mean:

Important: Read the instruction handbook before using the
Warning! Keep onlookers away. Beware of objects being flung out.
Warning! Keep hands and feet clear of the cutting deck when the machine is running.
Warning! Before starting any repair work, remove the spark plug cable from the spark plug.

Warning! Always tilt the lawnmowerbackwards when cleaning the
underside. Petrol and oil can run out if the lawnmower is tilted in the other direction.
INTRODUCTION
Type I
Type II
Type III
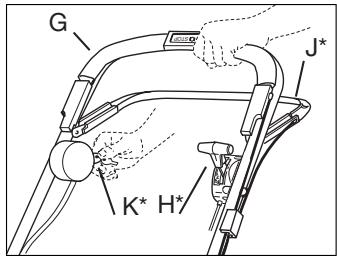
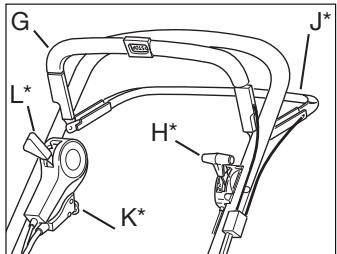
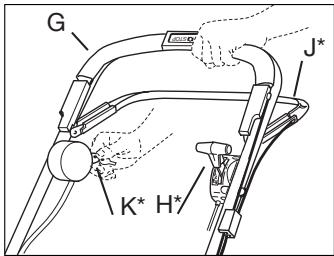
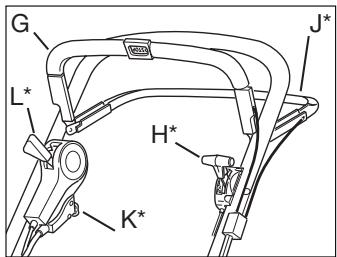
G Start/Stop loop
H Throttle control ()
J Clutch loop (^)
K Electric start ()
L Variator control (^*)
INSTALLATION
LOOSE PARTS IN THE BOX
2 brackets for the grass collector
4 screws for the brackets
1 ignition key (^)
1 battery charger ()
1 Allen key
1 socket wrench
+ Instruction books
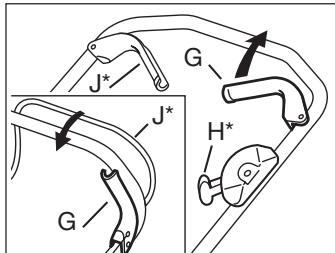
HANDLE (Type I-II)
- Fold up the lower part of the handle.
- Secure the upper part of the handle with washers and locking wheels. There is a lug on the right hand side for the starter handle (fig. 1).
- Then tighten the locking wheels onto the lower part of the handle. When these have been tightened, the height of the handle can be adjusted by tightening the screws A with the wrench provided. (fig. 2)
HANDLE (Type III)
-
Unscrew the locking wheels from the chassis and secure the lower part of the handle onto screws B (fig. 3).
-
Secure the upper part of the handle with washers and locking wheels. There is a lug on the right hand side for the starter handle (fig. 1).
- Then tighten the locking wheels onto the lower part of the handle. When these have been tightened, the height of the handle can be adjusted.
CABLE HOLDER
Secure the cables in the cable holders (fig. 4):
D: Start/Stop cable + Clutch cable ()
E: Throttle cable () + Clutch cable ()
F: Electric cable () + Variator cable (*)
VARIATOR CONTROL (*)
When the mower is delivered, the variator cable is set so that the transmission cannot be damaged.
The cable may need tightening, see under heading "ADJUSTING VARIATOR CABLE" in the section "MAINTENANCE".
GRASS COLLECTOR
Raise the collector flap and attach the two brackets to the grass collector with the screws provided. The brackets are marked with L and R and should be installed at the corresponding mark on the rear of the mower (fig. 5).
Fabric grass collector (^*) : Fit the fabric bag over the steel frame and then snap the bag onto the plastic lid (fig. 6).
Plastic grass collector (^*) : Snap together both halves and then the upper part (fig. 7).
Open the flap on the machine and attach the grass collector to the brackets.
NOTE! The lawnmower can be operated without the grass collector. The grass is then left in a line behind the machine.
BATTERY (*)

The electrolyte in the battery is toxic and corrosive. It can cause serious corrosion damage etc. Avoid all contact with skin, eyes and clothing.
Before starting for the first time the battery should be charged for 24 hours, see further information under the heading MAINTENANCE, BATTERY.
Insert ignition key (^*) into the ignition lock.
USING THE MOWER
COMBI (^*)
Your new lawnmower combines two different functions in the same machine:
1. "MULCHING"
The machine comes equipped with a plug (P), installed in the ejector opening (fig. 8). The machine can be used for 'Mulching' i.e. the blade finely cuts up the grass during mowing. The grass then falls into the lawn where it is allowed to rot.
This provides the lawn with nourishment.
To remove the plug, press in the catch (R - fig. 8a). On reinstalling the plug ensure that both pins are pressed firmly into the holes so that the plug snaps in place.
43 cm Combi:
To remove the plug, unscrew the wing nut (fig. 8b).
2. COLLECTION
Assemble the grass collector provided (fig. 6, 7). Open the flap, remove the plug and instead hook the collector onto the rear of the machine.
When mowing, the grass is collected in the collector.
Empty the grass onto the compost heap or spread it over borders as fertiliser. The machine is also ideal for collecting up leaves in the autumn.
3. REAR EJECTION
Use the mower without the plug or the grass collector (flap closed). The grass is released behind the machine without being cut up.
STARTING THE ENGINE
-
Place the lawnmower on flat, firm ground. Do not start in long grass.
-
Make sure the spark plug cable is connected to the spark plug.
-
Press in the Start/Stop loop G towards the handle. NOTE! The Start/Stop loop G must be kept pressed in to prevent the engine stopping (fig. 9).
4a Manual start: Grasp the starter handle and start the engine by pulling briskly on the starter cord.
4b Electric start (K^*) : Start the engine by turning the ignition key clockwise. Release the key as soon as the engine starts. Always make short attempts at starting in order to prevent discharging the battery.
- For the best mowing results, the engine should always be driven at full throttle.
STOPPING THE ENGINE

The engine may be very warm immediately after it is shut off. Do not touch the silencer, cylinder or cooling flanges. This can cause burn injuries.
Release the Start/Stop loopG (fig. 9) to stop the engine.

If the start/stop loop ceases to work, stop the engine by removing the spark plug cable from the spark plug. Immediately take the lawn mower to an authorised workshop for repair.
REAR WHEEL DRIVE (*)
Engage the drive by pressing the clutch loop J towards the handle. Disengage the drive by releasing the clutch loop J (fig. 9).
SPEED (*)

Do not touch the variator control when the engine is not running. This can damage the operation of the variator.
Set to a suitable speed by moving the variator control to one of the 4 positions (fig. 10).
The various positions have the following speeds:
Position : approx. 2.8 km/h
Position 2: approx. 3.1km / h
Position 3: approx. 3.6 ~km / h
Position : approx. 4.5 km/h
CUTTINGHEIGHT

Do not set the cutting height so low that the blade(s) come into contact with uneven ground.
The mower has single-lever control for adjusting the cutting height. Pull the lever out, and set the cutting height to one of the nine positions best suited to your lawn (fig. 11).
MAINTENANCE
IMPORTANT - Regular, careful maintenance is essential for keeping the safety level and original performance of the machine unchanged in time.
Wear strong working gloves during any cleaning, maintenance or adjustment operation on the machine.
Should it be necessary to access the lower part, only tilt the machine from the side shown in the engine handbook; following the relative instructions.
CLEANING
Carefully clean the machines with water after each cut; remove the grass debris and mud accumulated inside the chassis to avoid their drying and thus making the next start-up difficult.
The paintwork on the inside of the chassis may peel off in time due to the abrasive action of the cut grass; in this case, intervene promptly by touching up the paintwork using a rustproof paint to prevent the formation of rust that would lead to corrosion of the metal.
Remove the transmission casing by removing the screws S (fig. 12) and clean around the transmission () and drive belts () with a brush or compressed air once or twice a year.
Once every season, the drive wheels (*) should be cleaned internally. Remove both wheels. Clean the gear wheel and the wheel gear rim of grass and dirt using a brush or compressed air (fig. 13).
LUBRICATING DRIVE SHAFT (*)
Once per season, the wedge on the drive shaft should be greased. Remove the wheel (wheel cap, screw and washer). Then remove the circlip and washer so that the gear wheel can be removed from the shaft. Lubricate the wedge with universal grease.
Reinstall the wedge (the wedge is installed differently on the right and left side, fig. 14-15). Install the gear wheel so that the «L» faces out on the left side and the «R» faces out on the right side (machine viewed from the rear).
BATTERY (*)
In normal use during the season, the battery is charged by the engine. If the engine cannot be started with the ignition key, it may be because the battery is 'dead'.
Dismantle the battery by opening the battery cover, disconnecting the terminal on the engine and removing the battery (fig. 16). Connect the battery charger (provided) to the battery, then connect the charger to a wall socket and charge for 24 hours (fig. 17).
After charging, the battery may be reinstalled and the terminal on the battery connected to the terminal on the motor (fig. 18).
The battery charger may not be connected directly to the engine terminal. It is not possible to start the engine with the charger as the power source and the charger could be damaged.
WINTER STORAGE
Remove the battery and store it fully charged (see above) in a dry, cool place (between 0^ and +15^ ). At least once during the winter storage period, the battery should be maintenance-charged.
Before the start of the season, the battery should be charged once again for 24 hours.
ADJUSTING CLUTCH CABLE (*)
If the drive does not engage when the clutch loop is pressed against the handle, or if the lawnmower feels cumbersome or slow, this may be because the clutch in the transmission is slipping. To rectify this situation, adjust the clutch cable as follows (with the engine off):
- When the clutch loop is released, it should be possible to push the mower backwards without any resistance. If this is not the case, screw in the nipple T until the mower can be pushed (fig. 19).
- When the clutch loop is pressed in approx. 2cm position 1), there should be some resistance when pushing the lawnmower. With the clutch loop fully pressed in (position 2) it should not be possible to push the mower. Unscrew the nipple T until this position is achieved.
ADJUSTING VARIATOR CABLE (*)
If the speed difference between the settings in the variator control giving the fastest speed (position 3 and ) appears insignificant or nothing at all, the variator cable might need tightening (fig. 10).
- Run the mower for a few minutes in position
- If the variator cable shows some play in nipple Y it needs tightening. Undo the locking nut X and tighten the cable by unscrewing the nipple Y until the cable ceases to show any play.
- Tighten the locking nut X.
NOTE! Do not stretch the cable beyond the point where there is no play in the nipple Y. If the cable is over-tightened, the drive belt could break and/or other parts of the transmission be damaged. When setting after e.g. belt change, always start with the nipple Y completely screwed in.
SHOCK-ABSORBER
Fig. 20. Check the shock-absorber and the insulating sleeves twice per season. Replace in the event of damage or wear.
CHANGING BLADES
To replace the blade, undo the screw (fig. 21, 22). Fit the new blade so that the stamped logo is turned up facing the blade holder (not facing the grass).
Reinstall as illustrated. Tighten the screw properly. Tightening torque 40 Nm.
When replacing the blade, the blade screw should also be replaced.
SHARPENING THE BLADES
Sharpening of the blades must be done by wet method grinding, using a whetstone or a grindstone.
For safety reasons, the blades should not be sharpened on an emery wheel. A very high temperature could cause the blades to become brittle.
STORAGE
The same petrol must not remain in the tank for more than one month.
Thoroughly clean the mower and store it indoors in a dry place.
SERVICING
Genuine spare parts are supplied by service workshops and by many dealers.
We recommend that you take the machine to an authorised service station for annual servicing, maintenance and inspection of safety equipment.
For service and spare parts, please contact the dealer where the machine was purchased.
CONSIGNES DE SECURITÉ
A) FORMATION
REEMPLACEMENT DES LAMES
D) MANUTENSION Y ALMACENAJE
E) IPEPEBO3KA N IPEPEMUEHENE
1)Kakdbi pa3, KOrda Tp6yTc npDbuHyTB, NODHrTB, nPB3TN INI HAKLOHHTb MaunHy, CNyT:
- NaDbTb NIOThbl pa6Ou pyKaBnUbl;
- NOHIMATbMaINHy, YXBaTMB B TaKHX TOUkax, YTOObI OHA H BblCKoB3HyJa, YuHTbIbA B N OOCOHHOCTN KOHCTYKlun;
- npBnB KOnHCTBO JIOi, COOTBTCTBTOU BCy MaunHbN H xapaKTpNCTKAM TPAHCNPHTHO CPdCTBa INI MCTa, B KOTOPOM Ho6XoJIMO YctaHOBNTb, INI OTKya cNDY3aOpTaB.
OKPYXAIOLJAR CPEDA
B cTeyx oxpaHbI OKpykaIOe Cpebl Mbl peKOMeHyEM BblOJIHrT bCJeDyIOoe:
ПользуйтесьТOLьКО OЧицЕНыМ OT CBИнца 6eH3nHOM.
Пльзугесь Левами Канострам с контюм уpoBн,ЧТобь He npошларалова БбЗИн рп запык.
- He 3aJIbAaTe CJIuKOM MHOrO 6eH3nHa.
- He 3aJIbαIte CπιλΚΟ MΗΟ ΜΟτΟΡΗΟ ΜΙΝΤραΗΜΝΑΝΟΗΟ ΓΑΜΑ.
- Пи заме Малca, собире BCE снтое Macno, стаппесь, чтосынице Не раэл'tь и сдаite erо на санцю посяработkn.
He BbpaBbAte MaCnBbMnФnBbTp B MycOp, aCAnTe erho NaCTaUNIO nepeAp6TOKn.
- He BlyöpaBbIaTe McNoJIb3OBAHIIbe 6aTaapeN B MycOp. CdaIte Nx Ha cTaNIZU nepepaBOTK (OTHOICITK N HcHTPYMENTY c AkKYMЛTAPOMI).
Bcerda 3aMeHnTe HeNCpNaBbI rnyuHTeB. PnppeMOHe IcNoJIb3yIte ToJIbKO DeTANI 3aBODa-n3ROTOBTeJIe.
- Ecπιν Kocπικa Μbιλα Μόβργούθουλη καταπιδατορόm, κοτόρβιν Bblεηι ές Κτρογ, yσταHOΒΙΝΕ ΜΟβχικαταδΑτορ.
-Дяperулировки KapбюраTopа,обрацайтесь к cneцалисту.
-ПОНЗВОДИТЕЧСТКУВОДУSHИROTOФИNBТРаΚΑΚΟΝСАНВИНСТРУКЦИ.
EcninNocme MHORIXIETPABOTbl, BblpeuHTe 3aMeHnltb HCTpymENT,TOcdaTcSTApTuO KOCINKy TuTa, rDe Bbl ee npMoBepEnI dI nepepaOtKn.
INEHTNΦIKALUNI N3DEJIIN
IeHTnФиkaunu 3dJIIN OnpdeJETcBByM KOMNoHETAMN:
-Homep n3deJnH cepinHbH HOMEP INCTpyMeHTa.
IeHTnFkauHOBHe TaHHbI npBBeHbHa TaJIuKe Ha wAccn:
Pn nokynke 3anaChbIX DeTanei, yka3bBaIte ndHTnФkaUMOHbIe daHHbIe.
Cpa3y Je nocne nokynkn, nepeneunite daHHbIe c Tabnukn Ha nocneHIOU cTpaHUY daHHO bOpOHpbl.
U3rotobnteIb octabIeT 3a co6oI npaBO hBHeCHeHn3MeHEnH 6e3 ppeBaIpteJIbHO rpeDpynpexDeHn.
BAXKHO
YkaaHnOTHOCHTeBHO DBrAraTeJN 6aTapeN CMBCOOTBcTCTByIOxN HcTpyKlMx NkCnIyatauM.
6OpuyoBaHne,OTMeUeHHOe 3B3doUcKoI (^*) ,dJIa NEKOTOpbIX MoJelNe IuN CTpaH NoCTabJIaTcKa KAc cTaNAPTHOE.
B HeKOpToBix MoDEnIax OTCyTCTByet perYlnpObaHne DPOCCEBHO 3acNOHNK. Yactota O6OpOTOB DnIRaTeJIY yCTaHOBHeA B PEXIM ONTMaJIbHOJ paObTOI C MHHMAMJIbHbIM BbIOPcOM BblXONHbIX rAOB.
IPEyIpyEKPDAIOUHE 3HAKIN
Ha MaunHe NMeIOTcO nncaHbIe HnKe npEynpeJxDaaOuIe 3hAKn, HanOMHaOuIe O TOM, UTO, paobTaC MaunHOn, HyXHo bItb OcToPOXbIM HBMAtelBhlM.
3NaueHne npedynpeKdaIOx 3HaKOB:


BHMaHHe: O3HaKOMITbC C INHCTpyKUJMyM Do TORO, KAK N0JIb30BaTbCra30HOKOcNkoI.
BHHMAnHHe Ha Mece pa6oToIe He DoJnXHo 6bItb ToNcOpOHnHX NmC. OToOpXHo! Bo3MoXeH Bb6poc npEMeTOb IN-NOd MaunHb!
BHMnAe!Pnpa6oTeMaunHbCneDnTe3a TEM, qTOb6pyKn HOrn HaxOdnCb Ha 6beOnachom pacctoAnHn otpeXyUeO JNoKa.
BhimaHne! Do hauana IIO6oRo pemOnTa 0TOcoeINHte KaebIb OT CBeH 3axnraHn.
BHMMaHHe!Pn HnXHe NOBepXHOCTNaKJIOHrTe r3a0HOKoCNIky Ha3a.
Ecni ra3oHokocnka 6ydet
ONOPKINyTbIIOOOMdYROMHnPaBnEINBO3MOxNkHA yTEuKA6EB3HnA mCnA.
BBEDEHNE
Tun I
Tun II
Tun III

G Cko6a npckn octahOBKn DniratTeJr
H PerynTOp DpOceBHO3aCNoHKI (^)
J Cko6a MyfTbI cquenHeHnra (^)
K 3neKtpocTapTepe (^)
L PēpekJIIOUaTeIb cKOpOCTe ()
CEOPKA
OTdJIbHbIe IETAJIMB KOPOBKE
2 cko6blIraTpaBoc6bOpHnka
4 BnHTa JIJI cKo6 TpaBoc6OpHnka
1 KJIIOU 3axKINaHnY (^)
1 3apraHnoe yctpoiCtBO (^)
1 WectnrgaHHbI KJIIOU
1 TOPObB KJIIOU
+ pykoBOdCTBO NO 3KcIyatauIN
PYIKA (Tun I-II)
1.CnoXnTe HnXHIOU qaCt bpyKn.
2.3akpenitEbePxAIOOaCTbpyKmKoHTprAkanmCwa6amn.IypaKm m,ctapTeC npaBoi cTOPOHbIMMeTcBbCTyn.(pnc.1).
3. 3aTahnHe KOHTprAaKn B HnXHHe YacTn pyuKn. 3aTeM OTperpyuNpyte BbICOTy pyuKn NytEm 3aKpyuHaBaHnBnTOB A npunlaeMbIM KlnOchom. (pnc.2).
Pyika (Tun III)
- OTBnHTnte KOHtpraaKn OT waccn 3akpenTe HxHHIOU Yactb pyuKn BnHTamn B (pnc.3).
2.3akpenitBeBepxHOUOaCTbpyKNKoHTprAkaMn c 7aIbAMN.IIpyKn m,ctapTepaC npaBoi CTPOHbIMeETcBbCTyN (pnc.1).
3. 3aTHeNTE KOHTprAaKN B HnXKeH qactn pyuKn. 3aTeM OTpeYunpyte BbICOTy pUkn.
DEPKATEJIb TPOCNIKA
IPEKJIIOUATEJIb CKOPOCTEi (*)
Tpocnk nepekknouateIaCKOpcteN noCTabnEmo Ra3OHOKOCUNKU yCTaHOBJIeB NPOJoxHeH, NCKIOuOooe BO3MOXHOcTB NOpeKdEHHa Kopo6Kn pekeKnOHeHnepepea.
PnI Heo6xoDMIOCTN TPOCNI KNEyET NOJTAHyTb; CM. rnaBv "PEVJIMPOBKA TPOCINKA IIEPEKJIIOYATEJI KCKOPOCTEINBa3dene"O6CJIVXKNBAHVE."
TPABOCOPHVK
IopHnMnTe KpbIshky c6OpHnka n npKpEnnte DBe CkoBbI K TpaBoc6OpHny npNlaRaemBIMn BHTaMn. CkoBbI NOMEeHb6yKbAMn «L» (CneBa) n «R» (CnpBa) n DOJXHb6bTb YCTaHOBJIeHb Ha COOTBeCTBYIOue NOMEeHHe bMeCTa Ha 3aJHeN CTOpOHe ra3OHoKocNIk (Pnc.5).
MaTePcaTbI TpaBoc6OpHNK (^*) : IonoKnte MaTePcaTbI MeWOK NOBEx CTaJIbHOJ paMbI n npKnpeNteeroKnlaactNKOBOEMKoCTn (pnc. 6).
Пл actKobbltpaboc6bOpHMK (^*) :CoeINHnTE BHaJane DEI NOLOBNHTPaBCo6bOPHnKa, a 3aTeM npCoeINHnTE BepXNoO YoCTb (PNC.7).
OtkpoTe KpbIaKy MaunHbI npNKpeNtTe TpaBoc6OpHNK.
BHMAMHe! IaHOHOKOcNHa MoXeT pa6OtaT b TaKxE 6e3 TpaBoc6OpHnKa. B 3tOM cnyae nocne npoxoDa MaunHiO octaTeCBAJOK CKOseHNO TpaBb.
AKKUMUYIYTOPHAR BATAPER (*)

3JekpOInB aKKymyIaTPOH 6aTaapee npedctablaet c06o JAOBNToe n EKOE BeueCTBO. OH MOKET Bb3bBaTb Cep63Hbe KoppOsnHbIe NobpeXdHn H.T.I. N36eraiTe nonaDAnH 3JekTpOInTa B rA3a, Ha KOKy H OeKdy.
OCTAHOBKA DIBVATENEI

BbHrataIb MoKet 6bItb ropnHm cpa3y nocIe BbIKIOHey. He npkacaTReCb K TnyuHTenIO, 6IOky CmHApOB HnI peOpam OxIaXdHnR. 3TO moKET npBrCeTc K OXorAM.
Otnyctnte ckoby nycka n octahOBKn G (pnc.9) nocr octahOBKn DnIraTeJIa.

Ecni cKo6a npcka n octahOBKn He pa60TaET, OCTaHOBNTe DnRtaleb OTcoEINHeHMe Ka6JIaON TcBvN 3axKraHna. HEmdJIeHNO 6OpaHTteCbI JPN POMHTa raoHOKoCNI K B yJIOHNOMOeHHyIO pMOHTHyIO MaCTepCKyIO.
IPINBOI3ADHIXKOLIEC (^*)
BkIIOHTe npINBOd, npIXKAB cKObMyΦTbI cUeIIeHnJ no HaprabNeHnO KpyKe.
Otklnouhte npBOD, OTnyctNB cKo6y MyfTbI cZeJIeHnJ (pnc. 9).
IIDEHTNΦUKALNA HA IPOJYKTA
IeHTnФиKaZnraHa npOyKta ce onpeJenr OTepeHnHn HOMep N OT apTKyNa Ha MaunHata.
Te ca nomctehn Ha IeneHka Bbpxy pAmkata Ha MaunHATA:
ToioeTheTo diatheEve Kadoo oulambdayns (EK.6 ka7).
AvoTe Tn Upiida, BalyTe Tny Taia KaI OTepeWOTe Tov KaOo STO Niow ePoTou mXavmatoS.
Kata tvk tom tykaov n xlon sukyevtpveetai tOtv kaO. AdebiaTeTov kado oTo wuTo uTo uToAeImuTawn oTa aka Toykaov wc linaa
3.AIIOBOA
Xpaaouoantoe To xlookottiko xwpi c tana n kafo ouluoyic (bupida kaeiotn). H xlon anoBaAeai anto to niow mepoc tou nnxavnmuos xwpi vc ylaoteaCtai.
EKKINHSH KINTHHPA
XEIMEPINH AIOOHTKEYS
Byalte Tny unatapia kal anoNkeuote Tny teleia ophiouevn (BA. oxetikec obnyiec) ot eTVyokai bpoepoxwpo (ano 0^ 8eC +15^) .Katay diapkeia tou xeiova ba nperei va Tny ophiotie ToaAxiotov ia popa yia va biatnpnei oe kaan kataaon.
PvT xpono poptote Tyn natapia en 24 wpc.
PYOMIISHE NTIZAZ SYMNIAKTH (*)
IIDEHTNΦUKALUJA HA IPOUN3BOJOT
IeHTnDnkaunjata Ha npOn3BODOT ceYtBpduBa co cepNCKnO t 6poj n co 6pojTo HA npOn3BODOT Ha mauinHATA.
Icntte ce daeHn Ha IIIOUkaTHa paMKata Ha MOTOPOT:
PnKcEkoKoKTaCbAOTp3nPAH cHTAP 3a HabBaKaHa pe3epBm dIeONBO cKoRaI NocLyKeTe ce Co OBHeNoDATOu 3a IeHTNcFkaJa.
Bénhau no Hababka ha MaunhaT, 3aNiWte rN OBne 6pOeBn Ha nocLeHATA cTpaHua Ha OBA yNaTCTBO.
YIOTPEBA HA KOCAYKATA
COMBI (^*)
Obaa HOba Kocayka ObeinyuBa DBe pa3nHn cyHKuN BO eHa MaunHa:
1.“MULCHING"
MaunHata nma eENeH cEN (P) noCTaBEn Ha OTbOpOT Ha cnFpNaHe (Cn. 8). Moke da KopuCTnTe "Mulching," t.e. ceHMbata ja CnTHat TpeBaTb BO TEKOT Ha KocEHeTo. TpeBaTe caPnOCTenBya H TaPBHNKOT KaDe rHne. Ha toj NaHH Ce nofY6pyBa TpeBNHKOT.
3a da ro n3BaIte YenOT, npITnCHeTe ja KoHnIaTa (R - cI. 8a).
3a da ro NOCTABNI YeNOT, npOBepeTe DaJI NDbata KInHa CE npAunHNO BMeTHaN DoKpaj BO OTBOPnTE CO ueNcYeNt npAunHNo Da ce NOCTABNI.
43 µM. Combi:
3a da ro n3BaIne Yenot, OTwpaΦeTe ja KpInHaTa OCHOBa (cI. 8b).
2. COBIPAHBE TPEBA
IocTaBeTe ja DocTaBeHata Kopna 3a NOKoCeHata TpeBa (cJ.6n7).
OTbopete ro kanaKOT, n3BaTeTe ro yenOT n 3aKaueTe ja Kopnata 3a 3aHaTa CTpaHa Ha MaunHata.
Bo TeKOT Ha KOCHeTo HA TpeBHNKOT, TpeBaTce Co6bnpa HO KOpNaTae. NcTypeTe ja Kopnata co nOKoEHa TpeBa H Kyn 3a Da mRrHne nn no pa6obnTe Ha TpeBHNKOT 3a nofUpyBaHbe.
3. 3ADHO ICSΦPЛYBAHБE
KopncTe ja MaunHata 63e Yen nn 63 Kopna 3a nokocehata TpeBa (3atBopen Kanak).Tpebata ce pacpnplya od 3aHaTcpaHa Ha MaunHata 63 da Ce NCCTHN.
BKJyUyBAHbE HA MOTOPOT
- NoctabeTe ja kocaykata Bo xopri3oHTaHa no3uJa n do6pa notnpa Ha tepehot.He Bknyybajte ja Bo BMcoka TpeBa.
2.Поверете далкавелOT ha CbeКИчkaTа e NOВрзан COcamata CbeKИчka.
3.Пи捜ншеTe ja paчkaTe 3a пале№/raChHe G KOH dржаOT. 3AБЕЛЕШКА! PaчkaTe 3a panaHe/raChHe G TpeBaJa ce epKx Пи捜ншаTe 3a Ja ce cnpeu 3actaHybaHe Na MOTOPT (CJ.9).
4a PaHNo napeHe: 3aPateTe ro paKoPafot Ha naIeHTo N Bklyte To MOtOpOT CO UbpCTo NOBNEkyBaHe ja JaxeTo 3a napeHe.
46 EneKtpnHOn naneHe (K^*) : 3anaTe ro motopot co Toa wTo Ke ro CBPTNeTKeNyOT Bo npabeQT Ha
DnBxHeBTo Ha cKa3aANKte Ha yacobHnKOT.
Ipytete Ro knyot 1tOM Ke ce 3anaN MoTOpOT.
Cekoraaw N3bEyBaJte KpatKn 6oNdn 3a de Ca
n36BerHe np3aHe Ha akyMynatOpOT.
- 3a noctirnhybahe Ha haJIO6pn pezytatm, MOTOPcekoraw Tpe6a da pa60tn BO noH pexim.
3ANIPAbe HA MOTOPOT

Motopot Moke da e MHory Bpen no rachehe. He Donnpajte rn 3dYbHata ueBka, MOTOPOT HIN DENoBITE Ha rnaBata HA MOTOPOT. NocToN onaCHOCT OJ ONEKOTNIH.
3a da ro 3actaheTe MOTOPOT,OCno6oTe ja paKaTa 3a panHe/raCheHe G (cI.9).

Bo cnyaj ha pacinybahe ha paykata 3a panYe/raCheHe, 3actane To MOtOpT n 3BaTeTo Ka6eIOT Ha CBeKnUkata. BeHaaw Ondecete ja Kocaykata Bo abTopn3npan cepBncen ceHtap Ha nonpaBaK.
3AДHA BЛЕЧА (^*)
Bknyte ja bJeuata co pIurnckAbe Ha paKata 3a cNojHnUnte J KOH paKaTa. IVcknyte Ja bNeTuA co ocNoBdoYBaHe ha PaKaTa 3a cNoJHuaT A (cn.9).
Bp3nHA (^*)

He donnpajte ja komahdata 3a bapnjatopot Kora motopot e 3actanat. Obaa onepaujna moxe da ro oustetn bapnjatopot.
IocnHHeTe COOdbetHa 6p3nHa Co NOpemctyBaHe Ha Bapjatopot BO eHa od 4Te n03uun (c1. 10).
YeTpnte P03uyn COoDBetCTByBaat Ha CneHnBe6p3HH:
POnuJa: np6nXHo 2,8 km/4
POnuJa 2: npn6nnxHo 3.1 km/4
POnuJa 3: np6JnxHo 3.6 km/4
P03nziJa : npn6nXHo 4.5 km/4
BNCUHA HA KOCEHe

He perynpajte ja bncnata Ha Kocehe Ha npemHORY HNCKO pnp STO HOXBENTe 6n ro Doonpaane Tepenhot 6ndejkn BO Cnyaj Ha hepamnnn Tne Ro doonnpaat Tnoto.
Kocayka e onpeMeHa CO komHa oE ha paKa 3a perylnpaBe Ha BnInHata Ha KocHe. N3BleKyBaJte ja paKaTa 3a perynpaBe Ha BnInHaT a Ha KocHe BO nO3nUa 3a KocHe koja HajMhOry Ke OdrOba ap OMOKNITE DEBET No3nUm (Cn.11).
OДРЖУBAнБe
BAKHO-HeonxOJHo epeoBHO n npabunHOb OOpKyBaBe 3a DOnroptajaHO OOpKyBaBe Ha 6e3eHNOchoto HnBO mPpBoNTHaTc NcONHHTeHIOCT Ha MaunHATA.
Hocete 3aunTHn pakaBn npi ceko iNHTepBeHnja 3a YnCTeHe, oDpxyBaHe n peryaunHa MaunHata.
Bo cnyaj kora tpe6a da ce npctanu Do donnHOT den, HabeDHete ja MaunHATA cmo HA ctpaHATA KAKO ITO e pinnKAAHO BO ynatCTBOTO 3a MOTOPCneJeKn rcooDbETHNE IHCTpykUn.
JHCTEHe
IIO cekoe KOceHe, nCnepeTe ja MaunHaTa CO BODa; OCTpaHete rO tOauNTe OD TReBa N KAI KON CE HATAJOKHe ON BHATPeuHATA CTpHa Na KyKnUTeTo 3a Da N36BerHe TNe Da npEdu3BvKaat NoteukOTm npNoDOUHeXHO naHe.
JaKOT OdoHnO TdHa KyKnWTeTo MoKe da OTaJdHe 3apaIaBpa3iBHOTo DejcTbO Ha NOKoCeHata TpeBa; Bo Toj Cnyuj, TpeBa CnpemHo Da INHTepBeHnPate Co PmepaKyBaHe JaK npotNB 'pocyBaBe 3a Da ce cnpeu Co3DaBaHe 'pra Koja ro KopoJNa metaIOT.
I3BaTe ja KyTjnaja Ha npHeOCOT co OdbpyBaHae Ha HABrTKIne S (cn. 12) nCnCTeTe ja 6bnaCTa OKony npHeOCOT (^) nPEMeHNe (^) CO YETKNKHa IIN BO3dYx NOJ pNNTICOK eHaAI ROdIIHO
Ha noyetoKOT Ha ce3oHata Tpe6a Da ce nCNUCTn BHAHTeUHOCHTa Na oRHOHCNTe TPKANA (7).N3BaAteTe nDbete TPKANA. NcnuCTeTe rN 3aunehNKOT KpyHATA 3a da rN OTCTPaNHe TpeBA tN aDpyrTne HEnCTOTNI CO qETKNIKA IIN CO BO3dYx NOI pMNTICCK (cN.13).
IIOIMAUKYBAHbE HA IIOHOHCKOTO BPATNILO (串)
HaNoyeTOKOT Ha cekoja ce3OHa HeonxOHO e da ce NoDmaKaat 3aIyehuNtte Ha NorOHcKoTO BPATINO. IV3BaDeTe r m TPKanata (Hannata, HABrTK u NpOJORA). IToOA h3BaDeTe r n enactUHNOT npCTe H NOdNOrata 3a Da npMCTANTE DO 3aYChHKnOT r da Ro IV3BaJNTe OD BpATNIOTO. POnMaKajTe r 3aIyehuNtte Co YHMBepaJIHO MACNO.
Ioctabete rn 3anuehenuite (MOHTaxkata Ha decha n I neba cTpaHa e pa3nnHna, cn. 14 n 15).MOnhtupajte ro 3anuehenkot Taka wTo 6ykbata «L» Ke ce noctabn HanaDbop Ha nebata cTpaHa a 6ykbata «R» Ke ce noctabn HanaDbop Ha dechata cTpaHa (rnedajkn ja MaunHATA O3aDn).
AKYMJATOP (^*)
PnHOpMaJIHo KOpIcTeHe, akymyIaTOpOT ce noJIHn IpeKy MOTOpOT. Bo clyaj kora MOTOpOT He ce naJIn co
KJyOT 3a naJIeHbe, BepojaTHO akymyIaTOPOT nOTnIOHO npa3eH.
U3baTe ro akymyNatopOT co OTbopaHe ha COOBeHTNtOT KANak n Co BAteHeBe He CTERNAKITE OD MOTOPOT (cI. 16). PnKnyete ro noHaCyOT 3a akymyNatopOTOT (uTo e DocTaBEN) Ha akymyNatopOT n NOtoA NOp3eTe ro noNaHcyTO BO uTeKepe HsND nnHete ro 24 yaca (cI. 17).
IIO nonHeBe, noCTaBeTe ro akymyNatopOT n noCTaBeTe r cTcrrnAHa akymyNatopOT Ha MOTOPOT (Cn. 18).
He npnknnybajte ro nonnaohot 3a akymynatopn HnepeKTHO h a cnojHmUte Ha MOTOP. nnonhaOT 3a akymynatop He Cmee da ce Kopncn KaKo N3BOp Ha HanojybaBe 3a npndBxkyBaBe Ha MOTOP 6ndejk Moke da ro oOtETn.
CHYBAHBE BO 3NMA
I3BaTe ro akymyNatopot notnonHO HanonHET nCKnAupajTe ro hca cybo nnaHo MeCTO (BnDEtenope) (Mery 0^ e +15^) .Hajmanky bapem ednau BO TEKOT ha 3nMaTa Tpe6a da n3BpUnTe eHNO donOpHNHTeNoNnHeBe 3apaDi OdpxByaBe Ha akymyNatopot.
Ipeid noyetokot Ha ce3oHata, nonhete ro akymnatopot 24 yaca.
PEYJALIJA HA KABEJOT HA CNOJHILATA (^*)
Bo cnyuj kora cnojnhuata he ce aktnbnpa co CooDbteHo npntncKaHe na paKaTa KOH dpkauOT nI AKO KocacKaTa TeiKo IIN CNOpO Ce DnBKn, pniuHaTa MoKe da 6nde npOn3ryBaHe h cnojHnUa. 3a da ro enmHHnPate npObnEMOT, perynpajTe ro ka6eNoT 3a cnojHnUa KaKo wTo CneDn (co INCKnyeH MOTop).
- Kocaykata moke lecho da ce noTtyphe hana3ad kora pankata 3a cnojHnuaTa e onTywTeHa. Bo obpaten cnuyaj, 3aterHybajte ja T-cnojHnuaTa ce eoDeka He ce OBO3MOxN nOttypHyBaBe Ha kocaykata (cn. 19).
- Co npntnckahe Ha paqkata 3a cnojHncaTa HABHATpe 3a OKny 2 qM. (no3uJa 1) npn nOTtpHyBaHe Ha Kocakata Tpe6a Da ce Ocetn OpeDeH OTnp. Kora nap KaHATA 3a cNoHnCaTe e npntchata HABHATpe DOKpaj (no3uJa 2) He 6n Tpe6ano Beke da 6nDE moKHO da ce nOTtpHyBa KocakHa. Nonyuataje ja T-cnojHncaTa doKeKa He ja noCTurHete OBaa nOko6ba.
PEYJALUJHA KABEJIOT HA BAPNJATOPOT (^*)
Bo cnyaj kora pa3nIkaTao Bo 6p3nHa Mexy no3nHInTe HA KOMANDATA 3a BapjatopOT 3a MakcImaHa 6p3nHa (no3nHn 3 n) e MmHmAlHa Nn Hyn, BepoJaTH Tpe6a da ce 3aterHe KaBenot Ha BapjatopOT.
-
Octabete ja kocayka ta da pa60Tu BO no3njuja ** HeKoJky MInyTu
-
Ako 3abengknte npa3en oHa Ka6eNoT Ha Bapnajotop BO OJNOC Ha cnojkata Y,notpebHO e da ro 3aterHete Ka6eNoT. IopamHete ja 3aBpTkata X n DpKeTe ro Ka6eNoT 3awpaFyBajKn ja cnojkata Y Dokpaj Ce doKeKa he ce e JEmmHnPa npa3HnO t Ha Ka6eNoT.
-
3aupaede ja 3aBpTkata X.
3A5EJIELWKA! Ka6enot He cMee da ce 3aterHyba NOBEKe OTOrkata Ha KOja e aHynipan Ipa3HNOt OBO ODnOc Ha cnojkata Y. Ako Ka6enot e npemHory 3aTeRHaT, IpeHOChNt PEmEH MoKe YA NyKHe N/INMOxE Da ce OWTeT aDpyr DNIOB HA npeHcHNO t MExAH3AM. PIn peryNaUJa no 3aMeHa Ha pemeHOT Ha np., 3anoHHe TceKoraw Kora cnojkata Y e cenoCHO 3aTeRHaT.
AMOPTN3EP
Cn 20. Inpobepybajte rnaamoptn3epot n cnojnHnnte 3a nO3anaJuaBanTnBcKoja ce3oHa n3ameHeTe rA KOA e OwTeTEHN NINN ICTPOUENH.
3AMEHA HA CEYNBATA
Pa3na6abete rHn HABTKNTe 3a 3aMeHa HA HOXeBNTe (CJ.21 n 22).IocTabeTe rHOBOTo CEHBO Taka 7to O3Hakata hNPOM3BODIeTOT Da ce HaOFA KOHOCaHT Ha CeHbTO (He KOH TpeBata).IocTabeTe oNDHO Bako 7to e npikaJaoHO. IpaBUNHO 3aWpaPefTe rHABTKNTe.3aWpaPefTe CO 3aTeRHyBaVkM MOMENT o40 Nm.
ПиЗаменHa ceHyBTo, HeONXoJHo e da ce 3amehat n COODBeTHnTe HaBpTKn.
OCTPEHBE HA CEYNBOTO
OctpeheTo Ha ceYnBata Mopa Da ce I3BeDyBa co MOKpa NoCTanka, CO NOMoW Ha MOKap KAMeH IIN PNoHa 3a 6pyceHe.
Od 6363eHcNn pnuuHn, ceuBata He cMee da ce octpat co bpcunka. CeuBata ce KpUInB npn BucOKn TEmpeATpyn.
UyBAHe
БензИнт He Cmee Да OCTaHе BO pe3epBoapOT NOДОПRO OД eDEH MECEU.
IeTajHIO uCmCTeTe ja KocaKkata u octabete ja Ha cyBO n NOKPmeHO MecTo.