
ACA11EU - USB adapter TARGUS - Free user manual and instructions
Find the device manual for free ACA11EU TARGUS in PDF.
| Product Type | USB 2.0 Multi-Screen Adapter |
| Brand | TARGUS |
| Model | ACA11EU |
| Dimensions (approx.) | 10 x 5 x 2 cm |
| Weight (approx.) | 100 g |
| Power Supply | USB, no external power supply |
| Main Functions | Desktop extension, mirror mode, primary/secondary screen |
| Maximum Resolution | 2048 x 1152 pixels at 32-bit |
| Connectivity | USB 2.0 |
| Supported Operating Systems | Windows XP SP3, Windows Vista, Windows 7 |
| Minimum System Requirements | Intel Pentium or equivalent processor, USB 2.0 port, CD-ROM drive |
| Maintenance and Cleaning | Disconnect before cleaning, use a dry soft cloth |
| Safety | Install the driver before connecting the adapter; do not force connectors |
| Spare Parts | Not applicable (integrated cable) |
| Repairability | Contact Targus after-sales service in case of failure |
| Warranty | See terms on Targus website |
| Box Contents | Adapter, mini CD, user manual, DVI to VGA adapter |
Frequently Asked Questions - ACA11EU TARGUS
User questions about ACA11EU TARGUS
0 question about this device. Answer the ones you know or ask your own.
Ask a new question about this device
Download the instructions for your USB adapter in PDF format for free! Find your manual ACA11EU - TARGUS and take your electronic device back in hand. On this page are published all the documents necessary for the use of your device. ACA11EU by TARGUS.
USER MANUAL ACA11EU TARGUS
©2010 Manufactured or imported by Targus Europe Ltd., Hounslow, Middlesex, TW4 5DZ, UK. All rights reserved. Targus is either a registered trademark or trademark of Targus Group International, Inc. in the United States and/or other countries. Features and specifications are subject to change without notice. All trademarks and registered trademarks are the property of their respective owners.

N2953


C
User Guide
Table of Contents
GB-English
USB 2.0 MULTI - MONITOR ADAPTER
DE-Deutsch
USB 2.0 MULTI-MONITOR ADAPTER 23
ES-Espanol
ADAPTADOR USB 2.0 MULTI MONITOR 43
FR-Français
ADAPTATEUR USB 2.0 MULTI-ÉCRAN 63
IT - Italiano
ADATTATORE MONITOR USB 2.0 MULTI 83
NL-Nederlands
USB 2.0 MULTI - MONITOR ADAPTER 103
PT-Portugues
ADAPTADOR MULTI-MONITOR USB 2.0 123
GB - Introduction
Thank you for your purchase of the USB 2.0 Multi - Monitor Adapter.
Package Contents
In addition to this user guide, the package contains:
-USB2.0 Multi-Monitor Adapter
- Driver software CD (mini CD)
-User Guide
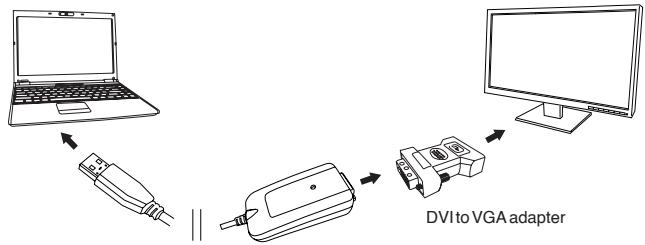
-DVI to VGA adaptor
System Requirements
Hardware
-PC with an Intel® Pentium® processor or equivalent
- USB version 2.0 port
-CD-ROM drive (support mini CD)
Operating System
- Mircosoft Windows® XP with Service Pack3
Mircosoft Windows Vista® with Service Pack 1
·Mircosoft Windows® 7
Installing the Device and Drivers
To use the monitor adaptor, you must first install the driver onto your computer. Then, connect the monitor adaptor to your computer and Windows plug-and-play will install the hardware drivers for each port.

WARNING: YOU MUST INSTALL THE ADAPTOR SOFTWARE BEFORE CONNECTING IT TO YOUR COMPUTER. OTHERWISE, THE ADAPTOR WILL NOT WORK PROPERLY.
Installing the Monitor Adaptor
Installing the adaptor driver enables your operating system to recognize the adaptor once it's connected.
1 Turn on your computer.
2 Insert the driver software CD into your computer's CD-ROM drive.
If setup does not begin automatically, click Start, Run, and enter D:\Setup.exe (where D: is the path of your CD-ROM drive) and then click OK.
3 Follow any on-screen instructions to complete the installation.
4 Click Finish and restart your computer when prompted.
Connecting the Monitor Adaptor to Your Computer
After installing the Monitor Adaptor software, you are ready to connect the Adaptor to your computer. Connect one end of the USB cable to the adaptor and the other end into an available USB 2.0 port on your computer.

DO NOT CONNECT ANY DEVICES TO THE ADAPTOR UNTIL THE INSTALLATION IS COMPLETED.
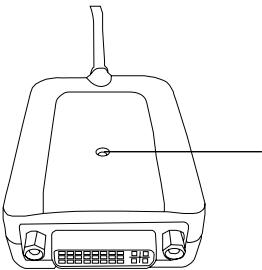
- A green light will be ON when the adaptor is functioning
Multi - Monitor Adapter
To avoid possible damage when connecting a new device, do not force the cable connector into the port on the adaptor. If the cable connector does not attach smoothly, turn the connector over and try attaching it again.
Connecting to a Monitor or LCD
Any monitor or LCD connected to the video port of the adaptor will be limited to a maximum resolution of 2048x1152 at 32bit color

NOTE: THE MAXIMUM RESOLUTION OF 2048 x 1152 IS ONLY SUPPORTED IF THE MONITOR OR LCD IS PLUGGED INTO THE ADAPTOR BEFORE CONNECTING THE ADAPTOR TO THE NOTEBOOK. IF THE MONITOR OR LCD IS PLUGGED INTO THE ADAPTOR AFTER THE ADAPTOR IS CONNECTED TO THE NOTEBOOK, THE RESOLUTION IS SET TO 1024 X 768.
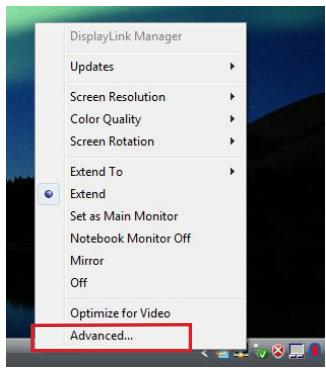
Controlling the Display using Adaptor's Video Menu Options
Video menu options can be accessed by right-clicking on the Adaptor icon
in the system tray or through the Windows Display Properties.
Windows XP / Windows Vista
Windows 7
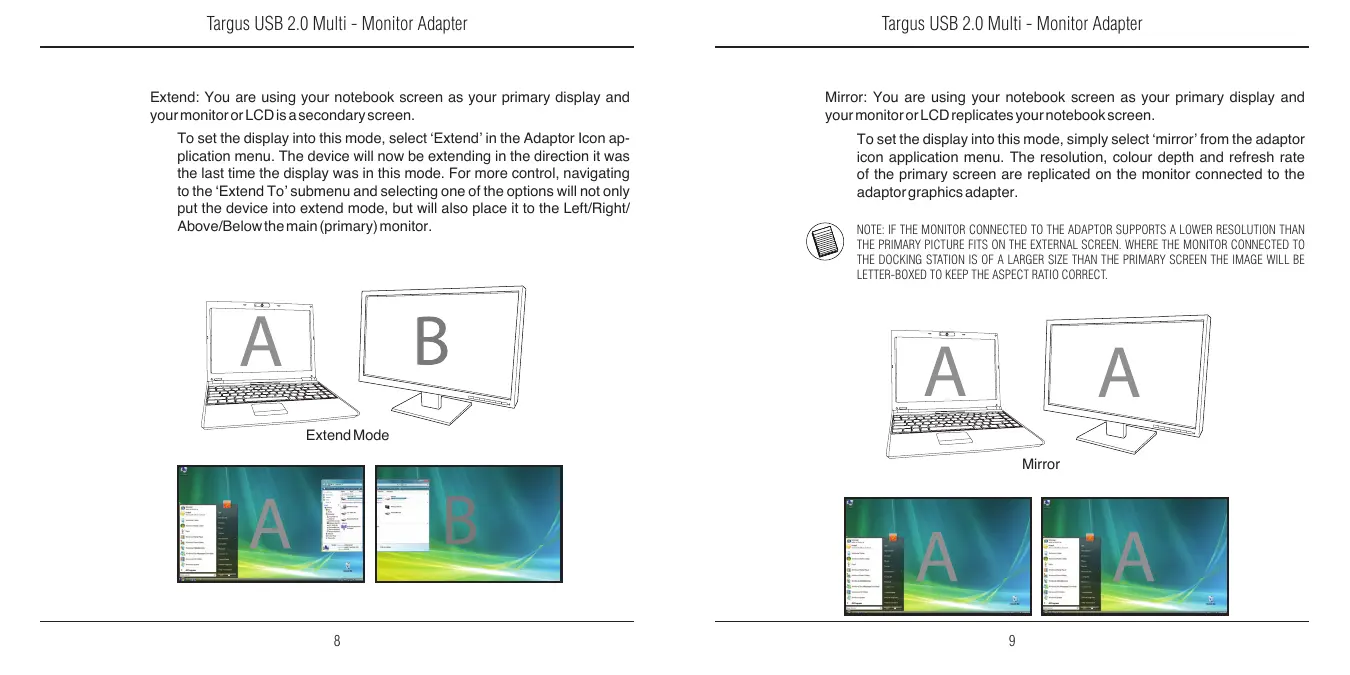
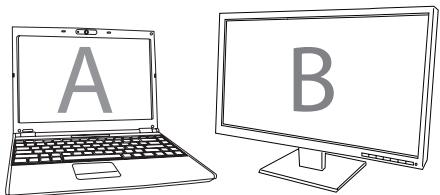
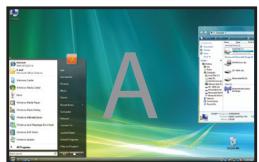
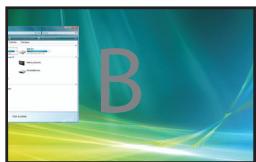
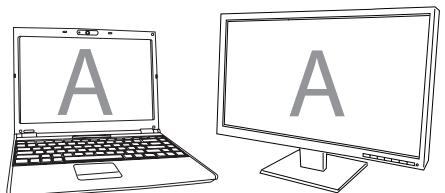
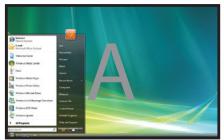
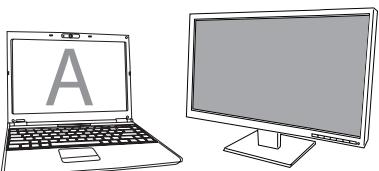
Extend: You are using your notebook screen as your primary display and your monitor or LCD is a secondary screen.
To set the display into this mode, select 'Extend' in the Adaptor Icon application menu. The device will now be extending in the direction it was the last time the display was in this mode. For more control, navigating to the 'Extend To' submenu and selecting one of the options will not only put the device into extend mode, but will also place it to the Left/Right/Above/Below the main (primary) monitor.
Extend Mode
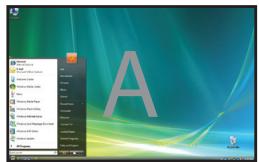
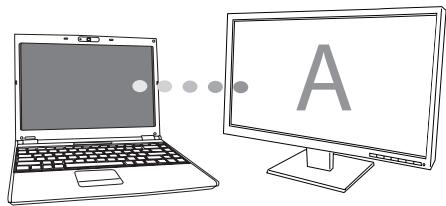
Mirror: You are using your notebook screen as your primary display and your monitor or LCD replicates your notebook screen.
To set the display into this mode, simply select 'mirror' from the adaptor icon application menu. The resolution, colour depth and refresh rate of the primary screen are replicated on the monitor connected to the adaptor graphics adapter.

NOTE: IF THE MONITOR CONNECTED TO THE ADAPTOR SUPPORTS A LOWER RESOLUTION THAN THE PRIMARY PICTURE FITS ON THE EXTERNAL SCREEN. WHERE THE MONITOR CONNECTED TO THE DOCKING STATION IS OF A LARGER SIZE THAN THE PRIMARY SCREEN THE IMAGE WILL BE LETTER-BOXED TO KEEP THE ASPECT RATIO CORRECT.
Mirror
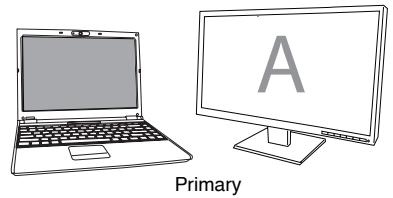
Primary (Notebook Monitor Off): You are using your monitor or LCD as your primary display and your notebook screen is turned off. To set the display into this mode, simply select 'notebook monitor off' from the adapter icon application monitor.

Off: You are using your notebook screen as your primary display and your monitor or LCD is turned off.
Off


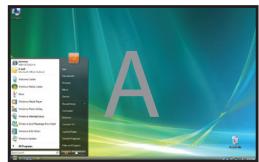
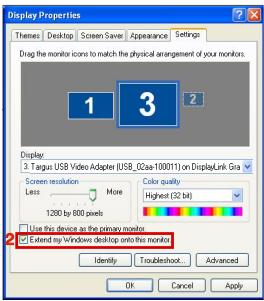
Controlling the Display using Windows Display Properties (for Windows XP and Vista)
Adaptor's video setting can also be configured from the Windows Display Properties dialog box. To do this on Windows Vista, right click on the desktop, click on "Personalize" and then select the 'Display Settings' link. The corresponding feature is available in Windows XP by right clicking on the desktop, selecting 'Properties' and then navigating to the 'Settings' tab.
Windows Vista
WindowsXP
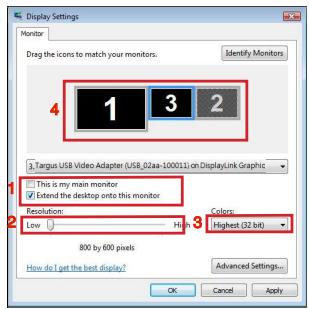
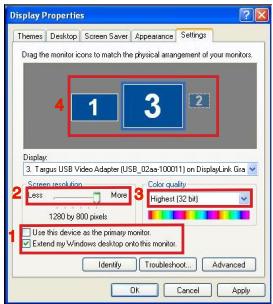
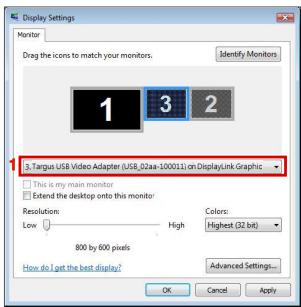
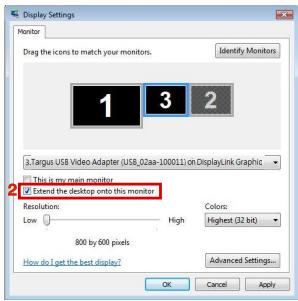
Figure 1
Extend Mode: To set the display into this mode, check the box marked 'Extend my Windows desktop onto this monitor' (1 in Figure 1). Arrange screen resolution and colour quality using the appropriate controls (2 and 3), and arrange its position with respect to the other monitors on the extended desktop in using the drag area(4).
Mirror Mode: To set the display into mirror mode, simply uncheck the box marked 'Extend the desktop onto this monitor' (1 in Figure 1 on previous page.).
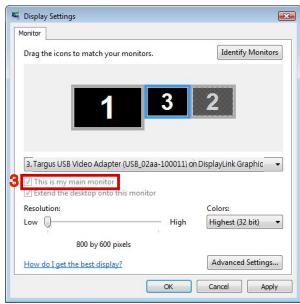
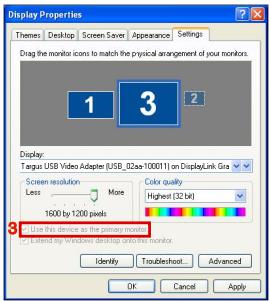
Setting the Primary Display: To make the monitor attached to the Adaptor as the primary display, follow the instructions below:
- In Display Properties window, using the drop down list, select the monitor that is attached to the Adaptor.
Windows Vista

Windows XP
- After selecting the corresponding monitor, check the box next to "extend the desktop onto this monitor" (for Vista) or "extend my Windows desktop onto this monitor" (for XP).
Windows Vista
Windows XP
- Then, check the box next to "This is my main monitor" (for Vista) "Use this device as the primary monitor" (for XP).
Windows Vista
Windows XP
-
Click "Apply".
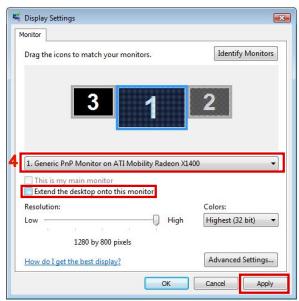
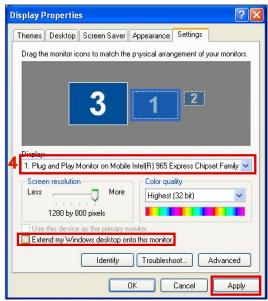
-
Select the Laptop monitor using the drop down list and uncheck the box "extend the desktop onto this monitor" (for Vista) or "Extend my Windows desktop onto this monitor" (for XP) and click "Apply"
Windows Vista
Windows XP

NOTE: IT IS POSSIBLE TO WORK MORE CONVENIently WITH A LAPTOP BY SETTING ITS ACTION ON LID CLOSED TO 'DO NOTHING' AND SETTING THE DOCKING TO PRIMARY MODE. THE LAPTOP LID CAN THEN BE CLOSED AND THE LAPTOP USED WITH THE EXTERNAL KEYBOARD AND MOUSE.
The monitor attached to the Adaptor stays primary if the PC enters hibernate or suspend mode or is rebooted. If the Adaptor is detached, the laptop's display becomes primary again.
Upon reconnection, the monitor attached to the Adaptor will return to primary mode.
Controlling the Display using Windows Display Properties (for Windows 7)
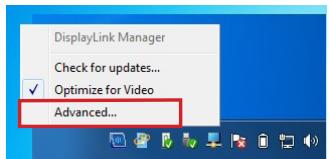
Adaptor's video setting can also be configured from the Windows Display Properties dialog box. To do this on Windows 7, right click on the desktop, click on "Personalize" and then select the 'Display' and then "Change display setting" link. Or right click on "Targus USB Video adapter" icon in the notification area and choose "advance".
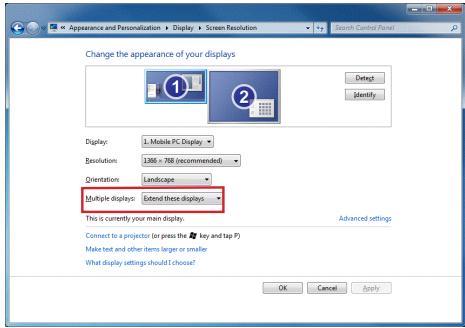
The various display output setting can be controlled by choosing the options provided in the "multiple display" drop-down list. Choose the desired setting and click "apply". The screen will refresh and confirm ok by selecting "keep changes".
Automatic Updates
Automatic Updates is a product maintenance feature from DisplayLink. The automatic update mechanism ensures that the Adaptor's graphics Adapter has the most up-to-date drivers and software, providing the user with increased performance and stability.
Disconnecting the Adaptor
If the Adaptor is powered off or the USB cable is removed from the computer, the display blanks. All windows and icons will shift to the primary screen. On reconnection or powering up of the Adaptor, the display returns to the same mode as it was before disconnection. However, windows and icons that were previously on the screen will not be moved back.
Supported Resolution
| Resolution | Refresh Rates available at32bit | Resolution | Refresh Rates available at32bit |
| 640x480 | 6067727585 | 1280x800 | 607585 |
| 720x480 | 5060 | 1280x960 | 60 |
| 768x576 | 5060 | 1280x1024 | 6075 |
| 800x600 | 5660727585 | 1360x768 | 60 |
| 832x624 | 75 | 1366x768 | 607585 |
| 800x480 | 60 | 1400x1050 | 60 |
| 848x480 | 60 | 1440x900 | 60 |
| 1024x600 | 60 | 1600x1200 | 60 |
| 1024x768 | 60707285 | 1680x1050 | 60 |
| 1152x864 | 75 | 1920x1080 | 5060 |
| 1152x870 | 75 | 1920x1200 | 60 |
| 1280x720 | 5060 | 2048x1152 | 60 |
Actual support resolutions are depend on the support of connected monitor.
Troubleshooting
Device Not Working
- Make sure that the device is fully inserted into the correct port on the adaptor.
- Plug the device into a different port on the adaptor. If it still doesn't work, test the device by connecting it directly to your computer.
- Verify that you ran the Setup or Install program for the device.
- Make sure that the device appears in Device Manager. For more information refer to "Verifying Devices are Installed"
Verifying Devices are Installed
You can view the devices installed on the adaptor from the Device Manager window in System Properties. Right-click My Computer, Properties, then click the Hardware tab, and then the Device Manager button.From the Device Manager window, expand the following:
-DisplayAdapters:
- Displaylink Graphic Adapter (XP only)
-
Displaylink Mirror Adapter (XP only)
-
Network Adapters:
-
High speed USB Ethernet Adapter
Monitor
-Targus USB Video Adapter
FAQ - DisplayLink
DisplayLink provides this support website to help answer questions. This may answer any questions you may have.
http://www.displaylink.com/support/index.php