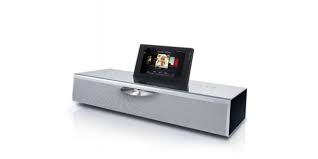
USER MANUAL SOUNDVISION LOEWE
| (nur Audio-Wiedergabe) |
| iPod touch (4th generation), iPod touch (3rd generation) |
| iPod touch (2nd generation), iPod touch (1st generation) |
| iPod classic |
| iPod nano (6th generation), iPod nano (5th generation) |
| iPod nano (4th generation), iPod nano (3rd generation) |
| iPhone 4S, iPhone 4, iPhone 3GS, iPhone 3G, iPhone |
Impressum
© Gracenote, Inc. 2009

Made for
iPod
iPhone
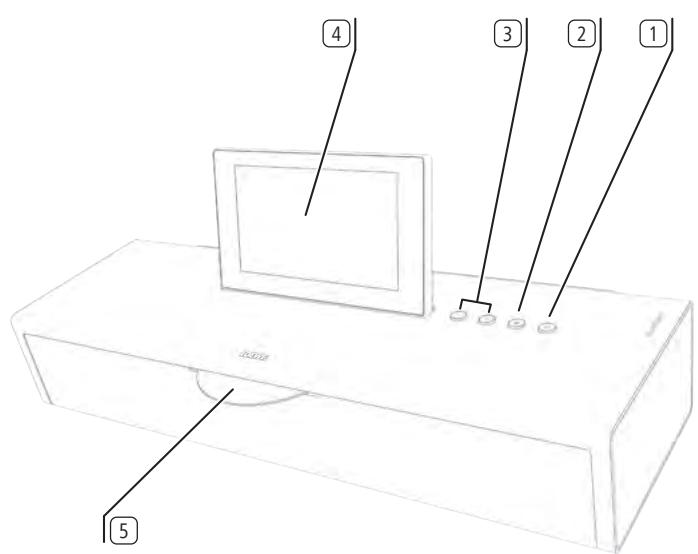
① Sound mute/on
② LED indicator light for current operating mode
③ OperatTVset
④ Sleep function
(5) Short press: "Main menu" Long press: hide menu
(6) V - V + Volume lower/higher
⑦ MENU: confirm/call up
⑧ Short press: playback Long press: AUPEOI: Love
(9) Short press: select title down Long press: AUPEO!: Ban
10 Manage Favourites
(1) Short press: Switch on/off in standby mode
Long press: Switch off in Energy Saving Mode
⑫ Operate the unit that has been set, e.g. SoundVision ID
⑬ Operate the unit that has been set, e.g. SoundBox
14 Short press: info menu Long press: Options menu
15 P+/P- Select title/radio station up/down; In the menu: browse
16 MENU:select/set
⑰ Short press: stop
18 Short press: select track up Long press: MusicID
(19) Pause
Contents
Control elements 26
Assist Easy remote control. 27
Welcome 29
Scope of supply 29
Accessories 29
Cleaning 29
For your safety. 29
Features 30
Set-up 31
Connection 31
Start-up 32
Inserting batteries 32
Setting the remote control 32
Operating other Loewe devices 32
Connecting to the mains supply 32
Switching on/off 32
Navigation in the menu 33
Main Menu. 33
Options menu 33
Setting the language 33
Network 33
Network Settings 33
Wired network. 33
Wireless network 34
Setting time 34
Setting up Bluetooth devices 34
Sound 35
Speaker selection 35
Display 35
Sound System 36
Software update 36
Control. 37
Menu Favourites 37
MusicID 37
Internet radio. 38
Setting Internet radio 38
Listening to Internet radio 38
Internet Radio options 38
AUPEOI 39
AUPEO! options 39
FM radio 40
Setting FM radio stations 40
Listening to FM radio 40
FM radio options 40
CD play. 41
Start play 41
Replay functions 41
CD play options 41
iPod operation 42
iPod play 42
iPod play options 42
Media Home operation. 43
Media Home play options 43
Playing back from audio sources that are connected
by cable 43
Playing back from Bluetooth audio sources 43
Alarm function. 44
Sleep function. 44
Glossary. 45
Troubleshooting 46
Troubleshooting 46
Technical Data 47
Legal information 47
Environmental protection. 47
Trademarks 48
Thank you
for choosing a Loewe product. We are happy to have you as a customer.
At Loewe we combine the highest requirements regarding technology, design and ease of use. This applies equally for TV, DVD, video, audio and accessories.
Neither technology nor design is an end in itself, but both are intended to provide our customers with the best possible audio and visual experience.
Our design is not influenced by short-term, fashionable trends. You have, after all, purchased a high-quality piece of equipment which you do not want to tire of tomorrow or the day after.
Scope of supply
Loewe SoundVision ID, Art. No. 51203-B/L/U10
- Assist Easy remote control with 2 batteries
- Mains cable
- Instructions for Use
Accessories
- Wall Mount SoundVision ID, Art.No. 71206T/W00
- Subwoofer adapter cable, article number 70495
- Trims in various colours - please contact your dealer for more information on them
Cleaning
Only clean the unit with a damp, soft and clean cloth (without using any kind of harsh cleaning agent).
For your safety
For your safety, and to avoid unnecessary damage to your unit, please read and follow the safety advice below.
Use for the intended purpose and ambient conditions
- The unit is intended exclusively for the playback of audio signals.
- Always switch off the unit before connecting or disconnecting other devices.
- Do not operate the unit unattended. Pull out the mains plug if you are away for a longer period.
Protect the unit from ...
Water, dampness, dripping or sprayed water or steam
- Impacts and mechanical stresses
- Magnetic and electric fields
- Higher electrical powers than specified
- Cold, heat, direct sunlight and high temperature fluctuations
Dust
- Covering which obstructs air circulation
- Interference with the internal workings of the unit


Do not place objects containing liquids on top of the unit.
Candles and other open flames must be kept away from the unit at all times to prevent the spread of fire.
This device has been built exclusively for private use in domestic environments. Warranty services cover this intended use. The terms of the warranty only cover the intended use of the unit.
WARNING: To prevent electrical shock, do not open the unit. There are no parts inside the unit that can be repaired by the user. Repairs should only be carried out by a Loewe dealer.
If you have moved the unit out of the cold into a warm environment, leave it switched off for about an hour to avoid condensation forming. Do not switch the unit on until it has reached room temperature. This prevents serious damage to the components.
Volume
Loud music can lead to ear damage. Avoid extreme volumes, especially over longer periods and if you use headphones.
About these Instructions for Use
The information in these instructions refers to the product Loewe SoundVision ID. Unless otherwise indicated, the instructions refer to the symbols on the touch screen display.
Paragraphs beginning with the 串串 symbol indicate important hints, tips or conditions for perfect operation.
Terms which you will find in the menu or printed on the unit are printed in bold type. In the functional descriptions, the necessary operating elements are arranged to the left of the text containing the handling instructions.
The Loewe SoundVision ID offers you convenient access to your media collection. It plays audio CDs, receives radio via antenna, cable or from the Internet. You can use digital music files from USB sticks and MP3 players in the same way as different Apple devices are used.
Connection options
2x USB 2.0 (1.1)
LAN RJ45 10/100 Mbps
WLAN 802.11 b/g/n
Audio-In 3.5 mm Stereo
Audio-Out 3.5 mm Stereo
Headphone 3.5 mm Stereo
Loewe Link 2.5 mm
FM Antenna 75 Ohm
Bluetooth A2DP protocol
CD player
Slot-in drive
Show title, album name, album graphics (if available)
Control via touch screen on the unit as well as remote control
Search function
Support for the UPnP/DLNA protocol
MusicIdentification via Internet databases
Show album graphic and title information
Show ID3v2 meta data
Call up meta data from the Internet
Music playback
Integrated audio amplifier and speaker 2x 50W music Playing audio CDs, CD-R and CD-RW discs
Playing back playlists from USB/PnP media
Repeating titles, tracks or directories
Random playback
Uninterrupted playback
Continue the playback from the last title (Resume)
Playing wired audio sources at AUDIO IN
Internet radio
Support for thousands of Internet radio stations
Support for Internet radio favourites lists - editable via Loewe Portal
FM radio
FM radio with RDS display via cable or terrestrial means
AUPEO!
Listen to internet radio organised by genre, artist or personal favourites
Rate songs with the tags "Love" and "Ban"
Apple device support
iPod docking station for various Apple devices
Convenient control via remote control Loewe Assist Easy
Charge accumulator
Further functions
Time display, alarm, snooze function, sleep function
Time display, time synchronisation via NTP Internet time server
Software update via Internet and USB
Set-up
- Place the unit on an even, firm, horizontal surface.
- Do not set up the unit near strong heat sources or in direct sunlight.
- If setting up in a shelf or a closed cupboard: Leave at least 2.5 ~cm clearance around the unit, so that the air can circulate unhindered and there is no heat backup. Do not cover the openings at the back. The device may not be laid on its back during operation.
- Incorrect voltages can damage the unit. This device may only be connected to a power supply with the voltage and frequency indicated on the type plate using the mains cable.
- Pull out the power cable during thunderstorms. A voltage surge caused by lightning conducted through the mains could damage the unit.
- If the unit is not to be used for an extended period, the plug should also be disconnected from the mains.
- The power plug of the TV set must be easily accessible so that the TV can be disconnected from the power supply at all times.
- Position the mains cable in such a way that it can not be damaged. The power cable may not be kinked or laid over sharp edges, stood on or exposed to chemicals; the latter also applies to the unit as a whole. A power cable with damaged insulation can cause electric shocks and poses a fire risk.
- When you want to unplug from the mains, pull on the plug housing rather than on the cable. The cables in the mains plug could otherwise be damaged and could cause a short-circuit when plugged in again.
- Do not touch the unit on the display ⑧ when unpacking and handling, as it could be damaged by this. Do not touch the speaker at the bottom of the unit.
Connection
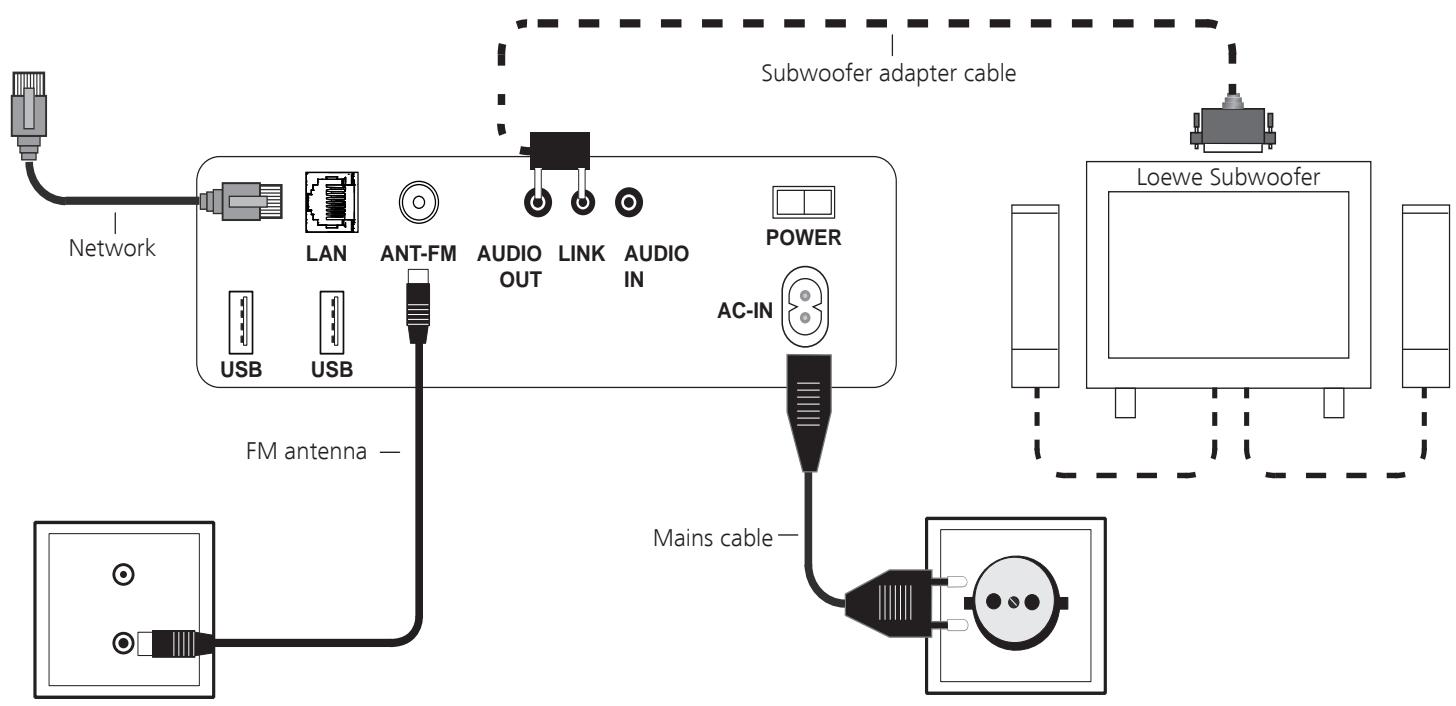
Remove the cable cover on the rear of the unit.
Use an RJ-45 network cable to connect the network socket LAN 9 to a network connection (e.g. switch or DSL router) of your home network with a connection to the Internet.
Connect the socket ANT FM 13 via an optional FM antenna cable to an FM antenna socket.
You can connect an external audio source to the socket AUDIO IN 14. Use an audio cable with 3.5 ~mm jack cable available from your dealer.
You can also connect a Loewe subwoofer with an audio link interface to the LINK (2.5 mm jack) on the SoundVision ID. The subwoofer is attached by using a subwoofer adapter cable that is available as an accessory. You can use the speakers that are integrated into the SoundVision ID or external speakers that are attached to the subwoofer.
Plug the network cable into the network socket AC-IN 16 and connect it to a 220-240V 50/60 Hz socket.
You can connect a headphone with a 3.5mm jack to the headphone socket 10 . The speakers of the unit are then switched off.
Replace the cable cover on the rear of the unit.
Example of cabling:
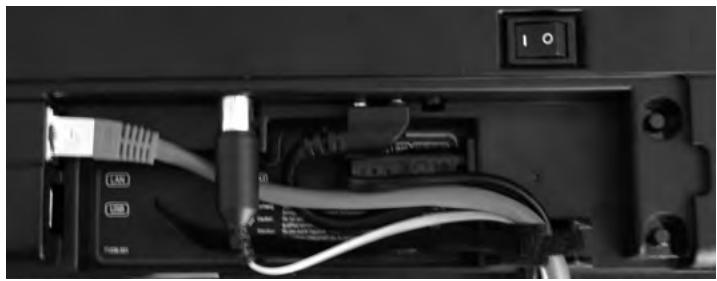
The unit type plate is located under the cable cover or on the bottom of the unit.
Inserting batteries
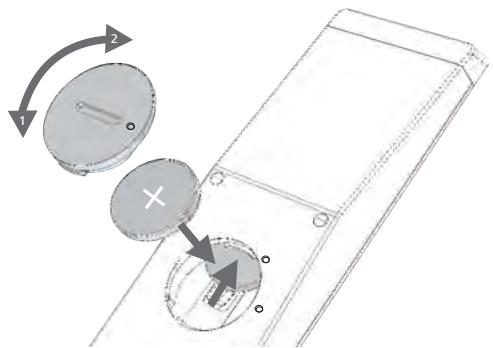
Twist the battery compartment lid out in an anti-clockwise direction and then remove it. Insert a CR2032/DL2032 battery. The plus pole of the battery must point upwards here. Replace the battery compartment cover onto the remote control (observe the markings).
Do not insert rechargeable batteries in the battery compartment of the remote control!
The batteries used must not be exposed to excessive heat such as sunlight, fire or similar!
Setting the remote control
The AUDIO and RADIO buttons can be configured to operate certain Loewe products:


Press the button down that you wish to configure (AUDIO or RADIO) and then press REC/AUX at the same time; hold the buttons down for 5 sec.
The LED over the selected button flashes twice.

Input the button combination from the table below (press the buttons one after another).
| Button combination | Unit |
| Red | Loewe TV Radio |
| Green | Loewe Mediacenter |
| Blue + yellow | Loewe BluTechVision Interactive/3D |
| Yellow | Loewe AudioVision |
| Green + blue | Apple Remote |
| Green + yellow | Apple TV |
| Green + yellow + blue | SoundBox * (RADIO) |
| Blue | SoundVision ID * (AUDIO) |
| Red + blue | <AirSpeaker> |
| Red + green + yellow | MediaVision 3D |
| Red + green + yellow + blue | Reset all settings |

Press OK
The LED above the button for the unit flashes twice.
Operating other Loewe devices
Using the remote control for the Loewe SoundBox

Press the button, the LED indicator lights up for about 5 seconds
Using the remote control for a Loewe TV set

Press the button, the LED indicator lights up for about 5 seconds
Every time a button is pressed, the LED indicator lights up for the selected operating mode to allow you to check (TV - AUDIO - RADIO). Please refer to the respective operating instructions on how to operate the individual devices.
Connecting to the mains supply
Make the required cable connections as shown in the section "Connection" (page 31). Plug the mains plug into the mains socket 220 - 240V , 50 / 60Hz .
Switching on/off
Switch the power switch 7 to position I.
SoundVision ID switches on.

Set the Assist Easy remote control for SoundVision ID mode by pressing the AUDIO button briefly.

Press the on/off button 1 briefly on the unit. The unit switches on.
To switch the unit into Quick-start Stand-by Mode, press the on/off button 1 briefly on the unit. The unit switches off. The LED display on the display lights up red.
In Quick-start Stand-by Mode, the switch-on process is fast, the unit not using much electricity (page 47).
To switch the unit off into Energy Saving Mode, press the on/off button 1 on the unit for 5 seconds. The announcement "Energy-saving mode is activated" appears for a few seconds.
The LED light on the display lights up (variant x10 only). It is possible to switch on via remote control (variant x10 only) and local control.
The power consumption is very low in Energy Saving Mode (page 47). The switch-on process takes somewhat longer.
Switch the unit off if you are away for longer periods first using the on/off button 1 and then move the power switch 7 to position 0. That saves energy and protects the environment.
These instructions for use describe the control of the unit via the touch screen. The symbols in the left column of these instructions for use refer to the symbols on the touch screen display. Functions are selected and set by wiping gestures with the finger over the touch screen display. The control functions (without settings) can also be made by remote control (page 27).
Main Menu
You can call up the various functions of the unit via the main Menu. You can make all entries directly on the touch screen by tapping on the symbols with your finger.
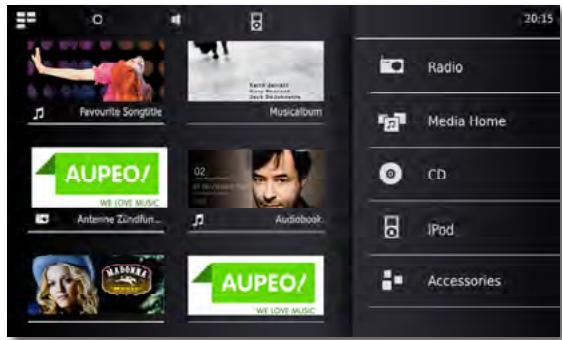

Call up the Main Menu.

Back in menu.
Customise SoundVision ID to your needs. The Options menu is context sensitive, i.e. it displays different functions depending on the situation from which it was called up.
0
Call up Options menu.
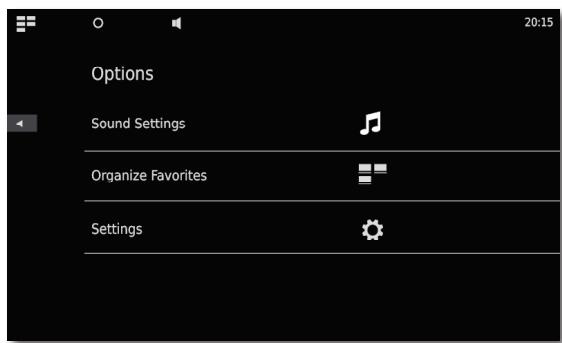
Setting the language
Set the desired menu language.
。
Call up Options from the Main Menu.
Call up Settings menu.
Select International option (second line from above)
Select desired Language.
Confirm selection with Set.
Confirm prompt with Restart.
Network
Depending on whether the device is connected by wire (Ethernet, Powerline) or wireless (WiFi), different settings have to be made.
Loewe recommends use of a wired network (Ethernet, Powerline) to ensure a high stability and quality of the data link. As a matter of principle, wireless connections can get disturbed due to external influences (e.g. microwave devices) and mostly provide a lower data transmission rate.
Network Settings
You can make the settings for the selected network here.

Call up Options menu.
Call up the Settings menu.

Select the Network option.
You can see the current network settings. After the first commissioning at the factory, your unit is set for a wired connection and automatic IP configuration. If an IP address is displayed in the network settings, a correct Internet connection is usually present and nothing further has to be set.
If the unit does not have an Internet connection, change the network settings.
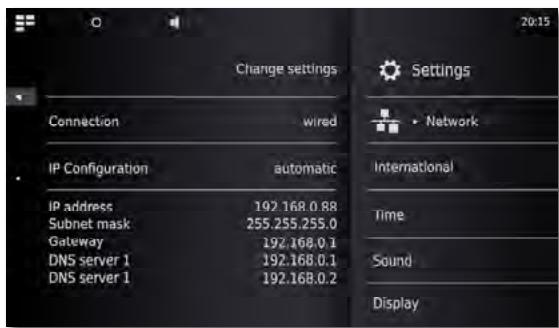
Wired network
Call up Change Settings.
Select desired Connection - wired for the network connection.
Confirm selection with Proceed
Select desired IP configuration.
automatic If a DHCP server is present in your home network (e.g. a DSL router), use this setting, as all network parameters are set automatically.
manual The network parameters can be set manually (e.g. if there is no DHCP server in your home network).
Confirm selection with Proceed
The network parameters determined are displayed in the overview in the automatic option.
Enter network parameters in the displayed data fields with the manual option.
Proceed Confirm selection with Proceed.
It is now possible to give the unit an individual name for identification in the network.
In the Host name line please press the field and enter the desired name via the keypad that appears.
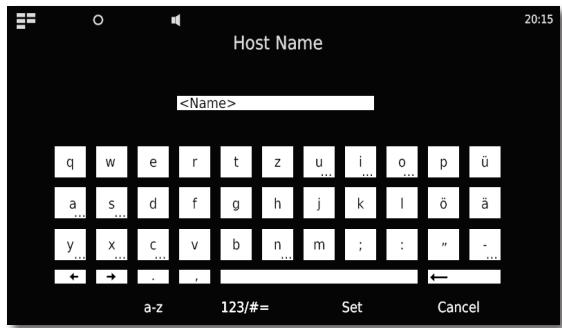
Confirm entry with Set.
You can now set whether a proxy server is present in the network.
Select desired setting for Proxy server - yes or no.
Confirm selection with Proceed.
If you have selected the setting Proxy server - yes, the entry fields for the proxy server will appear in the next step. Tap on the corresponding fields.
Proxy Server Name Enter the name for the proxy server via the keypad that appears.
Proxy Server Port Enter the proxy server port via the keypad that appears.
Confirm selection with Proceed.
The unit now attempts to establish a network connection with the current settings.
If these settings are correct, the network connection will be tested with the currently set parameters.
If the test had a positive result, a corresponding message will be displayed.
Wireless network
Call up Change Settings.
Select desired Connection type - wireless for the network connection.
The following options are now available:
manual The unit searches for wireless (WLAN-) networks
Confirm selection with manual.
The unit now searches for wireless networks in the surroundings. A list of the networks found is then displayed.
Setting time
The unit's time is automatically updated via time servers in the Internet (if your home network has access to the Internet). To keep the time display correct for your region, the deviation from the GMT time (time zone) and the summer/normal time can be set. You can also set the time manually.
Call up Options menu.
Call up the Settings menu.
Select Time option.
Set Mode - automatic or manual option.
Automatic
Time zone The time zone in which the unit operates can be set
Daylight Saving Summer time and normal time can be set.
The time zone CET corresponds to Central European Time. UTC or WET corresponds to World Time or West European Normal Time. EET corresponds to East European Time or Central European Summer Time.
Manual
Set hours time with Hour.
Set minutes time with Minute.
Confirm setting with Set.
Setting up Bluetooth devices
You can connect music sources, speakers or headphones wirelessly over Bluetooth. The devices must support the Bluetooth protocol A2DP.
Call up the Options menu.
Call up the Settings menu.
Select the Bluetooth option.
Select the option Bluetooth - on.
Select the option Continue.
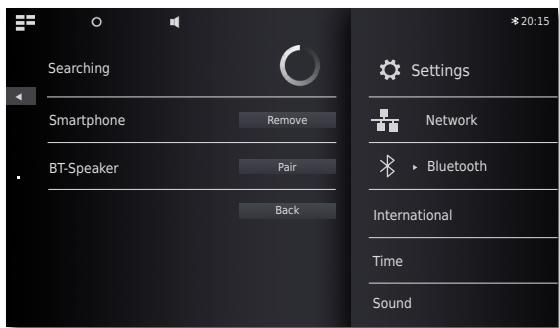
The system will now search for Bluetooth devices in the vicinity of SoundVision ID. Any devices that are found will be shown on the left hand side of the list.
Select Pair for the desired device.
You may need to confirm this on the device that is being connected as well. Please OK this when asked.
You can delete connected devices from the list by using the option Remove.
End the search with Back.
The Bluetooth connection can only be initiated by SoundVision ID.
You may need to activate the "visibility" function in the settings of the device that is being connected to.
Sound
You can make various sound settings in the Sound menu.

Call up Options menu.
Call up Sound menu.
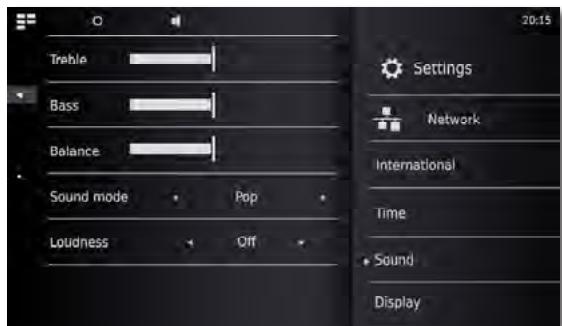
Set value or option.
Treble Settings for the high frequencies
Bass Settings for the low frequencies
Balance Emphasis on the left/right channel
Sound Mode
You can select various Sound Modes for the sound reproduction
Set value or option.
Pop The sound reproduction is optimised for pop music Classical The sound reproduction is optimised for classical music
Speech The sound reproduction is optimised for speech
Manual The sound reproduction can be set individually
Loudness
If you activate the setting, the frequency response will be corrected in relation to the volume (hearing compensated volume).
ON Hearing compensated volume adjustment on
OFF Linear frequency response
Defaults
You can use the Defaults function to restore the default settings of the sound settings.
Speaker selection
You can also play back the sound through external speakers or headphones that are connected via Bluetooth. The Bluetooth device must be connected as described in page 34 before this can happen.
Set value or option.
System speakers Speakers that are integrated into SoundVision ID [BT name] External Bluetooth speaker or headphones
After the device has been selected, it takes about a second before the external speaker begins to emit audio signals.
Display
You can make various screen settings in the Display menu.

Call up Options menu.
Call up the Settings menu.
Select the Display option.
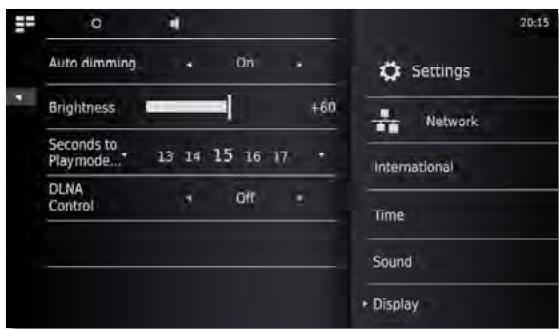
Set value or option.
Autom. dimming If you activate this setting, the brightness of the display will automatically be adapted to the ambient light via a light sensor
Brightness Brightness of the display
Sec. until ... Time until the Play menu is shown
DLNA remote control if this option is set to on, SoundVision ID can be remote controlled by DLNA compatible devices (Digital Media Controller). This means that you can play music from a DLNA compatible audio server (Digital Media Server) via SoundVision ID.
Sound System
In the Sound System menu, you can choose to play back sound using either the internal speakers or a Loewe sound system that is externally connected (page 31).

Call up the Options menu.
Standard Sound is played back either through the integrated speakers or through whichever device is currently selected in the menu Speaker selection (page 35).
Active speakers 2.0 The sound is played back in stereo over an active speaker that is externally connected.
Active speakers 2.1 The sound is played back over a Loewe 2.1 sound system that is externally connected.
Confirm selection with Set.
Active speakers 2.1
You can set the parameters for the subwoofer in the Active speaker 2.1 menu
Set value or option.
Cutoff Frequency The option Cutoff Frequency allows you to set the limit frequency for bass playback. Depending on which speakers you have attached, this can be between 20 Hz and 200 Hz.
Level The option Level allows you to set the basic bass volume to the level of your choice.
Phase The Phase can be set between 0^ and 180^ to provide optimal bass playback.
Confirm selection with Set.
Software update
You can download a software update suitable for your unit from the Internet, if required.

Call up Options menu.
Call up the Settings menu.
Select the Software Update option.

Set Source - Internet or USB option.
You can use the Check function to check whether new software is available for the unit.
If this is the case, the version number of the current version and the new version will be displayed.
The update process is started with the Update function. Depending on the speed of the Internet connection, the process lasts up to 70 minutes. The progress of the update is shown.
A corresponding menu is shown after a successful update. Confirm the Reboot function. The unit now restarts.
You can download a current version of the instructions for use as a PDF file from the Loewe web page: http://support.loewe.tv/de -Library Instructions for Use This is especially recommended after a software update.
You can save your favourite music sources as favourites on the Main Menu. Favourites are represented by symbols. If the selected music source has its own symbol this will be used. That means you can call up your music in just one step.
Adding Favourites
0
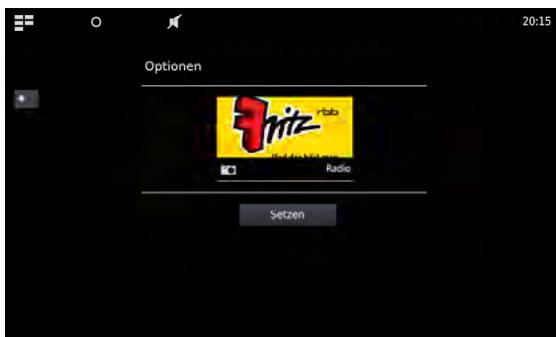
During playback: open menu Options.
Add to Favourites Add current title/current album or radio station to Favourites
Only title Add selected title to Favourites
Entire album Add selected album to Favourites
Set Confirm Favourites selection

Call up the Main Menu.
Symbols for the selected music source appear in the order in which you added them.
Touch the desired symbol to start the playback.
Sorting Favourites

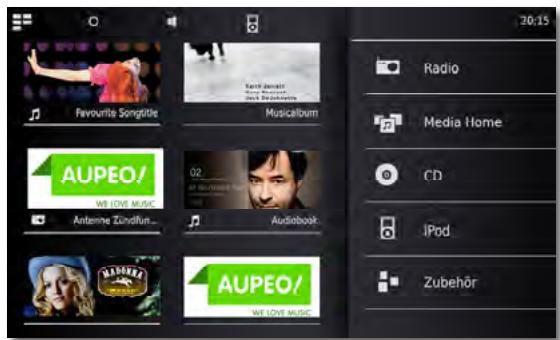
Call up the Main Menu.

Call up Options menu.
Manage Favourites Sort or delete favourites

Touch the symbol to be sorted with your finger and keep touched. After a short time, the symbol moves and can then be transferred to the desired position.

Call up the Main Menu.
Deleting Favourites

Call up the Main Menu.

Call up Options menu.
Manage Favourites Sort or delete favourites

A trash can symbol is shown in the right of the symbol. Touch the symbol to be deleted with your finger where the trash can is located. The symbol is immediately removed by this action.

Call up the Main Menu.

or

Quit Options menu.
MusicID
Your SoundVision ID can find additional information for your music from databases in the Internet.

Select the MusicID symbol.
or

Call up Options menu.

Select MusicID option.
gracenote.
If you are connected to the Internet, databases will now be queried in the Internet (Gracenote). If the query is successful, an album graphic along with potential supplementary information on the title will be shown.
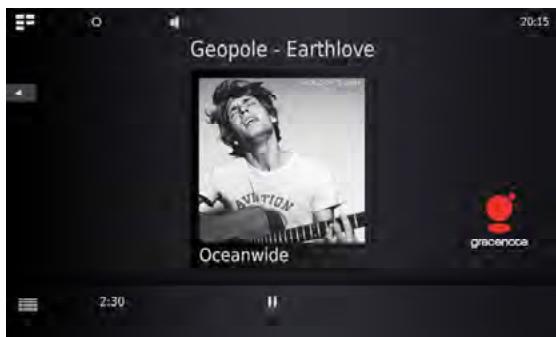
Databases are automatically queried for the albums/titles, only in the case of radio stations do you manually select the function for the relevant title.
| Internet radio | Poss. automatic display of title manual MusicID |
| FM radio | manual MusicID |
| USB media | MusicID automatisch |
| Audio CD | MusicID automatisch |

Slide the symbol upwards to view details on the current title in the Title Information menu.
Loewe SoundVision ID
-38
Instructions for Use
Control
Internet Radio
Internet radio
You can listen to Internet radio from a large number of radio stations with many different genres if the unit has a broadband connection to the Internet (page 33). To be able to use the service effectively, we recommend registering your unit in the Loewe Support Portal. You can then create and manage your own Internet radio favourites.
Setting Internet radio

Call up the Main Menu.

Select Radio.

Select Internet Radio.
Select desired category:
Local Germany Internet radio stations from your region
Favourites Your personal favourites, which you yourself can manage via the Loewe Support Portal in the area of Internet radio. You can also create favourites saved in the unit via the menu item
Add to Favourites. You can delete the individual stations from the favourites via Options -
Remove from Favourites
Countries Internet radio stations via a regional selection
Genre Internet radio stations sorted by styles of music
New stations Stations recently available
Popular stations Internet radio stations frequently listened to
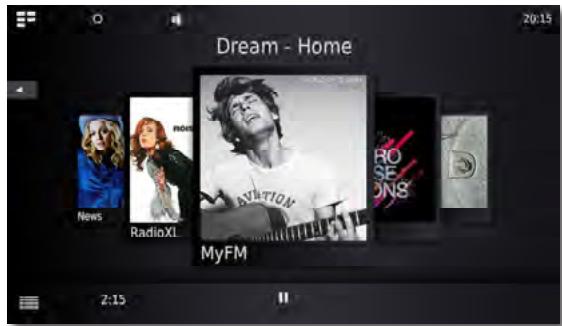
Select desired Internet radio station.
Listening to Internet radio


Volume up/down.

Sound mute/on.

Volume menu.

Slide the symbol upwards to view details on the current title in the Title Information menu.

Back in menu.

Select the MusicID symbol.
Internet Radio options

Call up Options menu.
Sound Settings Sound menu (page 35)
MusicID Recognise music (page 37)
Add to Favourites Add current station to Favourites on the unit
Sort by The station list can be sorted alphabetically in an ascending/descending order
Search Searches for a specific radio station
Set alarm source The radio station that is currently selected will be switched on when the alarm goes off
Settings Settings menu (page 33)
Loewe does not accept any liability for the nature and content of receivable Internet services. With its devices, Loewe merely provides the technical platform that fundamentally enables such material to be received. For this reason, Loewe cannot make any guarantees regarding changes in the nature and content of the material, particularly with regard to the future.
AUPEO!
AUPEO! allows you to create a personal music programme, enjoy channels programmed by music experts according to genre and receive channel recommendations fitting to your mood.
AUPEO! offers this service in both a basic and a premium version. The basic package available is free of charge. The premium package can be purchased on a monthly basis (see the AUPEO! website for information on the cost). It includes all components of the basic package as well as many benefits such as higher streaming quality. It is ad-free and gives you access to genre-specific stations that are programmed by music experts - so-called AUPEO! stations. You can subscribe to the premium package via the support portal on the Loewe homepage.

Call up the Main Menu.

Select Radio.

Select AUPE0!
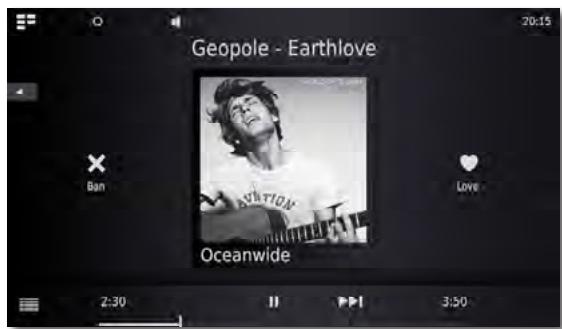
Select desired category:
Personal radio This radio plays your personal music programme. By rating the songs as like or don't like, AUPEO! saves and uses this information to eventually create a new music profile. Based on this profile, songs are suggested in the future that could match your taste.
Mood radio Choose music from the selection of moods you like best.
Artist Radio Your AUPEO! Artist stations play both the music by an artist of your choice and songs by similar artists. This way, you're in with a good chance of finding a new favourite artist.
AUPEO! Stations AUPEO! stations offer you the finest of genre radio, compiled by the AUPEO! music experts. Whether it's rock, pop or hip-hop, you'll find the very best of each genre here.

Love You like the title.

Ban You do not like the title.

Pause Stop play.

Play Continue play.

Next title

Select the MusicID symbol.
AUPEO! options

Call up Options menu.
Sound Settings Sound menu (page 35)
MusicID Recognise music (page 37)
Add to Favourites Add current station to Favourites on the unit
Set alarm source The radio station that is currently selected will be switched on when the alarm goes off
Settings Settings menu (page 33)
Loewe SoundVision ID
-40-
Instructions for Use
Control
Radio operation
FM radio
You can save more then 50 FM radio stations. Additional information is displayed for stations broadcasting RDS.
Setting FM radio stations

Call up the Main Menu.

Select Radio.

Select FM Radio.

Call up Options menu.
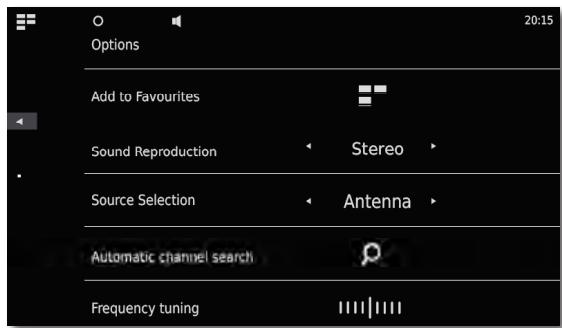

Call up Automatic channel search.
All the radio stations and FM radio favourites that have been saved up to this point will be deleted and overwritten by the new ones that the system has found (after the user has answered a confirmation prompt).
After the search, a message regarding the number of stations found is displayed.
Back in menu.
Listening to FM radio

Call up the Main Menu.

Select Radio.

Select FM Radio.
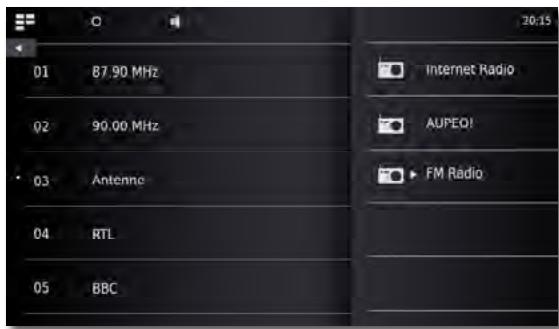
Select desired station from the list.
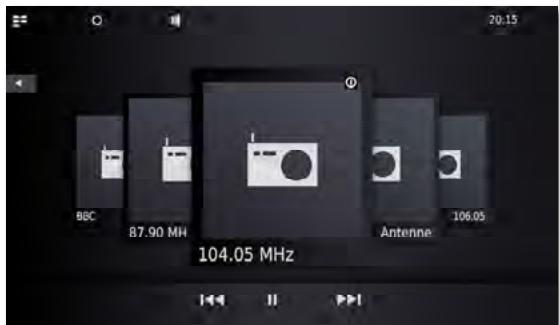


Radio station down/up.


Volume up/down.

Sound mute/on.

Main Menu menu.

Select the MusicID symbol.
FM radio options

Call up Options menu.
Sound Settings Sound menu (page 35)
MusicID Recognise music (page 37)
Add to Favourites Add current station to Favourites on the unit
Sound reproduction Stereo or Mono playback
Source selection Cable or Antenna
Autom. channel search Call up Autom. channel search
Fine tuning Fine tuning of the current station
Search Searches for a specific radio station
Set alarm source The radio station that is currently selected will
be switched on when the alarm goes off
Settings Settings menu (page 33)
CD play
You can play standard audio CDs (CD-DA) with a diameter of 12 cm with this unit. The device can also play audio data CDs you have written yourself in the format CD-R (ISO 9660) and CD-RW.
Handling discs
Do not touch the playing side of the disc. Hold the disc at the edges so as not to touch the surface with your fingers. Do not attach paper or adhesive tape onto either side of the disc.
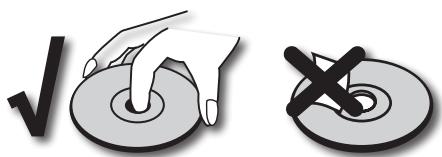
CD-R/RW discs written with a PC or a DVD or CD recorder cannot be played if the disc is damaged or dirty or the lens of the player is contaminated with condensation.
If you write a disc with a PC, it may be the case that the disc cannot be played owing to the application software settings, even if your format is compatible. (You can obtain more information from your software provider). Discs must be finalised.
Depending on the recording device or the CD-R/RW disc itself, some discs cannot be played with this device.
Do not use CDs with unusual shapes (e.g. heart shaped or octagonal). Otherwise malfunctions or damage cannot be ruled out.
Finger prints and scratches on the disc can impair the playing quality. Handle the discs carefully.
Inserting discs
The unit has a so-called slot-in drive ⑤. This is located on the front. Insert the disc in the drive until it is automatically drawn in. The cover side of the disc points upwards here.
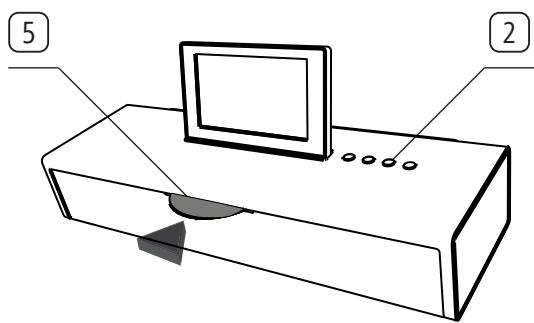
Ejecting the disc
To remove the inserted disc press 2
Start play

Call up the Main Menu.

Select CD.
Replay functions
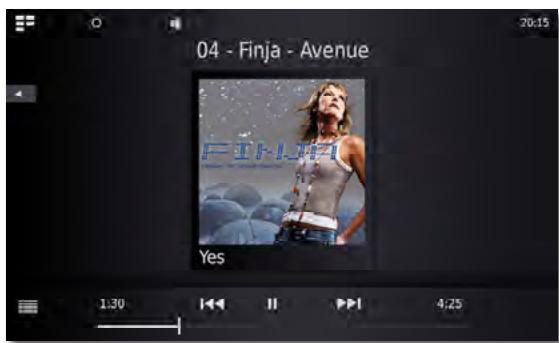

Pause Stop play.

Play Continue play.

Press briefly: Select title up/down.

Press briefly twice to return to the previous title.

Press longer: Search up/down.

Volume up/down.

Volume menu.

Select the MusicID symbol.

Slide the symbol upwards to view details on the current title in the Title Information menu.
Touch the centre of the display (Album Cover) to display the track list. You can now browse through this list and select individual titles directly.
CD play options

Call up Options menu.
Sound Settings Sound menu (page 35)
MusicID Recognise music (page 37)
Shuffle Plays the tracks back in random order
Repeat Repeats one or all of the tracks
Search Searches for specific tracks
Set alarm source The current track will play when the alarm goes off
Settings Settings menu (page 33)
iPod operation
You can connect your Apple device to SoundVision ID and enjoy your music in high quality. The unit has an integral iPod-Dock 6. If the unit is switched on, the accumulator of the connected Apple device is charged. You can find a list of what Apple devices are compatible with SoundVision ID on page 47.
The maximum number of titels is ≤ 25000 . The search can take longer than 1 minute.
Connecting the iPod
Insert the dock adapter supplied with your Apple device in the loading recess of the iPod-Dock 6. Than place your Apple device in the dock.
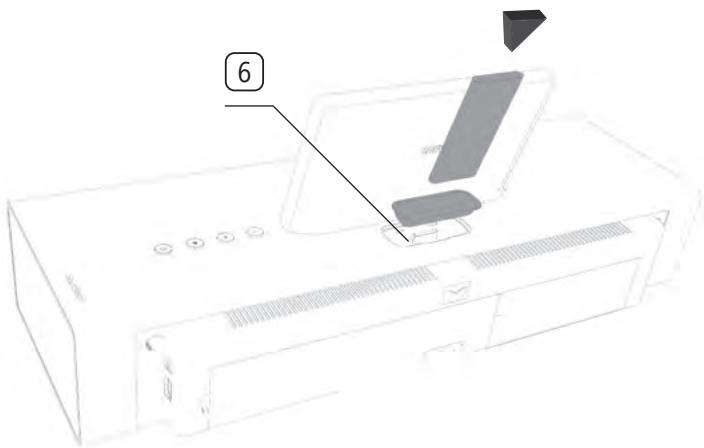
Use the corresponding Apple Dock Adapter of your Apple device to avoid damaging your iPod plug.
When inserting and handling the Apple device in the dock, only apply gentle force so as not to damage any sensitive plug-in connections.
iPod play

Call up the Main Menu.
iPod play.
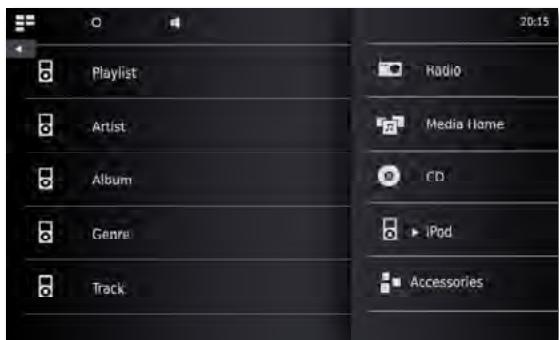

Select category or title.

Pause Stop play.
Play Continue play.

Press briefly: Select title up/down or back to the previous album for the first title.

Press briefly twice to return to the previous title.

Press longer: Search up/down.


Volume up/down.

Volume menu.

Select the MusicID symbol.
Slide the symbol upwards to view details on the current title in the Title Information menu.
Touch the centre of the display (Album Cover) to display the track list. You can now browse through this list and select individual titles directly.
iPod play options

Call up Options menu.
Sound Settings Sound menu (page 35)
MusicID Recognise music (page 37)
Add to Favourites Add current title/current album to Favourites
Shuffle Plays the tracks back in random order
Repeat Repeats one or all of the tracks
Sort byThe track list can be sorted alphabetically in an ascending/ descending order, by date or by track number
Search Searches for specific tracks
Set alarm source The current track will play when the alarm
goes off
Settings Settings menu (page 33)
Depending on the software version, your Apple device can possibly not be operated via the SoundVision ID. We recommend updating the software of your Apple device to the latest version.
The compatibility with your Apple device can vary depending on the model. For Apple devices supported see page 47.
Only disconnect your Apple device from the SoundVision ID if there is no further access to it.
With SoundVision ID you can play back digital media files or playlists that are saved on USB storage media or on your home network. USB sticks are supported in the format FAT16/32 and NTFS.
The maximum number of files and folders is ≤ 25000 . The search can take longer than 1 minute.

Call up the Main Menu.

Select Media Home.

Select USB play

or
Select DLNA play
Select storage medium or media source.
Select category or title.
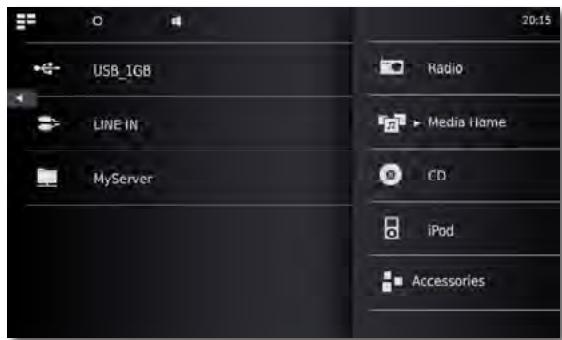

Pause Stop play.

Play Continue play.

Select title up/down.

Press briefly twice to return to the previous title.

Volume up/down.

Volume menu.

Slide the symbol upwards to view details on the current title in the Title Information menu.

Call up Options menu.
Sound Settings Sound menu (page 35)
MusicID Recognise music (page 37)
Add to Favourites Add current title/current album to Favourites
Shuffle Plays the tracks back in random order
Repeat Repeats one or all of the tracks
Sort by The track list can be sorted alphabetically in an ascending/descending order, by date or by track number
Search Searches for specific tracks
Set alarm source The current track will play when the alarm
goes off
Settings Settings menu (page 33)
Playing back from audio sources that are connected by cable
You can play an external audio source with SoundVision ID.
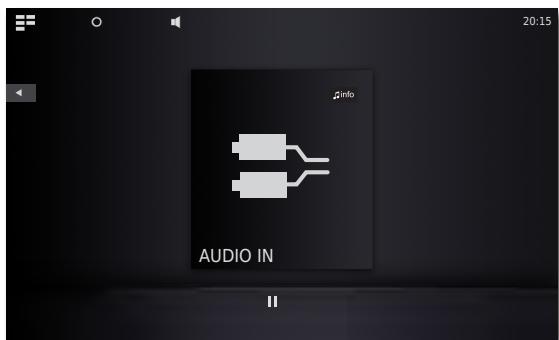
The source must be connected to the 3.5 mm jack socket AUDIO IN on the rear of the unit.

Call up the Main Menu.

Select Media Home.

Select AUDIO IN
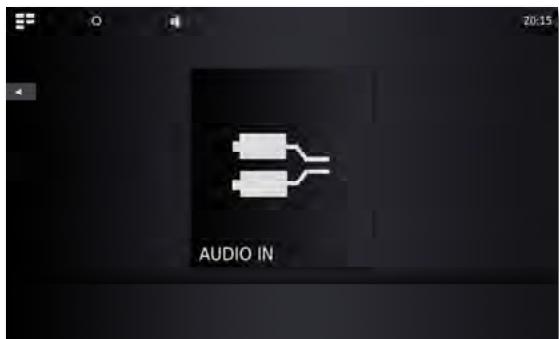

Start playing the connected audio source.
Select the MusicID symbol.
Playing back from Bluetooth audio sources
You can play back music from your Bluetooth source (e.g. Smartphone) using SoundVision ID.
The Bluetooth device must be connected as described in page 34 before this can happen.
Choose the option Connect in the settings of your Bluetooth source.
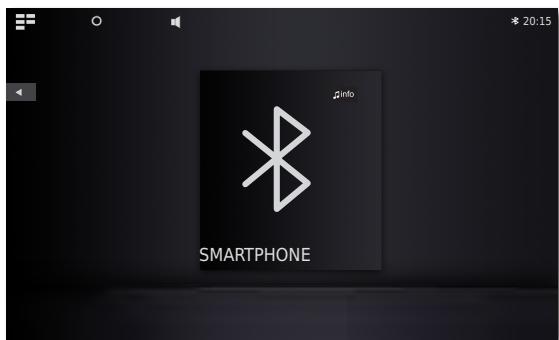
The Bluetooth symbol is now shown on the SoundVision ID display. The device is ready to play back sound files from the Bluetooth audio source.
Start the audio playback on your Bluetooth source.
Select the MusicID symbol.
Depending on the system, SoundVision ID can either play back music from a Bluetooth source over the integrated speakers or via Bluetooth over external speakers/headphones.
Loewe SoundVision ID
-44-
Instructions for Use
Control
Accessories
Alarm function
The device can wake you up at a preset time with one of the available audio sources.
Setting the alarm time
三
Call up the Main Menu

Select Accessories.

Select alarm.

Select hour to set the hour setting for the alarm.

Select minute to set the minute setting for the alarm.

Alarm source: The alarm source previously selected with the Playback options via Set alarm source is displayed here.
FM radio The selected FM radio station will play when the alarm goes off
Internet radio The selected internet radio station will play when the alarm goes off
AUPEO! The selected AUPEO! radio station will play when the alarm goes off
CD The CD that is inserted will play when the alarm goes off
Music source The selected Media Home music source will play when the alarm goes off
If no entry appears in the line Alarm source, first select a playback medium (e.g. internet radio), and then set the current source in the respective menu Playback options with the option Set alarm source as an alarm tone.
Activate/Deactivate alarm

Activate/Deactivate the alarm function by using timer active - on/off.

The symbol appears at the top edge of the screen. This shows that the alarm is switched on.
Snoopze function
Press snooze when the alarm goes off.
The alarm stops and automatically starts again in ten minutes.


Volume up/down.
Switch off the alarm
Press off when the alarm goes off.
The alarm clock stops.
The alarm function is deactivated after the alarm is switched off. Activate the alarm function again as described under "Activating/Deactivating the alarm function".
Sleep function
You can listen to music for a set amount of time and the device will then switch off by itself.
Setting the duration
Select the desired music source.

Call up the Main Menu.

Select Accessories.

Select sleep timer.

Select Minutes to set the duration in minutes.

Activate/Deactivate the sleep function by using timer active - on/off.

The symbol appears at the top edge of the screen. This shows that the sleep function is switched on.
Bluetooth: wireless connection between devices that are usually not located far from one another.
DHCP: Abbreviation for Dynamic Host Configuration Protocol. DHCP allows automatic assignment of IP addresses with the aid of a DHCP server.
DHCP server: Network service which takes care of automatic assignment of IP addresses to clients.
DNS: Abbreviation for Domain Name System. Numeral IP addresses are assigned to readable names (e.g. www.loewe-int.de). DNS servers are responsible for the resolution of readable addresses into the corresponding IP addresses.
DLNA: Abbreviation for Digital Living Network Alliance. Standard for cross-manufacturer control and communication of multimedia content between home network devices.
Wired network: see LAN.
Wireless network: see WLAN.
DRM: Digital Rights Management. Processes to control copyright protected data. To be used correctly, DRM protected contents require not only a DRM capable device but also the possession of a license issued by the provider (to be paid for).
Ethernet: Cable linked data net technology for local networks (LANs). Also covers standards for e.g. plug connectors and transfer speeds.
FAT: Abbreviation for File Allocation Table. File system on storage media.
FLAC: Abbreviation for Free Lossless Audio Codec. Method for loss-free audio data compression.
Gateway: Transition to another network; in this case connection from the home network to the Internet. The network device that establishes this connection is normally used as a standard gateway. As a rule, the DSL router also represents the Internet gateway.
ID3 tags: Additional information in the case of MP3-files. Data on Interpreter, title, album and album graphics etc. can be saved here. This data is then processed by the PC using an ID3 tag editor.
IP address: IP addresses (Internet Protocol Addresses) are used to identify devices in an Internet Protocol (IP) network. IP addresses are made up of four groups of numbers of three digits each.
Channel (WLAN): Channel is understood to mean a certain part of the WLAN frequency band. Devices that want to communicate with each other have to use the same WiFi channel. In Europe the WiFi frequency band is currently divided into 13 channels.
LAN: Abbreviation for Local Area Network. Mainly used as a name for networks with cabling (Ethernet).
MAC address: Hardware address of a network adapter, e.g. the network card in the PC. It is issued permanently by the manufacturer and is used to uniquely identify devices in networks.
Mbit/sec: Information about the transfer rate in networks in megabits, i.e. millions of characters per second. With WiFi the maximum speed is 11 (IEEE 802.11b) or 54 (IEEE 802.11g) Mbit/sec, in wired nets 10 Mbit/sec or 100 Mbit/sec (Fast Ethernet).
Media Server: Stands for the device which multimedia contents are stored on, but is also the name for the service provided by the device that makes this data available to the network.
MP3: Data format for compressed audio files.
Mono: Single channel sound.
Multimedia content: Videos, music files and photos are grouped together under this term.
NAS: Abbreviation for Network Attached Storage. The term describes a hard disk which is independently linked to the network (i.e. without a PC).
NTFS: Abbreviation for New Technology File System. File system developed by Microsoft for storage media.
Powerline: Powerline designates a type of wired network connection in which data is transferred via the domestic electricity network using optionally available adapters.
Proxy server: Connection member between different networks.
PSK: Stands fro Pre-Shared Key in conjunction with WLAN encryption. Clients that wish to connect to a wireless network secured with PSK must know this key.
RDS: Abbreviation for Radio Data System. This enables the transfer of digital additional information via analogue VHF radio.
Router: Device for connecting up several networks, e.g. home network and Internet.
Stereo: Two-channel sound.
Switch: Device for connecting several computers to a network.
UPnP AV: Abbreviation for Universal Plug and Play - Audio/Video. Is used to control network devices from all manufacturers. Has become a widespread standard for home networking.
USB: Universal Serial Bus. Serial bus system for connecting external devices (USB card reader, USB stick).
WEP: Abbreviation for Wired Equivalent Privacy. Former standard process in the WiFi encryption, now outdated.
WLAN: Abbreviation for Wireless Local Area Network. Also abbreviated as wireless network.
WMA: Abbreviation for Windows Media Audio, Microsoft own audio data format. As with MP3 files, the content is compressed here as well.
WPA: Abbreviation for Wi-Fi Protected Access. Replaced WEP as standard encryption for wireless networks.
Troubleshooting
| Problem | Possible cause | Remedy |
| Not working at all. | Mains cable not plugged in. | Plug the mains cable into a socket 220-240 V 50/60 Hz. |
| No sound. | Defective connections at the input cable. | Connect the cable correctly (page 31). If the problem continues, the cable might be defective. |
| The volume is set at minimum. | Turn up the volume. |
| The sound is set to mute. | Press or V+ on the remote control to reactivate the audio output and then set the volume level. |
| A headphone is connected. | Remove the headphone. |
| CD playback not possible. | No disc inserted. | Insert a disc. |
| A disc that cannot be played has been inserted. | Insert a disc that can be played (check the type of disc). |
| The disc is dirty. | Clean the disc. |
| The disc cannot be loaded. | Switch the unit on and then insert the disc in the drive. |
| The disc is not inserted with the playback side downwards. | Insert the disc with the playback side to the rear. |
| The CD contains MP3 files. | The playback of MP3 files from CDs is not supported. |
| A media file cannot be played. | The file format is not supported. | Convert the file to a supported format on a computer with a converter program. |
| The unit is not working properly. | | Unplug the mains plug from the mains socket and then try plugging it in again after 30 seconds. |
| The remote control is not working properly. | The batteries in the remote control are dead. | Replace the batteries with new ones. |
| The radio reception is disrupted. | The antenna is loose or damaged. | Insert the antenna cable firmly in the socket or replace it with a new one. |
| iPod operation is disrupted. | The iPod is not correctly inserted in the dock. | Pull the iPod out and insert it carefully in the dock again until the correction is properly established. |
| The iPod playback stops and another title is played. | The iPod function "Shake to Shuffle" is activated. | Deactivate this function in your iPod. |
| USB playback is not possible. | The combination of file and directory name is too long. | The combination of file and directory name must not exceed 250 characters. Please make the names shorter. |
| The file format of the USB storage medium is not compatible. | Format the USB storage medium in FAT32 format. |
| The number of files / directories is greater than the maximum allowed. | Reduce the number of files / directories (page 41). |
Technical Data
General
| Loewe SoundVision ID | Art.No. 51203-B/L/U10 |
| Operating temperature [°C] | 5 ... 40 |
| Humidity [%] (no condensation) | 30 ... 90 |
| Dimensions [W x H x D in cm] | 54.8 x 22.4 x 19.8 |
| Weight [kg] | 6.4 |
Electrical data
| Mains voltage [Volt 50/60 Hz] | 220 - 240 |
| Power consumption [Watt] | 13 |
| Power consumption in Standby [Watt] (Energy Saving mode) =< 0,5 |
| Laser | Laser class 1, wavelength: 790 nm |
| Output stages | 3 |
| Load bearing capacity [Watt] (Nominal) | 2x 25, 1x 50 |
| Load bearing capacity [Watt] (Peak) | 2x 50, 1x100 |
| Display | Touch screen, 17 cm diagonals, 800 x 480 pixels |
Interfaces
| Headphones | Jack socket 3.5 mm |
| AUDIO IN | Jack socket 3.5 mm |
| AUDIO OUT | Jack socket 3.5 mm |
| LINK | Jack socket 2.5 mm |
| USB | 2x V 2.0, type A |
| ANT FM | FM antenna input, 75 Ohm |
| LAN | Wired network RJ-45 |
Wireless Interfaces
| Supported standards | 801.11b/g + n |
| Frequency range | 2400-2483,5 MHz |
| Encryption | WEP, WPA, WPA2 |
| Bluetooth protocols | A2DP |
| CD | Audio-CD, CD-R, CD-RW |
| File formats supported | |
| Audio | MP3, WMA (without DRM), FLAC, AAC, |
| Audio | M3U, PLS |
| Home networking standard |
| Audio Universal Plug and Play Audio/Video (UPnP AV) DLNA |
Wired network
| Supported standards | 10 Mbit/s Ethernet (10Base-T) |
| 100 Mbit/s Fast Ethernet (100Base-T) |
Supported Apple devices - Made for
| (only for audio playback) |
| iPod touch (4th generation), iPod touch (3rd generation) |
| iPod touch (2nd generation), iPod touch (1st generation) |
| iPod classic |
| iPod nano (6th generation), iPod nano (5th generation) |
| iPod nano (4th generation), iPod nano (3rd generation) |
| iPhone 4S, iPhone 4, iPhone 3GS, iPhone 3G, iPhone |
Loewe Opta GmbH is a public limited company of German law with its Head Office in Kronach.
| Industriestrasse 11, 96317 Kronach |
| Telephone: +49 9261 99-500 |
| Fax: +49 9261 99-515 |
| Email: ccc@loewe.de |
| Commercial Register: Municipal Court Coburg, No. HRB 42243
VAT ID-No.: DE 193216550
WEEE registration number: DE 41359413 |
Editorial date 01.13.7th edition
Software Version 3.x
© Loewe Opta GmbH, Kronach
All rights reserved including translation.
Design and technical specifications are subject to change without notice.
Environmental protection
Cardboard box and packaging
In line with national regulations regarding the disposal of packaging materials, we pay a fee to authorised recyclers who collect packaging from dealers.
The unit
Attention: The EU Directive 2002/96/EC governs the proper return, handling and recycling of used electronic appliances.
Old electronic appliances must therefore be disposed of separately. Never dispose of this unit in normal domestic waste! You can hand in your old unit free of charge at identified collection points or to your dealer if you buy a similar new unit. Additional details about return (also for non EU countries) are available from your local municipal authorities.
Remote control batteries
The batteries provided contain no harmful materials such as cadmium, lead or mercury.
Used batteries should no longer be disposed of in the domestic waste according to the Battery Ordinance. You can dispose of used batteries free of charge at the collection points in commercial outlets. Your dealer will also have a collection point for used batteries.
Gracenote® End User License Agreement
This application or device contains software of Gracenote, Inc., with head office in Emeryville, California, USA (hereinafter referred to as "Gracenote").
The software provided by Gracenote ("Gracenote software") enables this application to identify music albums and/or files online and access music-related data from online servers or integral databases (summarised under the designation "Gracenote servers"), including information on the name, artist, track and title ("Gracenote data"), as well as execute further functions. You may only use the Gracenote data as intended for the end user functions of the application or device.
You hereby assure that you shall only utilise Gracenote data, the Gracenote software and the Gracenote servers for your personal and non-commercial use. You assure that you shall not make the Gracenote software or any Gracenote data available to third parties, copy such for third parties or transfer or send such to third parties. YOU HEREBY ASSURE THAT YOU SHALL ONLY UTILISE GRACENOTE DATA, THE GRACENOTE SOFTWARE AND GRACENOTE SERVERS AS EXPRESSLY PERMITTED IN THIS DOCUMENT.
You hereby accept that your non-exclusive licence for the use of Gracenote data, the Gracenote software and the Gracenote server shall expire if you violate the above restrictions. You assure that you shall cease to use the Gracenote data, the Gracenote software and Gracenote servers in any way whatsoever after expiry of your licence. Gracenote reserves all rights to Gracenote data, the Gracenote software and the Gracenote servers, in particular all rights of ownership. On no account is Gracenote obliged to make payments to you for information which you make available to Gracenote. You accept that Gracenote, Inc., may enforce its rights resulting from this agreement directly and on its own behalf against you.
The Gracenote service uses a special identification mechanism to record queries for statistical purposes. This randomly assigned numerical identification serves to enable the Gracenote service to count queries, without data about you being revealed. You can find further information on the Internet site with Gracenote's privacy policy for the Gracenote service. You shall receive a licence for the Gracenote software and all Gracenote data as issued. Gracenote does not make any explicit or implicit statements or promises in respect to the correctness of the Gracenote data on the Gracenote servers. Gracenote reserves the right to delete data from the Gracenote servers or change data categories for reasons that are reasonable in the opinion of Gracenote. Gracenote does not provide any assurance that the Gracenote software or the Gracenote servers are fault-free or that the Gracenote software and the Gracenote-Server will function without interruption. Gracenote is not obliged to provide you with new, improved or additional data types or categories which Gracenote might offer in the future, and Gracenote is entitled to stop its services at any time.
GRACENOTE EXCUSES ALL EXPRESS OR IMPLICIT GUARANTEES, IN PARTICULAR IMPLICIT GUARANTEES CONCERNING STANDARD QUALITY, SUITABILITY FOR A DEFINITE PURPOSE, OWNERSHIP AND THE NON-VIOLATION OF RIGHTS. GRACENOTE DOES NOT PROVIDE ANY GUARANTEE FOR THE RESULTS YOU ATTAIN THROUGH USING THE GRACENOTE SOFTWARE OR FROM GRACENOTE SERVERS. GRACENOTE IS ON NO ACCOUNT LIABLE FOR CONSEQUENTIAL OR ACCIDENTAL DAMAGE, FOR LOST PROFIT OR LOST REVENUE.
© Gracenote, Inc. 2009

Made for
iPod
iPhone
"Made for iPod" and "Made for iPhone" mean that an electronic accessory has been designed to connect specifically to iPod or iPhone, respectively, and has been certified by the developer to meet
Apple performance standards. Apple is not responsible for the operation of this device or its compliance with safety and regulatory standards. Please note that the use of this accessory with iPod or iPhone may affect wireless performance.
iPod and iPhone is a registered trademark of Apple Inc. in the USA and other countries.
Telecommande Assist Easy 51
Bienvenue 53
Loewe SoundVision ID, ref. 51203-B/L/U10
Raccordements possibles
2x USB 2.0 (1.1)
LAN RJ45 10/100 Mbps
WLAN 802.11 b/g/n
| (uniquement restitution audio) |
| iPod touch (4th generation), iPod touch (3rd generation) |
| iPod touch (2nd generation), iPod touch (1st generation) |
| iPod classic |
| iPod nano (6th generation), iPod nano (5th generation) |
| iPod nano (4th generation), iPod nano (3rd generation) |
| iPhone 4S, iPhone 4, iPhone 3GS, iPhone 3G, iPhone |
Mentions légales
© Gracenote, Inc. 2009

Made for
iPod
iPhone
Selectionare Media Home.

Selectionare Media Home.

Selectionare AUDIO IN
info
| (solo riproduzione audio) |
| iPod touch (4th generation), iPod touch (3rd generation) |
| iPod touch (2nd generation), iPod touch (1st generation) |
| iPod classic |
| iPod nano (6th generation), iPod nano (5th generation) |
| iPod nano (4th generation), iPod nano (3rd generation) |
| iPhone 4S, iPhone 4, iPhone 3GS, iPhone 3G, iPhone |
© Gracenote, Inc. 2009

Made for
iPod
iPhone
Powerline: Powerline has reference to a particular type of connection in the red zone, which is a special type of cable that connects the two areas.
| (solo reproducción de audio) |
| iPod touch (4th generation), iPod touch (3rd generation) |
| iPod touch (2nd generation), iPod touch (1st generation) |
| iPod classic |
| iPod nano (6th generation), iPod nano (5th generation) |
| iPod nano (4th generation), iPod nano (3rd generation) |
| iPhone 4S, iPhone 4, iPhone 3GS, iPhone 3G, iPhone |
Aviso legal
© Gracenote, Inc. 2009

Made for
iPod
iPhone
Herhalen van titels, tracks of mappen
| (enkel audioweergave) |
| iPod touch (4th generation), iPod touch (3rd generation) |
| iPod touch (2nd generation), iPod touch (1st generation) |
| iPod classic |
| iPod nano (6th generation), iPod nano (5th generation) |
| iPod nano (4th generation), iPod nano (3rd generation) |
| iPhone 4S, iPhone 4, iPhone 3GS, iPhone 3G, iPhone |
Colofon
© Gracenote, Inc. 2009
Made for
iPod
iPhone
Audio Products Group Pty Ltd
67 O'Riordan St
Alexandria NSW 2015, Australia
Tel +61 - 1300 130 492
Fax +61 -0295780140
E-mail: help@audioproducts.com.au
B NL L
Loewe Opta Benelux NV/SA
Uilenbaan 84
2160 Wommelgem, Belgie
Tel +32 - 3 - 2 70 99 30
Fax +32 - 3 - 2710108
E-mail: ccc@loewe.be
BG Darlington Service
193 Kn. Klementina St.
1612 Sofia, Bulgaria
Tel +359 - 2 9556399
E-mail: darlington@psp-bg.com
CH Telion AG
Rutistasse 26
CY Hadjikryiakos & Sons Ltd
121 Prodromos Str., P.O Box 21587
1511 Nicosia, Cyprus
Tel +357 - 22 87 21 11
Fax +357 -22663391
E-mail: savvas@hadjikyriakos.com.cy
Cz BaSys CS s.r.o.
Sodomkova 1478/8
10200 Praha 10 - Hostivar,
Ceská republika
Tel +420 234 706 700
Fax+420234706701
Customer Care Center
Industriestraße 11
1st Floor, 237A Kensington High St
London
W8 6SA, UK
Tel +44 - (0) 207 368 1100
Fax +44 -02073681101
E-mail: enquiries@loewe-uk.com
King's Tower 28/F, 111 King Lam Street
Kowloon, Hong Kong
Tel +852 - 27 77 89 88
Fax +852-23 10 08 08
E-mail: service@loewe.cn.com
HR Plug8Play Ltd.
Bednjanska 8, 10000 Zagreb
Hrvatska (Kroatia)
Tel +385 14929683
Fax +38514929682
E-mail: info@loewe.hr
Loewe Italiana S.r.L.
Via Monte Baldo, 14/P - 14/N
Clear electronic entertainment Ltd
13 Noah Mozes St
Agish Ravad Building
Tel Aviv 67442, Israel
Tel +972-3-6091100
Fax +972 - 3 - 6092200
E-mail: info@loewe.co.il
IND Navshiv Retail Pvt. Ltd.
Block D, Plot No. 7 Shanti Kunj
Vasant Kunj
New Delhi - 110070, India
Tel +91 11 47 65 55 00
Fax +91 11 47 67 67 15
E-Mail: admin@navshiv.com
IR MiMoRa HOLDING CO.
N0 1001, Afra Tower
Parsa St. Fereshteh
Tehran, Iran
Tel + 98 921 344 0521
E-Mail: s.zarandooz@gmail.com
KSA Salem Agencies & Services Co.
Hamad Al Haqueel Street, Rawdah, Jeddah
21413
Kingdom of Saudi Arabia
Tel +966 (2) 665 4616
Fax+966(2)6607864
E-mail: hkurkjian@aoi.com
LVEST
Kpartners SIA
A.Caka iela 80
Rtga, LV-1011, Latvia
Tel +3 71 - 67 29 29 59
Fax +3 71-67 31 05 68
E-mail: olga@dom332.lv
LT A Cappella Ltd.
Ausros Vartu 5, Pasazo skq.
01129 Vilnius, Lithuan
Tel +370-52 12 22 96
Fax +370 -52626681
Hamrun, HMR1514, Malta
Tel +356 - 21 - 22 53 81
Fax +356-21-23 07 35
E-mail: service@doneo.com.mt
MA Somara S.A.
377, Rue Mustapha El Maani
20000 Casablanca, Morocco
Tel +212 - 22 22 03 08
Fax +212-22 26 00 06
E-mail: somara@somara.ma
N Premium Consumer Electronics as
Østre Kullerød 5
Alexandria NSW 2015, Australia
Tel 0800 174 781
Fax +61-02 9578 0140
E-mail: help@audioproducts.com.au
P
Aptekarsky per 4 podied 5A
105005 Moscow, Russia
Te +7-499 940 42 32 (ext. 454)
Fax+7-4957307801
E-mail: service@loewe-cis.ru
S Kjaerulff 1 AB
Ridbanegatan 4,Box 9076
P.O. Box 32836, Sheikh Zaved Road
Dubai, UAE
Tel +971-4343 1441
Fax +971-43437748
E-mail: service@dubaiaudio.com
To3n ypeI OTROBAPRA Ha OCHOBHnTE n3NCKBaHnRA pa3wnpeHnTe CbOTBeTHn PpeINOCtABKn DnpeKTHBa 1999/5/EC. Pa3peSeHo e n3NOJ3BAHETo My BvB BCNUKN dPjKaBN OT EC, IN OCBeH ToBA B NcJAnDnA, HopBern I ShBeuapn. BvB Phanucn I n TtaJIra n3NoJ3BaHETo My e pa3peSeHO cAmO B 3aTBopeHn NOMeHn .
Toto zařízení je v souladu se základními požadavyk a ostatnímì odpovídajícími ustanoveními Směrnice 1999/5/EG. Múže být používan ve všech zemích EU dodatečné také na Islandu, v Norsku a ve Švýcarsku. Ve Franci a v Italiji je použítí prístroje dovolené jenom v interiéru.
Dieses Gerat entspricht den grundlegenden Anforderungen und den weiteren entsprechenden Vorgaben der Richtlinie 1999/5/EG. Es darf in allen Ländern der EU sowie zusätzlich in Island, Norwegen und der Schweiz betrieben werden. In Frankreich und Italien ist die Nutzung nur in Innenaufen zulässig. Die vollständige Konformitätserklärung finden Sie in der ausfuhrlichen Bedienungsanleitung, die Sie auf unserer Homepage herunterlagen können.
Dette udstyr er i overensstemmelse med de vaesentlige krav og andre relevante bestemmelser i Direktiv 1999/5/EF. Det mä kun anwendes i EU-landene somt i Island, Norge og Schweiz. I Frankrig og Italien er det kun tilladt at anvende det indendørs. Den fuldstændige onformitetserklæring er omfattet i den udforlige betjeningsvejledning, som kan downloads fra vores hjemmeside.
Este equipo cumple con los requisitos esenciales asi como con otheras dispositions de la Directiva 1999/5/CE. Puede operar en todos los paises de la UE y adiconalmente en Islandia, Noruega y Suiza. En Francia e Italia, su uso está permitted uicamente en espacios interiores. Encontrar a la declaracion de conformidad completa en las instruiones de manejo detalladas que podra descargar de nuestra pagina web.
Tämä laite tayttä direktiivin 1999/5/EYolennaiset vaatimukset ja on siinä asetettujen muiden laitetta koskevien märäysten mukainen. Laitetta saa kayttä kaikissa EU-maisa sekä Islannissa, Norjassa ja Sveitsissä. Ranskassa ja Italiassa laitetta saa kayttä vain sisātiloissa. Täydellisen vaatimustemmukaisuusvakuutuksen lóydät yksityiskohtaisesta kayttöohjeesta, Jonka voit ladata verkkosivuiltamme.
Cet apparéil est conforme aux exigences essentielles et aux autres dispositions pertinentes de la Directive 1999/5/EC. L'utilisation est possible dans tous les pays de l'UE, en Îlande, en Norvège et en Suisse. En France et en Italie l'utilisation est autorisé uniquement dans des espaces fermés. Vous trouvez la déclaration de conformité complète dans le mode d'emploi complet que vous pouvez télécharger sur notre page d'accueil.
This equipment is in compliance with the essential requirements and other relevant provisions of Directive 1999/5/EC. It may be operated in all countries in the EU and also in Iceland, Norway and Switzerland. In France and Italy it may only be used indoors. The complete declaration of conformity is included in the detailed operating manual, which you can download from our homepage.
Autos o eonaiouc evai oe uupopwn me tic ouoiwdeic attaithoeic kai aalecs oxetikcs diataeic ts Odbyias 1999/5/ EC. EITIPTETAI n aeitoupyia tns oleas tic xwpe ts EE, kaowkai otny Iolavbia, otnv Nopbnyia kai otnv Elambda. TnV rAIA kai otnv lAIA eTTIPTETAI n xpno movo oe wotepikoC xwpouc.
Questo apparato é conforme ai requisiti essenziali ed gli altri principi sanciti alla Direttiva 1999/5/CE. Può essere messo in funzione in tutti i paesi dell'UE e inoltre in Islanda, Norvegia e in Svizzera. In Francia e in Italia è consentito l'uso solo in ambienti chiusi. La versione integrale della dichiarazione di conformità è disponibile nel manuale d'istruzioni completo scarabile alla notre homepage.
Dette utstyret er i samsvar med de grunnleggende krav og andre relevante bestemmelsei EU-direktiv 1999/5/EF. Det kan brukes i alle EU-land og dessuten i Island, Norge og Sveits. I Frankrike og Italia er kun innendors bruk tillatt.
Dit apparaat voldoet aan de essentiele eisen en andere van toepassing zijnde bepalingen van de Richtlijn 1999/5/EG. Het gebruik is toegestaan in alle landen van de EU en ook in IJsland, Noorwegen en Zweden. In Frankrijk en Italiie is het gebruik slechts binnenshu is toegestaan. De volledige onformiteitsverklaring vindt u in de uitvoerige handleiding, die u van onsze homepage kunt downloaden.
Denna utrustning ar i overensstammelse med de vaesentiga kraven och andra relevanta bestammelser i Direktiv 1999/5/EC.Apparaten fär anvandas i alla lander inom EU liksom palsland, i Norge och i Schweiz. I Frankrike och Italien fär apparaten anvandas endast inomhus . Den fullstandiga konformitetsförklaringen hittar du i den utforlga bruksanvisingen, som du finner pa var hemsida for nerladddning.