MERIDA - Wood stove HASE - Free user manual and instructions
Find the device manual for free MERIDA HASE in PDF.

| Product Type | Wood Stove |
| Brand | HASE |
| Model | MERIDA |
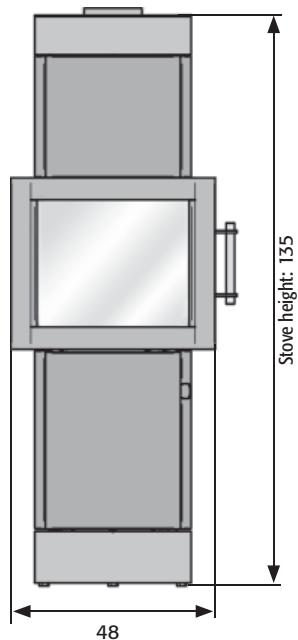
| Dimensions (H x W x D) | 135 x 48 x 41 cm |
| Weight | 144 kg |
| Nominal Heat Output | 4 kW (wood or briquettes) |
| Energy Efficiency | 80% (wood), 79% (briquettes) |
| Permitted Fuels | Wood logs (max 25 cm) and lignite briquettes |
| Maximum Fuel Charge | 1.7 kg |
| Firebox Area | 888 cm² |
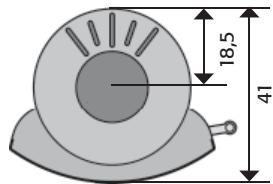
| Flue Pipe Diameter | 15 cm |
| Separate Air Supply (optional) | Diameter 10 cm, for low-energy houses |
| Rotating Base | Rotation 180°, locking at 15° intervals |
| Flue Connection | Top or rear (if rear, rotation not possible) |
| Safety Distances | 80 cm front, 25 cm sides (radiation zone); 10 cm elsewhere |
| Required Floor Plate | If combustible floor: non-combustible material, extending 50 cm front and 29 cm sides |
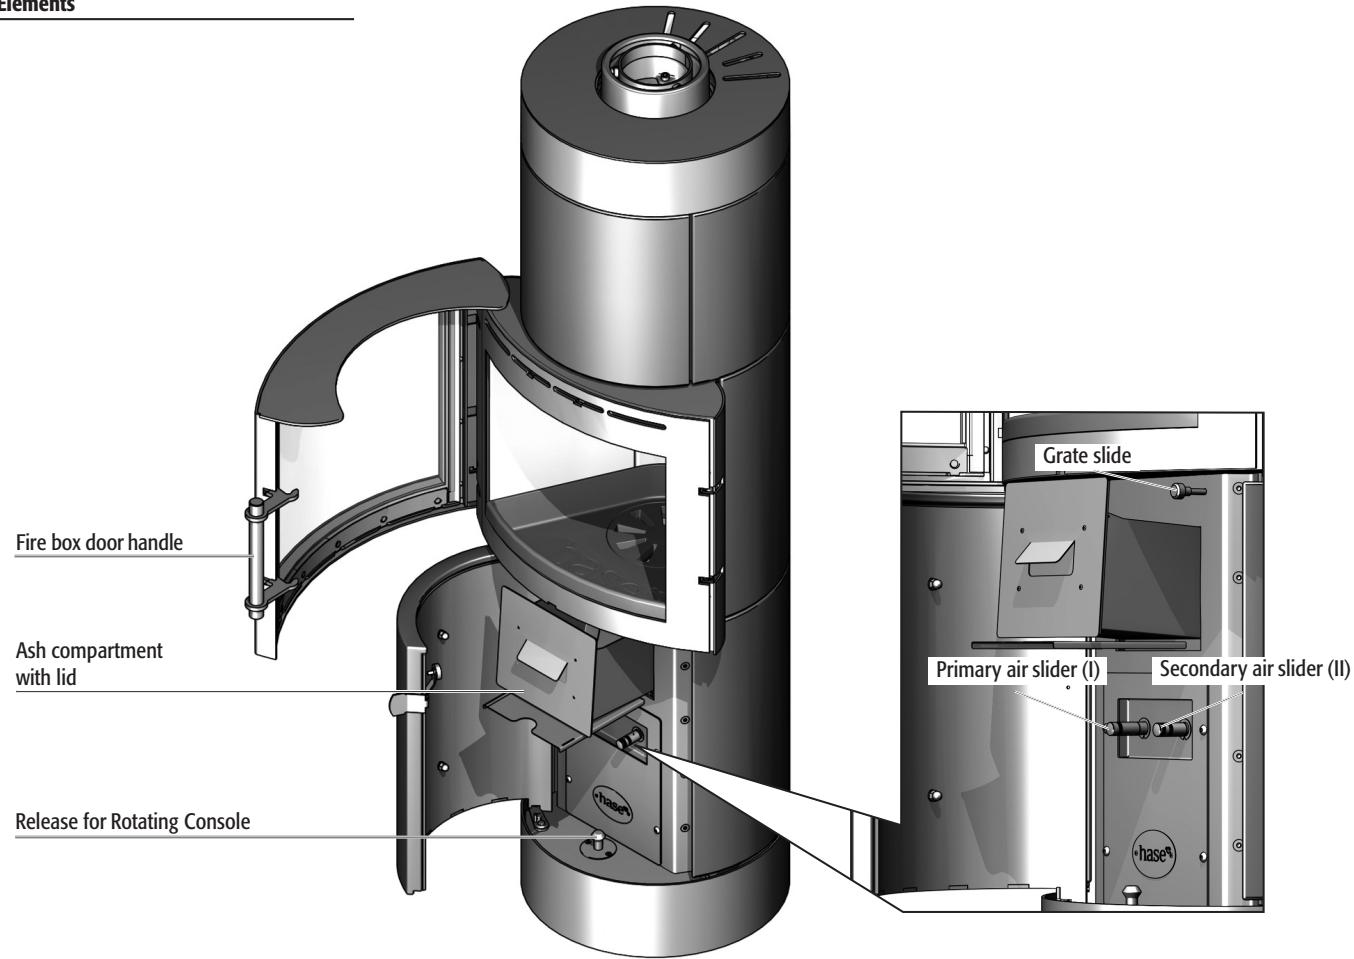
| Adjustable Firebox Grate | Yes, by pull rod |
| Air Controls | Primary (I) and secondary (II) by sliders |
| Ash Pan Maintenance | Empty after cooling, use lid to avoid dust |
| Safety | Do not rotate stove while lit; do not use flammable liquids; ventilate during first use |
| Certifications | DIN-EN 13240:2001+A2:2004, Art. 15a B-VG (Austria) |
Frequently Asked Questions - MERIDA HASE
User questions about MERIDA HASE
0 question about this device. Answer the ones you know or ask your own.
Ask a new question about this device
Download the instructions for your Wood stove in PDF format for free! Find your manual MERIDA - HASE and take your electronic device back in hand. On this page are published all the documents necessary for the use of your device. MERIDA by HASE.
USER MANUAL MERIDA HASE
natural_image
Green industrial stove burner with visible flame inside, mounted on a black chimney (no text or symbols)Merida
Bedienungsanleitung / Mode d'emploi / Istruzioni operative Instructions for use / Bedieningshandleiding
1
Instructions for use P. 32 - 39
Bedieningshandleiding P. 40 - 47
natural_image
Diagram showing a fan with raindrops and a cross-shaped object, labeled Abb. 5 (no text or symbols on the diagram itself)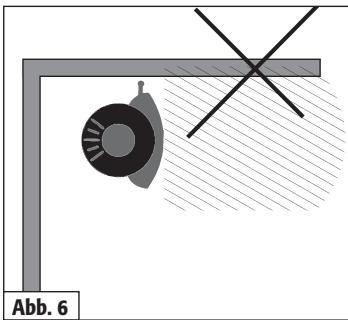
natural_image
Diagram showing a mechanical component with crosshair and hatched background, labeled Abb. 6 (no text or symbols on the diagram itself)Chère cliente, Cher client,
natural_image
Diagram showing a shield and a cross-shaped object with diagonal lines, labeled 'fig. 5' (no text or symbols on the shapes themselves)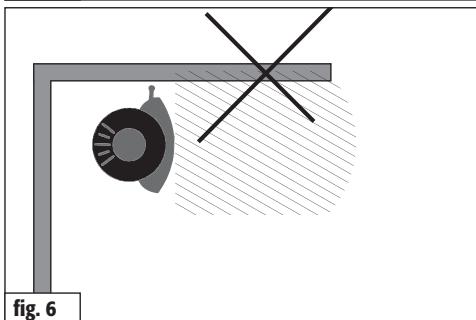
natural_image
Diagram showing a mechanical component with crosshair and hatched background, labeled 'fig. 6' (no text or symbols on the diagram itself)natural_image
Diagram showing a mechanical component with crosshair and hatched background, labeled 'fig. 6' (no text or symbols on the diagram itself)These operating instructions provide important information about the safe operation and handling of your Merida stove. Please read carefully through these operating instructions before using the stove for the first time.
In addition, your Merida stove comes with general operating instructions (part 2) containing further instructions and helpful tips on how to use Hase stoves.
Enjoy your Merida stove!
- General Information 32
1.1. Definition of Safety Notes......32 - Control Elements....33
- Safety Distances....34
- Fuel Load Sizes and Thermal Output 34
- Operating the Revolving Console 35
- Initial Operation 35
- Lighting the Fire 36
- Adding Fuel / Heating at Nominal Thermal Output .36
- Heating with Brown Coal Briquettes....37
- Banking the Fire and Raising the Temperature .....37
- Emptying the Ash Drawer....37
- Technical Data 38
- CE Declaration of Conformity....39
Page
1. General Information
This section contains important information on using this technical documentation. Utmost care was taken in preparing this document. Nevertheless, suggestions for improvement and comments regarding any errors are always welcome.
1.1 Definition of Safety Notes

WARNING!
This symbol alerts you to a potentially hazardous situation. Non-compliance with this warning can cause severe injuries, or even death.

CAUTION!
This symbol alerts you to a potentially hazardous situation. Non-compliance can cause damage to property or injuries to persons.

NOTE!
Provides additional tips about using the stove as well as useful information.

ENVIRONMENT!
Sections marked with this symbol provide information about safe and environmentally-friendly operation as well as environmental laws and regulations.
2. Control Elements
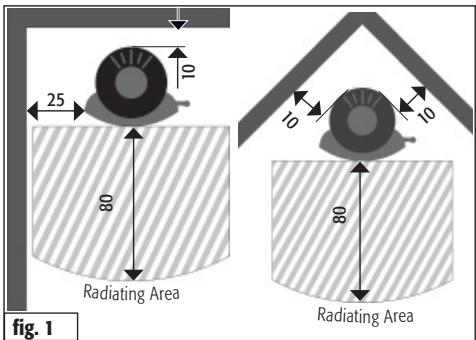
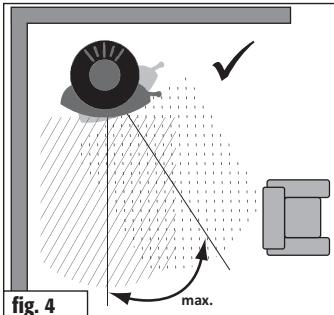
3. Safety Distances
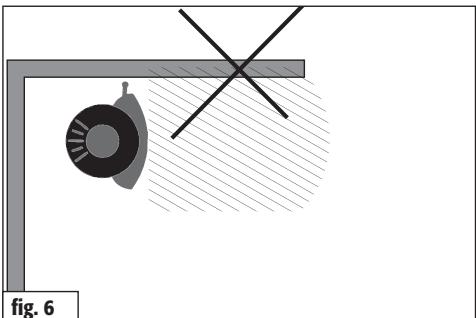
Within a radius of 80 cm in front of and 25 cm around the stove, flammable, combustible, or heat-sensitive materials (e.g. furniture, wood or plastic panelling, curtains, etc.) are not allowed to be located in the heat radiating area of the fire box window (Fig. 1).
With regard to flammable materials beyond the heat radiating area, a safety distance of 10 cm at the sides of the stove and 10 cm behind the stove has to be adhered to (Fig. 1).

WARNING!
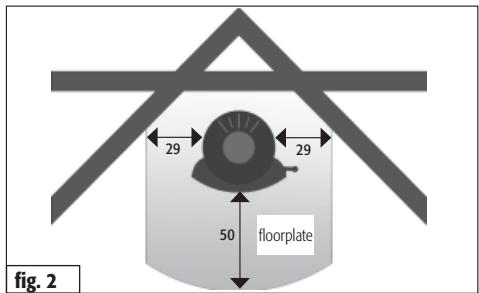
Flammable flooring materials (e.g., wood, laminate, carpeting,) must be protected with a floorplate made of non-combustible material (e.g., tiles, safety glass, slate, or sheet steel).
The size of the floorplate must be larger than the base of the stove by at least 50 cm in front and at least 29 cm at the sides of the stove (Fig. 2).

WARNING!
Never turn stove when lighting fire!
Dimensions in cm
Dimensions in cm
4. Fuel Load Sizes and Thermal Output
The thermal output depends on the amount of fuel you put in the stove. When adding more fuel, please do not exceed the maximum fuel load size of 1,7 kg. Exceeding the maximum fuel load size leads to a danger of overheating, which can result in damage to the stove and the risk of a stove fire.

NOTE!
To attain a thermal output of approx. 4 kW, burn wood logs that weigh 0.8 kg and are no longer than 25 cm in length for about 40 min. (with brown coal briquettes 2 briquettes with a total of approx. 1 kg at approx. 60 min)

NOTE!
To attain a thermal output of approx. 2 kW, burn wood logs that weigh 0.4 kg and are no longer than 25 cm in length for about 35 min. (with brown coal briquettes 1 briquette with a total of approx. 0.5 kg at approx. 55 min).
The Merida is intended for intermittent operation, please only apply one fuel layer at a time.
In Austria and Switzerland the Merida is only authorised to burn firewood.
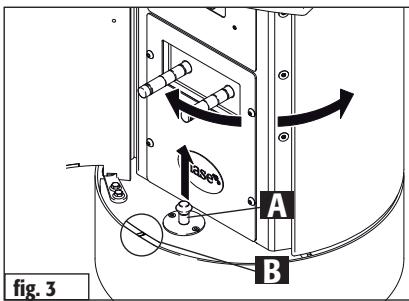
5. Operating the Revolving Console
The Merida features a revolving console as a standard feature. To turn the Merida to the desired position, pull the lever (A) to disengage the locking mechanism. The marking (B) indicates the middle position for the installation.
The Merida has a maximum rotational angle of 180 degrees; you can adjust the rotational angle in 15-degree increments.

WARNING!
Always comply with the safety distances to combustible and flammable materials!

NOTE!
The revolving function does not work for stoves with rear-mounted flue pipes
If a floor plate is required, its size must match the rotating range of the stove. Never turn stove when lighting fire!

natural_image
Diagram showing a lamp and a box with diagonal lines, no text or symbols present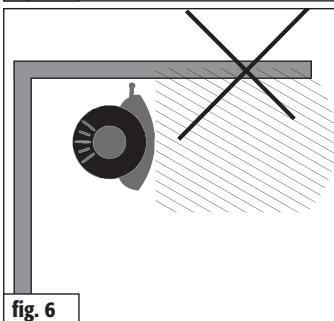
natural_image
Diagram showing a mechanical component with crosshair and hatched background, labeled 'fig. 6' (no text or symbols on diagram itself)6. Initial Operation

NOTE!
During shipment, condensation moisture can accumulate in the stove's interior, which may possibly lead to the appearance of condensation or water on the stove or flue pipes. Please dry off these damp areas imme diately.
The surface of your stove was treated in a sandblasting machine before applying the colour coating. Despite careful and thorough inspection, there may still be some residual material in the stove body, which can fall out when your stove is being installed.

NOTE!
To prevent any damage, please immediately vacuum up these small steel pellets with a vacuum cleaner.
The first time a stove is operated, the heat development causes the emission of volatile components from the coating, sealing strips and lubricants, and smoke and odours can occur.
At a higher combustion temperature, this one-time process can take between 4 to 5 hours.
To achieve this higher combustion temperature, please increase the fuel quantity recommended in Section 8, „Adding Fuel/ Heating with Nominal Thermal Output“, by approximately 25%.

CAUTION!
To prevent adverse effects on health, nobody should stay in the room(s) during this process unless absolutely necessary. Make sure the room is well-ventilated and open the windows and outside doors. If needed, use a fan for faster air circulation.
If the maximum temperature is not reached during the first heating operation, you may notice an odour for a short period of time the next time the stove is used as well.
7. Lighting the Fire
The firing up phase should be as short as possible, since higher emissions can occur during this phase.
The slider settings described in Table 1 (see figure on the right) are recommendations that were determined under conformance testing conditions, in compliance with the relevant standard. Depending on the weather conditions and the draught capability of your chimney, accordingly adjust the slider positions for your Merida to the local conditions.

NOTE!
The Merida may only be operated when the fire box door is closed; the fire box door may only be opened to add fuel.

WARNING!
Never use spirits, petrol, or other flammable fluids to light the stove.
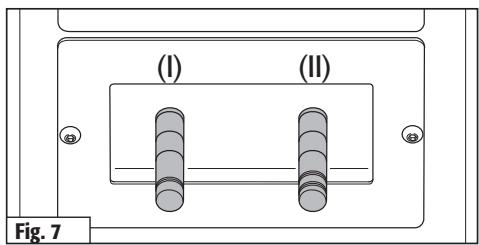
Lighting the Fire
| Procedure | Position of Control Elements |
| Completely open primary and secondary air. | Pull primary and secondary air slider all the way out. (fig. 7) |
| Open fire grate. | Pull out fire grate slider. |
| Pile up any remaining ash and unburned Charcoal into the centre of the combustion chamber. | |
| Place 2-3 small logs into the middle of the fire box; stack approx. 0.5 kg of dry wood chips on top. | Open fire box door. |
| Light the ignition material at several places. | Close fire box door. |
Tab. 1
8. Adding Fuel / Heating at Nominal Thermal Output
More fuel should be added to the fire when the flames from the previous burning off phase have just gone out.
Adding Fuel / Heating at Nominal Output
| Procedure | Position of Control Elements |
| Adjust primary and secondary air. | Close primary air slider (I), set secondary air slider (II) to position 3. (fig. 8) |
| Close fire grate. | Push in fire grate slider. |
| Add two logs weighing approx. 0,8 kg in total. Place logs with one end to the front of fire box. Only add a single layer of fuel. | Open fire box door. |
| Close fire box door. |
Tab. 2

9. Heating with Brown Coal Briquettes
Wood should be used for the warming-up phase and when adding fuel for the first time, see "Warming-up Phase". As soon as a basic glowing firebed is reached, place 2-3 brown coal briquettes on the grate in the middle of the firebox, keeping a finger's width between the briquettes, and use the following procedure and settings:
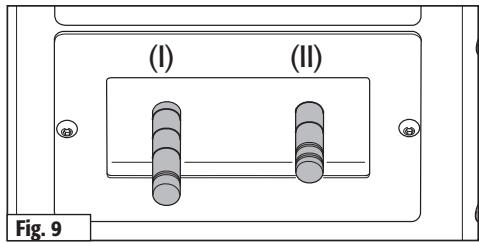
Heating with Brown Coal Briquettes
| Procedure | Position of Control Elements |
| Open primary air completely. | Pull primary air slider (I) all the way out (fig. 9) |
| Adjust secondary air. | Set secondary air slider (II) to position 2. (fig. 9) |
| Open fire grate. | Pull out fire grate slider. |
Tab. 3
10. Banking the Fire and Raising the Temperature
Keep the stove set as described above until the brown coal briquettes are thoroughly burnt. Then close the primary air (I) and the fire grate. Slide the secondary air slider (II) to position 2/3.

NOTE!
While the stove is in operation, the secondary air slider should never be completely closed.
To raise the temperature of the fire, stir up the rest of the glowing embers with the fire grate slider. Open the primary air (I) and add new logs to the fire.
11. Emptying the Ash Drawer
As a safety precaution, please make sure to wait until the ashes are cold before you dispose of them. While the ash collects during the fire, the lid is located under the ash drawer.
Remove both the ash drawer and the lid located underneath it. Slide the lid onto the ash drawer so that it is closed; this prevents ashes from flying around, which in turn means your home stays clean. To place the ash drawer back into the stove, proceed in the reverse order.

CAUTION!
Piled up ashes can impair or even block the supply of primary air supply to the stove. Please ensure that the air supply path for the primary air between the ash drawer and the bottom of the ash compartment remains clear.
12. Technical Data
The Merida, certified in compliance with DIN-EN 13240 : 2001 + A2 2004 and Art. 15 a B-VG (Austria), can only be operated when the fire box is closed; more than one device can be connected to the chimney.
VKF-No.: 21010; Inspection Report No. (A): FSPS-Wa 1962-A
The following data applies to the chimney characteristics in accordance with EN 13384-1 / 2:
| Combustion Values | Wood | Briquettes | |
| Nominal Thermal Output | 4 | 4 | kW |
| Waste Gas Mass Flow Rate | 4 | 4 | g/s |
| Waste Gas Outlet Temp. | 280 | 280 | °C |
| Min. Supply Pressure at Nominal Thermal Output | 12 | 12 | Pa |
| CO content at 13% O2 | 1059 | 1113 | mg/m ^3 |
| Efficiency | 80 | 79 | % |
| Particulate | 23 | 50 | mg/m ^3 |
Depending on the insulation of the building, the nominal thermal output of 4 kW indicated on 10 - 50 m² (subject to change)
| Dimensions: | Height | Width | Depth |
| Stove | 135 cm | 48 cm | 41 cm |
| Fire box | 34 cm | 22 cm | 27 cm |
| Weight: | 144 kg |
| Fire Box Opening: | 88 cm2 |
| Flue pipe diameter: | 15 cm |
| Pipe diameter of Hase ventilation system* | 10 cm |
* For separate air supply in low-energy houses and insufficient combustion air supply in the room where the stove is installed
Front view
Top view
Side view
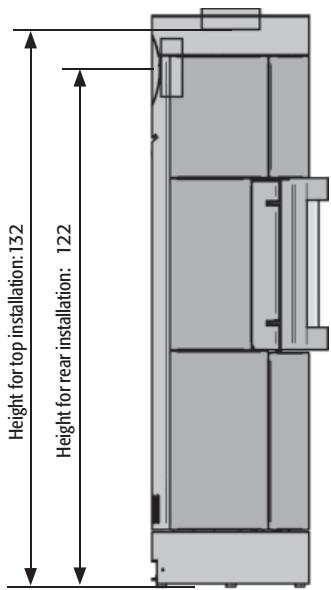
Dimensions in cm
13. CE Declaration of Conformity
The original Declaration of Conformity and associated documents are available from the manufacturer upon request.
Hereby declares that the room heating appliance for use
with solid fuels, bearing the trade name:
Merida
complies with the stipulations and provisions of the:
CE Construction Products Directive 89/106/EEC and the M129 Mandate
and is in compliance with the following harmonised standard:
EN 13240:2001+EN 13240:2001/ A2: 2004
The notified testing institute listed below has performed the inspection and testing of the room heating appliance for use with solid fuels in regards to conformity with the requirements specified by the standard:
RWE Power AG
Trier, Germany, dated 19.01.2011
Fernando Najera, Executive Manager
Please observe the safety notes and precautions contained in the installation and operating instructions that are shipped with the product.
Beste klant,
natural_image
Diagram showing a shield with a cross symbol and a box under rain, labeled 'fig. 5' (no text or symbols on diagram itself)