
PDVBT 101 - TV CALIBER - Free user manual and instructions
Find the device manual for free PDVBT 101 CALIBER in PDF.
| Product type | Digital TV DVB-T/T2 |
| Brand | CALIBER |
| Model | PDVBT 101 |
| Power supply | 9 V DC / 1.5 A (power adapter included) |
| Power consumption | ≤ 10 W |
| Receiver | DVB-T/T2, VHF bands 170–230 MHz, UHF 470–860 MHz |
| Supported video formats | MPEG-2, MPEG-4 AVC/H.264, HEVC/H.265 |
| Display resolutions | 480i, 480p, 576i, 576p, 720p, 1080i, 1080p |
| Supported audio formats | MPEG-1 Layer 1, 2, 3 |
| Video outputs | HDMI, CVBS (AV OUT) |
| Other connectors | USB, 3.5 mm headphone jack, coaxial (S/PDIF), antenna input (ANT.) |
| Main functions | EPG (Program Guide), PVR (USB recording), Teletext, subtitles, programmable standby (3h/4h), parental control, LCN adjustment, software update via USB |
| OSD languages | Multilingual (French, English, German, etc.) |
| Dimensions (approx.) | 25 × 40 × 8 cm (not provided, estimate) |
| Weight (approx.) | 2.5 kg (not provided, estimate) |
Frequently Asked Questions - PDVBT 101 CALIBER
User questions about PDVBT 101 CALIBER
0 question about this device. Answer the ones you know or ask your own.
Ask a new question about this device
Download the instructions for your TV in PDF format for free! Find your manual PDVBT 101 - CALIBER and take your electronic device back in hand. On this page are published all the documents necessary for the use of your device. PDVBT 101 by CALIBER.
USER MANUAL PDVBT 101 CALIBER
Technical Specifications
| Item | Sub Item | Parameter |
| Tuner | Input Frequency | 170~230MHz 470~860MHz |
| RF Input level | -25~-80dBm (64QAM) -10~-75dBm (256QAM) | |
| IF Bandwidth | 7MHz and 8MHz | |
| Modulation | QPSK,16QAM,64QAM,256QAM | |
| Video | Decoder Format | MPEG4 AVC/H.264 HP@L4 HEVC/H.265 HT@L4 MPEG2 MP@ML.HL |
| Output Port | CVBS,HDMI | |
| Audio | Decoder Format | MPEG-1 (layer1&2&3) |
| Audio output | Stereo | |
| Power | Voltage | DC 9V (1.5 A) |
| Working Power | ≤10W |
Headrest Bracket (sold separately)
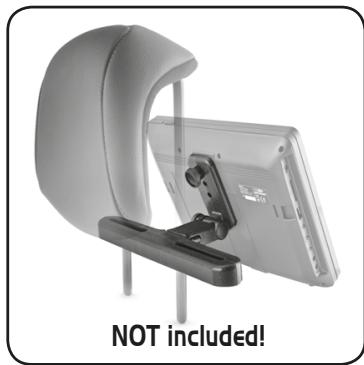
Product code: "DVD-Bracket"
EAN: 87.14505.04516.0
Safety Precautions
WARNING
RISK OF ELECTRIC SHOCK
DO NOT OPEN
Warning: when the unit is used by a child, the parents must make sure to let the child understand all contents in Instruction book how to use the battery to guarantee useage of battery correctly all the time.
Warning: when find battery overheat, swell or dour, please stop using the battery and contact service centre for getting replacement.
Warning: do not charge the battery on the place of insufficient ventilation such as: mattress, sofa, cushion, soft mat....
Warning: we will not take any responsibility if user incorrectly uses the battery, not following our warning instruction label on the battery case.
Identification of Controls

Main Unit


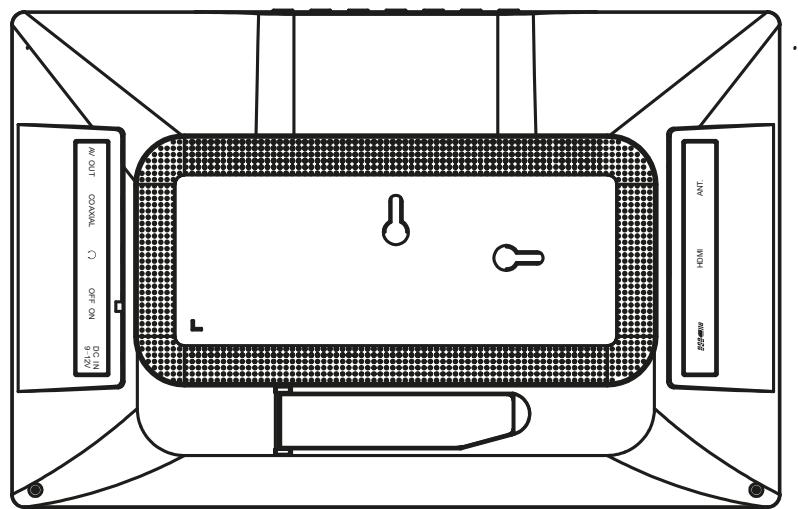
- SETUP
- ENTER
- EXIT
- UP
- DOWN
- LEFT/VOL-
- RIGHT/VOL+
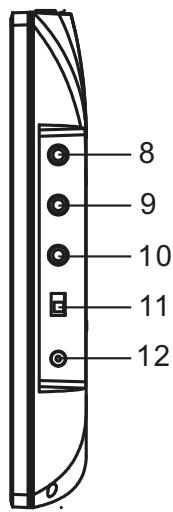
- AV OUT Video output
- COAXIAL
- Earphone Socket
- ON/OFF
- DC IN 9-12V
- ANT. Connect the Antenna for reception
- HDMI HDMI output
- USB slot Play media from USB
Identification of Controls
Remote control unit
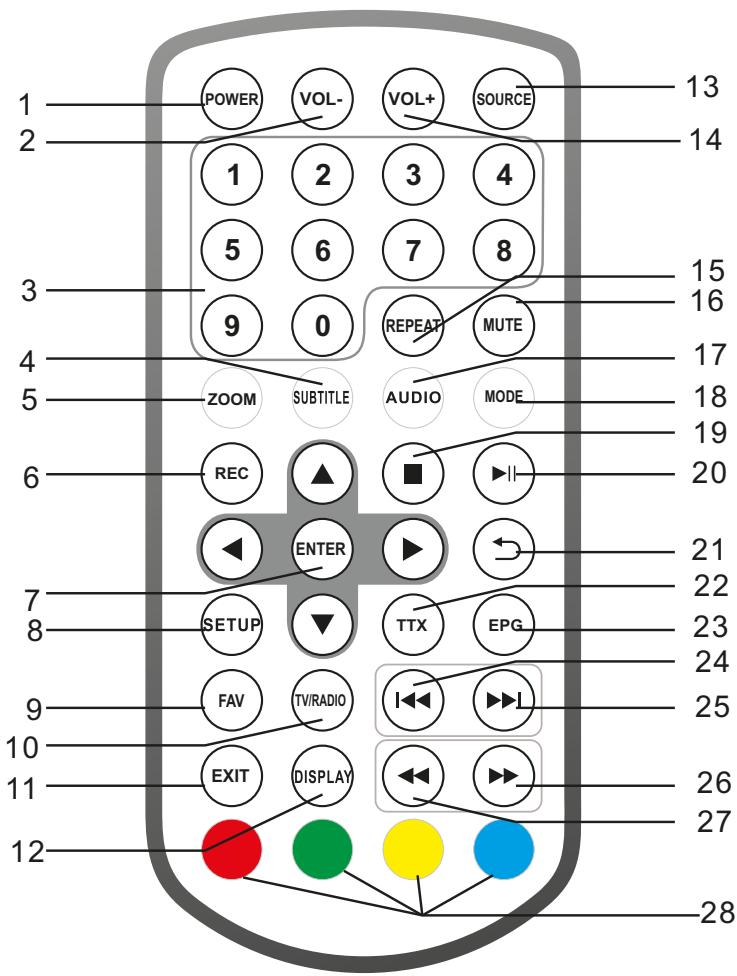
- POWER
On/off the power supply
- VOL +
Adjust VOLUME.
- VOL-
Adjust VOLUME.
- REPEAT
Repeat Play mp3 and video
- 0-9 NUMBER BUTTON
Selects numbered items in a menu.
- MUTE
Mute the sound
- SUBTITLE
Press SUBTITLE repeatedly during playback to view a different subtitle languages, if available.
- AUDIO
Press AUDIO repeatedly during playback to hear a different audio language or audio track, if available.
- ZOOM
JPEG: Use ZOOM to enlarge or shrink the picture.
- MODE
Mode menu setting
Each press of the ZOOM button changes the TV screen
-
STOP
-
REC
Record digital service.
-
PLAY/PAUSE
-
RETURN
-
ENTER
Confirm and Enter
- TTX
teletext
- SETUP
Main Menu/Return
- EPG
Show EPG information
- FAV
Open favorite programs list menu
- BUTTON
Previous option.
- TV/RADIO
Switch between TV and radio
- BUTTON
Next option.
-
EXIT
-
DISPLAY
Display the information of the current signal
- BUTTON
Fast forward
- BUTTON
Fast backward
- SOURCE
USB/TV
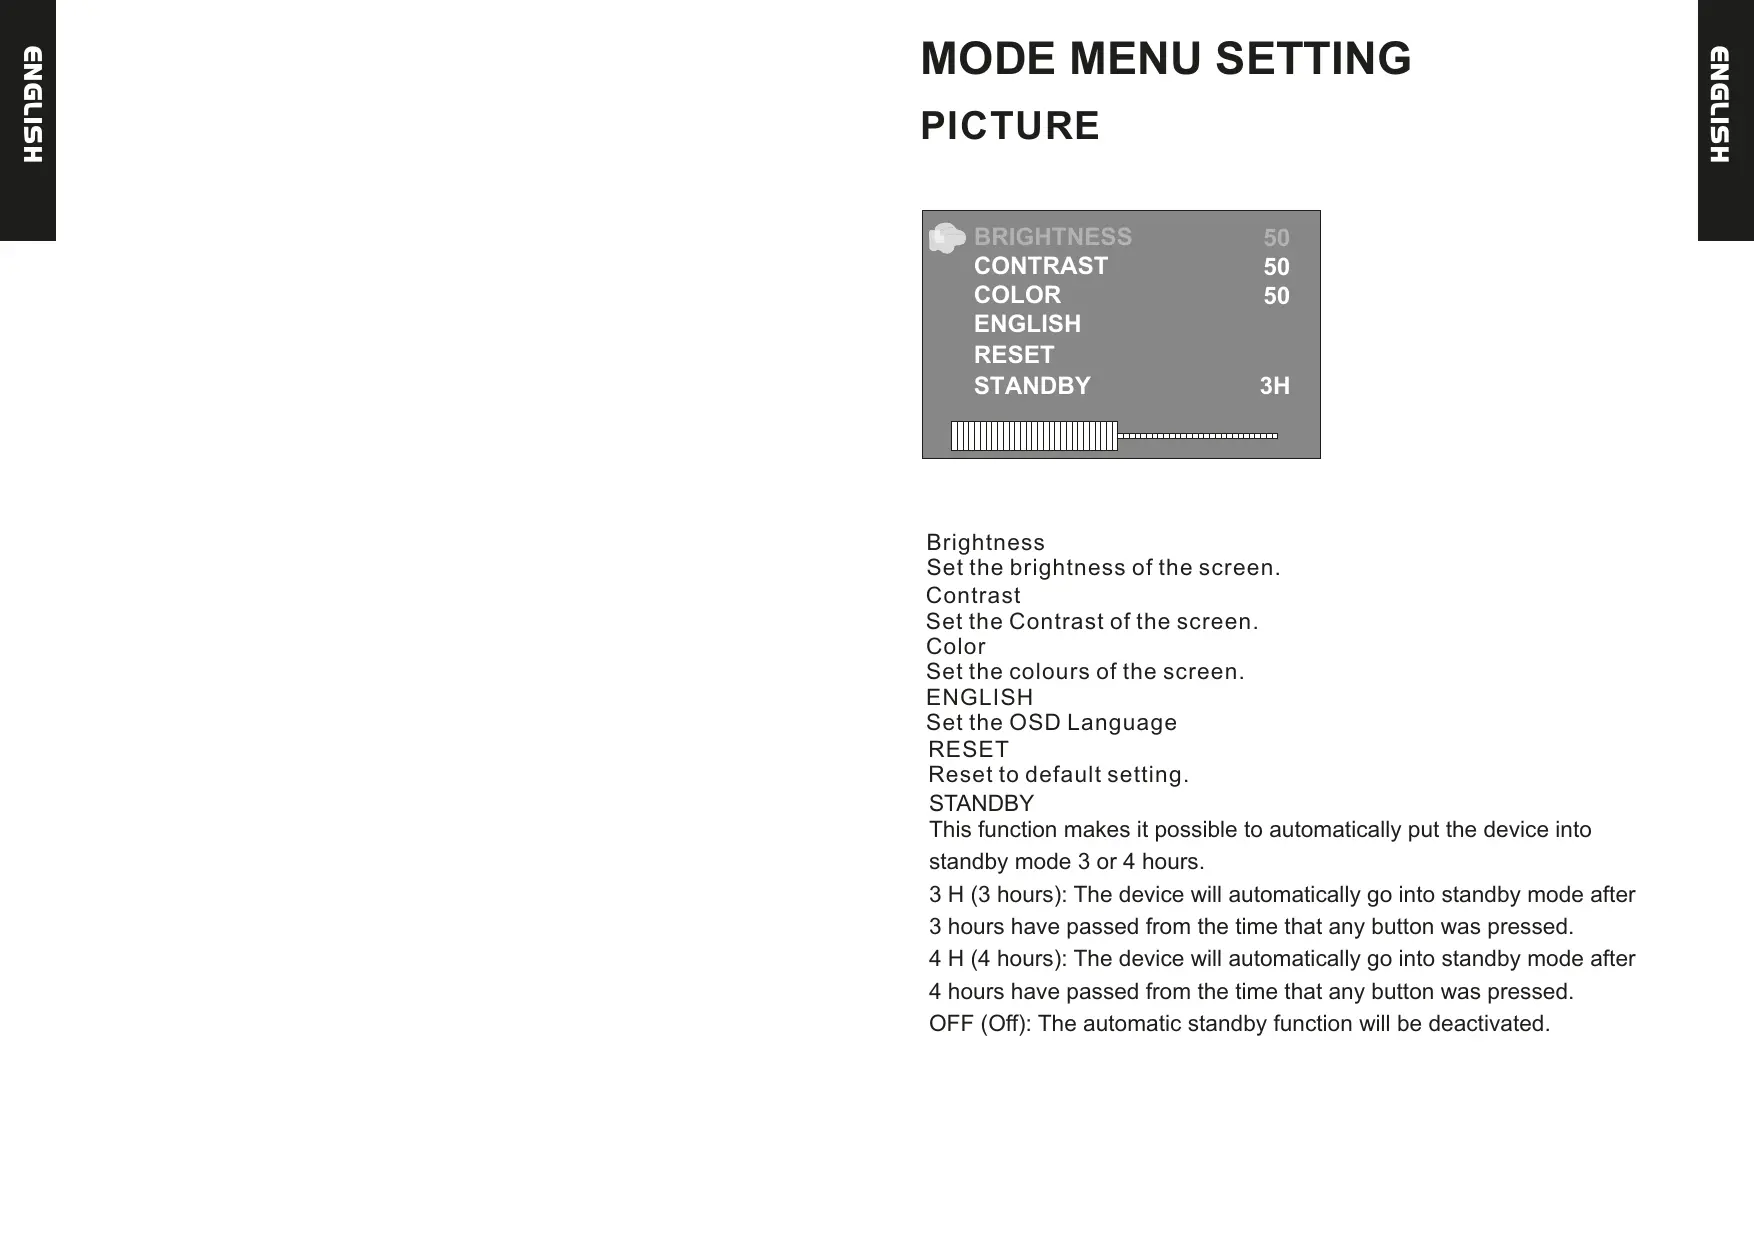
Set the brightness of the screen.
Contrast
Set the Contrast of the screen.
Color
Set the colours of the screen.
ENGLISH
Set the OSD Language
RESET
Reset to default setting.
STANDBY
This function makes it possible to automatically put the device into standby mode 3 or 4 hours.
3 H (3 hours): The device will automatically go into standby mode after
3 hours have passed from the time that any button was pressed.
4 H (4 hours): The device will automatically go into standby mode after
4 hours have passed from the time that any button was pressed.
OFF (Off): The automatic standby function will be deactivated.
First Time Installation
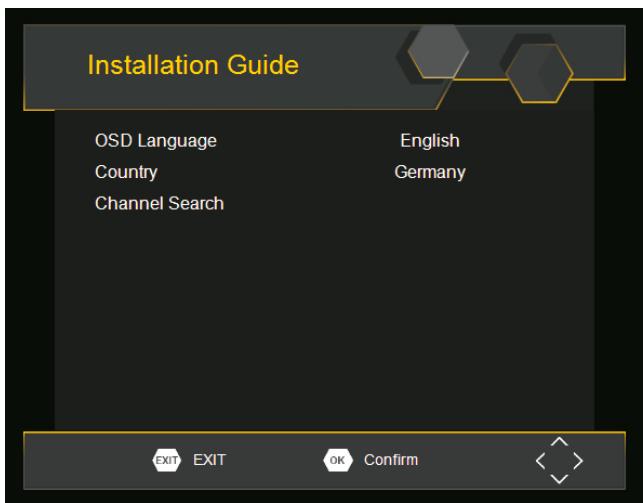
After all connections have been made properly, switch ON TV and make sure the receiver is connected to the Main Power. Press Power button to switch receiver ON. If you are using the receiver for the first time or restored to Factory Default, the Main Menu will appear on your TV screen.
(1) Select [OSD Language] and press RIGHT/LEFT key to select an language.
(2) Select [Country] and press RIGHT/LEFT key to select your country of residence.
(3) Select [Channel Search] and press RIGHT or OK key to begin Automatic channel search.
(4) Once channel tuning is complete, you are now ready to watch TV.
Basic Operation
Program Manage Settings
To access the Menu, press the SETUP button and select [Program]. The Menu provides options to adjust the Program Manage Settings. Select an option and press OK or RIGHT to adjust that setting. Press the EXIT button to exit the Menu.
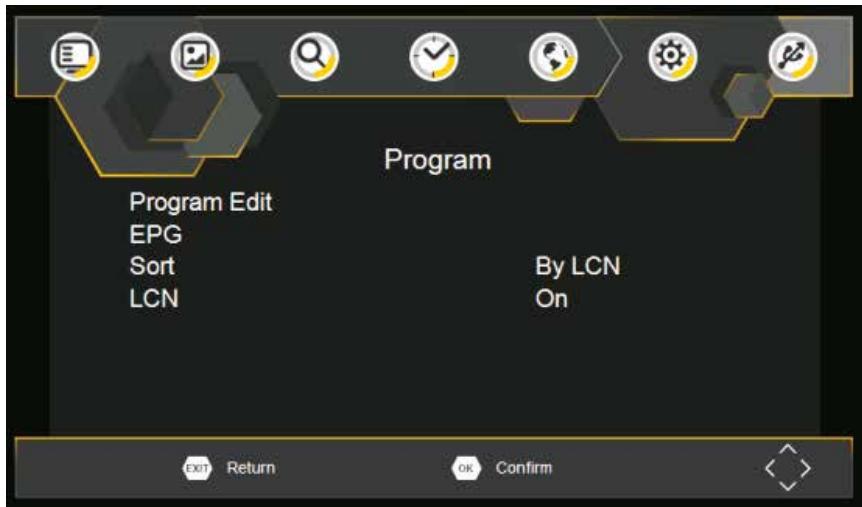
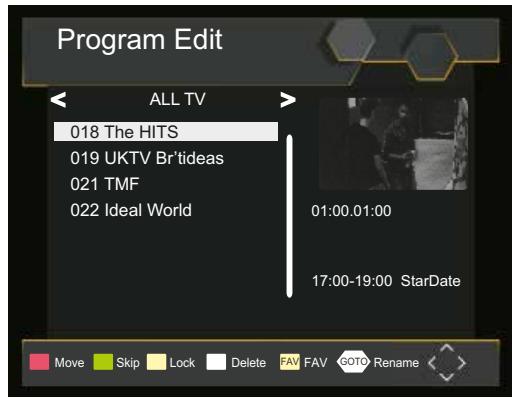
Program Edit
To edit your program preferences (lock, skip, favourite, move or delete), you will need to enter the Program Edit Menu. This Menu requires a password to access. Enter the default password '000000'.
First time installation
Set favourite programs
You can create a shortlist of favourite programs that you can easily access. Set favourite TV or radio program:
- Select the preferred program then press the FAVOURITE button. A heart-shaped symbol will appear and the program is marked as a favourite.
- Repeat the previous step to select more Favourite programs.
- To confirm and exit the Menu,press the EXIT key.
Disable Favourite TV or Radio Program:
Press the FAV buton on the Remote Control with the heart-shaped symbol.
View Favourite Programs:
- Press the Fav button and the Favourite Menu will appear.
- Press UP/DOWN to select your Favourite Programs.
- Press OK to select your favourite program.
Delete a TV or radio program
- Select the Program and then press the BLUE button A message will appear. Press OK to delete the program.
- Repeat the previous step to select more programs to delete.
Skip TV or Radio Program/s
- Select the program you would like to skip and press the GREEN button A skip symbol is displayed. The program is marked as a skip.
- Repeat the previous step to select more programs.
- To confirm and exit themenu,press EXIT key.
Disable a skip TV or Radio Program:
Press the GREEN button on the skip program with the skip symbol.
Move a TV or Radio Program/s
- Select the preferred program then press the RED button. A move symbolwill appear.
- Press UP/DOWN to move the program.
- Press OK to confirm.
- Repeat the above steps to move more channels.
Lock Program/s
You can lock selected programs for restricted view.
Lock a TV or Radio Program:
- Select the preferred program then press the YELLOW button. A lock-shaped symbol is displayed. The program is now marked as locked.
- Repeat the previous step to select more programs .
- To confirm and exit the menu, press the EXIT button.
- Press the YELLOW button to disable the locked program.
- To view the locked program, you will be required to enter the password.
EPG (Electronic program guide)
The EPG is an on-screen TV guide that shows scheduled programs seven days in advance for every tuned channel. Press the EPG button on the Remote Control to access guide.
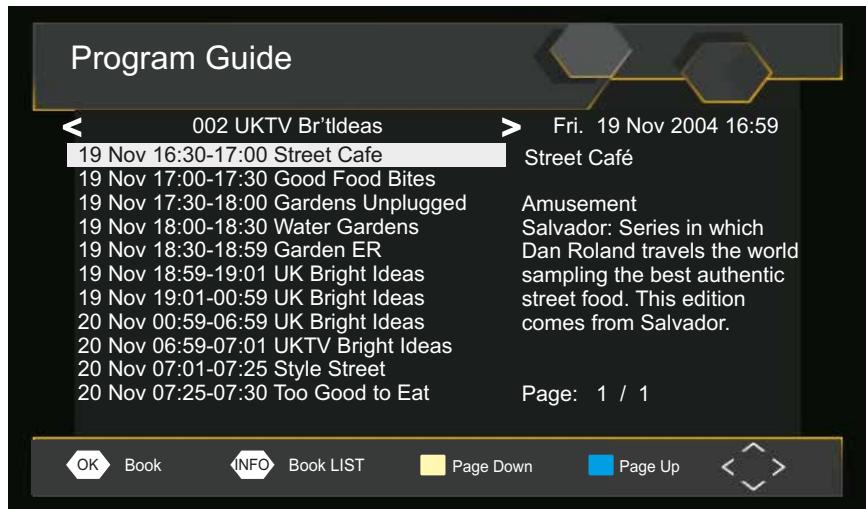
You can use the UP/DOWN key to select the preferred program. If there is more than one page of information, use the BLUE button for page up and the YELLOW button for page down.
Sort
Sort your channels from the following options:
[LCN] - Sort the channels in ascending order.
[Name] - Sort the channels in alphabetical order.
[Service ID] - Sort the channels according to the station.
LCN (Logical channel number)
Set LCN on or off.
Video Setting
To access the Menu, press SETUP then select [Picture]. The Menu provides options to adjust the video settings. Press UP/DOWN to select an option and press RIGHT/LEFT to adjust that setting. Press EXIT to exit the menu.
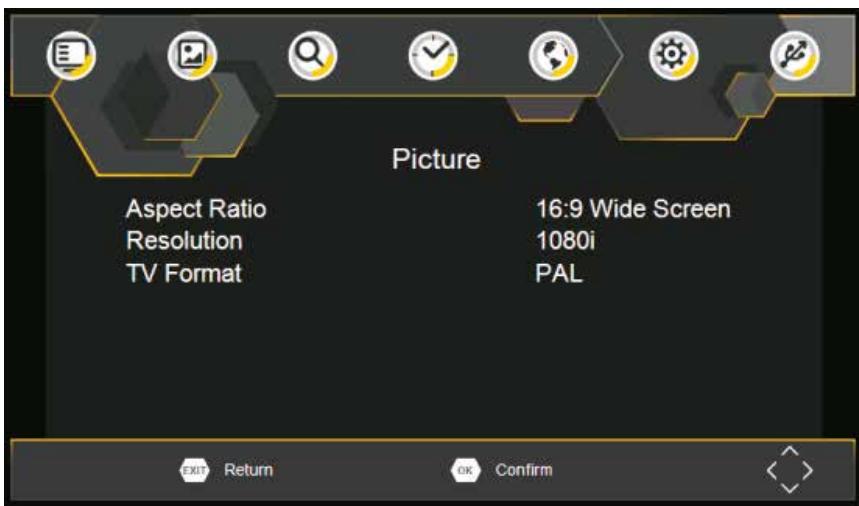
Aspect Ratio
You must set the display format to either 4:3 PanScan, 4:3 Letter Box, 4:3 Full, 16:9 Wide Screen, 16:9 PillarBox or Auto to get the maximum display when watching TV.
Resolution
If the video does not appear correctly, change the setting. This setting is to match the most common setting for HDMI.
[480i]: for NTSC system TV.
[480P]: for NTSC system TV.
[576i]: for PAL system TV.
[576P]: for PAL system TV.
[720P]: for NTSC or PAL system TV.
[1080l]: for NTSC or PAL system TV.
[1080P]: for NTSC or PAL system TV.
TV format
If the video does not appear correctly, you need to change the settings. This should match the most common setting for TVs in your country.
[NTSC]: for NTSC system TV.
[PAL]: for PAL system TV.
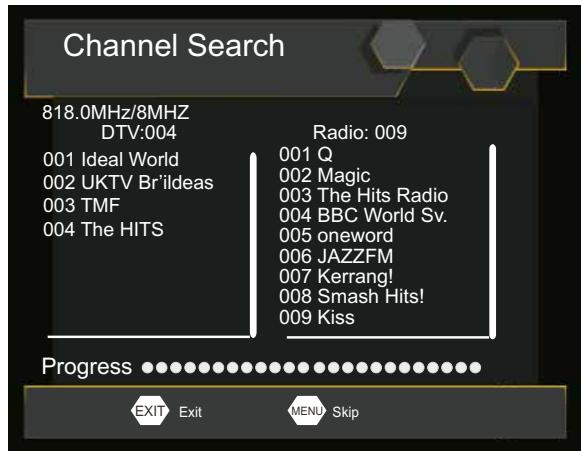
Channel search
To access the menu, press SETUP and select [Search Channel]. The Menu provides options to adjust the Search Channel settings. Select an option and press RIGHT/LEFT to adjust the settings. Press EXIT to exit the Menu.
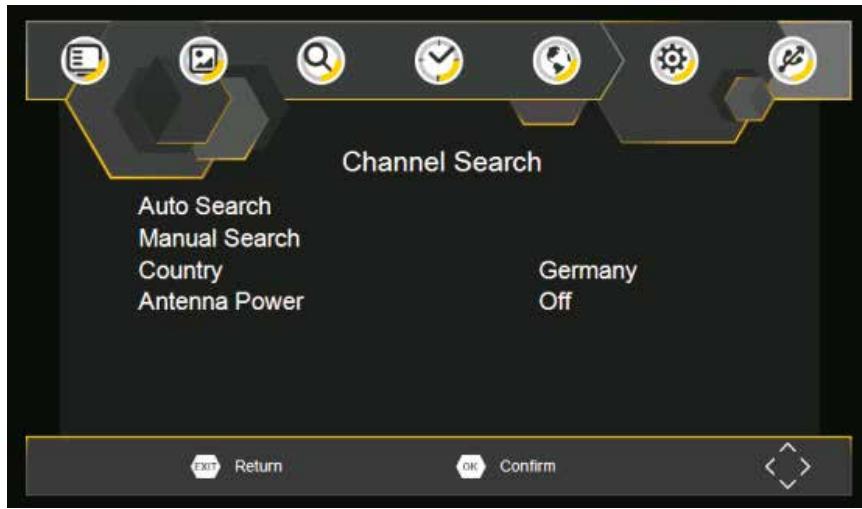
Auto Search
Search and install all channels automatically. This option overwrites all preset channels.
- Select [Auto Search] and press OK or RIGHT to start channel search.
- To cancel channel search, press EXIT.
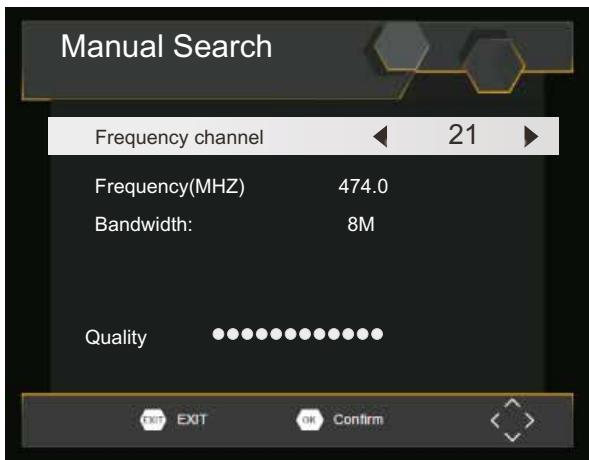
Manual Search
Install new channels manually. This option adds new channels without changing the current channels list.
- Select [Manual Search] then press OK or RIGHT. The channel search screen will appear.
- Press the RIGHT/LEFT key to select the channel frequency.
- Press OK to start searching channels.
If a channel is found, it is saved and added to the channels list. If channels can't be found, then exit the menu.
Country
Select your country of residence.
Time Setting
To access the Menu, press MENU then select [Time].
The Menu provides options to adjust the time settings.
Select an option and press RIGHT/LEFT to adjust the settings.
Press EXIT to exit the menu.
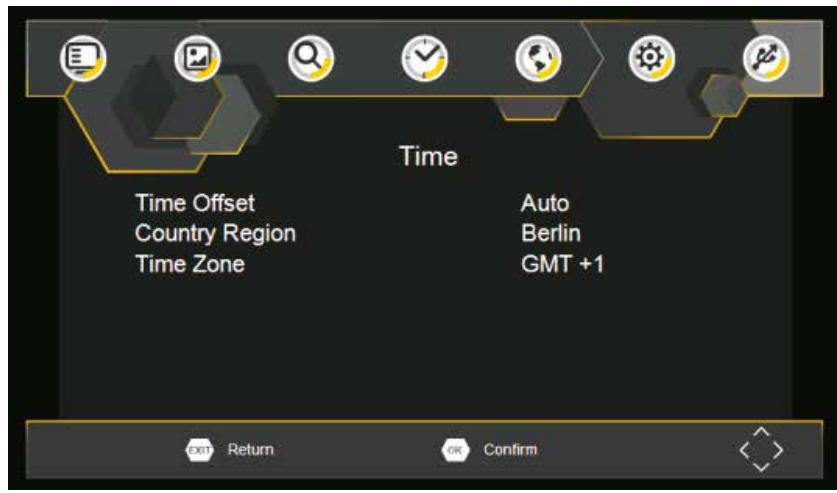
Time offset
Select auto or manual for GMT offset adjustments.
Country Region
Country Region is set automatically when you set the country at channel search menu.
Time Zone
Select the Time Zone Offset when [Time Offset] is set to Manual.
Option
To access the Menu, press SETUP and select [Option]. The menu provides options to adjust the OSD Language, Subtitle Language and Audio Language. Select an option and press RIGHT/LEFT to adjust the setting. Press EXIT to exit The Menu.
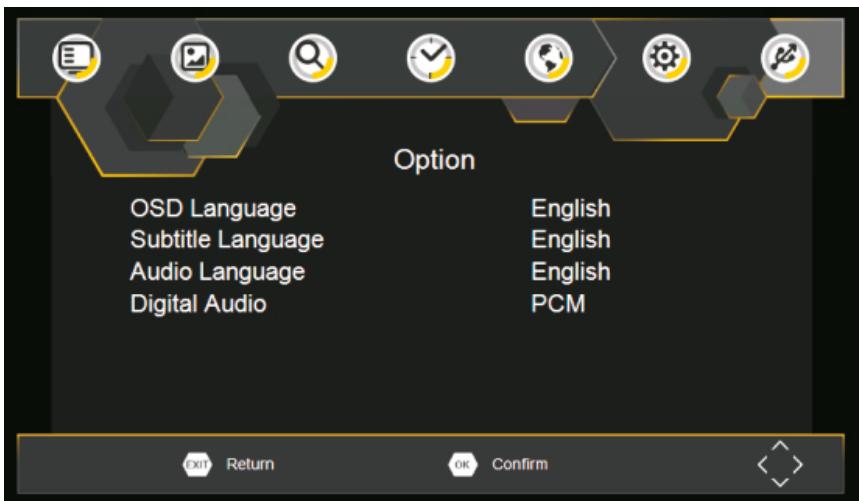
OSD Language
Select an OSD language.
Audio Language
Select the preferred audio language for watching TV channels.If the language is not available, the default program language will be used.
Subtitle Language
Select the preferred subtitle language.
Digital Audio
Set the desired audio format at the HDMI slot: PCM, Raw HDMI On, Raw HDMI Off, Off (if available).
System Setting
To access the Menu, press SETUP and select [System]. The menu provides options to adjust the system settings. Press the UP/DOWN key to select an option and press RIGHT/LEFT to adjust the setting. Press EXIT to exit the menu.
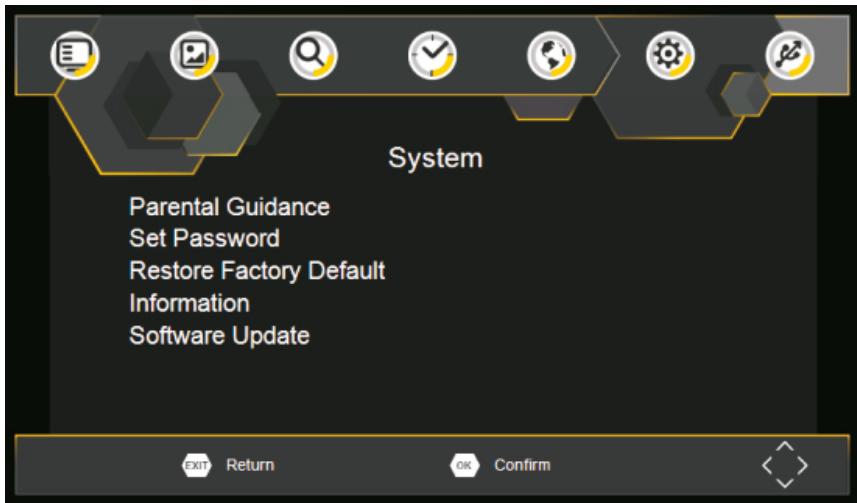
Parental Guidance
You can restrict access to channels that are unsuitable for children. To restrict / lock the channel you will need to enter either the default password '000000' or your own password.
Set Password
Set or change the password for Locked programs. Enter your old Password or the default password '000000'. You will then be asked to enter your new password. To confirm re-enter your new password. Once it is confirmed, press EXIT to exit the Menu.
Reset your Set Top Box to the Default Factory Settings. In Main Menu select [Restore Factory Default] and press OK or RIGHT to select. Enter your password or the default password '000000' and press OK to confirm. This option will delete all preset channels and settings.
Information
View model, hardware and software information.
Software update
Software update.
USB
To access the Menu, press the SETUP button and select USB.
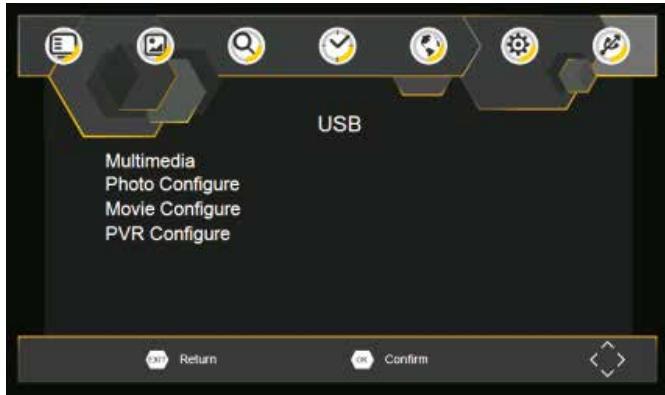
Multi-Media
Switch to USB mode and plug in USB to view files.
Photo Configure
Set the parameters for viewing photographs.
Movie Configure
Set the parameters for displaying movie subtitles.
PVR Configure
Set the parameters for record device.
Technical Specifications
| Item | Sub Item | Parameter |
| Tuner | Input Frequency | 170~230MHz 470~860MHz |
| RF Input level | -25~80dBm (64QAM) -10~75dBm (256QAM) | |
| IF Bandwidth | 7MHz and 8MHz | |
| Modulation | QPSK,16QAM,64QAM,256QAM | |
| Video | Decoder Format | MPEG4 AVC/H.264 HP@L4 HEVC/H.265 HT@L4 MPEG2 MP@ML.HL |
| Output Port | CVBS,HDMI | |
| Audio | Decoder Format | MPEG-1 (layer1&2&3) |
| Audio output | Stereo | |
| Power | Voltage | DC 9V (1.5 A) |
| Working Power | ≤10W |
Troubleshooting
| Problem | Potential Reasons | What to do |
| No picture | Power isn't connected | Connect the power |
| The power switch is not on | Switch on the power | |
| Screen shows “No Signal” | DVB-T cable not connected | Plug in the DVB-T cable |
| Incorrect setting | Reset setting | |
| No sound from speaker | No or incorrect connection with audio cable | Connect the audio cable correctly |
| Sound on mute | Turn off mute function | |
| Incorrect sound track | Try another sound track | |
| Only sound, no image on the screen | No or incorrect connection with AV cable | Make sure cables are connected correctly |
| The program is a radio program | Press <TV/RADIO> key to shift into TV mode | |
| Remote Control is not responding | The battery is exhausted | Change battery |
| Remote Control is not facing or close enough to the Set Top Box | Adjust the position of the Remote Control and move closer to the unit | |
| The image stopped suddenly or mosaic | The signal is too weak | Strengthen the signal |
Spcifications techniques
LCN (Logical channel number)
Imposta LCN acceso o spento.
Menú principal / Atrás
9.FAV
Fije LCN en on u off.
Define as cores do écran.
INGLES
Spela in digital tjonst.
7.ANGE
Bekrøfta och Ange
8.INSTALLING
Huvudmeny/Retur
9.FAV
Visa EPG-information
24.1 KNAPPEN
Fregende alternative.
- KNAPPEN
Nõsta altenativ.
- KNAPPEN
Stall in favoritprogram
Record digitale service.
- RETURN
22.TTX
- ENTER
Bevestig en Enter
teletekst
-
EPG
-
SETUP
Hoofdmenu / Terug
Toon EPG-informatie
-
KNOP
-
FAV
Stel favorite programma's in
GBCaliber hereby declares that the item PDVBT101 is in compliance with the essential requirements and other relevant provisions of Directive 2014/53/EU (RED) and 2011/65/EU (RoHS).
GB Old appliances and/or batteries must not be disposed with garbage! If the device/battery can not be used anymore, every user is legally obliged to dispose of old appliances and/or batteries separated from the garbage, e.g. at a collection point of his municipality/district.
