
RCD-06 - CD Player ROTEL - Free user manual and instructions
Find the device manual for free RCD-06 ROTEL in PDF.
| Product Type | CD Player |
| Brand | ROTEL |
| Model | RCD-06 |
| Dimensions (W x H x D) | 437 x 73 x 313 mm |
| Weight | 5 kg |
| Power (Voltage) | 120 V AC 60 Hz (USA) / 230 V AC 50 Hz (Europe) |
| Power Consumption | 20 W max |
| Digital/Analog Converter | 18 bit, Delta Sigma, 8x Oversampling |
| Analog Outputs | 1 pair RCA (Cinch) |
| Digital Output | Coaxial RCA (75 ohm impedance) |
| Frequency Response | 20 Hz - 20 kHz (±0.5 dB) |
| Signal-to-Noise Ratio | >100 dB |
| Total Harmonic Distortion | 0.0045% @ 1 kHz |
| Channel Separation | >98 dB @ 1 kHz |
| Programming Capacity | Up to 20 tracks |
| Special Functions | Random Play, Repeat (track/disc), Intro Scan (10 s) |
| Display | Elapsed/Remaining time, track number, mode indicators |
| Remote Control | Infrared RR-D95 (included) |
| External Remote Input | 3.5mm jack (EXT REM IN) |
| Trigger Input 12V | Yes (3-30 V AC/DC) |
| Cleaning | Dry cloth |
| Safety | Double insulation, do not expose to moisture |
| Ventilation | Minimum 10 cm free space around the unit |
Frequently Asked Questions - RCD-06 ROTEL
User questions about RCD-06 ROTEL
0 question about this device. Answer the ones you know or ask your own.
Ask a new question about this device
Download the instructions for your CD Player in PDF format for free! Find your manual RCD-06 - ROTEL and take your electronic device back in hand. On this page are published all the documents necessary for the use of your device. RCD-06 by ROTEL.
USER MANUAL RCD-06 ROTEL
Stereo Compact Disc Player
Important Safety Instructions
WARNING: There are no user serviceable parts inside. Refer all servicing to qualified service personnel.
WARNING: To reduce the risk of fire or electric shock, be sure that the apparatus shall not be exposed to dripping or splashing and that no objects filled with liquids, such as vases, shall be placed on the apparatus.
Do not allow foreign objects to get into the enclosure. If the unit is exposed to moisture, or a foreign object gets into the enclosure, immediately disconnect the power cord from the wall. Take the unit to a qualified service person for inspection and necessary repairs.
Read all the instructions before connecting or operating the component. Keep this manual so you can refer to these safety instructions.
Heed all warnings and safety information in these instructions and on the product itself. Follow all operating instructions.
Clean the enclosure only with a dry cloth or a vacuum cleaner.
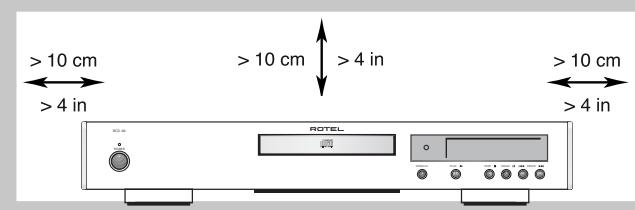
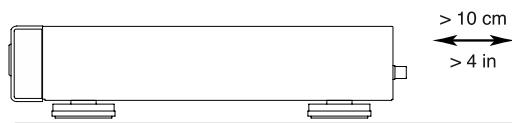
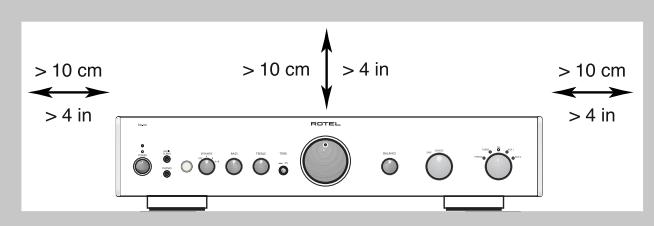
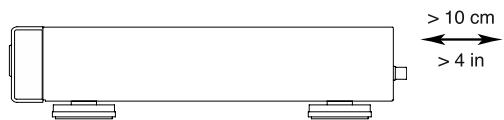
You must allow 10 cm or 4 inches of unobstructed clearance around the unit. Do not place the unit on a bed, sofa, rug, or similar surface that could block the ventilation slots. If the component is placed in a bookcase or cabinet, there must be ventilation of the cabinet to allow proper cooling.
Keep the component away from radiators, heat registers, stoves, or any other appliance that produces heat.
The unit must be connected to a power supply only of the type and voltage specified on the rear panel of the unit.
Connect the component to the power outlet only with the supplied power supply cable or an exact equivalent. Do not modify the supplied cable in any way. Do not attempt to defeat grounding and/or polarization provisions. Do not use extension cords.
Do not route the power cord where it will be crushed, pinched, bent at severe angles, exposed to heat, or damaged in any way. Pay particular attention to the power cord at the plug and where it exits the back of the unit.
The power cord should be unplugged from the wall outlet if the unit is to be left unused for a long period of time.
Immediately stop using the component and have it inspected and/or serviced by a qualified service agency if:
- The power supply cord or plug has been damaged.
- Objects have fallen or liquid has been spilled into the unit.
The unit has been exposed to rain. - The unit shows signs of improper operation
- The unit has been dropped or damaged in any way
Please use Class 2 Wiring when connecting the speaker terminals of the unit to ensure proper insulation and minimize the risk of electrical shock. Place the unit on a fixed, level surface strong enough to support its weight. Do not place it on a moveable cart that could tip over.
IMPORTANT FOR LASER PRODUCTS
- CLASS 1 LASER PRODUCT
- DANGER: Visible laser radiation when open and interlock failed or bypassed. Avoid direct exposure to beam.
- CAUTION: Do not open the top cover. There are no user serviceable parts inside the player; leave all servicing to qualified service personnel.
WARNING!
To reduce the risk of electrical shock, fires, etc.:
- Do not remove screws, covers or cabinet.
- Do not expose the unit to rain or moisture.
- Do not touch the power cord or plug with wet hands.

| CAUTION | - LASER RADIATION WHEN OPEN. DO NOT STARE INTO BEAM. |
| ATTENTION | - RAYONNEMENT LASER EN CAS D'OUVERTURE. NE PAS REGARDER DANS LE FAISCEAU. |
| VORSICH | - LASERSTRAHLLING, WEINH ABOCKEDGEÖFFENET. NICTT IN DEN STRAHL BICKEN. |
| ADVARSCH | - LASERSTRAHLLING VED ABNING. SE IKKE IMD I STRALEN. |
| ADVARSCH | - LASERSTRAHLLING NAR DEKSL APMIES. STRIR IKKE INN I STRALEN. |
| VARING | - LASERSTRAHLLING NAR DEMNA DEL AR ÖPPNAD. STRRA EJ IN I STRALEN. |
| VARO! | AVATTAESA OLET ALTTINA LASERSATEIYLLE, ÀLÉ TÜUOTA SATESEEN. |
| 注意 | - 当打开这里会出现激光,请不要直视激光。 |
| 注意 | - ごこ閉くとレーダー光が出来ます。レーダー光をそのまえないにはんだき。 |

CAUTION
RISK OF ELECTRIC SHOCK DO NOT OPEN

CAUTION: TO REDUCE THE RISK OF ELECTRIC SHOCK, DO NOT REMOVE COVER. NO USER-SERVICEABLE PARTS INSIDE REFER SERVICING TO QUALIFIED SERVICE PERSONNEL.
APPLICABLE FOR USA, CANADA OR WHERE APPROVED FOR THE USAGE
CAUTION: TO PREVENT ELECTRIC SHOCK, MATCH WIDE BLADE OF PLUG TO WIDE SLOT. INSERT FULLY.
ATTENTION: POUR EVITER LES CHOCSE ELECTRIQUES, INTRODUIRE LA LAME LA PLUS LARGE DE LA FICHE DANS LA BORNE CORRESPONDANTE DE LA PRISE ET POUSSER JUSQU AU FOND.

This symbol is to alert the user to the presence of uninsulated dangerous voltages inside the product's enclosure that may constitute a risk of electric shock.

This symbol is to alert the user to important operating and maintenance (service) instructions in this manual and literature accompanying the product.

Rotel products are designed to comply with international directives on the Restriction of Hazardous Substances (RoHS) in electrical and electronic equipment and the disposal of Waste Electrical and Electronic Equipment (WEEE). The crossed wheelie bin symbol indicates compliance and that the products must be appropriately recycled or processed in accordance with these directives.

This symbol means that this unit is double insulated. An earth connection is not required.
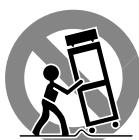
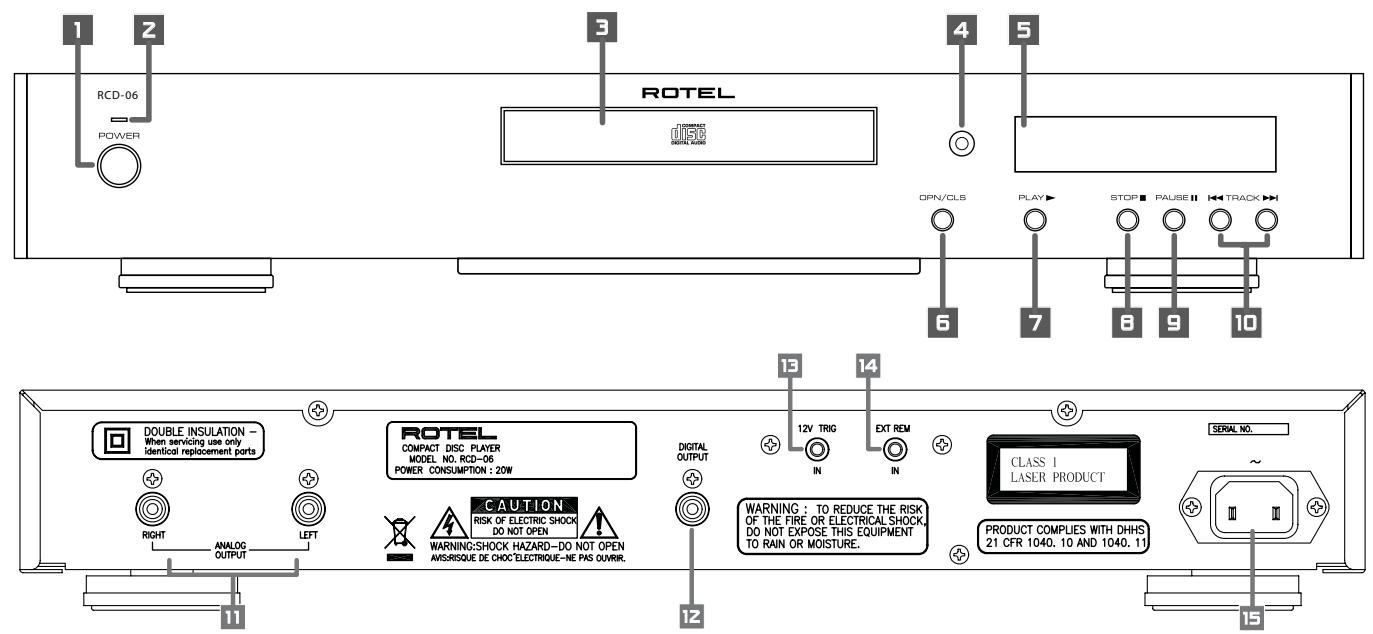
Figure 1: Controls and Connections Commandes et branchements Bedienelemente und Anschlisse Pannello frontale e posteriore Controles y Conexiones Bedieningsorganen en aansluitingen Funktioner och anslutninger Opranbl ynpablenen n pa3bembl
Figure 2: RR-D95 Remote Control
Télécommande RR-D95
Fernbedienung RR-D95
Telecomando RR-D95
Mando a Distancia RR-D95
De RR-D95 afstandsbediening
Fjärrkontroll RR-D95
Пульт ду RR-D95
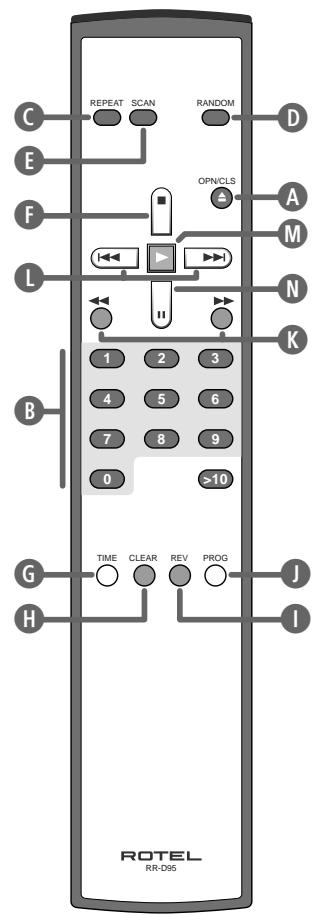
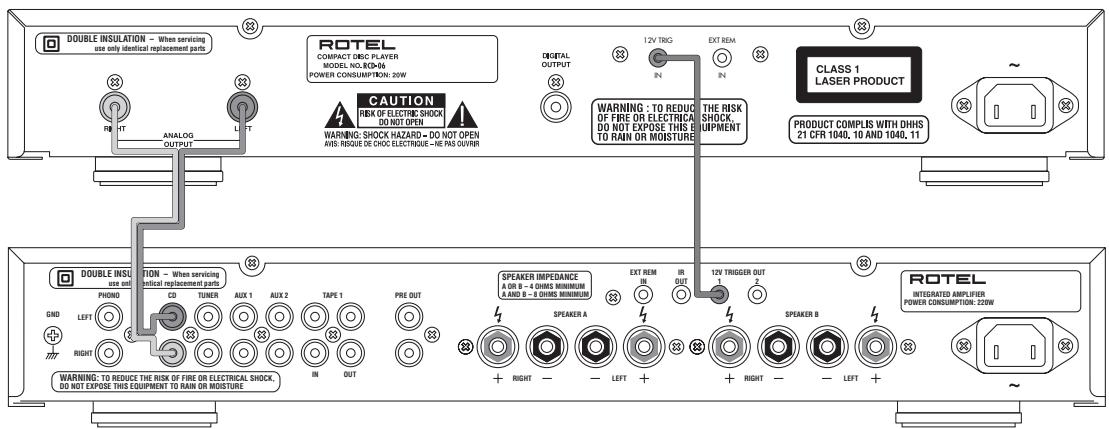
Figure 3: Analog Outputs Sorties analogiques Analoge Ausgänge Uscite Analogiche Salidas Analógicas De analoge uitgangen Analoga utgangar AnlolorobbIe BIXObl
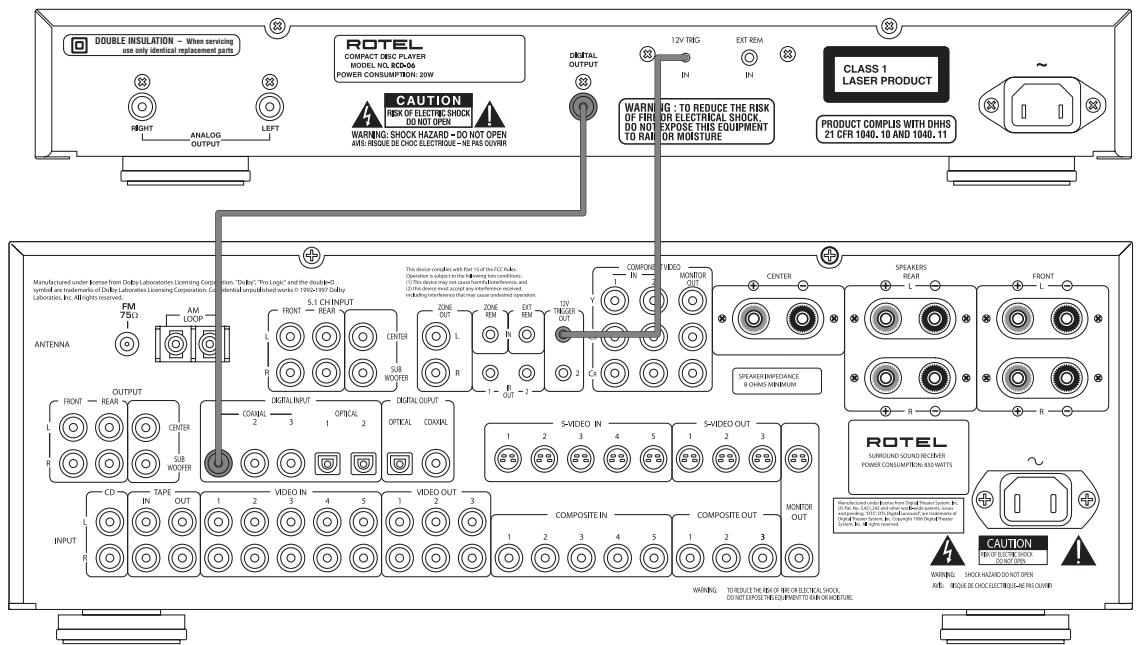
Figure 4: Digital Outputs Sorties numériques Digitalausgang Uscite Digitali Salidas Digitales De digitale uitgangen Digitala utgangar LnfoBbIe BvIXoDbI
Contents
Important Safety Instructions 2
Figure 1: Controls and Connections 3
Figure 2: RR-D95 Remote Control 3
Figure 3: Analog Outputs 4
Figure 4: Digital Outputs 4
About Rotel 5
Getting Started. 5
A Few Precautions 5
Placement 5
Control Identification 5
AC Power and Control 6
AC Power Input 15 6
Power Switch 1 and Power Indicator 2 6
Output Connections 6
Analog Outputs 6
Digital Output 12 6
Operation 6
Infrared Remote Control 4 6
Display 6
DiscDrawer 6
Transport Control Buttons. 7
OPEN/CLOSEButton 6 A 7
PLAYButton 7 M 7
STOP Button F 7
PAUSE Button 9 N 7
7
DIRECT ACCESS Buttons B 7
SEARCH Buttons K 7
Additional Features 7
PROGRAMButton 7
REVIEWButton 8
CLEAR Button H 8
RANDOM Button 8
REPEAT Button 8
SCAN Button 8
TIME Button 8
External Remote Input 14 8
12V Trigger Connection 13 8
Troubleshooting. 8
Power Indicator Is Not Lit 8
Fuse Replacement 9
No Sound 9
Specifications 9
About Rotel
A family whose passionate interest in music led them to manufacture high fidelity components of uncompromising quality founded Rotel over 40 years ago. Through the years that passion has remained undiminished and the family goal of providing exceptional value for audiophiles and music lovers regardless of their budget, is shared by all Rotel employees.
The engineers work as a close team, listening to, and fine tuning each new product until it reaches their exacting musical standards. They are free to choose components from around the world in order to make that product the best they can. You are likely to find capacitors from the United Kingdom and Germany, semi conductors from Japan or the United States, while toroidal power transformers are manufactured in Rotel's own factory.
Rotel's reputation for excellence has been earned through hundreds of good reviews and awards from the most respected reviewers in the industry, who listen to music every day. Their comments keep the company true to its goal - the pursuit of equipment that is musical, reliable and affordable.
All of us at Rotel, thank you for buying this product and hope it will bring you many hours of enjoyment.
Getting Started
Thank you for purchasing the Rotel RCD-06 Stereo Compact Disc Player. Its precision transport is back up by an 18-bit equivalent, multi-level Delta-Sigma D/A converter with 8x oversampling. These features, combined with Rotel's Balanced Design, ensure the RCD-06 will deliver the highest level of audio performance. When used in a high-quality audio system, your Rotel CD player will provide years of enjoyment.
A Few Precautions
Please read this manual carefully. In addition to installation and operating instructions, it provides valuable information on various RCD-06 system configurations as well as general information that will help you get optimum performance from your system. Please contact your authorized Rotel dealer for answers to any questions you might have. In addition, all of us at Rotel welcome your questions and comments.
Save the RCD-06 shipping carton and all enclosed packing material for future use. Shipping or moving the RCD-06 in anything other than the original packing material may result in severe damage that is not covered by the warranty.
Fill out and send in the owner's registration card packed with the RCD-06. Also be sure to keep the original sales receipt. It is your best record of the date of purchase, which you will need in the event warranty service is required.
Placement
Use common sense when placing the RCD-06 in a cabinet or when stacking other equipment. Make sure that the shelf or cabinet can support its weight. Do not stack heavy components on top of the RCD-06. Avoid placing the unit where it may be subject to excessive heat such as on top of a large power amplifier or near a heat register. For best performance, avoid placing the unit where it may be subject to vibration, such as near a speaker.
Control Identification
The cover of this manual has a fold out panel that shows illustrations of the front and rear panels and the RR-D95 remote control. Each item in the illustrations is identified with a call out in a gray box. Through out this manual the items referred to in the text are identified by the corresponding call out. The items on the front and rear panels are identified with a number call out, such a 1. The items on the remote control are labeled with a letter call out, such as A.
AC Power and Control
AC Power Input 15
Your RCD-06 is configured at the factory for the proper AC voltage in the country where you purchased it (either 120 volts or 230 volts). The AC line configuration is noted on a decal on the back panel.
NOTE: Should you move your CD player to another country, it may be possible to reconfigure it for use on a different line voltage. Do not attempt to perform this conversion yourself. Opening the enclosure of the RCD-06 exposes you to dangerous voltages. Consult a qualified service person or the Rotel factory service department for information.
The RCD-06 should be plugged directly into a 2-pin polarized wall outlet or into the switched outlet on another component in your audio system. Do not use an extension cord.
Be sure the power switch on the front panel of the RCD-06 is turned off (in the "out" position). Then, connect the supplied power cord to the AC power receptacle on the rear of the unit and the AC power outlet.
If you are going to be away from home for an extended period of time such as a month-long vacation, it is a sensible precaution to unplug your CD player (as well as other audio and video components) while you are away.
Power Switch 1 and Power Indicator 2
The power switch is located on the front panel of your CD player. To turn the CD player on, push the switch in. The LED indicator above the switch and the Display will light up, indicating that the CD player is turned on. To turn the CD player off, push the button again and return it to the "out" position.
NOTE: If you are using a switched outlet to turn on and off your CD player, you should leave the power switch in the "on" position. When AC power is applied to the unit, it will power up in fully active mode.
Output Connections
The RCD-06 gives you a choice of two different kinds of output connections — an analog output signal from the built-in D/A converter for use with conventional analog audio components and a coax digital output which provides an unprocessed digital data signal for use with outboard D/A converters or digital processors.
NOTE: To prevent loud noises that neither you nor your speakers will appreciate, make sure the CD player is turned off when you make any signal connections.
Analog Outputs 11
[See Figure 3 for wiring illustration] A pair of standard RCA jacks supplies an analog output signal from the RCD-06 to the source inputs of an audio preamplifier, integrated amplifier, or receiver.
Select high quality audio interconnect cables. Connect the left channel output of the RCD-06 to the left channel source input on the preamplifier or other component. Connect the right output of the RCD-06 to the right channel source input on the preamplifier or other component.
Digital Output 12
[See Figure 4 for wiring illustration] If you are using an outboard D/A converter or other digital processor, you will need an unprocessed digital data stream from the RCD-06, taken before the built-in D/A converter. This signal is supplied by the RCD-06's backpanel digital output jack. Using a standard 75 ohm coax digital cable, connect the RCD-06's coax digital output to the coax digital input connector on the outboard D/A converter.
Operation
The RCD-06 can be operated using its front panel buttons or from corresponding buttons on the supplied infrared remote control. Specific instructions for each of these controls are detailed below. Most of the buttons are duplicated on the front panel and on the IR remote control. However, there are a few exceptions where the buttons are only available on one or the other. These exceptions are noted in the instructions.
Infrared Remote Control 4
Before using the IR remote control, it is necessary to install two "UM-4/AAA" batteries (supplied). Remove the plastic cover on the back of the IR remote, install the batteries (observing the + and - polarity indications), and reinstall the cover.
To use the IR remote control, aim it at the IR sensor 4 located in the Display area on the front panel of the RCD-06.
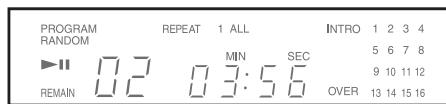
Display 5
A lighted Display on the front panel of the RCD-06 provides useful information about the status of the unit, activation of special features, and track/time information for the disc being played. Each of these indicators is described in the detailed operating instructions that follow.
DiscDrawer
A motor-driven disc drawer, located in the center of the RCD-06, slides out to accept a compact disc and retracts to play the disc. Place the compact disc in the drawer label-side up. Make sure the disc is properly centered in the tray. The drawer can be closed in two ways: pushing the OPN/CLS button or pushing the PLAY button.
Transport Control Buttons
These buttons provide basic control functions for the disc transport mechanism. Except where noted, all functions are available on the RCD-06 front panel and the IR remote control.
OPEN/CLOSE Button
When the transport disc drawer is closed, pressing this button automatically opens the drawer. To close the drawer, press this button again. The drawer can also be closed by pressing the PLAY button.
When the drawer is open, the Display will read "OPEN". When it is closed with no disc, the display will read "NO DISC". When the drawer closes with a disc inserted, the Display will indicate the number of tracks on the disc and the total time of the disc in minutes and seconds.
PLAY Button 7M
Press the PLAY button to start playing the disc. If the disc drawer is open, it will close automatically. The number of the track being played and the elapsed time will be shown in the display, along with the PLAY indicator. Normally, the disc will start playing with the first track. However, you can select a different track using the TRACK buttons or the DIRECT ACCESS buttons (see below) before pressing the PLAY button to start playing a different selection.
STOP Button F
This button stops a disc that is playing and resets the player, i.e. if play is resumed, the disc will start over from the first track. Pressing the STOP button twice quickly in succession cancels any programmed selections (see below).
PAUSE Button
This button is used to temporarily suspend play. The disc continues to spin and play will be resumed from the current position. The PAUSE indicator will light in the Display. To resume playing the disc, press the PAUSE button again or press the PLAY button.
TRACK Buttons
These buttons are used to select tracks on the disc. When a disc is playing, pressing the right TRACK button advances to the beginning of the next track. Pressing the left TRACK button returns to the beginning of the current track. Pressing twice quickly in succession returns to the beginning of the previous track. The new track number appears in the Display.
These buttons are also used to select a track before pressing the PLAY button or when memorizing tracks for the PROGRAM play mode (see below). These selections are made by continuously pressing the TRACK buttons until the desired track is reached.
In PROGRAM mode, the TRACK buttons advance or reverse to the next track in the memorized selection list.
DIRECT ACCESS Buttons B
Remote Only
These eleven numeric buttons (labelled 1 through 0 and >10 ) are used to directly access a track from the IR remote control instead of stepping through the tracks using the TRACK buttons.
The first ten tracks on a disc can be selected by pressing the corresponding button. For example, to play the third track, press the 3 button on the remote control.
When accessing track numbers greater than 10, press the >10 button followed by the track number. For example, to select track 12, press the >10 button followed by the 1 button and then the 2 button.
The number of the selected track will appear in the main numeric area at the center of the Display.
There is also a four by four matrix of track numbers (1 - 16) located at the right side of the display. This display indicates all of the tracks on the disc. If there are more than 16 tracks on the disc, all of the digits will light accompanied by the word OVER, regardless of which track is playing. This matrix is independent of the main numeric area of the Display, which will always indicate the currently playing track, even if above 16.
The DIRECT ACCESS buttons may also be used to memorize tracks in PROGRAM mode (see below).
SEARCH Buttons K
Remote Only
These buttons fast forward or fast reverse through the currently playing disc as long as they are pressed. While the buttons are pressed, you will hear high-speed audio. Releasing the buttons returns to PLAY mode.
Additional Features
These convenience features add extra functionality to the RCD-06, including the ability to memorize a group of tracks to be played, to repeat a disc, program, or track over and over, to play the tracks on a disc in random order, to automatically play the first 10 seconds of each track, and to select from several available time displays.
PROGRAM Button 1
Remote Only
This button, labeled PROG, allows you to memorize as many as 20 tracks on the current disc for playback in a specific order. For example, you could instruct the RCD-06 to play track 5, followed by track 3, followed by track 8. To begin a program:
1 Insert a disc and press the OPEN/CLOSE button to close the drawer. The RCD-06 will read the contents of the disc.
2 Press the PROGRAM button on the remote control. The PROGRAM indicator will light up in the Display, along with "P:00" indicating that the unit is waiting for the first track to be memorized.
3. Enter the first track number using the DIRECT ACCESS buttons. Your selection will be memorized automatically and the Display indicator will change to "P:01", indicating that one track has been memorized. Continue entering the rest of your selections using the DIRECT ACCESS buttons. Note that there is no need to press the PROGRAM button as each selection is memorized as it is entered.
Once you have memorized a play list, the RCD-06 remains in PROGRAM mode until you open the disc drawer or press the STOP button twice in succession. If you press the PLAY button, the memorized program will play instead of the entire disc, starting with the first selection in the memorized list.
When a PROGRAM has been memorized, most functions that would normally affect the entire disc operate on just the memorized program. For example, the TRACK buttons advance to the next track in the memorized program, not the next track on the disc. Likewise, the REPEAT button (see below) continuously plays the memorized program, not the entire disc.
REVIEW Button 1
Remote Only
This button is used to review the memorized tracks in PROGRAM mode. Press the button and the first memorized track number will appear in order in the Display, flashing for approximately five seconds. Pressing the REVIEW button again while the track number is flashing will continue the review sequence, showing the next memorized track. Continue pressing the REVIEW button to see the complete memorized track list.
If you do not press the REVIEW button while the track number is flashing, the review process is terminated and the unit resumes whatever mode it was in before you started to review, except that the last reviewed track number will remain active and shown in the display.
Note that you may remove a selection from the play list during the review procedure using the CLEAR button, as described below.
CLEAR Button H
Remote Only
This button allows you to remove a track selection from the memorized program play list during the review procedure described above. Follow the review procedure until the desired track number is flashing. Then, instead of pressing the REVIEW button to continue, remove the displayed track by pressing the CLEAR button while the number is still flashing. You may then continue the review procedure.
RANDOM Button D
Remote Only
This instructs the CD player to play tracks from the entire disc in random order. Once all of the selections have been played once, the disc will stop playing, unless the REPEAT Button (see below) has been engaged, in which case the random play will continue until the STOP button is pressed. When the RANDOM button is engaged, the word RANDOM appears in the Display.
REPEAT Button
Remote Only
This button allows you to repeat the current track or the entire disc continuously until the feature is cancelled by disengaging the REPEAT button or pressing STOP. The REPEAT button steps sequentially through the available options. Press the button once and the RCD-06 will repeat just the current track, displaying the indicator REPEAT 1 in the Display. Press the button a second time and the RCD-06 will repeat the entire disc, displaying REPEAT ALL in the Display. Press the button a third time to cancel the REPEAT function.
As noted above, REPEAT can be used in conjunction with the RANDOM play feature.
NOTE: The REPEAT function is automatically cancelled when the disc drawer is opened.
SCAN Button E
Remote Only
This feature automatically plays the first ten seconds of each track on the disc (or the memorized program). To activate the feature, press the SCAN button. The word INTRO appears in the Display. To stop scanning and resume normal operation at the current track, press the SCAN button again or press the PLAY button.
TIME Button
Remote Only
Normally, the RCD-06 displays the elapsed time of the currently playing track. The TIME button allows you to step through two alternative time displays. Pressing the button once displays the time remaining in the current track, which counts down as the track continues playing. Pressing the button a second time displays the time remaining on the entire disc (or memorized program). Pressing the button a third time reverts to the standard elapsed time display. When the TIME feature is activated, the word REMAIN appears in the Display.
External Remote Input
14
This 3.5mm mini-jack (labeled EXT REM IN) receives command codes from an industry-standard infrared receiver (Xantech, etc.) located in the main listening room. This feature is useful when the unit is installed in a cabinet and the front-panel sensor is blocked. Consult your authorized Rotel dealer for information on external receivers and the proper wiring of a jack to fit the mini-jack receptacle.
12V Trigger Connection
The RCD-06 can be activated by a 12 volt trigger signal from a Rotel preamplifier.
The trigger input accepts any control signal (AC or DC) ranging from 3 volts to 30 volts. When a cable is connected to the input and a trigger signal is present, the CD Player is activated. When the trigger signal is interrupted, the unit goes into standby mode. The front panel indicator light remains lit, but the display goes dark and the unit will not operate.
NOTE: When using the 12V Trigger feature, leave the POWER button in the ON position.
Troubleshooting
Most difficulties in audio systems are the result of incorrect connections, or improper control settings. If you encounter problems, isolate the area of the difficulty, check the control settings, determine the cause of the fault and make the necessary changes. If you are unable to get sound from the RCD-06, refer to the suggestions for the following conditions:
Power Indicator Is Not Lit
The Power Indicator and the basic items in the Display window should be lit whenever the RCD-06 is plugged into the wall power outlet and the Power button is pushed in. If it does not light, test the power outlet with another electrical device, such as a lamp. Be sure the power outlet being used is not controlled by a switch that has been turned off.
Fuse Replacement
If another electrical device works when plugged into the power outlet, but the Power Indicator and the Display still will not light when the RCD-06 is plugged into the wall outlet, it indicates that the internal power fuse may have blown. If you believe this has happened, contact your authorized Rotel dealer to get the fuse replaced.
No Sound
Check the cables between the RCD-06 and the amplifier inputs to be sure they are connected properly. Be sure the correct amplifier input is selected. Be sure the tape monitor system of the amplifier has not been activated. Check the wiring between the amplifier and the speakers.
Specifications
| Total Harmonic Distortion + Noise | 0.0045% @ 1kHz |
| Intermodulation Distortion | 0.0045% @ 1kHz |
| Frequency Response (± 0.5 dB) | 20-20,000 Hz |
| Channel Balance | ± 0.5 dB |
| Phase Linearity | ± 0.5 degree |
| Channel Separation | >98 dB @ 1kHz |
| Signal to Noise Ratio | >100dB |
| Dynamic Range | >96 dB |
| Digital to Analog Converters | Enhanced, multi-level Delta-Sigma DAC 8x oversampling digital filter |
| Speed Accuracy, Wow & Flutter | Quartz Crystal Precision |
| Output Impedance | 100 Ohms |
| Digital Output | 0.5 Volt, Peak to Peak |
| Load Impedance | 75 Ohms |
| Power Requirements | |
| USA Version | AC 120V, 60 Hz |
| European Version | AC 230V, 50 Hz |
| Power Consumption | 20 Watts |
| Dimensions (W, H, D) | 171/8 x 27/8 x 125/16 inches |
| 437 x 73 x 313 mm | |
| Panel Height | 60 mm / 23/8" |
| Weight (net) | 5 kg, 11 lb. |
RISQUE D'ÉLECTROCUTION NE PAS OUVRIR

ATTENTION: POUR RÉDUIRE LE RISQUE D'ÉLECTROCUTION, NE PAS RETIRER LE CAPOT. IL N'Y A À L'INTERIEUR AUCUNE PIECE SUSCEPTIBLE D'ÊTRÉ MODIFIÉE PAR L'UTILISATEUR. EN CAS DE PROBLEMÉ, ADRESSEZ-VOUS À UN RÉPARATEUR AGRÉE.

De "OPEN/CLS"toets 36
Visa programming 1 43
Ta bort en lat H 43
Ecn npednonaraetcdoctatoHNO donro He nCnOb3OBaTb annapat, BbInbTe BNky shypa nHTAHN H3 po3ETK.
HemeIeHHo npeKpaTHe noJIb3OBaTbC aannapatOM uO6paTHecb K KBaIIHnUPOBAHHomy nepcoHany, ecH:
- OOBpeXeHbI shyP nITaHnI nnBn Ka.
Bnytpb annapata nonann noctopohnne npedMebl nHJxukoctb. - Annapat nonan nojdoxkb.
- AnnapaT He fynKuOHpyTeJOnxHbIM o6pa3OM.
- Annapat ypoHnHn Hn OH nobpeKdH npYHM cnoc6om.
IcnoIb3yIte Ka6eNc 3aunToi Class 2 npn noCoeHHeHH KonoHOK K KJIeMMam ycInIeTg Ira o6ecpeHn HaedXHo H3OJauu N MmHmN3aun PnCKa ynapa 3JIeKtpnueCTBOM.
Pacnonarate npn6op Ha yctoynbo, poBHO NOBepxHocTH, IOCTaTOUHO npouho, tO6bl BbIepeKgatb erO Bec. He CTabte erO
Ha nepeBnraemyo TeJeKky, KOTopar MoKet ONpOKnHyTbCra.


3TOT CnBbON O3HauaET, YTO annapat 6bnaaet IBOHOn H0JIaueN He HxJdaetcB 3aemneHH.

BHIMAHNE
OTIACHOCTb IOPAXEHNIA 3JIeKTPiueCKIM TOKOM HE OTKpBiBATM

BHIMAHHE: Iy mHeBHeHn OAnCHoCTN NopAoxHEn 3NeKTPuCeKMM TOKOM, He CHMIOte BepxHIO u 3aDIOHO paHEn! BHyTPn HET qaTeB, DoctynbIX dIg o6CnyKBaHnnoB0BATEIO. IOBePte 0cIpyXbHAne KBaHnHmnpOBAHmO MaTepeY.

N3o6paxehne MoJHnB B pabHoctOpOHem TpeyToIbHnKe npDynpexJaet NOnb3ObaTeJe O HAIuHm BHyTpN KOpNyca N3dJIeH NHe30IpnoBaHHOro HapPaxHeH, BeJIuHHa KOtOporo MoKet Co3DaBAtb OnaCHocTb IopaxHeq YcHOBekA 3NeKTpuCeKIM TOKOM.

M3o6paqhenHe BocKlnuateIbHoro 3naka B paBHOCTOPOHem TpeYroIbnKe IpeynPexKaJTe Nol3OBaTeN O HANUIN B COpOBoXdAIOe annapat DOKyMeHTaUN BaxhIx INcTpyKlncn PO KcNpyataunn IN TexHNueCKOMy 06ClykNbAHNO.

PpOdykTB RoTeI CnpoeKTHPOBaHbI TaK, YTO6bI COOTBcTcBOBaTb Tpe6oBaHnM MEXyHApOJHbIX INpeKTHN B NO OPAHnueHIO pInmHeHnB BpeINbIX BeueCTB B 3NeKTPoTeXnHuCckOM n 3NeKTPoHHom 6OpuyoBaHn (Restriction of Hazardous Substances -RoHS), TaKke no o6paueHnIO cOTcyKnBuWM CBoi cPoK 3NeKTPoTeXnHuCckNM u 3NeKTPoHHbIM 6OpuyoBaHnEM (Waste Electrical and Electronic Equipment - WEEE). N3o6paKeHne nepeyepeKhTyoro Mycophoro 6aKa HA Konecax O3Haayet TaKke To, YTO 3TN PpOdykTB IOnJHbI 6bITb BtOpuHo nCNoJIb3oBaHbI (peuKNIpOBaHbI) nIN Je 6op6TaHbIB COOTBcTbHN CyONMAHyTbIM BbIe INpeKTHBAMn.
Copepknne
Pnc.1: OpraHbI ynpabHeHn npa3beMbI 3
Pnc.2:PynbT DY RR-D95....3
Pnc.3:Ahaorobblb BbIXoBbl 4
Pnc.4: Uufoobble BbIXoBbl 4
CopepxaHne. 47
O kompannn Rotel 47
Iepbte warn 47
MepbI npedoctopoKHoCTn 48
Pazmeuenie 48
O6o3HaueHnO npaHOynpaBneHH 48
Iitahne ycnltena 48
Pazbem dna cetebofo shypa 15 48
BbIKIOUcATEJIb NITAHIN 1
NINHINKATOP NHTAHNA 48
IopcoeunHeHne BXOHNbIX CnHAnOB 48
AHAJIOROBbIe BbIXOJbl 11 48
LHpOBBie BbIXoDb 12 48
OchOBhble onepaunn 49
NK npnbT 4 49
Ducnnei 5 49
Лоток за диска 3
KhoIkn ynpabNeHn npeepom 49
KhoNka OPEN/CLOSE 6 A 49
KHONKa PLAY 7 M 49
Khoinka STOP F 49
KHONKa PAUSE 9 N 49
Khonka TRACK 10 L 49
KHonKa DIRECT ACCESS B 49
KhoNka SEARCH K 49
DiononHnTeIbHbIe yHKnH 49
Khoonka PROGRAM
Khoonka REVIEW
Khonka CLEAR H
Khoinka RANDOM D
Khonka REPEAT C
Khonka SCAN
Khonka TIME
BxoJ BheWHeRo NK cnHana
Ext Remote 14 50
Pa3bem 12B
tprrreporo cnrhana 13 50
06hApxKeHne uytpaHeHne
HencnpabBHOtei 50
Hnndnkatop nntaHnHe roptn 50
3aMeHa npedoxpanHteIa 50
Her3Byka 50
Texnueckne xapaKtepncTKN 51
OKompann ROTEL
KOMNAHINROTEL OCHOBAHA 60Jee 40 let HA3a cEmbei, KOTOPa H3a cTpaCTHOI JIO6Bn K My3bike 3aHJIaCb IPOUN3BOIDCBOM hifi KOMTOHETOB. CToDAmN 3a cTpaCTb He yTHXJa, N CeroDnA cTpeMHeHne cEmbK OObecNeueHIO ayDINOΦHIOB N MeLOMAHOB, He3ABNCMO OT INx FHHAHCOBOro NOnOKeHN, Annapatypoi BbICOHaIWeRo KAeCTBa, pa3dEJIaHOT BCE cotpydnIKn Rotel.
Дужнаяковандаинжееровпсocnyшьаet ИН actpanbaet KAKdoe HOBOE N3dJIne, ПОКА OHO He 6yIeT COOTBETCTBOBATcambIM ВИСOKIM CTAHДAPTAM. ИnpedoctabHeHa СвобODa Bb6Opa KOMПЕKTуоши NO Всему МИPy, YTO6bl CdeIaTb annapat kak МоЖно ЛУчse. БеряТHo, Bbl CMOXete HAItN OTbOPHbIe KOHNecATOpbIиЗ BeINko6pITAHn И Германи, ПONYPNOBOnHKnи I3ЯNoHn И CLIaA, a TAKKte TopoINaIbHbIe CInIOBbie ТраHCФOPMAtOpbI, I3rOToBNeHHbIe Ha СобCTbeHHom 3aBoDE ROTEL.
Penytaun KOMPAnH NROTEL KAK npoIN3BOOINTeI INPEBOCXOHOH TeXNIKI NOITBEpKJHeA COTHM NIOLOXHTeJIbHIX OTbIBOB HAPAD ON HAHOOE YBaXaEMbIX 3KcNEPTOB. Xx KOMMeHTapN NOMOraHOT KOMPAnH NTOH DepKaTbC Kypca Ha npoIN3BOOCTBO KAChETBeHHORO, HAdEJKHO I IOCTYTHORO O6OpyIDOBAHNI.
Mbl, cotpyHNIK KOMPAnH N ROTEL 6IarOaIapm Bac 3a nokyKy 3TO rIO H3eINn, HnaJeemc, OTO OHO IOCTABNT BAM MHOYIOBOJIbCTBn.
Pepbblewarn
Blaoradapm Bac 3a nokynk nponrpbIatej
CD Rotel RCD-06. TpaHcnpTbMy MExAHn3M
BbICOKo ToHIOCTM, MHOrOyPobHEbYI DeIbTaC
Cnma LAP c pa3pAIOHcTbO, 3KBBaIeHTHOJ
18 6nt, 8-KpTHOH nepeINckPeTn3aUnei,
B coHTAHN C KOHcEJIuEiR yapMOHnHOrO
KOHCTpyKTHBOHO HCIOJIHeH NBalanced
Design" rapaHTIpyHOT BbICouaHwee
KaueCTBO BOCIpON3BEdEHN 3Byka. B coCTabe
BbICOKoAcYeCTBeHHoH ayINOCHCTMebl
nponrpbIateJI RCD-06 6yDet cnyXtB Bam
MHOrHe roDbI.
MepblnpedoctopoKHOCTN
BHIMATEJbHO npOHTaIte 3TO pyKOBOCTBO. IOMIMO OCHOBHbIX HNCTpyKUIN NO YCTAHOBKe N EKCIpyATAuHN, B HEM COIEpXATcpeKOMeHdAun, KOtOpBie NOMOT Bam MAKCMAMbHO hCnIOJIb3OBaTb BCE BO3MOXHOCTBaUWe CnCTEmbl. IIO BCEM INHTepeCyIOUm BAC BonPocAm o6paauTEcb K yONIHOMOeHHOMy DInIepy Rotel. BCE mbl, cotpydNHKn Rotel, Bcerla roTobbl OTBeITb Ha BaUn BonPocbl n npinHb Baun 3ameuHaH.
CoxpaHIne Kopo6ky IINI TpaHCnOpTIpOBKn IN BCE OCTaJIbHbIe YNAKOBOUHbIe MATEpHaJIbI, YTO6bl B DAJIbHeIM EHMetb BO3MOXHOCTb BOCIOJIb3OBAtBc rHm. NpeMeueHne HnI TpaHCnOpTIpOBKa IPOINrPBbATEIg RCD-06 B IpyToI yNAKOBKe MOxET BbI3BaTb CepBe3HbIe IOBpeKJHeHg YCTpoiCTBa, He IOKpbIBaEMble rapaHTnEi.
06aTeIbHO coxpaHnTe ueK n rapaHTnHbI TanoH. 3To IaBhIe IOKyMeHTbl, yIOCTOBepraUOJIne DaTy NOKyIKN, B cnyue o6paJehn 3a rapaHTnHbIM O6cnykHBAHmE.
YctahOBka
Bb6npaMeTOIyCTAHOBKnIpOnPbIBaTeN RCD-06 B ukafty ayno-Bnideo annapatpybI, nH N KOMNoHy erO C npYIMN yctpoiCTBaMn cntEmbl, pyKOBIOCTByntecb COo6paKeHNm3dPaBOrOcMbICna.Y6eINTeB B TOM, YTO nONKa UkaQcTcOcOBHa BbldepXaTb BEc annapata. He YcTaHabInBaHTe CBepxhy npOnPbIBaTeNb TReKeIbe KOMIOHEtbl. He CTABte npOnPbIBaTeNb B MeCTax, Ie OH 6yDet nOpBePraTcBc HbHOMy HARpeBy, HApnPmeR, Ha ycNlNTeNb MoUHOCTN nn PRAOM C OTOnPteNBbIMn pnp6opamn. IIr nOnyuHenry lyuNX paBoVHX xapakTeprnIK He YcTAHabINBaHTe npOnPbIBaTeNb B MeCTax, Ie OH MOKeT nOpBePHTbc BO3DeIcTBIO BV6paun, HApnPmeR, OKONO akyCTueckOIN CNTeMbI.
06o3haueHna opraHOB ynpabLeHn
Ha pncyHKax Page 3 n B daJIbHeNJHX OINCAHNX YNCla OTHCaTcK JETaJIaM annapata (pnc.1), a 6ykbbl OTHCaTcK K HONkAM Ha npIbte (pnc.2).
Ntahne npomrpbibatejra
PazbemДлсeTeBoro shHypa 15
RCD-06 Hactpoeh Ha 3aBOe B COOTBETCTBN Co CTAHApTAMn 3JIeKTPnuecko Cetn B BaWei cTpaHe (120 nN 230 B nepemHoro ToKa n 60 nN 50 T). KoHpIpyaun 3JIeKTPoNTaHnna O6O3HaueHa Ha 3aJHei NaHei annapata.
PIMMEYAHNE: EcnB Bb nepeedeTe BpyuO cTpaH, MoXHo npncnoc6ntb npOnpblBaTeIb K pyromy cTeBOMy HanpJxehnIO. OHaKo, He nbTaIteCb Cenatb 3TO camn. O6patntecb K KBaHnΦHnPoBAHOMy MaCTepy HnB CepBnCHyO cnjx6y Rotel
RCD-06 cneIyET nOdkIIOuATb HAnpMyo K HAcTeHHoI cTeBOi po3Etke, NIs6o K po3Etke, paCnONoKeHHoH Ha npYrOM KOMnoHeIte BaSeI cnCTeMbI. He nOlb3yInTeCb yDnnHInTeMaMn.
Y6eINTeCb, YTO KHOJKA NITAHNHa NpeedHei nAneHn annapata HaxoDHTcB NIOLOXeHN "BbIKIooHeO" (BbICTyPnaET Ha NOBepxHOCTbO nAneHn). 3aTeM NoCDoeHNITE WHyp NITAHn annapata K pa3bemy Ha 3aDnei nAneHn annapata N K ceteBOI po3eTke.
Ecnn Bbl haonro ye3kaete n3 doma, Hapnimep,Ha Mecau,pa3ymHO 6ydet BbHytBbnKn shypa nHTAHNA CD npOnrpBbATEn IN npTyNX KOMIOHETOB CNTeMbI n3 pO3etOK.
BbIKIIOUaTeNb PNTAHNIAHINDAKATOP NHTAHNIA 2.
YTO6bI BKJIOUHTb pOONrPbIBaTeJIb, HAXMITE KHOKNy BbIKNIOUATEJIa NITAHNI. 3aROpNTcN INHINKATOP HAD BbIKNIOUATEJIe M IINCPIeN. YTO6bI BbIKNIOUHTb pOONrPbIBaTeJIb, CHOBa HAXMITE KHOKNy. OHa DOnXHa BepHyTbcB OTKAtoE NOJOKeHHe.
PIMEYAHNE: Ecnn Bbl BkIouaete N BbIKIOUaete npOnrpbIBaTeNb Upe3 OTKIOUaEmyO po3eKu Ha Ipyrom Annapate, OCTabTe KONKny NITAHN BO BKIOUeHHOM NOLOXeHN. Pnnoaue NITAHNHa npOnrpbIBaTeNb OH 6ydt BkIOUaTbcraB NPOHOChHb pa6oOny peKHM
PoiocoeiHHeHne BbIXoIOB
RCD-06 MoXHO NOcOeHnHTb KaHAnOrOBomy ayDnO KOMNoHEnTy uepe3 aHaNoRoBbI BbIXoI, IIn6o K cNpOBoMy ayDnOKomNoHEnTy (coepKaaemy LApI nnuΦpOBoI npoueccop) uepe3 KoAKcnaIbHbI uNpOpBOB BbIXoI, HecuSiH Heo6pa6oTaHHbIe uNpOBoIe daHHbIe.
Nocbna KOMaHny, HnpaBnIte npblt B cToPOHy NK ceHCopa [4], haxoJzeroCpAOM C nncPiJeem npOnrpbBaTeJI.
Ducnnei 5
Icnne OTO6paKaet TeKyuuee CoCToHnne annapata, aKTHBHOCTb pa3InuHbIX yHKUIN, a TAKKe Homepa IN BpEMa BOCIpOn3BeHeHH npOxek IpONrpbBaemOrO nCKA.
3arpy30hblnnotok
IOMeCTHc INCK Ha IOTOK MAPKnPOBaHHoI CTOPHOB BBePx. Y6EInTeCb, YTO INCK NOnAN TOHOB CHTp IOTKa. IOTOK MOXHO 3aKpbITb HAKaTHeM KHOJKN OPN/CLS HIN PLAY.
KhoNkynpabJeHn npieepom
BolbHCTBO H3 KHOJOK npOy6I npoBaHbI -Ha nepeJeHne NaHeN, Ha Nylte . Ondako HMeetc HecKOnbKO NCKIoUeHn, KOtOpBle yKa3aHb BV HcTpyKuH.
KhoNka OPEN/CLOSE A
3ToKhONKOOTKpbIbAeTcN3aKpbIBaetc 3aRpy3OuHbI NtOK. NtOK 3aKpbIBaETc TaKke npn HaxkATnn KhoNk PLAY.
Korda NotOK OTKpbIT, Ha DnCnnee oTo6paxKaetc HADnncb "OPEN". Ecnn NotOK 3aKpbIT, HO B HEm Het DnCKa, OTo6paxKaetc HADnncb "NO DISC". Ecnn NotOK 3aKpbIT HEM ectb NsCK, Ha DnCnnei BbIOBnTcKoINueCTBO DOPOXeK DnCKa INBpeM BOCPON3BeHEnr BCero DnCKa B MInHyTAX IN CEkyHdx.
KhoIIka PLAY
3Toi KhoKo3aIyccaetcBOcnpOn3BedeHne
DnCKA.EcnIOKOTKpbIT,OHABTOMATUeCKN
3aKpoEtca.B npOecce BocnpOn3BedeHn
DncPLe OTO6paKaet Homep Tekyue
IDopoxkN INBpeM,NpOweJe
C hauana ee BOCpON3BedeHn.ObluHO
BOcnpOn3BedeHn HauHaeTc C nepBoi
DOpaKO,ecnIOHOxatn
KhoKn PLAYBbBb6panIppyuOdoPoxkY
KhoNkamn TRACK nIN DIRECT ACCESS, Bocnpon3BeHne HauHcTc c Hee.
KhoIIka STOP
OCTAHOB BOCPON3BedeHnI BO3BpaT K nepBoi Iopoxke DnCKa. EcnI DBAxNbI 6bICTpo Haxatb KhoNkY STOP, BBeHnHa nporpamma CTnpaetc n3 nAmrTH (cm.HnKe).
Khoinka PAUSE
BpeMeHHbIO octaHOB BocnpOn3BeHeHn IINCK IIck npOioJXaet Bpaaatbcra, IO3OMy MOxHO BO306HOBHTb BOCpOn3BeHeHne C MeCTa, Ie OHO 6blIO OCTaHOBNeHo. Ha Iincnnee CBETTCr INHdkATOp PAUSE. Yo6bl BO306HOBHTb BocnpOn3BeHeHne, HaxMnte PAUSE nnIPLAY.
KhoŋkN TRACK
Haxatne npabO K HONKn Bbl3bIbaet nepexoK n hauany cneDyUoSei dopoxKn. Haxatne neBov K HONKn Bbl3bIbaeT nepexoK n hauany TeKyuSei dopoxKn, a DBA 6bICTpbIX Haxatna noPraJ - K hauany npEdbIyuei dopoxKn. Homep Bbl6paHHoI dopoxKn oTo6pakaetcHa dncnlee.
Bb6op Iopoxkno MoKHO npOn3BoaHnTB KAK BO BpeMBOcnpOn3BeDeHn, TAK IN BpeKmE octahOBa HnI npOpammmPoBaHn (cm. Hxke).
Pn Bocnpo3BedeHnn nporpaMMbl Haxatne KhoNOK TRACK BbIbBaet nepexoK cneJyUeien nnn npedbyuee Iopoxke nporpaMMbl.
KhoNkDIRECT ACCESS B (TOnbKO Ha npJIte)
LHPOBbIe KHOJI, NOMEeHHbIe OIT "1" Do "10" n >10", HcNOnb3yOTcI INI pRmOrO Bb6Opa IOpoxKn C NylbTa, BMecTo TOTO, UTo6bl IObipTaCIO Hee NpyTeM nepe6opac NOMoUbKOHNOK TRACK.
IepBbIe DecaTb IopoXek BbI6paHOTc IpoCTbIM HAKATHeM KHONK, HAPnImep, UTo6bI BbI6paTb
TpeBIO IopOxKy, HaxMnTe KhoNkY "3".
YtO6bI BbIbPaTb Iopoxkcy C HOMePOM 60JIbIe 10, CHaJATA HaxMnTe ^ 一 > 1 0 ^ 一 ,3ATEM BBEInTe HOpE pIopoxkN. HanpImep, YtO6bI BbIbPaTb Iopoxkcy 12, HaxMnTe ^ 一 > 1 0 ^ 一 ,3ATem "1", 3ATem "2".
Homep Bb6paHHoI DopoXKn OTo6paXaetcHa HnCnnee.
Matpua 4x4 npabOB CTOpObI nCnpea ("kaneHapb") OTo6paXaET Bce DOpoxKn Dnka. Ecnn Dopoxek 6Onbwe 16-Tn, To, He3ABNCmIO OTTO, KAKaDopoxKa HrpaET, 6yUT CBETNbC Bce HOMepa PnOC INNkATOP "OVER". 3Ta Matpua He3ABNCMa OT OCHOBHO uΦpoBOI oBnactn DnCnpeA, Ie Bcerda NOKa3bIAeTcHomePekuSei DopoxKn, daxe ecn OH pBeBbIaet 16.
KhoNkDIRCT ACCESS MoXHO TaKKe HcNoJIb3OBaTb IINBBA BBOJa npOrpaMMbl (CM. HIXKe).
KhoNk SEARCH (Tolbko Ha npJIte)
C nOMOsbH 3nX KHOK OCUeCTBnEETcYCKOpEHoe BocnpOn3BeDeHne B HnPaBHeHHn BpepeHn Ha3aJ. Noka Bby ydepXnBaete KhoNky B HaxATOM COCToHHn, INCK DnBXkETcC NOBbIeHHo CKOpOCTbHn CnblWeH 3ByK BbICOKoCKOpOCTHO CnTbIBaHHn. PpN OTnyckAHnn KHOKN pON3OJTe BO3BpAT K HopMaNBHomy BOCnpOn3BeHnIO.
coeepkauyo 20-Tn Iopoxke.
- 3aRpy3nTe nIck n KhoNkoI OPN/ CLS 3akpoIte noToK.RCD-06 cHTaet coepkaHne nIcKa.
- Haxmte KhoNky PROG ha npIbTe.Ha nCnIe 3arOpntcHnIrkatop PROGRAMnHaIINCbP:00"O3HaauIOsa, yTo npOnrpBbATEb JxDet BBOda HOMepa nepBoIdoPoxKn.
- Пи помоши Кногok DIRECT ACCESS ВьадиTe HOMeрперBoДорожкnporpaMMbI. Home 3anomHaetcra ABTomatHueckn HaAnncb MeHЯETcRa "P:01", nOKa3bIBaR, YTO OJHa DOPoxKa BBeDEHa B PAMrTb. NOBToPЯ 3OT WAr, BvEJaTe octaJIbHbIe DOpOxKn nporpaMMbl.
Pocne BbOda nporpAmbl RCD-06 octaetcB pexnme nporpAmbl Do tex nop, noka He 6ydet OTKpbI NtOK nIN DBAxkbI NODpaHaxata KhoNka STOP. PnHaxatnn KhoNkPIAY 6ydet Bocnpon3BOOntbcra He BeCbDnCK Chauana, a BBeDeHHaar nporpAMMa. BoIbShInCTBO FyHKUn 6ydet DeiCTBOBaTbDnI nporpAmbl KAK dJa ObUHoro DNCKa.HanpImep, Haxatne KhoNkn TRACK BbIOBET nepexod He K cNeDuOse Iopoxke DNCKa, a K cNeDuOse Iopoxke nporpAmbl. KhoNka REPEAT (cm. Hxke) BbIOBET NOBTOpe He DNCKa, a nporpAmbl.
Khonka REVIEW
(TONbKO HnTynbTe)
3ta KHONka HcNoIb3yETcI Ia nPoCMOTpa nporpammbl. NocIe ee Haxatna Ha Incnlee NOBIIETcHomep nepBoJ DOpOxKn nporpammbl. OH Miraet Ipimepno 5 cekyn. Ecn Choba Haxatb KHONky REVIEW, noka mHaer Homep, 6ydet nokazahn Homep cneIyIoSei DOpOxKn. Takm o6pa3om MoXHo IpocMOTpeb BCIO nporpammy.
Ecnn He haxatb Khonky REVIEW, noka Homep IopoxkMnraet, npoecc npocmotpa OTMeHReTcnaanapat Bo3BpaUaetcBnCXOIIHOe COCTOHNHe. TolbKO HaNcPiee OctaetcHomep IocneHnnpocmTopeHHoIopoxkN.
B npocece npocmoTpa Moxho ydaNtB dopokky n3 nporpammbi npn NOMOu KNONK Clear.
Khonka CLEAR H
(TOJIbKO HA TnyIbTe)
3Toi KONKoN I3 nporpamMbI MOxHO ydaHnTb ty nHn Hnyo Dopoxk. NaHnTe DopoxkY B nporpAMMe, BbIOHnHB npoueDpy npocMOTpa c NOMOsbH KOHN REVIEW, HnHaKMITE CLEAR, Noka Homep DopoxkMnraet Ha dncPnee. Pocne 3TOrO MoXHO npoJOnKtB npocDpy npocMOTpa.
KhoIIka RANDOM D
(TOnbKO Ha nYnBTe)
3Toi KhoNkOJ 3anyckaTc npOnrpbBaHne BCex DOpOKeK INCKA B CnyaHOM NopRJaKe. Ha dncnnee 3atopaeTc HndNKatop "RANDOM". Korda Bce DOpOxKn 6yDyT BocnpoIN3BeDeHbI NO ODHOMy pa3y, BocnpoIN3BeHHe OCTAHOBHTc, ecn He BKInoue pexHm NobTopa (REPEAT). B npotNBHom cnyae BocnpoIN3BeHHe 6yDet npOOnjXaTbcra B CnyaHOM NopRJaKe Ido Haxatna KhoNkn STOP. npocMoTpa. Haxatna KhoNkn STOP
Khonka REPEAT
(TOnbKO Ha nYnbTe)
Повторhoe BOCПОнЗВЕДЕНUE ДОРОЖКИ,ДИСКА ПИПОНТРAMMbI ПОДОЛЖСЕТСДОТЕТNOП,ПOKA НЕБUYET OMEHENO KHNKOY REPEAT ПИП STOP. Перьоны Нжати КногнК REPEAT BKHQUaET ржим REPEAT 1 (Повтор TEкушЕ ДОРОЖК). Ворре Нжати BKHQUaET ржим REPEAT ALL (Повтор BCEROДИСК).Трете Нжати OTMEHAET ржим NOBTOPA.Пп ВКПЮЧЕHOM ржим повтора на диспee CBETNTCЯ COOTBETCTBYOUПИ ИНДИКATOP.
Kak OTmeueHO Bbliepe,peXMMIOBTopa MoKet 6bItb HcIPOJIb3OBAH COBMeCTHO C peXMMOM BOCnPOn3BeDEHINBA CNyAHNOM NOpJKe.
PpOeBpe Ka6en, noCoeHnHIOue BbIXoR C-RD-06 K yCnHnTeIHO; TOT IIN BxOD Bb6paH Ha ycHnTeNe; He BkIIOe Hn HA ycHnTeNe peXmKoHTpona CnHa, 3aNcHbIAeMOrO Ha MaHHToΦoH (Tape Monitor). PpOeBpe TaKke noCoeHneHne ycHnTeN K KOHOKAM.
TexHnueckne xapakTepncTNKn
06uhe rapmoHueckne nckxehnTHD+U 0,0045% Ha1 KfU INTEPMoynHbIe NCKxehn 0,0045% Ha1 KfU
Yactotha xapaktepuctnka (+0,5日 20-20000
BanaHc ctepeokahanob ±0,5 n6
JIHeHocThb a3OaCToTHoXapaKTePcTnKn ±0,5rpaIyca
Pazdelenne cTrepeokhaJIOB >98 5b Ha 1 K
OthoWeHne cHn/wh >100
UHpo-aHaNoorOBbIe Ipeo6pa3ObaTeJI
Cta6nblbHoctb ckopoctn, deToHaun BbyXoHDHO mmpedanc
UHPOBOB BbIXoA pa3Max 0,5B
ImpedaHc oKoHeuHn Harpy3Kn 75OM Tpe6obAHn K 3eKtponntAHIO 230B,50T
Iotppe6nemma Moocnoctb 20Bt
437 x 73 x 313 MM
60 MM
5,9 Kt
ROTEL
The Rotel Co. Ltd.
10-10 Shinsen-Cho
Shibuya-Ku
Tokyo 150-0045
Japan
Phone: +81 3-5458-5325
Fax: +81 3-5458-5310
Rotel of America
54 Concord Street
North Reading, MA 01864-2699
USA
Phone: +1 978-664-3820
Fax: +1 978-664-4109
Rotel Europe
Dale Road
Worthing, West Sussex BN1 12BH
England
Phone: +44 (0)1903 221 761
Fax: +44 (0)1903 221 525
Rotel Deutschland
Kleine Heide 12
- Important Safety Instructions
- IMPORTANT FOR LASER PRODUCTS
- WARNING!
- CAUTION
- APPLICABLE FOR USA, CANADA OR WHERE APPROVED FOR THE USAGE
- Contents
- About Rotel
- Getting Started
- A Few Precautions
- Placement
- Control Identification
- AC Power and Control
- AC Power Input 15
- Power Switch 1 and Power Indicator 2
- Output Connections
- Analog Outputs 11
- Digital Output 12
- Operation
- Infrared Remote Control 4
- Display 5
- DiscDrawer
- Transport Control Buttons
- OPEN/CLOSE Button
- PLAY Button 7M
- STOP Button F
- PAUSE Button
- TRACK Buttons
- DIRECT ACCESS Buttons B
- Remote Only
- SEARCH Buttons K
- Additional Features
- PROGRAM Button 1
- REVIEW Button 1
- CLEAR Button H
- RANDOM Button D
- REPEAT Button
- SCAN Button E
- TIME Button
- External Remote Input
- 12V Trigger Connection
- Troubleshooting
- Power Indicator Is Not Lit
- Fuse Replacement
- No Sound
- Specifications
- RISQUE D'ÉLECTROCUTION NE PAS OUVRIR
- BHIMAHNE
- Copepknne
- OKompann ROTEL
- Pepbblewarn
- MepblnpedoctopoKHOCTN
- YctahOBka
- 06o3haueHna opraHOB ynpabLeHn
- Ntahne npomrpbibatejra
- PazbemДлсeTeBoro shHypa 15
- BbIKIIOUaTeNb PNTAHNIAHINDAKATOP NHTAHNIA 2.
- PoiocoeiHHeHne BbIXoIOB
- Ducnnei 5
- 3arpy30hblnnotok
- KhoNkynpabJeHn npieepom
- KhoNka OPEN/CLOSE A
- KhoIIka PLAY
- KhoIIka STOP
- Khoinka PAUSE
- KhoŋkN TRACK
- KhoNkDIRECT ACCESS B (TOnbKO Ha npJIte)
- KhoNk SEARCH (Tolbko Ha npJIte)
- Khonka REVIEW
- Khonka CLEAR H
- KhoIIka RANDOM D
- Khonka REPEAT
- TexHnueckne xapakTepncTNKn
- ROTEL
Brand : ROTEL
Model : RCD-06
Category : CD Player