
MISTER CAPPUCINO - Coffee machine MORPHY RICHARDS - Free user manual and instructions
Find the device manual for free MISTER CAPPUCINO MORPHY RICHARDS in PDF.
| Product type | Espresso coffee machine with integrated milk frother |
| Brand | MORPHY RICHARDS |
| Model | MISTER CAPPUCINO |
| Dimensions (approx.) | 30 x 25 x 35 cm |
| Weight (approx.) | 4 kg |
| Power supply | 220-240 V ~ 50 Hz, 1000 W (approx.) |
| Water tank capacity | Up to 6 cups (markings 2, 4, 6) |
| Carafe capacity | 6 cups (max) |
| Main functions | Espresso, cappuccino, latte, integrated milk frother, strength selector (mild to strong) |
| Included accessories | Glass carafe with lid, stainless steel milk jug, measuring spoon/scoop, metal filter, filter holder, milk frother |
| Maintenance and cleaning | Removable parts dishwasher safe (except milk jug); regular descaling recommended every 2-3 months in hard water areas |
| Safety | Automatic shut-off not mentioned; on/off switch; safety cap; hot surfaces indicated |
| Spare parts and repairability | Filter, filter holder, carafe, milk jug, milk frother available; repair by authorized service |
| Warranty | 2 years (excluding consumables and improper use) |
| Country of manufacture | Not specified (manufactured to international standards) |
Frequently Asked Questions - MISTER CAPPUCINO MORPHY RICHARDS
User questions about MISTER CAPPUCINO MORPHY RICHARDS
0 question about this device. Answer the ones you know or ask your own.
Ask a new question about this device
Download the instructions for your Coffee machine in PDF format for free! Find your manual MISTER CAPPUCINO - MORPHY RICHARDS and take your electronic device back in hand. On this page are published all the documents necessary for the use of your device. MISTER CAPPUCINO by MORPHY RICHARDS.
USER MANUAL MISTER CAPPUCINO MORPHY RICHARDS
Mister Cappuccino Espresso coffee maker with heated milk frother
Please read and keep these instructions
IMPORTANT SAFETY INSTRUCTIONS
The use of any electrical appliance requires the following common sense safety rules.
Primarily there is danger of injury or death and secondly the danger of damage to the appliance. These are indicated in the text by the following two conventions:
IMPORTANT: Damage to the appliance! In addition we offer the following safety advice.
WARNING: Danger to the person!
Location
- Remove all the packaging and retain for future reference.
- Ensure the coffee maker is used on a firm, flat surface.
- Do not use the coffee maker outdoors or in a bathroom.
- Do not place the coffee maker on a highly polished wooden surface as damage may occur to the surface.
- Do not place the coffee maker on or near hot surfaces such as a hot plate or radiant rings or near a naked flame.
WARNING: Do not place the coffee maker onto a metal tray or metal surface whilst in use.
Mains lead
- Do not let the mains lead hang over the edge of the worktop where a child could reach it.
- Do not let the lead run across an open space e.g. between a low socket and table.
- Do not let the lead run across a cooker or other hot area which might damage the cable.
The mains lead should reach from the socket to the base unit without straining the connections.
Personal safety
Ensure the lid of the glass jug is securely in place before pouring.
Take care to pour hot coffee slowly and carefully without tipping the glass jug too fast.
- Do not fill above the capacity mark of the water level gauge marked on the jug.
- Do not use the glass jug in a microwave.
- Milk should not be reheated, only heat it when required.
- When heating milk, please use stainless steel jug provided.
- Do not fill milk jug above the MAX mark.
- Do not touch metal parts until the unit has cooled.
Children
Children do not understand the dangers associated with operating electrical appliances. Never allow children to use this appliance.
- This appliance is not intended to be used by young children or infirm persons unless they have been adequately supervised by a responsible person to ensure they can use the appliance safely.
- Young children should be supervised to ensure that they do not play with the appliance.
Product safety
- Never use warm or hot water to fill the water tank.
- Do not overfill the water tank.
-
Scalding may occur if the pressure cap is removed during the brewing cycles, therefore never open or remove the pressure cap whilst the machine is switched on. Pressure cap must be removed slowly before unlocking the filter holder. This procedure must be followed even when the machine is switched off and cooled.
-
The glass jug and the filter holder get hot while the machine is in use. Always use with care.
Make sure the mains lead does not touch the hot parts of the machine. - Do not wind the mains lead around the hot appliance or store the appliance until it has fully cooled down.
- Do not remove the filter holder when the appliance is producing hot water or coffee. Turn the machine off and release the steam first by slowly removing the pressure cap.
Treating scalds
- Run cold water over the affected area immediately. Do not stop to remove clothing, get medical help quickly.
Other safety considerations
- Disconnect the coffee maker from the mains supply when filling, cleaning or not in use.
- When unplugging, turn any control to 'off', then remove plug from the wall outlet.
- Keep the outside of the coffee maker area clean and dry at all times.
- Do not touch hot surfaces. Always use handles or knobs.
- Do not immerse the coffee maker itself in water and always ensure the electrical connections are kept dry.
- Do not operate any appliance with a damaged cord or plug or after the appliance malfunctions or has been damaged in any manner. Ring the helpline number for advice on examination and repair.
-
The use of attachments or tools not recommended or sold by Morphy Richards may cause fire, electric shock or injury.
-
Do not use the coffee maker for anything other than its intended purpose.
- Do not leave the product unattended when brewing.
ELECTRICAL REQUIREMENTS
Check that the voltage on the rating plate of your appliance corresponds with your house electricity supply which must be A.C. (Alternating current).
If the socket outlets in your home are not suitable for the plug supplied with this appliance the plug should be removed and the appropriate one fitted.
WARNING : The plug removed from the mains lead, if severed, must be destroyed as a plug with a bared flexible cord is hazardous if engaged into a live socket outlet.
Where used, should the fuse in the 13 amp plug require changing, a 13 amp BS1362 fuse must be fitted.
GETTING THE BEST FROM YOUR NEW COFFEE MAKER...
Safety first
Caution must be used when handling hot water, coffee or steam.
Run water through your machine before first use
It is important to run water through your coffee maker in order to rinse the machine. You can also run water through to warm your coffee machine.
Descale as appropriate for the hardness of the water in your area
It is important to descale as the performance of your coffee maker may be impaired by limescale and other impurities in the water supply.
Features
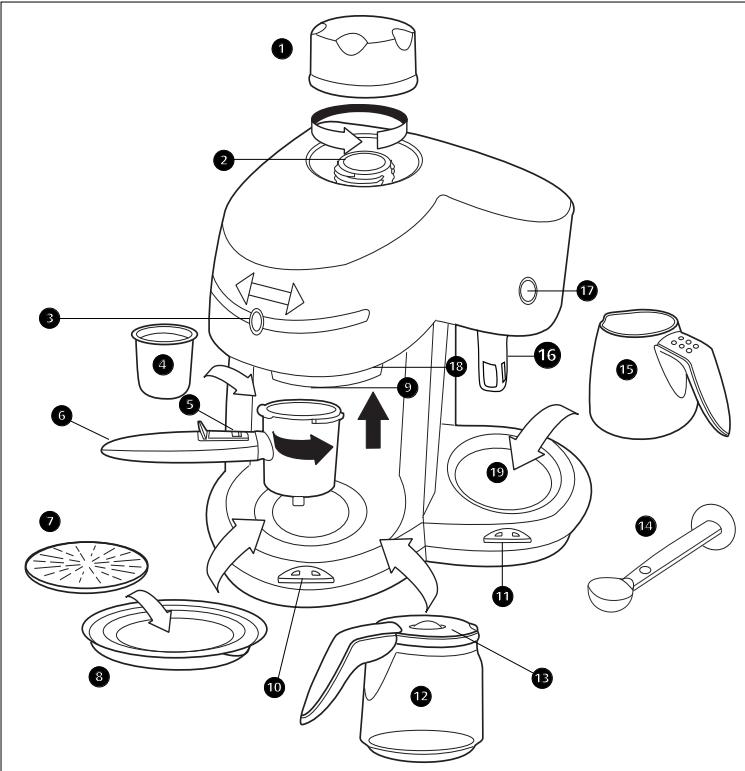
Pressure cap
Water tank
3 Strength selector
4 Filter
Filter retaining clip
6 Filter holder
Drip tray metal plate
8 Drip tray
Hot water outlet
On/off/switch with power and ready indicators
Milk frother hot plate on/off switch with indicator
Glass coffee jug with lid
Jug lid
14 Measuring spoon/tamper
15 Milk frother jug
16 Milk frother attachment
17 Milk frother on/off button
18 Steam exhaust tube
19 Milk frother hot plate
OPERATING THE APPLIANCE
Before use
Take your coffee maker out of the box and remove the packaging.
Before using the appliance for the first time, clean thoroughly by operating two or three times with the maximum volume of fresh water (6 cups) but without using coffee.
Wash the detachable parts of the machine in warm soapy water.
Making espresso coffee
1 Unscrew the pressure cap by turning it anti-clockwise.
2 To fill the water tank use your glass jug to measure the volume of water required. The jug is marked with the water levels for 2 cups (minimum), 4 cups and 6 cups (maximum).
Always switch the machine off and remove the plug from the socket before filling the water tank. Care should be taken to ensure that the correct quantity of water is placed in the tank, as the machine always uses all the water.
3 Close the pressure cap tightly by turning it clockwise.
4 Place the washable metal filter into the filter holder and add the desired quantity of coffee to the filter using the measuring spoon provided. Special marks on the inside of the filter show the correct levels for 2, 4 and 6 cups of coffee lightly compress the coffee down. Remove excess coffee from the edge of the filter.
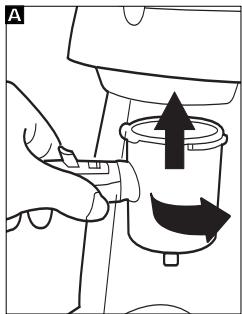
5 Position the filter holder underneath the water outlet, push it upwards and turn it to the right into the locked position to fix it onto your coffee machine A.
Note: Push firmly to the right to lock into position.
6 Your machine is fitted with a strength selector which allows you to make LIGHT to STRONG coffee. Set the strength selector mid way between LIGHT and STRONG for MEDIUM strength coffee.
7 Place your glass jug with the lid on the drip tray and directly under the spout of the filter holder, ensuring that the jug handle is pointing outwards from the unit.
8 Plug the espresso coffee maker in athte wall socket and push the coffee on/off switch to ON position. The orange light will glow to show the ecoffee maker is working.
9 The coffee will start to flow from the filter holder spout after about 2 or 3 minutes. Wait until all the water from the water tank has flowed into your glass jug and the green light glows.
10 When the filtering process is complete switched off the coffee maker, remove the glass jug from your coffee maker and pour the coffee into your cups.
WARNING: The coffee maker and hot plates are hot and remain hot for some time after switching off.
11 Unplug machine and allow to cool. Slowly remove the pressure cap.
12 To remove the used coffee grounds, remove the filter holder by turning the handle to the left until you find that the filter holder drops down. Flip the filter retaining clip so that it retains the filter. Turn the filter upside down and knock out the grounds. Flip the retaining clip back along the handle before the next use.
Note: Due to the amount of steam lost through the process, the coffee produced will be less than the water put in. This is accounted for in the amount to put in.
Making a cappuccino
Prepare your machine as described in the section 'Making a coffee'. Use your glass jug for measuring the correct amount of water needed.
Frothing milk
It is advised to start heating your milk at the same time as heating your coffee or several minutes before making coffee to ensure milk is hot.
1 Fill the stainless steel milk jug provided with the required amount of milk. Do not exceed the maximum level or add less than the minimum level.
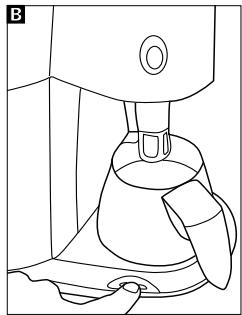
2 Place the jug on the hot plate and switch on B.
NOTE: You can turn on the hot plate at the same time as the coffee on/off switch. It will take approximately 5-7 minutes for the milk to heat up to its optimum frothing temperature.
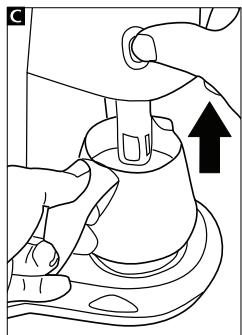
3 Lift the milk jug up to the milk frother blade C. Raise the milk jug ensuring that the cow is just under the surface of the milk - this will give the maximum froth. Maintain the milk jug in this position between 30-60 seconds.
WARNING: Take care as the milk will be hot.

4 Place the milk jug back on the hot plate to reheat the milk and preserve the quality of the froth.
NOTE: The jug can stay on the hot plate until the coffee has finished brewing but be careful not to burn your milk/froth.
5 Pour the coffee into cups and gently pour or preferably spoon the milk onto the coffee, then sprinkle a little chocolate powder for the perfect cappuccino.
6 Turn off the milk frother hot plate by pressing the on/off switch.
WARNING: the stainless steel jug and the hotplate will remain hot for sometime after switching off.
Cleaning
The milk frother blade can be wiped clean still attached to the machine or it can be removed for easy cleaning by unscrewing the blade and shaft. Wash carefully in hot soapy water.
For quick cleaning just after use, fill up the milk jug with hot water and run the frother for 30-50 seconds; repeat the process twice.
If the milk has been left for a long time the cowl and blade can be removed and soaked in hot soapy water for 2-5 minutes before rinsing clean.
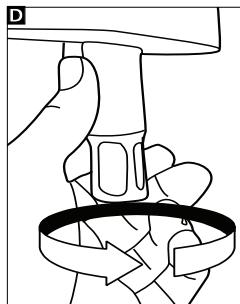
1 Remove the cowl directly after use and rinse in warm cold water D. It is recommended that you clean the blade immediately after use, as dried milk can be difficult to remove.
The frother blade can be wiped clean still attached to the machine.
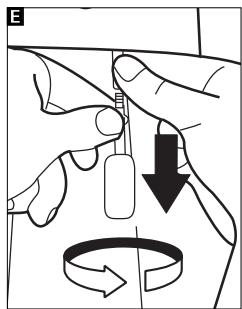
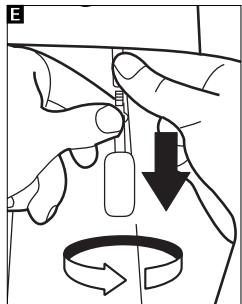
2 If further cleaning is required the propeller and shaft can be removed. To replace, insert the stem of the milk frother blade into the mounting hole on the unit and screw into place
NOTE: If the blade is removed, ensure that it is fully tightened in place otherwise the frother will not operate properly.
3 There may be some splash back of milk on the underside of the frothing unit. Switch the unit off then simply wipe this area clean with a damp cloth.
WARNING: THE FROther ONLY OPERATES CORRECTLY WHEN THE COWLING IS CORRECTLY ASSEMBLED.
DO NOT OPERATE THE FROTHER DRY OR NOT SUBMERSED IN LIQUID FOR LONG PERIODS OF TIME
RECIPIES
Cappuccino
1/3 espresso
1/3 hot milk
1/3 hot frothed milk
Chocolate powder for sprinkling
1 Prepare coffee as per 'making a perfect espresso coffee' instructions.
2 Fill the stainless steel milk jug with the required amount of milk, place on the hotplate and switch on. The milk will take approx.5-7 minutes to reach the appropriate temperature.
3 Froth milk by lifting the milk jug up to the milk frothing blade ensuring that the blade is just under the surface of the milk and press the milk frothing button. The milk will take approx. 30-60 seconds to froth.
Pour the coffee and hot milk into a capuccino cup, spoon over frothed milk.
5 Sprinkle with chocolate powder to serve.
Cafe Latte
1/2 espresso
1/2 hot frothed milk
1 Prepare coffee as per 'making a perfect espresso coffee' instructions.
2 Fill the stainless steel milk jug with the required amount of milk, place on the hotplate and switch on. The milk will take approx. 5-7 minutes to reach the appropriate temperature.
3 Froth milk by lifting the milk jug up to the milk frothing blade ensuring that the blade is just under the surface of the milk and press the milk frothing button. The milk will take approx. 30-60 seconds to froth.
4 Pour the coffee into a tall glass and top with the frothed milk.
Moccacino
1/3 espresso
1/3 hot frothed milk
1/3 hot chocolate
1 Prepare coffee as per 'making a perfect espresso coffee' instructions.
2 Fill the stainless steel milk jug with the required amount of milk, place on the hotplate and switch on. The milk will take approx. 5-7 minutes to reach the appropriate temperature.
3 Froth milk by lifting the milk jug up to the milk frothing blade ensuring that the blade is just under the surface of the milk and press the milk frothing button. The milk will take approx. 30-60 seconds to froth.
4 Prepare the hot chocolate according to the instructions.
5 Pour the coffee, hot milk and hot chocolate into a tall glass and serve.
Irish coffee
Makes 2 servings
40ml of double cream
2 tsp sugar
4 shots of Irish whisky
350ml hot strong coffee
1 Whip double cream until thick then chill.
2 Warm 2 Irish coffee glasses with hot water and place in each a teaspoon of sugar and 2 shots of Irish whisky.
3 Divide coffee among the glasses.
4 Slowly dribble the chilled cream over the back of the spoon.
5 Do not stir.
Amaretto coffee
250ml hot strong coffee
2 tablespoons of double or whipped cream
2 shots of Amaretto
Sugar to taste
1 Stir the coffee and alcohol together either with a couple of tablespoons of double-cream, or top with a dollop of whipped cream.
2 Sprinkle with grated chocolate and serve.
HINTS AND TIPS
Cleaning and maintenance
Refilling
1 Switch off the coffee maker, and allow 5 minutes to cool.
2 Remove the pressure cap slowly and refill with cold water.
Dscaling
If you live in a harder water area, we recommend that your coffee makers is descaled at regular intervals, eg. every 2 - 3 months. In areas of moderately hard water you should descale every 6 months.
If the water filters through more slowly than usual, it is a sign that descending is necessary.
We recommend you to use proprietary liquid descaler which is especially made for coffee makers and plastic kettles. Follow the instructions on the bottle or sachet, and them operate the coffee maker with just water 3 times before making coffee.
- Do not use kettle descaler unless the packet specially states it is suitable for coffee makers.
Cleaning care
Unplug the coffee maker, slowly remove the pressure cap and allow to cool.
Do not immerse the coffee maker in liquid.
Rinse the water tank occasionally with cold water. Do not use a cloth as any residue or lint may be left behind to clog the coffee maker.
Wash the milk frother blade, mailk frother attachment, milk frother jug drip tray metal plate, drip tray, glass jug, filter and filter holder, in warm soapy water. Rinse and dry all parts thoroughly. Refit filter, filer holder, milk frother blade, milk frother attachment
Wipe all external surfaces with a damp cloth and dry thoroughly.
Never use harsh or abrasive cleaners.
MILK FROTHER PARTS (EXCLUDING MILK FROTHER JUG) ARE DISHWASHER SAFE
YOUR TWO YEAR GUARANTEE
It is important to retain the retailers receipt as proof of purchase. Staple your receipt to this back cover for future reference. Please quote the following information if the product develops a fault. These numbers can be found on the base of the product.
Model no. Serial no.
All Morphy Richards products are individually tested before leaving the factory. In the unlikely event of any appliance proving to be faulty within 28 days of purchase it should be returned to the place of purchase for it to be replaced.
If the fault develops after 28 days and within 24 months of original purchase, you should contact the Helpline number quoting Model number and Serial number on the product, or write to Morphy Richards at the address shown. You will be asked to return the product (in secure, adequate packaging) to the address below along with a copy of proof of purchase.
Subject to the exclusions set out below (see Exclusions) the faulty appliance will then be repaired or replaced and dispatched usually within 7 working days of receipt. If for any reason this item is replaced during the 2 year guarantee period, the guarantee on the new item will be calculated from original purchase date. Therefore it is vital to retain your original till receipt or invoice to indicate the date of initial purchase.
To qualify for the 2 year guarantee the appliance must have been used according to the manufacturers instructions. For example coffee makers should have been regularly descaled.
EXCLUSIONS
Morphy Richards shall not be liable to replace or repair the goods under the terms of the guarantee where:
1 The fault has been caused or is attributable to accidental use, misuse, negligent use or used contrary to the manufacturers recommendations or where the fault has been caused by power surges or damage caused in transit.
2 The appliance has been used on a voltage supply other than that stamped on the products.
3 Repairs have been attempted by persons other than our service staff (or authorised dealer).
4 Where the appliance has been used for hire purposes or non domestic use.
5 Morphy Richards are not liable to carry out any type of servicing work, under the guarantee.
6 Plastic filters for all Morphy Richards kettles and coffee makers are not covered by the guarantee.
- This guarantee does not confer any rights other than those expressly set out above and does not cover any claims for consequential loss or damage. This guarantee is offered as an additional benefit and does not affect your statutory rights as a consumer.

CONSIGNES DE
SECURITE IMPORTANTES
WAARSCHUWING: DE MELKOPSCHUIMER WERKT NAAR BEHOREN WANNEER DE STOOMPIJP GOED IS GEMONTEERD.
DE MELKOPSCHUIMER NIET GEDURENDE LANGE PERIODEN DROOG OF ONDERGEDOMPELD IN VLOEISTOF GEBRUKEN
RECEPTEN
Cappuccino
1/3 koffie
1/3 hete melk
1/3 hete opschuimmelk
WARNING: Fara for person!
Placering
WOJA DWULETNIA GWARANCJA
MEPbI IPEIOCTOPOXHOCTN
ПИ ПОЛьЗВАнИ NIOБИМ ПЕКТРОПИБОМ NOE6XODIMO СОДЮДТБ ANEMENTAPHYO OCTOPOKHOCKTБ.
Bo-nepBbIX, HenpaBnIbHoe
ncPbI3OBAHne MOKET NOBNeYb
TpAByM INIc McPeTb, a BO-TObpIx,
pNBEcK N NOBpeKdEHHO
yCTPOIcTBa. MepbI 6e3oNaCHocTN BdaHOM pYKOBOcCTBe
noPa3dJIeIOTcHa cNeIyUOnie DBe KaterOpIN:
BAKHO: Onacnoctb noBpeJdeHn yCTpOCTBa! KpOme 3TO, Mbl npEJaRaem DonONHnTeNbHbe COBeTb IIO MePam 6e3OnaNoCHoCTn.
PNEyPPEKJEHHe:OnaChocTb nOlyuHn TpaMb!
Pa3meueHne
- CHMNHTE C yctpoTbCTBa CIO ynakOBky COxpaHNTe ee nI NaONCEyUOeI ROPMHeHEN
- YbDnteScb, YTO KcfoBepKa paCnOlaeraTcH Na IpoHNOI, PnCKoN NOBepXHOCTn.
He nol3yntecb KoepeBapkoHa ynIe mN B BaHNo.
He yctahabnibawte Koepebapky Ha xopoio OTnOJnnpoBAHHy o nobepxHOCTb, TaK KaK TaKaI naOBepxHOCTb MOKeT 6bItb NobpeXDeHa.
He yctaHabnBaIte KoepEbpKy Ha torpaHx NOBEPXHOCTAx IIN pRDOM C HIMN, HApnpMep, C 3NeKtpuYeCKO nnTko NN B6JIa3N OTKpbIToTO ORHa.
PNEUYIPEXJDEHME:He cTaBbTe KoFeBaRPy Ha metaTnIeCckn NIOHc HNn HHyO metaTnIeCkyo NOBepxHOCTb BO BpMa paobToIb.
Cetebo npoBoa
CneIte 3a Tem, YTo6bI npoBod He CBnCaI C Kpaar paOchey NOBepxHOCTN TAK, YTO DO HrO MoR 6bI DOTPOHytbcpeBEOHK.
Cneinte 3a Tem, YTo6bl npoBd He npoxOJIH Npe3 OTKpbIToe IpoCTpaHCTBO,T. e.OT HnKopacNoJXeHHoP03eTKN K CTONY.
He donyckaTe toro, YTo6bI shHyp npoxOJIH NaD KxOHHO IINTOH INn DpyTmN TropHMn NOBepXHOCTMn, KOtOpbIE MOrY IOBpeDntb erO.
CetBoi npoBd oJoxH 6bTb nOKnIOUeH K pO3Etke 6e3 HATRAKHeH.
B30nacHocTb NOJB3OBaTeJIa
- Пегд Tem, Кад Налвать кODE, y6eNTeCb, YTO KpbIshka
CTEKJIHHOчш XopoJO 3akpenJIHeA.
HannBaIte KOFe MeIeHHOIOCTOPOXHO,HE HAKIOHRACTKINHHyIO GaUy CInuWKOM6bICTPO.
He hainbaite BOblbIe MeTKn, HaneceHHoHa Yauhe.
3aIpeuaaTcraCnOpIb3OBaTbCTeKJIHHyU cAlyBMMKPOBOHOBO Nei. - Monoko Hénb3a pa3oRpeBaTb NOBtopHO, HarpeBaTe erO toIbKO npri Heo6xoDMIOCTn.
- Pnр раогравим monoka
нользунтсь пилагаим чашей
иЗ Нержавецч стал.
He hanoHnHre Taay DnMa MONoka BbIe OTMeTKn MAX.
HeDOTparMBAeTcBdo MeTALIueCKXuACTeN,NOKA yCTPOIcTBOHEOCTbIO.
Aetn
- DeTN He OOC3HaOT OnaCHOCTN, KOTOPAR MOKET BO3HNKHYb npn pa6oTe C 3NeKtPOnpnp6opam. DeTAM KaTEROpMueCKn 3anpeuAetcN PONb3ObaTbCn DaHHbIM np6opom.
-Данньnpибор He npeHa3HaueH ДгЯ ИСПОЛБЗВаоИ МALEЕБКIMМ ДетьМИИ INHBaIaDAm 6e3 Надлесхаero рпсмOTpa co
CTOPOHbI 10BTBCTBEHHORIO Mua C ZelbuO 06ecneHnE 6e3oNacHOrO NCNOLB3OBAHNI pRbopa.
- TTo6bl MaIeHbKne DeTn He IuPraJIc n pIb6OpOM, OHN DOnJXhbl HaxoDITbCn POn PnICMOTPM B3pOcBbX.
Mepbi 6e3oNaChOCTN
HkoTdHa HanoNnTEmKoCTb DnBODI TENNOI IINrOpaey BDOI.
He nepenonHnIte emKoCTb Ia BObl.
EcInB npocece npirotoBlenHn KaOe CHrTb KpbIuKy,MOXHO NOnyUHTb OKOT,NO3OTMY HNKoTda He OTKpbIBaIte N He CHImaITe KpbIuKy,KOJa KOpeBapKa BKNIOUHe. IpePe ChrTneM pInlbTpa MeJIoENHO OTKpyTnte KpbIuKy. 3ToI npoeDpyb CneJeYET npIndepxNBAbCTaJaE B Cnyueae, ecIn KoPeBapKa BbIKIOUeHa N OCTbJa.
Bo BpemnncnoB3OBAHnna KopebapKnCTeKlnHHa Yaua n DepeKaTeNbФInbTa HarpEbaIOTcN. Bcerda 6yblte octopoknbl npn nCNoB3OBAHnN.
- YbdeHntTeCb, YTO cTeBOI npBoO H KcacaTcRrpaHx NacteY yCTpOJCTBa.
He 6MaTaBbAaTe CeTeBOI npoBoD BOKpy TOrpaHx qacteN He ybpaarTe YcTpoiCTBO Ha XpaHene, NOKA OHO NnHOCTbO He OCTbHEt.
BoBpemnpiroTOBnEHHropaey BoBbIINKoPeHcHmHaIte DePkaTeIb PnIbTpa.BkIIIOHTe KoopeBaApKy I ChaHaIb BInyCtNt Nap,MeJeHHOOTKpyTnB KpbIshky.
Pn OwnapnbAHn
HemeJEnHo NoCTabTe npaKeHHb yuactOK noxIoHyO BOy.CNHmte OeJy c npaKeHHOro yuactKa,6bICTpo Obpatntec3aMeDunHckOn NOMOsbIO.
Ecnn BnIka CeTeBOrO nPoBoda npri6oba He NoIxDxOHT K DOMaushNM 3NeKTPnueckm P03eTKam, Heo6XoJIMMo ee 3aMeHnBuNko COOTBeCTByIoUeO 6bpa3ua.
PNEyIPEXJEHNE: Pn NoBpEKeHm CHrTo Co uHypa NHTAHN BUNK eE Heo6xOIMO YHNTOXHTb, NCKOJbKY BNKA c OrOHeHHbIM nPoBODM npEcTaJIeT ONAChOCTb PnE ee NoDKJIIOeHm K HaxOJaIeCn Po HaPrkHeHem po3eTke.
B 3aBnCmOCTN OT XeCTKoCTN NcPb3yEmo Bamn BDoI nepNoDnueckn ydaJIaIte HaKnIb n3 YauHnKa
BaJHo OuHnauTb KoFeBapKy O T hAKINN, TAK KAK HAcKInb N dpyrne npIMecn B yNtpe6IeHemO BoDE MOrYT yXyDmNTb nPON3BOIDHTeJIbHOCTb KoFeBapKn.
CocTBHbIe yactn
Kpbioka
2 Pe3epByap IJRA BoIb
3 PeryIaTOp KpeIOcTn KoOe
4 ΦnIbTp
3axmФnltpa
6 DepekaTeIb cHJIbTpA
7MetaJIINHeCKn IoDDOH
8 PoiDOn DJIa KOHdeHcata
BbIXoD ropayeBODbl
10 PepeKlOuateIeB "BkI./BbIKn" cHdMkAToPamB KblOJeHn IROTOBHOCTN
11 Pereknlouatael "Bkn./BbKn." nntatpOmbI NoDorpeBa BCNEHINBATeMa MOJOKa C INDnKATOPOM
CTeKJIaHHa YaHa c KpbIiKOJ
KpbiSha Kaa
14 Mepha Joxka/ynlnotteB
15 YashaДлЯ BCHeHnBaHnM MONOKa
16 Hacadka dIy BCNEHbAHN MOKOA
KONIKA BKJIIOUeHnI/ BbIKJIIOUeHnI BCNEHnBaHnI MOJOKa
18 ConnoДЯ Вынусka npa
Pnlatpomno nOorperba BCNEHNBATEJI MOnoka
3KCNJLYATALUNYCTPOINCTBA
Ipekjde yem npncTynntb K nCNoJb3OBAHnIO np60pa
BbIbTe KoFeBaKpy n3 Kopo6kn n ydaJIte YnakOBky.
Ipeep npBbIM npmmeHnem Koebeapkn Tuaetelbno pomOnte ee, DBA mIn Tpu pa3a HarpBc MAKcMaJIbHOe KOJIueCTBO BODI (6 Chaew), HO 6e3 KoPe.
BbmoTe Bce CbeMhble Yactn B ropaey MblbHOI BOe.
PnuroToBne Hne Kofo 3cnpecco
1 OTKpyTnTe KpbIuKy, Bpaaar ee npOTNB yacBOB CTpeKN.
2 PnHaonHeHnpe3epByapa DnB OdbI IcONb3yIte CTeknHHyU Oauy DnOTMpBvAHN Heo6XoDMOrO KOINueCTBa OdbI. Ha auy HaNecbI cNeDyUOuNE OTMeTK: 2 aukn (MmHNYM), 4 aukn 6 uwek (MaKcmym).
Ipeed HanoHHeHem pe3epByapa
IaBBObI O6BaTeBbHO BbIKIOHTe
KoPeBAPKy N BbHbTe Bnky N3
pO3eTKn. CneyEt BnMaTBeLbHO
OTMeprTB KOnuYeCTBO BOBo,
3aJIbAeMoI B pe3epByap,
NoCKoJIbKy KoPeBAPKa BcERda
NCNOL3yeT BcO BoYd.
3 3akpoTe KpbIku, BpaJaa ee no Yacoboi CTpeJIke.
4 YctaHOBnTE MOOUIINCMAETaJIHnECKnФINbTpB DEpKaTeIb KINbTpRa I,NCIOJIb3yMepHyIOJoxKy,3aCbIbTe BΦINbTpTpe6yEmoe KOINueCTBO KoPe.OTMeTKn Ha BYHTpeHNeYacCTNΦINbTpNaOKa3bBAoiTHeo6XoDMOE KOINueCTBO KoPeДЯ npriTOBnEHn2,4 n 6 yaWeKHaNItKa.Cnerka yTpAmSyIte KoPe.YdAIITE n3bIToHNoeKOINueCTBO KoPe c KpOMKnΦINbTpA.
5 PtoHecnTe pInbTp K HxHHeu TaCTN BbIXOa BOBt, HxKMTe BBepx M NOpeHnTE BnpaBO, YTOsbI 3aΦHKcNOpBaTb Ha KoΦeBaPke A.
PnmeaHne: HaxMMTe Bnpabo, 106bHaNaExKHO 3aФNKCuPOBaTbФmIbTp.
6 KoFeBapka oCnaeHa perynlTOpOM KpeNoCTn HAnITkA, KOtOpbI nO3BOJAEr TOrOBtB LIGHT (cna6bI) INN STRONG (KpenKn) KoFe.ДЯ npRTOBNeHn HAnITkA CPEDHEK peNoCTn, NOMeCTInTe peryIaTOp B pOmExyTuHoe nOLOKeHne MeJyOtMTkAmLIGHT nSTRONG.
7 YctaHOBInTe CTeKJIaHHU OaUy C KpbIshKOHa NIOdON H HenOcpeDCTBeHNO NOD DePxaTeNb FInbTpa.Y6eINTecb TOM,HTo pyuKa YauN NOBepHyTa B CTOpOHy OT KoFeBapKn.
8 BkIIOUHTe KoPeBapKy B pO3eTKy I nepeBedeTne peKJIIOuTaTeB nOIOJHHe "ON" (BKn.). 3aropITcOpaHBeBaJ aMnOuaK, NOKa3bIbAra, YTO KoPeBapKa pa6oTaet.
9 Yepe3 2-3 MInHybIYepe3 HocnK DePkaTeJIaФNlbTpa NaHcHT TeH KoPe. IIOJoxDITE, NOKA BcB BoDa I3 pe3epByapa He nepeJIbeTcB b AaU, N He 3aROpITcB 3eEhbl nHdNKATOP.
10 Nocne 3aBepenHnФnIbTpoBaHnB BkKnIOuHTe KoPeBapKy, ChMNTe C Hee CTeKNHHyO aUy n paJNeTc KoPe NO qauKam.
IPEyPEXKDEHNE:KoepeBapka nIIaTΦopMbI dIra NIOgRpeBa rOpHne N OCTAOCTCR OPRAHMn Eue HeKOTOpE BpEmr NoCle BbIKLIOUeHn.
11 BbIIOUHTe KoceBapKy u daIte eOCTbITb. MeJIeHNO OTKpyTInTe KpbIky (HaxoDHTcN IOd DaJIeHHeM).
12 Ttobby ydaTb KoFeHnyu ryUy, CHMNTe DePjKTeB fNlbTpA, NOBOPaNBaR pyKv BBeO, noka DePjKTeB He BByIaDeT Bn3. HaxMMte Ha 3azHM fNlbTpA dJa YdePjKBaHnA fNlbTpA. IpeBepHNrTe fNlbTp BBePx DHom N BbITpXnHTe ryU. IpeEd CNeDyUoIMM IcNoJIb3OBAHmE Bo3BpATne 3aXHM fNlbTpA B NcxOJHOe IIOJKeHne Ha pyKe.
PnroTOBJIeHne kanyuHNO
IpoiroTOBtE KoFeBapKy, KaK OINcaHO B pa3dene "PnroTOBHeNe KoFe 3cnpecco. IaTOrTO yTo6bO Tmepntb HxJHoe KOniHECTBO BObl, INcNb3yTe CTeKNaHHyU qaWy.
BcneHbAHne MoNoka
Pekomehdyetca Haatab
noDorpeBaTb MONOKO
OHDOBpeMeHNO C npiroTOBJIeHnEM
KoFe IIN3a HeCKONbKO MNHT Do
npiroTOBJIeHnA KoFe, YTObI
MONOKo 6blIO ropAIM.
1 3aONHnTe yauy n3 HepXabeIoueI cTaN Heo6xOdMbIM KOINueCTBOM MOnoka.He npEboaaiTe MAKcMaJIbHOrO yOpBnI He OJyCKaIte, YTObI yPObBeHb bIJI MeHbSe MMHmAbHOrO.
2 POMeCTNe TaHsHa NpAaTfOpMy IAnNoOrpeBa HBKIOUHTe BbIKIOuAteB 3


IPNIMEAHHE:Платформу Дд норгоба мохно BKЛЮЧаь ODHOBPemEHNO CперкИюкATEмЕ Дд ряг�OTOBENJIКОDE. ПонадбNTСРпнбиNTeBJHO 5-7 MNHT Дд расогрБа MONOKAdo ONTIMALBOH TempepaTpybl BCNEHBAHAN.
3ПОДнecиTeЧуС MOnOKOM K HасдКe BCNEHINBATEЯ ПОДнIMITEЧУДА MOnOKaТak, YTO6bI KOJInK BCNEHINBATEЯ HEMHOrO NOrpy3NlCBA MOnOKO. TakIM O6pa3oM DoCTIrAeTcR MAkCmMaJIbHOE KOJInCteBO NeHbI. YdErPkJBaiTe EMcKoCTb C MOnOKOM В 3ToM NOJoxeHIM 30-60 cKeYhD.
PENEYPPEXDEHNE: Bybte octopoxhbl - MONOKO rpoaee.
4 POMeCTInTe YaUy C MOnIOKOM 0bpaTHo Hn pIaTcPOMy DnI NpOOrpeBa, qTObI pa3OrPeTb MOnIOKo IN COxpaHtB KaEcTBO nHeIb.
Hacadky BCNEHBATEJMOXHO npoTepeTb, He CHIMAR C KoofeapkN.
2 EcIN Tpe6yETCA BoJee TuaTeNbHaN YnCTKa HacaKn, ee MOxHO CHrTb BMeCTe C BaONM. YoBbI NoCTaBnTb BaJ HacaKn BCNEHbATEJI MOnoka Ha MeCTo, BCTaBbTe erO B KpEnexHoe OTBepCTne KoPeBaPkn IN BKpyTnte E.
ПРИМЕЧАНЕ:ЕслнHacaJaKa 6blna ChHtA,почно Зakpenite ee Ha MeCTo.ВПрOTиBOM Cnyae BCNEHBATteBJ 6bETdФHKsIOHNIPOBaTb HENpaBInbHo.
3 Ha 6bpaTHoI CTOpOHe BCnEHnBaTeJIa MOxET 6bITb HEMHOr paoNcckAWeROcY MoJOKa. B 3TOM CUYae BbIKIOHHTe YcTOICTBO N BbITPOTE 30 MeCTO BJaXHOI TpANKOI.
PPEyPExKdEHNE: BCIEHNBATEIb FYHKUHOHPYET PPABUNbHO TOJbKO BcIyAE PIPABUNbHOYCTAHOBKN KOJIINAKA.
HE DONYCKAITE PA5OTbI BCNEHBATEJI BCVXVIO H HE NOPYKAAITE ETO B XIKKOCTb HA DOJIORE BPEM
PELIENTbI
KanyuHNO
1/3 kode 3cnpecco
1/3 ropyero MOLOKa
1/3 ropaero BCneHHO MOIoka
JokolaHbI npoWok
1 PnroTOBtKe KoeCOrnAHO nHCTpyKuIN NO pnproTOBLeHNO Koe3cnpceco.
2 3aonHnTe yawu n3 HepxabeOoue cnTAN Heo6XoIMbIM KOINueCTBOM MOnoka, NmecHTte Ha nlaTfOpmy dna IIOdorgBa BKNIOUHTe np6Op. Notpe6yETc npNbnI3nteNbHO 5-7 MNHyT, qTObbl MOlOKO DOCTNfLO COOTBeTCTBHyOoe TemnepaTybl.
3 BCNeHbTe MOJOKO, NOHnB YAuIy K HAKOHeuNky BCNEHbAteJIa TAK, YTO6bI HAKOHeuNk HEMHOI NOrpy3JIcB MOJOKO, IHaKMITE KHOJky BCNEHbAteJIa. JIN BNCHEHbAHNI MOnoKA IOHaIOb6ITcR np6JIIn3ITeJIbHO 30-60 cekyHd.
4 BneIte Koepe I ropuee MoKO B uawky Ira KanuyHNO I npeleneTe BCNEHENHOE MOKO JIOKKO.
5 NocbIbTe WOKOJaHbIM NOpOwKOM IN NOdaBaIte.
Kode naTte
1/2 Kodje 3cnpecco
1/2 ropaero BCneneHHoro MOIoka
1 PnpiroTOBbTe KoPe cOrnAChIOHnCTpyKuIN NO pniroTOBNeHIOKoPe 3cnpecco.
2 3aONHnTe Yauy N3 HepXaBeIOUeI CTaII Heo6xOdIbIM KOnIyCehTBM MOLOKA, NOMeCTNe Ia NpA TcOpMy dIa NpOOrpeBa I BKNIOUHTe PnIbOp PoTpe6yETcpaNpBImNtEblNo5-7 MInHy, YTO6bI MoJOKO DOCTNILO COOTBcTCTByIOUeI TEMNepaTpybl.
3 BCNEHbTe MOJOKO, NOHReB Yauy K HAKOHeuHHky BCNEHbATEeTaK, YTO6bl HAKOHeuHHK HEMHOrO NORpy3INcB MOJOKO, N HAKMITE KHONKY BCNEHbATEe. Jnra BCNEHbAHNMOJOKA NOHaDObNTcR np6bn3nteIbHO 30-60 cekyHd.
4 BnneTe KoCbe B BbICOKm CTaKaH n HaneIte CBepxycNEHeHHOE MONJOKO.
MOKKaUHNO
1/3 Kode 3cnpecco
1/3 ropeero BCneHnro MOJOKa
1/3 ropeyero zoKoIa
1 PnIroTObTe KoPe cOrnaCHO INCTpyKIN IO PnIroTOBLeHIO KOpe 3cnpecco.
2 3aONHnTe aayu n3 HepxabeHouee CTaIIN HeoXoDMbIM KOINcEChBOM MOJOKA, NOMcETHe Na INaTΦOpMy DnI NODOrpeBa IN BkInOHTe np6Op. PoTpe6yEtca Pm6JIINrTeNbHO 5-7 MHyT, YTO6bl MOJOKO DOCTNfIO COOTBetCTByUoSe TMnepaTypbI.
3 BcneHbTe MOLOKO, NOdNbY ZaUy K HakoHeuHKy BCeHbBaTeJraT, QTO6bI HAcOHeuHK NEMHO Tnpy3UNCA BMOKO, INaHXMmTE KONKy BCeHbBaTeJ. JnB BCeHbBAHHMOKoNAHOaDObuNTc np6bn3TeJbHo 30-60 cekyHd.
4 PnproToBbTe roPnyuWokOnaCDornaCHO HNCTpyKUIN.
5 BneiteKepe, ropeuee MONOKO n ropaHNI 60KoJaB B bICOKN CTaKaH NIODaBaTe.
Upnaundckn KoFe Ha 2 nopuzn
40 MЛ ДВОИХБIX CJINBOK
2 chaHbIe loXKn caxapa
4npunn npnaandCKOTo BnCKn
350 Mn ropanero Kpenkofo Kope
1 B36eIte DBOHbIe CnIBKn DO o6pa3OBAHnI rGTOI Maccbl OXJaIdTe.
2 Cnolochinte ropraeBbOJ 2 cTakHa dIJI npHaNDCKOrO KoCpe, 3acblbTe B KaKdbI cTaKaH ONHy TaHyIOxKy caxapa N BneTe 2 npCmnpIPLaHDCKOrO BnCKN.
3 Pa3JeIe KoIe no CTakaHaM.
4 MeДлЕнно Вьеп Te ToHКо CTунКоO OXnAХДeHнБIe CINBKN, HanpaВЯЯ IX Na ObaPahTyIO CTOPOHy JNoKKn.
5 He nepemewinBaIte.
Kode amapeTTO
250 mI ropaero Kpenko Rofoe
2Чаиные loхкдBOйньxИINB36nTbIX CnMBOK
2 npucn nkepa "Amapetto"
Caxap no Bkyc
1 CmeaTe KoFe n CnIrpTHoH HAnITOK C DByM RAaHbIMN loKKaMn BDoBHyx CJINBOK NIn Do6aBbTe HEmHO R3bNTbIX CJINBOK.
2 IocbIbTe TeptbIM WOKOJaOM IN OdaBaNTe.
COBETbln
PEKOMEHДALIN
YnctKa n yxOa
NoBToPHoE HanoJIHeHne
1 BbIKIOHHTe KOpEBApKy IaIte eN octbITb B TeueHHe 5 MNHyT.
2 MeIeHHO OTKpyTInTe KpbIshky I HANOHNTE Yauy XOLOHIO BOIO.
YdaJIeHHe NaKInn
- EcIn B BaWe MeCTHOcTKaB Oda, peKOMeHdyETcpeYpIpaH OuMauTb KoPeBaPky OT HaknPi, HapMpE, pa3 B 2-3 MeCaJa. EcIn B BaWEM paOHe BOda cpeIne JcECTKOCTN, TO OHCTKY HuxHO npOn3BODITb pa3 B pONlroDa.
EcnI B0a Noctynaet Ype3 cnIbTp MeIeHHe, Yem O6bIHo, 3HaHT Heo6XoIMnIO POBeCTN OHCTKy OT HAcKn. - PeKOMEHdyETcI NOJIb3OBAbTcBcCneUaJIbHOJ KNUKOCTBo OTHaIKIN, IpeDnA3HNeHIOH DnI KoΦeBaPOK I 3NEKtPrHeCKNqYaHnKOB. BbIOnHInTe INCTpyKuIM, Yka3aHHbIe HA 6ytbIKe IINI NaKte, 3aTeM 3 p3a BKNIOHTe KoΦeBaPky TOLbKO C BOdO, npExJe QEM BAPITb KoΦe.
He npb3yntecb cpectBOM OT hakINI dIaYauHINOB, eCNI Ha ynakOBKe He yka3aHO,TO OHO nOxOJNTN DnA KoFeBaPOK.
YxOДи OUNCtka
BbIKNoCHTE KoFEBAPKy,MeDNeHNO CHIMMTe KpbUk Ky daiTe KOFEBAPK OCTbTb.
He norgykaTe KoepeBapky B KUKOCTb.
Bpemr O T BpemEn npombIbaiTe pe3epByap dIra BObl XoIoNDHO BOIOH. He noJIb3yIteCbTKaHbIO, TAK KAK MOrY OCTaTbCry aCTNUKIN TKAHN INN HNTeK, KOToBle 3acOpRT KoΦeBapKy.
BbIMoTe TEnNoMbIbHOB BDOH hacaDky BCNEHbATEJMA NOOKa, MeTaNJIueCckn NDoDn DJaW bCNEHbATEJN, NDoDn HKnOHNcATA, CTeKJIaHHyU qaWy, fNtbp n depkatae bNtpa. TaTeJbHO ONONCHITE n npocuyinte Bce Auctn. YctahOBHTa He MeTo FInbTp, DepKaTeBf NtbpTa, hAcadKy BCNEHbATEJNA
CTEKJIaHHbIe COcYdbl.
Dahha rapaHTnHe
npeoctabJnEeKaKx-Im6oDpynx
npaB, Kpome Tex, KOtOpbIe YetTKO
N3JIOXeHb BbISe, PnD 3TOM
N3ROTOBNTeJIb He npHnMaet KaKnx
JI60 npeTeH3n, CB8aHHbIX C
KOCBENHBIMN yuepe6amn
y6bItkamn. DaaHna rapaHTnA
IpeJaaraetcB KaueCTBe
DONOHHTeJIbHOn Jbrotb IN He
OrpaHnUHbAeT BaIINX
npaBnotpe6nteJ.
morphy richards
- TapaHTmHoe o6cIyKbAHHe npOdyKmMorphyRichardsocUeCTBnAETcHa Bcei TePPntOpu PoCCm TeXnueckmmu ceHTpAMPTU «COBHNCEPBNC».
- TapaHTnHbI cpoK Ha n3dEINaMorphyRichardscoCTabJIeT 2 roJa C MOMeHTa npoJaxn.
- JapanthuHoe 06cIyKbHae NapcnpocTpaHreTc H aedeKbI, Bo3NHkUme B pOoceCE WcNlBtOBaHn I3dEINr npri yCNOBm c6pIoHeHH Tpe6oBaHn PnO3bOHTeNo I3KcPnyatauMn I3dEINu H ne BbXoRaJra 3a paMKn JInhBx H yKd n npri COOTBCTYIOeHem HAPRKeHN NIIATAOoi CETN.
- TapaHTnHe pacnpoCTpaHAreTc Ha:
a. pacxOdHbIe MaTePnAJIbI;
b. eCTeCTBeHHbI IN3HOC;
C. MexaHueckne NOBpeXdEHHN IN3DeHN INIeero Yacte;
d. NOBpeXdeHn, Bbl3BaHHbIe KaueCTBOM BOdbI;
e. NOBpeXdEHH, Bb3BaHHbIe 3KcNpyaTaeNe, BbIXOJaIe 3a paMKn IINHbIX HyXd;
f. nOBpeKJENHbI, b3BaBHnHeB He6PbKHOJ IN HnEBpAINbIK 3KcNpYATAuNEi, a TAkXEe B3BaBHnBe IOnaJaAHMe BHYTpB u3dJIeNoCTOPOHHNH INpeDMTOB, JxIKoCTei INH NACEOMbIX;
g. NOBpeXdHn, Bbl3BaHHbIe BO3dIcTBnEM BblCOKnx TempeaTyp;
h. NOBpeXdEHH, Bb3BaHHbIe OTJIOKeHHeM HAKINN BHE 3aBNCIMOCTN OT TnA BObl;
i. NOBpeKDeHn, BbI3BaHHbIe CaMOCToRteNbHbIM N3MeHeHnEM KOHCTpyKcN IN3deHn INI erO KOMJIeKTyIOxN. - IOTpe6nteJIHO MOKeT 6bIb OTKa3aHO B rapaHTnHOM 06cJyXnBaHN eCNI:
a. OTCyTCTByET INN He 3aONHeH rapaHTnHbI TaIOH;
b. cTePT nnn NOBpeKdEh cepnHbI HOMep N3dJIINr;
C. BCKpbblI INN NOBpeXdEhbl NLOMbbl Ha n3deJIN;
d. n3dJIne peMOHTnIOBaNOC BHe aBTOpN3OBAHHO CepBnCHOro cHTpa yNoIhMoUeHHoro MorphyRichards. - HactozaarapaHTHne He yueemnEepyrHex 3aOKHbX npab NOTpe6BteIe, npdeOCTaJIeHHbx Emy DeCTBouzIM 3aOKHOATEbCTOB CTpaHb.
Morphy Richards products are intended for household use only.
Morphy Richards has a policy of continuous improvement in product quality and design.
The Company, therefore, reserves the right to change the specification of its models at any time.
The After Sales Division,
Morphy Richards Ltd, Mexborough, South Yorkshire, England, S64 8AJ
Helpline (office hours) UK 0870 060 2609 Republic of Ireland 1800 409119
AUS Australia - Service centre locations
Asko Appliances (Australia) Pty Ltd. Victoria
35 Sunmore Close, Moorabbin. 3189 T: 03 8551 2200
New South Wales
F3/3-9 Birnie Ave., Lidcombe.2141 T:02 8748 2900
Queensland
2/112 Fison Ave., Eagle Farm. 4009 T: 07 3868 2989
South Australia
45 Hampton Road, Keswick. 5035 T:08 8293 1833
Western Australia
15 Walters Drive, Osborne Park. 6017 T: 08 9244 4366
www.morphyrichards.be
63 For electrical products sold within the European Community.
At the end of the electrical products useful life it should not be disposed of with household waste.
Please recycle where facilities exist.
Check with your Local Authority or retailer for recycling advice in your country.
- IMPORTANT SAFETY INSTRUCTIONS
- Location
- Mains lead
- Personal safety
- Children
- Product safety
- Treating scalds
- Other safety considerations
- ELECTRICAL REQUIREMENTS
- GETTING THE BEST FROM YOUR NEW COFFEE MAKER...
- Safety first
- Run water through your machine before first use
- Descale as appropriate for the hardness of the water in your area
- Features
- OPERATING THE APPLIANCE
- Before use
- Making espresso coffee
- Making a cappuccino
- Frothing milk
- Cleaning
- RECIPIES
- Cappuccino
- Cafe Latte
- Moccacino
- Irish coffee
- Amaretto coffee
- HINTS AND TIPS
- Cleaning and maintenance
- Refilling
- Dscaling
- Cleaning care
- YOUR TWO YEAR GUARANTEE
- EXCLUSIONS
- CONSIGNES DE
- SECURITE IMPORTANTES
- RECEPTEN
- WARNING: Fara for person!
- Placering
- WOJA DWULETNIA GWARANCJA
- MEPbI IPEIOCTOPOXHOCTN
- Pa3meueHne
- Cetebo npoBoa
- B30nacHocTb NOJB3OBaTeJIa
- Aetn
- Mepbi 6e3oNaChOCTN
- Pn OwnapnbAHn
- CocTBHbIe yactn
- 3KCNJLYATALUNYCTPOINCTBA
- Ipekjde yem npncTynntb K nCNoJb3OBAHnIO np60pa
- PnuroToBne Hne Kofo 3cnpecco
- PnroTOBJIeHne kanyuHNO
- BcneHbAHne MoNoka
- PELIENTbI
- KanyuHNO
- Kode naTte
- MOKKaUHNO
- Kode amapeTTO
- COBETbln
- PEKOMEHДALIN
- YnctKa n yxOa
- NoBToPHoE HanoJIHeHne
- YdaJIeHHe NaKInn
- YxOДи OUNCtka
- morphy richards
Brand : MORPHY RICHARDS
Model : MISTER CAPPUCINO
Category : Coffee machine