SC 414 XL II - Microphone AKG - Free user manual and instructions
Find the device manual for free SC 414 XL II AKG in PDF.
User questions about SC 414 XL II AKG
0 question about this device. Answer the ones you know or ask your own.
Ask a new question about this device
Download the instructions for your Microphone in PDF format for free! Find your manual SC 414 XL II - AKG and take your electronic device back in hand. On this page are published all the documents necessary for the use of your device. SC 414 XL II by AKG.
USER MANUAL SC 414 XL II AKG
Please read the manual before using the equipment!
MODE D'EMPLOI p.32
1 Safety and Environment 18
1.1 Safety 18
1.2 Environment 18
2 Description 19
2.1 Packing List. 19
2.2 Optional Accessories 19
2.3 C414XLS. 19
2.3.1 Controls 19
2.4 C 414 XLII 21
2.5 Stereo Pairs 21
3 Powering 22
4 Using Your Microphone 23
4.1 Introduction 23
4.2 Bass Cut Filters 23
4.3 Preattenuation Pads 23
4.4 Stand Mounting 23
4.5 Application Areas 23
4.6 Hints on Microrhone Placement 24
4.6.1 Lead Vocals 24
4.6.2Choir,Backing Vocals 25
4.6.3 Violin, Viola 25
4.6.4 Double Bass, Cello. 26
4.6.5 Acoustic Guitar 26
4.6.6 Flute 27
4.6.7 Calrinte 27
4.6.8 Tenor and Soprano Saxophones 27
4.6.9 Trumpet, Trombone 28
4.6.10 Grand and Upright Pianos 28
4.6.11 Electric Guitar and Bass 29
4.6.12 Drums 29
5 Cleaning 30
5.1 Microphone 30
5.2Windscreen 30
6 Specifications 30
Welcome!
Thank you for purchasing an AKG product. This Manual contains important instructions for setting up and operating your equipment. Please take a few minutes to read the instructions below, specifically section 1 Safety and Environment, carefully before operating the equipment. Please keep the Manual for future reference. Have fun and impress your audience!

1.1 Safety
1 Safety and Environment
- Please make sure that the piece of equipment your microphone will be connected to fulfills the safety regulations in force in your country and is fitted with a ground lead.
1.2 Environment
- When scrapping the equipment, separate the case, circuit boards, and cables, and dispose of all components in accordance with local waste disposal rules.
- The packaging of the equipment is recyclable. To dispose of the packaging, make sure to use a collection/recycling system provided for that purpose and observe local legislation relating to waste disposal and recycling.
C 414 XLS or C 414 XLII
SA 60 stand adapter
H85shockmount
PF 80 pop screen
W 414X foam windscreen
- Original frequency response trace with serial number and production date code
High quality carrying case
- 2 x C 414 XLS or C 414 XLII
- 2 x SA 60 stand adapter
- 2 × 185 shock mounts
- 2xW414Xfoam windscreens
1xH50 stereobar - Original frequency response trace with serial number and production date code
High quality carrying case -
Check that the packaging contains all of the components listed for your model. Should anything be missing, please contact your AKG dealer.
-
For optional accessories, refer to the current AKG catalog or folder, or visit www.akg.com. Your dealer will be glad to help.
This large-diaphragm condenser microphone has been designed on the basis of feedback from sound engineers who have used the C 12, C 12A, C 12B, C 414comb, C 414EB-P 48, C 414B-ULS, C 414B-TL II, and C 414B-XLII microphones in recording studios and on stages around the world for years. Using advanced, reliable components that provide more functions in the same space, the C 414 XLS meets the highest professional standards and will withstand the tough handling typically encountered in the recording studio and on stage for many years.
The electronic circuitry of the microphone has been redesigned to achieve completely linear transfer characteristics of all electrical parameters. Extremely low self-noise and high headroom add up to a dynamic range of approximately 134 dB (A-weighted) that is far superior to figures quoted for conventional condenser microphones and other studio equipment. A dual-diaphragm transducer allows you to select one of several polar patterns. The diaphragm is made of a plastic foil that is gold-sputtered on one side only to prevent shorting to the back electrode even at extremely high sound pressure levels.
The all-metal body adds to the rejection of RF interference so you can use the microphone near transmitter stations, along with wireless microphones or other communications equipment.
Unlike earlier versions of the C 414, the C 414 XLS / C 414 XLII provides three separate bidirectional pushbuttons for selecting the polar pattern, preattenuation pad, and bass cut filter, each with an LED bar indicating the selected setting. The selectors and indicator LEDs are only active as long as power (48 V phantom power) to the microphone is on.
- To select the desired value or polar pattern, press the desired arrow on the appropriate selector once or several times.
A green LED above the appropriate value or symbol is lit to indicate the selected setting. To select a different setting after having reached the last position available, press the opposite arrow on the selector. (Pressing the same arrow again will not set the parameter back to its initial position.)
Stero Pairs:
2.2 Optional Accessories
2.3 C 414 XLS
2.3.1 Controls
2 Description
- When you switch phantom power to the microphone off and back on later, the currently selected settings of all three selectors will be restored automatically as soon as you switch phantom power back on.
All settings are saved in memory about 500 msec. after you last pressed any of the three selectors. Thus, your latest settings will be available again even if phantom power ahs been interrupted (e.g., if you disconnected the microphone and connected it again later).
Lock Mode:
Locking the Controls:
- Live-sound engineers as well as engineers for theater, opera, or musical productions often use the same microphones for the same purposes every night, and may even install some microphones permanently. In Lock Mode, all controls on the microphone are disabled so the settings you selected for a specific application (polar pattern, preattenuation pad, bass cut filter) cannot be changed unintentionally.
- Press and hold one of the arrows on the polar pattern selector (1) for at least 2 seconds. All controls are disabled and remain disabled even if phantom power has been interrupted (e.g., if you disconnected the microphone and connected it again later).
Note:
Unlocking the Controls:
- To indicate that the microphone is in Lock Mode, the LED(s) above the currently selected polar pattern will be lit red momentarily when you press any key.
- To unlock the selectors, press and hold the polar pattern selector (1) for at least 2 seconds again.
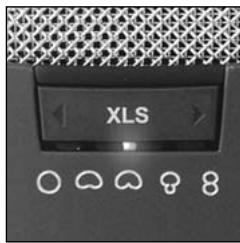
Fig. 1: Polar pattern selector.
1 Polar Pattern Selector
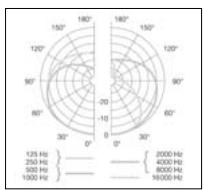
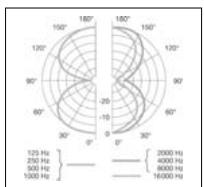
Selector 1 on the microphone front panel (refer to fig. 1) lets you select one of nine carefully designed polar patterns similar to those of the legendary C 12 and C 12 VR studio microphones from AKG, providing the optimum polar pattern for best possible results in the most diverse miking situations. All polar patterns are largely frequency-independent for realistic and uncolored off-axis sound.
The LEDs below the selector indicate the selected polar pattern as shown in Table 1 below:
Table 1: Indication of selected polar pattern.
| LED Polar pattern | ○ | ○ | ○ | ○ | 8 |
| Omnidirectional | * | ||||
| Intermediate | * | * | |||
| Wide cardioid | * | ||||
| Intermediate | * | * | |||
| Cardioid | * | ||||
| Intermediate | * | * | |||
| Hypercardioid | * | ||||
| Intermediate | * | * | |||
| Figure eight | * |
Note:
- Approximately 500 msecs. after you changed a polar pattern, preattenuation, or bass cut setting, your settings will be saved automatically. If you switch phantom power off and back on later, these settings will be restored automatically.
2 Preattenuation Pad Selector*)
Selector 2 on the microphone rear panel (refer to fig. 2) lets you increase the headroom by 6 dB, 12 dB, or 18 dB for distortion-free close-in recording. The preattenuation pads prevent the microphone's output level, particularly at low frequencies, from overloading the miniature transformers used in mixer input stages, etc.
\*) Note:
- To keep noise levels in the microphone input stage as low as possible, the entire transducer section uses extremely high-impedance circuitry. Therefore, the selected (changed) polar pattern or preattenuation setting will take about 10 to 15 seconds to become fully active.
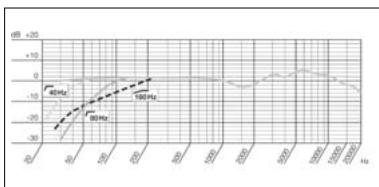
3 Bass Cut Selector
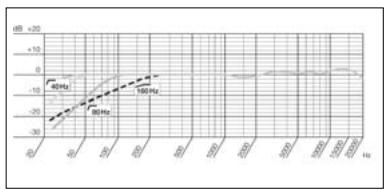
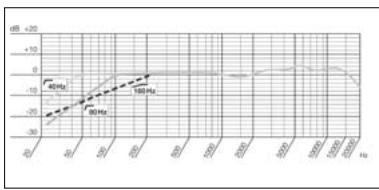
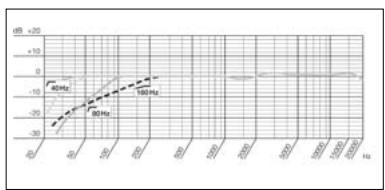
Selector 3 on the microphone rear panel (refer to fig. 3) reduces low-end distortion caused by footfall or wind noise, etc. The filter slope is more than 12dB /octave at the 40Hz and 80Hz settings and 6dB /octave at the 160Hz setting. The 160Hz setting minimizes the proximity effect that may arise when close-in miking from less than 6 inches.
Overload Indication with Peak Hold Function
The polar pattern indicator LEDs also provide an overload indication.
With conventional peak indicators, overload peaks lasting only for a fraction of a second may easily escape your attention. The new peak hold function of the C 414 XLS and C 414 XLII, however, makes sure you will notice even the shortest overload peak: If the output level of the microphone equals or exceeds a value of approximately 2 dB below the overload limit, the currently active polar pattern LED will change to red for about 3 seconds. If this happens, we recommend increasing the preattenuation by one or more "notches" using Selector 2.
The C 414 XLII has been designed as a sonic alternative to the standard C 414 XLS, and closely approximates the sound of the legendary AKG C 12. It is identical to the C 414 XLS with the exception of a completely different acoustic resistor that provides a slight high-frequency rise at 3kHz and above. This HF boost enhances the presence of vocals, so we specifically recommend the C 414 XLII for miking up solo voices or solo instruments (see also sections 4.5 and 4.6). In addition, it is an excellent choice for distant miking, e.g. suspended from a concert hall ceiling.
Realistic stereo recordings require microphones with outstanding performance and excellent quality. They also require consistent performance and accurate localization throughout the entire frequency range from the pair of microphones.
Therefore, every factory-matched pair of C 414s is created from thousands of individual microphones selected by AKG's sophisticated computer-aided matching method.
The C 414 XLS and C 414 XLII matched stereo pairs thus provide the highest possible correlation over the microphones' entire frequency range and virtually identical sensitivity for stunning, three-dimensional recordings.
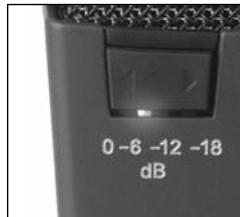
Fig. 2: Preattenuation selector.
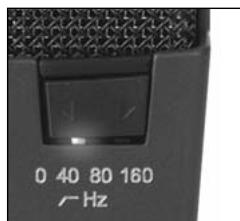
Fig. 3: Bass cut selector.
2.4 C 414 XLII
2.5 Stereo Pairs
3 Powering
The C 414 XLS and C 414 XLII provide extremely low self-noise yet high headroom. The only way to meet these strict engineering requirements was to limit the powering options for both microphones to 48V phantom power to IEC 61938 only. This standard requires a positive voltage of 48V with reference to the cable shield.
Important!

- Do not connect the microphone to any power supply other than a phantom power source (input with phantom power or external phantom power supply) to IEC 61938 with a floating connector, using a balanced cable with studio grade connectors to IEC 268-12 only. This is the only way to ensure safe and reliable operation.
4 Using Your Microphone

4.1 Introduction
(For details on the C 414 XLII refer to sectin 2.4.)
Besides offering high headroom, minimum distortion, as well as temperature and humidity resistant construction, the microphone is suited for a uniquely wide range of applications.
The standard version C 414 XLS features a very smooth frequency response and the typical sound of AKG large-diaphragm microphones. This sound has hardly changed over the many years the C 414 has been in production, and the
C 414 has become an "industry standard" against which most competitive or new products are compared.
You can use the C 414 XLS for most musical instruments (see also sections 4.5 and 4.6). Selector 1 lets you optimally adjust the microphone's polar pattern to the instrument to be recorded and the recording environment.
The switchable bass cut filters at 40Hz , 80Hz , and 160Hz will effectively cancel out any unwanted noise such as blower noise from air conditioning systems, etc., or low-frequency noise due to floor vibrations, handling noise, etc. without affecting the sound of the recorded voice or instrument on tape.
The switchable preattenuation pads allow you to increase the microphone's headroom. Remember to check that the equipment connected to the microphone (microphone preamp, mixer input, recorder input) can handle the maximum output level of the microphone without causing distortion.
- The supplied H 85 shock mount has a standard 3/8'' thread insert so you can mount the microphone on almost every commercial stand or suspension with a 3/8'' thread.
- To mount the H 85 on a stand with a 5/8 thread, remove the tread insert and screw the H 85 directly on the stand.
- To remove the H 85 from the microphone, rotate the bayonet-type lock at the lower end of the H 85 CCW to the point that the H 85 unlocks.
We recommend the C 414 XLS and C 414 XLII for the following recording studio applications:
4.2 Bass Cut Filters
4.3 Preattenuation Pads
4.4 Stand Mounting
4.5 Application Areas
Table 2:Recommended applications.
| Sound source | C 414 XLS | C 414 XLII |
| Lead/solo vocals | ● | ●● |
| Backing vocals/choir | ●● | |
| Speech | ● | ●● |
| Acoustic guitar | ●● | ●● |
| Electric guitar | ● | |
| Electric bass | ● | |
| Double bass | ●● | |
| Violin | ●● | ● |
| Cello | ●● | ● |
| Zither | ● | ●● |
| Grand piano (classical) | ●● | |
| Upright piano (rock & jazz) | ●● | ●● |
| Organ | ●● | ● |
| Trumpet | ●● | ●● |
| Trombone | ●● | ● |
| French horn | ●● | ●● |
| Tuba | ●● | ● |
| Saxophone | ●● | ●● |
| Flute | ●● | ●● |
4 Using Your Microphone
(Table 2)
| Sound source | C 414 XLS | C 414 XLII |
| Clarinet | ●● | ●● |
| Harmonica | ● | ●● |
| Bass drum | ●● | |
| Toms | ● | ● |
| Cymbals | ● | |
| Bongos, congas | ● |
Highly recommended
Recommended
4.6 Hints on Microphone Placement
As an introduction to the "secret science of making good recordings", the following sections describe some proven miking techniques.
4.6.1 Lead Vocals
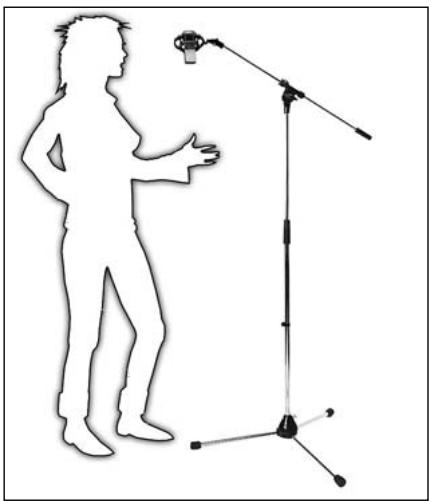
Fig. 4: Solo vocalist.
- Working distance: 6 to 12 in. (15 to 30~cm )
- Polar pattern: cardioid
- Bass cut: ON (40 or 80 Hz)
- W 414X windscreen or PF 80 pop screen recommended
To give the talent better control of their own voice, we recommend adding the talent's track to their headphone monitor signal.
4 Using Your Microphone

4.6.2 Choir, Backing Vocals
To record large mixed choirs, we recommend using one stereo microphone plus one spot microphone each for the soprano, alto, tenor, and bass sections.
In rooms with good acoustics, a single stereo microphone or two matched mono microphones will often do the trick.
Backing vocals/technique 1:
If you have enough tracks available, we recommend overdubbing each voice separately (refer to section 4.6.1 Lead Vocals above).
Backing vocals/technique 2:
If you use a separate microphone for each of several vocalists simultaneously, set each microphone to
hypercardioid to prevent crosstalk, particularly if the microphones are closely spaced.
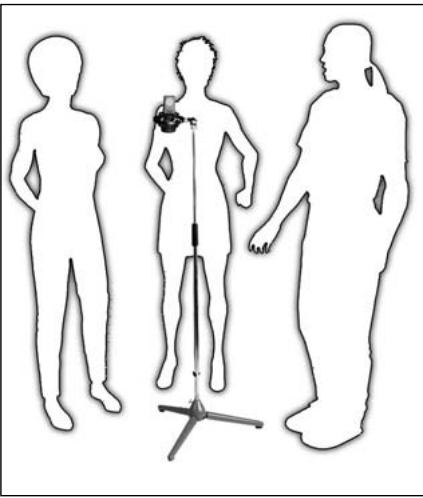
Fig. 5: Backing vocalists sharing a single microphone (technique 3).
Backing vocals/technique 3:
If you use a single microphone for the entire group, select the cardioid or omni pattern and place the vocalists in a semicircle in front of the microphone.
Solo violin:
Direct the microphone to the f holes from a height of 6 to 8 feet (1.8 to 2.5m ) above the floor.
Large string sections:
Use a combination of a main microphone in an XY, MS, ORTF, or other stereo configuration and close-in spot microphones.
Viola:
Direct the microphone to the f holes from a height of 7 to 10 feet (2.2 to 3m ) above the floor.
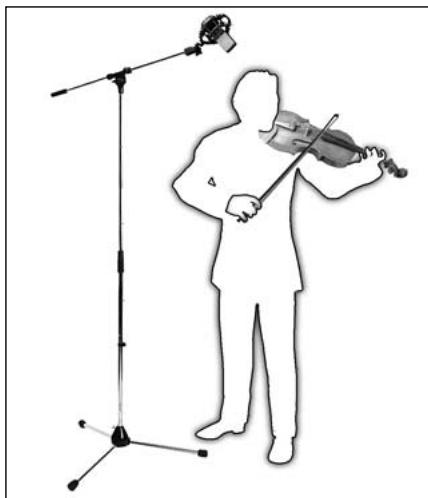
4.6.3 Violin, Viola
Fig. 6: Violin.
4 Using Your Microphone
4.6.4 Double Bass, Cello
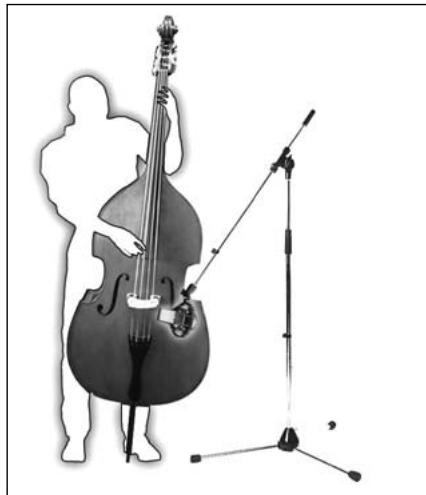
Fig. 7: Double bass.
Double bass:
Align the microphone with one of the f holes from a distance of about 16 inches (40~cm) .If you need to record the double bass together with an ensemble, place the microphone closer to the instrument and set the polar pattern to hypercardioid to prevent leakage from other instruments into the bass microphone.
Cello/technique 1:
Refer to "Double bass" above.
Cello/technique 2:
Use a close-in microphone as in technique 1 above plus a distant microphone. Set the level of the close-in microphone approx. 20dB lower than the distant mic level.
4.6.5 Acoustic Guitar
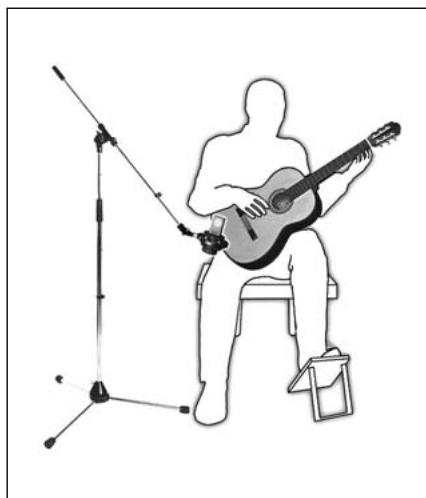
Fig. 8: Miking an acoustic guitar using a single C 414.
We recommend using two microphones.
Place one C 414 8 to 12 inches (20 to 30~cm ) away from the guitar and aim at the sound hole. Aim a small-diaphragm microphone (e.g., a C 451B) at a point near the bridge from a distance of about 3 1/2 feet (1m) or at the body from a point below and to the rear of the instrument.
4 Using Your Microphone
4.6.6 Flute
We recommend using two microphones.
Place mic 1 above and to one side of the player (to reduce blowing noise) and align it with the player's mouth, and aim mic 2 at the instrument from the side.
If you prefer to use a single microphone, place the microphone as mic 1 above at a distance of about 7 to 8 1/2 feet (2 to 2.5m ) above the floor.
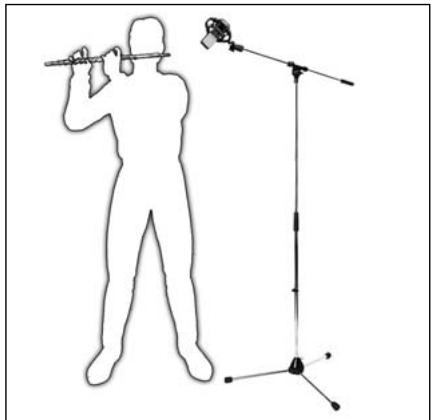
Fig. 9: Using a single microphone to mic up a flute.
Point the microphone at the lowest key. To minimize key noise, place the microphone a little ways to the side of the instrument.
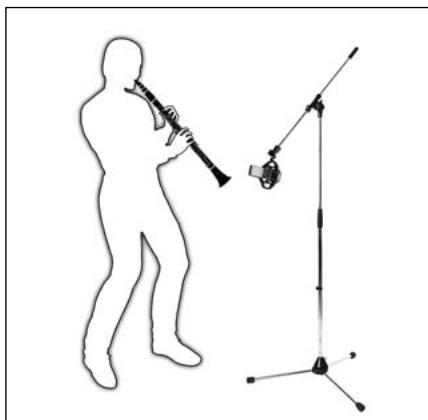
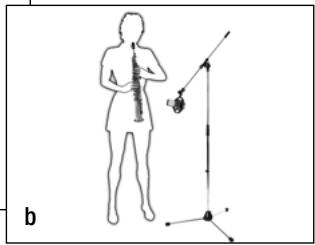
4.6.7 Clarinet
Fig. 10: Clarinet.
Aim the microphone at the middle of the instrument from a distance of about 2 to 3 1/2 feet (50 cm to 1 m).
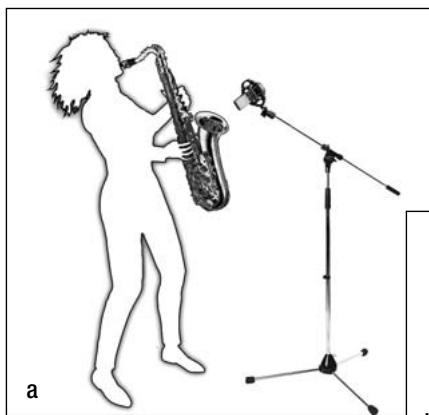
4.6.8 Tenor and Soprano Saxophones
Fig. 11: Tenor saxophone (a), soprano saxophone (b).
4.6.9 Trumpet, Trombone
4 Using Your Microphone
Place the microphone about 1 foot (30~cm) in front of the instrument, slightly off the bell axis. Switch in one of the preattenuation pads. Using the supplied windscreen will help reduce blowing noise.
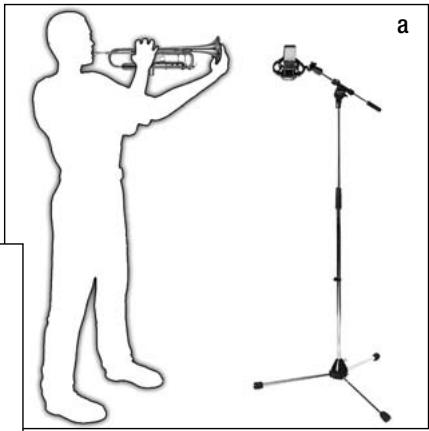
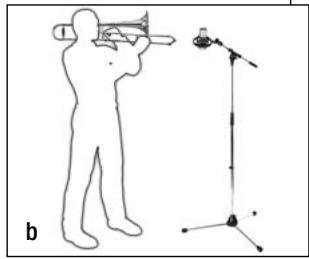
Fig. 12: Trumpet (a), trombone (b).
4.6.10 Grand and Upright Pianos
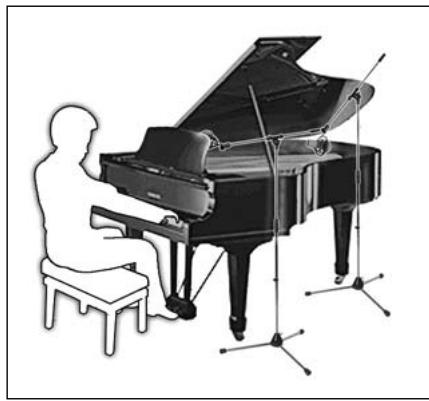
Grand piano:
Aim a single C 414 or an XY, MS, or ORTF pair of C 414s at the middle strings from a height of 5 to 7 feet (1.5 to 2 m).
For a rock/pop sound, place two C 414s roughly 8 to 16 inches (20 to 40~cm ) above the strings. Align mic 1 with the treble strings and mic 2 with the bass strings, both at a point about 6 inches (15cm) behind the dampers.
Fig. 13: Grand piano.
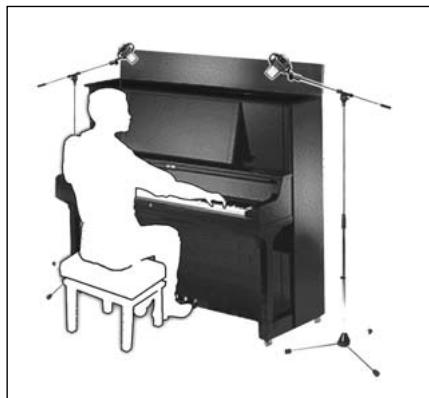
Fig. 14: Upright piano.
Upright piano:
Use the same technique as for the grand. Open the lid and have the microphones "peek into the instrument" from above.
4 Using Your Microphone

4.6.11 Electric Guitar and Bass
Electric guitar:
Position the microphone 3 to 6 inches (8 to 15~cm ) in front of the speaker, aiming at a point off the speaker diaphragm center. Use the bass cut and a preattenuation pad. You may want to use an additional distant microphone.
Electric bass:
Use the same technique as for the electric guitar. You can use a DI box to add the direct signal of the line output on the bass amp to the microphone signal.
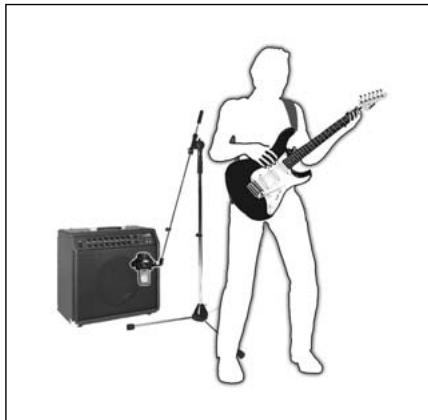
Fig. 15: Electric guitar.
Overhead miking:
Place two C 414s in an AB or XY configuration about 2 3/4 to 4 feet (80 to 120~cm ) above the drummer's head. This technique will pick up the entire kit, delivering a highly natural sound. Use little or no EQ!
Hanging and floor toms:
Use one microphone for each tom or for every two toms, aligning the microphone with the rim of the top head. To reduce leakage from other instruments, attenuate the HF range above 10kHz using the channel EQ(s).
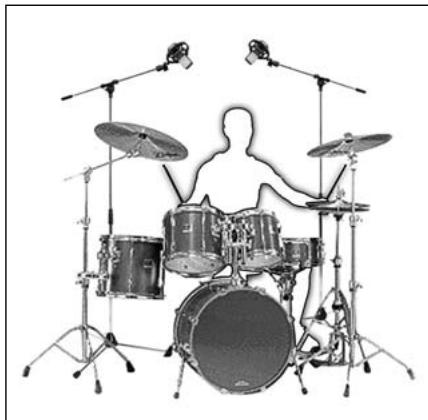
4.6.12 Drums
Fig. 16: Typical drum kit.
Kick drum:
Remove the resonance head and place the microphone right inside the shell. Be sure to switch in the 18-dB preattenuation pad because sound pressure levels may rise to 160 dB.
5 Cleaning
5.1 Microphone
- Use a soft cloth moistened with water to clean the surface of the microphone body.
5.2 Windscreen
- Wash the foam windscreen in mild sudy water. Do not use the windscreen before it has dried completely.

6 Specifications
| Type: | 1-inch large-diaphragm pressure gradient microphone |
| Polar patterns: | nine, selectable |
| Open-circuit sensitivity: | 23 mV/Pa (-33 dBV ± 0.5 dB) |
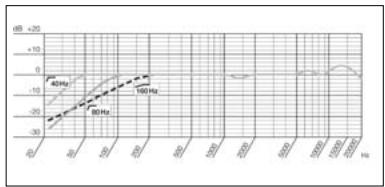
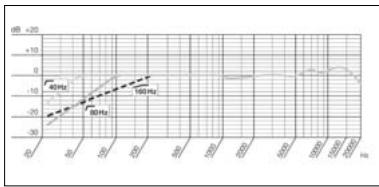
| Frequency range: | 20 to 20,000 Hz (see frequency response traces) |
| Impedance: | ≤ 200 ohms |
| Recommended load impedance: | ≥ 2200 ohms |
| Bass cut filter slopes: | 12 dB/octave at 40 Hz and 80 Hz; 6 dB/octave at 160 Hz |
| Preattenuation pads: | -6 dB, -12 dB, -18 dB (selectable) |
| Equivalent noise level to IEC 60268-4: | 20 dB (0 dB preattenuation) |
| Equivalent noise level to IEC 60268-4 (A-weighted): | 6 dB-A (0 dB preattenuation) |
| Signal/noise ratio re 1 Pa (A-weighted): | 88 dB |
| Max. SPL for 0.5% THD: | 200/400/800/1600 Pa ≅ 140/146/152/158 dB SPL (0/-6/-12/-18 dB preattenuation) |
| Dynamic range: | 134 dB min. |
| Max. output level: | 5 V rms (+14 dBV) |
| Environment: | temperature: -10°C to +60°C R.H.: 95% (+20°C); 85% (+60°C) |
| Powering: | 48 V phantom power to IEC 61938 |
| Current consumption: | approx. 4.5 mA |
| Connector: | 3-pin XLR (pin 2 hot) |
| Dimensions: | 50 x 38 x 160 mm / 2 x 1.5 x 6.3 in. |
| Net weight: | 300 g / 10.6 oz. |
| Patents: | Electrostatic transducer (patents nos. AT 395.225, DE 4.103.784, JP 2.815.488, US 7,356,151) |
This product conforms to the standards listed in the Declaration of Conformity. To order a free copy of the Declaration of Conformity, visit http://www.akg.com or contact sales@akg.com.
Frequency Response C 414 XLS
Polar Diagram C 414 XLS / C 414 XLII
Frequency Response C 414 XLII
Omnidirectional
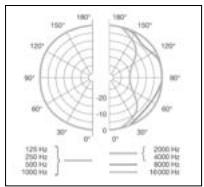
Wide Cardioid


Cardioid

Hypercardioid
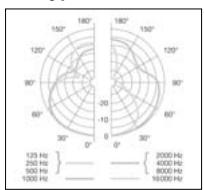
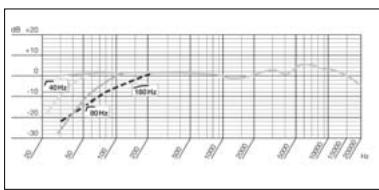
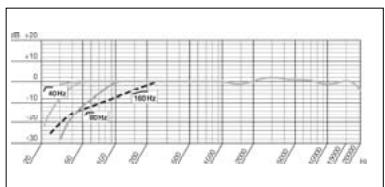
Figure 8
Page
Bienvenue! 33

Fig. 14: piano vertical
Piano vertical:
For other products and distributors worldwide visit www.akg.com

C∈ ROHS OK
H A Harman International Company
Technische Änderungen vorhabten. Specifications subject to change without notice. Ces caractéristiques sont susceptibles de modifications. Ci riserviamo il diritto di effettuare modifiche tecniche. Nos reservamos el dato de introducir modificaciones Tecnicas. Especificações sujeitas a mudanças sem uso prévio.
Printed in Austria
03/09/9100 U 12870