
HC 577 L - Headphones AKG - Free user manual and instructions
Find the device manual for free HC 577 L AKG in PDF.

| Product type | Headset microphone, electret condenser |
| Brand | AKG |
| Model | HC 577 L |
| Polar pattern | Omnidirectional |
| Frequency response | 20 Hz – 20 000 Hz |
| Open circuit sensitivity | 8 mV/Pa |
| Maximum sound pressure level | 133 dB |
| Equivalent noise level | < 26 dB-A |
| Signal-to-noise ratio | > 68 dB (A-weighted, 1 Pa) |
| Electrical impedance | < 3 500 ohms |
| Recommended load impedance | > 10 000 ohms |
| Supply voltage | 1.5 – 12 V DC |
| Current consumption | < 0.6 mA |
| Connector | Mini XLR 3-pin |
| Cable length | 1.5 m |
| Net weight | 15 g |
| Dimensions (L x W x H) | 180 x 130 x 85 mm |
| Housing color | Flesh, matte |
| Main applications | Stage, television, professional use |
| Special features | Dual diaphragm capsule with sweat-proof membrane; detachable and adjustable boom; left or right mounting; Teflon collector ring; optional PB 77 high-frequency boost cap; possibility to mount two microphones |
| Maintenance | Clean surfaces with a soft damp cloth; rinse microphone housing with distilled water; wash windscreen with mild soapy water |
| Safety | Read the manual before use; check safety of connected device; dispose of used batteries according to regulations; packaging recyclable |
| Spare parts and repairability | Microphone boom with capsule, cable and connector; boom holder; cable clip; collector ring; PB 77 cap. Available from AKG customer service (service@akg.com) |
| Warranty | Use with transmitters of other brands or excessive deformation may void the warranty |
Frequently Asked Questions - HC 577 L AKG
User questions about HC 577 L AKG
0 question about this device. Answer the ones you know or ask your own.
Ask a new question about this device
Download the instructions for your Headphones in PDF format for free! Find your manual HC 577 L - AKG and take your electronic device back in hand. On this page are published all the documents necessary for the use of your device. HC 577 L by AKG.
USER MANUAL HC 577 L AKG
Please read the manual before using the equipment!
MODE D'EMPLOI p.28
1 Safety and Environment 16
1.1 Symbols Used in the Manual 16
1.2 Safety. 16
1.3 Environment 16
2 Description. 16
2.1 Introduction 16
2.2 Packing List 16
2.3 Brief Description 17
2.4 Moisture Shield 18
3 Interfacing 18
4 Using Your Microphone 19
4.1 Mounting the Microphone Arm on the Left or Right 19
4.2 Putting the Microphone On 20
4.3 Adjusting the Microphone Arm 21
4.4 Aligning the Microphone 22
4.5 Windscreen 22
4.6 Mounting the PB 77 23
4.7 Replacing the Moisture Shield 23
4.8 Mounting Two Microphones 23
4.8.1 Two HC 577 Ls 23
4.8.2 HC 577 L + CK 77 24
5 Cleaning 25
5.1 Surfaces 25
5.2 Microphone Cap 25
5.3Windscreen 25
6 Troubleshooting 26
7 Specifications 27

1.1 Symbols Used in the Manual
1 Safety and Environment

Follow instructions marked by this symbol to ensure safe operation. Ignoring these instructions may cause damage to or malfunctioning of the equipment.
1.2 Safety
- Please make sure that the piece of equipment your microphone will be connected to fulfills the safety regulations in force in your country and is fitted with a ground lead.
1.3 Environment
- Be sure to dispose of used batteries as required by local waste disposal rules. Never throw batteries into a fire (risk of explosion) or garbage bin.
- When scrapping the equipment, remove the batteries, separate the case, circuit boards, and cables, and dispose of all components in accordance with local waste disposal rules.
- The packaging of the equipment is recyclable. To dispose of the packaging, make sure to use a collection/recycling system provided for that purpose and observe local legislation relating to waste disposal and recycling.

2.1 Introduction
2 Description
Thank you for purchasing an AKG product. This Manual contains important instructions for setting up and operating your equipment. Please take a few minutes to read the instructions below carefully before operating the equipment. Please keep the Manual for future reference. Have fun and impress your audience!
2.2 Packing List
HC577L microphone
W77 windscreen
PB 77 presence boost cap
Teflon moisture shield
- Check that the packaging contains all of the components listed above. Should anything be missing, please contact your AKG dealer.
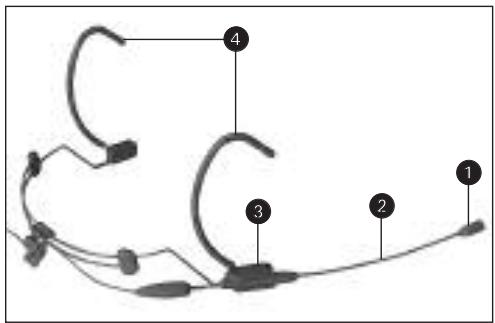
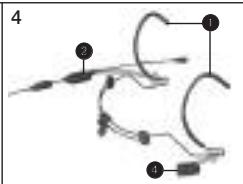
Fig.1:HC 577 L microphone
2.3 Brief Description
Refer to fig. 1.
The HC 577 L is a highly professional head-worn condenser microphone specifically designed for almost "invisible" use by performers on stage and radio or TV moderators. In line with this concept, the microphone is extremely light.
The dual-diaphragm microphone capsule (1) on the HC 577 L features an additional gold-sputtered protective diaphragm that prevents moisture and perspiration from penetrating into the transducer. This reduces the risk of failure caused by humidity to a practical minimum.
Both the microphone arm (2) and the microphone arm holder (3) are removable. Therefore, you can mount the microphone arm (2) either on the left or right temple piece (4). In addition, you may snap the microphone arm into the microphone arm holder at any desired point to adjust the distance between the microphone and the user's mouth.
This modular design also allows you to mount a second microphone, e.g., as a backup during an open-air opera performance, on the opposite temple piece. The microphone arm with microphone and cable as well as the microphone arm holder are available separately from AKG Service at service@akg.com. As delivered, the microphone provides a virtually flat high-frequency response. The supplied PB 77 presence boost cap lets you boost the high-frequency range around 12kHz by 3 dB.
2 Description
2.4 Moisture Shield
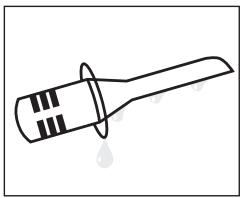
Fig. 2: Moisture shield.
The moisture shield on the microphone capsule is made of Teflon. This material makes sure perspiration and makeup will flow off extremely quickly. This barrier prevents the microphone sound entries from being clogged by perspiration or
makeup which would make the sound dull and reduce the sensitivity of the microphone. Therefore, never remove the moisture shield from the microphone!
3 Interfacing
You can use the HC 577 L with AKG bodypack transmitters only.
- Plug the mini XLR connector on the cable of your microphone all the way into the audio input connector on the bodypack transmitter.
The connector will lock automatically.
Refer to the instruction manual of your bodypack transmitter.

The HC 577 L has been designed specifically for use with AKG bodypack transmitters. Using the microphone with a bodypack from a different manufacturer may cause malfunction or damage to the microphone which may not be covered by the warranty.
4 Using Your Microphone

- The clear-Teflon moisture shield on the microphone prevents perspiration or makeup from clogging the sound entry ports and thus changing the sound and reducing the microphone's sensitivity.
Therefore, never remove the moisture shield from the microphone! - The behind-the-neck headband and microphone arm are made of thin-walled tubing. Bend these parts with extreme caution. If you bend the parts too sharply they may break, which will void the warranty.

Important!
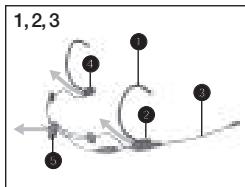
As delivered, the microphone arm is fitted on the right side of the behind-the-neck headband. To mount the microphone arm on the left side of the headband:
- Pull the microphone arm holder (2) with the microphone arm (3) from the temple piece (1) in the direction of the arrow.
- Remove the cover (4) from the opposite temple piece.
- Remove the cable from the cable holder (5).
- Slide the microphone arm holder (2) and cover (4) into the wire loops below the respective opposite temple pieces (1) to the point that they lock into place.
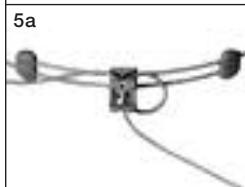
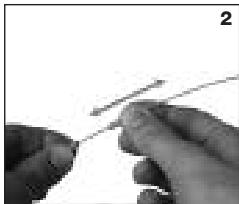
4.1 Mounting the Microphone Arm on the Left or Right
Fig. 3: Removing the microphone arm and mounting it on the opposite temple piece.
Refer to fig. 3/1, 2, 3.
Refer to fig. 3/4.
4 Using Your Microphone
(The cover (4) stabilizes the temple piece and prevents your hair from getting caught in the wire loop.)
- Press the cable back into the cable holder (5).
Note:
Refer to fig. 3/5a.
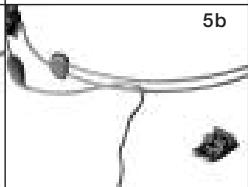
Two Alternative Ways to Route the Cable
a) To fix the cable more tightly inside the cable holder, you can reeve the cable through the cable holder twice. Make sure to leave enough slack in the rest of the cable so you can still readjust the behind-the-neck headband.
Refer to fig. 3/5b
b) Set the behind-the-neck headband to its smallest size and route the connector and cable through the behind-the-neck headband wires.
4.2 Putting the Microphone On
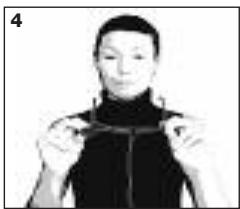
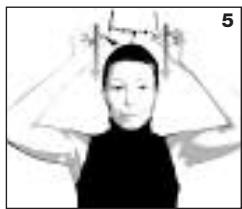
Figs. 4 through 6: Putting on and tightening the headband.
- Set the behind-the-neck headband to its largest size by pulling the two wires apart all the way.
- Put the behind-the-neck headband on as shown in figs. 4 through 6.
- If necessary, slide the
headband wires inward to the point that the microphone will rest securely yet comfortably on your head.
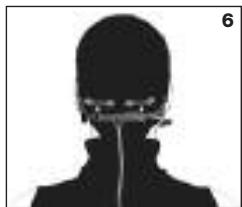
- Should the microphone still fit loosely even at its smallest size, you can bend the behind-the-neck headband and the temple pieces inward:
4 Using Your Microphone
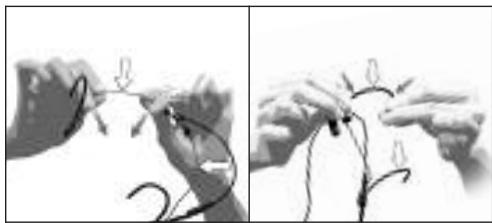
Fig.7:Bending the headband and temple pieces to fit.
- Hold the headband or temple piece firmly at the points marked in fig. 7 and bend inward with extreme care.
- Check whether the microphone fits better. If it does not, bend the wire some more, again with extreme care.
Refer to fig. 7.
4.3 Adjusting the Microphone Arm
Fig. 8/1, 2, 4: Adjusting the microphone arm.
Refer to fig. 8/1.
Refer to fig. 8/2.
- Hold the temple piece firmly with one hand and lever the guide bush on the microphone arm out of the holder with the other hand.
- Hold the microphone arm by the cable grip and shift the guide bush. The position of the guide bush sets the longitu
dinal distance between the microphone and mouth.
- Press the guide bush back into the holder.
- You can adjust the lateral distance between the microphone and your cheek by turning the microphone arm by the cable grip or by
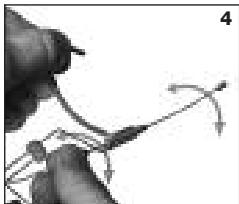
cautiously bending the microphone arm.
Refer to fig. 8/4.

Important!

4 Using Your Microphone
- Never try to shift the microphone arm inside the holder. This would damage the microphone arm.
- When removing the microphone arm from the holder, never grasp the microphone arm itself! The strain may break the tubing.
4.4 Aligning the Microphone
Fig. 9: Microphone capsule position for optimum audio.
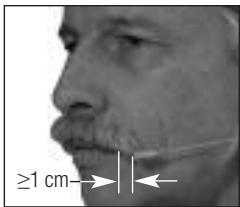
- Put the microphone on.
-
Position the microphone capsule approx. 0.4 in. (1 cm) behind the corner of your mouth. This alignment ensures optimum signal level and minimum pop noise.
-
If required for visual rea-sition the microphone capsule el will, however, be lower.
Important!

- To avoid distortion and pop noise, do not position the microphone capsule directly in front of your mouth!
Always position the microphone capsule where it cannot touch your skin! Direct contact with the skin may cause moisture or perspiration to penetrate into the microphone capsule and/or generate mechanical noise.
4.5 Windscreen
- If the microphone arm protrudes too far back, try to bend this part of the microphone arm closer toward the head with care.
If (for instance, in outdoor use) excessive wind or pop noise becomes audible, attach the supplied foam windscreen to the microphone.
Note:
-
You can apply makeup in the color of the user's face to the windscreen.
-
Make sure not to use any more makeup than absolutely necessary. Too much makeup will clog the foam cells and thus change the sound of the microphone.
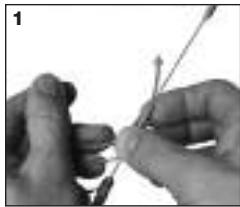
To boost the high-frequency response by 3 dB in the range around 12kHz you can replace the microphone cap with the supplied PB 77 presence boost cap:
- Hold the microphone arm pointing straight up in order not to lose the moisture shield.
- Unscrew the microphone cap CCW.
- Screw the PB 77 presence boost cap on CW.
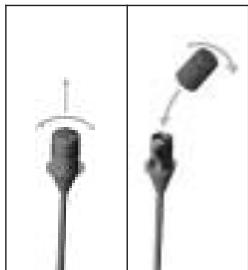
- Unscrew the microphone cap CCW.
- Remove the moisture shield and place the new moisture shield on the microphone capsule.
-
Screw the microphone cap back on CW.
-
If you mount two microphones on the behind-the-neck headband of the HC 577 L, make sure to place the required two bodypack transmitters as far from each other as possible to avoid mutual interference between the transmitter signals.
The complete microphone arm with microphone capsule, cable, and connector as well as the microphone arm holder and cable holder are available separately from the AKG Service Center at AKG Vienna (service@akg.com).
Important!
4.6 Mounting the PB 77
4.7 Replacing the Moisture Shield
4.8 Mounting Two Microphones

Fig. 10: Mounting the PB 77 presence boost cap.
Important!
4.8.1 Two HC 577 Ls
Refer to fig. 11. See also section 4.3.
See also section 4.1, step 5.
4.8.2 HC 577 L + CK 77
Fig. 12: Fixing a CK 77 on the microphone arm.
Refer to fig. 12.
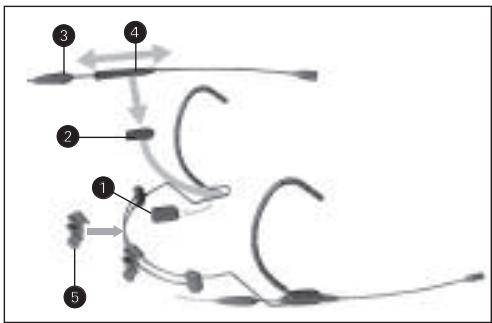
Fig. 11: Mounting a second microphone arm.
- Remove the cover (1) from the "unused" temple piece.
- Slide the microphone arm holder (2) into the wire loop below the temple piece (1) to the point that it locks into place.
- Hold the microphone arm by the cable grip (3) and slide the guide bush (4) to the desired position.
- Press the guide bush (4) into the holder (2).
- Clamp the second cable holder (5) on the behind-the-neck headband.
- Press the cable into the cable holder (5).
- Fix the CK 77 on the microphone arm with adhesive tape.
4 Using Your Microphone

- Route the cable through the behind-the-neck headband wires.
Refer to fig. 12 on page 25.
5 Cleaning

- To clean metal and plastic surfaces, use a soft cloth moistened with water. Never use benzine or solvents.
5.1 Surfaces
5.2 Microphone Cap
If perspiration or makeup should penetrate into the microphone capsule:
- Unscrew the microphone cap CCW from the microphone arm.
- Move the cap back and forth rapidly in distilled water.

Important!
- The cap is connected to ground. If you use tap water to clean the cap, furring may interrupt the ground connection and cause hum. Therefore, use distilled water only.
- Allow the cap to dry completely.
- Screw the cap back on the microphone arm CW.
- Use a mild detergent solution to wash the windscreen. The windscreen will be ready for use as soon as it has dried completely.
5.3 Windscreen
| Problem | Possible Cause | Remedy |
| No sound. | 1. No supply voltage. 2. Microphone arm contacts soiled, shorted by moisture, or corroded. | 1. Check phantom power supply. 2. Contact nearest AKG Service Center. |
| Loud pop, wind, and/or breath noise. | • Microphone sits too close to mouth or nose. | 1. Align microphone sound entries with corner of mouth and move microphone just far enough away from mouth and nose to stop breath noise. 2. Attach windscreen. |
| Microphone sounds dull. | 1. Soiled windscreen attenuates high frequencies. 2. Sound entries clogged. | 1. Clean windscreen. 2. Clean microphone case. |
| Reduced sensitivity and gain before feedback. | 1. Microphone sits too far away from corner of mouth. 2. Sound entries clogged. | 1. Place microphone closer to corner of mouth. 2. Clean microphone case. |
| Also read transmitter and receiver manuals! | ||
| Type: | pre-polarized dual-diaphragm condenser microphone |
| Polar pattern: | omnidirectional |
| Frequency range: | 20 Hz to 20 kHz |
| Sensitivity at 1000 Hz: | 8 mV/Pa |
| Max. SPL: | 133 dB |
| Equivalent noise level: | <26 dB-A |
| Signal-to-noise ratio (A-weighted): | >68 dB |
| Electrical Impedance: | <3.5 kohms |
| Recommended load impedance: | 10 kohms |
| Supply voltage: | 1.5 VDC to 12 VDC |
| Current consumption: | <0.6 mA |
| Connector: | 3-pin mini XLR |
| Cable length: | 1.5 m (5 ft.) |
| Finish: | matte flesh-tone |
| Size (LxWxH): | approx. 180 x 130 mm x 85 mm (7.1 x 5.2 x 3.3 in.) |
| Net/shipping weight: | approx. 15 g / 325 g (0.53 oz. / 11.5 oz.) |
This product conforms to the standards listed in the Declaration of Conformity. To order a free copy of the Declaration of Conformity, visit http://www.akg.com or contact sales@akg.com.
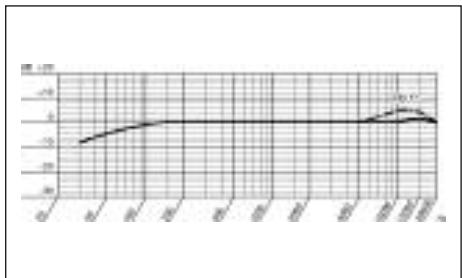
Frequency Response
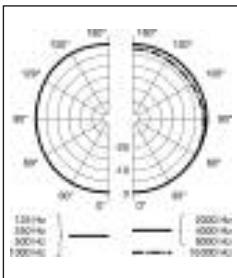
Polar Diagram
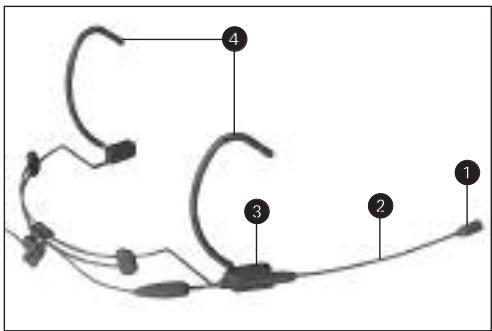
Fig.1: Microphone HC 577 L
Voir Fig. 1.
6 Resolver problemas 78
7 Especificações 79

1.1 Simbolos usados
For other products and distributors worldwide visit www.akg.com


ROHS OK
H A Harman International Company
Technische Änderungen vorbehalten. Specifications subject to change without notice. Ces caractéristiques sont susceptibles de modifications. Ci riserviamo il diritto di effettare modifiche tecniche. Nos reservamos el direcho de introduir modificaciones Tecnicas. Especificações sujetas a mudanças sem aviso prévio.
Printed in Austria on recycled paper.
09/06/9100 U 1223


- Safety and Environment 16
- Description. 16
- Interfacing 18
- Using Your Microphone 19
- Cleaning 25
- Troubleshooting 26
- Specifications 27
- Symbols Used in the Manual
- Safety and Environment
- Safety
- Environment
- Introduction
- Description
- Packing List
- Brief Description
- Moisture Shield
- Interfacing
- Using Your Microphone
- Mounting the Microphone Arm on the Left or Right
- Note:
- Two Alternative Ways to Route the Cable
- Putting the Microphone On
- Adjusting the Microphone Arm
- Important!
- Aligning the Microphone
- Windscreen
- Mounting the PB 77
- Replacing the Moisture Shield
- Mounting Two Microphones
- Two HC 577 Ls
- Cleaning
- Surfaces
- Microphone Cap
- Windscreen
- Resolver problemas 78
- Especificações 79
- Simbolos usados
- H A Harman International Company
Brand : AKG
Model : HC 577 L
Category : Headphones