D 550 - Headphones AKG - Free user manual and instructions
Find the device manual for free D 550 AKG in PDF.

User questions about D 550 AKG
0 question about this device. Answer the ones you know or ask your own.
Ask a new question about this device
Download the instructions for your Headphones in PDF format for free! Find your manual D 550 - AKG and take your electronic device back in hand. On this page are published all the documents necessary for the use of your device. D 550 by AKG.
USER MANUAL D 550 AKG
User Instructions . p. 13
Please read the manual before using the equipment!
1 Precaution/Description
Please make sure that the piece of equipment your microphone will be connected to fulfills the safety regulations in force in your country and is fitted with a ground lead.
1.1 Precaution
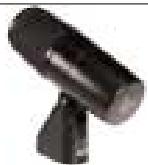
1D550
2 StA 550 extension stubs for floor stands
Check that the packaging contains all of the components listed above. Should anything be missing, please contact your AKG dealer.
1.2 Unpacking
- Frequency response tailored to bass instrument miking.
- Integrated swivel stand adapter for easy mounting on a microphone stand.
- Standard accessories include two stand extension stubs for precise positioning.
Built-in windscreen/pop filter for effective suppression of pop and breath noise. - Transducer shock mount reduces handling and cable noise.
Frequency-independent cardioid polar response for high gain before feedback.
The D 550 is a unidirectional dynamic microphone (pressure gradient microphone). It has been designed specifically for miking up bass instruments in tough onstage usage. The integrated stand adapter provides a swivel range of approximately 135 degrees for easy, precise, and reliable microphone alignment. The supplied StA 550 extension
1.3 Features
1.4 Brief Description
stubs for floor stands allow you to place the microphone at the optimum position in front of the bass drum or a bass amp. The frequency independent cardioid pickup pattern of the D 550 ensures high gain before feedback. The D 550 is fitted with a shock absorbing inner grille that protects the transducer against damage. The strong plastic housing and the wire-mesh outer grille provide additional protection for the transducer system. The outer grille and a layer of special fabric beneath it form a very effective windscreen that will suppress blowing and wind noise on open-air stages.
1.5 Optional Accessories
- MK 9/10 microphone cable: 10m (30 ft.) 2-conductor shielded cable with 3-pin male and 3-contact female XLR connectors
ST 305, ST 102A, ST 200 floor stands
ST1,ST12,ST45tablestands
W 880 windscreen
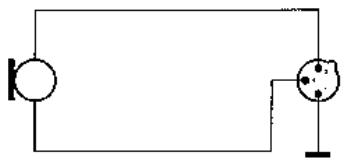
The microphone provides a balanced output on a 3-pin male XLR connector:
Pin 1: ground
Pin 2: hot
Pin 3: return
You can connect the microphone either to a balanced or an unbalanced microphone input.
- Use a commercial XLR cable such as the optional MK 9/10 from AKG.
The length of these cables does not affect audio quality.
2.1 Circuit Diagram
Fig. 1: Microphone circuit diagram.
2.2 Connecting the Microphone to a Balanced Input
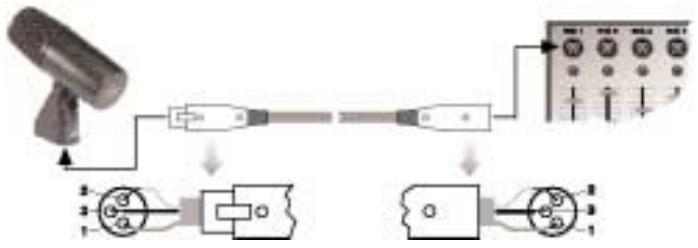
Fig. 2: Using a balanced connecting cable.
-
Plug the female XLR connector on the microphone cable into the male XLR connector on the microphone.
-
Plug the other connector on the microphone cable into the desired microphone input socket on your mixer or amplifier.
2.3 Connecting the Microphone to an Unbalanced Input
- To connect the microphone to an unbalanced microphone input (1/4" jack), use a cable with a female XLR connector and a 1/4" TS jack plug. These cables are available at music stores.
Please note that unbalanced cables may pick up interference from stray magnetic fields near power or lighting cables, electric motors, etc. like an antenna. This may cause hum or similar noise when you use a cable that is longer than 16 feet (5 m).
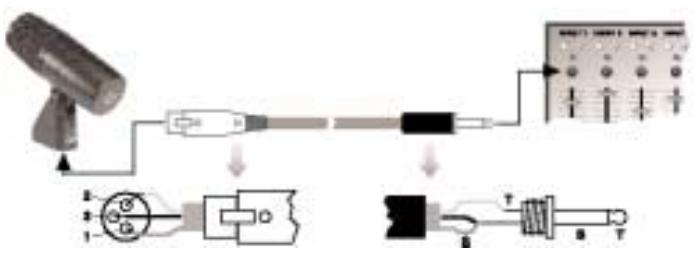
Fig. 3: Using an unbalanced cable.
- Plug the female XLR connector on the microphone cable into the male XLR connector on the microphone.
- Plug the other connector on the microphone cable into the desired microphone input jack on your mixer or amplifier.
The best way to get the "right" sound is to experiment with microphone placement. The following sections contain useful suggestions.
Please note that moving the microphone closer to the instrument will boost the bass range. (This is known as "proximity effect".)
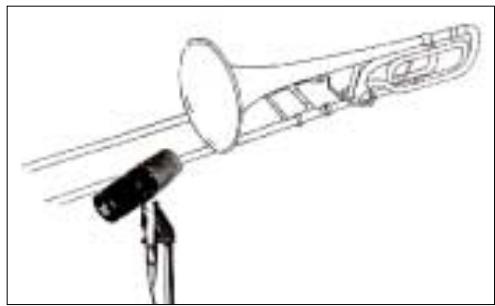
Fig. 4: Microphone placement for the trombone.
3.1 Trombone
In order to capture the entire frequency spectrum of the trombone, direct the microphone toward the lower rim of the bell.
The optimum working distance is 12 to 20 inches. On stage, you may have to move as close as 2 inches to the microphone in order to avoid getting feedback or spillover from other instruments. In this situation, make sure not to blow right into the microphone.
If you get too much blowing noise, use an extra windscreen, e.g., the optional W 880 from AKG.
3.2 Tuba
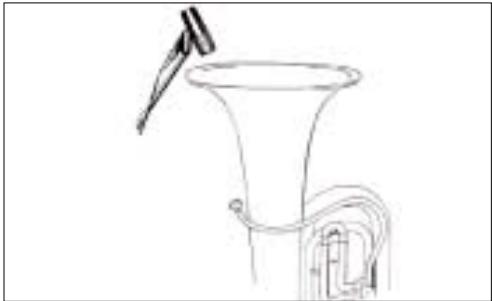
Fig. 5: Microphone placement for the tuba.
In order to optimally capture all the frequencies emitted by the tuba, aim the microphone at the perimeter of the bell from above.
Optimum working distance is 12 to 20 inches.
On stage, you may have to move the microphone closer to the instrument (as close as 2 inches) in order to prevent feedback or spillover from other instruments. In this situation, take extra care not to blow right into the microphone.
If you get too much blowing noise, use an additional external windscreen, e.g., the optional W 880 from AKG.
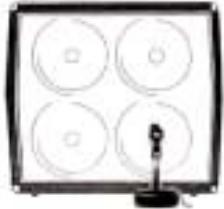
Fig. 6: Microphone placement for a bass amp.
Loudspeakers radiate high frequencies within a very narrow angle.
Place the microphone about 2 to 6 inches in front of the loudspeaker diaphragm and aim the microphone at the center of the diaphragm. The microphone will capture the entire frequency range and thus the pristine combined sound of the instrument and amplifier.
You may mount the microphone on the boom of a floor stand and align it as described above.
If you prefer a less visible alternative, we recommend to mount the microphone on the optional ST 305 floor stand or a table stand from AKG:
- Screw at least one or, if necessary, both of the two supplied StA 550 extension stubs on the stand.
- Screw the microphone on the extension stub.
- Direct the microphone at the center of the speaker diaphragm.
3.3 Bass Amplifier
Refer to section
1.5 Optional Accessories.
3.4 Bass Drum
3.4.1 Using a Boom Stand
Fig. 7: Microphone placement for the bass drum.
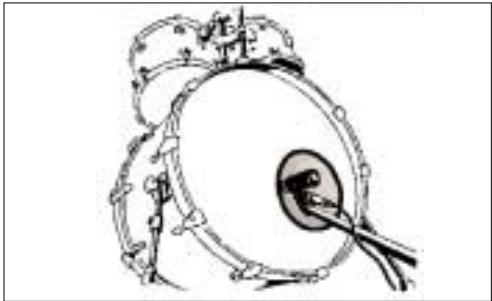
Place the microphone inside the opening in the front head.
3.4.2 Using a Table Stand Refer to section 1.5 Optional Accessories.
- Screw at least one or, if necessary, both of the two supplied StA 550 extension stubs on an ST 305 floor stand or a table stand.
- Screw the microphone on the extension stub.
- Place the stand with the microphone inside the drum and aim the microphone at the point where the beater hits the skin.
The sound will be the drier and harder, the closer the microphone sits to the head. Working distances around 1 inch provide the famous "disco click".
If you prefer a rounder sound aim the microphone at a point between the center and the perimeter of the head.
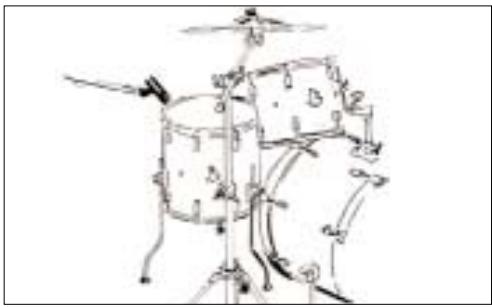
Fig. 8: Microphone placement for the floor tom.
3.5 Floor Tom
- To prevent excessive ringing of the head, tape a strip of felt or a piece of tissue paper to the top head near the perimeter.
- Mount the microphone on the boom of a floor stand.
- Position the microphone about 2 to 4 inches away from the drum, aiming it at the perimeter of the top head.
4 Cleaning

To clean the microphone case, use a soft cloth moistened with water.
| Problem | Possible Cause | Remedy |
| No sound: | 1. Power to mixer and/or amplifier is off. 2. Channel or master fader on mixer, or volume control on amplifier is at zero. 3. Microphone is not connected to mi-xer or amplifier. 4. Cable connectors are seated loosely. 5. Cable is defective. | 1. Switch power to mixer or amplifier on. 2. Set channel or master fader on mixer or volume control on amplifier to desired level. 3. Connect micro-phoneto mixer or amplifier. 4. Check cable connectors for secure seat. 5. Check cable and replace if damaged. |
| Type: | dynamic pressure gradient microphone |
| Polar pattern: | cardioid |
| Frequency range: | 20 to 20,000 Hz |
| Sensitivity at 1000 Hz: | 2.5 mV/Pa (-52 dBV re 1 V/Pa) |
| Equivalent noise level: | 18 dB(A) (DIN 45412) |
| Max. SPL for 1 % / 3 % THD: | 147 dB SPL / 156 dB SPL |
| Electrical impedance at 1000 Hz: | ≤600 ohms |
| Recommended load impedance: | ≥2000 ohms |
| Environment: | temperature: -10°C to +60°C rel. humidity at +20°C: 95% |
| Connector: | 3-pin XLR |
| Connector pinout: | pin 1 – ground pin 2 – hot pin 3 – return |
| Case material: | plastic |
| Finish: | matte black enamel |
| Size: | length: 121 mm (4.8 in.); max. dia.: 46 mm (1.8 in.); height: 104 mm (4 in.) |
| Net/shipping weight: | 203 g (7.2 oz.) / 563 g (1.2 lbs.) |
This product conforms to EN 50 082-1.
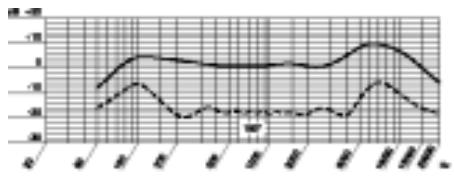
Frequency Response
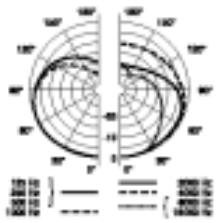
Polar Diagram
broche 2 = point chaud
broche 3 = point froid
For other distributors worldwide see our website: http://www.akg-acoustics.com

H A Harman International Company