
MAX 132-S - Electric drill KRESS - Free user manual and instructions
Find the device manual for free MAX 132-S KRESS in PDF.
| Product type | Cordless drill/driver |
| Brand | KRESS |
| Model | MAX 132-S |
| Power supply | NiCd battery 13.2 V; 1.5 Ah |
| Charger | Model MSL 60; input 230 V~; output 13.2 V; charging current 1.65 A; charging time approx. 60 min |
| No-load speed | 1st gear: 0-450 min⁻¹; 2nd gear: 0-1500 min⁻¹ |
| Drilling capacity | Wood max. 16 mm; steel max. 10 mm |
| Screwdriving capacity | Wood max. 6 mm (screws) |
| Maximum torque | 18 Nm (drilling); adjustable up to approx. 7 Nm for screwdriving (7 positions) |
| Chuck | Keyless chuck; Ø 1-10 mm; spindle thread 3/8" UNF |
| Weight | Approx. 1.75 kg with battery |
| Rotation direction | Right and left; reversing switch with lock in middle position |
| 2-speed mechanical clutch | Selection by switch (positions 1 and 2) |
| Sound level | Intensity 63 dB(A); level 76 dB(A); hearing protection recommended |
| Vibrations | Acceleration < 2.5 m/s² |
| Operating temperature | Battery: +5 °C to +45 °C |
| Safety | Double insulation; automatic spindle lock; overload shutdown; detailed safety instructions in the manual |
| Maintenance and cleaning | Keep dry and clean; do not open battery; discharge before maintenance; recycle according to Directive 57/EEC |
| Spare parts and repairability | Battery part number A132 (No. 46416); charger MSL 60 (No. 30858); KRESS after-sales service for repairs |
| General information | Manual available in several languages; CE compliance (EN 50 260, EN 55 014, etc.) |
Frequently Asked Questions - MAX 132-S KRESS
User questions about MAX 132-S KRESS
0 question about this device. Answer the ones you know or ask your own.
Ask a new question about this device
Download the instructions for your Electric drill in PDF format for free! Find your manual MAX 132-S - KRESS and take your electronic device back in hand. On this page are published all the documents necessary for the use of your device. MAX 132-S by KRESS.
USER MANUAL MAX 132-S KRESS
Operating Instructions GB 9
Mode d'emploi F 14
The battery-driven rotary screwdriver is universally suitable for use as a drill or a screwdriver with wood, metal and plastic.
2

Safety Instructions and Accident Prevention
WARNING! When using battery-driven tools basic safety precautions are to be taken, including the following, in order to reduce the risk of fire, batteries leaking and persons becoming injured.
Before operating the machine, please read through the operating instructions completely, follow the Safety Instructions in this manual as well as the general Safety Instructions for Power Tools in the accompanying booklet.
Important instructions, which should be read before starting operation, and which we strongly recommend observing:
- For charging the batteries, only use a charger which is recommended by the manufacturer and never use the recommended charger to charge other electrical equipment.
- Never carry the tool with your finger on the switch.
- Before any work on the machine itself, remove the battery.
- Do not use any defective or deformed batteries.
- Any machines and batteries that are not being used should be kept separately in a dry place that is high up or locked, out of the reach of children. For safety's sake, a battery charger connected to the mains should also be permanently supervised.
- Do not expose the machine, battery and battery charger to rain. Do not use the machines in a wet or damp environment.
- Always keep the battery and battery charger clean and dry.
- Do not open the battery and protect from impact.
-
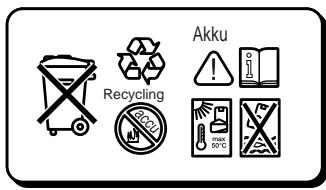
Protect the battery from heat and fire: Danger of explosion! Do not place the battery on radiators or expose to strong sun rays for a longer time; temperatures over 50^ cause damage.
-
In extreme conditions battery fluid can leak out. This does not mean it is defective. If in such a case the casing is no longer sealed and battery fluid comes into contact with the skin, proceed as follows:
- Wash affected skin immediately with soap and water.
- Neutralise the battery fluid with vinegar or lemon juice.
- If the eyes are affected, rinse with clear water with at least 10 minutes. Consult a doctor immediately!
- Before connecting the charger to the mains, please check that the voltage of your mains connection corresponds to the voltage stated on the nameplate of the charger.
- Always inspect the plug and cable before use. If damaged, they must be replaced by a qualified professional.
- Caution - High voltage: Do not open the battery charger!
- Ensure that the connection between the battery charger and battery is correctly positioned and is not obstructed by foreign bodies.
- Keep battery charger slot free of foreign objects and protect against dirt and humidity. Store in a dry and frost-free place.
- When the battery is outside the battery charger, cover battery terminals to avoid short circuits from metal objects. Danger of fire or explosion results when shorted by a metal object!
- Do not charge batteries of other manufacturers. Only use genuine Kress accessories.
- Observe notes on environmental protection.
- When drilling or screwing in walls, they must be checked for hidden electric cables or water and gas pipes with a detector.
- Do not work with materials containing asbestos!
- Do not drill holes into the housing to label the machine. The protective insulation will be bridged. Please use self-adhesive labels.
- Protect the cables of the battery charger from sharp edges. Damaged cables must be replaced immediately by one of our service depots.
10 English
MAX 132/s
3 Illustration
1 ON/OFF switch
2 Rotational direction switch
3 Mechanical two-speed selector
4 Torque adjustment ring
5 Battery locking
6 Battery
7 Battery charging unit
Accessories illustrated or described are not always included as standard delivery items.
5 Noise/vibration information
Measured values determined according to EN 50 260.
Sound pressure level: 63 + 3dB (A)
Sound power level: 76 + 3dB (A)
Work place emission value: 66 + 3dB (A).
For operation, noise protection measures are required.
The acceleration measured is usually less than 2.5m / s^2
4 Technical Data
Electronic battery-driven rotary screwdriver
Article number
Right/Left rotation
No-load speed
1st Gear
2nd Gear
Screwing into wood up to max.
Drilling into steel up to
Drilling into wood up to
Spindle thread
Drill chuck span
Mechanical torque selection
Max. torque
Weight with battery
Rechargeable Battery A132
Article number
(Spare parts no. 46416)
Type
Rated voltage
Capacity
Number of cells
Operating temperature range
Weight
Battery charging unit
Article number
(Spare parts no. 30858)
Input voltage
Output voltage
Charging current/time
Weight
MAX 132/s
12042401
0-450 min-1
0-1500 min
6 mm
10 mm
16 mm
3/8" UNF
1-10 mm
in 7 stages
to approx. 7 Nm
18Nm
approx. 1.75kg
98024701
NiCd
13.2V=
1.5 Ah
11
+5°C ... +45°C
0.8 kg
MSL 60
98033401
230 V ~
13.2V=
approx. 1.65 A /
approx. 60 min
approx. 1.3kg
6 Charging the batteries
The rated voltage of the battery must agree with the value on the machine.
- The batteries are not charged. They therefore have to be charged before use.
- A new battery develops full power only after it has been subjected to approx. 5 charging and discharging cycles.
- The maximum service life of the batteries is attained if you charge these at an ambient temperature of between +5^ and max. +45^ .
- If the battery is not within the permitted loading temperature range (approx. +5^ and +45^ ) charging time is extended by the cooling or warm-up time.
- Important! Batteries will discharge even if the tool is not used. They should therefore be re-charged regularly.
Or better still - connect the battery to the mains charger which will automatically switch to maintenance charging after the battery has been fully charged. This is particularly useful for maintenance and for the optimal operational readiness of the batteries.
- Do not leave the battery in the charger if the latter is not in operating condition.


MAX 132/s
English
11
To ensure long service life, the batteries should always be charged in good time. This is particularly important if you notice a reduction in power output.
- Remove battery 6 from the handle by simultaneously pressing the locking device 5.
- Make sure that the mains voltage complies with the voltage on the name-plate on the charger. Connect charger plug to mains.
- Push battery into battery until it snaps into place.
Battery charging unit type: MSL 60
Use as Intended
The device is only designed for charging Kress NiCd batteries with voltages between 12V and 13.2V .
Charging Procedure
The charging process begins as soon as the mains plug is inserted into the power supply socket and the battery is placed into battery charger slot.
The "intelligent" battery charger recognises the charged condition of the battery and switches a fully charged battery immediately to trickle charging. By means of this charging process, the battery is protected and always fully charged.
Rapid charging is only possible when the temperature of the battery is between +5^ and +45^ .
The charging unit it suitable for continuous operation.
Display and Key
Blinking green indicator light: The battery has contact; charging is in progress (max. 60 minutes).
Constant green indicator light: The battery is charged; the charger has switched to maintaining charge.
Constant red light: The battery is not connected or too warm. Remove the battery from the charger and reconnect or allow to cool off to room temperature, then recommence charging.
Constant red light: The battery is too hot or too cold.
The charging process begins automatically as soon as the battery is in the permissible temperature range.
Blinking red ligh: The battery is defective or there is a short between the charging contacts.
- Remove the battery from the battery charger.
- Pull out the mains plug!
- Check the charging slot for foreign bodies.
If the batteries cannot be charged correctly:
- Make sure the socket is providing voltage.
- Make sure the charging points provide good contact.
- Should charging still not be possible, please send the battery and battery charger to our nearest service centre.
Notes for the correct use of the battery:
- To obtain the maximum service life, do not recharge the battery immediately after a short period of use but, if possible, discharge to the lower capacity limit and then recharge.
- Avoid to the extent possible the blocking of the machine. The resulting excessive current flow leads to quick discharging and increased wear of the battery.
- An increasingly shorter operating time per recharging of the battery is an indication that the battery is worn out and must be replaced.
Do not carry out any repair on the charger yourself!
As a basic rule, return the faulty machine to our next customer service centre (also in the case of defective mains cables)!
7 Putting into Operation
Convince yourself before using that the battery is securely seated in the machine.
Switching On/Off
With the ON/OFF switch 1 the torque can be continuously controlled in the application selected by the mechanical 2-speed selector and adjusted to process various materials.
Rotation direction selector
Pressing the rotation direction selector 2 as far as it will go causes the drill to rotate in the corresponding direction. The ON/OFF switch is blocked in the middle position, thus preventing the drill being switched on unintentionally and protecting the battery from undesired discharge.
Attention! Change direction of rotation only when the motor has ceased turning!
12 English
MAX 132/s
Mechanical 2-speed selector
For battery equipment, the mechanical 2-speed selector permits optimal drilling torques of 0-1500 rpm in 2nd speed and with high transmission in 1st speed (0-450 rpm) very high tractive power even with screws of a large diameter. The switchover is performed by moving the switch 3 until it stops in position 1 or 2.
Torque selection
The battery-driven rotary screwdriver is equipped with a seven-stage mechanical torque selection. The starting torque for a particular screw is set at the adjusting ring 4 according to the scale.
The volume of the torque is dependent on various factors - type and hardness of the material to be processed, type and length of the screws to be used, but in addition the demands made on the screw connection. The data contained in the following table should be observed as a guideline:
Stage 1 = approx. 1 Nm: screws Ø 3 mm
Stage 2 = approx. 2 Nm: screws 3.5mm
Stage 3 = approx. 3 Nm: screws Ø 4 mm
Stage 4 = approx. 4 Nm: screws 4.5 mm
Stage 5 = approx. 5 Nm: screws 5 mm
Stage 6 = approx. 6 Nm: screws 5.5 mm
Stage 7 = approx. 7 Nm: screws Ø 6 mm
When the set torque is reached it is signalled acoustically through the construction of the torque coupling. The coupling disengages with a click.
Operation of the
Quick Clamping Drill Chuck
Rotational direction switch in the LOCK position.
The fully automatic spindle locking makes possible quick and easy changing of the tool in the drill chuck.
Opening: Turn the sleeve in the "AUF" direction.
Clamping: Open the chuck and insert the tool as far as possible. Firmly clamp the chuck by turning the sleeve in the "ZU" direction.
For soft drill shafts, it may be necessary to retighten after a short time.

Caution! For reasons of safety, take the battery out of the device for all installation and removal operations!
8 Practical Tips
Drilling
When drilling, set the torque ring to the "drill" symbol. The torque coupling is deactivated. Maximum torque is available for drilling.

When drilling steel, take care that no swarf enters the ventilation slits of the housing, as these are attracted by the permanently active magnet of the motor and would remain on the motor.
Screwing
Make sure that the bit and screw correspond in size and shape.
It is advisable to use socket-head screws since their self-centering action ensures safe work.
Or even better - TORX screws and the corresponding bits. Optimal screwing is achieved when the screwing device is fixed securely in the screw head.
Dismounting the Drill Chuck
Rotational direction switch in the LOCK position.
Remove the left-hand threaded screw that secures the drill chuck on the drill spindle against unscrewing in left rotation. The drill chuck can then be loosened by lightly striking a Allen key clamped in the drill chuck and screwed off.
Remounting takes place in the reverse order.
Clean the flat surfaces on the drill chuck and spindle before mounting. Screw on the drill chuck firmly and secure with the safety screw.
Observe in addition that, when using a rim gear drill chuck, the chuck key must not be attached to the machine with chains, cords or similar means.
When drilling or screwdriving, secure the work pieces against being rotated by the drill.
MAX 132/s
English
13
9 Maintenance Measures
Servicing Instructions
If you make heavy use of the equipment for an extended period of time, we recommend returning it together with the charger to our servicing department for a thorough inspection at regular intervals. This prevents high repair costs and extends the service life of your equipment.
10 Environmental Protection

Kress takes back worn-out machines for the purpose of resource-saving recycling. As a result of their modular construction, Kress machines can be very easily dismantled into their reusable materials.
Defective
rechargeable
batteries must
be recycled
according to the
Guidelines
91/157/EEC.
Do not throw
used batteries in
household waste,
in fire or in water.
Do not open battery and dispose of it through the available collection points.
Do not place the battery on any heated surface or expose it to strong sunlight for a longer period of time. Do not expose the battery to temperatures over 50^ .
Give your worn-out Kress machine to your dealer or send it directly to Kress.
Subject to change without notice
14 François
MAX 132/s
1 Utilisation
Stap 1 = ca. 1 Nm: Schroevenø 3 mm
Stap 2 = ca. 2 Nm: Schroeven 0 3,5 mm
Stap 3 = ca. 3 Nm: Schroeven 4 mm
Stap 4 = ca. 4 Nm: Schroeven 4,5 mm
Stap 5 = ca. 5 Nm: Schroeven 5 mm
Stap 6 = ca. 6 Nm: Schroeven 0 5,5 mm
Stap 7 = ca. 7 Nm: Schroeven 6 mm
Reservation for andringar
MAX 132/s
Dansk
39
1 Anvendelse
Ladeaggregat for akkumulator
Varenummer
(Reservedel-nr. 30858)
Indgangsspending
Udgangsspaending
Ladestrom/ladetidt
Vægt
MAX 132/s
12042401
0-450 min
0-1500 min
6 mm
10 mm
16 mm
3/8" UNF
1-10mm
i7 trin
indtil ca. 7 Nm
18Nm
ca. 1,75 kg
98024701
NiCd
13.2V=
1,5 Ah
11
+5°C ... +45°C
0,8 kg
MSL 60
98033401
230 V ~
13.2V=
ca. 1,65 A /
ca. 60 min
ca. 1,3 kg
(Reservedsnumber 46416)
Type
Nominell spanning
Kapasitet
Antall celler
Pepiox ngouoviyEng took
Mnxavikn euloyn pomns otpeync
Avotatn potn otpeyns
Bapoc natapia
Mnatapia A132
Aipouoc npoiovtoc
Anouvapoloyon tou took
O diakontnc euloyns opac npiotpnpnc
Bpioketaln thenlock.
Apaipote nV apioTePoToPOn BiOa aopaleiaocou eIIOdiEi nV ouoTpoPn Tou Took eIaNw OToV aEova kata nV apioTePoToPOn aeIoupyia.To Took auveta paapeiatae eva eIApco xTuImua eNaw o' eva KJIe iEgWepikou Eeaywou (Tunou AEv), opiyuovou eo a oTo idio to Took.
GB C Declaration of conformity
We declare under our sole responsibility that this product is in conformity with the following standards or standardization documents: EN 50 260, EN 55 014-1, EN 55 014-2, EN 60 555 according to the provisions of the regulations 73/23/EEC, 89/336/EEC, 98/37/EC. (Charging device: EN 60 335, EN 55 014-1, EN 55 014-2, EN 61 000-3-2, EN 61 000-3-3, 73/23/EEC, 89/336/EEC).
- Safety Instructions and Accident Prevention
- Important instructions, which should be read before starting operation, and which we strongly recommend observing:
- English
- MAX 132/s
- Illustration
- Noise/vibration information
- Technical Data
- Electronic battery-driven rotary screwdriver
- Rechargeable Battery A132
- Battery charging unit
- MSL 60
- Charging the batteries
- Battery charging unit type: MSL 60
- Use as Intended
- Charging Procedure
- Display and Key
- Notes for the correct use of the battery:
- Putting into Operation
- Switching On/Off
- Rotation direction selector
- English
- Mechanical 2-speed selector
- Torque selection
- Operation of the
- Quick Clamping Drill Chuck
- Practical Tips
- Drilling
- Screwing
- Dismounting the Drill Chuck
- Maintenance Measures
- Servicing Instructions
- Environmental Protection
- François
- Utilisation
- Anvendelse
- Ladeaggregat for akkumulator
- Mnatapia A132
- Anouvapoloyon tou took
- GB C Declaration of conformity
Brand : KRESS
Model : MAX 132-S
Category : Electric drill