MAXI PRO - Baby car seat KIDDY - Free user manual and instructions
Find the device manual for free MAXI PRO KIDDY in PDF.
User questions about MAXI PRO KIDDY
0 question about this device. Answer the ones you know or ask your own.
Ask a new question about this device
Download the instructions for your Baby car seat in PDF format for free! Find your manual MAXI PRO - KIDDY and take your electronic device back in hand. On this page are published all the documents necessary for the use of your device. MAXI PRO by KIDDY.
USER MANUAL MAXI PRO KIDDY
natural_image
Interior view of a gray baby car seat with visible bedding and buttons (no text or symbols)Inhalt
Einleitung
natural_image
Illustration of a gray basket with a handle and patterned skirt (no text or symbols)Abb.1
natural_image
Illustration of a baby buntington (no text or symbols)Abb.3
natural_image
Illustration of a woven basket with a handle and spout (no text or symbols)Abb.2
natural_image
Gray baby crib with white cushion and blue handle (no text or symbols)Abb.4
natural_image
Illustration of a hand holding a small object with a yellow highlight, against a stylized mountain background (no text or symbols)Abb.5
natural_image
Illustration of a basket with handle and two labeled parts (1 and 2), no text or symbols present.Abb.6
natural_image
Diagram of a mechanical component with colored parts and red directional arrows indicating motion (no text or symbols)Abb.7
text_image
Diagram of a bag with labeled parts and directional arrows indicating movement or forceAbb.8
natural_image
Line drawing of a car seat with adjustable armrest (no text or symbols)Abb.9
text_image
Diagram illustrating seatbelt usage with magnified insets showing safety features like shock and crash.Abb.10
natural_image
Illustration of a car seat with a blue seat highlighted, showing the interior and side view (no text or symbols)Abb.11
natural_image
Illustration of a car seatbelt with a belt buckle (no text or symbols)Abb.12
text_image
Technical diagram showing a mechanical assembly with labeled parts and directional arrows indicating motion or forceAbb.13
natural_image
Illustration of a human head in profile view with abstract curved lines and shading (no text or symbols)Abb.15
richtig
natural_image
Illustration of a human head profile with a curved line and shaded area, no text or symbols presentfalsch, zu hoch
natural_image
Illustration of a human head with a curved line and shaded regions, possibly depicting a medical or anatomical concept (no text or symbols present)falsch, zu niedrig
natural_image
Illustration of a baby wearing a car seatbelt with red arrows indicating pressure points (no text or symbols)Abb.16
natural_image
Illustration of a baby wearing a seatbelt and holding a red object, with no visible text or symbols.Abb.17
natural_image
Illustration of a person wearing a seatbelt with a red seatbelt and numbered label (1), no text or symbols present.Abb.20
natural_image
Close-up of a mechanical component with a numbered label (1) and curved line, no readable text or symbols present.Abb.21

natural_image
Close-up of a car seatbelt buckle with a red arrow indicating force (no text or symbols)natural_image
Illustration of a car comfort seat with buttons and a red seal (no text or symbols)Abb.22
text_image
Diagram showing seatbelt buckle assembly with red arrows indicating movement or force directionAbb.23
natural_image
Illustration of a person wearing a hat and glasses, viewed from behind (no text or symbols)Abb.24
natural_image
Illustration of a car seatbelt with a key inserted, shown in an inset view (no text or symbols present)Abb.25
- Applicability.... 3
- General safety instructions.... 4
- General use.... 6
3.1 Functions of the carrying frame.... 6
3.2 Functions of the sun canopy 7 - Fitting into the vehicle.... 8
4.1 Choice of sea.... 8
4.2 Fitting stages.... 9 - Securing the baby into the seat pan.... 10
5.1 Height adjustment of 5-point belt system.... 10 and the head support
5.1.1 Loosening of the 5-point belt system.... 11
5.1.2 Adjustment of the 5-point belt system.... 11
5.2 Buckling up the baby.... 12 - Care notes.... 13
6.1 Cleaning the seat cover.... 13
6.2 Cleaning the plastic parts.... 14
6.3 Cleaning the 5-point belt system.... 14
6.4 Dismantling the 5-point belt system.... 14
6.4.1 Dismantling the buckle.... 14
6.4.2 Dismantling the shoulder belt.... 15
6.5 Fitting the belts.... 16
6.6 Removing the cover.... 16
6.7 Replacing the cover.... 17 - Procedure after an accident.... 17
- Guarantee.... 17
Introduction
The kiddy maxi pro is part our company's new pro line, which offers completely safety to protect your baby and growing child by means of a special material that derives energy. In order to secure your baby completely in the kiddy maxi pro seat, this is fitted in the head support area with the new material. The impact of a side collision will be absorbed particularly well before it reaches the sensitive head area of the baby. For complete protection of your baby the kiddy maxi pro has to be used exactly as is described in these directions.
1. Applicability
The kiddy maxi pro seat was tested and approved in line with the most current version of the standard ECE44-04. It received the design certification for the category "universal". This means that it should be used in all vehicle types on seats with 3-point vehicle belt in accordance with ECE 16 or comparable norms.
text_image
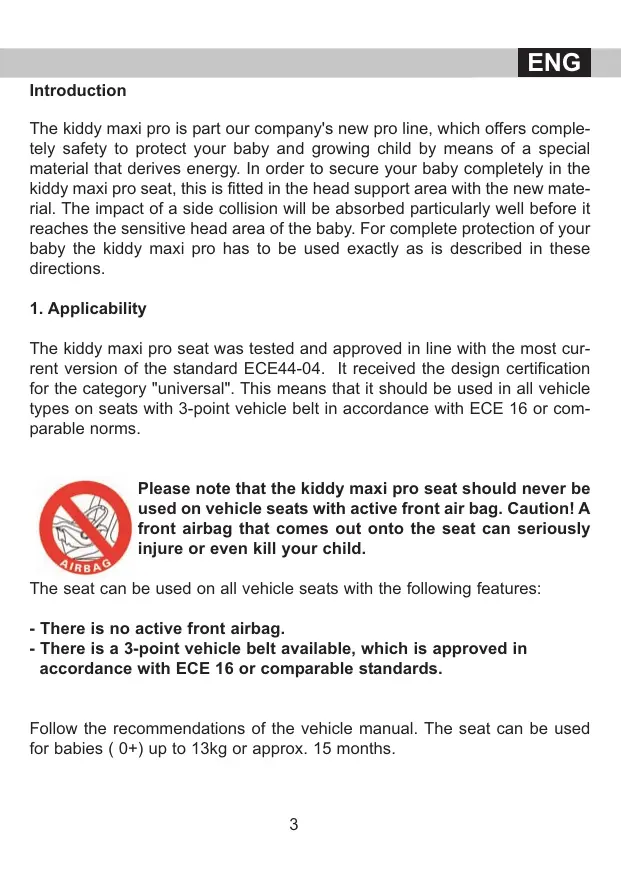
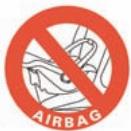
AIRBAGPlease note that the kiddy maxi pro seat should never be used on vehicle seats with active front air bag. Caution! A front airbag that comes out onto the seat can seriously injure or even kill your child.
The seat can be used on all vehicle seats with the following features:
- There is no active front airbag.
- There is a 3-point vehicle belt available, which is approved in accordance with ECE 16 or comparable standards.
Follow the recommendations of the vehicle manual. The seat can be used for babies (0+) up to 13kg or approx. 15 months.
2. General safety instructions
Read through the directions for use carefully before fitting the kiddy maxi pro seat for the first time. Incorrect use can be life-threatening for your child.
Many injuries are caused by carelessness and are easily avoidable.

It is forbidden to make any changes whatsoever to the child restraint systems. The protective effect can be lost or restricted. If you experience difficulties please contact your specialist dealer or the manufacturer directly.

Before each journey check the parts of the seat pan. Above all the belt system has to be regularly checked for wear and tear and possible damage. Do not carry out any settings during the journey.

Fit the seat pan in the opposite direction to which you are driving (always with the back in the driving direction).

Please observe the notes in the vehicle manual, in which the seat pan is to be fitted. Cf. chapter 4.1.

Make sure that all parts are always locked in place correctly. Set the adjustable back rest of your car seat so that it has contact to the carrying frame of the seat pan.

Make sure that no parts of the seat pan are penned into the doors or adjustable seats.

With vans and caravans make sure that in the case of a rescue operation by a third party the seat pan is preferably on a seat that is easily accessible.
Only use the seat pan for the weight category specified - up to a maximum of 13kg. Cf. chapter 1.
Never use the seat pan without the original cover. It is part of the safety concept.
Never use the seat pan as a shopping aid or other carrying aid.
Never leave your baby unattended in the seat pan, especially not when you put the seat pan on raised surfaces (baby changing unit, table etc.).
Do not place any heavy objects on the rear shelf. This could be dangerous in the event of an accident.
If you drive with the seat in the car without a child, always secure it with the safety belt.
Protect the seat pan from direct sun light as it could heat up and cause discomfort.
Allow your baby breaks during longer journeys and see that you take the baby out of the seat during these breaks to relieve the spine.
Ensure that the seat pan has been fitted in the vehicle according to these instructions.
Never use the seat pan without having the child car seat's own 5-point belt system locked and the belt tightened. This also applies to use outside the vehicle.
Do not continue to use the seat shell if parts have been damaged or loosened after an accident (accident speed great then 10 km/h) or through other effects.
3. General use
Please read these directions carefully before using the seat shell kiddy maxi pro for the first time. Always keep the directions for use in the box provided underneath the seat pan. This way it is always there if you encounter problems.
3.1 Functions of the carrying frame
The carrying frame of your seat shell kiddy maxi pro can be locked in place in 4 places.
natural_image
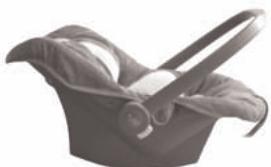
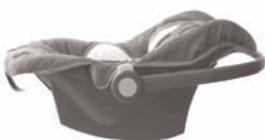
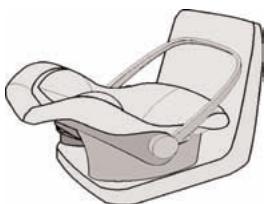
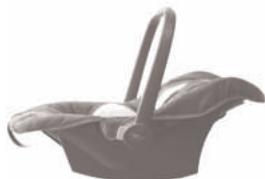
Illustration of a gray basket with a handle and patterned skirt (no text or symbols)Fig.1 Setting of carry handle for operation in the vehicle.

natural_image
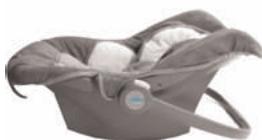
Illustration of a woven basket with a handle and spout (no text or symbols)Fig.2 Position the handle folded upwards to carry the seat pan.
Caution! All other settings are not allowed during vehicle operation.
natural_image
Gray plastic bucket with textured surface and handle (no text or symbols)Fig.3 Position folded back to release the swing function.
natural_image
Gray baby baby seat with white bedding (no text or symbols visible)Fig.4 Position folded diagonally downwards to cancel the swing function
natural_image
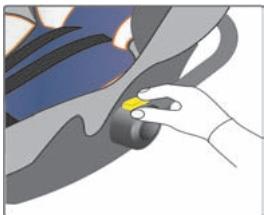
Illustration of a hand holding a small object over a stylized blue and gray background (no text or symbols)To adjust the carrying frame, press the yellow button on both sides on the swivel joint.
Fig.5

Make sure you never position the seat shell on sloping ground and avoid putting it down on raised items (table, baby changing unit, etc.)
3.2 Functions of the sun canopy
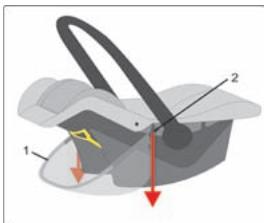
The sun canopy can be opened to protect against direct sunlight. Turn the sun canopy frame forwards until it locks in place (fig. 6).
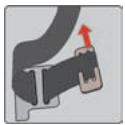
If the sun canopy is not needed, it can be fixed using the spring mounted clamp under the pan rim (fig. 7). Fold the material folding top under the pan rim and secure it.
Below are instructions on how to dismantle or assemble the sun canopy:
natural_image
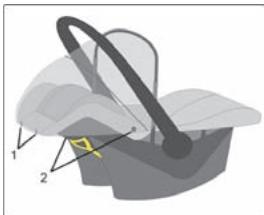
Illustration of a basket with handle and two labeled parts (1 and 2), no text or symbols present.Fig.6
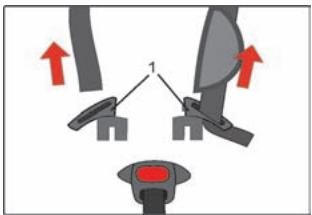
- Loosen both mounting clips (fig. 6/no. 1) and both press studs (fig. 6/no. 2) from the pan rim or the pan cover.

natural_image
Diagram of a mechanical component with colored parts and red directional arrows indicating motion (no text or symbols)Fig.7
- Swivel the sun canopy (fig. 8/no. 1) downwards over the top end rim of the pan. Now you can pull the clamp bracing (fig.8/no.2) down vertically and remove the clamp. (CAUTION: The clamp can only be loosened in the pan position specified.
text_image
Diagram of a bag with labeled parts and directional arrows indicating movement or forceFig.8
- Feed the clamp out of the material strap of the sun canopy.
To assemble the sun canopy proceed in reverse order. When mounting make sure that the slot in the clamp (fig. 7/no. 1) is pointing downwards.
4. Fitting into the vehicle
4.1 Choice of seat
Using the child car seat
| In driving direction | no |
| Opposite of driving direction | yes |
| With 2-point belt | no |
| With 3-point belt | yes |
| With front airbag | no |
Some vehicle manufacturers enable the front airbag to be switched off. Obtain information on using seat pans from your vehicle manual or consult your authorised repair shop. 8
The seat pan is not suitable for seats which are only fitted with a 2-point lap belt. Only use the seat pan on seats that have a 3-point vehicle belt.

We recommend using the seat pan on the rear bench seat in cars. In vans the seat pan should be mounted on the seat that has the easiest access in the event of a rescue operation.
4.2 Fitting stages
After looking through the vehicle manual as well as selecting the appropriate seat, the seat pan can be fitted in the vehicle as described in the following section.
natural_image
Line drawing of a car seat with adjustable armrest and seat plate (no text or symbols)Fig.9
Position the seat pan backwards facing the vehicle seat and turn the carrying frame in the position of drive operation (fig. 9).
natural_image
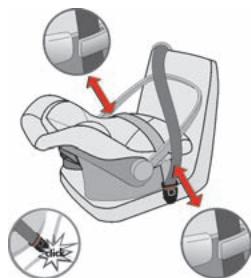
Illustration of a car seatbelt with red arrows indicating stress or shock zones (no text or symbols)Fig.10
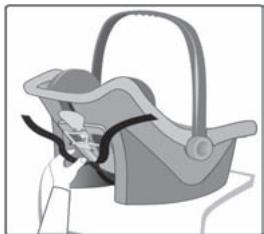
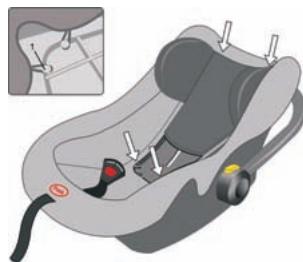
Direct the lap belt of the vehicle's own 3-point belt systems through both lap belt guides on the seat pan and let the belt tongue lock in place. You will hear a clicking noise (fig. 10). Check that this is locked in place by pulling on the belt.
natural_image
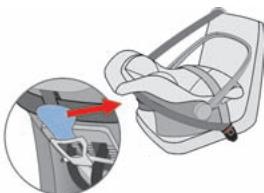
Illustration of a car seatbelt with a blue seatbelt highlighted, showing no text or symbols.Fig.11
Guide the shoulder belt of the vehicle's own 3-point belt systems on the back of the baby seat pan and thread this between the blue belt guide and the guide on the seat pan (fig. 11).

natural_image
Illustration of a car seatbelt with a belt buckle (no text or symbols)Tighten the vehicle's own 3-point belt by heftily pulling on the shoulder belt (fig. 12).
Fig.12
Some vehicles have so-called retractor locks. The automatic roll-up of the vehicle's own belt system can be disabled. A more permanent fitting of the seat pan is possible. Read your vehicle manual or consult your authorised repair shop.
5. Securing the baby into the seat
5.1 Height adjustment of 5-point belt system and head support
The kiddy maxi pro has a 5-point belt system, which guarantees optimal protection for your baby in the seat pan.
In order to guarantee the best possible safety for your baby with the 5-point belt system, this must be adapted accurately to the body size. Shoulder belt and head supports must be adjusted together as a unit.
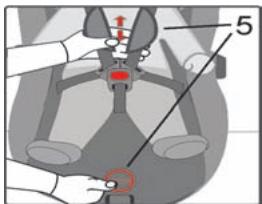
5.1.1 Loosening of the 5-point belt system
text_image
Diagram showing a mechanical or anatomical component with labeled parts and directional arrows, likely illustrating a process or assembly.Fig.13
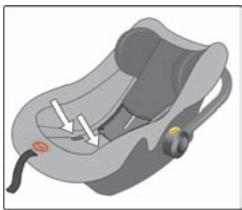
Before you can adapt the belt system, you must loosen this. By pressing the central belt adjustment, the area marked in red (press) in front on the cover of the seat pan and at the same time pulling on both shoulder belts you can loosen the 5-point belt system (fig. 13)
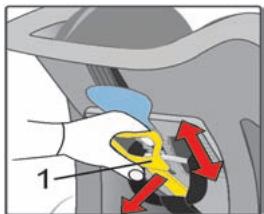
5.1.2 Adjustment of the 5-point belt system
text_image
1Fig.14
In order to adjust the shoulder belt in height, you must move the head support in the direction required by means of the yellow head support adjustment on the back of the seat pan (fig. 14/no.1) The head support adjustment must be loosened by bringing it out slightly from its locked in position and at the same push it up or downs into the required position.
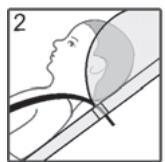
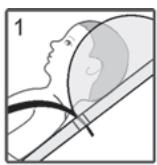
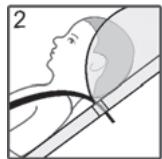
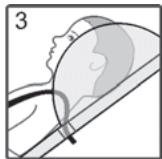
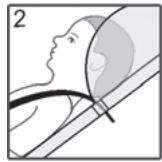
Lock the head support adjustment in place again. The head support must be set so that the shoulder belt is at shoulder height of the baby or slightly above (fig. 15/no. 1).
natural_image
Illustration of a human head in profile with abstract curved lines and shading (no text or symbols)Fig.15
correct

natural_image
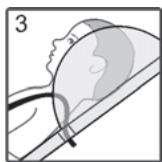
Illustration of a human head profile with a curved line and shaded area, no text or symbols presentincorrect, too high

natural_image
Illustration of a human head with a curved line and shaded regions, possibly depicting a medical or anatomical concept (no text or symbols present)incorrect, too low
Make sure that the belts are never twisted.
5.2 Buckling up the baby
Please make sure that your baby is always wearing a seat belt in the seat pan. That also means outside of the vehicle.
Loosen the shoulder belt as described in section 5.1.1. Open the buckle by pressing the red button.
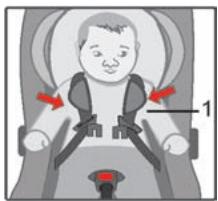
natural_image
Illustration of a baby wearing a car seatbelt with red arrows indicating pressure points (no text or symbols)Fig.16
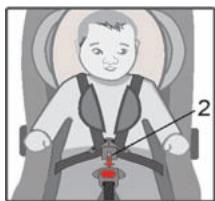
Place the child in the seat pan and then guide the shoulder belt over your baby's shoulder (fig.16/no.1).

natural_image
Illustration of a baby wearing a seatbelt and holding a red object, with no visible text or symbolsFig.17
Feed the latches of the shoulder belt (fig.17/no.2) together into the buckle.
text_image
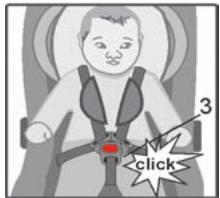
3 clickFig.18
The buckle is locked in place once you hear a clicking noise. (Fig.18/no.3) Check that this is fastened securely by pulling on both shoulder belts and the buckle at the same time.
text_image
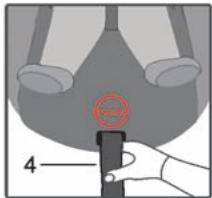
4Fig.19
To tighten the shoulder belt pull in front of the central belt adjustment until the belt system fits tightly. (Fig.19/no.4)
To take your baby out open the 5-point belt system by pressing the red button on the front of the buckle and loosen the belt (see chapter 5.1.1). Then take your baby out of the seat pan.
6. Care notes
6.1 Cleaning the seat cover

The seat pan should not be used without the cover. The covers are an essential part of the safety concept. Only use original covers from the manufacturer. If you require replacement covers, you can order these from your dealer.

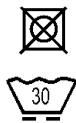
The cover is removable and washable at 30 degrees mild washing. Spin drying and tumble drying are not recommended.
If you fit the cover again, make sure that the belts are not twisted when being thread into the cover.
6.2 Cleaning the plastic parts
The plastic parts can be cleaned with a mild cleaning agent or a damp cloth. Do not use harsh cleaning products (e.g. solvent).
6.3 Cleaning the 5-point belt system
The belt system can be cleaned with a damp cloth. Please never wash in a washing machine and never treat with chemical cleaning agents.
Make sure that the buckle stays clean so that it keeps its effectiveness. If contamination does affect the effectiveness, you can soak the buckle in a mild soapsuds and then rinse with plenty of warm water.
6.4 Dismantling the 5-point belt system
6.4.1 Dismantling the seatbelt

natural_image
Illustration of a person wearing a seatbelt with a red seatbelt and numbered label (1), no text or symbols present.Fig.20
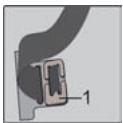
Open the buckle by pressing the red button (fig. 20/no. 1).
Tip the seat shell backwards. Pull the belt tongue that fastens the buckle on the seat shell behind the instruction manual box and weave the belt out. Now you can take the buckle out.
6.4.2 Dismantling of shoulder belt
natural_image
Close-up of a mechanical component with a numbered label (1) and curved line, no readable text or symbols present.Fig.21

natural_image
Close-up of a car seatbelt buckle with a red arrow indicating force (no text or symbols)Open the buckle. Weave the lap belt from the side belt tongues underneath the inner cover (fig. 21/22).
natural_image
Illustration of a baby car seat with arrows indicating movement or pressure points (no text or symbols)Fig.22
Weave the belt through both slots on the seat pan as well as through the slot in the cover. (Fig. 22).
text_image
Diagram showing seatbelt buckle assembly with red arrows indicating movement or force directionFig.23
Remove both buckle tongues from the belt (fig.23)
natural_image
Illustration of a person wearing a hat and glasses, holding a large bag (no text or symbols visible)Fig.24
Pull both belt straps through the inside cover, through the head part and rear panel. Feed the belt on the back of the seat pan from the tie loop with the central belt adjustment (fig. 24).
6.5 Fitting the belts
When mounting the belt proceed in the reverse order of dismantling.

Caution! Check the correct belt fitting.
6.6 Removing the cover
In order to remove the covers of the kiddy maxi pro seat pan for cleaning, do the following:
- Remove the clips of the seat pan cover from the outer rim of the plastic pan and detach the cover in the lower area from the seat pan.
- Feed the buckle through the seat pan cover (item 6.4.1).
- Remove the shoulder belt and proceed as described in item 6.4.2.
- Also take off the head support cover incl. padding.
natural_image
Illustration of a car seatbelt with a key inserted, showing no text or symbolsFig.25
In order to be able to remove the seat pan cover, loosen the straps on the loops (fig. 25/no. 1) on the inside of the seat pan. Loosen this first in the lower area of the pan. Then push the head support completely upward and loosen the straps in the upper area of the seat pan.
Remove the seat pan cover.
6.7 Replacing the cover
When replacing the cover proceed in the reverse order of removing the cover.
Make sure that when feeding the belt straps in the lower area of the seat pan, these are fed first through the outer slot and then through the inner slot. The belt strap must be inside the seat pan and fastened with the belt tongue (fig.21/no.1).
7. Procedure after an accident
After an accident resulting from a speed of over 10km, the seat pan must be checked by the manufacturer for possible damage and if required, replaced.
8. Guarantee
For this seat pan we offer a 2 year guarantee for manufacturing or material defects. The guarantee period commences on the day of purchase.
A sales receipt will be required for complaint.
The guarantee is limited to seat pans, which have been handled appropriately and are returned in clean and sound condition.
The guarantee shall not extend to:
- natural occurrences of wear and tear and damages caused by excessive strain.
- Damages through inappropriate or improper use.
Materials: All of our materials meet high standards regarding colour resistance against sunlight. Nevertheless all materials discolour when they are exposed to UV light. This will not be considered as a material defect, but normal wear and tear. No guarantee can be assumed in this case.
In the case of guarantee please contact your dealer directly.
Inhoud
Inleiding
natural_image
Illustration of a gray basket with a handle and patterned skirt (no text or symbols)Afb.1
natural_image
Illustration of a baby buntington (no text or symbols)Afb.3
natural_image
Illustration of a woven basket with a handle and spout (no text or symbols)Afb.2
natural_image
Gray baby baby seat with white bedding and a button (no text or symbols visible)Afb.4
natural_image
Illustration of a hand holding a small object over a stylized blue and gray background (no text or symbols)Afb.5
natural_image
Illustration of a basket with handle and two labeled parts (1 and 2), no text or symbols present.Afb.6
natural_image
Diagram of a mechanical component with colored parts and red directional arrows indicating motion (no text or symbols)Afb.7
text_image
Diagram of a bag with labeled parts and directional arrows indicating movement or forceAfb.8
natural_image
Line drawing of a baby car seat with adjustable arm and seat (no text or symbols)Afb.9
natural_image
Illustration of a car seatbelt with red arrows indicating stress or shock zones (no text or symbols)Afb.10
natural_image
Illustration of a car seatbelt with a magnified inset showing the seatbelt area (no text or symbols)Afb.11
natural_image
Illustration of a car seatbelt with a belt buckle (no text or symbols)Afb.12
text_image
Diagram of a mechanical assembly with labeled parts, showing a central component and directional arrows indicating motion or force.Afb.13
natural_image
Illustration of a human head in profile with abstract curved lines and shading (no text or symbols)Afb.15
Goed
natural_image
Illustration of a human head in profile with a curved line and shaded area, no text or symbols presentfout te hoog
natural_image
Illustration of a person's head and shoulders on an inclined plane, no text or symbols presentfout te laag
natural_image
Illustration of a baby wearing a car seatbelt, with red arrows indicating movement or pressure points (no text or symbols present)Afb.16
natural_image
Illustration of a baby wearing a seatbelt and holding a red object, with no visible text or symbols.Afb.17
natural_image
Illustration of a person wearing a seatbelt with a red seatbelt and numbered label (1), no text or symbols present.Afb.20
natural_image
Close-up of a mechanical component with a numbered label (1) and curved line, no readable text or symbols present.Afb.21

natural_image
Close-up of a car seatbelt buckle with a red arrow indicating force direction (no text or symbols)natural_image
Illustration of a car comfort seat with buttons and a red seal (no text or symbols)Afb.22
text_image
Diagram showing seatbelt buckle assembly with red arrows indicating movement or force directionAfb.23
natural_image
Illustration of a person wearing a hat and glasses, viewed from behind (no text or symbols)Afb.24
natural_image
Illustration of a car seatbelt with a key inserted, showing no text or symbolsAfb.25
natural_image
Illustration of a gray basket with a handle and patterned skirt (no text or symbols)natural_image
Illustration of a woven basket with a handle and spout (no text or symbols)natural_image
Gray plastic bucket with textured surface and handle (no text or symbols)natural_image
Gray baby baby seat with white bedding (no text or symbols visible)natural_image
Illustration of a hand holding a small object over a stylized blue and gray background (no text or symbols)Fig.5
natural_image
Illustration of a basket with handle and two labeled parts (1 and 2), no text or symbols present.Fig.6
natural_image
Diagram of a mechanical component with colored parts and red directional arrows indicating motion (no text or symbols)Fig.7
text_image
Diagram of a bag with labeled parts and directional arrows indicating movement or forceFig.8
natural_image
Line drawing of a car seat with adjustable armrest and seat plate (no text or symbols)Fig.9
text_image
Diagram illustrating seatbelt usage with magnified insets showing safety features like shock and crash.Fig.10
natural_image
Illustration of a car seatbelt with a blue seatbelt highlighted, showing no text or symbols.Fig.11
natural_image
Illustration of a car seatbelt with a belt buckle (no text or symbols)Fig.12
text_image
Diagram showing a mechanical or anatomical component with labeled parts and directional arrows, likely illustrating a process or assembly.Fig.13
natural_image
Illustration of a human head in profile view with abstract curved lines and shading (no text or symbols)Fig.15
Correct

natural_image
Illustration of a human head profile with a curved line and shaded area, no text or symbols presentIncorrect trop haut

natural_image
Illustration of a human head with a curved line and shaded regions, possibly depicting a medical or anatomical concept (no text or symbols present)Incorrect trop bas
natural_image
Illustration of a baby wearing a car seatbelt, with red arrows indicating pressure points (no text or symbols present)Fig.16
natural_image
Illustration of a child wearing a seatbelt and holding a red object, with no visible text or symbols.Fig.17
natural_image
Illustration of a person wearing a seatbelt with a red seatbelt and numbered label (1), no text or symbols present.Fig.20
natural_image
Close-up of a mechanical component with a numbered label (1) and curved line, no readable text or symbols present.Fig.21

natural_image
Close-up of a car seatbelt buckle with a red arrow indicating force direction (no text or symbols)natural_image
Illustration of a baby car seat with arrows indicating movement or pressure points (no text or symbols)Fig.22
text_image
Diagram showing car seatbelt buckle assembly with red arrows indicating movement or force directionFig.23
natural_image
Illustration of a person wearing a hat and glasses, holding an open bag (no text or symbols visible)Fig.24
natural_image
Illustration of a car seatbelt with a key inserted, showing no text or symbolsFig.25
natural_image
Illustration of a gray basket with a handle and patterned skirt (no text or symbols)Fig.1
natural_image
Gray plastic bucket with a strap and handle, no visible text or symbolsFig.3
natural_image
Illustration of a woven basket with a handle and spout (no text or symbols)Fig.2
natural_image
Gray baby baby seat with white bedding and a button (no text or symbols visible)Fig.4
natural_image
Illustration of a hand holding a small object over a stylized blue and gray background (no text or symbols)Fig.5
natural_image
Illustration of a basket with handle and two labeled parts (1 and 2), no text or symbols present.Fig.6
natural_image
Diagram of a mechanical component with colored parts and red directional arrows indicating motion (no text or symbols)Fig.7
text_image
Diagram of a bag with labeled parts and directional arrows indicating movement or forceFig.8
natural_image
Line drawing of a baby car seat with adjustable armrest (no text or symbols)Fig.9
text_image
Diagram illustrating seatbelt usage with red arrows indicating force application and a warning symbolFig.10
natural_image
Illustration of a car seatbelt with a blue seatbelt highlighted, showing no text or symbols.Fig.11
natural_image
Illustration of a car seatbelt with a belt buckle (no text or symbols)Fig.12
text_image
Diagram showing a mechanical or anatomical component with labeled parts and directional arrows, likely illustrating a process or assembly.Fig.13
natural_image
Illustration of a human head in profile view with abstract curved lines and shading (no text or symbols)Fig.15
Correcto

natural_image
Illustration of a human head profile with a curved line and shaded area, no text or symbols presentnatural_image
Illustration of a human head with a curved line and shaded regions, possibly depicting a medical or anatomical concept (no text or symbols present)natural_image
Illustration of a baby wearing a car seatbelt, with red arrows indicating pressure points (no text or symbols present)Fig.16
natural_image
Illustration of a child wearing a seatbelt and holding a red object, with no visible text or symbols.Fig.17
natural_image
Illustration of a person wearing a seatbelt with a red seatbelt and numbered label (1), no text or symbols present.Fig.20
natural_image
Close-up of a mechanical component with a numbered label (1) and curved line, no readable text or symbols present.Fig.21

natural_image
Close-up of a car seatbelt buckle with a red arrow indicating force (no text or symbols)Abra o fecho do cinto. Enfie o cinto de cintura pelas linguetas que se encontram na parte lateral e no interior da cobertura (Fig. 21/22).

natural_image
Illustration of a baby car seat with arrows indicating movement or pressure points (no text or symbols)Fig.22
text_image
Diagram showing seatbelt buckle assembly with red arrows indicating movement or force directionFig.23
natural_image
Illustration of a person wearing a hat and glasses, holding a large bag (no text or symbols visible)Fig.24
natural_image
Illustration of a car seatbelt with a key inserted, showing no text or symbolsFig.25
natural_image
Illustration of a gray basket with a handle and patterned skirt (no text or symbols)natural_image
Gray plastic bucket with textured surface and handle (no text or symbols)natural_image
Illustration of a woven basket with a handle and spout (no text or symbols)natural_image
Gray baby baby seat with white bedding (no text or symbols visible)natural_image
Illustration of a hand holding a small object with a yellow highlight, against a stylized mountain background (no text or symbols)Fig.5
natural_image
Illustration of a basket with handle and two labeled parts (1 and 2), no text or symbols present.Fig.6
natural_image
Diagram of a mechanical component with colored parts and red directional arrows indicating motion (no text or symbols)Fig.7
text_image
Diagram of a bag with labeled parts and directional arrows indicating movement or forceFig.8
natural_image
Line drawing of a baby car seat with adjustable armrest (no text or symbols)Fig.9
natural_image
Illustration of a car seatbelt with red arrows indicating stress or shock zones (no text or symbols)Fig.10
natural_image
Illustration of a car seatbelt with a blue seatbelt highlighted, showing no text or symbols.Fig.11
natural_image
Illustration of a car seatbelt with a belt buckle (no text or symbols)text_image
Diagram showing a mechanical or anatomical component with labeled parts and directional arrows, likely illustrating a process or assembly.Fig.13
natural_image
Illustration of a human head in profile view with abstract curved lines and shading (no text or symbols)Abb.15
Giusto

natural_image
Illustration of a human head profile with a curved line and shaded area, no text or symbols presentnatural_image
Illustration of a human head with a curved line and shaded regions, possibly depicting a medical or anatomical concept (no text or symbols present)natural_image
Illustration of a baby wearing a car seatbelt, with red arrows indicating pressure points (no text or symbols present)Fig.16
natural_image
Illustration of a baby wearing a seatbelt and holding a red object, with no visible text or symbols.Fig.17
natural_image
Illustration of a person wearing a seatbelt with a red seatbelt and numbered label (1), no text or symbols present.Fig.20
natural_image
Close-up of a mechanical component with a numbered label (1) and curved line, no readable text or symbols present.Fig.21

natural_image
Close-up of a car seatbelt buckle with a red arrow indicating force direction (no text or symbols)natural_image
Illustration of a baby car seat with arrows indicating movement or pressure points (no text or symbols)Fig.22
text_image
Diagram showing seatbelt buckle assembly with red arrows indicating movement or force directionFig.23
natural_image
Illustration of a person wearing a hat and glasses, holding a large bag (no text or symbols visible)Fig.24
natural_image
Illustration of a car seatbelt with a key inserted, showing no text or symbolsFig.25
natural_image
Black and white illustration of a hat with a handle, no text or symbols visibleObr.1
natural_image
Gray illustration of a baby bib with a handle and seat (no text or symbols)Obr.3
natural_image
Illustration of a woven basket with a handle and a small bowl (no text or symbols)Obr.2
natural_image
Gray baby baby seat with white bedding and a button (no text or symbols visible)Obr.4
natural_image
Illustration of a hand holding a small object over a stylized blue and gray background (no text or symbols)Obr.5
natural_image
Illustration of a handbag with labeled parts (1 and 2), no text or symbols presentObr.6
natural_image
Diagram of a mechanical component with colored parts and red directional arrows indicating motion (no text or symbols)Obr.7
text_image
Diagram of a bag with labeled parts and directional arrows indicating movement or forceObr.8
natural_image
Line drawing of a car seat with adjustable armrest (no text or symbols)Obr.9
natural_image
Illustration of a car seatbelt with red arrows indicating stress or shock zones (no text or symbols)Obr.10
natural_image
Illustration of a car seat with a blue seat highlighted, showing the seatbelt and dashboard (no text or symbols)Obr.11
natural_image
Illustration of a car seatbelt with a belt buckle (no text or symbols)Obr.12
text_image
Technical diagram showing a mechanical assembly with labeled parts and directional arrows indicating motion or forceObr.13
natural_image
Illustration of a human head in profile with abstract curved lines and shading (no text or symbols)Obr.15
Správně

natural_image
Illustration of a human head profile with a curved line and shaded area, no text or symbols presentnatural_image
Illustration of a human head with a curved line and shaded regions, possibly depicting a medical or anatomical concept (no text or symbols present)špatně příliš nízko
text_image
Diagram showing a baby seated in a car seat with red arrows indicating direction of movement or pressure points, labeled with number 1.Obr.16
natural_image
Illustration of a child wearing a car seatbelt, no text or symbols presentObr.17
natural_image
Illustration of a person wearing a car seatbelt with a red belt and numbered label (1), no text or symbols present.Obr.20
natural_image
Close-up of a mechanical component with a numbered label (1) and curved line, no readable text or symbols present.Obr.21

natural_image
Close-up of a car seatbelt buckle with a red arrow indicating force (no text or symbols)natural_image
Illustration of a car comfort seat with buttons and a red seal (no text or symbols)Obr.22
text_image
Diagram showing seatbelt buckle assembly with red arrows indicating movement or force directionObr.23
natural_image
Illustration of a person wearing a hat and glasses, viewed from behind (no text or symbols)Obr.24
natural_image
Illustration of a car seatbelt with a key inserted, showing no text or symbolsObr.25
natural_image
Illustration of a handbag filled with a patterned cloth (no text or symbols)Afb.1
Bæregrebets position for brug i bilen
natural_image
Illustration of a woven basket with a handle and spout (no text or symbols)Afb.2
natural_image
Gray 3D-rendered image of a baby bow with a bandage and handle (no text or symbols)Afb.3
natural_image
Gray baby bathtub with cushion and seat, no visible text or symbolsAfb.4
natural_image
Illustration of a hand holding a small object over a stylized blue and gray background (no text or symbols)Afb.5
natural_image
Illustration of a basket with handle and two labeled parts (1 and 2), no text or symbols present.Afb.6
natural_image
Diagram of a mechanical component with colored parts and red directional arrows indicating motion (no text or symbols)Afb.7
text_image
Diagram of a bag with labeled parts and directional arrows indicating movement or forceAfb.8
natural_image
Line drawing of a car seat with adjustable armrest (no text or symbols)Afb.9
text_image
Diagram illustrating seatbelt usage with red arrows indicating force application and safety symbolsAfb.10
natural_image
Illustration of a car seat with a blue seat highlighted, showing the seatbelt and dashboard (no text or symbols)Afb.11
natural_image
Illustration of a car seatbelt with a belt buckle (no text or symbols)Afb.12
text_image
Technical diagram showing a mechanical assembly with labeled parts and directional arrows indicating motion or forceAfb.13
natural_image
Illustration of a human head in profile view with abstract curved lines and shading (no text or symbols)Afb.15
Rigtig

natural_image
Illustration of a human head profile with a curved line and shaded area, no text or symbols presentforkert for højt

natural_image
Illustration of a human head with a curved line and shaded regions, possibly depicting a medical or anatomical concept (no text or symbols present)forkert for lavt
natural_image
Illustration of a baby wearing a car seatbelt with red arrows indicating pressure points (no text or symbols)Afb.16
Læg barnet ned i babyskålen og før så skulderselerne over din babys skuldre (afbildning 16/nr. 1).
natural_image
Illustration of a baby wearing a seatbelt and safety harness, with no visible text or symbolsAfb.17
natural_image
Illustration of a person wearing a seatbelt with a red seatbelt and numbered label (1), no text or symbols present.Afb.20
natural_image
Close-up of a mechanical component with a numbered label (1) and curved line, no readable text or symbols present.Afb.21
natural_image
Close-up of a car seatbelt buckle with a red arrow indicating force (no text or symbols)natural_image
Illustration of a car comfort seat with buttons and a red seal (no text or symbols)Afb.22
text_image
Diagram showing seatbelt buckle assembly with red arrows indicating movement or force directionAfb.23
natural_image
Illustration of a person wearing a hat and glasses, viewed from behind (no text or symbols)Afb.24
natural_image
Illustration of a car seatbelt with a key inserted, shown in an inset view (no text or symbols present)Afb.25
natural_image
Illustration of a gray basket with a handle and patterned skirt (no text or symbols)fig.1
natural_image
Gray baby bottle with a strap and handle, no visible text or symbolsfig.3
natural_image
Illustration of a woven basket with a handle and spout (no text or symbols)fig.2
natural_image
Gray baby baby seat with white bedding and a button (no text or symbols visible)fig.4
natural_image
Illustration of a hand holding a small object over a stylized blue and gray background (no text or symbols)fig.5
natural_image
Illustration of a basket with handle and two labeled parts (1 and 2), no text or symbols present.fig.6
natural_image
Diagram of a mechanical component with colored parts and red directional arrows indicating motion (no text or symbols)fig.7
text_image
Diagram of a bag with labeled parts and directional arrows indicating movement or forcefig.8
natural_image
Line drawing of a car seat with adjustable armrest (no text or symbols)fig.9
text_image
Diagram illustrating seatbelt usage with red arrows indicating force application and a warning symbolfig.10
natural_image
Illustration of a car seatbelt with a blue seatbelt highlighted, showing no text or symbols.fig.11
natural_image
Illustration of a car seatbelt with a belt buckle (no text or symbols)fig.12
text_image
Diagram showing a mechanical or anatomical component with numbered parts and directional arrows, likely illustrating a process or assembly.fig.13
natural_image
Illustration of a human head in profile with a circular anatomical structure, possibly indicating a medical or anatomical context (no text or symbols present)fig.15
Correcto
natural_image
Illustration of a human head in profile with a curved line and shaded area, no text or symbols presentnatural_image
Illustration of a human head with a curved line and shaded regions, possibly depicting a medical or anatomical concept (no text or symbols present)natural_image
Illustration of a baby wearing a car seatbelt with red arrows indicating pressure points (no text or symbols)fig.16
natural_image
Illustration of a baby wearing a seatbelt and holding a red object, with no visible text or symbols.fig.17
natural_image
Illustration of a person wearing a seatbelt with a red seatbelt and numbered label (1), no text or symbols present.fig.20
natural_image
Close-up of a mechanical component with a numbered label (1) and curved line, no readable text or symbols present.fig.21

natural_image
Illustration of a car seatbelt buckle with a red arrow indicating force or movement (no text or symbols)natural_image
Illustration of a baby car seat with arrows indicating movement or pressure points (no text or symbols)fig.22
text_image
Diagram showing car seatbelt buckle assembly with red arrows indicating movement or force directionfig.23
natural_image
Illustration of a person wearing a hat and glasses, holding a large bag (no text or symbols visible)fig.24
natural_image
Illustration of a car seatbelt with a key inserted, shown in an inset view (no text or symbols present)fig.25
natural_image
Illustration of a gray basket with a handle and patterned skirt (no text or symbols)Rys.1
natural_image
Illustration of a baby wearing a baby hat with a strap (no text or symbols)Rys.3
natural_image
Illustration of a woven basket with a handle and spout (no text or symbols)Rys.2
natural_image
Gray baby baby seat with white bedding and a button (no text or symbols visible)Rys.4
natural_image
Illustration of a hand holding a small object over a stylized blue and gray background (no text or symbols)Rys.5
natural_image
Illustration of a basket with handle and two labeled parts (1 and 2), no text or symbols present.Rys.6
natural_image
Diagram of a mechanical component with colored parts and red directional arrows indicating motion (no text or symbols)Rys.7
text_image
Diagram of a bag with labeled parts and directional arrows indicating movement or forceRys.8
natural_image
Line drawing of a car seat with adjustable armrest and seat plate (no text or symbols)Rys.9
natural_image
Illustration of a car seatbelt with red arrows indicating stress or shock zones (no text or symbols)Rys.10
natural_image
Illustration of a car seatbelt with a highlighted seatbelt component (no text or symbols)Rys.11
natural_image
Illustration of a car seatbelt with a belt buckle (no text or symbols)Rys.12
text_image
Medical diagram showing anatomical or mechanical structure with labeled parts and directional arrowsRys.13
natural_image
Illustration of a human head in profile view with abstract curved lines and shading (no text or symbols)Rys.15 prawidłowo

natural_image
Illustration of a human head profile with a curved line and shaded area, no text or symbols presentnatural_image
Illustration of a human head with a curved line and shaded regions, possibly depicting a medical or anatomical concept (no text or symbols present)natural_image
Illustration of a person seated in a car seat with red arrows indicating movement or pressure points (no text or symbols present)Rys.16

natural_image
Illustration of a child wearing a seatbelt and holding a red object, with no visible text or symbols.Rys.17
natural_image
Illustration of a person wearing a seatbelt with a red seatbelt and numbered label (1), no text or symbols present.Rys.20
natural_image
Close-up of a mechanical component with a numbered label (1) and curved line, no readable text or symbols present.Rys.21

natural_image
Close-up of a car seatbelt buckle with a red arrow indicating force (no text or symbols)natural_image
Illustration of a baby car seat with arrows indicating movement or pressure points (no text or symbols)Rys.22
text_image
Diagram showing seatbelt buckle assembly with red arrows indicating movement or force directionRys.23
natural_image
Illustration of a person wearing a hat and glasses, holding a large bag (no text or symbols visible)Rys.24
natural_image
Illustration of a car seatbelt with a key inserted, showing no text or symbolsRys.25