SMILEFIX PRO - Baby car seat KIDDY - Free user manual and instructions
Find the device manual for free SMILEFIX PRO KIDDY in PDF.
User questions about SMILEFIX PRO KIDDY
0 question about this device. Answer the ones you know or ask your own.
Ask a new question about this device
Download the instructions for your Baby car seat in PDF format for free! Find your manual SMILEFIX PRO - KIDDY and take your electronic device back in hand. On this page are published all the documents necessary for the use of your device. SMILEFIX PRO by KIDDY.
USER MANUAL SMILEFIX PRO KIDDY
- Introduction 3
- Suitability 3
- General safety instructions 4
- General use / adjustments 6
4.1 Functions of the carry handle 6
4.2 Folding back the sunshield 6
4.3 Adjustment of the headrest and the 5-point belt system
4.3.1 Slacken the integrated seat 5-point belt system.. 7
4.3.2 Adjusting the headrests and the 5-point belt system.. 7 - Buckling / unbuckling of the baby 7
- Installation in the vehicle 8
6.1 Installation with the vehicle restraint 8
6.1.1 Seat selection 8
6.1.2 Installation steps with the vehicle restraint 9
6.2 Installation on the kiddyfix ISOFIX platform 10
6.2.1 Seat selection 10
6.2.2 Installation steps on the kiddyfix (ISOFIX) 10
6.3 Removing the kiddy smilefix pro from the kiddyfix 11 - Removing the covers 11
7.1 Removing the sunshield 12
7.2 Removing the belt padding and inlay cover 12
7.3 Removing the shell cover 12
7.4 Pulling on the covers 13 - Cleaning the seat covers 13
- Cleaning the plastic components 13
- Cleaning the belt system 13
- Steps to take after an accident 13
- Warranty 14
Directions for using the kiddy smilefix pro
1. Introduction
We are pleased that you have decided on the kiddy smilefix pro as your choice for a child restraint system.
The kiddy smilefix pro forms part of the Pro product line of our company, which, by making use of special energy-absorbing materials, provides extensive safety for the protection of your baby and growing child.
The forces generated at a collision are absorbed particularly well before it reaches the delicate body parts of your baby. To gain the most comprehensive protection for your child, the kiddy smilefix pro must be used exactly as described in this manual!
2. Suitability
The kiddy smilefix pro seat shell has been tested and approved in accordance with the latest version of the Safety Standard ECE-R44/04. It was granted the design certification for the "universal" and "semi-universal" (combined with the ISOFIX platform) class of products.
This means:
Universal: Your kiddy smilefix pro may be used in all vehicles with seats with three-point restraints compliant with ECE 16 or comparable standards.
Semi-universal: In combination with the kiddyfix platform (accessory) the smilefix pro may be used in all vehicles on the vehicle type list.
Check the current list at: http://www.kiddy.de/content/files/kiddyfix.pdf
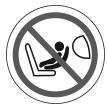
It is important to take note that you may never use your kiddy seat on a car seat with an active front airbag! A front airbag that hits the seat shell with force can cause serious injury or even death to the child!

For use in your vehicle, please also follow the manufacturer's recommendations in your owner's manual.
3. General safety instructions

Please read the instructions for use carefully before using the baby seat for the first time. Incorrect use can endanger the life of your child.
Many injuries are caused by mere thoughtlessness and can easily be avoided.

Making any modifications to the child restraint system is not permitted. Doing so nullifies or impairs its effectiveness in protection. If difficulties arise, please consult your dealer or the manufacturer.

Regularly inspect the different elements of the seat shell. The belt system and belt clip in particular must be checked regularly for wear and tear or possible damage. Do not attempt to make adjustments while travelling!

Always install your kiddy seat facing the direction opposite to the one in which you are travelling.

Please adhere to the instructions in the owner's manual of the vehicle, into which your kiddy is installed.

Make sure that all movable parts of the kiddy seat are always properly locked in place.

The seat shell should only be used for the age group 0+ (up to a max. of 13kg or approx. 15 months).

In vans and minivans it is particularly important to ensure that the kiddy seat is installed in an easily accessible seat in the event that third-party rescue is required.

Never use your kiddy seat as a shopping bag or as a means for transporting something.

Never leave your baby unsupervised, especially not when your kiddy seat is placed on a high surface (nappy changing station, table, etc.).

Always secure the baby with the belt system (even when you are not using your kiddy inside the vehicle)!

Do not place any heavy items on the rear window shelf; these can become dangerous projectiles in an accident.

Always fasten your kiddy seat with the vehicle seatbelt or on the kiddyfix (original accessory) when transporting it in your car unoccupied.

Never use your kiddy without its original cover, it forms part of the safety concept!

Shield your kiddy seat from direct sunlight to prevent uncomfortable heating of the surface.

Plan for breaks during longer trips and take your baby out of the kiddy seat to relieve the pressure on its spinal column.

Only fasten the kiddy seat with the vehicle's own three-point restraint or on the kiddyfix ISOFIX platform, available as an accessory.

Do not use youiddy seat any further if parts have been damaged or after an accident (at an impact speed greater than 10km / h ! (See point 11)

4. General use / adjustments
Please read this instruction manual carefully before using your kiddy seat for the first time. Always keep the manual in the storage compartment underneath the baby car seat (A)! This way it's always available should any problem occur.
4.1 Functions of the carry handle
To adjust the carry handle (G), press both carry handle buttons (J) (Fig. 1; No. 1) and then swivel the carry handle (G) (Fig. 1, No. 2) into the required position.

Make sure that both carry handle buttons (J) are locked in place again!
The carry handle (G) of your kiddy smilefix pro can be used in several different positions (Fig. 2-4).
Fig. 2 - carry position / installation on kiddyfix / installation position in vehicle with 3-point seatbelt
Fig. 3 - feeding position (more upright)
Fig. 4 - rocking position (for sleeping)
4.2 Unfolding and attaching the sunshield
To unfold the sunshield, pull it forward in the direction of the foot end of the baby car seat (Fig. 5).
Now hook the attachment hooks on the sunshield into the sunshield loops (I) on the rim of the shell (Fig. 6).
4.3 Adjustment of the headrest and the 5-point belt system
4.3.1 Slacken the integrated seat 5-point belt system
Before you can adjust the headrest (E) or the height of the shoulder belts (D), the belt system must be slackened.
For this purpose, keep the centre belt button (N) (Fig. 7, No. 1) pressed in and pull both shoulder belts (D) (Fig. 7, No. 2) out.
Now the headrest (E) or the shoulder belts (D) can be adjusted to the size of the child or the child can be lifted out of the baby car seat.
4.3.2 Adjusting the headrest and the 5-point belt system
The belt system is connected to the headrest (E), which means the belt system must not be adjusted separately from the headrest (E)!
To adjust it, pull the height adjustment handle (P) outwards (Fig. 8, No. 1) and move it in the required direction upwards or downwards (Fig. 8, No. 2).
The headrest (E) must be adjusted in such a way that the shoulder belts are positioned at the same level as the baby's shoulders (Fig. 9).
Let the height adjustment handle (P) click into place again after the headrest (E) has been adjusted. Make sure that the belt system is not twisted or wedged in!
5. Buckling / unbuckling of the baby
Make a point off always buckling up your child when it lies in the baby car seat (A)!
Slacken the shoulder belts as described in point 4.3.1 and place it over the side of the rim of the shell.
Place your baby in the baby car seat and then position the shoulder belts (D) over its shoulders (Fig. 10).
Place the safety belt lock tongues (C) attached to the shoulder belts over each other (Fig. 11).
Now push the safety belt lock tongues (C) into the belt clip (B). It is locked in place when a click sound is heard (Fig. 12).

Make certain that it is securely locked in place!
Now pull the centre belt (M) until the belt system fits the body of the child snugly (Fig. 13)!

Make sure that the belt system is not twisted and does not fit the child's body too tightly.
Slacken the shoulder belts (D) as described in Point 4.3.1 and press the red button on the belt clip (B) to unbuckle the baby. Now you can take the child out of the seat.
6. Installation in the vehicle
6.1 Installation with the vehicle restraint
6.1.1 Seat selection
Read up all the necessary information about the use of child restraint systems in your vehicle owner's manual.
The kiddy smilefix pro child restraint system can be installed on any seat of vehicles equipped with a 3-point belt system (Fig. 14).

- The passenger airbag must be deactivated or another seat must be used.
6.1.2 Installation steps with the vehicle restraint
Place your kiddy facing the rear on a seat without an active front airbag and with a 3-point belt (Fig. 15).
Pull the vehicle restraint out and feed the lap belt through both lap belt guides (K) and press the safety belt lock tongue with a clearly audible click into the belt clip (Fig. 16).
Tighten the lap belt (Fig. 16).
Now place the shoulder belt around the baby car seat (A) and feed it through the diagonal belt guide (O) at the rear of the kiddy seat (Fig. 17).
Make certain that the belt clip is in the correct position. Now pull the belt system tight.
Make certain that the belt is not twisted (Fig. 18)!

Some vehicles are fitted with so-called retractor locks. With this the automatic recoiling of the belt can be blocked, which makes a more secure installation of the kiddy seat possible.
Read your vehicles' owner manual for more information on this feature or ask your authorised workshop or dealer.
6.2 Installation on the kiddyfix ISOFIX platform
6.2.1 Seat selection
Please familiarise yourself thoroughly with the use of child restraint systems (A) as described in your vehicle owner's manual.
The kiddy smilefix pro child restraint system can be installed in combination with the kiddyfix ISOFIX platform on any seat equipped with ISOFIX attachments. However, it is imperative that you consult the vehicle type list included with regard to the seat selection in your vehicle. The latest version of the vehicle type list can always be downloaded at http://www.kiddy.de/content/files/kiddyfix.pdf.
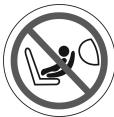
Child restraint systems facing rearwards may never be used on a car seat with an active front airbag!
6.2.2 Installation steps on the kiddyfix (ISOFIX)

The kiddyfix ISOFIX platform must first be properly installed in the vehicle. Please refer to the kiddyfix user manual for this purpose.
Move the carriage to front-most position first. Flip both lateral carriage levers upwards (Fig. 19, No. 1) and then pull the carriage to the front (Fig. 19, No. 2).
To combine your smilefix pro with a pre-installed kiddyfix, slide the attachment guides of the baby car seat into the grommets on the platform (Fig. 20, No. 1).
Now push the head end of the baby car seat downwards (Fig. 21, No. 2).
When the baby car seat is correctly locked in position on the platform, an audible signal will be emitted (Fig. 22).
The correct locked-in position can also be checked at the position of the emergency release buttons.
When the baby car seat is locked into the correct position, the green surfaces will be visible and the buttons are at the top (Fig. 23).
Now slide the baby car seat together with the carriage securely and tightly against the backrest of the car seat (Fig. 24).
The carry handle must always be in this position when the seat is used on the kiddyfix (Fig. 24).
6.3 Removing the kiddy smilefix pro from the kiddyfix
To be able to remove the baby car seat, push the shell lightly downwards at the head end and keep the release switch button (F) on the carry handle (G) pressed in (Fig. 25, No. 1).
The kiddy seat can now be removed in an upwards movement (Fig. 25, No. 2).
As alternative procedure the baby car seat can be released from the platform by simultaneously pressing down the emergency release buttons (Fig. 26) and pulling the carry handle (G).
7. Removing the covers
The baby car seat may not be used without its cover. The covers are a fundamental component of the safety concept! Therefore, use only original covers from the manufacturer! If you require replacement covers, you can order them from the manufacturer.
If you want to remove the cover, it is not necessary to dismantle the belt system of the kiddy smilefix pro!
7.1 Removing the sunshield
Unzip the zipper between the sunshield and the shell cover. Now the sunshield can be removed.
7.2 Removing the belt padding and inlay cover
Release the belt clip (B) and pull the belt clip padding from the clip in an upwards movement.
Now the Velcro® fasteners on the outsides of the shoulder belt padding (D) can be opened to remove the padding.
The inlay cover can be removed by opening the Velcro® fasteners next to the shoulder belts (D). Now the inlay cover can be removed by pulling it upwards from the headrest (E).
7.3 Removing the shell cover
To remove the shell cover, slide the headrest to the uppermost position first.
Now the attachment eyelets (Fig. 27, No. 1) in the lower area can be unfastened.
Then slide the headrest to the lowest position and unfasten the upper eyelots (Fig. 27, No. 1).
Now open the Velcro® fasteners next to the lap belts.
Loosen the attachment hooks on the shell rim next to the lap belt guides (K).
Now pull the cover out from under the central adjustment button (N) and from under the lap belt guides (K), push the belt clip (B) through the cover and remove (Fig. 28).
7.4 Pulling on the covers
To pull the cover on, do it in reverse sequence as when removing the cover (Point 7.1 - 7.3).

When pulling the cover back on, make certain that the belts are not twisted or wedged in.
8. Cleaning the seat covers
The covers can be washed at 30 degrees with a washing machine set to the gentle or delicates cycle. Do not use the spinning cycle and do not dry in a dryer.
9. Cleaning the plastic components
Plastic parts can be cleaned with a mild detergent or with a damp cloth. Never use aggressive cleaning agents (e.g. solvents).
10. Cleaning the belt system
The belt system may not be removed. It can be cleaned with a damp cloth. Do not use detergents under any circumstances!
11. Steps to take after an accident
After an accident with an impact speed greater than 10km / h , the child restraint system must be sent back to the manufacturer without fail, to be checked for possible damages and replaced at no charge if deemed necessary.
12. Warranty
For the kiddy fx pro pro we extend a warranty against defects in materials and workmanship for up to two years. The warranty period begins on the date of purchase.
A receipt is required for all claims.
The warranty covers child restraint systems that have been handled properly and are returned in a clean and orderly condition.
The warranty does not cover:
- Normal wear and tear and damage due to unreasonable use
- Damages due to improper or inordinate usage.
Fabrics: All of our fabrics meet the highest standards regarding colourfastness against UV radiation. Nevertheless, all fabrics fade when exposed to UV radiation. This is not due to defective material but to normal wear and tear, which is not covered by the warranty. Please contact your specialist dealer immediately in the event of warranty claim.
The kiddy team wish you and your child a good and safe trip at all times.