
HDDV 8000 - Digital Camera AIPTEK - Free user manual and instructions
Find the device manual for free HDDV 8000 AIPTEK in PDF.
| Product Type | Multi-functional digital camera (camcorder, still camera, MP3 player, voice recorder) |
| Brand | AIPTEK |
| Model | HDDV 8000 |
| Dimensions | 130 x 76 x 50 mm (3.9 x 3.0 x 2.0 inches) |
| Power Supply | 4 AA batteries (alkaline recommended) or optional AC adapter (5V, 2A) |
| Main Functions | MPEG4 digital camcorder (up to 640x480 at 11 fps), digital still camera (up to 6 MP interpolated), MP3 player, digital voice recorder (WAV format, ~40 min) |
| Internal Storage | 11.5 MB flash memory |
| External Storage | CompactFlash (CF) card or Microdrive slot |
| Lens | Autofocus, aperture F=3.5 |
| Zoom | 4x digital zoom |
| Display | 2.0-inch LTPS color LCD screen |
| Flash | Auto, on, off, slow sync |
| White Balance | Auto, sunny, cloudy, tungsten, fluorescent |
| Interface | USB 1.1 (2.0 compatible), TV output (NTSC/PAL), headphone jack, DC input |
| Maintenance and Cleaning | Avoid contact with water, do not expose to high temperatures, clean with a soft dry cloth |
| Safety | Do not disassemble, puncture, or drop the device; use only the supplied accessories; keep out of reach of children |
| Spare Parts and Repairability | Standard AA batteries, USB cable, AV cable, wrist strap, optional AC adapter; no user repair, contact customer service |
| General Information | Manual available in multiple languages on the manufacturer's website |
Frequently Asked Questions - HDDV 8000 AIPTEK
User questions about HDDV 8000 AIPTEK
0 question about this device. Answer the ones you know or ask your own.
Ask a new question about this device
Download the instructions for your Digital Camera in PDF format for free! Find your manual HDDV 8000 - AIPTEK and take your electronic device back in hand. On this page are published all the documents necessary for the use of your device. HDDV 8000 by AIPTEK.
USER MANUAL HDDV 8000 AIPTEK
4 Megapixel CCD Camcorder features MPEG-4, 6MP Still Pictures, and More!!
User's Manual

Herzlich willkommen
Dear user, thanks for purchasing this product.
Much investment in time and effort has gone into its development,
and it is our hope that it will give you many years of trouble-free service.
Safety Notice
- Do not drop, puncture or disassemble the camera; otherwise the warranty will be voided.
- Avoid all contact with water, and dry hands before using.
- Do not expose the camera to high temperature or leave it in direct sunlight. Doing so may damage the camera.
- Use the camera with care. Avoid pressing hard on the camera body.
- For your own safety, avoid using the camera when there is a storm or lightning.
- Avoid using batteries of different brands or types at the same time. This may lead to the potential for serious damage.
- Remove batteries during long periods between usage, as deteriorated batteries may affect the functionality of the camera.
- Remove batteries if they show signs of leaking or distortion.
- Use only the accessories supplied by the manufacturer.
- Keep the camera out of the reach of infants.


Table of Contents
Welcome 1
Safety Notice 1
Table of Contents 2
Getting Started. 4
Knowing your camera parts. 4
Loading batteries 5
Inserting a memory card (optional) 6
Attaching the wrist strap (optional) 7
How to hold your camera 8
How to open the connector cover. 8
Using the tripod (optional) 9
Basic Operations 10
Turning on your camera 10
Turning off your camera 10
Reading LCD indicators 11
Setting language 13
Setting date and time 13
Recording a video clip 14
Taking a still picture 15
Recording a voice clip 16
Playing back your recordings 17
Playing MP3 music 19
Connecting the camera to your TV 20
Advanced Settings 21
Menu operation 21
Menu illustration 21
Menu items in Digital Camcorder mode 22
Menu items in Digital Camera mode 24
Menu items in playback mode 27
Menu items in MP3 mode 28
Menu items in Settings mode 29
Copying Files to Your PC 31
Installing the driver to your PC 31
Connecting the camera to your PC 33
Copying files to the PC 34
Table of Contents
Viewing/Playing files on your PC 36
File location 37
Addenda 38
Troubleshooting 38
Flicker Settings 41
Battery Life Indicator 41
Storage Capacity 42
System Message 43
Specifications 44
DC-in Adapter Spec. 45
Getting Started
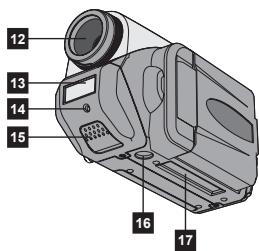
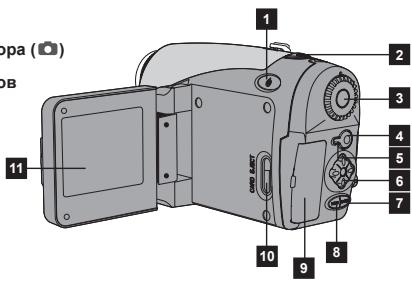
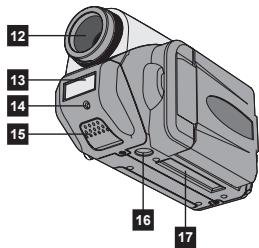
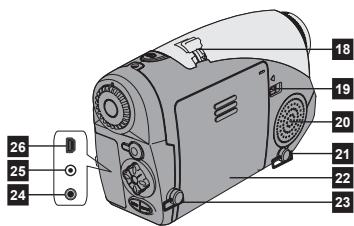
Knowing your camera parts
1 Power Button (B)
2 Shutter Button (O)
3 Mode Dial
4 Record Button (●)
5 Back LED
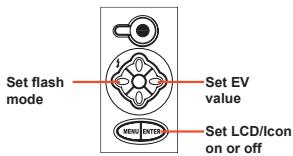
6 4-Way Buttons (↑)
7 Enter Button (ENTER)
8 Menu Button (MENU)
9 Connector Cover
10 Card Eject Button (I)
11 LCD Display
12 Lens
13 Flash Strobe
14 Front LED
15 Microphone
16 Tripod Socket
17 Memory Card Slot
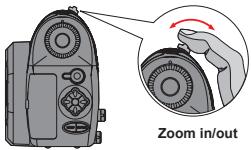
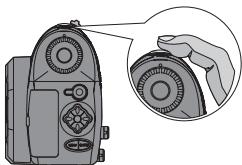
18 Zoom Lever
19 Battery Release Lever
20 Speaker
21 Strap Holder (1)
22 Battery Compartment Cover
23 Strap Holder (2)
24 TV-out/Earphone Connector
25 DC-in Connector
26 USB Connector


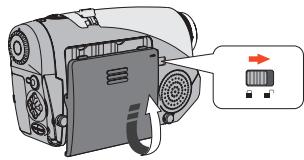
Loading batteries
1 Open the battery compartment cover.
Push the battery release lever to the unlock position, and then pull the battery compartment cover downward and lift the cover up to remove the cover.
2 Install batteries.
Place four AA batteries into the compartment. Note that the positive (+) and negative(-) ends cannot be reversed.
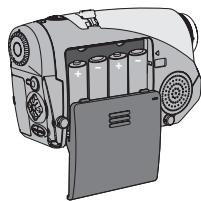
3 Replace the cover.
After the batteries are properly installed, replace the battery compartment cover.
Do not use different types or brands of batteries at the same time.
Alkaline batteries or rechargeable NiMH batteries are recommended for high performance.
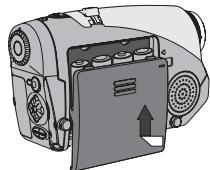
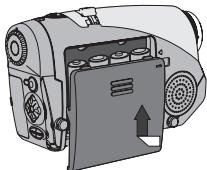
- Inserting a memory card (optional)
In addition to the built-in flash memory, your camera can store data on a Compact Flash (CF) card or a Microdrive.
To insert a memory card, gently push the card as indicated until the card reaches the end of the slot. Note that you should insert a memory card before powering on the camera.
After inserting a memory card, you are recommended to format the memory card before using it. To format a memory card with the camera, follow these procedures:
Insert a memory card Power on the camera Set the Mode Dial to Settings (Y) mode Enter the
Advanced sub-menu Enter the Format sub-menu Select Yes and press the Enter (ENTER) button.
Note that all data stored on the memory card will be gone after formatting.
Menu
Advanced
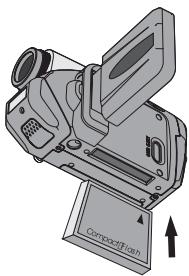
- Inserting a memory card (continued)
To remove the card, first make sure that the power is off. Then open the LCD panel, and push the card eject button to pop out the card or Microdrive.
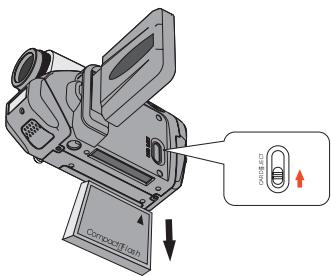
Do not remove the memory card while the camera is powered on. Doing so would cause the camera to shut down abnormally.
When a memory card is inserted, the camera will use the card as the main storage medium. Files stored in the camera's built-in memory will become inaccessible until the card is removed.
If the CF card cannot be identified by your camera but is usable on other devices, it is probably because of incompatible format. Please see the Troubleshooting section for more information.
Attaching the wrist strap (optional)
1 Unfold the strap.
Unfold and spread the wrist strap as illustrated.
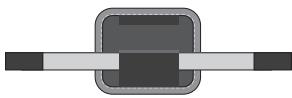
2 Thread the strap through the hook.
Thread the ends of the strap through the hooks on the camera. Then fasten the two ends together as indicated.
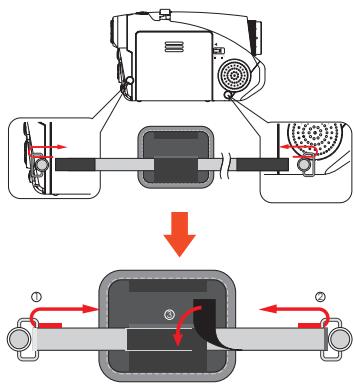
3 Ready the strap for use.
Fold the wrapping cover to secure the wrist strap.
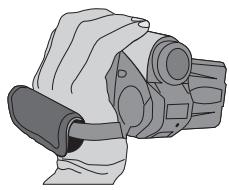
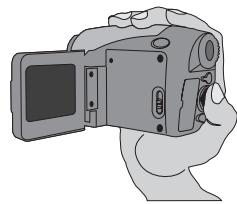
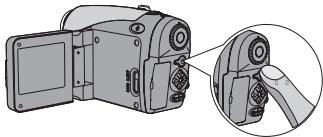
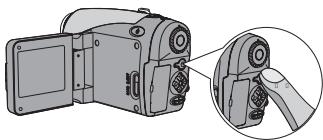
- How to hold your camera
Put your hand through the wrist strap and firmly hold the camera as illustrated. While taking still pictures or recording video clips, avoid blocking the lens to retain the best result.
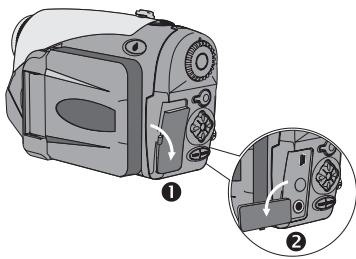
- How to open the connector cover
When you want to connect the camera to your PC, TV, microphone, or AC/DC adapter, you need to open the connector cover. Please open the cover gently in the sequence as illustrated below.

Using the tripod (optional)
Use a tripod to minimize camera movement and ensure optimal image quality, especially while shooting self-portraits or having video conference.

The illustration of the tripod is for your reference. The actual model may differ.
Basic Operations
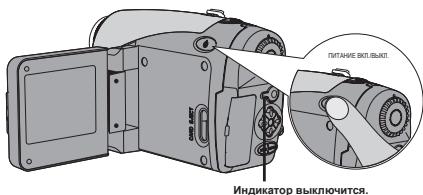
Turning on your camera
Press and hold down the Power ( ) button for 1 second to turn on the camera.
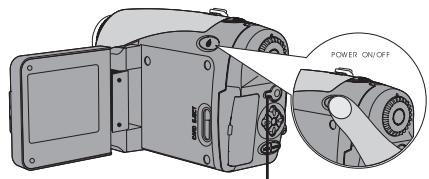
The LED will light up.
If the camera is not turned on after pressing the power button, please check:
- There are four AA batteries installed in the camera.
- The batteries have enough power left.
- The polar (+) directions of the installed batteries are correct.
Turning off your camera
Press and hold down the Power ( ) button for 1 second to turn off the camera.
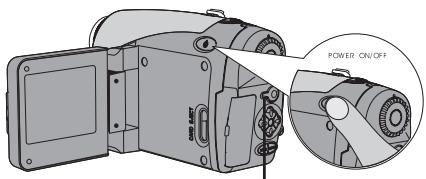
The LED will go out.
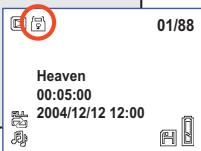
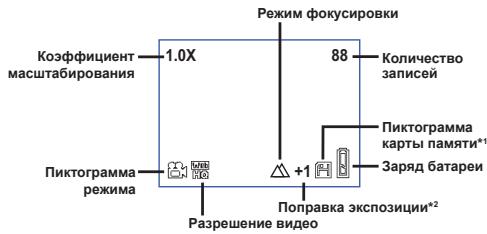
Reading LCD indicators
Digital Camcorder mode:
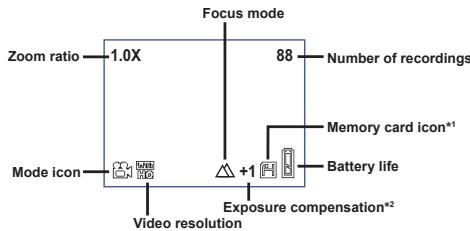
1 This icon will appear when a memory card is inserted.
2 This icon will appear when a non-default setting is selected.
Digital Camera mode:
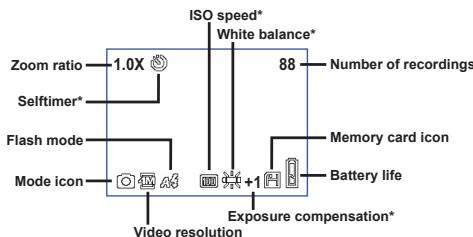
* These icons will appear when non-default settings are selected.
Pressing the Enter (ENTER) button repeatedly will switch the LCD display in the following cycle:
OSD on (LCD on) OSD off (LCD on) LCD off.
Reading LCD indicators (continued)

Playback mode:

Voice Record mode:
MP3 mode:

This icon will appear 30 seconds into playing or when pressing the Enter (ENTER) button during playing.
2 This icon will appear during playing.
Setting language
When you power on the camera for the first time, the LCD display may not show messages in your local language. You can set the LCD display language using the method below:
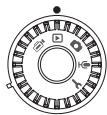
Turn on the camera and set the Mode Dial to Settings () mode.
2 Press the Left or Right (▶) button to select the icon and press the Enter (ENTER) button.
3 Press the Left or Right (▶) button to select a suitable language and press the Enter (ENTER) button.
Setting date and time
Set the correct date and time so that the file information can be correctly saved. You can set the date and time using the method below:
Turn on the camera and set the Mode Dial to Settings () mode.
2 Press the Left or Right (▶) button to select the icon and press the Enter (ENTER) button.
3 Press the Up or Down ( ) button to adjust the value. Press the Enter (ENTER) button to confirm the setting. After all items are done, the date and time settings will be recorded.
1 Turn on the camera and set the Mode Dial to Digital Camcorder (三) mode.

2 Press the Record (●) button to start recording.
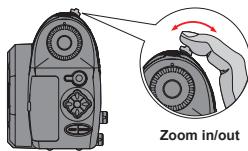
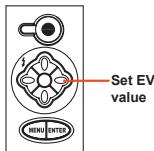
3 During recording, you can use the Zoom Lever to zoom in or zoom out the screen. You can also adjust the focus or EV value if necessary.
| Set focus: Press Shutter (a) button during recording. | |
| 200cm ~ ∞ | |
| 100cm ~ 200cm | |
| 40cm ~ 100cm | |
| EV value: ranges from -3 to +3. | |
Recording a video clip (continued)
You can enable the auto-focusing function for video recording. To enable the function, follow these procedures:
Power on the camera Set the Mode Dial to Digital Camcorder () mode Press the Menu (MEN) button Enter the AF Enable sub-menu Select On and press the Enter (ENTER) button.
If the auto-focusing function is toggled on, some mechanical noise might occur during recording.
4 Press the Record () button again to stop recording.
- Taking a still picture
1 Turn on the camera and set the Mode Dial to Digital Camera (O) mode.

2 Before taking a picture, you can use the Zoom Lever to zoom in or zoom out the screen.
3 Adjust the Flash mode or EV value if necessary.
| Flash mode: | |||
| 3 | 4 | 5 | 6 |
| On | Auto | Off | Slow Sync |
| EV value: ranges from -3 to +3. | |||
4 Press the Shutter (O) button half way and hold for the camera to automatically focus. Then press the button all the way down to take a still picture.
Recording a voice clip
1 Turn on the camera and set the Mode Dial to Voice Record ( 念 ) mode.

2 Press the Record (●) button to start recording.
3 When you are done, press the Record (●) button again to stop recording.
Playing back your recordings
1 Turn on the camera and set the Mode Dial to Playback (E) mode.
2 Full-screen mode operations:
| File type | How to... | Action |
| Picture (◇) | Shift between files | Press the Left or Right (▲) button (when the zoom ratio is not locked). |
| Zoom in/out (1x-4x) | Use the zoom lever to zoom in/out. | |
| Lock/Release zoom ratio | When the zoom ratio is greater than 1.0x, press the Shutter (◇) button. | |
| Browse the enlarged picture | When the zoom ratio is locked, use the 4-way (▲) buttons to browse the picture. | |
| Video (≡) & Audio (♣) | Shift between files | Press the Left or Right (▲) button (when no file is being played). |
| Start playing | Press the Shutter (◇) button. | |
| Pause/Resume playing | During playing/While paused, press the Shutter (◇) button. | |
| Fast wind/Rewind | During playing, press the Left or Right (▲) button. Press the same button again to resume playing. | |
| Adjust sound volume | During playing, press the Up or Down (▲) button. | |
| Stop playing | During playing, press the Menu (MENU) button. |
Playing back your recordings (continued)
3 Index mode operations:
| How to... | Action |
| Switch to index mode | Move the zoom lever toward W. |
| Switch back to full-screen mode | Move the zoom lever toward T. |
| Shift between files | Press the Left or Right (▲) button. |
| Scroll up/down pages | Press the Up or Down (▲) button. |
| Play/view the selected file | Press the Shutter (▲) button. |
Playing MP3 music
1 Turn on the camera and set the Mode Dial to Playback (mode. Then press the Record () button.
2 MP3 operations:
| How to... | Action |
| Switch between MP3 andPlayback modes | Press the Record (●) button (when no track is being played). |
| Shift between files | Press the Left or Right (▲) button (when the track is paused or stopped). |
| Play the selected title | Press the Shutter (○) button. |
| Pause/Resume playing | Press the Shutter (○) button. |
| Fast wind/Rewind | During playing, press the Left or Right (▲) button. |
| Adjust sound volume | During playing, press the Up or Down (▲) button. |
| Stop playing | During playing, press the Menu (MEN) button. |
| Lock/Unlock button | During playing, press the Enter (Enter) button. |
| Switch sound output toearphone/buzzer | Press the Menu (MEN) button, and then change the sound output device. |
Before playing MP3 music, you need to copy MP3 files to the camera. See page 33 for details on connecting the camera to your PC. Then you can copy MP3 files to the camera as if using a removable disk (see page 39).
The LCD display will be off and all buttons will be locked after 30 seconds of playing. Press any button to switch on the LCD and then press the Enter (ENTER) button to unlock the buttons.
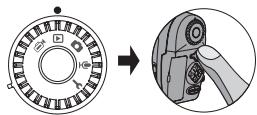
Connecting the camera to your TV
Connect your camera and TV via the accessory AV cable for real-time display. You can display your video clips, still pictures, and audio recordings directly on your TV, sharing them with your friends and family.
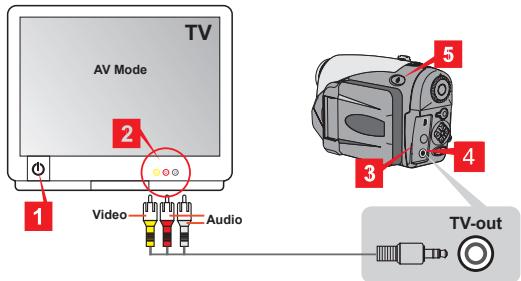
1 Turn on your TV and switch the TV to AV mode.
2 Connect the audio and video ends to the TV.
3 Open the connector cover.
4 Connect the other end of the AV cable to your camera.
5 Turn on the camera Set the Mode Dial to Settings (Y) mode TV item TV Out item Select On.
If no image is seen on TV, try switching the audio and video ends.
If abnormal display occurs, examine the NTSC/PAL setting of the camera.
To resume display on the camera LCD, set the Mode Dial to Settings () mode TV item TV Out item Select Off.
Advanced Settings
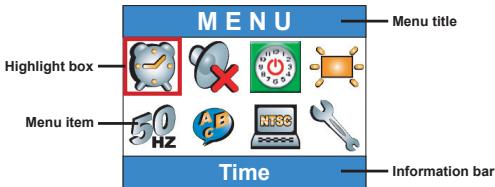
Menu operation
The menu items provide several options for you to fine-tune your camera functions. The following table gives details on menu operations.
| How to... | Action |
| Bring up the menu *1 | Press the Menu (MENU) button. |
| Move the highlight box | Press the Left or Right (▲) button. |
| Enter sub-menu/ Confirm an item | Press the Enter (ENTER) button. |
| Go back to upper menu | When in sub-menu, press the Menu (MENU) button. |
| Quick-export the menu | Press the Shutter (◎) button. |
| *1 In Voice Record mode, menu operation is not available. In Settings mode, this action is not required. | |
Menu illustration

Menu items in Digital Camcorder mode
Power-on Set the Mode Dial to Digital Camcorder ()mode Press the Menu (MEN) button.
| Item | Option | Description |
| Size | TVHQ640x480 | This option provides the best resolution that is suitable for filming stable subjects. |
| TV352x288 | This option records films suitable for viewing on TV. The video quality is similar to VCD. | |
| WebHQ320x240 | This option records films suitable for transmitting over high-speed Internet. | |
| WebS176x144 | This option provides low resolution with the smoothest flow. | |
| Effect | Normal | This option allows you to record films in natural color. |
| B&W | This option allows you to record films in black and white. |

Menu items in Digital Camcorder mode (continued)
| Exposure | EV+3 | The exposure is dramatically increased. |
| EV+2 | The exposure is moderately increased. | |
| EV+1 | The exposure is slightly increased. | |
| EV0 | The exposure is not changed. | |
| EV-1 | The exposure is slightly decreased. | |
| EV-2 | The exposure is moderately decreased. | |
| EV-3 | The exposure is dramatically decreased. | |
| AF Enable | On/Off | This function allows the camera to auto-focus during video recording. Note that some mechanical noise might occur when the camera is adjusting focus during recording. |

Menu items in Digital Camera mode
Power-on Set the Mode Dial to Digital Camera (O) mode Press the Menu (MENJ) button.
| Item | Option | Description |
| Memo record | Record | This option lets you add voice memos to your pictures. Here are some notes on using this feature: 1. Each voice memo lasts for 10 seconds. 2. This function is available after taking a picture. If you want to add a memo to every picture you take, you must use this function immediately after every shot. 3. For one picture, only one voice memo can be recorded. Once the voice memo is recorded, it cannot be modified or remade. |
| Size | 2832x2128 | This option provides the best resolution that is suitable for developing 6x8 photos. |
| 2304x1728 | This option lets you take pictures suitable for developing 5x7 or 6x8 photos. | |
| 1600x1200 | This option lets you take pictures suitable for developing 3x5 or 4x6 photos. | |
| 640x480 | This option lets you take pictures suitable for viewing on the PC screen. | |
| Strobe | Auto | The flash will automatically fire if the lighting is insufficient. |
| On | The flash fires on every shot. | |
| Slow Sync | The flash fires several times in a shot. Together with a slow shutter speed, this option allows you to take pictures of vivid images in the dark. | |
| Off | The flash is disabled. |

Menu items in Digital Camera mode (continued)
| Item | Option | Description |
| Selftimer | On/Off | When you fully press the shutter, the camera will have ten seconds delay before taking a picture. |
| Effect | Normal | This option allows you to take pictures in natural color. |
| Classic | This option allows you to take sepia-toned pictures, resembling old photos. | |
| B&W | This option allows you to take pictures in black and white. | |
| Solarize | This option allows you to take pictures with over-exposed effect. | |
| Date Stamp | On/Off | After the date stamp is enabled, a date mark will be printed on every picture you take. |
| Advanced ↓ White Balance | Auto | The white balance is automatically adjusted. |
| Sunny | This option is suitable for outdoor shooting under direct sun light. | |
| Cloudy | This option is suitable for outdoor shooting in cloudy weather or shady environments. | |
| Fluorescent | This option is suitable for indoor shooting with fluorescent lamp lighting or environments with high color temperature. | |
| Tungsten | This option is suitable for indoor shooting with incandescent lamp lighting or environments with low color temperature. |
- Menu items in Digital Camera mode (continued)
| Item | Option | Description |
| Advanced↓ISO | ISO Auto | The camera determines the ISO speed automatically. |
| ISO 100 | The ISO speed is set to 100, suitable for shooting in environments with ample light. | |
| ISO 100 | The ISO speed is set to 200, suitable for shooting in environments with moderate light. | |
| ISO 200 | The ISO speed is set to 200, suitable for shooting in environments with moderate light. | |
| ISO 200 | The ISO speed is set to 400, suitable for shooting in dim environments or with a faster shutter speed. | |
| Advanced↓Exposure | EV+3 | The exposure is dramatically increased. |
| EV+2 | The exposure is moderately increased. | |
| EV+1 | The exposure is slightly increased. | |
| EV0 | The exposure is not changed. | |
| EV-1 | The exposure is slightly decreased. | |
| EV-2 | The exposure is moderately decreased. | |
| EV-3 | The exposure is dramatically decreased. |
- Menu items in Playback mode
Power-on Set the Mode Dial to Playback (E) mode Press the Menu (MEN) button.
| Item | Option | Description |
| Voice memo | On/Off | Enabling this function will let you hear voice memos while reviewing still pictures. The voice memo (if any) will be automatically played when the still picture is reviewed. You can press the Shutter ( ) button to pause/resume playing. |
| Delete one | Yes/No | This option lets you delete the current file. |
| Delete all | Yes/No | Depending on the storage medium you are using, you are able to delete all files stored in the memory card or internal memory. |
| File sort | ALL | This option allows all files to be displayed. |
| Still | This option allows only still pictures to be displayed. | |
| Video | This option allows only video clips to be displayed. | |
| Audio | This option allows only audio clips to be displayed. | |
| File information | On/off | This option determines whether file information (such as file size...) is displayed in thePlayback mode. |

Menu items in MP3 mode
Power-on Set the Mode Dial to Playback (B) mode Press the Record (●) button Press the Menu (MEN) button.
| Item | Option | Description |
| Delete one | Yes/No | This option lets you delete the current track. |
| Delete all | Yes/No | This option lets you delete all tracks. |
| Repeat mode | One | Repeat playing the current track. |
| All | Repeat playing all tracks. | |
| Audio Out | Headphone | Sets the headphone as the audio output device. |
| Buzzer | Sets the speaker as the audio output device. |

Menu items in Settings mode
Power-on Set the Mode Dial to Settings (Y) mode
| Item | Option | Description |
| Time | - | This option allows you to set date and time. |
| Beep | On/Off | This option allows you to toggle beep sound on or off. |
| Auto off | 1 min | The camera will automatically shut down if staying inactive for over one minute. |
| 5 min | The camera will automatically shut down if staying inactive for over five minutes. | |
| 10 min | The camera will automatically shut down if staying inactive for over ten minutes. | |
| Brightness | High | The LCD brightness is set to high. |
| Normal | The LCD brightness is set to normal. | |
| Low | The LCD brightness is set to low. | |
| Flicker | 50 Hz | Set the flicker to 50 Hz. |
| 60 Hz | Set the flicker to 60 Hz. | |
| Language | - | This option allows you to set language. |

Menu items in Settings mode (continued)
| Item | Option | Description |
| TV ↓ TV System | NTSC | This option is suitable for America, Taiwan, Japan, and Korea areas. |
| PAL | This option is suitable for Germany, England, Italy, Netherlands, China, Japan, and Hongkong. | |
| TV ↓ TV Out | On/Off | This option allows you to toggle the TV-out function on or off. |
| Advanced ↓ Default | On/Off | This option allows you to restore factory defaults. Note that all non-default settings will be overridden. |
| Advanced ↓ Format | On/Off | Depending on the storage medium you are using, you are able to format the memory card or internal memory. Note that all files stored in the medium will be erased and gone forever. |
Copying Files to Your PC
Installing the driver to your PC
You need to install the camera driver to ensure that video clips can be played back on your PC. To install the software:
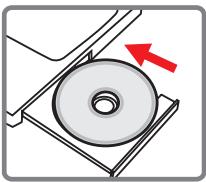
Insert the driver CD.
Turn on your computer. Then place the accessory CD into the CD-ROM drive.
Do not connect the USB cable to your computer now.
Shut down all other applications running on your computer.
If the autorun screen does not appear automatically, double-click on My Computer and then the CD-ROM drive. Then start the Setup.exe program manually.
2 Start the installation.
Click on the

icon to launch the installation of the driver.
Notice for Windows 2000 users:
During the installation process, a warning message regarding digital signature may appear twice or more. Please click on Yes to continue the process. The software is fully compatible with Windows 2000 operation system.
Installing the driver to your PC (continued)
3 Install the driver.
The Install Shield Wizard will then appear and automatically install the program. Click on Next and follow the on-screen instructions to complete the installation.
4 Install codecs.
After the driver installation is completed, the program will prompt you to install Windows Media Player Codes. If you are not sure whether the CODECs have been installed in your computer, please click on Yes and follow the on-screen instructions to complete the installation.
5 Install Direct X 8.0 or above.
After the CODEs installation is completed, you will be prompted to install Direct X 8.0 or above if the program is not yet installed in your computer. Please click on Yes to continue.

Windows Media Player Codes and Direct X 8.0 or above are necessary for viewing the video clips recorded by the camera.
6 Restart the computer.
After the installation is completed, you may need to restart your computer for the driver to take effect.
Connecting the camera to your PC
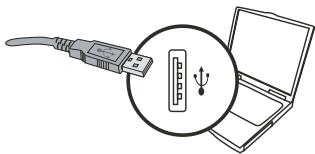
1 Connect the USB cable to your computer.
Turn on your computer, and then connect the accessory USB cable to the USB port of your computer. Make sure the cable and the port are correctly aligned.
2 Connect the USB cable to your camera.
Make sure there are 4 AA batteries installed in the camera. Then connect the other end of the USB cable to the camera.
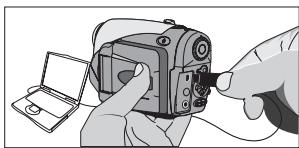
Make sure the installed batteries have enough power left or the connection may fail.
Notice for Windows 2000/XP/ME users: If you want to disconnect the camera from your computer, please follow these steps:
- Double-click in the system tray.
- Click (USB Disk), and then click Stop.
- Select the camera when the confirmation screen appears and click OK.
- Follow the on-screen instructions to safely disconnect the camera from your computer.
- Copying files to the PC
This step varies depending on your operation system:
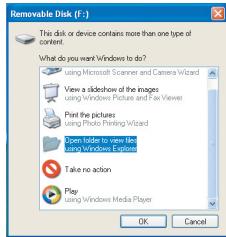
For Windows XP users:
After the camera is connected to your computer, a dialogue window will appear automatically. Please select the item Open folder to view files using Windows Explorer and click OK.
For Windows 2000/ME/98SE
users:
Double-click on My Computer. Then
double-click on the icon of the removable disk that has just appeared.
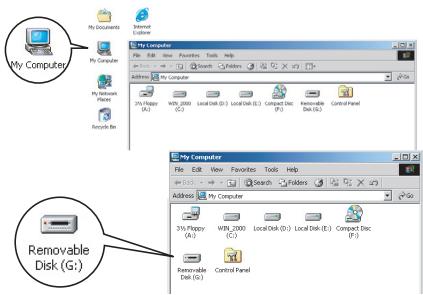
When a memory card is inserted, the removable disk refers to the card. Otherwise the removable disk refers to the internal flash memory.
- Copying files to the PC (continued)
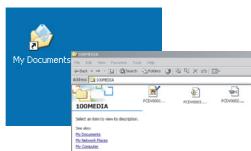
2 Double-click on the DCIM file folder.
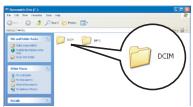
Windows XP
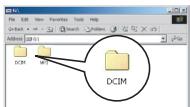
Windows 2000/ME/98 SE
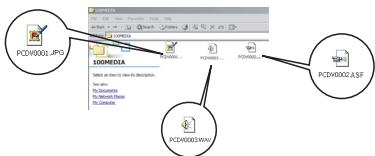
3 Double-click on the 100MEDIA file folder.
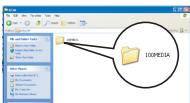
Windows XP
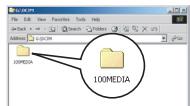
Windows 2000/ME/98 SE
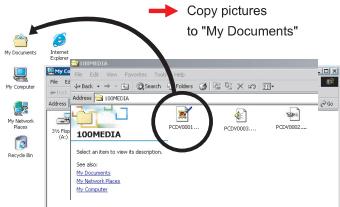
4 Drag the target file into My Documents or the destination folder.
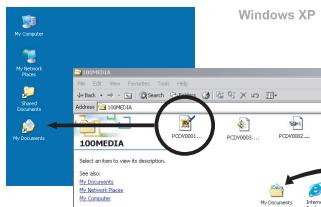
Copy pictures
to "My Documents"
Viewing/Playing files on your PC
Double-click on My Documents or any other folder that stores your files.

Windows XP
Windows 2000/ME/98 SE
2 Double-click on the desired file, and the file will be opened by the program matching the file type.
Windows XP
Windows 2000/ME/98 SE

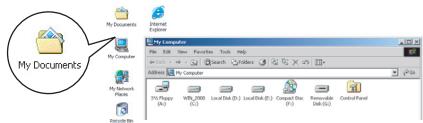
File location
After connecting the camera to your computer, a removable disk will appear in your computer. The removable disk actually represents the storage medium of your camera. In the disk you can find all of your recordings. Refer to the figure on the right to see where the files are stored.
Folders

Desktop

My Documents

My Computer

31/2 Floppy (A):

WIN2000(C:)

Local Disk (D:)

Local Disk (E:)

V23 (F:)

Removable Disk (G):

DCIM

100MEDIA

Control Panel

My Network Places
Addenda
Troubleshooting
| When using the camera: | ||
| Problem | Cause | Solution |
| The camera can not be powered on normally. | The batteries are out of power. | Replace the batteries. |
| The batteries are incorrectly installed. | Re-install the batteries. | |
| Low quality batteries are used. | Use alkaline or rechargeable NiMH batteries. DO NOT use different brands or types of batteries at the same time. | |
| The camera is still powered on, but the LCD screen does not display. | If the camera stays idle for over one minute, the LCD screen will automatically shut down to save power. | Press any button except the power button to reactivate the display. |
| The LCD display is disabled. | Press the Enter (ENTER) button to switch on the display. | |
| The TV Out function is enabled. | Turn off the camera and then turn it on again. | |
| Can not take pictures or video clips when pressing the Shutter or Record button. | Out of memory. | Free some space from the memory card or the internal memory. |
| The camera is recharging the flash strobe. | Wait until the flash strobe is fully charged. | |
| LCD icon error after instering a memory card. | The card is not correctly inserted. | Remove the card and insert it in correct direction. |
| 1. The CF card cannot be identified by the camera.2. The LCD screen displays "MEMORY ERROR" or "CARD ERROR" message. | The format of the memory card is not compatible with the camera. | Use the camera "Format" function to format the card. |
| The memory card is corrupted. | Replace the memory card with a new one. | |
Addenda
| When using the camera: | ||
| Problem | Cause | Solution |
| I did not delete the pictures and video clips, but can not find them in the memory card. | It happens when you insert a memory card after taking a few pictures or video clips. The lost recordings are in the internal memory. | You can access those files after removing the memory card. |
| Cannot use the flash strobe. | If the OSD icon indicates low battery life, the flash strobe may be disabled due to insufficient voltage. | Replace the batteries. |
| The recorded pictures appear too blurred. | The focus is not correctly adjusted. | Press the Shutter (▲) button half way and hold for the camera to automatically focus. Then press the button all the way down to take a still picture. |
| The recorded pictures or video clips appear too dark. | The environment of shooting or recording does not have adequate light. | Use flash strobe when taking pictures. Add extra light sources when recording video clips. |
| The subject appears too dark and the background too bright. | The subject is facing against light source. | Set higher EV value to lighten up the subject. |
| Noises occur when viewing images on the LCD screen or on the computer. | The flicker setting does not match the standard of the country you are staying. | Adjust the flicker setting. For more information, please refer to the "Flicker Settings" table on page 43. |
| No sound is heard when playing MP3 music. | The sound output device is set to earphone. | Go into the MP3 menu and set the sound output device to buzzer. |
Addenda
| When connecting the camera to the computer or TV: | ||
| Problem | Cause | Solution |
| Cannot find removable disk after connecting the camera to a PC. | Batteries are not installed or out of power. | Install new batteries. |
| I cannot view the video clips on my computer. | Driver or software is not installed on the computer. | Install Direct X 8.0 or above and Windows Media 9.0 Codecsto solve this problem. See page 33 for details on installing the software, or go to http://www.microsoft.com to download the required files. |
| Driver installation failed. | The installation is terminated abnormally. | Remove the driver and other related programs. Follow the installation steps in the manual to re-install the driver. |
| The camera has been connected to the PC via the USB cable before installing the driver. | 1. Remove the driver.2. Install the driver prior to plugging in the USB cable. | |
| The TV screen does not display correctly after connecting the camera to the TV. | The camera is not correctly connected to the TV. | Reconnect the camera to TV correctly. |
| TV system (NTSC/PAL) setting error. | Set the TV system to a correct item. | |
| A conflict with other installed camera or capture device occurred. | The device is not compatible with the camera. | If you have any other camera or capture device installed in your computer, please completely remove the camera and its driver from the computer to avoid the conflict. |
Addenda
Flicker Settings
| Country | England | Germany | France | Italy | Spain | Netherlands |
| Setting | 50Hz | 50Hz | 60Hz | 50Hz | 50Hz | 50Hz |
| Country | Portugal | America | Taiwan | China | Japan | Korea |
| Setting | 50Hz | 60Hz | 60Hz | 50Hz | 50/60Hz | 60Hz |
Note: The flicker setting is based on the frequency standard of your local power supply.
Battery Life Indicator
| Icon | Description |
| Full battery life | |
| Low battery life | |
| Empty battery life |
Note: To avoid sudden outage of power supply, you are recommended to replace batteries when the icon indicates low battery life.
Addenda
Storage Capacity
| Memory | Video clip (min.) | |||
| TV-HQ 640x480 (10fps) | TV-S 352x288 (30fps) | WEB-HQ 320x240 (30fps) | WEB-S 176x144 (30fps) | |
| Internal memory (11.5MB) | 0.7 ~ 1 | 0.2 ~ 0.6 | 0.7 ~ 1 | 1 ~ 1.5 |
| Memory card (32MB) | 2 ~ 2.5 | 0.5 ~ 1.5 | 2 ~ 2.5 | 3 ~ 4 |
| Memory card (64MB) | 3.5 ~ 5 | 1 ~ 2.5 | 3.5 ~ 5 | 6 ~ 8 |
| Memory card (128MB) | 7 ~ 10 | 2.5 ~ 5.5 | 7 ~ 10 | 13 ~ 16 |
| Memory card (256MB) | 14 ~ 20 | 5 ~ 11 | 14 ~ 20 | 25 ~ 32 |
| Memory card (512MB) | 28 ~ 40 | 10 ~ 20 | 30 ~ 40 | 50 ~ 64 |
| Microdrive HDD (1GB) | 60 ~ 80 | 20 ~ 40 | 60 ~ 80 | 100 ~ 128 |
| Microdrive HDD (2GB) | 120 ~ 160 | 40 ~ 80 | 120 ~ 160 | 200 ~ 256 |
| Microdrive HDD (4GB) | 240 ~ 320 | 80 ~ 160 | 240 ~ 320 | 400 ~ 512 |
| Microdrive HDD (5GB) | 300 ~ 400 | 100 ~ 200 | 300 ~ 400 | 500 ~ 640 |
| Memory | Audio clip (hour) | Still picture | |||
| Maximum | 2832x2128 | 2304x1728 | 1600x1200 | 640x480 | |
| Internal memory (11.5MB) | 0.75 | 10 | 15 | 25 | 130 |
| Memory card (32MB) | 2 | 30 | 40 | 75 | 350 |
| Memory card (64MB) | 4 | 60 | 80 | 150 | 750 |
| Memory card (128MB) | 8 | 120 | 160 | 300 | 1500 |
| Memory card (256MB) | 16 | 240 | 320 | 600 | 3000 |
| Memory card (512MB) | 32 | 480 | 640 | 1200 | 6000 |
| Microdrive HDD (1GB) | 64 | 960 | 1280 | 2400 | 12000 |
| Microdrive HDD (2GB) | 128 | 1920 | 2560 | 4800 | 24000 |
| Microdrive HDD (4GB) | 256 | 3840 | 5120 | 9600 | 48000 |
| Microdrive HDD (5GB) | 320 | 4800 | 6400 | 12000 | 60000 |
- The actual value of capacity may vary (up to ± 30%) depending on the color saturation and complexity of your subject and surroundings.
Addenda
System Message
| Message | Description |
| Recording | The camera is recording a file. |
| No Files To Play | When the camera is set toPlayback mode without any existing file to play, this message will show up. |
| Please Change Batteries | The battery life of the camera is low. You should replace the batteries with new ones immediately. |
| Memory Full | The storage medium is full and cannot store any more files. Please change the memory card or delete some files to free some memory space. |
| Memory Error | The camera can not access data in the internal memory. Please format the medium to solve this problem. |
| Strobe Is Charging | The flash strobe is charging. |
| File Format Error | The file being played is not compatible with the camera. |
| Formatting | The camera is formatting the storage medium. |
| Card exit; power will be off | An installed memory card has been removed when the camera is power on. The camera will shut down. |
Addenda
Specifications
Main Functions:
- Digital Video Camcorder: MPEG4 (.ASF) format
VGA (640 x 480 pixels) / up to 11 fps - CIF (352 x 288 pixels) / up to 30 fps
- Digital Still Camera:
- 6 MP (2832 x 2128) pixels
- 4 MP (2304 x 1728) pixels
- 2 MP (1600 x 1200) pixels
VGA (640 x 480) pixels - MP3 Player: Full Function MP3 Player
- Digital Voice Recorder:
WAVE (.WAV) format with 11.5 MB memory -
Recording time: approximately records 40 minutes
-
Sensor Effective Resolution: 4 MP (2304 x 1728) pixels
- Interpolated Resolution: 6 MP (2832 x 2128) pixels
- Internal Memory: 11.5 MB Flash memory (storage)
- External Memory: Built-in CF/Microdrive Card slot
- Lens: Auto Focus (F=3.5)
- Digital Zoom: 4X
- LCD Display: 2.0" Color LTPS LCD
- TV-Out: Support NTSC/PAL TV System
- Shutter: Mechanical
-Flash/Strobe:Auto/On/Off/SlowSync,Anti-Redeyes - White Balance: Auto/ Sunny/ Cloudy/ Tungsten/ Fluorescent
- Interface: USB 1.1 (2.0 compatible)
- Built-in Microphone & Speaker
- Battery: AA x 4 (Alkaline Recommended)
- Dimensions: 3.9'' × 3.0'' × 2.0'' (130 x76 x 50 mm)
Note: Specifications are subject to change without notification.
Addenda
AC Adapter Spec.
| Input | 100 - 240V ~ 50/60 Hz 0.3A 30VA |
| Output | +5V --- 2A ⊙- ⊙- + |
| Length | 8.3 (mm) |
| Plug radius | 4.0 (mm) |
Bienvenue
Note that all data stored on the memory card will be gone after formatting.
Menu


Advanced
IopKlueyne KamepbI K KOMnbTepy. 35
KoNipOBaHne paIIOB Ha KOMnbIOTep. 36
Ipocmotp/Bocnpoun3BeHne paJIOB Ha KOMnbTepe 38
PacnoJoxKeHne faiIOB 39
PpniloxeHne 40
UcTpaHHe HenoJaok. 40
HacrpoKu yactotbI o6HOJIeHnA 43
INHdkatop 3apya 6aatae. 43
EMKoCTb HocHTeJIe 44
CnCTeMHbIe coo6uHnra 45
Texnueckne xapakterpntikn 46
Texnueckne xapaKtepcntu ceteBOro aanTepa. 47
Haualo eknnyamauu
O63op DeTaJIe KAmepbl
1 Khonka nHTaHn (O)
2 Cnycboa KhoNka 3aTbopa (O)
3 PpeeknouateIb peKIMOB
4 Khonka 3aHncn (●)
5 3aHn HnDkaTOp
6 4 KhoNkyn Kypcopa (K)
7 KhoNka BvoA (ENTER)
8 KhoNka MeHIO (MENU)
9 Kpbuika pa3bema
10 KhoNka n3BneueHnKapTbI (I)
11KKdncnnei
12 06bektnB
13ΦOTOBnblIka
14 PeneHn HndkaTop
15 MmKpOoH
16 ⅢtaTnBHOe rHe3do
17 THe3do dny KapTbI namrtn
18 Pbyar macuTa6npoBaHna
19 Φικατορ δαταρε
20 DnHaMnK
21 PpoyuHa nla pemeuka (1)
22 Kpbiuka 6aTaapeHoro OTecka
23 PpoyunHa dIra pEmeuka (2)
TBbIxOa/PazbEmnayHuiNikOB
25 Pa3bem 6JIOka Ntahnra
26 Pa3bem USB
YcTaHOBKa 6aTapei
1 OTkpoTe KpbIshky 6aTapeHoro OTceKa.
PepemecHTe pKNCATOp Batapeu B OTKpBITOE NPOXOHeNe, a 3aTeM NOTAHNTe KpbIShU BatapeHOrO OTEcKa BH3N I NPDHMNTe ee BBepx, YTObbl CHrTB KpbIShU.

2 yctahobnte 6atapen.
YcTaHOBnTE B OTCK 4 6batape TInopaa3MePAA.Co6bnJaTe NOIpaHocTb NOnOxNtEnBbIX (+) INOTPiAtaNbHbIX (-) KOHTAKOB.

3 YctaHOBNTe KpbIiKy.
Ponce npabinbHoiYCTaHOBIX batapeYCTaHOBITE Ha MeTOKpblkUOY OTCeka.
He nCnOJIb3yIe OJHOBpeMeHHo 6aTapeH pa3nUHbIX TINOB INI npOn3BOIDTeJIe.
1Дпг OTNIMANbHОн 3KcPbYaTauZHn KaMepbI peKoMeHnyetcNcN0JIb3ObAtb 5eONuHb6 batape INI aKKyMlyTOpHbIe HKeNeb-MetaIaRdPdNbIb6 batape.
YctaHObKa KapTbI NaMaTn (He BXoJNT B KOMJIeKT NOCTaBKn)
ПOMМО BCTPOEHHOДФЛЗИ- namЯн kamepa moXET COxpaHtB daHbIe Ha KapTe Compact Flash nIu Microdrive.
BbIKJIouHeHKe KaMEpbI
Haxmnte u ydepKnBaIte KhoNkPy PtTahnry ( ) B TeueHne OndHc CeynDbI, YTObbl BbIKNoHTb KaMepy.
3наченииндikkaTopobЖК дсплег
Pexm UnpoBov BnDeokamepbI:
I Pnokknochite Ka6ebb USB K KomnbHoptepy.
BKnIOHTe KOMblbTeAp, a 3aTeM
NodKnIOHTe Ka6BeN USB (He
BxOJNT B KOMJINEKT NoCTabKN)
K npOTy USB KOMblbTePa.
Y6eInteC, yTO pa3beM Ka6BeN
npABInTBo Yc7TaOHnBn E NpOT.
