USER MANUAL DREAM N PLAY HAUCK
Read these instructions carefully before use and keep them safe. If you do not follow these instructions, your child's safety can be impaired.
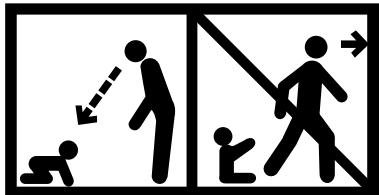
WARNING: Never leave your child unattended.
WARNING: Keep all plastic packaging materials out of the reach of children, in order to avoid any risk of suffocation.
- All locking mechanism must be securely engaged & locked first, before the playard can be used.
- Keep the travel bed away from: fans, heat sources, sharp objects or corners, water containers or window blind, to avoid injury.
- Strangulation Hazard: do not place the product in any location where there are cords, such as new drapes, phone cords, curtain in cords, strings, etc.
- To prevent falling, do not use this product when the infant begins to push up on hands and knees, or has reached manufacturer's recommended maximum weight or height, whichever comes first.
- Do not add anything in the travel bed, which can cause strangulation hazard.
- The travel bed should not be used without the mattress base, which is provided.
- Should you use an additional mattress, make sure, the height (from mattress surface to the upper edge of the bed) is at least 200mm . Do not use water mattress or air mattress with this product.
- Before use, check your travel bed for worn parts, torn material or stitching. Replace or repair the parts when needed. Do not use the travel bed if any parts are broken or missing.
THIS PRODUCT CORRESPONDS TO THE NORM DIN EN 716-1:1995-12, 716-2: 1995-8.
This travel bed is intended for use by a child who is unable to climb out of travel bed, is less than 35 inches (89cm), or weight not more than 14kg (30 lbs).
CARE AND MAINTENANCE
In General
Please check the travel bed function on a regular basis. Make sure that the frame is stable, the screws are tight. Check the cover occasionally, making sure that the stitching is still firm, and inspect the quality of the plastic parts. Any broken or worn working parts should be replaced immediately. Proceed in the same manner with components that are broken, torn, defect or worn-out. Please use only original hauck replacement parts. If you find any parts or top
rails are not functioning, stop using this travel bed immediately.
To clean the travel bed, wipe with damp cloth and mild detergent cleaners.
TO SET UP THE TRAVEL BED
- Remove the travel bed from the bag. Unfasten mattress (fig. 1).
- Stand the travel bed, folded upright on its legs. Do not push the base of the playard down. (fig. 2).
- Grip the short side top rails and pull upwards until they audibly lock in place (fig. 3a). Then grip the long side top rails and pull upwards until they audibly lock in place (fig. 3b). Check every top rail to ensure each of them is securely locked in place before going to next step.
- Then press the central base downwards until it audibly locks in place (fig.4)
- Put the mattress inside the travel bed (fig.5). Secure the mattress by fixing the Velcro through the 2 side holes to the bottom of the travel bed.
TO FOLD THE TRAVEL BED
- Remove the mattress (fig.6).
- Pull the strap on the central base upwards until halfway up (fig. 7).
- To unlock the top rails, first locate the press button underneath each top rail (where a is located). Squeeze this button upward and press the rail down. Do this for each of the 4 top rails in any order (fig. 8a, 8b).
- Fold the travel bed together by pulling upwards the strap in the central base, bringing all 4 sides close together (fig. 9).
- Now wrap the mattress round the travel bed and close the hook by loop fasteners (fig. 10).
- Finally, put the bed into the travel bag (fig. 11).
OPTION FEATURES (The following features are not mandatory in your product)
Side Zipper Opening (Feature 1)
Open the zipper to use as travel bed's additional side exit for child.
Sundries Toy Bag (Feature 2)
The bag can be removed as toy/accessories bag.
Warning: This sundries toy bag is intended for maximum weight of 3 kg. Do not over weight.
Wheels (Feature 3)
The wheels are provided for easy transport. To move the playyard, lift the side opposite to the wheel
up and the wheel will roll. Never keep 'your child in when you want to move your travel bed.
Toy Bar (Feature 4)
Clip the toy bar on the left & right long side top rails. The toy bar must be removed in order to fold the travel bed.
Warning: The toy bar is only a toy, do not use it as a carrier.
Bassinet (Feature 5a, 5b, 5c)
Press the plastic brackets onto the long and short sides of the bed (feature 5a). Make sure the brackets are properly seated and the 4 corners are inserted inside the plastic corner of the travel bed (feature 5b). Then put the mattress in (feature 5c). To remove the bassinet, proceed in reverse order. The bassinet must be removed in order to fold the travel bed.
Changing table (Feature 6a, 6b, 6c)
Unfold the changing table (feature 6a). Align the plastic at the corner and the side of the travel bed (feature 6b). Then snap it in (feature 6c). To remove the bassinet, proceed in reverse order. The bassinet must be removed in order to fold the travel bed.
Warning:
a. Never leave your child unattended on the changing table.
b. This changing table is recommended for infant, with max weight of 9kg.
c. Never use the changing table if the baby can already sit by itself.
Babycommode (speciale utrusting 6a, 6b, 6c)
ΔΠ ∧ ΩΣH TOY KPEBATIOY TAΞΙΟΥ
- Byáλτe To στρώμα από To κρεβάτi (Eik. 6).
- TpaBnTe Tn OTo dAteDo Tou KpeBatiou Tpoc Ta ETTAVW, EwOToU To dAteDo miooAnKwThei (EIK. 7).
- Ia va aTaaOphiAIOE tou avw OwIyec tou piaoiou, Bpeite ta kouptnia TIEoNc OTNV KATW TLEUPaTw avw OwIyaw Tou TIAoiou (Ekei otou atteikoviciai To omuolo).Piote TO KOUPTI POC Ta ETTAVKW KA, tN OUVExia, MTEATE VOV AVTIATOxO OwIyav Tou TTAAIOU TPOC TA KATU. AkoLouHOTe, ME OTOIA eipA ETIIuMeTe, TNV IDIA DIAkacia Ka YIA Tou cAALLouc 3 AVW OwIyveoc Tou PAIAIOU (EIK.8a, 8b).
- 41AOWOTe TO KpBAtI, 1paBwTAC TPOc TAETAVW Tg OTHIA OTO dATTEO TO KpeBAtIOU KAIKIEIVOTAC mTaI TC 4TAUEPcE (EiK. 9).
-
- Στη συνέχεια, τυλίετε το στρωμα γύρω από το κρεβάτι και λείστε τα βέλκρο (Eik. 10).
- Téloç, βáIε to κρεβαIι στην τολνι (Eik. 11).
IPOAIPETIKOESIADIKOS EONIAIMOOS (O aKoLauOos EIOIKOs EOTIAOos Dv TEPiExETAI aTapaiinTa 0To diko oac Tpoiov)
E-mail : info@hauck.de
Internet: http://www.hauck.de