
NWA-3160 - Wireless Access Point ZYXEL - Free user manual and instructions
Find the device manual for free NWA-3160 ZYXEL in PDF.
| Product type | Professional wireless access point |
| Wireless standards | IEEE 802.11a/b/g |
| Maximum data rate | 54 Mbit/s |
| Frequencies | 2.4 GHz and 5 GHz |
| Power supply | 12 V DC (power adapter included) or PoE (Power over Ethernet) |
| Power consumption | 10 W maximum |
| Dimensions (L x W x H) | 180 x 120 x 30 mm |
| Weight | 300 g |
| Interfaces | 1 Ethernet 10/100 port (RJ-45) |
| Antennas | 2 external removable antennas (SMA connectors) |
| Wireless security | WEP, WPA, WPA2-PSK, MAC filtering |
| Management | Web interface (HTTP/HTTPS) |
| Indicator LEDs | PWR/SYS (green), ETHN (green/yellow for 10/100 Mbps) |
| Mounting | Wall (screws spaced 140 mm apart), desk, or ceiling (optional kit) |
| Operating temperature | 0 °C to 40 °C |
| Maintenance | Clean with a dry, soft cloth. Do not use chemical products. |
| Repairability | Spare parts available via Zyxel customer service. Reset by pressing the Reset button. |
Frequently Asked Questions - NWA-3160 ZYXEL
User questions about NWA-3160 ZYXEL
0 question about this device. Answer the ones you know or ask your own.
Ask a new question about this device
Download the instructions for your Wireless Access Point in PDF format for free! Find your manual NWA-3160 - ZYXEL and take your electronic device back in hand. On this page are published all the documents necessary for the use of your device. NWA-3160 by ZYXEL.
USER MANUAL NWA-3160 ZYXEL
802.11a/b/g Business WLAN Access Point
NWA-3163
802.11b/g Business WLAN Access Point
Quick Start Guide
Version 3.60
01/2010
Edition 3
DEFAULT Login
IP Address http://192.168.1.2
Password 1234
Table of Contents
ENGLISH 2
DEUTSCH 16
ESPANOL 32
FRANÇAIS 46
ITALIANO 60
PYCCKNI 74
SVENSKA 88
简体中文 102
繁體中文 114
Legal 128
Overview
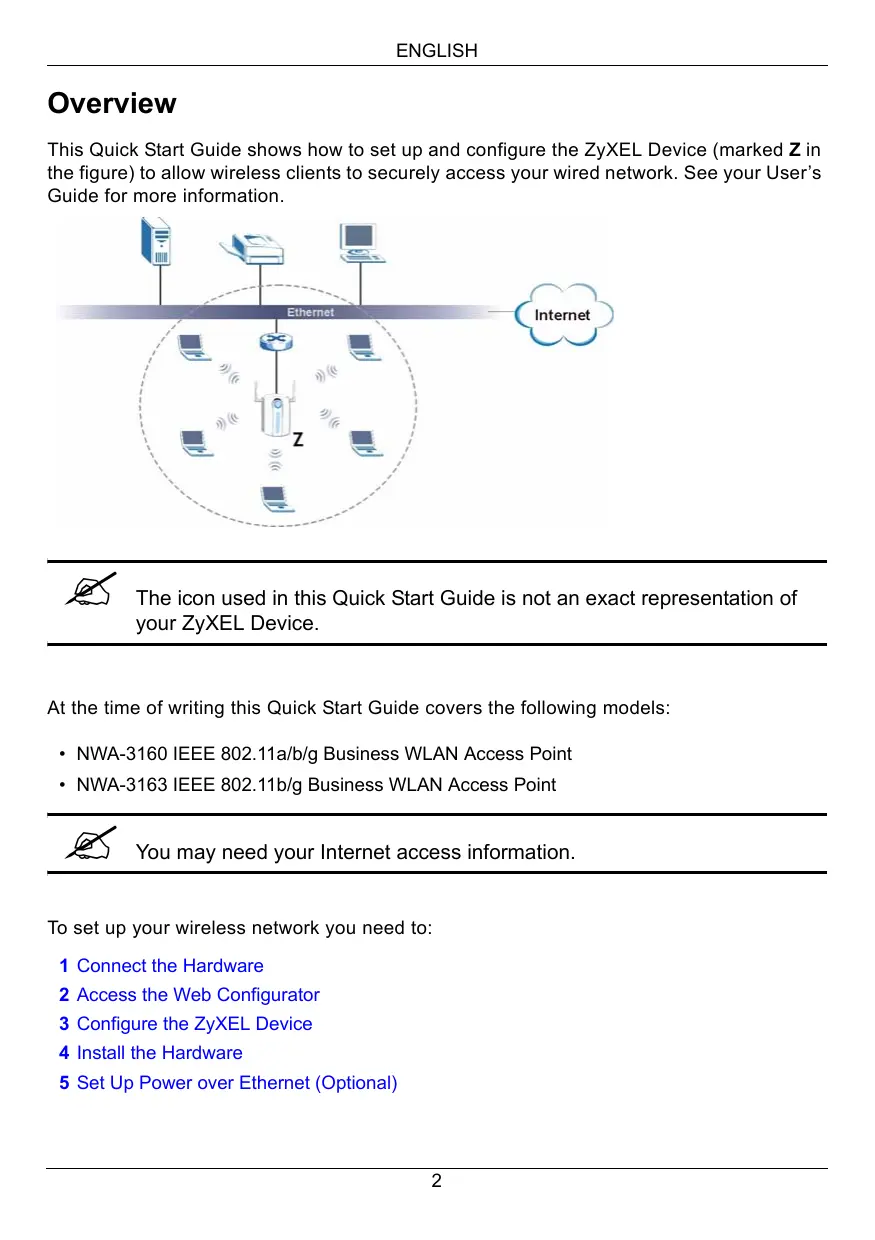
This Quick Start Guide shows how to set up and configure the ZyXEL Device (marked Z in the figure) to allow wireless clients to securely access your wired network. See your User's Guide for more information.
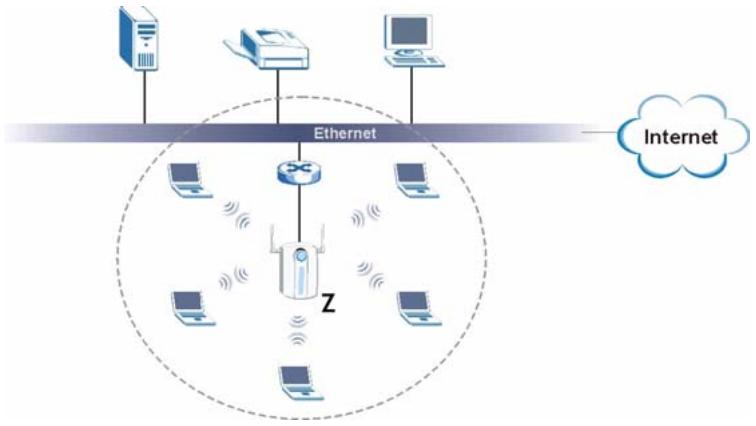

The icon used in this Quick Start Guide is not an exact representation of your ZyXEL Device.
At the time of writing this Quick Start Guide covers the following models:
- NWA-3160 IEEE 802.11a/b/g Business WLAN Access Point
- NWA-3163 IEEE 802.11b/g Business WLAN Access Point

You may need your Internet access information.
To set up your wireless network you need to:
1 Connect the Hardware
2 Access the Web Configurator
3 Configure the ZyXEL Device
4 Install the Hardware
5 Set Up Power over Ethernet (Optional)
1 Connect the Hardware
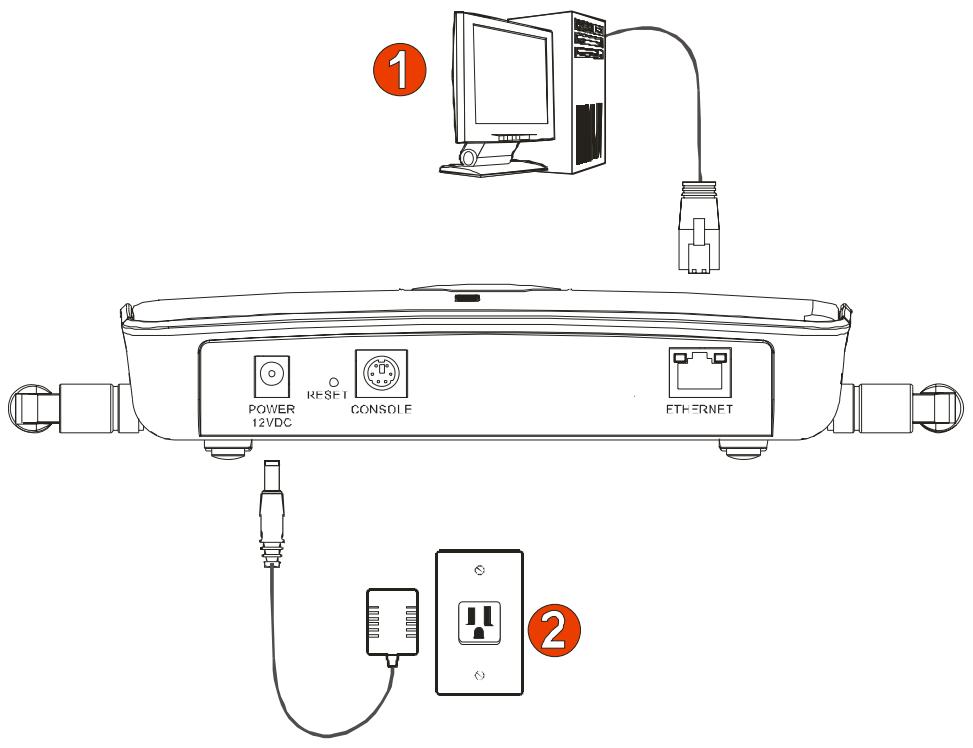

The figures and screens shown in this Quick Start Guide are from the NWA-3160. Your device may differ in minor ways.
1 Using the grey Ethernet cable, connect the ETHERNET port to a computer for initial configuration.
2 Connect the POWER 12VDC socket to a power source using only the included power adaptor.

Connect the ZyXEL Device's ETHERNET port to an Ethernet jack with network access after you have completed the initial configuration.
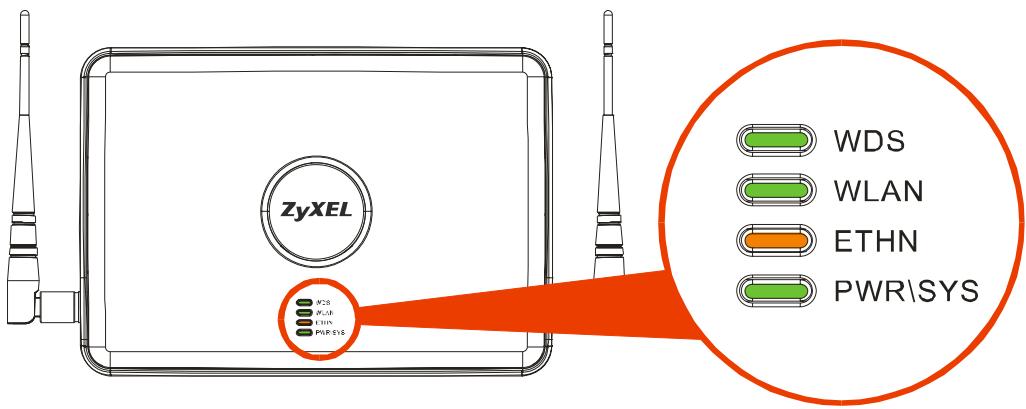
1.1 LEDs
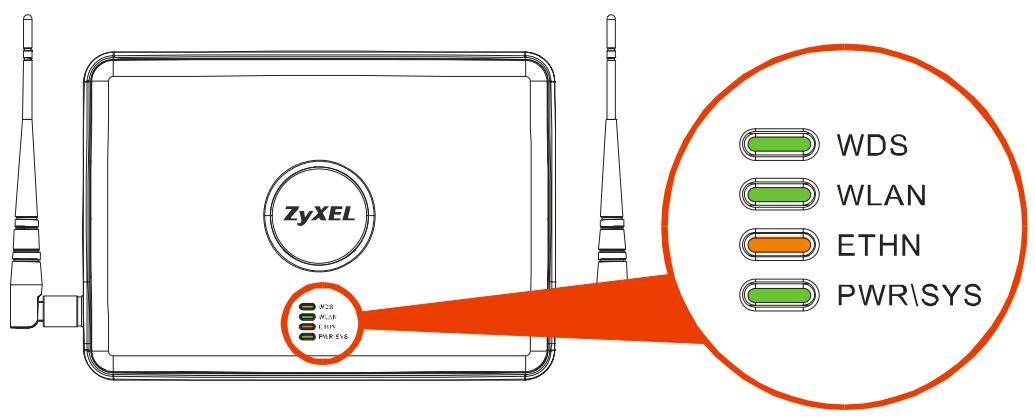
- The PWR/SYS LED turns steady green when the power is connected.
- The ETHN LED turns on if the ETHERNET port is properly connected, and blinks when there is traffic. The LED turns green if the connection is at 10Mbps, and turns yellow if the connection is at 100Mbps.

If the ETHN LED does not turn on, check the cable connection to the ZyXEL Device's ETHERNET port. Ensure your computer's network card is working properly.
2 Access the Web Configurator

Use Internet Explorer 6.0 and later or Netscape Navigator 7.0 and later versions with JavaScript enabled and pop-up blocking disabled.
2.1 Set Up Your Computer's IP Address

Note down your computer's current IP settings before you change them.
First, set your computer to use a static IP address in the 192.168.1.3 - 192.168.1.254 range with a subnet mask of 255.255.255.0. This ensures that your computer can communicate with your ZyXEL Device. See your User's Guide for information on setting up your computer's IP address.
2.2 Log Into the Web Configurator

Even though you can connect to the ZyXEL Device wirelessly, it is recommended that you connect your computer to the ETHERNET port for initial configuration.
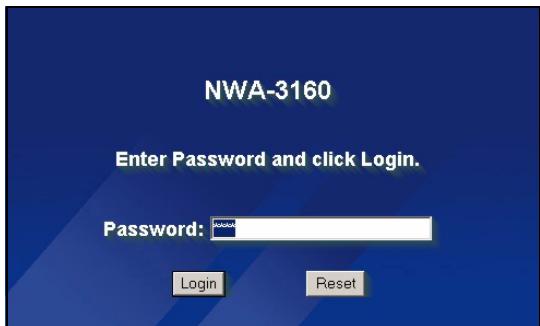
1 Launch your web browser. Enter 192.168.1.2 (the ZyXEL Device's default IP address) as the address.


If you cannot access the Web configurator, make sure the IP addresses and subnet masks of the ZyXEL Device and the computer are in the same IP address range (see Section 2.1).
2 Click Login (the default password 1234 is already entered).
3 Change the login password by entering a new password and clicking Apply. Be sure to record the new password and keep it in a safe place.
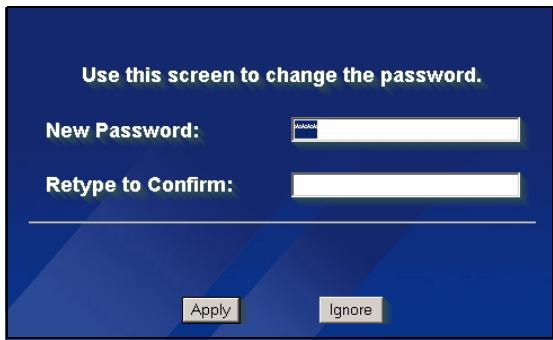

If you change the password and then forget it, you will need to reset the ZyXEL Device. Refer to the User's Guide for how to use the RESET button.
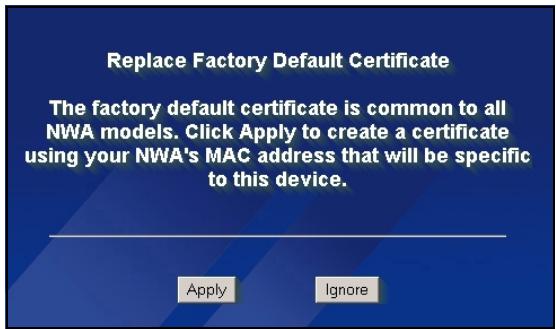
4 Click Apply to replace the factory default certificate for added security; alternatively click Ignore to proceed if you do not want to change the certificate now.
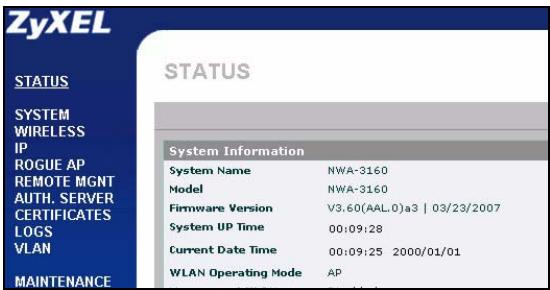
5 The STATUS screen appears.
3 Configure the ZyXEL Device
3.1 Configure System Settings
1 Click SYSTEM in the navigation panel.
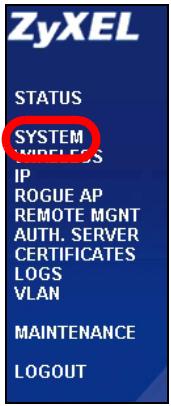
2 The SYSTEM > General screen appears.
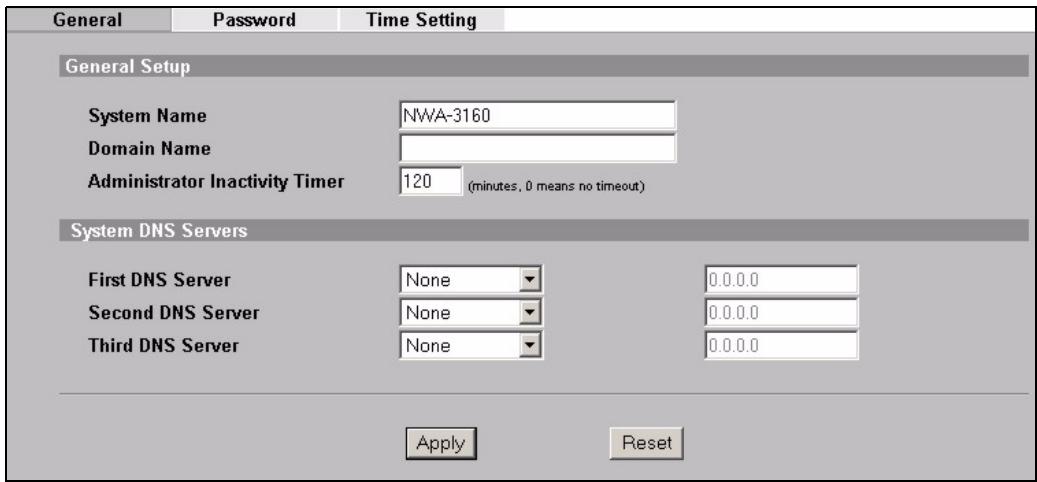
System Name is for identifying the ZyXEL Device on your network. Choose a distinctive name, or leave this at its default.
Domain Name: Enter a domain name if your ISP requires one for authentication. Otherwise you can leave it blank or set to whatever may have displayed automatically.
DNS Server(s): if your ISP gave you specific DNS (Domain Name System) settings, select User-Defined and enter them here. Otherwise, leave these fields at their defaults.
3 Click Apply.
Configure Wireless Settings
1 Click WIRELESS in the navigation panel. A screen similar to the following appears. Not all fields are available in all models.


The wireless stations and the ZyXEL Device must use the same SSID, channel ID and encryption settings for wireless communication.
Operating Mode: Ensure that Access Point mode is selected.
802.11 Mode: Select the wireless standard you want your network to use. If you are not sure which to select, select 802.11b+g.
Channel ID: Select the wireless channel you want your network to use. To have the ZyXEL Device automatically select a channel, click Scan instead.
SSID Profile: Select the SSID profile you want to configure for network access from the drop-down list box. This example uses the SSID03 profile.
2 Click Apply to save your settings.
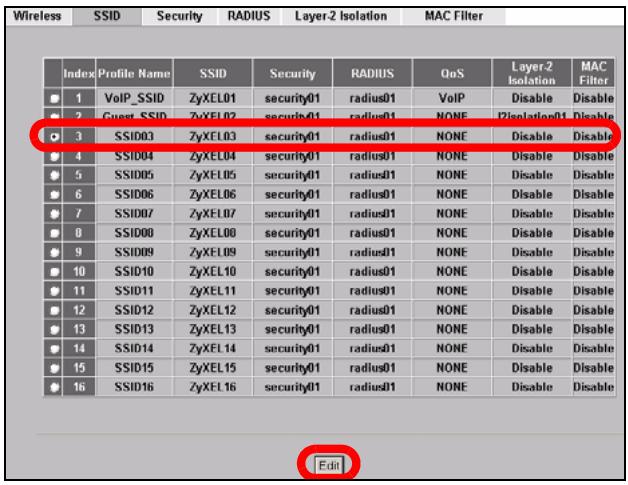
3 Click the SSID tab. The following screen appears. Ensure the settings for SSID03 are at their default values.
The default SSID (the name of the network) is ZyXEL03, its default Security setting is Security01. Layer 2 Isolation and MAC Filter are set to Disable by default.
If you want to change the SSID profile's settings, select SSID03 and click Edit.
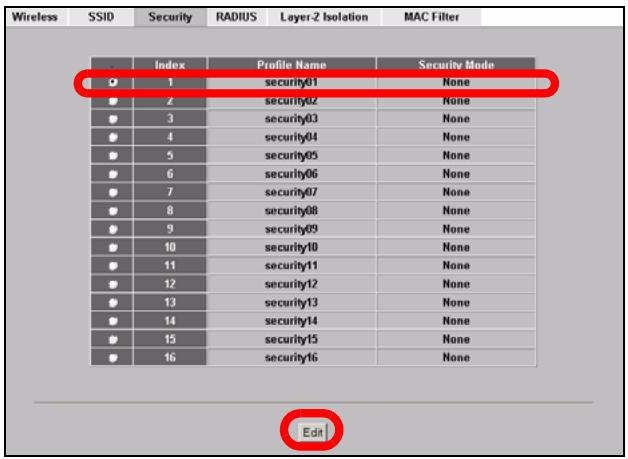
4 Click the Security tab.
Ensure that Security01 is selected and click Edit.
If you don't configure wireless security, then anyone can access your network.
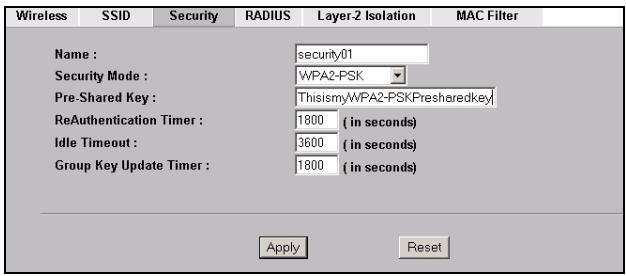
5 This is where you can enter the security settings for your wireless network. The fields you fill in differ according to the type of security you select in the Security Mode field.
Select None if you do not wish to use wireless security.
This example uses WPA2-
PSK security, in which all wireless clients must use the same pre-shared key to join the network.
Ensure that all your wireless clients support the type of security you set.
Click Apply when you have finished.

If the wireless clients cannot communicate with the network, ensure that the clients and the ZyXEL Device are using the same wireless security settings.
3.2 Configure IP Settings
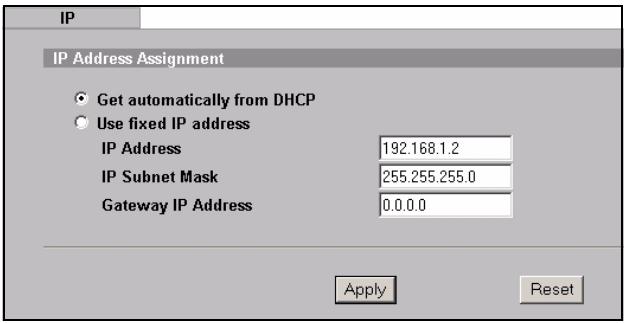
1 You need to set your ZyXEL Device's IP address to be in the same subnet as your network. Click IP in the navigation panel.
Select Get automatically from DHCP if you want to have a DHCP server on your network assign an IP address to the ZyXEL Device.
If you have a specific IP address to use, select Use fixed IP address and enter it along with the subnet mask and gateway IP address.
Click Apply. The ZyXEL Device now uses the new IP settings; you can no longer connect to the ZyXEL Device using the default IP address.

If you change the ZyXEL Device's IP address, you must use the new IP address when you next access the web configurator. If you select Get automatically from DHCP, check your DHCP server to determine the IP address it assigns to the ZyXEL Device. Refer to your DHCP server's documentation for more information.
2 If you changed your computer's IP address in Section 2.1, return it to its previous setting.
3 Change the wireless settings in the wireless stations to match those of the ZyXEL Device. Refer to your wireless adapter's documentation.
The ZyXEL Device is now ready to connect to your switch or router. You can do this now, or once you have attached the antennas and mounted the ZyXEL Device.

If the ZyXEL Device cannot communicate with the network, ensure that the ZyXEL Device is using an IP address on the same subnet as the switch / router.
4 Install the Hardware
Figures in this section use generic icons. The ZyXEL Device in the picture is not an exact representation of your device.
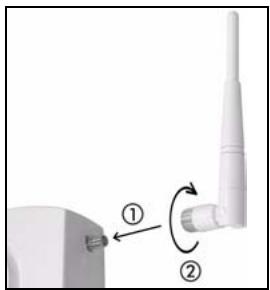
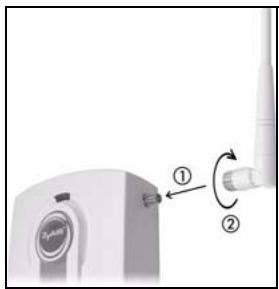
4.1 Attaching Antennas
Screw the antennas clockwise onto the antenna connectors on the sides of your ZyXEL Device. The antennas should be perpendicular to the ground and parallel to each other.
Make sure the antennas are securely screwed onto the antenna connectors.
4.2 Hardware Mounting
In general, the best location for the access point is at the center of your intended wireless coverage area. For better performance, mount the ZyXEL Device high up in an area that is free of obstructions.
Wall-mounting
Do the following to attach your ZyXEL Device to a wall.
1 Screw the two screws provided with your ZyXEL Device into the wall 140mm apart (see the figure in step 3). Use screws with 6mm ~ 8mm (0.24" ~ 0.31") wide heads. Do not screw the screws all the way in to the wall; leave a small gap between the head of the screw and the wall.
The gap must be big enough for the screw heads to slide into the screw slots and the connection cables to run down the back of the ZyXEL Device.

Make sure the screws are securely fixed to the wall and strong enough to hold the weight of the ZyXEL Device with the connection cables.
2 Adjust the cables.
Run the connection cables down the back of the ZyXEL Device as shown in the following figure.
OR:
Run the connection cables upward and along the edge of the ceiling.
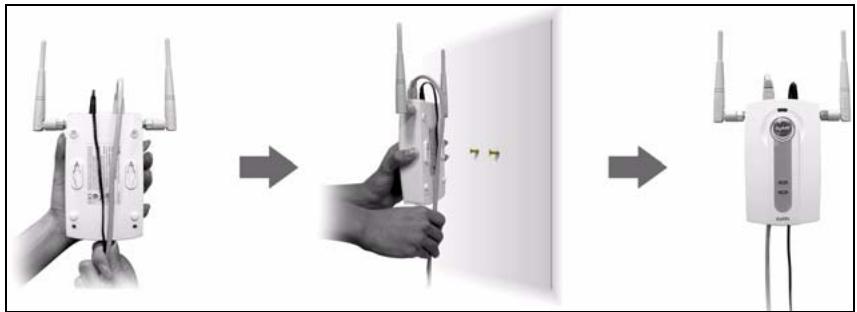
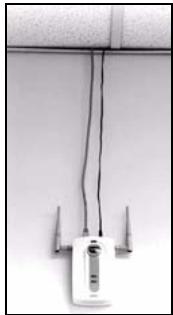
3 Align the holes on the back of the ZyXEL Device with the screws on the wall. Hang the ZyXEL Device on the screws.


You can also use the optional Ceiling Mount Kit (sold separately) to mount the ZyXEL Device on a ceiling instead of a wall.
5 Set Up Power over Ethernet (Optional)
Power over Ethernet (PoE) is the ability to provide power to your ZyXEL Device via an 8-pin CAT 5 Ethernet cable, eliminating the need for a nearby power source.
A PoE injector (not included) is also needed to supply the Ethernet cable with power. This feature allows increased flexibility in the location of your ZyXEL Device.
In the following figure, Z is your ZyXEL Device, A is the CAT 5 Ethernet cable, B is the PoE injector and C is the power cable.
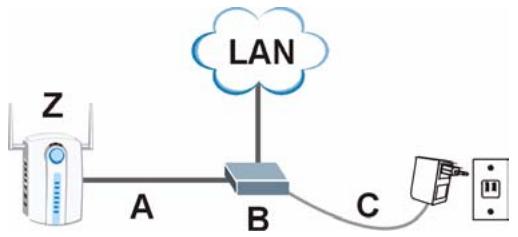

You can connect the ZyXEL Device to PoE via the ETHERNET port AND to a power source via the POWER 12VDC port. If you do so, do not disconnect the ETHERNET port before you disconnect the POWER 12VDC port. This causes the ZyXEL Device to restart.
6 Procedure to View a Product's Certification(s)
1 Go to www.zyxel.com.
2 Select your product from the drop-down list box on the ZyXEL home page to go to that product's page.
3 Select the certification you wish to view from this page.
Übersicht
5 Power over Ethernet (PoE)
5 Power over Ethernet (PoE)
1.1 CBeToIOnIOHbIe HnIkaTopbI
Use fixed IP address
(IcnoB3OBA Tb
AHTeHHbI DOnJXHbI paCNoIarTaBcB CBePTKaJIbHO I npapAnIeJIbHO dpyr Odpyry.
Y6eIITecb, YTO OHI 3aKpeIneHbI NaJeXHO.
4.2 MoNTaX O6OpyIDoBaHnIa
Лунчese BCero yctaHaBnBaTb TOnkUуньA B OeHTpe 3OHbI, B KOTopoH Heo6xOIMO oBeCneuHb TOKpbItne 6ecnpoBOdHcetN.ДЯ DoCTnxKeHna HauLyuWe npOn3BODInTeJbHOCTn yctaHOBInTe NWA NObISe, B CBO6OdHOM OT BO3MOKhBIX NOMEX MecTe.
He3akpenJIeHHHoe noJIOXKeHne
The factory default certificate is common to all NWA models. Click Apply to create a certificate using your NWA's MAC address that will be specific to this device.
Apply
Ignore
ZyXEL
STATUS
SYSTEM
WIRELESS
ROGUE AP
REMOTE MGNT
AUTH. SERVER
CERTIFICATE
LOGS
VLAN
MAINTENANCE
LOGOUT
STATUS
System Information
System Name
Model
Firwam Xerion
System UP Time
Current Data Time
WAN Operating Mode
10
1
WAN WANG
NWA-3160
NWA-3160
V3.60(A4-0)+2103/23/2007
09:03:20
09:09:35 2000/01/01
10
图
D
1.2:1.6:1.2
08:19db:1c08:2a
00:13:中1:00:2a
System
Flash
Memo No. 10
CPU
XIAN
Interf
Inter
1
图
3 Konfigurera ZyXEL-enheten
- Do NOT use this product near water, for example, in a wet basement or near a swimming pool.
- Do NOT expose your device to dampness, dust or corrosive liquids.
- Do NOT store things on the device.
- Do NOT install, use, or service this device during a thunderstorm. There is a remote risk of electric shock from lightning.
- Connect ONLY suitable accessories to the device.
- Do NOT open the device or unit. Opening or removing covers can expose you to dangerous high voltage points or other risks. ONLY qualified service personnel should service or disassemble this device. Please contact your vendor for further information.
- Make sure to connect the cables to the correct ports.
- Place connecting cables carefully so that no one will step on them or stumble over them.
- Always disconnect all cables from this device before servicing or disassembling.
- Use ONLY an appropriate power adaptor or cord for your device. Connect it to the right supply voltage (for example, 110V AC in North America or 230V AC in Europe).
- Do NOT allow anything to rest on the power adaptor or cord and do NOT place the product where anyone can walk on the power adaptor or cord.
- Do NOT use the device if the power adaptor or cord is damaged as it might cause electrocution.
- If the power adaptor or cord is damaged, remove it from the device and the power source.
- Do NOT attempt to repair the power adaptor or cord. Contact your local vendor to order a new one.
- Do not use the device outside, and make sure all the connections are indoors. There is a remote risk of electric shock from lightning.
- Do NOT obstruct the device ventilation slots, as insufficient airflow may harm your device.
- Use only No. 26 AWG (American Wire Gauge) or larger telecommunication line cord.
- If you wall mount your device, make sure that no electrical lines, gas or water pipes will be damaged.
This product is recyclable. Dispose of it properly.

Certifications
Federal Communications Commission (FCC) Interference Statement
The device complies with Part 15 of FCC rules. Operation is subject to the following two conditions:
- This device may not cause harmful interference.
This device must accept any interference received, including interference that may cause undesired operations.
This device has been tested and found to comply with the limits for a Class B digital device pursuant to Part 15 of the FCC Rules. These limits are designed to provide reasonable protection against harmful interference in a residential installation. This device generates, uses, and can radiate radio frequency energy, and if not installed and used in accordance with the instructions, may cause harmful interference to radio communications. However, there is no guarantee that interference will not occur in a particular installation.
If this device does cause harmful interference to radio/television reception, which can be determined by turning the device off and on, the user is encouraged to try to correct the interference by one or more of the following measures:
1 Reorient or relocate the receiving antenna.
2 Increase the separation between the equipment and the receiver.
3 Connect the equipment into an outlet on a circuit different from that to which the receiver is connected.
4 Consult the dealer or an experienced radio/TV technician for help.
Notices
Changes or modifications not expressly approved by the party responsible for compliance could void the user's authority to operate the equipment. This Class B digital apparatus complies with Canadian ICES-003.Cet appeareil numérique de la classe B est conforme à la norme NMB-003 du Canada.
Viewing Certifications
1 Go to http://www.zyxel.com.
2 Select your product on the ZyXEL home page to go to that product's page.
3 Select the certification you wish to view from this page.
ZyXEL Limited Warranty
ZyXEL warrants to the original end user (purchaser) that this product is free from any defects in materials or workmanship for a period of up to two years from the date of purchase. During the warranty period, and upon proof of purchase, should the product have indications of failure due to faulty workmanship and/or materials, ZyXEL will, at its discretion, repair or replace the defective products or components without charge for either parts or labor, and to whatever extent it shall deem necessary to restore the product or components to proper operating condition. Any replacement will consist of a new or re-manufactured functionally equivalent product of equal or higher value, and will be solely at the discretion of ZyXEL. This warranty shall not apply if the product has been modified, misused, tampered with, damaged by an act of God, or subjected to abnormal working conditions.
Note
Repair or replacement, as provided under this warranty, is the exclusive remedy of the purchaser. This warranty is in lieu of all other warranties, express or implied, including any implied warranty of merchantability or fitness for a particular use or purpose. ZyXEL shall in no event be held liable for indirect or consequential damages of any kind to the purchaser.
To obtain the services of this warranty, contact ZyXEL's Service Center for your Return Material Authorization number (RMA). Products must be returned Postage Prepaid. It is recommended that the unit be insured when shipped. Any returned products without proof of purchase or those with an out-dated warranty will be repaired or replaced (at the discretion of ZyXEL) and the customer will be billed for parts and labor. All repaired or replaced products will be shipped by ZyXEL to the corresponding return address, Postage Paid. This warranty gives you specific legal rights, and you may also have other rights that vary from country to country.
Registration
Register your product online to receive e-mail notices of firmware upgrades and information at www.zyxel.com for global products, or at www.us.zyxel.com for North American products.
Related Documentation
Please go to http://www.zyxel.com for product news, firmware, documentation, and other support materials.
Copyright
Copyright © 2010 by ZyXEL Communications Corporation.
The contents of this publication may not be reproduced in any part or as a whole, transcribed, stored in a retrieval system, translated into any language, or transmitted in any form or by any means, electronic, mechanical, magnetic, optical, chemical, photocopying, manual, or otherwise, without the prior written permission of ZyXEL Communications Corporation.
Published by ZyXEL Communications Corporation. All rights reserved.
Disclaimer
ZyXEL does not assume any liability arising out of the application or use of any products, or software described herein. Neither does it convey any license under its patent rights nor the patent rights of others. ZyXEL further reserves the right to make changes in any products described herein without notice. This publication is subject to change without notice.
Trademarks
ZyNOS (ZyXEL Network Operating System) is a registered trademark of ZyXEL Communications, Inc. Other trademarks mentioned in this publication are used for identification purposes only and may be properties of their respective owners.
- NWA-3163
- Quick Start Guide
- DEFAULT Login
- Table of Contents
- Overview
- Connect the Hardware
- LEDs
- Access the Web Configurator
- Set Up Your Computer's IP Address
- Log Into the Web Configurator
- Configure the ZyXEL Device
- Configure System Settings
- Configure Wireless Settings
- Configure IP Settings
- Install the Hardware
- Attaching Antennas
- Hardware Mounting
- Wall-mounting
- Set Up Power over Ethernet (Optional)
- Procedure to View a Product's Certification(s)
- Übersicht
- Power over Ethernet (PoE)
- CBeToIOnIOHbIe HnIkaTopbI
- Use fixed IP address
- MoNTaX O6OpyIDoBaHnIa
- He3akpenJIeHHHoe noJIOXKeHne
- ZyXEL
- STATUS
- Konfigurera ZyXEL-enheten
- Certifications
- Federal Communications Commission (FCC) Interference Statement
- Notices
- Viewing Certifications
- ZyXEL Limited Warranty
- Note
- Registration
- Related Documentation
- Copyright
- Disclaimer
- Trademarks
Brand : ZYXEL
Model : NWA-3160
Category : Wireless Access Point