
NWA-3100 - Wireless Access Point ZYXEL - Free user manual and instructions
Find the device manual for free NWA-3100 ZYXEL in PDF.
| Product Type | Wireless Access Point |
| Brand | ZYXEL |
| Model | NWA-3100 |
| Wireless Standards | IEEE 802.11a/b/g (2.4 GHz and 5 GHz) |
| Maximum Data Rate | 54 Mbps (802.11a/g), 11 Mbps (802.11b) |
| Interfaces | 1 Ethernet 10/100 Mbps port (RJ-45) |
| Power Supply | 12 VDC via AC adapter (included) or PoE (injector not included) |
| Power Consumption | Approximately 12 W |
| Dimensions | Approximately 150 x 100 x 30 mm |
| Weight | Approximately 200 g |
| Antennas | 2 detachable antennas (one main transmitter/receiver, one receiver) |
| LEDs | Power, ZyAIR, Ethernet |
| Main Functions | Access point, web management, multiple SSIDs, WEP/WPA/WPA2-PSK security, DHCP, DNS |
| Mounting | Desktop or wall-mounted (kit not included) |
| Operating Temperature | 0°C to 40°C |
| Humidity | 10% to 90% non-condensing |
| Security | Administrator password change recommended, configurable wireless encryption |
| Maintenance and Cleaning | Clean with a soft, dry cloth. Do not use liquid or abrasive products. |
| Spare Parts and Repairability | Available parts: AC adapter, antennas. For repairs, contact an authorized service center. |
Frequently Asked Questions - NWA-3100 ZYXEL
User questions about NWA-3100 ZYXEL
0 question about this device. Answer the ones you know or ask your own.
Ask a new question about this device
Download the instructions for your Wireless Access Point in PDF format for free! Find your manual NWA-3100 - ZYXEL and take your electronic device back in hand. On this page are published all the documents necessary for the use of your device. NWA-3100 by ZYXEL.
USER MANUAL NWA-3100 ZYXEL
802.11a/b/g Wireless Access Point
Quick Start Guide
Version 3.60
10/2006
Edition 1
Table of Contents
| ENGLISH | 1 |
| DEUTSCH | 13 |
| ESPAÑOL | 27 |
| FRANÇAIS | 41 |
| ITALIANO | 55 |
| PYCCKÍN | 69 |
| 简体中文 | 83 |
| SVENSKA | 95 |
| 繁體中文 | 109 |
Overview
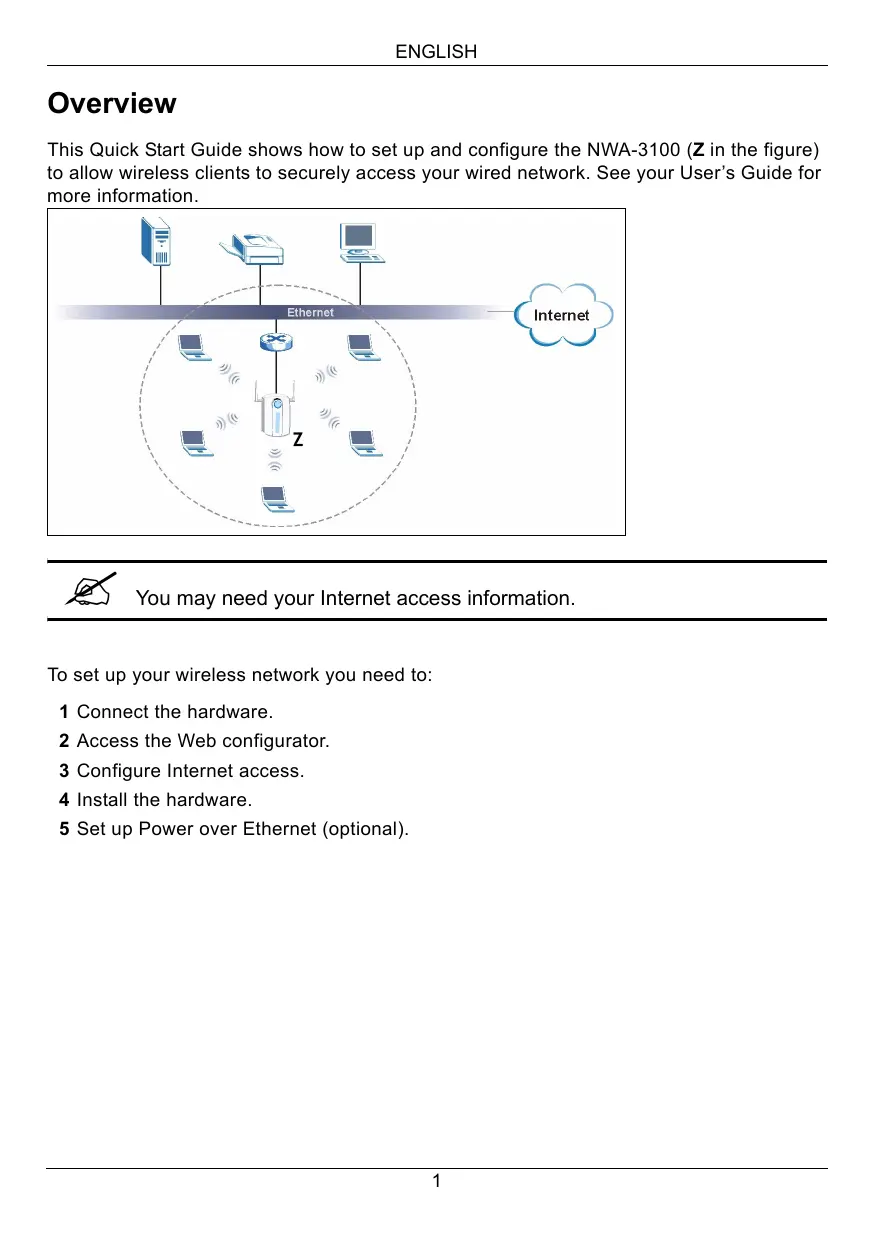
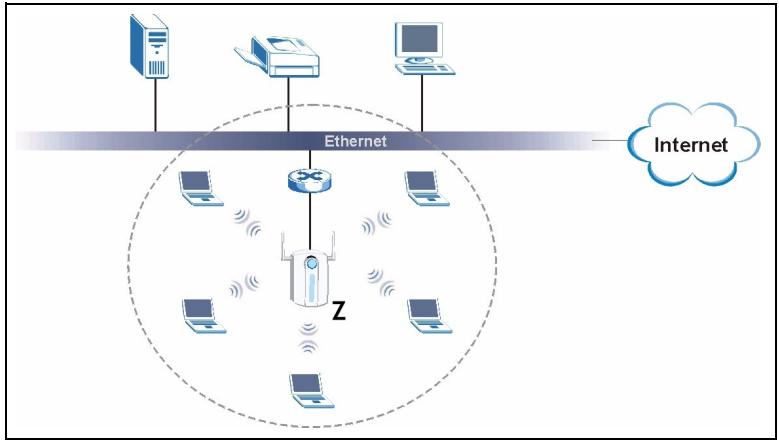
This Quick Start Guide shows how to set up and configure the NWA-3100 (Z in the figure) to allow wireless clients to securely access your wired network. See your User's Guide for more information.

You may need your Internet access information.
To set up your wireless network you need to:
1 Connect the hardware.
2 Access the Web configurator.
3 Configure Internet access.
4 Install the hardware.
5 Set up Power over Ethernet (optional).
1 Connect the Hardware
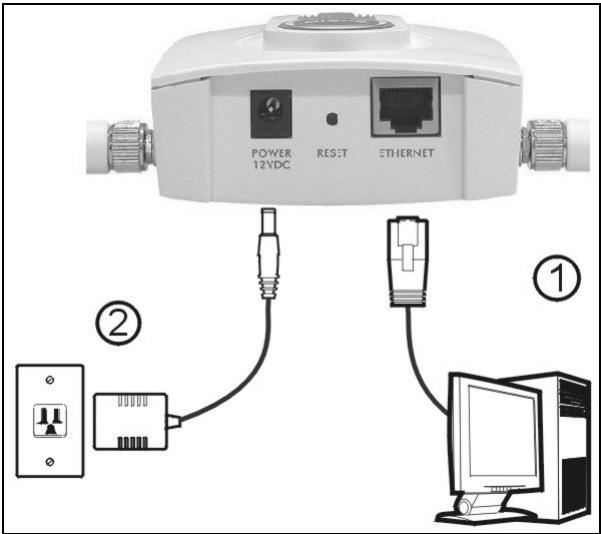
1 Using an Ethernet cable, connect the ETHERNET port to a computer for initial configuration.
2 Connect the POWER 12VDC socket to a power source using only the included power adaptor.

Connect the NWA-3100's ETHERNET port to an Ethernet jack with network access after you have completed the initial configuration.
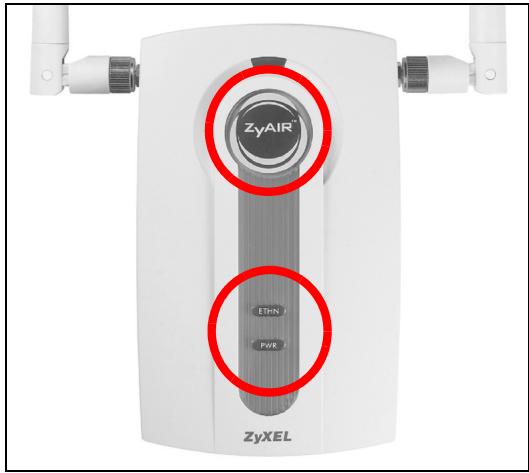
1.1 LEDs
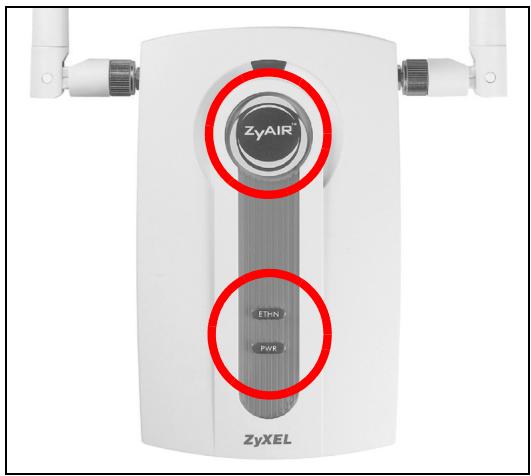
The PWR and ZyAIR LEDs turn on when the power is connected. The ETHN LED turns on if the ETHERNET port is properly connected.

If the PWR LED does not turn on, make sure you are using the correct power adaptor and that the power adaptor is plugged into an appropriate power supply. Unplug the power adaptor and plug it in again. If the error persists, you may have a hardware problem. In this case, you should contact your vendor.
If the ETHN LED does not turn on, check the cable connection to the NWA-3100's ETHERNET port. Ensure your computer's network card is working properly.
2 Access the Web Configurator

Use Internet Explorer 6.0 and later or Netscape Navigator 7.0 and later versions with JavaScript enabled.
2.1 Set Up Your Computer's IP Address
You must first set your computer to use a static IP address in the 192.168.1.3 - 192.168.1.254 range with a subnet mask of 255.255.255.0. This ensures that your computer can communicate with your NWA-3100.
The following instructions are for the Windows 2000, Windows NT and Windows XP operating systems.
1 In Windows XP, click Start > Control Panel.
In Windows 2000/NT, click Start > Settings > Control Panel.
2 In Windows XP, click Network Connections.
In Windows 2000/NT, click Network and Dial-up Connections.
3 Right-click Local Area Connection and then click Properties.
4 Select Internet Protocol (TCP/IP) (under the General tab in Windows XP) and click Properties.
5 The Internet Protocol TCP/IP Properties screen opens (the General tab in Windows XP).
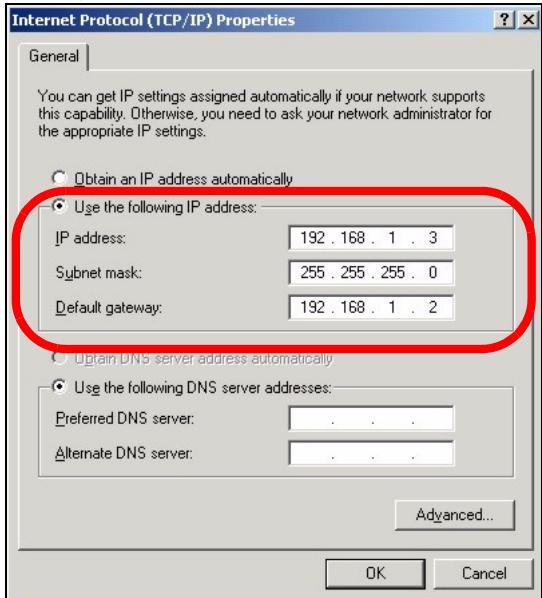
6 Select Use the following IP address and fill in the IP address (choose one in the range 192.168.1.3 - 192.168.1.254), Subnet mask (255.255.255.0), and Default gateway (192.168.1.2) fields.
7 Click OK to close the Internet Protocol (TCP/IP) Properties window.
8 Click Close (OK in Windows 2000/NT) to close the Local Area Connection Properties window.
Close the Network Connections window.
2.2 Log Into the Web Configurator

Even though you can connect to the NWA-3100 wirelessly, it is recommended that you connect your computer to the ETHERNET port for initial configuration.
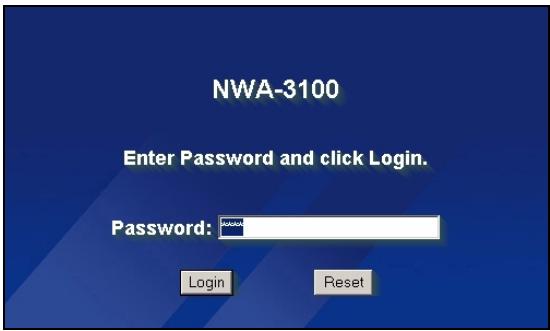
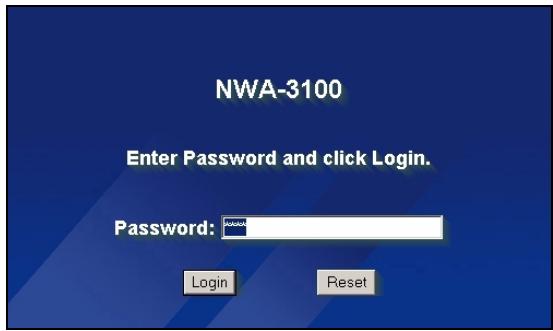
1 Launch your web browser. Enter 192.168.1.2 (the NWA-3100's default IP address) as the address.


If you cannot access the Web configurator, make sure the IP addresses and subnet masks of the NWA-3100 and the computer are in the same IP address range (see Section 2.1).
2 Click Login (the default password 1234 is already entered).
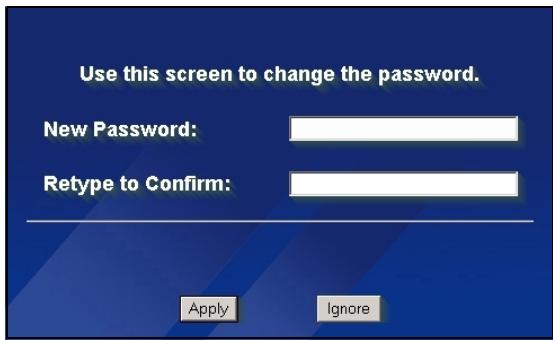
3 Change the login password by entering a new password and clicking Apply. Be sure to record the new password and keep it in a safe place.
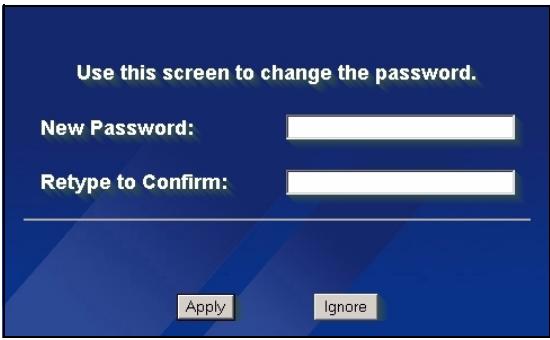

If you change the password and then forget it, you will need to reset the NWA-3100. Refer to the User's Guide for how to use the RESET button.
4 Click Apply to replace the factory default certificate for added security; alternatively click Ignore to proceed if you do not want to change the certificate now.
5 The MAIN MENU screen appears.
Replace Factory Default Certificate
The factory default certificate is common to all NWA models. Click Apply to create a certificate using your NWA's MAC address that will be specific to this device.
Apply
Ignore
ZyXEL
ADVANCED
SYSTEM
WIRELESS
IP
ROGUE AP
REMOTE MGNT
CERTIFIC
LOGS
VLAN
MAINTENANCE
LOGOUT
MAIN MENU
Welcome to the ZyXEL embedded web configurator.
- Click Maintenance to access a range of maintenance submenus.
3 Configure Internet Access
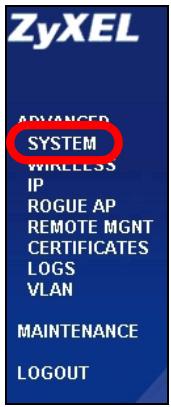
1 Click SYSTEM in the navigation panel.
2 The SYSTEM > General screen appears.
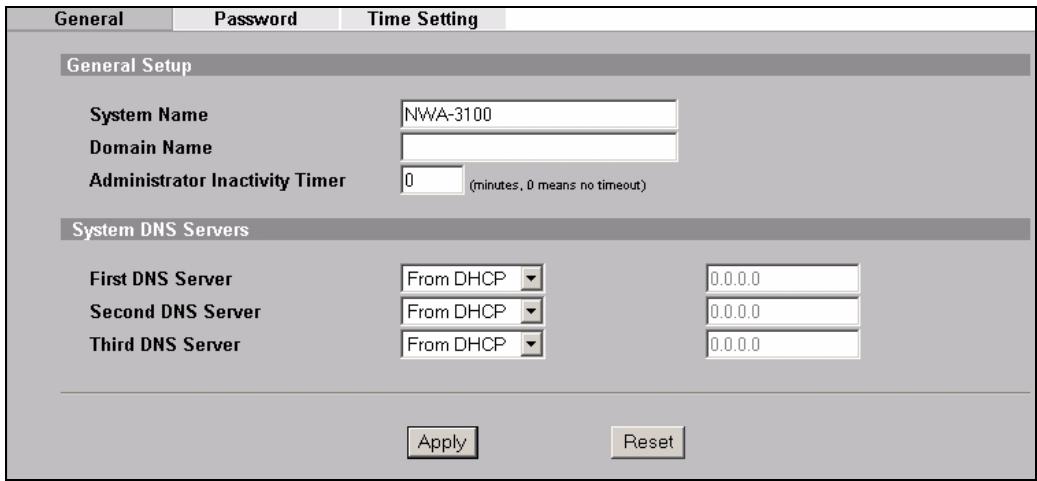
System Name is for identifying the NWA-3100 on your network. Choose a distinctive name, or leave this at its default.
Domain Name: Enter a domain name if your ISP requires one for authentication. Otherwise you can leave it blank or set to whatever may have displayed automatically.
DNS Server(s): if your ISP gave you specific DNS (Domain Name System) settings, enter them here. Otherwise, leave these fields at their defaults.
3 Click Apply.
4 Click WIRELESS in the navigation panel. The following screen appears.
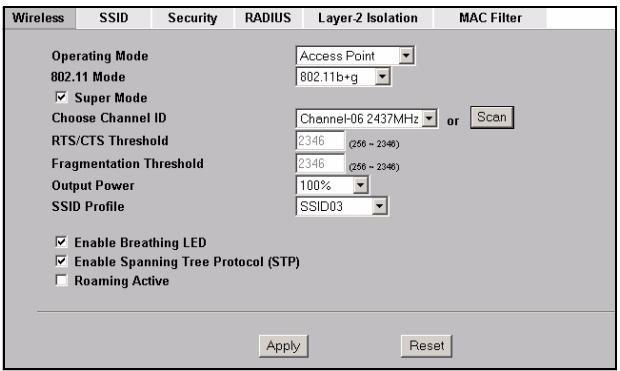

The wireless stations and the NWA-3100 must use the same SSID, channel ID and encryption settings for wireless communication.
Operating Mode: Ensure that Access Point mode is selected.
802.11 Mode: Select the wireless standard you want your network to use. If all the wireless clients support IEEE 802.11a, select 802.11a. Otherwise, select 802.11b+g.
Choose Channel ID: Select the wireless channel you want your network to use. To have the NWA-3100 automatically select a channel, click Scan instead.
SSID Profile: Select the SSID profile you want to configure for network access from the drop-down list box. This example uses the SSID03 profile.
5 Click Apply to save your settings.
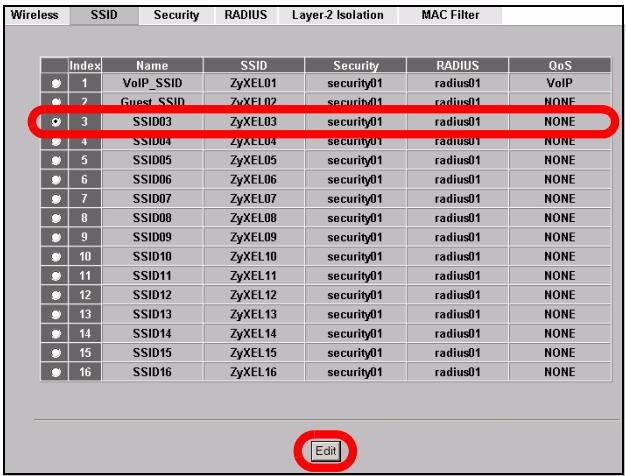
6 Click the SSID tab. The following screen appears.
SSID03's default SSID (the name of the network) is ZyXEL03 and its default Security setting is Security01.
If the settings are different, or if you want to change the SSID, select SSID03 and click Edit to change the settings.
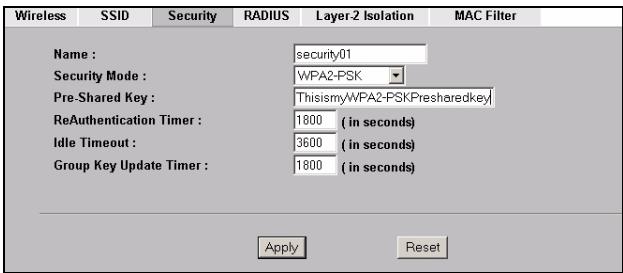
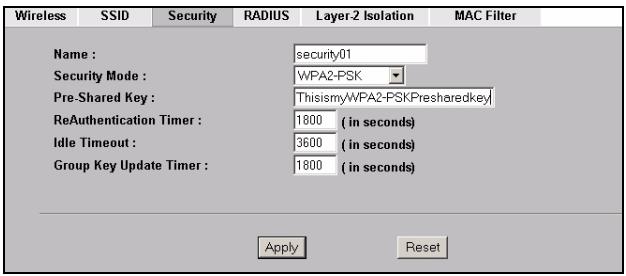
7 Click the Security tab. Ensure that Security01 is selected and click Edit.
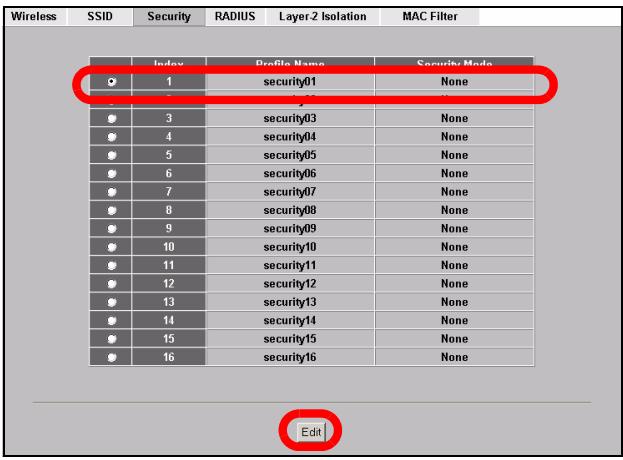
8 This is where you can enter the security settings for your wireless network. The fields you fill in differ according to the type of security you select in the Security Mode field. Select None if you do not wish to use wireless security.
This example uses WPA2-PSK security, in which all wireless clients must use the same pre-shared key to join the network.
Ensure that all your wireless clients can use the type of security you set. Click Apply when you have finished.
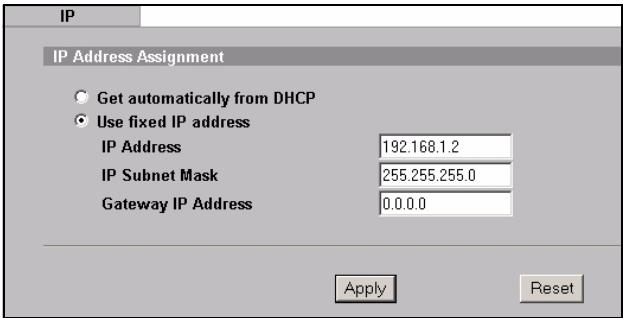
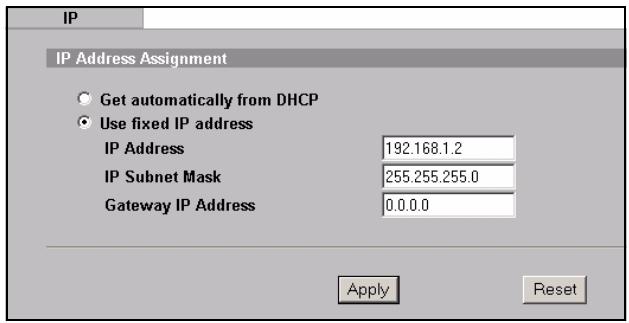
9 Click IP in the navigation panel.
If you have an IP address to use, select Use fixed IP address and enter it along with the subnet mask and gateway IP address. Otherwise, select Get automatically from DHCP. Click Apply.
10 Change the wireless settings in the wireless stations to match those of the NWA-3100. Refer to your wireless adapter's documentation.

If you change the NWA-3100's IP address, you must use the new IP address when you next access the web configurator.
The device is now ready to connect to your wired network. You can do this now, or once you have installed the hardware.

If the wireless clients cannot access the wired network, verify that the IP address and the subnet mask of the NWA-3100 and the computers on the network are in the same range. If the ETHN LED is off, check the cables between the NWA-3100 and your computer or hub.
4 Install the Hardware
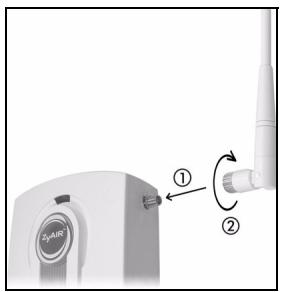
4.1 Attaching Antennas

When facing the front of the NWA-3100, the right antenna (main antenna) transmits and receives; the left antenna only receives.
1 Screw the antennas clockwise onto the antenna connectors on the sides of your NWA-3100. The antennas should be perpendicular to the ground and parallel to each other.
Make sure the antennas are securely screwed onto the antenna connectors.
4.2 Hardware Mounting
In general, the best location for the access point is at the center of your intended wireless coverage area. For better performance, mount the NWA-3100 high up in an area that is free of obstructions.
Free-standing
Lie your NWA-3100 on a flat, level surface (a desk or shelf, for example) that is strong enough to support the weight of the NWA-3100 with connection cables.
Wall-mounted
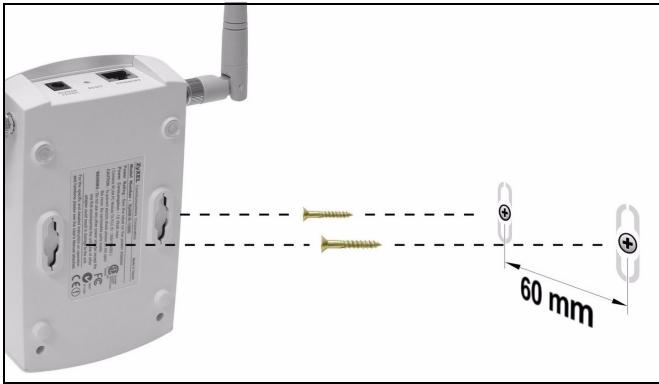
Do the following to attach your NWA-3100 to a wall.
1 Screw two screws (not included) into the wall 60mm apart (see the figure in step 3). Use screws with 6mm 8mm ( 0.24'' 0.31'' ) wide heads. Do not screw the screws all the way in to the wall; leave a small gap between the head of the screw and the wall. The gap must be big enough for the screw heads to slide into the screw slots and the connection cables to run down the back of the NWA-3100.

Make sure the screws are securely fixed to the wall and strong enough to hold the weight of the NWA-3100 with the connection cables.
2 Adjust the cables.
Run the connection cables down the back of the NWA-3100 as shown in the following figure.
OR:
Run the connection cables upward and along the edge of the ceiling.
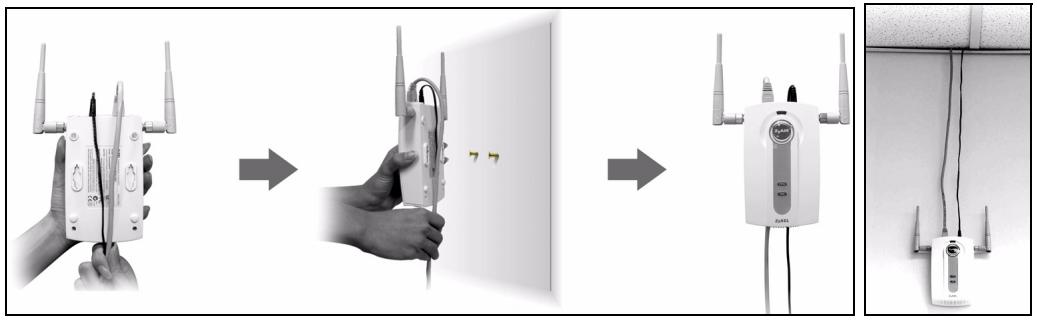
3 Align the holes on the back of the NWA-3100 with the screws on the wall. Hang the NWA-3100 on the screws.
5 Set Up Power Over Ethernet (Optional)
Power over Ethernet (PoE) is the ability to provide power to your NWA-3100 via an 8-pin CAT 5 Ethernet cable, eliminating the need for a nearby power source.
A PoE injector (not included) is also needed to supply the Ethernet cable with power. This feature allows increased flexibility in the location of your NWA-3100.
In the following figure, Z is your NWA-3100, A is the CAT 5 Ethernet cable, B is the PoE injector and C is the power cable.

6 Procedure to View a Product's Certification(s)
1 Go to www.zyxel.com.
2 Select your product from the drop-down list box on the ZyXEL home page to go to that product's page.
3 Select the certification you wish to view from this page.
Übersicht
5 Power over Ethernet (PoE)
5 Power over Ethernet (PoE)
1.1 CBeToNDNoHbIe INdNkaTopbI
3aKpOte OKHO Network Connections (CeTeBbIe IOnkJIIOHeHnA).
2.2Дoc'tynКВe6-конфуразур

Даже, ecnbl MOxeTe NOdkHouHTb NWA-3100 no 6ecnpoBODHOcTn, Дя NaayalbHoi HacTroKni peKOMeHdyeTcЯ NOdkHouHTb BaW KOMpbOTep K npoty ETHERNET.
1 3anycntte BaW web-6pay3ep. BBeNTe 192.168.1.2 (IP-aDpec NWA-3100 no ymoJIyAnHIO) B cTpOke aDpeca.


EcnBbHe MoKeTe BoTn B Be6-KoHcHypaTop, To npOBepbTe IP-aDpeC n Macky PocSeT NWA-3100 n KombHOTepa. OHi DoJXhbl HaxOHTbcra B OndHoi PoDCeTI (cm. Section 2.1).
2 Μεικητe Na KhONke Login (BxOД) (napoIb no yMOnuHaHnIO - 1234 - yXe BVeDeH).
3Изменипаповь BXODaВсnteMy, BBeДЯ HOвьи,ИнжмITEHa Apply (ПриMuMeHnTB).3aПишITE Hoвьй napOBи ИpoJOxNteВбeЗоноанhoe MecTo.

EcnBbI n3MeHnI npoJIb, a NOTOM erO 3a6blN, TO Bam npndTcR nepeyctaHOBntb NWA-3100. O TOM, KaK nCNoJIb3OBaTb KhoNky RESET (CBPOC) moXHo npOHTaTb B ryKOBoDCTBe noJIb3OBaTeJIa.
B 3TOM npimeme nCnOlb3yetcCTaHdapt 6e3oNaCHOCTN WPA2-PSK, B KOTOPOM BCE6ecnpoBOndbIe KJIneHTbI dIpyNOkJIIOUChEHNK CETN DOJXHbI NcNoIb3OBaTb IpeDvapNTelbHO3aDaHHbIKHOU.
Y6eIntecb, YTO BCE BaUN
6eCnpoBOHbIe KJIneHTbI MOrYT
NcIOJIb3OBA Tb Bbl6paHHbI
BAMn TIN 6e3OnaChocTn.
UeIKHnTe Apply (PpIMeHnTb)
NO OKOHuaHm BHceEHn
N3MeHeHn.
9IeJKNHTe Ha IP Ha nHaenn HABINrAun.
Ecn y Bac ecTb nIy IcnoJIb3OBAHnI OnpeJeHnBI IP aDpec, YTO Bb6epNTe Use fixed IP address (UcnoJIb3OBAtB fNkCnpoBaHnBI IP-aDpec) IN BBeIte erO pRdOM c MaCKoI noCTeN i IP-aDpecOM sIHO3a. B npOTINBHOM cIyuae, Bb6epNTe Get automatically from DHCP (POnLyuHTb abTomatueckn OT DHCP). Haxmnte Apply (PpIMeHnTb).
10 I3MeHnTe 6ecnpoBOHbIe HAcTpoKn 6ecnpoBOHbIX CTaHcN TAK, YTObI OHN coBnAaJInc NWA-3100. ObpaTntEc b K DoKymeHTaUIN dIy BaWero 6ecnpoBOHoro aanTepa.

EcnBbI n3MeHnIIP-aDpc NWA-3100,TO Bbl DOnJXhbl NcNoJb3OBA Tb HObI IP-aDpc npi cIeNyUoIeM doCType K Be6-KOHpIpyaTopy.
Ceyac yctpoCTBO noTROTOBHeO IJRA NOKJIIOUeHnK npoBOHOcTeN. Bbl moKet cdeNaTb 3TO CEyac nIIN cpa3y Je nocne yCTaHOBKn ObOpydoBaHnA.

Ecni 6ecnpoBODhIe KJIneHTbI He MOrTy IIOKJIIOUHTbcr K IpoBoHOH CeTn, To npOBepbTe IP-aDPEC n Macky IooCTn NWA-3100 n KOMNbIoTepa. OHI DOnJXbI HaxOoNTbcra B OJHOI IOoCTn. Ecni INHdNkATop ETHN He CBETTCsA, To npOBepbTe IIOKJIIOUChHe Ka6eIa MeJdy NWA-3100 n BaShIM KOMNbIoTePOM IIIN KOMMyTaTOPOM.
4 UctaHObKa OobpyOboHnY
4.2 MoNTax o6OpyIDoBaHnIa
B obuem, haunnywey tokyo yctahOBKn toyn knoCTyna raBnreTcyeHtp 30hbl, B KOTOPOHyKHO oecneuNTb nokpbItne beocnpoBOdHOn cetn. IJra doCTnxKeHna HauNyUwe npoun3BOUnTeJIbHOCTn ycTaHOBInTe NWA-3100 noBbIwe, B CBO6OdHOM OT nppeTCTBm MeCTe.
Cbo6oJHo cTOnJaee paCnoJoxKeHne
Положи Te NWA-3100 Ha поскую ropuэнтajbHyю noBepxHocTb (CTOлпи полky, habример), достатуно почую дя BEca NWA-3100 BmecTe c coeДиНiteьныIMn npobODamn.
KpenneHne Ha cTeHy
YTo6bI npKpeNTb NwA-3100 K cTeHe BblOnHnTe cJeDyUoJne oNepaun.
1 Bvntte B cTeHy dBa upyna (He nocTaNJrTOc) Ha paCCToHn 60 MM dpyr ot dpyra (cm. cxemyB ware 3). IcnoIb3yIe TsepynbI C sIupnHO rOIOBKn 6MM \~ 8MM. He BKpyuBaIe upynbI do ynpa, oCTabIe npOMejTK MExdy rOIOBKO u pypa n CTehoI.
3TOT npomexytoKdoJKeH 6bItb DoCTaTOUHbIM IJRA TORO, UTObI WpyuBb BOUJI B pa3bEmbl Ha Kopnyce, a coeHNHTeNbHbIe npOBoJa npoxoJnN c3aJN NWA-3100.

- 802.11a/b/g Wireless Access Point
- Quick Start Guide
- Overview
- Connect the Hardware
- LEDs
- Access the Web Configurator
- Set Up Your Computer's IP Address
- Log Into the Web Configurator
- Replace Factory Default Certificate
- ZyXEL
- Configure Internet Access
- Install the Hardware
- Attaching Antennas
- Hardware Mounting
- Free-standing
- Wall-mounted
- Set Up Power Over Ethernet (Optional)
- Procedure to View a Product's Certification(s)
- Übersicht
- Power over Ethernet (PoE)
- CBeToNDNoHbIe INdNkaTopbI
- 2.2Дoc'tynКВe6-конфуразур
- UctaHObKa OobpyOboHnY
- MoNTax o6OpyIDoBaHnIa
- Cbo6oJHo cTOnJaee paCnoJoxKeHne
- KpenneHne Ha cTeHy
Brand : ZYXEL
Model : NWA-3100
Category : Wireless Access Point