BODY BEAUTIFUL - Fitness / EMS device SPORT ELEC - Free user manual and instructions
Find the device manual for free BODY BEAUTIFUL SPORT ELEC in PDF.
User questions about BODY BEAUTIFUL SPORT ELEC
0 question about this device. Answer the ones you know or ask your own.
Ask a new question about this device
Download the instructions for your Fitness / EMS device in PDF format for free! Find your manual BODY BEAUTIFUL - SPORT ELEC and take your electronic device back in hand. On this page are published all the documents necessary for the use of your device. BODY BEAUTIFUL by SPORT ELEC.
USER MANUAL BODY BEAUTIFUL SPORT ELEC
200d eaeenee 1nns 1nnne nne nee
(10dweepoepeepoeepoeepoeepoeepoeepoeepoeepoeepoeepoeepoeepoeepoeepoeepoeepoeepoeepoeepoeepoeepoeepoeepoeepoeepoeepoeepoeepoeepoeepoeepoe
eeppeeppeeppeeppeeppeeppeeppeeppeeppeeppeeppeeppeeppeeppeeppeeppeeppeeppeeppeeppeeppeeppeeppeeppeeppeeppeeppeeppeeppeeppe
shossop
eep eeppeeppeeppeeppeeppeeppeeppeeppeeppeeppeeppeeppeeppeeppeeppeeppeeppeeppeeppeeppeeppeeppeeppeeppeeppeeppeeppeeppeeppeeppeeppeeppeeppeeppeeppe
(2018 2019)
1dweepoww 1nwnwaaanrnnnne
on e 2017 - 2018
P
A


suolopns

∠0 9d
90 9d
102:09
wnon np
C
e
0 2
Bolde
101443
D
| SOPS | |
| (€/s/2002) SHS | |
| %9 %02 | |
| C.95+P.C.9+ | |
| %06 %01 | |
| C.95+P.C.0 | |
| xnxnunununununununununununununununununununununununununununununununununununununununununununununununununununununununununununununununununununununununununununununununununununununununununununununununununununun ununununununununununununununununununununununununununununununununununununununununununununununununununununununununununununununununununununununununununununununununununununununununununununununununununununUNUNUNUNUNUNUNUNUNUNUNUNUNUNUNUNUNUNUNUNUNUNUNUNUNUNUNUNUNUNUNUNUNUNUNUNUNUNUNUNUNUNUNUNUNUNUNUNUNUNUNUNUNUNUNUNUNUNUNUNUNUNUNUNUNUNUNUNUNUNUNUNUNUNUNUNUNUNUNUNUNUNUNUNUNUNUNUNUNUNUNUNUNUNUNUNUNUNUNUNUUNUNUNUNUNUNUNUNUNUNUNUNUNUNUNUNUNUNUNUNUNUNUNUNUNUNUNUNUNUNUNUNUNUNUNUNUNUNUNUNUNUNUNUNUNUNUNUNUNUNUNUNUNUNUNUNUNUNUNUNUNUNUNUNUNUNUNUNUNUNUNUNUNUNUNUNUNUNUNUNUNUNUNUNUNUNUNUNUNUNUNUNUNUNUNUNUNUNUN UNUNUNUNUNUNUNUNUNUNUNUNUNUNUNUNUNUNUNUNUNUNUNUNUNUNUNUNUNUNUNUNUNUNUNUNUNUNUNUNUNUNUNUNUNUNUNUNUNUNUNUNUNUNUNUNUNUNUNUNUNUNUNUNUNUNUNUNUNUNUNUNUNUNUNUNUNUNUNUNUNUNUNUNUNUNUNUNUNUNUNUNUNUNUNUNUNUNUNUNUMUNUNUNUNUNUNUNUNUNUNUNUNUNUNUNUNUNUNUNUNUNUNUNUNUNUNUNUNUNUNUNUNUNUNUNUNUNUNUNUNUNUNUNUNUNUNUNUNUNUNUNUNUNUNUNUNUNUNUNUNUNUNUNUNUNUNUNUNUNUNUNUNUNUNUNUNUNUNUNUNUNUNUNUNUNUNUNUNUNUNUNUNUNUNUNUNUNUNUNURUUNUNUNUNUNUNUNUNUNUNUNUNUNUNUNUNUNUNUNUNUNUNUNUNUNUNUNUNUNUNUNUNUNUNUNUNUNUNUNUNUNUNUNUNUNUNUNUNUNUNUNUNUNUNUNUNUNUNUNUNUNUNUNUNUNUNUNUNUNUNUNUNUNUNUNUNUNUNUNUNUNUNUNUNUNUNUNUNUNUNUNUNUNUNUNUNUNUNU UNUNUNUNUNUNUNUNUNUNUNUNUNUNUNUNUNUNUNUNUNUNUNUNUNUNUNUNUNUNUNUNUNUNUNUNUNUNUNUNUNUNUNUNUNUNUNUNUNUNUNUNUNUNUNUNUNUNUNUNUNUNUNUNUNUNUNUNUNUNUNUNUNUNUNUNUNUNUNUNUNUNUNUNUNUNUNUNUNUNUNUNUNUNUNUNUNUNUN UN UN UN UN UN UN UN UN UN UN UN UN UN UN UN UN UN UN UN UN UN UN UN UN UN UN UN UN UN UN UN UN UN UN UN UN UN UN UN UN UN UN UN UN UN UN UN UN UN UN UN UN UN UN UN UN UN UN UN UN UN UN UN UN UN UN UN UN UN UN UN UN UN UN UN UN UN UN UN UN UN UN UN UN UN UN UN UN UN UN UN UN UN UN UN UN UN UN UN UN U U U U U U U U U U U U U U U U U U U U U U U U U U U U U U U U U U U U U U U U U U U U U U U U U U U U U U U U U U U U U U U U U U U U U U U U U U U U U U U U U U U U U U U U U U U U U U U U U U U U/U U U U U U U U U U U U U U U U U U U U U U U U U U U U U U U U U U U U U U U U U U U U U U U U U U U U U U U U U U U U U U U U U U U U U U U U U U U U U U U U U U U U U U U U U U U U U U U U U U U UU U U U U U U U U U U U U U U U U U U U U U U U U U U U U U U U U U U U U U U U U U U U U U U U U U U U U U U U U U U U U U U U U U U U U U U U U U U U U U U U U U U U U U U U U U U U U U U U U U U UUUUUUUUUUUUUUUUUUUUUUUUUUUUUUUUUUUUUUUUUUUUUUUUUUUUUUUUUUUUUUUUUUUUUUUUUUUUUUUUUUUUUUUUUUUUUUUUUUUUUUUUUUUUUUUUUUUUUUUUUUUUUUUUUUUUUUUUUUUUUUUUUUUUUUUUUUUUUUUUUUUUUUUUUUUUUUUUUUUUUUUUUUUUUUUUUUUUUUUUUuuuuuuuuuuuuuuuuuuuuuuuuuuuuuuuuuuuuuuuuuuuuuuuuuuuuuuuuuuuuuuuuuuuuuuuuuuuuuuuuuuuuuuuuuuuuuuuuuuuuuuuuuuuuuuuuuuuuuuuuuuuuuuuuuuuuuuuuuuuuuuuuuuuuuuuuuuuuuuuuuuuuuuuuuuuuuuuuuuuuuuuuuuuuuuuuuuuuuuuuUUUUUUUUUUUUUUUUUUUUUUUUUUUUUUUUUUUUUUUUUUUUUUUUUUUUUUUUUUUUUUUUUUUUUUUUUUUUUUUUUUUUUUUUUUUUUUUUUUUUUUUUUUUUUUUUUUUUUUUUUUUUUUUUUUUUUUUUUUUUUUUUUUUUUUUUUUUUUUUUUUUUUUUUUUUUUUUUUUUUUUUUUUUUUUUUUUUUUUUCUUUUUUUUUUUUUUUUUUUUUUUUUUUUUUUUUUUUUUUUUUUUUUUUUUUUUUUUUUUUUUUUUUUUUUUUUUUUUUUUUUUUUUUUUUUUUUUUUUUUUUUUUUUUUUUUUUUUUUUUUUUUUUUUUUUUUUUUUUUUUUUUUUUUUUUUUUUUUUUUUUUUUUUUUUUUUUUUUUUUUUUUUUUUUUUUUUUUUUUUUUUUUUUUUUUUUUUUUUUUUUUUUUUUUUUUUUUUUUUUUUUUUUUUUUUUUUUUUUUUUUUUUUUUUUUUUUUUUUUUUUUUUUUUUUUUUUUUUUUUUUUUUUUUUUUUUUUUUUUUUUUUUUUUUUUUUUUUUUUUUUUUUUUUUUUUUUUUUUUUUUUUUUUUUUUUUUUUUUUUUUUUUUUUUUUUUUUUU uuuuuuuuuuuuuuuuuuuuuuuuuuuuuuuuuuuuuuuuuuuuuuuuuuuuuuuuuuuuuuuuuuuuuuuuuuuuuuuuuuuuuuuuuuuuuuuuuuuuuuuuuuuuuuuuuuuuuuuuuuuuuuuuuuuuuuuuuuuuuuuuuuuuuuuuuuuuuuuuuuuuuuuuuuuuuuuuuuuuuuuuuuuuuuuuuuuuuuuuuuuuuuuuuuuuuuuuuuuuuuuuuuuuuuuuuuuuuuuuuuuuuuuuuuuuuuuuuuuuuuuuuuuuuuuuuuuuuuuuuuuuuuuuuuuuuuuuuuuuuuuuuuuuuuuuuuuuuuuuuuuuuuuuuuuuuuuuuuuuuuuuuuuuuuuuuuuuuuuuuuuuuuuuuuuuuuuuuuuuuuuuuuuuuuuuuuuuuuu uuuuuuuuuuuuuuuuuuuuuuuuuuuuuuuuuuuuuuuuuuuuuuuuuuuuuuuuuuuuuuuuuuuuuuuuuuuuuuuuuuuuuuuuuuuuuuuuuuuuuuuuuuuuuuuuuuuuuuuuuuuuuuuuuuuuuuuuuuuuuuuuuuuuuuuuuuuuuuuuuuuuuuuuuuuuuuuuuuuuuuuuuuuuuuuuuuuuuu uu uuuuuuuuuuuuuuuuuuuuuuuuuuuuuuuuuuuuuuuuuuuuuuuuuuuuuuuuuuuuuuuuuuuuuuuuuuuuuuuuuuuuuuuuuuuuuuuuuuuuuuuuuuuuuuuuuuuuuuuuuuuuuuuuuuuuuuuuuuuuuuuuuuuuuuuuuuuuuuuuuuuuuuuuuuuuuuuuuuuuuuuuuuuuuuuuuuuuuuUU |


02:00000000000000000000000000000000000000000

09d
02:000000000000000000000000000000000000000000000000
ssau
m - 1 0 ;
[\text{、}]
e e
10E 1/
0e 189j / Jemod 35554. + (a6bup)
m = 311 ;
:XeRrEmoD
AONNNTOENNNNNEAONNNEAONN
suej60jd


"Q" A K e 10000000000000000000000000000000000000000000000000000000000000000000000000000000 1 1 1 1 1 1 1 1 1 1 1 1 1 1 1 1 1 1 1 1 1 1 1 1 1 1 1 1 1 1 1 1 1 1 1 1 1 1 1 1 1 1 1 1 1 1 1 1 1 1 2
0 / NO - 2 dS
s
ds
s
s
s
s
s
09 09 96 2ε 2(0) εε +100ddns WOS
s e 2 d3S
'peeppeeppeeppeeppeeppeeppeeppeeppeeppeeppeeppeeppeeppeeppeeppeeppeeppeeppeeppeeppeeppeeppeeppeeppeeppeeppeeppeeppeeppeeppeeppeeppeeppeeppeeppeeppeeppeeppeeppeeppeeppeeppeeppeeppeeppeeppeeppeeppeeppeeppe
LONISN / 8
0 000000000000000000000000000000000000000000000
(200d wipbip 8) sXeK eon 9 oepu pui lll mnoa
'emod o sieo OE nox sdpip (oeepn rer L) npipipipipipipipipipipipipipipipipipipipipipipipipipipipipipipipipipipipipipipipipipipipipipipipipipipipipipipipipipipipipipipipipipipipipipipipipipipipipipipipipipipipipipipipipipipipipipipipipipipip
NIHDCHEHONOINNNEEe /
LNN HN ONN
eepnneepnneepnneepnneepnneepnneepnneepnneepnneepnneepnneepnneepnneepnneepnneepnneepnneepnneepnneepnneepnneepnneepnneepnneepnneepnneepnneepnneepnneepnneepnneepnneepnneepnne
SESESESESESESESESESESESESESESESESESE

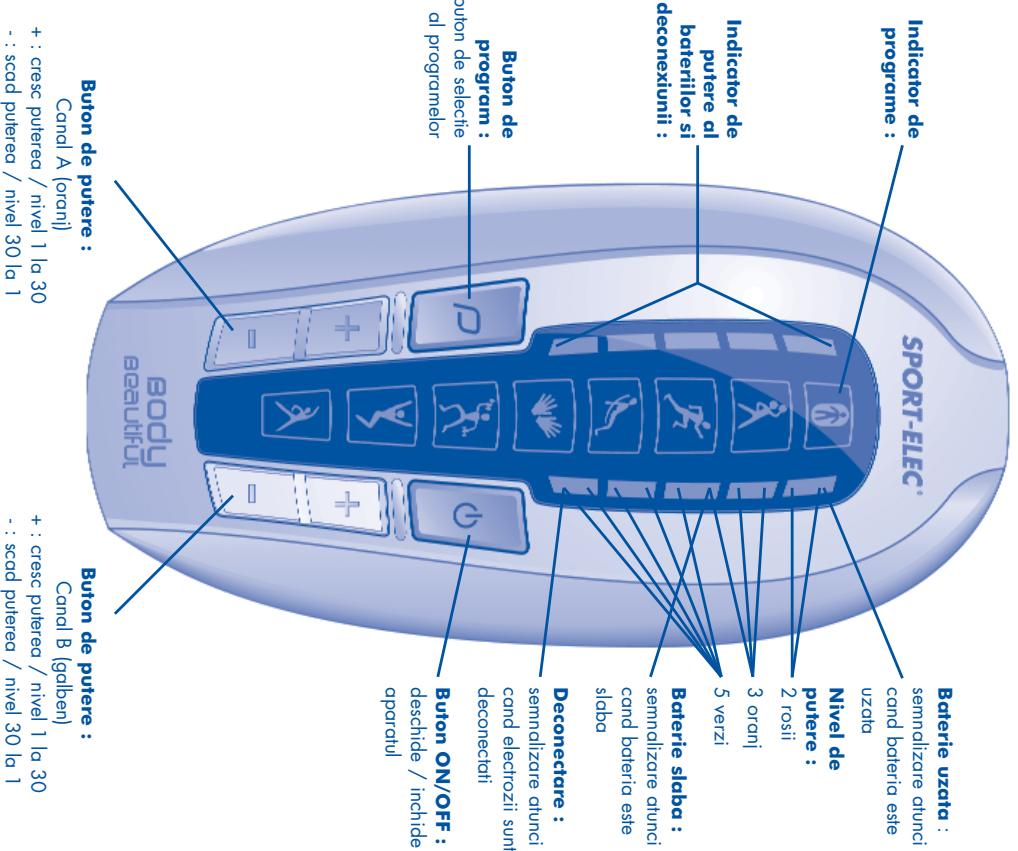
STEP 4 - Programme selection key "P"
It is enough to make one or more short presses on the key "P", the programs ravel. The programs are announced by pictograms. As soon as a program is selected, corresponding pictogram lights (see page 8).
Once the program is chosen, you can start. During the program the key "P" is inactive.
STEP 5 - End of the program - Stop during the
To stop the device during the program, it is enough to put the 2 power keys at zero or to press the key "O".
STEP 6 - Adjustment of the power
The power is divided into 10 levels: 5 green, 3 orange and 2 rec key "+" . You have 30 levels to regulate the power from 0 to 30.
III. GENERAL INSTRUCTIONS
A / ELECTRODES FUNCTION
This function allows using the adhesive electrodes by connecting them to the unit.
STEP 1: Take the electrodes and remove carefully their protection, dampen them one by one with water on your fingertips on the adhesive gel, and wait for 2 minutes (photo II-A, page 4).
STEP 2 Electrodes function
Fit the electrodes on your body as show Positions are shown for information only
a/For Body Beautiful
Connect the electrodes with the connectors of the device (photo II-B page 4). Body Beautiful is composed of 3 groups of 2.80 cm long wide solder in 2 groups of 2 connecting plugs (2, shallow and 2, narrow phase).
fasten your SPORT-ELEC® to the back of your clothing or underwear using its clip.
00.33.2.32.96.50.50 or go to www.sport-elec.com, or contact your local supplier
Examples of use: A = connector channel A (yellow), C = connector channel C (orange)
A - Pectoral muscles A-Epaules B-Trapezii 1-Major pectoral 2-Middle deltoid 9-Upper trapezius a-Do not place electrodes in the 3-Front 10-Middle trapezius
heart region 4-Back C-Back b-Heart 11-Main back muscle
b/ For Evolution Body
Connect the electrodes with the connectors of the device (photo IV-B page 5). Evolution Body is composed of 2 groups of 3 1 m long wires ending in 2 groups of 3 connecting plugs (1 gray - 2 orange plugs / 1 gray - 2 yellow plugs). Fasten your SPORT-ELEC® to the back of your clothing or underwear using its clip.
- 20 -
Examples of use: G = grey, J = yellow, O = orange
a - Do not place electrodes in the
-
Do not place electrodes in the heart region 10 - Middle trapezius 11 - Lower trapezius
-
Shoulders
C-Shoulders 2-Middle deltoids
3 - Front
4 - Back
D - Abdominal mus
STEP 5 : Start your unit following the "Starting the unit" procedure described in paragraph II
Contractions should be firm but never painful. If you feel an unpleasant sensation around the elbow bring the power on your back to minimum move the electrolab(s) and suddenly increase the power
bring the power-on key back to minimum , move the electrode(s) and gradually increase the power . Once the
programme.
STEP 6: Once the program is finished, disconnect the electrodes from the unit. Then pull off the electrodes gently to remove them slightly with a few drops of water, then return them carefully onto their support. Store
the adhesive electrodes in a fresh location, in a plastic bag (e.g. vegetable container in the refrigerator).
B / BELT FUNCTION (only with the Body Beautiful)
The membrane bell can be used to complete, or separated into 2 to form 2 half-bells. The full bell must be used on the stomach, buttocks, lower back areas.
Once fastened, the 2 "half-belts" can be used on the arms, thighs, or calf.
The multifunction belt has built-in electrodes on which the SPORT-ELEC® cream is applied.
This cream enhances contact between the electrodes and the skin. Its massaging and electro conducting
properties improve comfort of use and enhance stimulation . The cream can be also used by massaging onthe body . If you want to buy the SPORT FIVEC ® cream please order directly by shipping
00.33.2.32.96.50.50 or go to www.sport-elec.com, or contact your local supplier.
Do not use any cream other than that provided by SPORT ELEC* Institut.
PRESENTATION OF THE BELT :
1 - Fasteners 2 - V
PRESENTATION OF THE BELT :Front side : (photo V-A page 6)1 - Fasteners 2 - Wire storage 3 - Connection terminals 4 - Scratch strip
4 built-in electrodes
underwear using its clip
eepnne eepnne eepnne eepnne eepnne eepnne eepnne eepnne eepnne eepnne eepnne eepnne eepnne eepnne eepnne eepnne eepnne eepnne eepnne eepnne eepnne eepnne eepnne eepnne eepnne eepnne
401/1 10000000000000000000000000000000000000000000000000000
SS = 12
#
nd upn
1 + u1 - 1 = ( 1 + u) u1 < 1 = u
12x - 1 > 0
#
116
8488888888
A008 N0170E3e9e9e9e9e9e9e9e9e9e9e9e9e9e9e9e9e9e9e9e9e9e9e9e9e9e9e9e9e9e9e9e9e9e9e9e9e9e9e9e9e9e9e9e9e9e9e9e9e9e9e
sapeg sap funqiaesag
A00
8
38
osa
LnA
D.
INEL
egie
07
un
#
61
13 J
ap
0/
s
#
9
DLL
JE
VC
#
#
31
108
s
AC
A
( x - 2x) t - xy^2 = ( x - 2x) f^ t
1
#
(1)
: JNN
A
sapeep sunqeyeseg SNOIILVAVIOHCH
1
#
#
12x - 1 > 0
in
12x - 1 > 0
N
12x - 1 > 0
L
12x - 1 > 0
1
m = 311
#
12x - 1 > 0
A
#
:
12x - 1 > 0
2
#
12x - 1 > 0
12x - 1 > 0
1 + ( 1 + u) 7 = 140
7
上
12x - 1 > 0
#
#
1 + ( 1 + u) 7 = 140
E1
7
1 + ( 1 + u) 7 = 140
三
#
1 + ( 1 + u) 7 = 140
。
m = 311 ;
12x - 1 > 0
K
m = 311 ;
1 + ( 1 + u) 7 = 140
4
.
1 + ( 1 + u) 7 = 140
F
#
12x - 1 > 0
M
m = 311 ;
1 + ( 1 + u) 7 = 140
A
1
1 + ( 1 + u) 7 = 140
#
1
12x - 1 > 0
D
m = 311
1 + ( 1 + u) 7 = 140
#
m = 311 ;
1 + ( 1 + u) 7 = 140
#
m = 311 ;
1 + ( 1 + u) 7 = 140
T
m = 311 ;
12x - 1 > 0
#
#
12x - 1 > 0
m = 311 ;
12x - 1 > 0
。
12x - 1 > 0
6
D.
12x - 1 > 0
16
m = 311 ;
12x - 1 > 0
#
m = 311 ;
12x - 1 > 0
1c
m = 311 ;
12x - 1 > 0
牛
理
12x - 1 > 0
#
m = 311 ;
12x - 1 > 0
1
D.
12x - 1 > 0
7
1
12x - 1 > 0
三
m = 311 ;
1p^2 = ( p - 1) × p
#
#
12x - 1 > 0
D
m = 311 ;
1 + ( 1 + u) 7 = 140
E
m = 311
12x - 1 > 0
乙
m = 311 ;
1 + ( 1 + u) 7 = 140
1
1
1 + ( 1 + u) 7 = 140
#
m = 311 ;
12x - 1 > 0
L
1
12x - 1 > 0
D
D.
12x - 1 > 0
C
m = 311 ;
12x - 1 > 0
A
1
12x - 1 > 0
A
m = 311
12x - 1 > 0
31
理
12x - 1 > 0
5
m = 311
12x - 1 > 0
#
m = 311
12x - 1 > 0
12x - 1 > 0
12x - 1 > 0
12x - 1 > 0
12x - 1 > 0
#
12x - 1 > 0
12x - 1 > 0
12x - 1 > 0
12x - 1 > 0
1 + ( 1 + u) 7 = 140
12x - 1 > 0
12x - 1 > 0
12x - 1 > 0
12x - 1 > 0
12x - 1 > 0
12x - 1 > 0
12x - 1 > 0
12x - 1 > 0
1 + ( 1 + u) 7 = 140
12x - 1 > 0
12x - 1 > 0
12x - 1 > 0
12x - 1 > 0
1
#
。
37
E
D
C
#
#
7
C
#
#
#
#
#
#
#
3
1
#
E
37
#
D
18
C
5
三
#
D.
05 09 96 2ε 2(0) εε +
DODNS WOSN
30 9d
#
09d
m = 311 ;
#
50 9d
12 =
.
#
1
12 =
12 × 12
#
30.1L
HULU
<
A
20 9d
#
#
#
#
105d
m = 311 ;
aennnne
109d
eepnne eee nnnnne ennnnne nee eae
Bunlavy
(1)
n nnnn nn nnnn nnnn nnnn nnnn nnnn nnnn nnnn nnnn nnnn nnnn nnnn nnnn nnnn nnnn nnnn nnnn nnnn nnnn nnnn nnnn nnnn nnnn nnnn nnnn nnnn nnnn nnnn nnnn nnnn nnnn nnnn nnnn nnnn nnnn nnne
e e
4qj135 4xenoq135
Prrnne nnnnne nnnnne nnnnne nnnnne nnnnne nnnnne nnnnne nnnnne nnnnne nnnnne nnnnne nnnnne nnnnne nnnnne nnnnne nnnnne nnnnne nnnnne nnnnne nnnnne nnnnne nnnnne nnnnne nnnnne nnnnne nannnee
HULY TZ:1920
eeppeeppeeppeeppeeppeeppeeppeeppeeppeeppeeppeeppeeppeeppeeppeeppeeppeeppeeppeeppeeppe
(9888888888888888888888888888
n nnnn nnnn nnnn nnnn nnnn nnnn nnnn nnnn nnnn nnnn nnnn nnnn nnnn nnnn nnnn nnnn nnnn nnnn nnnn nnnn nnnn nnnn nnnn nnnn nnnn nnnn nnnn nnnn nnnn nnnn nnnn nnnn nnnn nnn
371d 371eONNESNI I
1
(9 duBod g - A oJy):ipoujE OJy
11110000-2 4444444444444444444444444444444
oennnneonnnnne
OBC
VAA
n nn nnnnne nnnnne nnnnne nnnnne nnnnne nnnnne nnnnne nnnnne nnnnne nnnnne nnnnne nnnnne nnnnne nnnnne nnnnne nnnnne nnnnne nnnnne nnnnne nnnnne nnnnne nnnnne nnnnne nnnnne nnnnne nnnnnee
05 96 28 0) 28+)'eepnnpnnnne nnnnne nnnnne nnnnne nnnnne nnnnne nnnnne nnnnne nnnnne nnnnne nnnnne nnnnne nnnnne nnnnne nnnnne nnnnne nnnnne nnnnne nnnnne nnnnne nnnnne nnnnne nnnnne nnnnne nnnnne nnnnne nnnee nnnnne nnnnne nnnnne nnnnne nnnnne nnnnne nnnnne nnnnne nnnnne nnnnne nnnnne nnnnne nnnnne nnnnne nnnnne nnnnne nnnnne nnnnne nnnnne nnnnne nnnnne nnnnne nnnnne nnnnne nnnnnee nannnee
(ngnnnneepnneepnneepnneepnneepnneepnneepnneepnneepnneepnneepnneepnneepnneepnneepnneepnneepnneepnneepnneepnneepnneepnneepnneepnneepnneepnneepnneepnneepnneep
O!M,|D DZZeJNCS
aee
O
0
N
(1) b : NaOH + HCl2OH = NaCH3OH (序: N 、
Nnnnne nnnnne
:OHHDReVd471
P
aee aee eaeessssaae ooe aee
oos un pnnn nnnnne nnnnne nnnnne nnnnne nnnnne nnnnne nnnnne nnnnne nnnnne nnnnne nnnnne nnnnne nnnnne nnnnne nnnnne nnnnne nnnnne nnnnne nnnnne nnnnne nnnnne nnnnne nnnnne nnnnne nnnnne nnnnnee
:VIZNVQ
e e e e e e e e e e e e e e e e e e e e e e e e e e
Dunnns npnnnnnnnnaaannnnd o nssaa
6051:os9p 2
(1) _i = 1^n1i! (2) _i = 1^n1i + 1 (3) _i = 1^n1i + 2
:
1UUU
(27/6/2002)
103/967/00021SH-4
(006) 111
% 99% 02
0S+D0S+
061%0L
0
eepnepnupBo ns aepnepdipipipipipipipipipipipipipipipipipipipipipipipipipipipipipipipipipipipipipipipipipipipipipipipipipipipipipipipipipipipipipipipipipipipipipipipipipipip
00
0
60E6-wwg8x091x0
(1)
srl 02E 091
ZH001D L
0001PQq-uuO/PQ
(1)
1wwBoid
oaiipipipipipipipipipipipipipipipipipipipipipipipipipipipipipipipipipipipipipipipipipipipipipipipipipipipipipipipipipipipipipipipipipipipipipipipipipipipipipipipipipipipipipipipipipipipipipipipipipipipip
sopoeepoeepoeepoeepoeepoeepoeepoeepoeepoeepoeepoeepoeepoeepoeepoeepoeepoeepoeepoeepoeepoeepoeepoeepoeepoeepoeepoeepoeepoeepoeepoeepoeepoeepoeepoeepoeepoeepoeepoeepoeepoeepoeepoeepoeepoeepoeepoeepoe
(10016p4dV-1104) so nnnn 2 cndr dse A oos eonps onp sopep so epund p cooepoeaed aon oon oon soeep enn opeoed enb oodos je aeaeepoee eoee
Apog uOIOINIOAe I OIBd /q
NnONNNNNNNNNNNNNNNNNNNNNNNNNNNNNNNNNNNNNNNNNNNNNNNNNNNNNNNNNNNNNNNNNNNNNNNNNNNNNNNNNNNNNNNNNNNNNNNNNNNNNNNNNNN
n 10000000000000000000000000000000000000000000000000000000000000000000000000000000
#
__________
(13 13 13 13 13 13 13 13 13 13 13 13 13 13 13 13 13 13 13 13 13 13 13
:eposnueeoeae n eoloseoeped
03dWbD 536N00000000
a aae aee aee e ae aee aee aee aee aee aee aee aee aee aee aee aee aee aee aee aee aee aee aee aee aee aee aee aee aee aee aee aee aee aee aee aee aee
Prrnnnne nnnnne eannnnnne ennnnne ennnnne ennnnne ennnnne ennnnne ennnnne ennnnne ennnnne ennnnne ennnnne ennnnne ennnnne ennnnne ennnnne ennnnne ennnnne ennnnne ennnnne ennnnne ennnnne ennnnne ennnnne ennnnne ennnnne ennnnne
: SINODDAEONWDO
Prrnnnne nnnnne eannnnnne ennnnne ennnnne ennnnne ennnnne ennnnne ennnnne ennnnne ennnnne ennnnne ennnnne ennnnne ennnnne ennnnne ennnnne ennnnne ennnnne ennnnne ennnnne ennnnne ennnnne ennnnne ennnnne ennnnne ennnnne ennnnne
: SINODDAEONWDO

#
#
a a a a a a a a a a a a a a a a a a a a a a a a a a a a a a a a a a a a a a a a a a a a a a a a a a
m = 311
#
一
力
#
12 =
#
Isod
1
103
UaT
102
D 10
op
#
Dun
#
so
010
101
sdu
U
#
0Z
IDC
snu
#
01
ID5
iqu
16
[3]
2016
bit
bu
su
34
blue
bpu
05
uə
un
图 2
us!
! DI
uos
D
1 + u1 - 1 = ( 1 + u) u1 < 1 = u
1
#
#
#
46.
山
51
#
103
#
A
156
u9
1
0
3。
D
+
SV
。
10/12
1 + u7 = 70%
m = 311


C
…
#
…
12/12
.
#
m = 311
13/14
#
V
#
1
1
10d
#
equation
p S
43
61
OK
ou
ad
pan
ua
us
ap
an
[04]
!u!
DD
qu
op0
5
1


1
1
lan
D3
so
121
#
[Tab]
/ln
1
m = 311
m = 311
m = 311 ;
1
1
m = 311
13/14
.
#
#
.
#
.
13/14
#
V
#
1
1
d
10
OZD
#
ps
4a
[6]
OK
u
d c
an
uə
0S
#
#
41
Usc
#
qu
op0
5
1
Vznnn 3d sorsns
Z
一
#
5
#

Oz: 0eBn

∠0 9d
000000000000000000000000000000000000000000000000
ssu


so 9d
mnnnne nnnnne nnnnne nnnnne nnnnne nnnnne nnnnne nnnnne nnnnne nnnnne nnnnne nnnnne nnnnne nnnnne nnnnne nnnnne nnnnne nnnnne nnnnne nnnnne nnnnne nnnnne nnnnne nnnnne nnnnne nnnnne
: BuHua

02:00:00
m = 311
Paae aae aee aee aee aee aee aee aee aee
H
e
eeppeeppeeppeeppeeppeeppeeppeeppeeppeeppeeppeeppeeppeeppeeppeeppeeppeeppeeppeeppeeppeeppeeppe
eessss
A08 NOIANTOANes TnJIINVAE B08
InnneJeede eae
Rnne nnnnne nee nee nee nee nee nee nee nee nee nee nee nee nee nee nee nee nee nee nee nee nee nee nee nee nee nee nee nee nee nee nee nee nee nee nee nee nee nee nee nee nee nee nee nee nee nee nee nee nee nee neee
:
AD = AC = 1 = x,y
[ \Rightarrow \;{3}^{x} = - 2 + 2\sqrt{2}]
( x - 2x) t - xy^2 = ( x - 2x) f^ t
( x - 2x) t - xy^2 = ( x - 2x) f^ t
( x - 2x) t - xy^2 = ( x - 2x) f^ t
( x - 2x) t - xy^2 = ( x - 2x) f^ t
( x - 2x) t - xy^2 = ( x - 2x) f^ t
1 + 2( 1 + u) u1 - ( 1 + u) ^2 + 1 + 21 T =
( x - 2x) t - xy^2 = ( x - 2x) f^ t
m = 311 ;
: wD.
1,2,3 1,3,4 2,3,4 3,4 4,5
( x - 2x) t - xy^2 = ( x - 2x) f^ t
2 : x^ ( x) = 10 , x^ = - 4.
( x - 2x) t - xy^2 = ( x - 2x) f^ t
( x - 2x) t - xy^2 = ( x - 2x) f^ t
( x - 2x) t - xy^2 = ( x - 2x) f^ t
:U40
In a
an en
m - 1 0 ;
12x - 1 > 0 ②
( x - 1) ( x + 3) = 0
m - 1 0 ;
:
V88
Paaee
m - 1 0 ;
L-10909N3:1e4e4d4
01OSI:Repee
2/01016/110051
12 : 20 月 19/1 05/1
m = 311 ;
eeppeee eeppeee
10
qnnnne nnnnne nnnnne nnnnne nnnnne
(6)
e/burduuses|pupcog
P
nne nnnnne
(1)
B
a
e
P
e e
H
1,2,3 : a1 = 12,b1 = 32,c_1 = - 12
P
6
12 : 13
A
aee
1 + u1 - 1 s = 1 + u1 - 1 s =
eeppeeppeeppeeppeeppeeppeeppeeppeeppeeppeeppeeppeeppeeppeeppeeppeeppeeppeeppeeppeeppeeppeeppeeppeeppeeppeeppeeppeeppeeppeeppeeppeeppeeppeeppe
Jenneseep
m : x = 1 或 3x + 4y + 1 = 0
Sueyey
e
A
( x - 1) ( x + 3) = 0
:1314d4d4

09N3
E
100
07892
epuep
1
12 =
12 =
Jep
Aups
epoxy
一
一
一
一
12
Jepo
6upw
一
12 =
eep
12 =
A
12
180^
一
4n 6
12
10116
180^
5 - 12 = 2
一
71

01-2-1090
77
3
13/14
17/86 0
12x - 1 > 0
12x - 1 > 0
12 =
yeon
C.
uobus
10 : 1 + 2 = 90^
1
31 + u + 4q = 1 + u + uq dH
31 + u + 4q = 1 + u + uq dH
- ba + b = - dc + d
e
1
12 =
IOX AND DE
m = 311 ;
JoBodjeA
13/14
12x - 1 > 0
12x - 1 > 0
31 + u + 4q = 1 + u + uq dH
X
法
(1)
12x - 1 > 0
- ba + b = - dc + d
A
09 8ed : L0/IT/ZI 60L XDOBTOA/IJINWBEe

innejede eaeosag
A008 NOLLNTOAE nes 7nlllVaB A008
09 96 2ε 2(0) εε +
DODNS WOSN


209d
02:00
A
e e
Dzpaouny nndn Dnwnesu! 11111111111111
e
200d nnnnBnD eD nnnnnn Dnss
ISdEeB Ee TnVdAe
DdNnne nnnnne
eppeeppeeppeeppeeppeeppeeppeeppeeppeeppeeppeeppeeppeeppeeppeeppeeppeeppeeppeeppeeppeeppeeppeeppeeppeeppeeppeeppeeppeeppeeppeeppeeppeeppeeppeeppe
eannnnnne nnnnne
Dzoeonun un nneosop npnueed duuA- Dc
__________

Boides
02:00

209d
e e

90 9d
e
50 9d
1
e e e e e e e e e e e e e e e e e e e e e e
Babal
Babal
B
B
e
Babal
eep
eep
eep
eep
eep
eep
eep
eep
eep
eep
eep
eep
eep
Reerree
Reerree
Reerree
Reerree
Reerree
Reerree
Reerree
Reerree
Reerree
Prrnne nnnnne nee eaeene ene eee
50 9d
50 9d
50 9d
50 9d
50 9d
50 9d
00
P 50 9d
P 50 9d
00
P 50 9d
P 50 9d
P 50 9d
P 50 9d
P 50 9d
50 9d
50 9d
50 9d
50 9d
50 9d
50 9d
50 9d
50 9d
50 9d
50 9d
Reerree
50 9d
50 9d

P 1

Wn nnnnne nnnnne nnnnne nnnnne nnnnne nnnnne nnnnne nnnnne nnnnne nnnnne nnnnne nnnnne nnnnne nnnnne nnnnne nnnnne nnnnne nnnnne nnnnne nnnnne nnnnne nnnnne nnnnne nnnnne nnnnne nnnnnee nnnnne nnnnne nnnnne nnnnne nnnnne nnnnne nnnnne nnnnne nnnnne nnnnne nnnnne nnnnne nnnnne nnnnne nnnnne nnnnne nnnnne nnnnne nnnnne nnnnne nnnnne nnnnne nnnnne nnnnne nnnn ne

00 00 00 00 00 00 00 00 00 00 00 00 00 00 00 00 00 00 00 00 00 00 00 00 00 00 00 00 00

02

a#d
aeweJ6oJd
INNTNNTNNNTNNNTNNNTNNNTNNNTNNNTNNNTNNNTNNNTNNNTNNNTNNNTNNNTNNNTNNNTNNNTNNNTNNNTNNNTNNNTNNNTNNNTNNNTNNNTNNNTNNNTNNNTNNNTNNNTNNNTNNNTNNNTNNNTNNNTNNNTNNNTNNNTNNNTNNNTNNNTNNNTNNNTNNNTNNNTNNNTNNNTNNNTNNNTNNNTNNNT


I. INSERAREA BATERIILOR
II. PORNIREA APARATULUI
A / PREZENTAREA APARATULUIarat este in conformitate cu toate normele in vigoare"amurim" a feste nilificanthe are imortune
Infertata "om masina" a fost simplificata la maxim, est realizat cu pictograme luminoase, butoane de fonctionare *P". Pictograma retra-luminosa sa via indica programul ales. Doua retele (1 pe canal) vor indica 30 nivele de putere
Boud Telle (1 pe canai) vor Indica 30 hivele de puiere Aveti 6 butoane de comanda (schema pag 7): - 1 buton pornit / oprit 己 - apasare scurta
- 1 buton porth / ophri O - apasare scurd
- 1 buton "P" pentru alegerea programului - apasare scurtu
- 2 double butege "I" / "I" - pentu siuutegae rutei stimuli
IINNNNNEAENNNNNNNNNNNNN
epoowonnnspspspspspspspspspspspspspspspspspspspspspspspspspspspspspspspspspspspspspspspspspspspspspspspspspspspspspspspspspspspspspsps

IINNNNNEENNNNNNNNNNNNNNNNNNNNNNN
e 10000000000000000000000000000000000000000000000000000000000000000000000000
#
n n n n n n n n n n n n n n n n n n n n n n n n n n n n n n n n n n n n n n n n n n n n n n n n n n
eep eep eep eep eep eep eep eep eep eep eep eep eep eep eep eep eep eep eep eep eep eep eep eep eep eep eep eep eep eep eep eep eep eep ecp eep eep eep eep eep eep eep eep eep eep eep eep eep eep eep eep eep eep
nnnnnnnnnnnnnnnnnnnnnnnnnnnnnnnnnnnnnnnnnnnnnnnnnnnnnnnnnnnnnnnnnnnnnnnnnnnnnnnnnnnnnnnnnnnnnnnnnnnnnnnnnnnnnnnnnnnnnnnnnnnnnnnnnnnnnnnnnnnnnnnnnnnnnn nn nannn nannn nannn nannn nannn nannn nannn nannn nannn nannn nannn nannn nannn nannn nannn nannn nannn nannn nannn nannn nannn nannn nannn nannn nannn nannn nannn nannn nannn nannn nannn nannn nannn nannn
e e e e e e e e e e e e e e e e e e e e e e e e e e e e e e e e e ee
#

EINHHEIIEIIEIIEIIEIIEIIE
e e e e e e e e e e e e e e e e e e e e e e e e e e e e e e e e e e e e e e e e e e e e e ee
Cnrrnnnne nnnnnnne nnnnnnne nnnnnnne nnnnnnne nnnnnnne nnnnnnne nnnnnnne nnnnnnne nnnnnnne nnnnnnne nnnnnnne nnnnnnne nnnnnnne nnnnnnne nnnnnnne nnnnnnne nnnnnnne nnnnnnne nnnnnnne nnnnnnne nannnne nannnne nannnne nannnne nannnne nannnne nannnne nannnne nannnne nannnne nannnne nannnne nannnne nannnne nannnne nannnne nannnne nannnne nannnne nannnne nannnne nannnne nannnne nannnne nannnne nennnee
| CONNECTIONS | |
| 1) C2 | C3 |
| (0E/96/2002) SHS | JEREBBOOENDSDNPSRNEAENPENPAENPENPAENPAENPAENPAENPAENPAENPAENPAENPAENPAENPAENPAENPAENPAENPAENPAENPAENPAENPAENPAENPAENPAENPAENPAENPAENPAENPAENPAENPAENPAENPAENPAENPAENPAENPAENPAENPAENPAENPAENPAENPAENPAENPAENPAENPAENPAENPAENPAENPAENPAENPCONHOO |
| C57H50 | |
| %06 M %01 | |
| %06 + M %05 | |
| %06 + M %00 | |
| # | |


02:00:00 00:00:00

0000 0000
opuaunw
sloopns
sloopns
suojopns
sloops
SHIOOPNS
L D O E /Dipdop d Hnnnepd D: - O E L /Dipdop d Dnneepd : +
L D O E / Dnueoepd Dnueepd Dnueepd : - O E D L / Dnueoepd Dnueepd Dnueepd : +
(1)
[\text{解得}A \cup B = A]
m - 1 0 ;
spsdopd
pspaaed appe
L D O E / Dnueoepd Dnueepd Dnueepd : - O E D L / Dnueoepd Dnueepd Dnueepd : +
u02:op5pa
Ooepoeepoeepoeepoeepoeepoeepoeepoeepoeepoeepoeepoeepoeepoeepoeepoeepoeepoeepoeepoeepoeepoeepoeepoeepoeepoeepoeepoeepoeepoeepoeepoeepoeepoeepoeepoeepoeepoeepoeepoeepoe
20d DnDnDnOe Oos Ooos Oosn Oosn
(essssssssssssssssssssssssssssssssssssssssssssssssssssssssssssssssssssssssssssssssss
E E E E E E E E E E E E E E E E E E E E E E E E E E E E E E E E E
Oo
oepoeepoeepoeepoeepoeepoeepoeepoeepoeepoeepoeepoeepoeepoeepoeepoeepoeepoeepoeepoeepoeepoeepoeepoeepoeepoeepoeepoeepoeepoeepoeepoeepoeepoeepoeepoeepoeepoeepoeepoeepoeepoeepoeepoe
sopoeepoeepoeepoeepoeepoeepoeepoeepoeepoeepoeepoeepoeepoeepoeepoeepoeepoeepoeepoeepoeepoeepoeepoeepoeepoeepoeepoeepoeepoeepoeepoeepoeepoeepoeepoeepoeepoeepoeepoeepoeepoeepoeepoeepoeepoeepoe
sopoeepoepoeepoeepoeepoeepoeepoeepoeepoeepoeepoeepoeepoeepoeepoeepoeepoeepoeepoeepoeepoeepoeepoeepoeepoeepoeepoeepoeepoeepoeepoeepoeepoeepoeepoeepoeepoeepoeepoeepoeepoeepoeepoeepoeepoeepoeepoeepoe
(9 du6d - ofo) :
oogobg!eepsoqfo- 2 soqocpa-d -
OONNNEA
nns nnnnne nnnnne nnnnne nnnnne nnnnne nnnnne nnnnne nnnnne nnnnne nnnnne nnnnne nnnnne nnnnne nnnnne nnnnne nnnnne nnnnne nnnnne nnnnne nnnnne nnnnne nnnnne nnnnne nnnnne nnnnne nnnnnee
DpOeepoepoeepoeepoeepoeepoeepoeepoeepoeepoeepoeepoeepoeepoeepoeepoeepoeepoeepoeepoeepoeepoeepoeepoeepoeepoeepoeepoeepoeepoeepoeepoeepoeepoeepoeepoeepoeepoeepoeepoeepoeepoeepoeepoeepoeepoeepoeepoeepoeepoeepoeepoepoepoepoepoepoepoepoepoepoepoepoepoepoepoepoepoepoepoepoepoepoepoepoepoepoepo
Apogonone ybd /q
35N4E-1D10B8H190B02Z5Z-0000[6n]
op aepes oepnepnepnepnepnepnepnepnepnepnepnepnepnepnepnepnepnepnepnepnepnepnepnepnepnepnepnepnepnepnepnepnepnepnepnepnepnepnepnepnepnepnepnepnepnepnepnepnepnepnepnppepnppepnppepnppepnppepnppepnppepnppepnppepnppepnppepnppepnppepnppepnppepnppepnppe
001+ 005+006+007+008+009+010+011+012+013+014+015+016+017+018+019+020+021+022+023+024+025+026+027+028+029+030+031+032+033+034+035+036+037+038+039+040+041+042+043+044+045+046+047+048+049+050+
(10000000000000000000000000000000000000000000000000000000000000000000000000000
nnpnnnne nne nne nne nne nne nne nne nne nne nne nne nne nne nne nne nne nne nne nne nne nne nne nne nne nne nne nne nne nne nne nne nne nne nne nne nne nne nne nne nne nne nne nne nne nne nne nne nne nne nne
nne nnnnne nee eae ene nee nee nee nee nee nee nee nee nee nee nee nee nee nee nee nee nee nee nee nee nee nee nee nee nee nee nee nee nee nee nee nee nee nee nee nee nee nee nee nee nee nee nee nee nee nee nee nee nee nee
oepoeepoeepoeepoeepoeepoeepoeepoeepoeepoeepoeepoeepoeepoeepoeepoeepoeepoeepoeepoeepoeepoeepoeepoeepoeepoeepoeepoeepoeepoeepoeepoeepoeepoeepoeepoeepoeepoeepoeepoeepoeepoeepoeepoeepoeepoeepoeepoeepoeepoeepoee
sbsbssb spsbsspsbpsbpsbpsbpsbpsbpsbpsbpsbpsbpsbpsbpsbpsbpsbpsbpsbpsbpsbpsbpsbpsbpsbpsbpsbpsbpsbpsbpsbpsbpsbpsbpsbpsbpsbpsbpsbpsbpsbpsbpsbpsbpsbpsbpsbpsbpsbpsbpsbpsbps

m - 1 0 ;
Pnnnnne nnnnne nnnnne nnnnne nnnnne nnnnne nnnnne nnnnne nnnnne nnnnne nnnnne nnnnne nnnnne nnnnne nnnnne nnnnne nnnnne nnnnne nnnnne nnnnne nnnnne nnnnne nnnnne nnnnne nnnnne nnnnne
02:innpsip
02:innpspl!
09 09 96 2ε 2(0) εε +
DODNS WOSN
n n nn nnnn nnnnnnnnnnnnnnnnnnnnnnnnnnnnnnnnnnnnnnnnnnnnnnnnnnnnnnnnnnnnnnnnnnnnnnnnnnnnnnnnnnnnnnnnnnnnnnnnnnnnnnnnnnnnnnnnnnnnnnnnnnnnnnnnnnn
eepn eepn eneepn eneepn eneepn eneepn eneepn eneepn eneepn eneepn eneepn eneepn eneepn eneepn eneepn eneepn eneepn eneepn eneepn eneepn eneepn eneepn eneepn eneepn eneepn eneepn eneepn en
e 8


-28
1 1 1 1 1 1 1 1 1 1 1 1 1 1 1 1 1 1 1 1 1 1 1 1 1 1 1 1 1 1 1 1 1
Innnnneeppeeppeeppeep
eepnepnepnepnepnepnepnepnepnepnepnepnepnepnepnepnepnepnepnepnepnepnepnepnepnepnepnepnepnepnepnepnepnepnepnepnepnepnepnepnepnepnepnepnepnepnepnepnepnepnep
( 4 2 3 4 5 6 7 8 9 0 1 2 3 4 5 6 7 8 9 0 1 2 3 4 5 6 7 8 9 0 1 2 3 4 5 6 7 8 9 0 1 2 3 4 5 6 7 8 9 0 1 2 3 4 5 6 7 8 9


eeppeeppeeppeeppeeppeeppeeppeeppeeppeeppeeppeeppeeppeeppeeppeeppeeppeeppeeppeeppeeppeeppeeppeeppeeppeeppeeppeeppeeppeeppeeppeeppeeppeeppeeppeeppeeppeeppe
oeonnnnne ennnnne nnnnne nee eee nnnnne ennnnne ennnnne ennnnne ennnnne ennnnne ennnnne ennnnne ennnnne ennnnne ennnnne ennnnne ennnnne ennnnne ennnnne ennnnne ennnnne ennnnne ennnnne ennnnne ennnnne ennnnne ennnnne ennnnne ennnnne ennnnne
eeppeeppeeppeeppeeppeeppeeppeeppeeppeeppeeppeeppeeppeeppeeppeeppeeppeeppeeppeeppeeppeeppeeppeeppeeppeeppeeppeeppeeppeeppeeppeeppeeppeeppeeppeeppe
(5)eppeeppeeppeeppeeppeeppeeppeeppeeppeeppeeppeeppeeppeeppeeppeeppeeppeeppeeppeeppeeppeeppeeppeeppeeppeeppeeppeeppeeppeeppeeppeeppeeppeeppeeppeeppeeppeeppeeppeeppeeppeeppeeppe
eeppeeppeeppeeppeeppeeppeeppeeppeeppeeppeeppeeppeeppeeppeeppeeppeeppeeppeeppeeppeeppeeppeeppeeppeeppeeppeeppeeppeeppeeppeeppeeppeeppeeppeeppeeppeeppeeppeeppeeppeeppeeppeeppe
eep 202
- 2 [ ] - 1 [ ] - 1 [ ]
eepnne eepnne eepnne eepnne eepnne eepnne eepnne eepnne eepnne eepnne eepnne eepnne eepnne eepnne eepnne eepnne eepnne eepnne eepnne eepnne eepnne eepnne eepnne eepnne eepnne eepnne
[ \text{等} = \text{O}^{\prime} \text{等} \text{等} = \text{I}^{\prime} \text{等} \text{等} = \text{O} : u \text{等} \text{等} \text{等} \text{等} \text{等} \text{等} \text{等} \text{等} \text{等} \text{等} \text{等} \text{等} \text{等} \text{等} \text{等} \text{等} \text{等} \text{等} \text{等} \text{等} \text{等}]
| 100% | |
| 100% | |
| 100% | |
| 100% | |
| 100% | |
| 100% | |
| 100% | |
| 100% | |
| 100% | |
| 100% | |
| 100% | |
| 100% | |
| 100% | |
| 10% | |
| 20% | |
| 30% | |
| 40% | |
| 50% | |
| 60% | |
| 70% | |
| 80% | |
| 90% | |
| 100% |
NENNNNEHOSINH
Q nzsI Rn du eae Ieepie Ieepie Ieepie Ieepie Ieepie Ieepie Ieepie Ieepie Ieepie Ieepie Ieepie Ieepie Ieepie Ieepie Ieepie Ieepie Ieepie Ieepie Ieepie Ieepie Ieepie Ieepie Ieepie Ieepie Ieepie Ieep ie 100000000000000000000000000000000000000000000000000000000000000000000000000000
NO / NO - 245
' ( ) '
( L uonu uunu bzpi) blbui iuzkssm uomzdo pmp , uumn, bs eep qeep .
' ( L uonu uunu bzpi) blbui iuzkssm aozozdo wood dp , uqis, bs eep qeep .
' ( L uonu uunu bzpi) blbui iuzkssm uoepdz bs eep qeep .
e 2 d13
'qz000000000000000000000000000000000000000000000000000000000000000000000000000000000000
eoooepo - 1 dAEL
Rnrrnnr / 8
R 1 1 1 1 1 1 1 1 1 1 1 1 1 1 1 1 1 1 1 1 1 1 1 1 1 1 1 1 1 1 1 1 1 1 1 1 1 1 1 1 1 1 1 1 1 1 1 1 1
VINEZADZHN SIO / V
11
I

-26
ndzoz boowod dz leisqso Auzieq op qn Dnqn knd np 0eEETRkOds Pocdoepd zsezoe W
' (a hzz z! dzzs L aomozoycnoed wod Z- dzzs L) eazm E nolzopz O yAonoozoyo zw L
100000p o mopomzizid E kzbim z z eis oBocbliprks npomzizid boowod dz poxpei epo enoobocbipod sse! oKxoepepd
(S duosg - Al ePpz) dppd moopomzizd op Axpoeeze zo
Apoepnepnnpn (9 duosg - A aolpz) : poaekoe duouss .
Adzduu oM - 8 Apomazid ou eaeozseoiopd - 2 omokpsrpeiddz - L (9 duosv - A aolpz) : pozid
nns nnnn nn nnnn nn nnnn nn nnnn nn nnnn nn nnnn nn nnnn nn nnnn nn nnnn nn nnnn nn nnnn nn nnnn nn nnnn nn nnnn nn nnnn nn nnnn nn nnnn nn nnnn nn nnnn nn nnnn nn nnnn nn nnnn nn nnnn nn nnnn nn nnnn nn nnnn
mzssn z bIbnk nq n'wocoeoedssmmopbp 05-05962828E00nnnneepnnpnepnnpnepnnpnepnnpnepnnpnepnepnepnepnepnepnepnepnepnepnepnepnepnepnepnepnepnepnepnepnepnepnepnepnepnepnepnepnepnepnepnepnepnepnepnepnepnepnepnepnepnepnepnepnepnepnepnepnepnepn
1 1 1 1 1 1 1 1 1 1 1 1 1 1 1 1 1 1 1 1 1 1 1 1 1 1 1 1 1 1 1 1 1 1 1 1 1 1 1 1 1 1 1 1 1 1 1 1 1 1 1
(1)
RRERRRRRRRRRRRRRRRRRRRRRRRRRRRRRRRRRRRRRRRRRRRRRRRRRRRRRRRRRRRRRRRRRRRRRRRRRRRRRRRRRRRRRRRRRRRRRRRRRRRRRRRRRRRRRRRRRRRRRRRRRRRRRRRRRRRRRRRRRRRRRRRRRRRRRRRRRRRRRRRRRRRRRRRRRRRRRRRRRRRRRRRRRRRRRRRRRRRRRRRR
y 1 1 1 1 1 1 1 1 1 1 1 1 1 1 1 1 1 1 1 1 1 1 1 1 1 1 1 1
0.01 + op 2.5+ po azinaprida w rostlwhu Aupdaz w mowwauadz iup oblzaoedzdo ouo du ooumoud Azapu Apocp audae Azidou
[apwipn]
1 1 1 1 1 1 1 1 1 1 1 1 1 1 1 1 1 1 1 1 1 1 1 1 1 1 1 1 1
y
a aae eae aeae aeae aeae aeae aeae aeae aeae aeae aeae aeae aeae aeae aeae aeae aeae aeae aeae aeae aeae aeae aeae aeae aeae aeae aeae aeae aeae aeae aeae aeae aeae aeae aeae aeae aeae aeae aeae aeae aeae aeae aeae aeae aeae aeae aeae aeae aeae aeae aeae aeae aaee
VINVA