
HS-100 - Headphones LENCO - Free user manual and instructions
Find the device manual for free HS-100 LENCO in PDF.


| Product Type | Portable A4 Scanner |
| Brand | LENCO |
| Model | HS-100 |
| Power Supply | 2 AA alkaline batteries (not included) |
| Image Sensor | A4 Color Contact Image Sensor |
| Resolution | Low: 300x300 dpi, High: 600x600 dpi |
| File Format | JPEG |
| Storage | MicroSD memory card (not included) up to 32 GB |
| Scanning Speed (A4) | Color High Res: 13 s, Mono High: 6 s, Color Low: 3 s, Mono Low: 2 s |
| Scanning Width | 21 cm (8.27 inches) |
| Maximum Scanning Length | 127 cm (50 inches) at 300 dpi, 63 cm (25 inches) at 600 dpi |
| Screen | Status LCD Display |
| Interface | USB 2.0 |
| System Compatibility | Windows 7/Vista/XP, Mac OS 10.4 and above |
| Auto Power Off | 3 minutes of inactivity |
| Maintenance and Cleaning | Clean the lens with a soft, dry cloth; clean the exterior with a soft cloth |
| Safety | Do not expose to humidity, extreme temperatures (<5°C or >35°C), or liquids. Remove batteries if not used for a long time. |
| Repairability | No user-serviceable parts; refer servicing to qualified personnel |
| Box Contents | Scanner, USB cable, user manual; batteries and MicroSD card not included |
Frequently Asked Questions - HS-100 LENCO
User questions about HS-100 LENCO
0 question about this device. Answer the ones you know or ask your own.
Ask a new question about this device
Download the instructions for your Headphones in PDF format for free! Find your manual HS-100 - LENCO and take your electronic device back in hand. On this page are published all the documents necessary for the use of your device. HS-100 by LENCO.
USER MANUAL HS-100 LENCO
natural_image
Technical line drawing of a rectangular electronic device casing (no text or symbols)Instruction Manual
For information and support, www.lenco.eu

CAUTION
RISK OF ELECTRIC SHOCK DO NOT OPEN

CAUTION: TO PREVENT THE RISK OF ELECTRIC SHOCK, DO NOT REMOVE COVER (OR BACK).
NO USER-SERVICEABLE PARTS INSIDE.
REFER SERVICING TO QUALIFIED SERVICE PERSONNEL.
 | This symbol indicates that dangerous voltage constituting a risk of electric shock is present within this unit. |
 | This symbol indicates that there are important operating and maintenance instructions in the literature accompanying this unit. |
CAUTION
TO ENSURE CONTINUED SAFETY DO NOT REMOVE ANY COVERS OR ATTEMPT TO GAIN ACCESS TO THE INSIDE OF THE PRODUCT.
REFER ALL SERVICING TO QUALIFIED PERSONNEL.
TO PREVENT FIRE OR SHOCK HAZARD, DO NOT EXPOSE THIS APPARATUS TO RAIN OR MOISTURE.
■ Do not install the unit in an unstable space.
■ Do not exposed the unit to where there are extremes of temperature (below 5^ C or exceeding 35^ C) or moisture.
■ Do not expose the unit to directly sunlight or heat nearby.
■ Do not place this unit in any liquid.
■ The apparatus shall not be exposed to dropping or splashing. No object filled with liquids, such as vases, shall be placed on the apparatus.
■ No naked flame sources, such as lighted candles, should be placed on the apparatus.
This product should not be adjusted or repaired by anyone except properly qualified personal when an abnormal condition or trouble happens. Please consult with the qualified service person.
■ Always remove the batteries and store in a dry place if the unit is not to be used for a long time.
■ Avoid drop down the unit and damage it.
■ Only clean the unit with a soft dry cloth.
ONLY CLEAN THE SCAN-LENS WITH THE CLEANING-CLOTH THAT IS INCLUDED IN THIS PACKAGE.
LENCO RECOMMENDS THE USE OF A-BRAND BATTERIES.
Manual
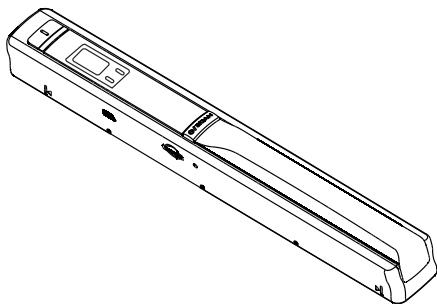
1. Key features
Color /Monochrome (Mono) scan selection
600/300 dpi scan selection
Direct save JPG file to microSD card
Support microSD card up to 32GB
Driver free to download for Windows 7 / Vista / XP and
Mac OS10.4 or above (direct plug-in, driver installation not required)
2. Functional parts
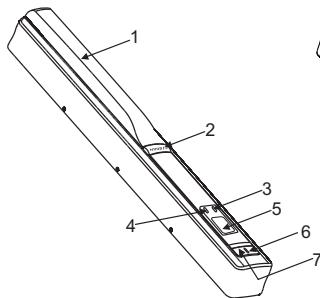
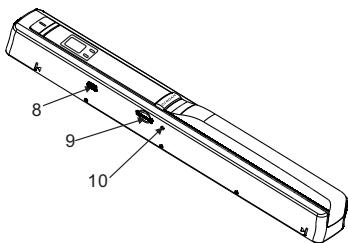
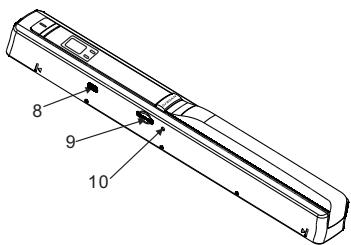
| Part | Function | |
| 1 | Battery door | For 2x AA alkaline batteries |
| 2 | Power/Scan | Power On/ Off : Press and hold this key for 2 seconds to turn power on or off. In power on mode, press this button to start scan, press this button again to stop |
| 3 | Error LED indicator | Over speed: Red LED on |
| 4 | Scan LED indicator | Ready for scan: Green LED on |
| 5 | LCD screen | Scanning status display |
| 6 | Resolution | Select High(600dpi)/Low(300dpi) resolution;High/Low resolution mode icon will be displayed on status LCD |
| 7 | C/BW | Select Color/Mono scan, Color/Mono mode icon will be displayed on status LCD |
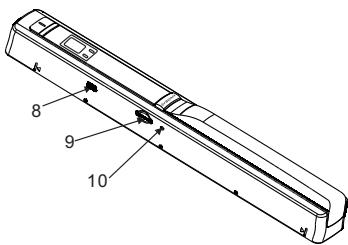
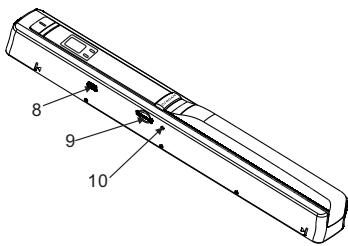
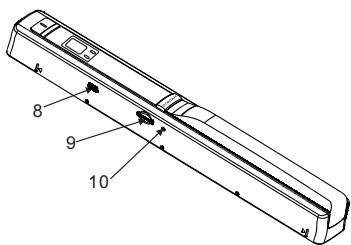
| 8 | USB interface | Download photo to a computer via USB cable provided. |
| 9 | SD card slot | MicroSD card storage location. |
| 10 | Format button | Press this button to format the microSD card. |
3. Explanation of the status icons
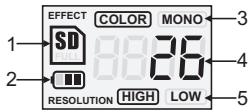
| Item | Function | Description |
| 1 | SD card indicator | Photos will be stored in microSD card |
| 2 | Battery indicator | Battery is full Empty battery |
| 3 | Effect indicator | Color or Mono |
| 4 | Counting indicator | Show scanned files in microSD card |
| 5 | Selected resolution | High:600 dpi / Low:300 dpi |
4. Using the scanner
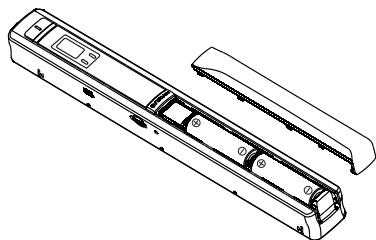
4.1 Installing the battery
- Open the battery door.
- Insert 2x AA alkaline batteries into the battery compartment.
- Turn on the scanner by pressing the [POWER] button for 2 seconds.
natural_image
Technical line drawing of a device casing with internal components and mounting holes (no text or symbols)4.2 Inserting a microSD memory card (not included)
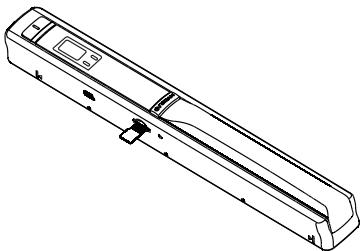
You must insert a microSD Card (not included) to record and store your pictures. Inserting the microSD memory card:
- Turn OFF the scanner.
- Insert the microSD card into the microSD card slot, gently press in until card is latched.
Note: -Do not force the card into the slot; forcing may damage scanner and the microSD memory card. Align microSD card position (as marked) and try again.
- The microSD memory card must be formatted before scanning.
See the following instruction.
natural_image
Line drawing of a rectangular electronic device with a control panel and indicator lights (no text or symbols)4.3 Formatting the microSD memory card
- Insert a new microSD card into the scanner, then turn on the scanner.
- Press the format button into format mode. "F" shows on the LCD.
- Press the Power/Scan button to start formatting the microSD card.
- SD card indicator will blink until format is complete.
4.4 Setting the resolution
Press the [DPI] button to select High/Low resolution. High/Low resolution icon will be displayed on status LCD.
4.5 Setting the scan mode
Press the [C/BW] button to select Color/Mono mode. Color/Mono icon will be displayed on status LCD.
4.6 How to scan
Hold the document firmly by one hand. Place the scanner on the start-scanning position. Hold the scanner tight and press the scan button once. Slide the scanner slowly and keep your hand stable to get the best quality picture. Press again to stop scanning.

natural_image
Close-up of hands using a power tool to write on paper (no visible text or symbols)
natural_image
Hand holding a black electronic device with a circular logo containing the word 'OK' (no readable text or symbols on device)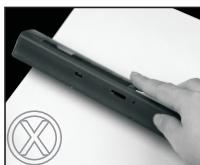
natural_image
Hand holding a smartphone with a circular logo nearby (no readable text or symbols)Please note: * The maximal scan speed, see specifications. * When a scan is of bad quality re-calibrate the white balance.
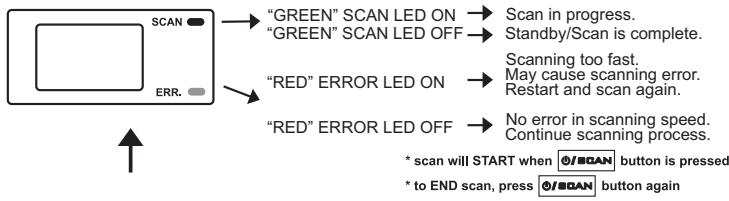
5. LED light indications
flowchart
graph TD
    A["SCAN"] --> B[""GREEN" SCAN LED ON"]
    B --> C[""GREEN" SCAN LED OFF"]
    C --> D[""RED" ERROR LED ON"]
    D --> E[""RED" ERROR LED OFF"]
    E --> F[""Scan in progress. Standby/Scan is complete. Scanning too fast. May cause scanning error. Restart and scan again. No error in scanning speed. Continue scanning process. * scan will START when @/SCAN button is pressed * to END scan, press @/SCAN button again"]
6. Connect to computer
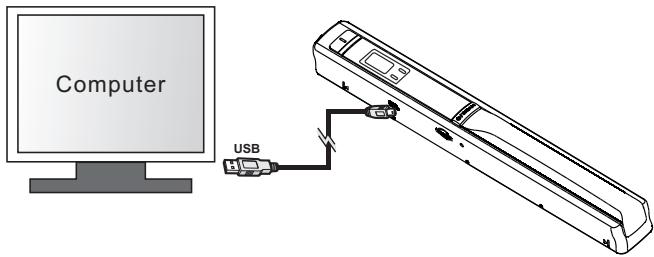
Turn on the device. Connect it to your computer as displayed in below picture and follow the instructions on your monitor.
7. Specification
| Image sensor | A4 Color Contact Image Sensor | |
| Number of sensor | 5136 dots(1st~5104 dots available) | |
| Resolution | Low resolution : 300x300 dpi(default)High resolution: 600x600 dpi | |
| Maximum scanning speed for A4 size document | Color High resolutionMono High resolutionColor Low resolutionMono Low resolution | 13 Seconds6.0 Seconds3.0 Seconds2.0 Seconds |
| Capacity (Based on 1GB microSD card. Scan A4 size file, the quantity of scans varies depending on the content complexity) | 600dpi color | 220 Photos(Min.) |
| 600dpi mono | 290 Photos(Min.) | |
| 300dpi color | 780 Photos(Min.) | |
| 300dpi mono | 1280 Photos(Min.) | |
| Scan width | 21cm (8.27") | |
| Scan length | 300DPI : 127cm (50") (Max), 600DPI : 63cm (25") (Max) | |
| File format | JPEG | |
| LCD | Scanning status display | |
| Auto Power Off | 3 Minutes | |
| USB Port | USB 2.0 high speed | |
| External memory | microSD Card (not included) | |
| Standard Battery | 2XAA alkaline batteries | |
8. Computer system minimum requirement
| Operating system | Windows 7 / Vista / XP and Mac OS 10.4 or above (direct plug-in, driver installation not required) |
| CPU | Pentium II or above |
| RAM | 64MB |
| Interface | USB port |
9. Troubleshooting
| Problem | Cause | Solution |
| Cannot turn on the scanner | 1. Low battery power2. Battery not inserted properly | Replace or install the battery correctly |
| Pictures cannot be saved when you are scanning them | 1. MicroSD card has not been installed2. Memory is full3. The microSD card has not been formatted properly | 1. Install microSD card2. Download the pictures from the scanner to the computer to create storage space3. Please refer to section 4.3 |
| Computer does not recognize your scanner when connected. (You cannot find removable disk) | Connection failure | Make sure all cable connections are secured. Restart the computer if necessary |
| The battery life is very short | Use wrong type of battery | Replace with new A-Brand 2x AA alkaline batteries |
| Blurry images | The lens of scanner is dirty | Clean the lens with soft dry cloth |
| ERR. LED is on when scanning a document | Scanning speed is too fast | Press the Power/Scan button to reset and scan again the document |
10.ABBYY® Screenshot Reader
For help with OCR software applications, please refer to the help menu in software CD.

If at any time in the future you should need to dispose of this product please note that: Waste electrical products should not be disposed of with household waste. Please recycle where facilities exist. Check with your Local Authority or retailer for recycling advice. (Waste Electrical and Electronic Equipment Directive)
Lenco
HANDY SCANNER
HS-100
natural_image
Technical line drawing of a rectangular electronic device casing with mounting holes and internal components (no text or symbols)RISQUE D'ELECTROCUTION NE PAS OUVRIR

natural_image
Technical line drawing of a mechanical device with internal components and mounting holes (no text or symbols)natural_image
Technical line drawing of a rectangular electronic device with internal components and mounting holes (no text or symbols)natural_image
Close-up of hands using a power tool to write on paper (no visible text or symbols)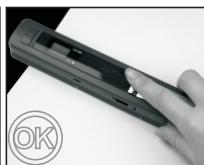
natural_image
Hand holding a black electronic device with a circular 'OK' logo nearby (no text or symbols on device)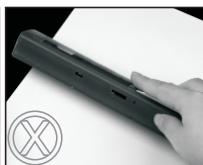
natural_image
Hand holding a smartphone with a circular logo nearby (no readable text or symbols)7. Spécification
natural_image
Technical line drawing of a rectangular electronic device casing (no text or symbols)Handleiding
natural_image
Technical line drawing of a device casing with internal components and mounting holes (no text or symbols)natural_image
Line drawing of a rectangular electronic device with a control panel and indicator lights (no text or symbols)4.3 De microSD-geheugenkaart formatteren
natural_image
Close-up of hands using a pen on paper (no visible text or symbols)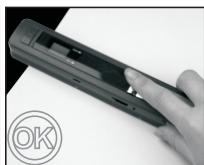
natural_image
Hand holding a black electronic device with a circular logo (no readable text or symbols)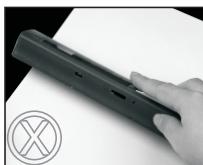
natural_image
Hand holding a smartphone on a white surface, with a circular logo in the corner (no readable text or symbols)7. Specifications
natural_image
Technical line drawing of a rectangular electronic device casing (no text or symbols)
ACHTUNG
natural_image
Technical line drawing of a device casing with internal components and mounting bracket (no text or symbols)natural_image
Technical line drawing of a rectangular electronic device with internal components and mounting holes (no text or symbols)natural_image
Close-up of hands using a pen on a white sheet of paper (no visible text or symbols)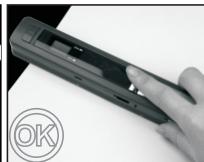
natural_image
Hand holding a black electronic device with a circular 'OK' logo nearby (no readable text or symbols on device)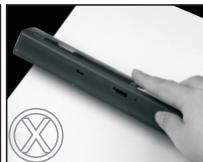
natural_image
Hand holding a smartphone with a circular logo nearby (no readable text or symbols)natural_image
Technical line drawing of a rectangular electronic device casing (no text or symbols)Manual de usuario
natural_image
Technical line drawing of a mechanical device with internal components and mounting brackets (no text or symbols)natural_image
Technical line drawing of a rectangular electronic device with internal components and mounting holes (no text or symbols)4.3 Formatear la tarjeta MicroSD
natural_image
Close-up of hands using a pen to write on paper (no visible text or symbols)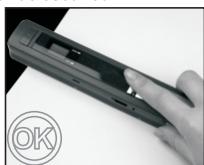
natural_image
Hand holding a black electronic device with a circular logo (no readable text or symbols)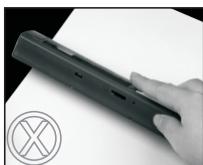
natural_image
Hand holding a smartphone with a circular logo in the corner (no visible text or symbols on device)- Especificaciones



- CAUTION
- Manual
- Key features
- Functional parts
- Explanation of the status icons
- Using the scanner
- Installing the battery
- Inserting a microSD memory card (not included)
- Formatting the microSD memory card
- Setting the resolution
- Setting the scan mode
- How to scan
- LED light indications
- Connect to computer
- Specification
- Computer system minimum requirement
- Troubleshooting
- 10.ABBYY® Screenshot Reader
- Lenco
- HANDY SCANNER
- Spécification
- Handleiding
- De microSD-geheugenkaart formatteren
- Specifications
- ACHTUNG
- Formatear la tarjeta MicroSD
Brand : LENCO
Model : HS-100
Category : Headphones