
WET610N - Wireless Network Adapter LINKSYS - Free user manual and instructions
Find the device manual for free WET610N LINKSYS in PDF.
| Product Type | Dual-Band N Wireless Bridge |
| Brand | LINKSYS |
| Model | WET610N |
| Standards | IEEE 802.3u, 802.11a/b/g/n |
| Frequency Bands | 2.4 GHz and 5 GHz |
| Maximum Theoretical Throughput | Up to 300 Mbps |
| Ports | 1 Ethernet RJ-45 port |
| Antennas | 3 internal (non-removable) |
| Wireless Security | WEP, WPA, WPA2 with up to 128-bit encryption |
| Configuration | Via web browser (user interface) |
| Main Functions | Wireless Bridge, Wi-Fi Protected Setup, MAC Filtering |
| Power Supply | 12V DC, 1A (power adapter included) |
| Dimensions (L x W x H) | 145 x 106 x 52 mm |
| Weight | 159 g |
| Operating Temperature | 0 to 40 °C |
| Operating Humidity | 10 to 85% (non-condensing) |
| Certifications | FCC, CE, Wi-Fi, WPA2, Wi-Fi Protected Setup, WMM |
| Package Contents | Bridge, power adapter, Ethernet cable, quick installation guide |
| Care and Cleaning | Clean with a soft, dry cloth. Avoid moisture and liquids. |
| Recommended Security | Change default admin password, enable WPA2 encryption, enable MAC filtering |
| Repairability | Not user-serviceable. Contact Linksys technical support. |
Frequently Asked Questions - WET610N LINKSYS
User questions about WET610N LINKSYS
0 question about this device. Answer the ones you know or ask your own.
Ask a new question about this device
Download the instructions for your Wireless Network Adapter in PDF format for free! Find your manual WET610N - LINKSYS and take your electronic device back in hand. On this page are published all the documents necessary for the use of your device. WET610N by LINKSYS.
USER MANUAL WET610N LINKSYS
Wireless Security Checklist
Change the default wireless network name or SSID 4
Change the default password 4
Enable MAC address filtering 4
Enable encryption 4
General Network Security Guidelines. 4
Additional Security Tips 5
Advanced Configuration
How to access the browser-based utility. .6
Setup > Basic Setup. 7
Language 7
Network Setup 7
Wireless > Basic Wireless Settings 7
Basic Wireless Settings 8
Wireless Security 8
Wi-Fi Protected Setup 9
Wireless > Wireless Network Site Survey. 10
Wireless Network Site Survey 10
Wireless > WMM 11
WMM 12
Wireless > Advanced Wireless Settings 13
Advanced Wireless 13
Administration > Management 14
Management 14
Administration > Factory Defaults. 15
Factory Defaults 15
Administration > Upgrade Firmware 15
Upgrade Firmware 15
Status > Bridge. 15
Bridge Information 16
Local Network 16
Status > Wireless. 16
Wireless 16
Troubleshooting
WES610N/WET610N 17
Specifications
WES610N 18
WET610N 19
Product Overview
Thank you for choosing the Linksys Dual-Band N Entertainment Bridge. The bridge can connect any wired, Ethernet device to your wireless network. The bridge is based on dual-band Wireless-N, so it is compatible with any Wireless-N, -G, -A, or -B router or access point. For first-time installation, follow the steps on the CD folder. To configure advanced settings, use the convenient, browser-based utility.
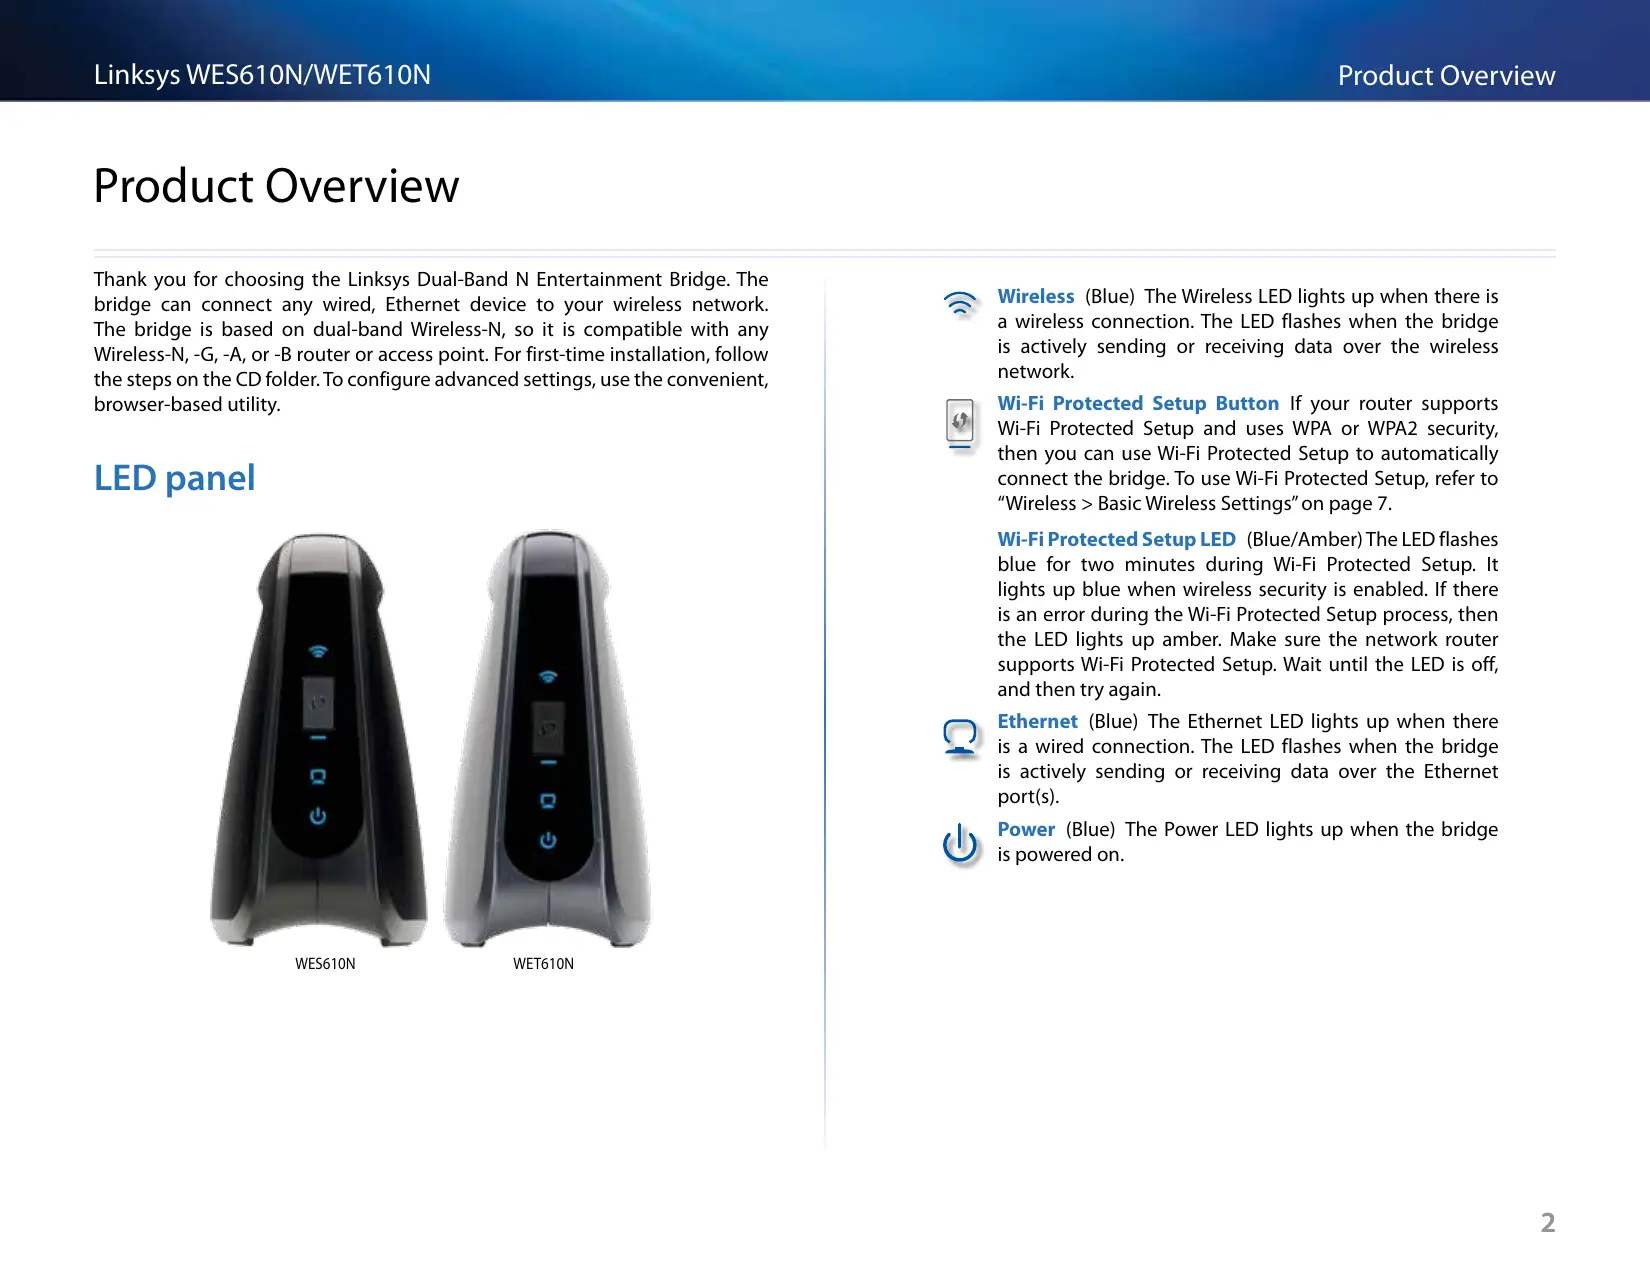
LED panel

WES610N

WET610N
Wireless (Blue) The Wireless LED lights up when there is a wireless connection. The LED flashes when the bridge is actively sending or receiving data over the wireless network.
Wi-Fi Protected Setup Button If your router supports Wi-Fi Protected Setup and uses WPA or WPA2 security, then you can use Wi-Fi Protected Setup to automatically connect the bridge. To use Wi-Fi Protected Setup, refer to "Wireless > Basic Wireless Settings" on page 7.
Wi-Fi Protected Setup LED (Blue/Amber) The LED flashes blue for two minutes during Wi-Fi Protected Setup. It lights up blue when wireless security is enabled. If there is an error during the Wi-Fi Protected Setup process, then the LED lights up amber. Make sure the network router supports Wi-Fi Protected Setup. Wait until the LED is off, and then try again.
Ethernet (Blue) The Ethernet LED lights up when there is a wired connection. The LED flashes when the bridge is actively sending or receiving data over the Ethernet port(s).
Power (Blue) The Power LED lights up when the bridge is powered on.
Ports panel
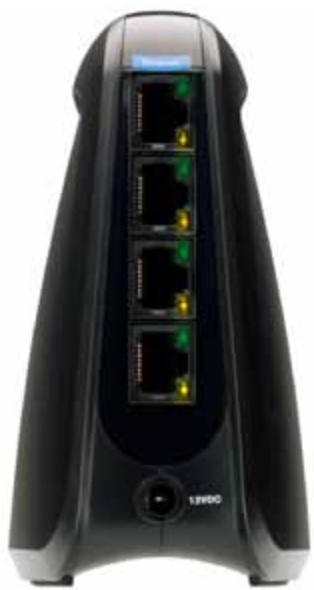
WES610N
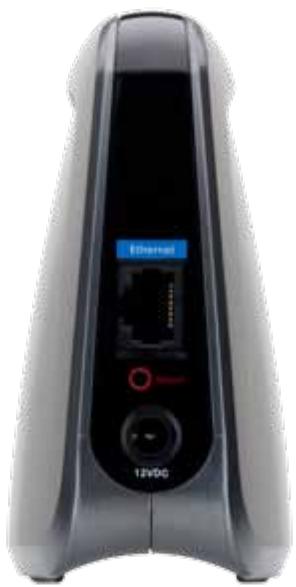
WET610N

Ethernet The Ethernet port(s) connects the bridge to a computer or other Ethernet network device. The WES610N has four ports, and the WET610N has a single port.
Reset There are two ways to reset the bridge's factory defaults. Either press and hold the Reset button for approximately five seconds, or restore the defaults from Administration > Factory Defaults in the bridge's browser-based utility. The WES610N has a reset button on the bottom, and the WET610N has a reset button on the back port panel.

Power The Power port connects the bridge to the included power adapter.
Wireless Security Checklist
Wireless networks are convenient and easy to install, so homes with high-speed Internet access are adopting them at a rapid pace. Because wireless networking operates by sending information over radio waves, it can be more vulnerable to intruders than a traditional wired network. Like signals from your cellular or cordless phones, signals from your wireless network can also be intercepted. Since you cannot physically prevent someone from connecting to your wireless network, you need to take some additional steps to keep your network secure.
Change the default wireless network name or SSID
Wireless devices have a default wireless network name or Service Set Identifier (SSID) set by the factory. This is the name of your wireless network, and can be up to 32 characters in length. Linksys wireless products use linksys as the default wireless network name. You should change the wireless network name to something unique to distinguish your wireless network from other wireless networks that may exist around you, but do not use personal information (such as your Social Security number) because this information may be available for anyone to see when browsing for wireless networks.
Change the default password
For wireless products such as access points and routers, you will be asked for a password when you want to change their settings. These devices have a default password set by the factory. The Linksys default password is admin. Hackers know these defaults and may try to use them to access your wireless device and change your network settings. To thwart any unauthorized changes, customize the device's password so it will be hard to guess.
Enable MAC address filtering
Linksys routers give you the ability to enable Media Access Control (MAC) address filtering. The MAC address is a unique series of numbers and letters assigned to every networking device. With MAC address filtering enabled, wireless network access is provided solely for wireless devices with specific MAC addresses. For example, you can specify the MAC address of each computer in your home so that only those computers can access your wireless network.
Enable encryption
Encryption protects data transmitted over a wireless network. Wi-Fi Protected Access (WPA/WPA2) and Wired Equivalent Privacy (WEP) offer different levels of security for wireless communication.
A network encrypted with WPA/WPA2 is more secure than a network encrypted with WEP, because WPA/WPA2 uses dynamic key encryption. To protect the information as it passes over the airwaves, you should enable the highest level of encryption supported by your network equipment.
WEP is an older encryption standard and may be the only option available on some older devices that do not support WPA.
General Network Security Guidelines
Wireless network security is useless if the underlying network is not secure.
- Password protect all computers on the network and individually password protect sensitive files.
- Change passwords on a regular basis.
Install anti-virus software and personal firewall software. - Disable file sharing (peer-to-peer). Some applications may open file sharing without your consent and/or knowledge.
Additional Security Tips
- Keep wireless routers, access points, or gateways away from exterior walls and windows.
- Turn wireless routers, access points, or gateways off when they are not being used (at night, during vacations).
- Use strong passphrases that are at least eight characters in length. Combine letters and numbers to avoid using standard words that can be found in the dictionary.
Advanced Configuration
After setting up the bridge by following the steps on the CD folder, the bridge will be ready for use. However, if you want to change its advanced settings, use the bridge's browser-based utility. This chapter describes each web page of the utility and each page's key functions. You can access the utility via a web browser on a computer networked with the bridge.
The browser-based utility has these main tabs: Setup, Wireless, Administration, and Status. Additional tabs will be available after you click one of the main tabs.
How to access the browser-based utility
Use a web browser to access the browser-based utility.
If the bridge is connected to a network with a DHCP server (usually the network router), then the bridge will obtain its IP address from the DHCP server. If there is no DHCP server, then the bridge will use its default static IP address, 169.254.1.250. (If you set a permanent static IP address on the bridge through the browser-based utility, then enter the static IP address instead.)
NOTE
If you do not know the bridge's IP address, then find its IP address in the DHCP clients table of your router. (Refer to the documentation for your router.)
If you cannot locate the bridge's IP address, you can reset the bridge; press the Reset button on the bridge for approximately five seconds, using a straightened paper clip. This will reset the bridge back to the factory default settings. The bridge will request an IP address from the DHCP server (usually the network router). If no DHCP server is found, then the bridge will use its default static IP address, 169.254.1.250, until it detects a DHCP server and is assigned a dynamic IP address.
If the bridge is not associated with a router and is using the factory default settings, connect a computer to the bridge using an Ethernet connection to access the web-based utility. You will need to configure the Ethernet connection on the computer with a static IP address and subnet mask.
The IP address of your Ethernet adapter should be set to a specific IP address.
- In the IP address field, enter 169.254.x.y (x should be replaced by a number between 1 and 254, and y should be replaced by a number between 0 and 255).
- In the Subnet mask field, enter 255.255.0.0.
NOTE
The steps to assign a static IP address to the Ethernet adapter on your computer vary by operating system. For instructions, please refer to the help documentation of your specific operating system.
After you have assigned your Ethernet adapter with a static IP address, launch your web browser, and enter the Adapter's IP address (the default setting is 169.254.1.250) in the Address field. Press Enter.
A password request screen appears. (Non-Windows XP users will see a similar screen.) Leave the User name field blank. Enter the password you created during the Setup Wizard. If you did not create a new password, use the default password admin. (You can set a new password from the Administration > Management screen.) Click OK to continue.

NOTE
If the password request screen does not appear, wait two minutes and try again.
Setup > Basic Setup
The first screen that appears is the Basic Setup screen. Use this screen to change the browser-based utility's language, or to change the bridge's wired, Ethernet network settings.
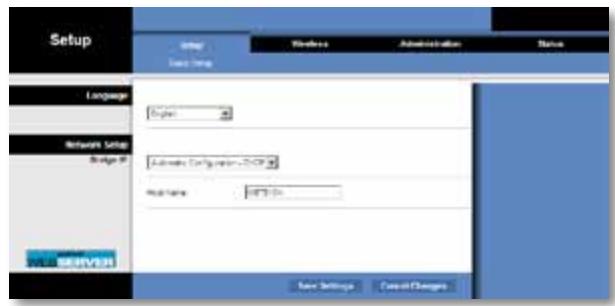
Language
Language This is used to set the language displayed by the browser-based utility. Select the desired language from the drop-down menu.
Network Setup
This section determines if the bridge's IP address is obtained automatically from a DHCP server, such as your network router (Automatic Configuration - DHCP), or set manually (Static IP).
Bridge IP If your network has a DHCP server, such as your network router, assigning IP addresses to your network devices, then keep the default, Automatic Configuration - DHCP. The bridge will request an IP address from the DHCP server (usually the network router). If no DHCP server is found, then the bridge will use its default static IP address, 169.254.1.250, until it detects a DHCP server and is assigned a dynamic IP address.
If you want to set a permanent static IP address for the bridge, then select Static IP.
If you select Static IP, then complete the following fields:
- Static IP Address Enter a unique IP address that will be used to access the browser-based utility.
- Subnet Mask Enter the subnet mask of your wired network.
- Default Gateway Enter the IP address of the default gateway for your network (in most cases, this is your router).
Click Save Settings to apply your changes, or click Cancel Changes to cancel your changes.
Wireless > Basic Wireless Settings
Use the Basic Wireless Settings screen to configure the bridge's basic wireless and security settings.
There are two ways to configure the bridge's settings, manual and Wi-Fi Protected Setup. Wi-Fi Protected Setup is a feature that makes it easy to set up your wireless network. If your network router supports Wi-Fi Protected Setup and uses WPA or WPA2 security, then you can use Wi-Fi Protected Setup to automatically connect the bridge.
Configuration View To manually configure your wireless network, select Manual. Refer to Basic Wireless Settings, page 8. To use Wi-Fi Protected Setup, select Wi-Fi Protected Setup. Refer to Wi-Fi Protected Setup, page 9.
Basic Wireless Settings
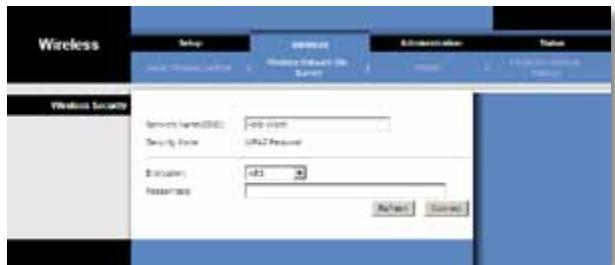
Network Name (SSID) TheSSID is the network name shared among all points in a wireless network. TheSSID must be identical for all devices in the wireless network. It is case-sensitive and must not exceed 32 characters (use any characters on the keyboard). Make sure this setting matches the setting on your wireless router or access point. For added security, you should change the defaultSSID (linksys) to a unique name.
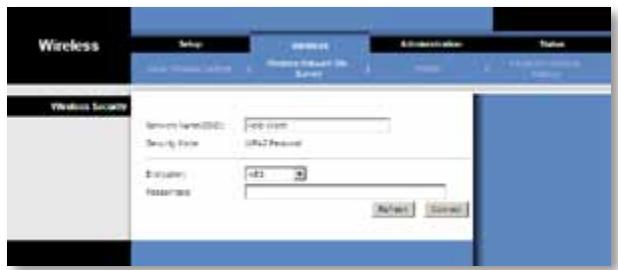
Wireless Security
The bridge supports the following wireless security options: WPA Personal, WPA2 Personal, and WEP. WPA (Wi-Fi Protected Access) and WPA2 are stronger security methods than WEP (Wired Equivalent Privacy). For more information about wireless security, refer to "Wireless Security Checklist" on page 4.
Security Mode
Select the security method for your wireless network. If you do not want to use wireless security, keep the default, Disabled.
NOTE
Remember that each device in your wireless network MUST use the same security method and passphrase/key, or else the wireless devices will not be able to communicate with each other.
WPA Personal
WPA is a security standard stronger than WEP encryption.

Encryption WPA supports the TKIP encryption method, with dynamic encryption keys.
Passphrase Enter the key shared by the bridge and your wireless router or access point. It must have 8-63 characters.
Click Save Settings to apply your changes, or click Cancel Changes to cancel your changes.
WPA2 Personal
WPA2 is a more advanced, more secure version of WPA.
Encryption WPA2 supports two encryption methods, TKIP and AES, with dynamic encryption keys. Select the encryption method, AES or TKIP or AES. The default selection is AES.
Passphrase Enter the key shared by the bridge and wireless router or access point. It must have 8-63 characters.
Click Save Settings to apply your changes, or click Cancel Changes to cancel your changes.
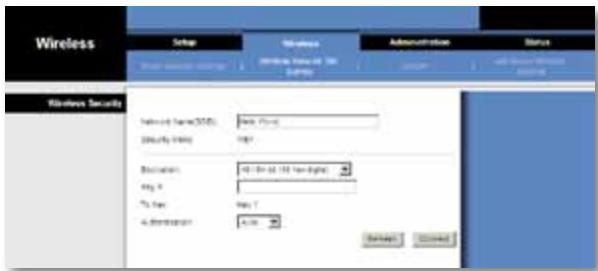
WEP
WEP is a basic encryption method, which is not as secure as WPA or WPA2.
Encryption Select a level of WEP encryption, 40/64 bits (10 hex digits) or 104/128 bits (26 hex digits). The default is 40/64 bits (10 hex digits).
Key 1 Enter the WEP key of your network.
Tx Key Key 1 is the transmit key used by the bridge.
Authentication The default is Auto, which allows either Open system or Shared key authentication to be used. Select Open to use open system authentication; the sender and recipient do not use a WEP key for authentication. Select Shared to use shared key authentication; the sender and recipient use a WEP key for authentication.
Click Save Settings to apply your changes, or click Cancel Changes to cancel your changes.
Wi-Fi Protected Setup
There are two methods available. Use the method that applies to the router you are using.
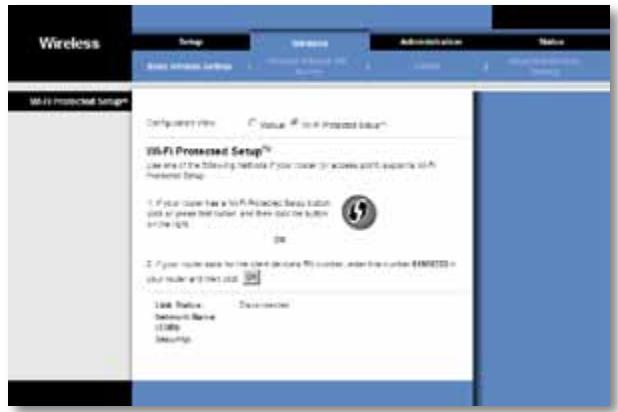
Method #1
Use this method if your router has a Wi-Fi Protected Setup button.
- Click or press the Wi-Fi Protected Setup button on the router.
- Within two minutes, click the Wi-Fi Protected Setup button on the bridge's Wi-Fi Protected Setup screen.
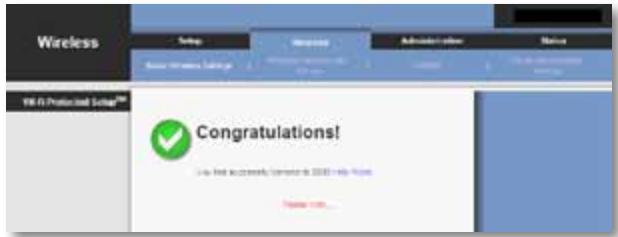
- After the bridge has been configured, click Close.
The Wi-Fi Protected Setup screen displays the Link Status, Network Name (SSID), and Security method.
Method #2
Use this method if your router requests the PIN number of the bridge.
- On the router's Wi-Fi Protected Setup screen, enter the PIN number on the bridge's Wi-Fi Protected Setup screen. Then click Register or the appropriate button. (It is also listed on the label on the bottom of the bridge.)
- On the bridge's Wi-Fi Protected Setup screen, click OK.
- After the bridge has been configured, click Close.
The Wi-Fi Protected Setup screen displays the Link Status, Network Name (SSID), and Security method.
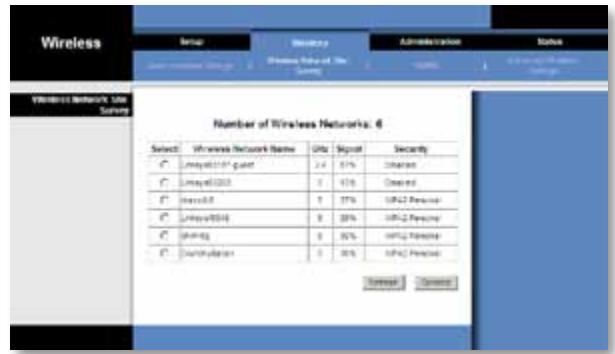
Wireless > Wireless Network Site Survey
Click the Wireless Network Site Survey tab to begin a site survey. The Wireless Network Site Survey screen lists the wireless networks detected by the bridge.
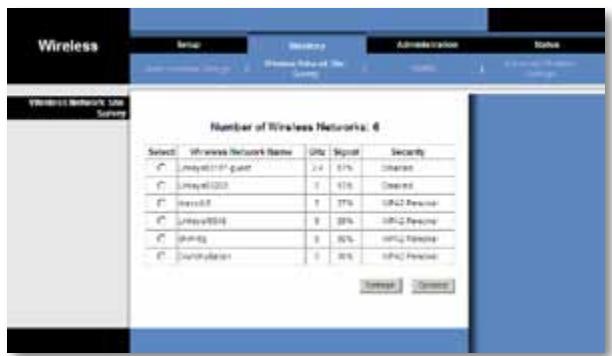
Wireless Network Site Survey
Number of Wireless Networks The number of wireless networks detected by the bridge is displayed.
Select To connect to a wireless network, click Select. Then click Connect.
Wireless Network Name The network name or SSID of the wireless network is displayed.
GHz The radio band of the wireless network is displayed.
Signal The percentage of signal strength is displayed. 100% is the strongest signal strength possible; 0% is the weakest possible.
Security If the network supports Wi-Fi Protected Setup, the Wi-Fi Protected Setup icon is displayed. The security method used by the wireless network is displayed.
Click Refresh to update the on-screen information.
After you have selected a network, click Connect. A new screen appears. Follow the instructions for the security method of your network.
WPA
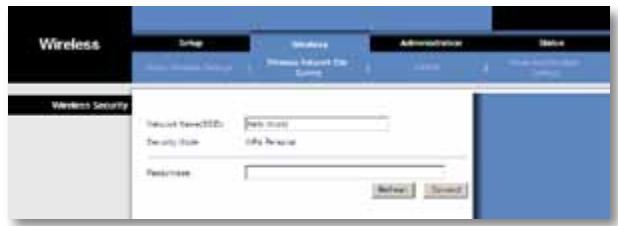
Network Name (SSID) The name of the network you selected is automatically displayed.
Security Mode WPA Personal is automatically displayed.
Encryption WPA supports the TKIP encryption method, with dynamic encryption keys.
Passphrase Enter the key shared by the bridge and wireless router or access point. It must have 8-63 characters.
Click Refresh to update the on-screen information.
After you have entered the security settings, click Connect.
WPA2
Network Name (SSID) The name of the network you selected is automatically displayed.
Security Mode WPA2 Personal is automatically displayed.
Encryption WPA2 supports two encryption methods, TKIP and AES, with dynamic encryption keys. Select the encryption method, AES or TKIP or AES.
Passphrase Enter the key shared by the bridge and wireless router or access point. It must have 8-63 characters.
Click Refresh to update the on-screen information.
After you have entered the security settings, click Connect.
WEP
Network Name (SSID) The name of the network you selected is automatically displayed.
Security Mode WEP is automatically displayed.
Encryption Select a level of WEP encryption, 40/64 bits (10 hex digits) or 104/128 bits (26 hex digits).
Key 1 Enter the WEP key of your network.
Tx Key Key 1 is the transmit key used by the bridge.
Authentication The default is Auto, which allows either Open system or Shared key authentication to be used. Select Open to use open system authentication; the sender and recipient do not use a WEP key for authentication. Select Shared to use shared key authentication; the sender and recipient use a WEP key for authentication.
Click Refresh to update the on-screen information.
After you have entered the security settings, click Connect.
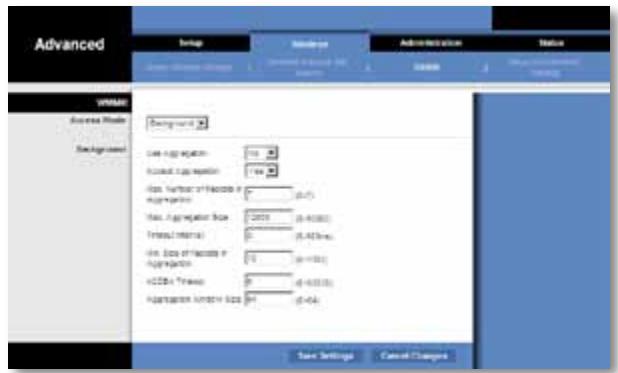
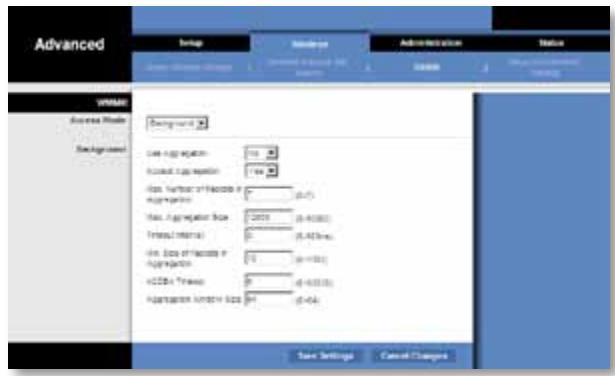
Wireless > WMM®
Configure the Wireless MultiMedia (WMM) settings. WMM prioritizes packets depending on their respective access mode (traffic type): Background, Best Effort, Video, or Voice. These settings should only be adjusted by an expert administrator as incorrect settings can reduce wireless performance.
NOTE
The settings on the WMM screen are designed for advanced users only.
WMM
Access Mode
You can assign different settings to the four access modes available. Select the mode you want to configure: Background, Best Effort, Video, or Voice. Follow the instructions for the mode you select.
Background
Use Aggregation This option defines whether or not the Media Access Control (MAC) layer will set up an Add Block Acknowledgement (ADDBA) session. The default is No. Select Yes to enable this option.
Accept Aggregation This option defines whether or not the MAC layer will accept an ADDBA request. The default is Yes. Select No to disable this option.
Max. Number of Packets in Aggregation This option defines the maximum number of packets (sub-frames) in the aggregate. The range is 0 to 7. The default is 7.
Max. Aggregation Size This option defines the maximum size of the aggregate (in bytes). The range is 0 to 16000. The default is 12000.
Timeout Internal This option defines the timeout period in which the aggregate should be closed with a "closing condition" before it is closed by the timer. The range is 0 to 100 ms. The default is 3.
Min. Size of Packet in Aggregation This option defines the minimum size (in bytes) of packets to be accumulated in the aggregate. The range is 0 to 1500. The default is 10.
ADDBA Timeout This option defines the duration after which the ADDBA setup is terminated, if there are no frame exchanges within this duration by the Block Acknowledgement (ACK) agreement. The range is 0 to 65535 ms. The default is 0, which disables the timeout.
Aggregation Window Size This option defines the maximum number of packets transmitted without getting ACKs. The range is 0 to 64. The default is 64.
Click Save Settings to apply your changes, or click Cancel Changes to cancel your changes.
Best Effort
Use Aggregation This option defines whether or not the Media Access Control (MAC) layer will set up an Add Block Acknowledgement (ADDBA) session. The default is Yes. Select No to disable this option.
Accept Aggregation This option defines whether or not the MAC layer will accept an ADDBA request. The default is Yes. Select No to disable this option.
Max. Number of Packets in Aggregation This option defines the maximum number of packets (sub-frames) in the aggregate. The range is 0 to 10. The default is 10.
Max. Aggregation Size This option defines the maximum size of the aggregate (in bytes). The range is 0 to 20000. The default is 16000.
Timeout Internal This option defines the timeout period in which the aggregate should be closed with a "closing condition" before it is closed by the timer. The range is 0 to 100 ms. The default is 3.
Min. Size of Packet in Aggregation This option defines the minimum size (in bytes) of packets to be accumulated in the aggregate. The range is 0 to 1500. The default is 10.
ADDBA Timeout This option defines the duration after which the ADDBA setup is terminated, if there are no frame exchanges within this duration by the Block Acknowledgement (ACK) agreement. The range is 0 to 65535 ms. The default is 0, which disables the timeout.
Aggregation Window Size This option defines the maximum number of packets transmitted without getting ACKs. The range is 0 to 64. The default is 64.
Click Save Settings to apply your changes, or click Cancel Changes to cancel your changes.
Video
Use Aggregation This option defines whether or not the Media Access Control (MAC) layer will set up an Add Block Acknowledgement (ADDBA) session. The default is Yes. Select No to disable this option.
Accept Aggregation This option defines whether or not the MAC layer will accept an ADDBA request. The default is Yes. Select No to disable this option.
Max. Number of Packets in Aggregation This option defines the maximum number of packets (sub-frames) in the aggregate. The range is 0 to 7. The default is 7.
Max. Aggregation Size This option defines the maximum size of the aggregate (in bytes). The range is 0 to 16000. The default is 12000.
Timeout Internal This option defines the timeout period in which the aggregate should be closed with a "closing condition" before it is closed by the timer. The range is 0 to 100 ms. The default is 3.
Min. Size of Packet in Aggregation This option defines the minimum size (in bytes) of packets to be accumulated in the aggregate. The range is 0 to 1500. The default is 10.
ADDBA Timeout This option defines the duration after which the ADDBA setup is terminated, if there are no frame exchanges within this duration by the Block Acknowledgement (ACK) agreement. The range is 0 to 65535 ms. The default is 0, which disables the timeout.
Aggregation Window Size This option defines the maximum number of packets transmitted without getting ACKs. The range is 0 to 64. The default is 64.
Click Save Settings to apply your changes, or click Cancel Changes to cancel your changes.
Voice
Use Aggregation This option defines whether or not the Media Access Control (MAC) layer will set up an Add Block Acknowledgement (ADDBA) session. The default is Yes. Select No to disable this option.
Accept Aggregation This option defines whether or not the MAC layer will accept an ADDBA request. The default is Yes. Select No to disable this option.
Max. Number of Packets in Aggregation This option defines the maximum number of packets (sub-frames) in the aggregate. The range is 0 to 2. The default is 2.
Max. Aggregation Size This option defines the maximum size of the aggregate (in bytes). The range is 0 to 16000. The default is 10000.
Timeout Internal This option defines the timeout period in which the aggregate should be closed with a "closing condition" before it is closed by the timer. The range is 0 to 100 ms. The default is 10.
Min. Size of Packet in Aggregation This option defines the minimum size (in bytes) of packets to be accumulated in the aggregate. The range is 0 to 1500. The default is 10.
ADDBA Timeout This option defines the duration after which the ADDBA setup is terminated, if there are no frame exchanges within this duration by the Block Acknowledgement (ACK) agreement. The range is 0 to 65535 ms. The default is 0, which disables the timeout.
Aggregation Window Size This option defines the maximum number of packets transmitted without getting ACKs. The range is 0 to 64. The default is 64.
Click Save Settings to apply your changes, or click Cancel Changes to cancel your changes.
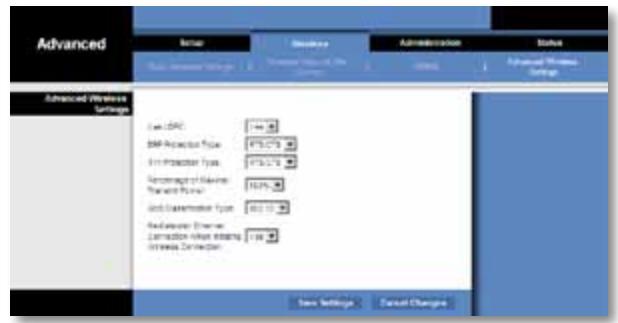
Wireless > Advanced Wireless Settings
Configure the bridge's advanced wireless functions. These settings should only be adjusted by an expert administrator as incorrect settings can reduce wireless performance.
NOTE
The settings on the Advanced Wireless Settings screen are designed for advanced users only.
Advanced Wireless
Use LDPC Low-Density Parity-Check Code (LDPC) enables or disables error correction to reduce the probability of data loss in noisy channels. The Rate Adaptation algorithm automatically disabled LDPC coding when working at high PHY rates (higher than 162). To use the LDCP advanced error correction scheme, keep the default, Yes. Otherwise, select No.
ERP Protection Type This option configures protection of OFDM packets despite the presence of 802.11b stations within the wireless network. By sending RTS/CTS or CTS2Self packets in 802.11b rates, the bridge informs the wireless network that OFDM packets are going to be transferred and protects the packets in the wireless network. The RTS/CTS and CTS2Self packets create overhead, which may result in lower throughputs.
The RTS/CTS option provides better coverage but lower throughputs when compared to CTS2Self, because the RTS/CTS option includes acknowledgement from the receiving device. To use the RTS/CTS option, keep the default, RTS/CTS. The None option may cause collisions between OFDM and CCK packets. To use the None option, select None. To use the CTS2Self option, select CTS2Self.
11n Protection Type This option configures protection from non-High Throughput (HT) devices within the wireless network. In case the wireless router (or access point) detects an association of a non-HT legacy device, it will signal all the HT devices to use RTS/CTS or CTS2Self mechanisms before each data transmission. This feature also supports all 802.11n standard protections, including MIMO.
The RTS/CTS option provides better coverage but lower throughputs when compared to CTS2Self, because the RTS/CTS option includes acknowledgement from the receiving device. To use the RTS/CTS option, keep the default, RTS/CTS. The None option may cause collisions between HT and legacy packets. To use the None option, select None. To use the CTS2Self option, select CTS2Self.
Percentage of maximal transmit power This option sets the percentage of maximal transmit power relative to the regulatory domain restrictions. For example, if the regulatory domain restriction allows transmissions of up to 20 dB, then setting the percentage at 50% allows maximal transmit power of 10 dB. Select the percentage you want to use: 12% , 25% , 50% , or 100% . The default is 100% .
QoS Classification Type This option sets 802.1D or 802.1Q mapping from the IP DSCP/TOS field to WMM priorities (Background, Best Effects, Video, Voice). Keep the default, 802.1D, or select 802.1Q, which is used by some IPTV streams.
Re-establish Ethernet connection when initiating wireless connection To trigger DHCP discovery from the device that resides behind the bridge, the bridge will reset the Ethernet link between the bridge and the device every time a wireless connection is established. To disable this behavior, select No. Otherwise, keep the default, Yes.
Click Save Settings to apply your changes, or click Cancel Changes to cancel your changes.
Administration > Management
Use this screen to manage specific bridge functions: access to the web-based utility, backup of the configuration file, and reboot.
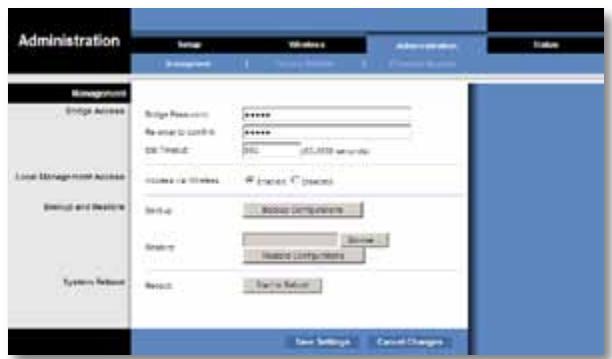
Management
Bridge Access
Use a password to protect access to the browser-based utility.
Bridge Password Enter a new Password for the bridge.
Re-enter to confirm Enter the Password again to confirm.
Idle Timeout The login times out after a period of inactivity that you specify.
The range is 60 to 3600 seconds. The default is 600.
Web Access
Access via Wireless If you are using the bridge in a public domain where you are giving wireless access to your guests, you can disable wireless access to the bridge's browser-based utility. You will only be able to access the browser-based utility via a wired connection if you disable the setting. Keep the default, Enabled, to allow wireless access to the bridge's browser-based utility, or select Disabled to block wireless access to the utility.
Backup and Restore
Backup To backup the bridge's configuration file, click Backup Configurations. Then follow the on-screen instructions.
Restore Click Browse and select the configuration file. Then click Restore Configurations.
System Reboot
Reboot To reboot or restart the bridge, click Start to Reboot.
Click Save Settings to apply your changes, or click Cancel Changes to cancel your changes.
Administration > Factory Defaults
Use this screen to restore the bridge's configuration to its factory default settings.
Factory Defaults
Restore All Settings To reset the bridge's settings to the factory defaults, click Restore All Settings. Any settings you have saved will be lost when the default settings are restored.

Administration > Upgrade Firmware
Use this screen to upgrade the bridge's firmware. Do not upgrade the firmware unless you are experiencing problems with the bridge or the new firmware has a feature you want to use.
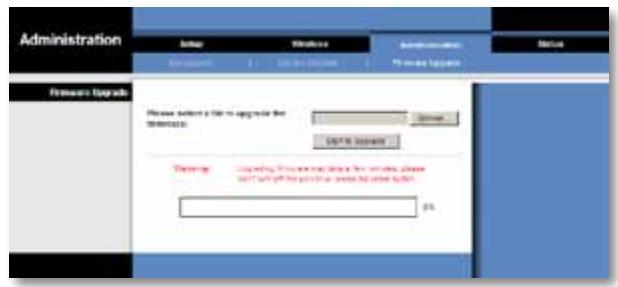
Before upgrading the firmware, download the bridge's firmware upgrade file from the Linksys website, www.Linksys.com/support.
Upgrade Firmware
Please select a file to upgrade the firmware Click Browse and select the firmware upgrade file. Then click Start to Upgrade and follow the on-screen instructions.
Status > Bridge
The bridge's current status information is displayed.
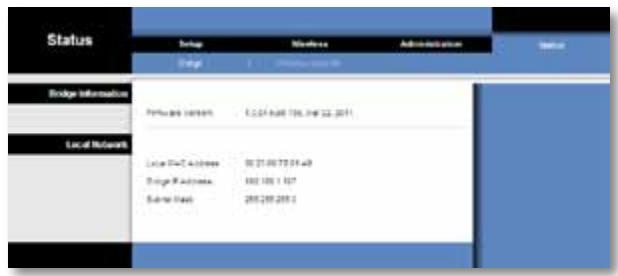
Bridge Information
Firmware Version The bridge's current firmware is displayed.
Local Network
Local MAC Address The bridge's MAC Address, as seen on your local, Ethernet network, is displayed.
IP Address The bridge's IP Address, as seen on your local, Ethernet network, is displayed.
Subnet Mask The Subnet Mask configured for your local network is displayed.
Status > Wireless
Information about your wireless network is displayed.
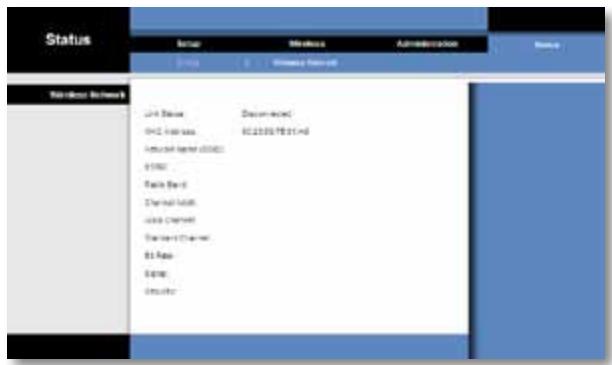
Wireless
Link Status The status of the connection to your wireless network is displayed.
MAC Address The bridge's MAC Address, as seen on your local, wireless network, is displayed.
Network Name (SSID) The wireless network name orSSID is displayed.
BSSID The wireless MAC address of the connected wireless router (or access point) is displayed.
Radio Band The radio band of your wireless network is displayed.
Channel Width The channel width, in MHz, used by your wireless network is displayed.
Wide Channel Depending on the channel settings of your network router, the Wide Channel is displayed. If you selected Wide - 40MHz Channel for the router's Radio Band or Channel Width setting, then this will be your primary Wireless-N channel.
Standard Channel The Standard Channel setting is displayed. If you selected Wide - 40MHz Channel for the router's Radio Band or Channel Width setting, then the Standard Channel will be a secondary channel for Wireless-N.
Bit Rate The data transmission rate is displayed.
Signal The percentage of signal strength is displayed. 100% is the strongest signal strength possible; 0% is the weakest possible.
Security The security method of your wireless network is displayed.
Troubleshooting
WES610N/WET610N
Your computer or other wired, Ethernet device cannot communicate with the wireless router.
- Access the bridge's browser-based utility.
- On the Basic Wireless Settings screen, make sure the Network Name (SSID) matches the name of your wireless network.
- Make sure the security settings (WPA, WPA2, or WEP) match the security settings of your wireless network.
The bridge's IP address needs to be changed.
If the bridge is connected to a network with a DHCP server (usually the network router), then the bridge will obtain its IP address from the DHCP server. If there is no DHCP server, then the bridge will use its default, static IP address, 169.254.1.250.
If you want the bridge to always use a static IP address, then follow these instructions:
- Access the bridge's browser-based utility.
- Click the Network Setup tab.
- From the Network Connection Type drop-down menu, select Static IP.
- Complete the Static IP Address, Subnet Mask, and Default Gateway fields.
- Click Save Settings.
The bridge-enabled computer or other wired, Ethernet device will not communicate with another wireless-enabled device (such as a computer or printer).
Check the following:
- Make sure the wireless-enabled device is on the same wireless network as the computer or other wired, Ethernet device connected to the bridge.
-
Make sure that the same Network Name (SSID) is used for all devices on the wireless network.
-
Make sure all devices are on the same IP network, using compatible IP addresses.
The browser-based utility does not accept your password.
Check the following:
- The password is case-sensitive. Make sure that you are using the correct case(s) when entering the password.
- If you forget your password, you can reset the bridge to its factory defaults.
Press and hold the bridge's Reset button for approximately five seconds; the password will be reset to its factory default, admin. All other bridge settings will be reset to the factory defaults as well. (To access the browser-based utility, enter admin in the Password field.)
After you make changes through the browser-based utility, the new settings are not displayed on-screen.
On your web browser, click Refresh. If the new settings are not displayed, then follow these instructions:
- Unplug the power adapter from the bridge.
- Wait five seconds, and then plug the power adapter back into the bridge.
- On your web browser, click Refresh.
WEB
If your questions are not addressed here, refer to the Linksys website at Linksys.com/support
Specifications
WES610N
| Model | WES610N |
| Standards | IEEE 802.3u, 802.11g, 802.11b, 802.11a, 802.11n |
| LEDs | Power, Ethernet, Wi-Fi Protected SetupTM, Wireless, individual Ethernet link and activity |
| Ports | Ethernet (4), Power |
| Buttons | Reset, Wi-Fi Protected Setup |
| Cabling Type | CAT5e |
| Antennas | 3 (internal) |
| Antenna Connector Type | N/A |
| Detachable (Yes/No) | No |
| Modulations | 802.11a: OFDM/BPSK, QPSK, 16-QAM, 64-QAM 802.11b: CCK/QPSK, BPSK 802.11g: OFDM/BPSK, QPSK, 16-QAM, 64-QAM 802.11n: OFDM/BPSK, QPSK, 16-QAM, 64-QAM |
| RF Pwr (EIRP) in dBm | 802.11a: 15 dBm (typical) @ 54Mbps 802.11b: 19 dBm (typical) @ 11 Mbps 802.11g: 16 dBm (typical) @ 54 Mbps 802.11n (2.4 GHz): 18 dBm (typical) @ MCS15 802.11n (5 GHz): 16 dBm (typical) @ MCS15 |
| Receive Sensitivity | 802.11a: -72 dBm (typical) @ 54 Mbps 802.11b: -85 dBm (typical) @ 11 Mbps 802.11g: -73 dBm (typical) @ 54 Mbps 802.11n (20 MHz): -75 dBm (typical) @ MCS15 802.11n (40 MHz): -69 dBm (typical) @ MCS15 |
| Antenna Gain in dBi | 1 |
| Wireless Security | WEP, Wi-Fi Protected AccessTM (WPA), Wi-Fi Protected AccessTM 2 (WPA2) |
| Security Key Bits | Up to 128-bit encryption |
Environmental
| Dimensions | 6.97" x 5.04" x 2.68" (177 x 128 x 68 mm) |
| Weight | 0.65 lb (295 g) |
| Certification | FCC, UL/cUL, ICES-003, RSS210, CE, Wi-Fi (IEEE 802 11a/b/g/draft n), WPA2™, Wi-Fi Protected Setup, WMM® |
| Power | 12V, 1A |
| Operating Temperature | 32 to 104°F (0 to 40°C) |
| Storage Temperature | -4 to 140°F (-20 to 60°C) |
| Operating Humidity | 10 to 85% Noncondensing |
| Storage Humidity | 5 to 90% Noncondensing |
Specifications are subject to change without notice.
WET610N
| Model | WET610N |
| Standards | IEEE 802.3u, 802.11g, 802.11b, 802.11a, 802.11n |
| LEDs | Power, Ethernet, Wi-Fi Protected SetupTM, Wireless |
| Ports | Ethernet, Power |
| Buttons | Reset, Wi-Fi Protected Setup |
| Cabling Type | CAT5e |
| Antennas | 3 (internal) |
| Antenna Connector Type | N/A |
| Detachable (Yes/No) | No |
| Modulations | 802.11a: OFDM/BPSK, QPSK, 16-QAM, 64-QAM 802.11b: CCK/QPSK, BPSK 802.11g: OFDM/BPSK, QPSK, 16-QAM, 64-QAM 802.11n: OFDM/BPSK, QPSK, 16-QAM, 64-QAM |
| RF Pwr (EIRP) in dBm | 802.11a: 15 dBm (typical) @ 54Mbps 802.11b: 18 dBm (typical) @ 11 Mbps 802.11g: 16 dBm (typical) @ 54 Mbps 802.11n: 12 dBm (typical) @ 130 Mbps (HT20), 270 Mbps (HT40) |
| Receive Sensitivity | 802.11a: -72 dBm (typical) @ 54 Mbps 802.11b: -85 dBm (typical) @ 11 Mbps 802.11g: -73 dBm (typical) @ 54 Mbps 802.11n: -70 dBm (typical) @ MCS15/2.4 GHz, -69 dBm (typical) @ MCS15/5.0 GHz |
| Antenna Gain in dBi | 1 |
| Wireless Security | WEP, Wi-Fi Protected AccessTM (WPA), Wi-Fi Protected AccessTM 2 (WPA2) |
| Security Key Bits | Up to 128-bit encryption |
Environmental
| Dimensions | 5.71" x 4.17" x 2.05" (145 x 106 x 52 mm) |
| Weight | 5.61 oz (159 g) |
| Certification | FCC, UL/cUL, ICES-003, RSS210, CE, Wi-Fi (IEEE 802 11a/b/g/draft n), WPA2TM, Wi-Fi Protected Setup, WMM® |
| Power | 12V, 1A |
| Operating Temperature | 32 to 104°F (0 to 40°C) |
| Storage Temperature | -4 to 140°F (-20 to 60°C) |
| Operating Humidity | 10 to 85% Noncondensing |
| Storage Humidity | 5 to 90% Noncondensing |
Specifications are subject to change without notice.
Linksys.com/support

Cisco, the Cisco logo, and Linksys are trademarks or registered trademarks of Cisco and/or its affiliates in the United States and other countries. A listing of Cisco's trademarks can be found at www.cisco.com/go/trademarks. All other trademarks mentioned in this document are the property of their respective owners.
ppl
Lg
Advanced Wireless Settings < (
13. (a)
13 (2021) 4.5 LwU Advanced Wireless
14. (a) Management < (a) Administration
14 (a) Management
Factory Defaults < (__) Administration
14. (aeal)
15 (a) Factory Defaults
15. (C) Upgrade Firmware < (D, D) Administration
15 (C) Upgrade Firmware
15. (JL) Bridge < ( JL) Status
15 (J) Logle) Bridge Information
15 (.1.1) Local Network
16. (SLW) Wireless < (JL) Status
16 (w) Wireless
Lg> Lg<1h>
17 WES610N/WET610N
#
18. WES610N
19. WET610N
i 150
2 1g
3. 1eI11 a-gJ
LwUJ L0xJn nn Jaa
4 SSID gJ
4
4 MAC 1j
4
4
5 1oU
paaa 1
6.
6. (J) Basic Setup < (J) Setup
(ə·LJI) Language
7 (A) Language
7 (aSJJ) Network Setup
7 (_ ) Basic Wireless Settings < ( < ) Wireless
7 (aLwI aLwU)Basic Wireless Settings
8 (LwUJnLo) Wireless Security
9 (Wi-Fi 12 Wi-Fi Protected Setup
≤ . Wireless Network Site Survey < (≤ L) Wireless
9 (a.s.u.)
10 (a.sLwUaSjJgog) Wireless Network Site Survey
11. WMM< (Lw) Wireless
11 WMM
iiie 1c aolc jzj
SLWJLwJLwJLwJLwJLwJLwJLwJLwJLwJLwJLwJLwJLwJLwJLwJLwJLwJLwJLwJLwJLwJLwJLwJLwJLwJLwJLwJLwJLwJLwJLwJLwJLwJLw

aLcXl aai y bI aI Lgll J WpFi aiai gaoal 1sclj j
plasw lscWPA2 g WPA loa pssuWgi Fi aiai yaoal
aLcXl plaswJ Lali JwogJWi-Fi aiai yaoal
Basic Wireless < ( (LwU) Wireless" g J .Wi-Fi aiai yaoal .7 aiaiJy "aawwzlaiaeLwU) Settings

JgU LgU g U (giyS/gy)Wi-Fi aiaia yaaal 1aLg21 eg
g21 Wf-aiia ayaaal slcxl sli jn nn aai yag
g21 w-fai aiaia ayaaal slcxl sli jn nn aai yag
g21 w-fai aiaia ayaaal slcxl sli jn nn aai yag
g21 w-fai aiaia ayaaal slcxl sli jn nn aai yag
g21 w-fai aiaia ayaaal slcxl sli jn nn aai yag
g21 w-fai aian ayaaal slcxl sli jn nn aai yag
g21 w-fai aiaia ayaaal slcxl sli jn nn aai yag
g21 w-fai aiaia ayaaal slcxl sli jn nn aai yag
g21 w-fai aiaia ayaaal slcxl sli jn nn aai yag
g21 w-fai aiaie ayaaal slcxl sli jn nn aai yag
g21 w-fai aiaia ayaaal slcxl sli jn nn aai yag
g21 w-fai aiaia ayaaal slcxl sli jn nn aai yag
g21 w-fai aiaia ayaaal slcxl sli jn nn aai yag
g21 w-fai aiaiae ayaaal slcxl sli jn nn aai yag
g21 w-fai aiaia ayaaal slcxl sli jn nn aai yag
g21 w-fai aiaia ayaaal slcxl sli jn nn aai yag
g21 w-fai aiaia ayaaal slcxl sli jn nn aai yag
g21 w-fai aiaic ayaaal slcxl sli jn nn aai yag
g21 w-fai aiaia ayaaal slcxl sli jn nn aai yag
g21 w-fai aiaia ayaaal slcxl sli jn nn aai yag
g21 w-fai aiaia ayaaal slcxl sli jn nn aai yag
g21 w-fai aiaii ayaaal slcxl sli jn nn aai yag
g21 w-fai aiaii ayaaal slcxl sli jn nn aai yag
g21 w-fai aiaii ayaaal slcxl sli jn nn aai yag
g21 w-fai aiaii ayaaal slcxl sli jn nn aai yag
g21 w-fai aia ii ayaaal slcxl sli jn nn aai yag
g21 w-fai aiaii ayaaal slcxl sli jn nn aai yag
g21 w-fai aiaii ayaaal slcxl sli jn nn aai yag
g21 w-fai aiaii ayaaal slcxl sli jn nn aai yag
g21 w-fai aiaiu ayaaal slcxl sli jn nn aai yag
g21 w-fai aiaiu ayaaal slcxl sli jn nn aai yag
g21 w-fai aiaiu ayaaal slcxl sli jn nn aai yag
g21 w-fai aiaiu ayaaal slcxl sli jn nn aai yag
g21 w-fai aiaii ayaaal slcxl sli jn nn aai yag
g21 w-fai aiaii ayaaal slcxl sli jn nn aai yag
g21 w-fai aiaii ayaaal slcxl sli jn nn aai yag
g21 w-fai aiaII ayaaal slcxl sli jn nn aai yag
g21 w-fai aiaII ayaaI SLCXL SLCXL SLCXL SLCXL SLCXL SLCXL SLCXL SLCXL SLCXL SLCXL SLCXL SLCXL SLCXL SLCXL SLCXL SLCXL SLCXL SLCXL SLCXL SLCXL SLCXL SLCXL SLCXL SLCXL SLCXL SLCXL SLCXL SLCXL SLCXL SLCXL SLCXL SLCXL SLCXL SLCXL
SLJlJIiLoLc Ethernet (j) Ethernet (i) iioic Lolai g Jllil JyJyLoLc

JziiJzjwJzJgL oic aIJI gio ()

Ethernet jLg jJusjusjusjusjusjusjusjusjusjusjusjusjusjusjusjusjusjusjusjusjusjusjusjusjusjusjusjusjusjusjusjusjusjusjusjusjusjusjusjusjusjusjusjusjusjusjusjusjusjusjus
1g

WES610N

WET610N
iLil

WES610N

WET610N
jgsgJg jgsyBwSsEET hnet (iol) a oog Ethernet sgsa Lai iiaLio aer WES610N gWET 4c WET610N

a5rlll aiaaaaii aaiai iinaii aiee aeae eae aiee 111111111111111111111111111111111111111111111111111111111111111111111111
aJ aJI JgJgJgJgJgJgJgJgJgJg

jai jai
Wi-Fi a1 a2 a3 a4 a5 a6 a7 a8 a9 a10 a11 a12 a13 a14 a15 a16 a17 a18 a19 a20 a21 a22 a23 a24 a25 a26 a27 a28 a29 a30 a31 a32 a33 a34 a35 a36 a37 a38 a39 a40 a41 a42 a43 a44 a45 a46 a47 a48 a49 a50 a51 a52 a53 a54 a55 a56 a57 a58 a59 a60 a61 a62 a63 a64 a65 a66 a67 a68 a69 a70
WPA/WEP abwgl aJ aS Jn LiLo jS WPA/WPA2 abwgl aJ aS Jn S S Jn S Jn S Jn S Jn S Jn S Jn S Jn S Jn S Jn S Jn S Jn S Jn S Jn S Jn S Jn S Jn S Jn S Jn S Jn S Jn S Jn S Jn S Jn S Jn S Jn S Jn S Jn S Jn S Jn S Jn S Jn S Jn S Jn S Jn
aL 1JUJI JIJIgJgJgJgJgJgJgJgJgJg
aiej x gill aasall ogy 21 jne ylc gagai lglgllg WEP .WPA
45.11 JLo8 4oL21 13L
aolj cawwLw2l aS, wll L o1; aS LwUJ aS; wll J o no 3
aJJI gJJI aL5 axi jg JdS JI JLgjgJgJJI aJIS axi
.
LJIyJyJI LQS
aalaaal aalaaal aalaaal aalaaal aalaaal
Jolal 45 Jluo Laih jll jiej cji (jui jui) Jalal 45 Jluo Jhei
1:120g/1g 120g
LwUJ LoxJn nn gaa
aall Jlalll gao aaii iiaag aaiia aaiia aaiia aaiia aaiia aaiia aaiia aaiia aaiia aaiia aaiia aaiia aaiia aaiia aaiia aaiia aaiia aaiia aaiia aaiia aaiia aaiia aaiia aaiia aaiia aaiia aaiia aaiia aaiia aaiia aaiia aaiia aaiia aaiia
SSID gJ 1
J 32 15 15 15 15 15 15 15 15 15 15 15 15 15 15 15 15 15 15 15 15 15 15 15 15 15 15 15 15 15 15 15 15 15 15
aaijio81gaiol aOLS
JL 150000000000000000000000000000000000000000000000000000000000000000000000000000000
gaii
MAC 1gic aaaa
MAC 1gic n! (MAC) 1jLwJll JgwsyBcSsIgic aAa nn SsI Linksys aIg jg .i. i. i. i. i. i. i. i. i. i. i. i. i. i. i. i. i. i. i. i. i. i. i. i. i. i. i. i. i. i. i. i. i. i. i. i. i. i. i. i. i. i. i. i. i. i. i. i. i. i. i. . MAC 1glic LJIaSLWUJgJgJLgUJgJLgUJgJLgUJgJLgUJgJLgUJgJLgUJgJLgUJgJLgUJgJLgUJgJLgU
aLwUJcS. wI JgogJbZo aJgogSJJ 0
JU
aagglg aaglal jssjll jc oae e aLwU UJ gJgogU Jla i gJgGJI slA
sli) lgolw pac slij aLswll cIgJgJgJbai gJgJgJgJbai pa
JJIJI JLIJ
p8j81g 8821 0000. J881 1c 881 aaiai o Lggb aiaa aag g
wgaLJIgLgLgJgJgJgJgJgJgJgJgJgJgJgJgJgJgJgJgJgJgJgJgJgJgJgJgJgJgJgJgJgJgJgJgJgJgJgJgJgJgJgJgJg
IP jgic c Ethernet JgcaaJl IP jgic
y9 254g 1 jnnn x Jdcbj) 169.254.x.y J (IP jgc) IP address .1
.255,0
.255.255.0.0 ___ / __ / _ / _ / _ / _ / _ / _ / _ 1 Subnet mask 2
ab = 16
Lj 1y jll jgssSll lC Ethernet Jgssucl IP lgic nss cgs b s
Jt jll pbl t Lqleil gttig aegsso sljll. Claeill glc Eklu.Jt iill plb
山
JooJIy JIOI IP Ugic JIOIg 8000000000000000000000000000000000000000000000000
.(JL)Enter Ic Jia (J/gj//) Address (169.254.1.250
LWindows XP aabj 8 2n nn nnnn nn nnnn nn nnnn nn nnnn nn nnnn nn nnnn nn nnnn nn nnnn nn nnnn nn nnnn nn nnnn nn nnnn nn nnnn nn nnnn nn nnnn nn nnnn nn nnnn nn nnnn nn nnnn nn nnnn nn nnnn nn nnnn nn nnnn nn nnnn nn nnnn nn nannn nn nnnn nn nnnn nn nnnn nn nnnn nn nnnn nn nnnn nn nnnn nn nnnn nn nnnn nn nnnn nn nnnn nn nnnn nn nnnn nn nnnn nn nnnn nn nnnn nn nnnn nn nnnn nn nnnn nn nnnn nn nnnn nn nnnn nn nnnn nn nnnn nn nennn nn nnnn nn nnnn nn nnnn nn nnnn nn nnnn nn nnnn nn nnnn nn nnnn nn nnnn nn nnnn nn nnnn nn nnnn nn nnnn nn nnnn nn nnnn nn nnnn nn nnnn nn nnnn nn nnnn nn nnnn nn nnnn nn nnnn nn
a.101(gfo)

ab = 30
5j0JgLg jgLg jgLg jgLg JgLg JgLg JgLg
Paaal jg5
jol jll jg k. gai all jayall jy f aagai all gbiil agi jy jn c y jll acl l 10
jy iio oiaaiaiaiaiaiaiaiaiaiaiaiaiaiaiaiaiaiaiaiaiaiaiaiaiaiaiaiaiaiaiaiaiaiaiaiaiaiaiaiaiaiaiaiaiaiaiaiaiaiaiaiaiaiaiaiaiaiaiaiaiaiaiaiaiaiaiaiaiaiaiaiaiaiaiaiaiaiaiaiaiaiaiaiaiaiaiaia
JaujL Jaiio
(1) Setup: aJlllJ aJwLwJ bJgWJ L oLx Jc Jc Jc Jc Jc Jc Jc Jc Jc Jc Jc Jc Jc Jc Jc Jc Jc Jc Jc Jc Jc Jc Jc Jc Jc Jc Jc Jc Jc Jc Jc Jc Jc Jc Jc Jc Jc Jc Jc Jc Jc Jc Jc Jc Jc Jc Jc Jc Jc Jc Jcr Jc Jcr Jcr Jcr Jcr Jcr Jcr Jcr Jcr Jcr Jcr Jcr Jcr Jcr Jcr Jcr Jcr Jcr Jcr Jcr Jcr Jcr Jcr Jcr Jcr Jcr Jcr Jcr Jcr Jcr Jcr
auiuuiuuiuuiuuiuuiuuiuuiuuiuuiuuiuuiuuiuuiuuiuuiuuiuuiuuiuuiuuiuuiuuiuuiuuiuuiuuiuuiuuiuuiuuiuuiuuiuuiuuiuuiuuiuuiuuiuuiuuiuuiuuiuuiuuiuuiuuiuuiuuiuuiuui
J 1 Jgog
#
joeioo oI! ooiuoll oicwll oI! Jgwool wogoeioo pdo
IP 1gic Ic JI (a500 oO Lc) DHCP 1s b00 a5000000000000000000000000000000000000000000000000000000000000000000000000000
LJ 10
ab = 30
Jgj g aLJI IP jlgic n Jy Jy JI IP jlgic y 3i S 13 (aJy Jy Jy Jy Jy Jy DHCP
Ii:JyJyJyJyJyJyJyJyJyJyJyJyJyJyJyJyJyJyJyJyJyJyJyJyJyJyJyJyJyJyJyJyJyJyJyJyJyJyJyJyJyJyJyJyJyJyJyJyJyJyJ y J.169.254.1.250. y J y J y J y J y J y J y J y J y J y J y J y J y J y J y J y J y J y J y J y J y J y J y J y J y J y J y J y J y J y J y J y J y J y J y J y J y J y J y J y J y J y J y J y J y J y J y J y J y J y J y
Jusg jaa aai aal al aai aai aai aai aai aai aai aai aai aai aai aai aai aai aai aai aai aai aai aai aai aai aai aai aai aai aai aai aai aai aai aai aai aai aai aai aai aai aai aai aai aai aai aai aai aai aai aai aai aai aal
a<10gipipipipipipipipipipipipipipipipipipipipipipipipipipipipipipipipipipipipipipipipipipipipipipipipipipipipipipipipipipipipipipipipipipipipipipipipipipipipipipipipipipipipipipipipipipipipipipipipipipipip
Jg jy jy jy jy jy jy jy jy jy jy jy jy jy jy jy jy jy jy jy jy jy jy jy jy jy jy jy jy jy jy jy jy jy jy jy jy jy jy jy jy jy jy jy jy jy jy jy jy jy jy j yj yj yj yj yj yj yj yj yj yj yj yj yj yj yj yj yj yj yj yj yj yj yj yj yj yj yj yj yj yj yj yj yj yj yj yj yj yj yj yj yj yj yj yj yj yj yj yj yj yj y
.1 IP) Static IP
:JJI JgJJI JLoJ.(LiIP) Static IP 13j
JgUgUgUgUgUgUgUgUgUgUgUgUgUgUgUgUgUgUgUgUgUgUgUgUgUgUgUgUgUgUgUgUgUgUgUgUgUgUgUgUgUgUgUgUgUgUgUgUgUgUg
J 1 Jd 1 d 1 d 1 d 1 d 1 d
aLwJ aSJJy JolJI aCJ all SjI jI (aJ aSJJ e Li) Subnet Mask
) Lc, aLsJ1 aJzIyJI 0JI IIP Jgic JzI (aJzIyJI 0JI Default Gateway
.()
cI)Cancel Changes gjg jai jai jai (a) Save Settings gjg
y
Basic Wireless Settings < (1,1) Wireless
(wLw81 5LwU1 c81)
aLwU1/2cU1/2gU2/2 (AuwLw/2AuwLwU/2cU)Basic Wireless Settings aLw
J 1
JyI JyI JyI JyI JyI JyI JyI JyI JyI JyI JyI JyI JyI JyI JyI JyI JyI JyI JyI JyI JyI JyI JyI JyI JyI JyI JyI JyI JyI JyI JyI JyI JyI JyI J
LiLi Li Ji Jiwi-Fi aaiy gaoJl alcyl plsiwl liS
..(g) Manual .Lg y LwLl 1s Lg (n g) Configuration View
.8 a, (aLwLl aLwLl t ad) Basic Wireless Settings
.(Wi-Fi aiai i Wi-Fi Protected Setup .Wi-Fi aaii ai
9.4 (Wi-Fi Wi-Fi Protected Setup
(Lw)Basic Setup<(S) Setup
aJy aLwI aI oiaaW (yLw/1/c2)Basic Setup aLw y gbl aLw JgJyJL aLwJI aLwll Ethernet aK wJl aI aI JgJd WJd LwJl


(AU) Language
Jywo Jt wll bcl wall oabw gaoa jn (A) Language
Network Setup
D HCP L no Lalalipipipipipipipipipipipipipipipipipipipipipipipipipipipipipipipipipipipipipipipipipipipipipipipipipipipipipipipipipipipipipipipipipipipipipipipipipipipipipipipipipipipipipipipipipipipipipipipipipipipip
.(LIP)
WPA) WPA Personal
.WEP wu wu wu wu wu wu wu WPA

JgUa aI g I JI U WPA (j) Encryption
JgUa aI g I JI U U uagallg jnnll JgUa JgUa Passphrase 63 8 8 8 8 8 8 8 8 8 8 8 8 8 8 8 8 8 8 8 8 8 8 8 8 8 8 8 8 8 8 8 8 8 8 8 8
(wn WPA2) WPA2 Personal
LiLoIg Loaai j51 WPA JooJoo WPA2

Ae 1000000000000000000000000000000000000000000000000000000000000000000000000000000000
(4wLw! 4.5LwUf)Basic Wireless Settings

f bLaI aI aI aI aI SSID (SSID) (SSID) Network Name
aiaiaiaiaiaiaiaiaiaiaiaiaiaiaiaiaiaiaiaiaiaiaiaiaiaiaiaiaiaiaiaiaiaiaiaiaiaiaiaiaiaiaiaiaiaiaiaiaiaiaiaiaiaiaiaiaiaiaiaiaiaiaiaiaiaiaiaiaiaiaiaiaiaiaiaiaiaiaiaiaiaiaiaiaiaiaiaiaiaiaiaiaiaiaiaiaiaiaiaia iaaii
(L) Wireless Security
WPA2) WPA2 Personal (吉 吉 吉 吉 吉) WPA) WPA Personal: 吉 吉 吉 吉 吉 吉 吉 吉 吉 吉 吉 吉 吉 吉 吉 吉 吉 吉 吉 吉 吉 ) WEP (Wi-Fi) WPA2g (Wi-Fi) WPA. WEPg (WPA2g) WEPg (WPA2g) WPA. WEPg (WPA2g) WPA. WEPg (WPA2g) WPA. WEPg (WPA2g) WPA. WEPg (WPA2g) WPA. WEPg (WPA2g) WPA. WEPg (WPA2g) WPA. WEPg (WPA2g) WPA. WEPg (WPA2g) WPA. WEPg
(ω) Security Mode
12cXl 1c 1 LwU ULo21 pLwU u 2 cS 13! aLwU ULo21 wU LwU d (Jbeo) Disabled
21 × 3
aLgJUwJwJz aSLWUu cLs w g JgJ5 pssus jy aJ sii JgJLgJwJUwJz aSLWUu oJgJz bHnui Jz 21g CliJI/gyJI
(Wi-Fi i.i. j. y) Wi-Fi Protected Setup
aaii jai iie gai jia jai jai wai jai


1
Wi-Fi aaiy i yao ool 1 j j aoaiy aagai jL 13j uLw21 10
AicbcjolgJGgJI JcogJWi-Fi aaii jaoJl aclj jgj gaj 1
JgJ (Wi-Fi J) Wi-Fi Protected Setup jj gJ 2
Jy JLi (Wi-Fi aai yooJ/1oJ) Wi-Fi Protected Setup aL
.(g) Close ggej jyJyJ 3
(LbL) Link Status (Wi-Fi aaaa/aaJ/la) Wi-Fi Protected Setup aL
. (LOL^T) Security ((SSID) 一 < 一 < 一 < 一 < 一 < 一 < 一 < 一 < 一 < 一 < 一 < 一 < 一 < 一 < 一 < s (SSD) Network Name9
JgJgJI aJI gJI gJI gJI gJI gJI gJI gJI gJI gJI gJI gJI gJI gJI gJI gJI gJI gJI gJI gJI gJI gJI gJI gJI gJI gJI gJI gJI gJI gJI gJI gJI gJI gJI gJI gJI gJI gJI gJI gJI gJI gJI gJI gJI gJI gJI gJI gJI gJI gJI gJI
Lg6g8jnnnnaa
cI)Cancel Changes gjg j 1
1
WEP
.WPA2g WPA LLoJ 1sL JwLwJg WEP

ρLj 10) 40/64) (10 hex digits) 40/64 bits .WEP yad jy gssd (yad Jf) Encryption
L21 ((Lus LwLwLq 26) 104/128) (26 hex digits) 104/128 bits g! (a
((a) 10) (10 hex digits) 40/64 bits
1.1.5 WEP (Liào) (1 LiàoJI) Key 1
JJI abwglposimolJLWgZI ciao 1 Cioa JI Key 1 (JLwZI Ciao) Tx Key
Lao plasw y (jLai) Auto g JxJ (aLaJ) Authentication
2:GiaJl pIaill aIaI aIaI (Gia) Open 12:JiaJI JlaJI gJ GiaJI pIbJI
ClaolalaoLuo (Joo) Shared 2. aolalw WEP ciao g Jowll
LWEPcJgJyJi
cLjC ael Changes gg jg jg jg Save Settings g
1
(aLw) Wireless Network Site Survey
JyI LwUJ 1200000000000000000000000000000000000000000000000000000000
J 1
.(JL) Connect (a) Select (a) Select a SSID g (a) Wireless Network Name
aLwUd 4 LwU d Ug u Gz (jLz) GHz
0% .a2
Factory Defaults < (__) Administration
14. (aeal) 15 (a) Factory Defaults 15. (C) Upgrade Firmware < (D, D) Administration 15 (C) Upgrade Firmware 15. (JL) Bridge < ( JL) Status 15 (J) Logle) Bridge Information 15 (.1.1) Local Network 16. (SLW) Wireless < (JL) Status 16 (w) WirelessLg> Lg<1h>
17 WES610N/WET610N#
18. WES610N 19. WET610Ni 150
2 1g 3. 1eI11 a-gJLwUJ L0xJn nn Jaa
4 SSID gJ 4 4 MAC 1j 4 4 5 1oUpaaa 1
6. 6. (J) Basic Setup < (J) Setup (ə·LJI) Language 7 (A) Language 7 (aSJJ) Network Setup 7 (_ ) Basic Wireless Settings < ( < ) Wireless 7 (aLwI aLwU)Basic Wireless Settings 8 (LwUJnLo) Wireless Security 9 (Wi-Fi 12 Wi-Fi Protected Setup ≤ . Wireless Network Site Survey < (≤ L) Wireless 9 (a.s.u.) 10 (a.sLwUaSjJgog) Wireless Network Site Survey 11. WMM< (Lw) Wireless 11 WMMiiie 1c aolc jzj
SLWJLwJLwJLwJLwJLwJLwJLwJLwJLwJLwJLwJLwJLwJLwJLwJLwJLwJLwJLwJLwJLwJLwJLwJLwJLwJLwJLwJLwJLwJLwJLwJLwJLwJLw  aLcXl aai y bI aI Lgll J WpFi aiai gaoal 1sclj j plasw lscWPA2 g WPA loa pssuWgi Fi aiai yaoal aLcXl plaswJ Lali JwogJWi-Fi aiai yaoal Basic Wireless < ( (LwU) Wireless" g J .Wi-Fi aiai yaoal .7 aiaiJy "aawwzlaiaeLwU) Settings  JgU LgU g U (giyS/gy)Wi-Fi aiaia yaaal 1aLg21 eg g21 Wf-aiia ayaaal slcxl sli jn nn aai yag g21 w-fai aiaia ayaaal slcxl sli jn nn aai yag g21 w-fai aiaia ayaaal slcxl sli jn nn aai yag g21 w-fai aiaia ayaaal slcxl sli jn nn aai yag g21 w-fai aiaia ayaaal slcxl sli jn nn aai yag g21 w-fai aian ayaaal slcxl sli jn nn aai yag g21 w-fai aiaia ayaaal slcxl sli jn nn aai yag g21 w-fai aiaia ayaaal slcxl sli jn nn aai yag g21 w-fai aiaia ayaaal slcxl sli jn nn aai yag g21 w-fai aiaie ayaaal slcxl sli jn nn aai yag g21 w-fai aiaia ayaaal slcxl sli jn nn aai yag g21 w-fai aiaia ayaaal slcxl sli jn nn aai yag g21 w-fai aiaia ayaaal slcxl sli jn nn aai yag g21 w-fai aiaiae ayaaal slcxl sli jn nn aai yag g21 w-fai aiaia ayaaal slcxl sli jn nn aai yag g21 w-fai aiaia ayaaal slcxl sli jn nn aai yag g21 w-fai aiaia ayaaal slcxl sli jn nn aai yag g21 w-fai aiaic ayaaal slcxl sli jn nn aai yag g21 w-fai aiaia ayaaal slcxl sli jn nn aai yag g21 w-fai aiaia ayaaal slcxl sli jn nn aai yag g21 w-fai aiaia ayaaal slcxl sli jn nn aai yag g21 w-fai aiaii ayaaal slcxl sli jn nn aai yag g21 w-fai aiaii ayaaal slcxl sli jn nn aai yag g21 w-fai aiaii ayaaal slcxl sli jn nn aai yag g21 w-fai aiaii ayaaal slcxl sli jn nn aai yag g21 w-fai aia ii ayaaal slcxl sli jn nn aai yag g21 w-fai aiaii ayaaal slcxl sli jn nn aai yag g21 w-fai aiaii ayaaal slcxl sli jn nn aai yag g21 w-fai aiaii ayaaal slcxl sli jn nn aai yag g21 w-fai aiaiu ayaaal slcxl sli jn nn aai yag g21 w-fai aiaiu ayaaal slcxl sli jn nn aai yag g21 w-fai aiaiu ayaaal slcxl sli jn nn aai yag g21 w-fai aiaiu ayaaal slcxl sli jn nn aai yag g21 w-fai aiaii ayaaal slcxl sli jn nn aai yag g21 w-fai aiaii ayaaal slcxl sli jn nn aai yag g21 w-fai aiaii ayaaal slcxl sli jn nn aai yag g21 w-fai aiaII ayaaal slcxl sli jn nn aai yag g21 w-fai aiaII ayaaI SLCXL SLCXL SLCXL SLCXL SLCXL SLCXL SLCXL SLCXL SLCXL SLCXL SLCXL SLCXL SLCXL SLCXL SLCXL SLCXL SLCXL SLCXL SLCXL SLCXL SLCXL SLCXL SLCXL SLCXL SLCXL SLCXL SLCXL SLCXL SLCXL SLCXL SLCXL SLCXL SLCXL SLCXL SLJlJIiLoLc Ethernet (j) Ethernet (i) iioic Lolai g Jllil JyJyLoLc  JziiJzjwJzJgL oic aIJI gio ()  Ethernet jLg jJusjusjusjusjusjusjusjusjusjusjusjusjusjusjusjusjusjusjusjusjusjusjusjusjusjusjusjusjusjusjusjusjusjusjusjusjusjusjusjusjusjusjusjusjusjusjusjusjusjusjus 1g  WES610N  WET610N iLil  WES610N  WET610N jgsgJg jgsyBwSsEET hnet (iol) a oog Ethernet sgsa Lai iiaLio aer WES610N gWET 4c WET610N  a5rlll aiaaaaii aaiai iinaii aiee aeae eae aiee 111111111111111111111111111111111111111111111111111111111111111111111111 aJ aJI JgJgJgJgJgJgJgJgJgJg jai jai
Wi-Fi a1 a2 a3 a4 a5 a6 a7 a8 a9 a10 a11 a12 a13 a14 a15 a16 a17 a18 a19 a20 a21 a22 a23 a24 a25 a26 a27 a28 a29 a30 a31 a32 a33 a34 a35 a36 a37 a38 a39 a40 a41 a42 a43 a44 a45 a46 a47 a48 a49 a50 a51 a52 a53 a54 a55 a56 a57 a58 a59 a60 a61 a62 a63 a64 a65 a66 a67 a68 a69 a70 WPA/WEP abwgl aJ aS Jn LiLo jS WPA/WPA2 abwgl aJ aS Jn S S Jn S Jn S Jn S Jn S Jn S Jn S Jn S Jn S Jn S Jn S Jn S Jn S Jn S Jn S Jn S Jn S Jn S Jn S Jn S Jn S Jn S Jn S Jn S Jn S Jn S Jn S Jn S Jn S Jn S Jn S Jn S Jn S Jn S Jn aL 1JUJI JIJIgJgJgJgJgJgJgJgJgJg aiej x gill aasall ogy 21 jne ylc gagai lglgllg WEP .WPA45.11 JLo8 4oL21 13L
aolj cawwLw2l aS, wll L o1; aS LwUJ aS; wll J o no 3 aJJI gJJI aL5 axi jg JdS JI JLgjgJgJJI aJIS axi . LJIyJyJI LQS aalaaal aalaaal aalaaal aalaaal aalaaal Jolal 45 Jluo Laih jll jiej cji (jui jui) Jalal 45 Jluo Jhei 1:120g/1g 120gLwUJ LoxJn nn gaa
aall Jlalll gao aaii iiaag aaiia aaiia aaiia aaiia aaiia aaiia aaiia aaiia aaiia aaiia aaiia aaiia aaiia aaiia aaiia aaiia aaiia aaiia aaiia aaiia aaiia aaiia aaiia aaiia aaiia aaiia aaiia aaiia aaiia aaiia aaiia aaiia aaiia aaiiaSSID gJ 1
J 32 15 15 15 15 15 15 15 15 15 15 15 15 15 15 15 15 15 15 15 15 15 15 15 15 15 15 15 15 15 15 15 15 15 15aaijio81gaiol aOLS
JL 150000000000000000000000000000000000000000000000000000000000000000000000000000000 gaiiMAC 1gic aaaa
MAC 1gic n! (MAC) 1jLwJll JgwsyBcSsIgic aAa nn SsI Linksys aIg jg .i. i. i. i. i. i. i. i. i. i. i. i. i. i. i. i. i. i. i. i. i. i. i. i. i. i. i. i. i. i. i. i. i. i. i. i. i. i. i. i. i. i. i. i. i. i. i. i. i. i. i. . MAC 1glic LJIaSLWUJgJgJLgUJgJLgUJgJLgUJgJLgUJgJLgUJgJLgUJgJLgUJgJLgUJgJLgUJgJLgU aLwUJcS. wI JgogJbZo aJgogSJJ 0JU
aagglg aaglal jssjll jc oae e aLwU UJ gJgogU Jla i gJgGJI slA sli) lgolw pac slij aLswll cIgJgJgJbai gJgJgJgJbai pa JJIJI JLIJ p8j81g 8821 0000. J881 1c 881 aaiai o Lggb aiaa aag g wgaLJIgLgLgJgJgJgJgJgJgJgJgJgJgJgJgJgJgJgJgJgJgJgJgJgJgJgJgJgJgJgJgJgJgJgJgJgJgJgJgJgJgJgJgJg IP jgic c Ethernet JgcaaJl IP jgic y9 254g 1 jnnn x Jdcbj) 169.254.x.y J (IP jgc) IP address .1 .255,0 .255.255.0.0 ___ / __ / _ / _ / _ / _ / _ / _ / _ 1 Subnet mask 2ab = 16
Lj 1y jll jgssSll lC Ethernet Jgssucl IP lgic nss cgs b s Jt jll pbl t Lqleil gttig aegsso sljll. Claeill glc Eklu.Jt iill plb 山 JooJIy JIOI IP Ugic JIOIg 8000000000000000000000000000000000000000000000000 .(JL)Enter Ic Jia (J/gj//) Address (169.254.1.250 LWindows XP aabj 8 2n nn nnnn nn nnnn nn nnnn nn nnnn nn nnnn nn nnnn nn nnnn nn nnnn nn nnnn nn nnnn nn nnnn nn nnnn nn nnnn nn nnnn nn nnnn nn nnnn nn nnnn nn nnnn nn nnnn nn nnnn nn nnnn nn nnnn nn nnnn nn nnnn nn nnnn nn nannn nn nnnn nn nnnn nn nnnn nn nnnn nn nnnn nn nnnn nn nnnn nn nnnn nn nnnn nn nnnn nn nnnn nn nnnn nn nnnn nn nnnn nn nnnn nn nnnn nn nnnn nn nnnn nn nnnn nn nnnn nn nnnn nn nnnn nn nnnn nn nnnn nn nennn nn nnnn nn nnnn nn nnnn nn nnnn nn nnnn nn nnnn nn nnnn nn nnnn nn nnnn nn nnnn nn nnnn nn nnnn nn nnnn nn nnnn nn nnnn nn nnnn nn nnnn nn nnnn nn nnnn nn nnnn nn nnnn nn nnnn nn a.101(gfo) ab = 30
5j0JgLg jgLg jgLg jgLg JgLg JgLg JgLg Paaal jg5 jol jll jg k. gai all jayall jy f aagai all gbiil agi jy jn c y jll acl l 10 jy iio oiaaiaiaiaiaiaiaiaiaiaiaiaiaiaiaiaiaiaiaiaiaiaiaiaiaiaiaiaiaiaiaiaiaiaiaiaiaiaiaiaiaiaiaiaiaiaiaiaiaiaiaiaiaiaiaiaiaiaiaiaiaiaiaiaiaiaiaiaiaiaiaiaiaiaiaiaiaiaiaiaiaiaiaiaiaiaiaia JaujL Jaiio (1) Setup: aJlllJ aJwLwJ bJgWJ L oLx Jc Jc Jc Jc Jc Jc Jc Jc Jc Jc Jc Jc Jc Jc Jc Jc Jc Jc Jc Jc Jc Jc Jc Jc Jc Jc Jc Jc Jc Jc Jc Jc Jc Jc Jc Jc Jc Jc Jc Jc Jc Jc Jc Jc Jc Jc Jc Jc Jc Jc Jcr Jc Jcr Jcr Jcr Jcr Jcr Jcr Jcr Jcr Jcr Jcr Jcr Jcr Jcr Jcr Jcr Jcr Jcr Jcr Jcr Jcr Jcr Jcr Jcr Jcr Jcr Jcr Jcr Jcr Jcr Jcr auiuuiuuiuuiuuiuuiuuiuuiuuiuuiuuiuuiuuiuuiuuiuuiuuiuuiuuiuuiuuiuuiuuiuuiuuiuuiuuiuuiuuiuuiuuiuuiuuiuuiuuiuuiuuiuuiuuiuuiuuiuuiuuiuuiuuiuuiuuiuuiuuiuuiuui J 1 Jgog # joeioo oI! ooiuoll oicwll oI! Jgwool wogoeioo pdo IP 1gic Ic JI (a500 oO Lc) DHCP 1s b00 a5000000000000000000000000000000000000000000000000000000000000000000000000000 LJ 10ab = 30
Jgj g aLJI IP jlgic n Jy Jy JI IP jlgic y 3i S 13 (aJy Jy Jy Jy Jy Jy DHCP Ii:JyJyJyJyJyJyJyJyJyJyJyJyJyJyJyJyJyJyJyJyJyJyJyJyJyJyJyJyJyJyJyJyJyJyJyJyJyJyJyJyJyJyJyJyJyJyJyJyJyJyJ y J.169.254.1.250. y J y J y J y J y J y J y J y J y J y J y J y J y J y J y J y J y J y J y J y J y J y J y J y J y J y J y J y J y J y J y J y J y J y J y J y J y J y J y J y J y J y J y J y J y J y J y J y J y J y J y Jusg jaa aai aal al aai aai aai aai aai aai aai aai aai aai aai aai aai aai aai aai aai aai aai aai aai aai aai aai aai aai aai aai aai aai aai aai aai aai aai aai aai aai aai aai aai aai aai aai aai aai aai aai aai aai aal a<10gipipipipipipipipipipipipipipipipipipipipipipipipipipipipipipipipipipipipipipipipipipipipipipipipipipipipipipipipipipipipipipipipipipipipipipipipipipipipipipipipipipipipipipipipipipipipipipipipipipipip Jg jy jy jy jy jy jy jy jy jy jy jy jy jy jy jy jy jy jy jy jy jy jy jy jy jy jy jy jy jy jy jy jy jy jy jy jy jy jy jy jy jy jy jy jy jy jy jy jy jy jy j yj yj yj yj yj yj yj yj yj yj yj yj yj yj yj yj yj yj yj yj yj yj yj yj yj yj yj yj yj yj yj yj yj yj yj yj yj yj yj yj yj yj yj yj yj yj yj yj yj yj y .1 IP) Static IP :JJI JgJJI JLoJ.(LiIP) Static IP 13j JgUgUgUgUgUgUgUgUgUgUgUgUgUgUgUgUgUgUgUgUgUgUgUgUgUgUgUgUgUgUgUgUgUgUgUgUgUgUgUgUgUgUgUgUgUgUgUgUgUgUg J 1 Jd 1 d 1 d 1 d 1 d 1 d aLwJ aSJJy JolJI aCJ all SjI jI (aJ aSJJ e Li) Subnet Mask ) Lc, aLsJ1 aJzIyJI 0JI IIP Jgic JzI (aJzIyJI 0JI Default Gateway .() cI)Cancel Changes gjg jai jai jai (a) Save Settings gjg yBasic Wireless Settings < (1,1) Wireless
(wLw81 5LwU1 c81)
aLwU1/2cU1/2gU2/2 (AuwLw/2AuwLwU/2cU)Basic Wireless Settings aLw J 1 JyI JyI JyI JyI JyI JyI JyI JyI JyI JyI JyI JyI JyI JyI JyI JyI JyI JyI JyI JyI JyI JyI JyI JyI JyI JyI JyI JyI JyI JyI JyI JyI JyI JyI J LiLi Li Ji Jiwi-Fi aaiy gaoJl alcyl plsiwl liS ..(g) Manual .Lg y LwLl 1s Lg (n g) Configuration View .8 a, (aLwLl aLwLl t ad) Basic Wireless Settings .(Wi-Fi aiai i Wi-Fi Protected Setup .Wi-Fi aaii ai 9.4 (Wi-Fi Wi-Fi Protected Setup(Lw)Basic Setup<(S) Setup
aJy aLwI aI oiaaW (yLw/1/c2)Basic Setup aLw y gbl aLw JgJyJL aLwJI aLwll Ethernet aK wJl aI aI JgJd WJd LwJl   (AU) Language Jywo Jt wll bcl wall oabw gaoa jn (A) Language Network Setup D HCP L no Lalalipipipipipipipipipipipipipipipipipipipipipipipipipipipipipipipipipipipipipipipipipipipipipipipipipipipipipipipipipipipipipipipipipipipipipipipipipipipipipipipipipipipipipipipipipipipipipipipipipipipip .(LIP) WPA) WPA Personal .WEP wu wu wu wu wu wu wu WPA  JgUa aI g I JI U WPA (j) Encryption JgUa aI g I JI U U uagallg jnnll JgUa JgUa Passphrase 63 8 8 8 8 8 8 8 8 8 8 8 8 8 8 8 8 8 8 8 8 8 8 8 8 8 8 8 8 8 8 8 8 8 8 8 8 (wn WPA2) WPA2 Personal LiLoIg Loaai j51 WPA JooJoo WPA2  Ae 1000000000000000000000000000000000000000000000000000000000000000000000000000000000 (4wLw! 4.5LwUf)Basic Wireless Settings  f bLaI aI aI aI aI SSID (SSID) (SSID) Network Name aiaiaiaiaiaiaiaiaiaiaiaiaiaiaiaiaiaiaiaiaiaiaiaiaiaiaiaiaiaiaiaiaiaiaiaiaiaiaiaiaiaiaiaiaiaiaiaiaiaiaiaiaiaiaiaiaiaiaiaiaiaiaiaiaiaiaiaiaiaiaiaiaiaiaiaiaiaiaiaiaiaiaiaiaiaiaiaiaiaiaiaiaiaiaiaiaiaiaiaia iaaii (L) Wireless Security WPA2) WPA2 Personal (吉 吉 吉 吉 吉) WPA) WPA Personal: 吉 吉 吉 吉 吉 吉 吉 吉 吉 吉 吉 吉 吉 吉 吉 吉 吉 吉 吉 吉 吉 ) WEP (Wi-Fi) WPA2g (Wi-Fi) WPA. WEPg (WPA2g) WEPg (WPA2g) WPA. WEPg (WPA2g) WPA. WEPg (WPA2g) WPA. WEPg (WPA2g) WPA. WEPg (WPA2g) WPA. WEPg (WPA2g) WPA. WEPg (WPA2g) WPA. WEPg (WPA2g) WPA. WEPg (WPA2g) WPA. WEPg (ω) Security Mode 12cXl 1c 1 LwU ULo21 pLwU u 2 cS 13! aLwU ULo21 wU LwU d (Jbeo) Disabled 21 × 3 aLgJUwJwJz aSLWUu cLs w g JgJ5 pssus jy aJ sii JgJLgJwJUwJz aSLWUu oJgJz bHnui Jz 21g CliJI/gyJI(Wi-Fi i.i. j. y) Wi-Fi Protected Setup
aaii jai iie gai jia jai jai wai jai  1
Wi-Fi aaiy i yao ool 1 j j aoaiy aagai jL 13j uLw21 10 AicbcjolgJGgJI JcogJWi-Fi aaii jaoJl aclj jgj gaj 1 JgJ (Wi-Fi J) Wi-Fi Protected Setup jj gJ 2 Jy JLi (Wi-Fi aai yooJ/1oJ) Wi-Fi Protected Setup aL .(g) Close ggej jyJyJ 3 (LbL) Link Status (Wi-Fi aaaa/aaJ/la) Wi-Fi Protected Setup aL . (LOL^T) Security ((SSID) 一 < 一 < 一 < 一 < 一 < 一 < 一 < 一 < 一 < 一 < 一 < 一 < 一 < 一 < 一 < s (SSD) Network Name9 JgJgJI aJI gJI gJI gJI gJI gJI gJI gJI gJI gJI gJI gJI gJI gJI gJI gJI gJI gJI gJI gJI gJI gJI gJI gJI gJI gJI gJI gJI gJI gJI gJI gJI gJI gJI gJI gJI gJI gJI gJI gJI gJI gJI gJI gJI gJI gJI gJI gJI gJI gJI gJI Lg6g8jnnnnaa cI)Cancel Changes gjg j 1 1WEP
.WPA2g WPA LLoJ 1sL JwLwJg WEP  ρLj 10) 40/64) (10 hex digits) 40/64 bits .WEP yad jy gssd (yad Jf) Encryption L21 ((Lus LwLwLq 26) 104/128) (26 hex digits) 104/128 bits g! (a ((a) 10) (10 hex digits) 40/64 bits 1.1.5 WEP (Liào) (1 LiàoJI) Key 1 JJI abwglposimolJLWgZI ciao 1 Cioa JI Key 1 (JLwZI Ciao) Tx Key Lao plasw y (jLai) Auto g JxJ (aLaJ) Authentication 2:GiaJl pIaill aIaI aIaI (Gia) Open 12:JiaJI JlaJI gJ GiaJI pIbJI ClaolalaoLuo (Joo) Shared 2. aolalw WEP ciao g Jowll LWEPcJgJyJi cLjC ael Changes gg jg jg jg Save Settings g 1(aLw) Wireless Network Site Survey
JyI LwUJ 1200000000000000000000000000000000000000000000000000000000 J 1 .(JL) Connect (a) Select (a) Select a SSID g (a) Wireless Network Name aLwUd 4 LwU d Ug u Gz (jLz) GHz 0% .aJgssll gddl 1000000000000000000000000000000000000000000
J.1
(Wi-Fi aaiy J/2c) Wi-Fi Protected Setup aLw 1
Wi-Fi aaiy J/2c) Wi-Fi Protected Setup aLw 1
Wu-11111111111111111111111111111111111111111111
gJfJy J (Wi-Fi aai y aJ/1cY) Wi-Fi Protected Setup aL W .2 0g.
(1) Close g
(LL) Link Status (Wi-Fi Wi-Fi Protected Setup .Security ((SSID) (SSID) Network Nameg
Wireless Network Site Survey < (w) Wireless
(4.5 Lw)U1 4.5 W U2
Wires Network Site Survey Wireless Network Site Survey Wireless Network Site Survey
L: L WEP CLiQo (1 LiQJ) Key 1
JwJhawjgposssuJlWx1 Ciao g (1 CiaoJ) Key 1 (JLwZ1 Ciao) Tx Key
WMM® < (S L W U) Wireless
gJ L e J p J WMM gai (WMM) aLwll oal bJwll cJd! y Video gj (Jg J) Best Effort gJ (aJlJI Background: (cJLJI JG) Lg JsALJ JwJJI aiBlaJI 1J jI JIO BAA Baa Jg wO Pg Ja J B. (C) Voice gJ (gJ)
LwU1s2Jn
ab = 30
Ia# jooiaJ JooisiWll aocaa WMM aLw g oagg
WPA2
Lalol Looe eee ee eee (SSID) (SSID) Network Name
Lal (wPA2) WPA2 Personal (w) Security Mode
AeJg 2014 2015
.(AES gf TKIP) TKIP or AES gAES
Jgogll algl g<swll agolg jn jnl jol (golal Passphrase
63g8jnnn
aLJIgJbJI gJI logJI (z) Refresh g
.(JL)Connect
WEP
Lalol Laiy jll (SSID) (SSID) Network Name
LLaWEP (LLa) Security Mode
ρLj 10) 40/64) (10 hex digits) 40/64 bits .WEP yaiw sgiw w (yaiw) Encryption
((L_j, , L_j, , 26)) 104/128) (26 hex digits) 104/128 bits g
Best Effort
JgJgJgJgJgJgJgJgJgJgJgJgJgJgJgJgJgJgJgJgJgJgJgJgJgJgJgJgJgJgJgJgJgJgJgJgJgJgJgJgJgJgJgJgJgJgJgJgJgJgJ gA (ADDBA) JAC AASL JGpAsw (MAC) JLwgl JI JI JI JI JI JI JI JI JI JI JI JI JI JI JI JI JI JI JI JI JI JI JI JI JI JI JI JI JI JI JI JI JI JI JI JI JI JI JI JI JI JI JI JI JI JI JI JI JI JI J1
ADDBA JIa MAC a a c 1! Lo jal I Jg) Accept Aggregation JJI JIeil (2) No .(p) Yes g y
JJI JIeil (2) p JJI JIeil Max. Number of Packets in Aggregation
JJI JIeil .10 0 0 bn Lo jai JIeil .g (a c JIeil LbJ) pJJI JIeil
J 16000 g 20000 g 0 0 0 0 0 0 0 0 0 0 0 0 0 0 0 0 0 0 0 0 0 0 0 0 0 0 0 0 0 0 0 0 0 0 0 0 0 0 0 0 0 0 0 0 0 0 0 0 0 0 8
J 1500 0 0 0 0 0 0 0 0 0 0 0 0 0 0 0 0 0 0 0 0 0 0 0 0 0 0 0 0 0 0 0 0 0 0 0 0 0 0
ADDBA 1 (ADDBA A) ADDBA Timeout Lo glll (ACK) .g.0 65535 0
aggagagagagagagagagagagagagagagagagagagagagagagagagagagagagagagagagagagagagagagagagagagagagagagagagagagagagagagagagagagagagagagagagagagagagagagagagagagagagagagagagagagagagagagagagagagag
(2) Video
J! JgUgUgUgUgUgUgUgUgUgUgUgUgUgUgUgUgUgUgUgUgUgUgUgUgUgUgUgUgUgUgUgUgUgUgUgUgUgUgUgUgUgUgUgUgUgUgUgUgUgUg U (e) Use Aggregation Yes gA (ADDBA) 1.2 p1 (ADDBA) 1.2 p1 (ADDBA) 1.2 p1 (ADDBA) 1.2 p1 (ADDBA) 1.2 p1 (ADDBA) 1.2 p1 (ADDBA) 1.2 p1 (ADDBA) 1.2 p1 (ADDBA) 1.2 p1 (ADDBA) 1.2 p1
ADDBA 13 Jai MAC a a b c d l j Lo a j j (e g) Accept Aggregation Jj Jn Jn Jn Jn (2) No . (paej) Yes g y
Jy Jy Jy Jy Jy Jy Jy Jy Jy Jy Jy Jy Jy Jy Jy Jy Jy Jy Jy Jy Jy Jy Jy Jy Jy Jy Jy Jy Jy Jy Jy Jy Jy Jy Jy Jy Jy Jy Jy Jy Jy Jy Jy Jy Jy Jy Jy Jy Jy Jy Jy
WMM
()Access Mode
ADDBA JdLd (ADDBA d) ADDBA Timeout
Lo glll (ACK) aajll jyjx yelai jyai jyai jyai jyai jyai jyai jyai jyai jyai jyai jyai jyai jyai jyai jyai jyai jyai jyai jyai jyai jyai jyai jyai jyai jyai jyai jyai jyai
algJJI JJI 0JJIaJI LLo 65535 0
Aggregation Window Size
.64g yjy j 64g0 jyy lo gblil jglj y aegn o jy jlc JgJgJgJgJgJgJgJgJg
cLj)Cancel Changes gg j 1 (A) Save Settings g
y
Advanced Wireless Settings < (w) Wireless
(aaaaal aLwU U 1scl)
a h b a Jg g w g a j 1
LwUJ 100
m = 311
LwU //cY) Advanced Wireless Settings
kae oai aill oaii wail daaio (aoia)
(Advanced Wireless
Jbe j ≤ Jc (LDPC) aLdS JdS SdS (LDPC Use LDPC
aoslo aoojg jao sliagally aolal ogai g oilll aed aiaolal Jaaai slaa
pL1.182 no jLc) aeey PHY cXeJooJI iic LiLiLDPC jooji JooJI
.(No 2g. (pai) Yes.LDCP Jolal jil sbj
J 1 J 1 J 1 J 1 J 1 J 1 J 1 J 1 J 1 J 1 J 1 J 1 J 1 J 1 J 1 J 1 J 1 J 1 J 1 J 1 J 1 J 1 J 1 J 1 J 1 J 1 J 1 J 1 J 1 J 1 J 1 J 1 J 1 J 1 J
.12000 9 16000 9 10000
Ig!
100gJLo glllgljy jai aal alwlglae 1a J 3"glc! 1pss
3g
JJI JI JI (e) Min. Size of Packet in Aggregation
Aggregation Window Size
64g 64g0 jn Lo gblil Cglj. aaoa oJgJgJL JgJLw
<Li)Cancel Changes gg f (A) Save Settings g
1
(Voice
J J J J J J J J J J J J J J J J J J J J J J J J J J J J J J J J J J J J J J J J J J J J J J J J J J J J J J J J J J J J J J J J J J J J J J J J J J J J J J J J J J J
Yes gA (ADDBA) aLacw (MAC) JlLwJ
JzJI JI JIeJ (2) No. (paei)
ADDBA J MAC LoJg)Accept Aggregation
J J 1) Max. Number of Packets in Aggregation
y 2g0 JLo glllglj. g (aaglll) j
.2
J 1 J 1 J 1 J 1 J 1 J 1 J 1 J 1 J 1 J 1 J 1 J 1 J 1 J 1 J 1 J 1 J 1 J 1 J 1 J 1 J 1 J 1 J 1 J 1 J 1 J 1 J 1 J 1 J 1 J 1 J 1 J 1 J 1 J 1 J
.10000 9 16000 9 10000
Lgss gnnll g! yall algo all ool jll (algo) Timeout Internal
100 9 0 j JLo gUJIgJyBcJgJJIaBwJgAldI yj JJJ "Jx! Jo
.10
JJI JI (eannnnnne nnnnnnnnnnnnnnnnnnnnnnnnnnnnnnnnnnnnnnnnnnnnnnnnnnnnnnnnnnnnnnnnnnnnnnnnnnnnnnnnnnnnnnnnnnnnnnnnnnnnnnnnnnnnnnnnnnnnnnnnnnnnnnnnnnnnnnnnnnnnn
1500g 1
.10
(_j, _j) Management < (_j, _j) Administration
Jg Jg Jg Jg Jg Jg Jg Jg Jg Jg Jg Jg Jg Jg Jg Jg Jg Jg Jg Jg Jg Jg Jg Jg Jg Jg Jg Jg Jg Jg Jg Jg Jg Jg Jg Jg Jg Jg Jg Jg Jg Jg Jg Jg
aillolglglllalgl
Management
(1) Bridge Access
Joo 1 Joo
JSSS JSSS JSSS JSSS JSSS JSSS JSSS JSSS JSSS
L 111 111 111 111 111 111 111 111 111 111 111 111 111 111 111
glll jyj. Lssnn JgocJd aee JgocJd JgocJg (JgocJd) Idle Timeout
.600 3600 60
(1) Web Access
gaaagaaagaaagaaagaaagaaagaaagaaagaaagaaagaaagaaagaaagaaagaaagaaagaaagaaagaaagaaagaaagaaagaaagaaagaaagaaagaaagaaagaaagaaagaaagaaagaaagaaagaaagaaagaaagaaagaaagaaagaaagaaagaaagaaagaaagaaagaaagaaagaaagaaagaaegaaaegaaaegaaaegaaaegaaaegaaaegaaaegaaaegaaaegaaaegaaaegaaaegaaaegaaaegaaaegaaaegaaaegaaaegaaaegaaaegaaaegaaaegaaaegaaaegaaaegaaaegaaaegaaaegaaaegaaaegaaaegaaaegaaaegaaaegaaaegaaaegaaaegaaaegaaaegaaaegaaaegaaaegaaaegaaaegaaaegaaaegaaaegaaaegaaaegaaaegAAA
.0cLwJ 1s J sLWJ JgogJ jnJ (Jzao)
(δLeWgblzIj) Backup and Restore
Backup Configurations gg j 1j 1j 1j 1j 1j 1j 1j 1j 1j 1j 1j 1j 1j 1j 1j 1j 1j 1j 1j 1j 1j 1j 1j 1j 1j 1j 1j 1j 1j 1j 1j 1j
.(Lb)
JL OFDM JyA LLa Jc Jc (ERP Aaeg) ERP Protection Type
CTS2Self RTS/CTS JyJLw! aic. aySLwUJ aS,JJ 802.11b Uu u g
JyJL WJyJLw! aic yjw aJySLWUJ aS,JJ JyJL wu Jy 802.11b
JyJL WJyJLw! aic yjw aJySLWUJ aS,JJ JyJL wu Jy 802.11b
JyJL WJyJLw! aic yjw aJySLWUJ aS,JJ JyJL wu Jy 802.11b
RTS/CTS.CTS2Self 一 _ 一 LLaLJLJLJLJLJLJLJLJLJLJLJLJLJLJLJLJLJLJLJLJLJLJLJLJLJLJLJLJLJLJLJLJLJLJLJLJLJLJLJLJLJLJLJLJLJLJLJLJLJLJL
aS y aJy aJy aJy aJy aJy aJy aJy aJy (11n aJy g) 11n Protection Type
jz jz (Jyagjj abai g) S LwUu aagaa Jz. aLwUu aS k u Jz aai y aai y
aai ay aai ay aai ay aai ay aai ay aai ay aai ay aai ay aai ay aai ay aai ay aai ay aai ay aai ay aai ay aai ay aai ay aai ay aai ay aai ay aai ay aai ay aai ay aai ay aai ay aai ay aai ay aai ay aai ay aai ay aai ay aai ay aai ay aai ay aal ay aal ay aal ay aal ay aal ay aal ay aal ay aal ay aal ay aal ay aal ay aal ay aal ay aal ay aal ay aal ay aal ay aal ay aal ay aal ay aal ay aal ay aal ay aal ay aal ay
RTS/CTS.CTS2Self .CTS2Self .CTS2Self .CTS2Self .CTS2Self .CTS2Self .CTS2Self .CTS2Self .CTS2Self .CTS2Self .CTS2Self .CTS2Self .CTS2Self .CTS2Self .CTS2Self .CTS2Self .CTS2Self .CTS2Self .CTS2Self .CTS2Self .CTS2Self .CTS2Self .CTS2Self .CTS2Self .CTS2Self .CTS2Self
JLw!gagagaijll) Percentage of maximal transmit power
Jcawl! JIJIaIJIgblalJLW!gagagaiJAI
JbIcaw50% Ic agaiJIgblal20JLW!gagaiJIgblal
g50%g125%g1 12%:lgaoiaiaiaiaiaiaiaiaiaiaiaiaiaiaiaiaiaiaiaiaiaiaiaiaiaiaiaiaiaiaiaiaiaiaiaiaiaiaiaiaiaiaiaiaiaiaiaiaiaiaiaiaiaiaiaiaiaiaiaiaiaiaiaiaiaiaiaiaiaiaiaiaiaiaiaiaiaiaiaiaiaiaiaiaiaiaiaiaiaiaiaiaiaiaiaiaiaiaia
802.1Q g 802.1D y bnnn nn nnaa (g) QoS Classification Type Video .(L) Best Effects .(A) Background) WMM 已 IP DSCP/TOS J
802.1Q g 802.1D .((s) Voice .(y) IPTV
JLw! Lw! Lc) Re-establish Ethernet connection when initiating wireless connection
Jw! Wg. Jw! Wg. Jw! Wg. Jw! Wg. Jw! Wg. Jw! Wg. Jw! Wg. Jw! Wg. Jw! Wg. Jw! Wg. Jw! Wg. Jw! Wg. Jw! Wg. Jw! Wg. Jw! Wg. Jw! Wg. Jw! Wg. Jw! W
(L) Upgrade Firmware
( (c) (c) (c) (c) (c) (c) (c) (c) (c) (c) (c) (c) (c) (c) (c) (c) (c) (c) (c) (c) (c) (c) (c) (c) (c) (c) (c) (c) (c) (c) (c) (c) (c) (c)
aLilllc ybi jill laeill
(1) Bridge < (JL) Status
a aal aal al LogLeo
Restore gge jai jai .jai (asw) Browse gge jai (sLeW) Restore
( Lugs^*JIaSaI_wI) Configurations
System Reboot
05c) Start to Reboot gjg jai al. aai oLg j gl Jgai oLg (Jg) Reboot
( 1 + x1 - 10) + ·s + ( 1 - 10) + ( 1 + 101 - 10)
cI)Cancel Changes gjg j 1 (J) Save Settings
1
a a a a a a a a a a a a a a a a a a a a a a a a a a a a a a a a a a a a a a a a a a a a a a a a a a
g w dA! (J) Sd A!Restore All Settings g
aaljaiy jaiy aaiy oaleiui sic lghany u

LwU Lc: LwU LwU LwU LwU LwU LwU LwU LwU LwU LwU LwU LwU LwU LwU LwU LwU LwU LwU LwU LwU LwU LwU LwU LwU LwU LwU LwU LwU LwU LwU LwU LwU LwU LwU
Wide - 40MHz 1! a! a! a! a! a! a! a! a! a! a! a! a! a! a! a! a! a! a! a! a! a! a! a! a! a! a! a! a! a! a! a! a! a! a! a! a! a! a! a! a! a! a! a! a! a! a! a! a! a! a!a! a! a! a! a! a! a! a! a! a! a! a! a! a! a! a! a! a! a! a! a! a! a! a! a! a! a! a! a! a! a! a! a! a! a! a! a! a! a!a!a!a!a!a!a!a!a!a!a!a!a!a!a!a!a!a!a!a!a!a!a!a!a!a!a!a!a!a!a!a!a!a!a!a!a!a!a!a!a!a!a!a!a!a!a!a!a!a!a!
0% . : 100% Signal
(,) Bridge Information
JLLIJIILIJIILIJIILIJIILIJIILIJIILIJIILIJIILIJIILIJIILIJIIL
(aJooJI a5JJ) Local Network
Ic Jc Jc Jc Jc Jc Jc Jc Jc Jc Jc Jc Jc Jc Jc Jc Jc Jc Jc Jc Jc Jc Jc Jc Jc Jc Jc Jc Jc Jc Jc Jc Jc Jc Jc Jc Jc Jc Jc Jc Jc Jc Jc Jc Jc Jc Jc Jc Jc Jc Jc
. 一 _ 1 ^ 一 Ijll Ethernet aLcIgJLsLaJLip JI IP lgicip (IP lgic) IP Address
15:50:50:50:50:50:50:50:50:50:50:50:50:50:50:50:50:50:50:50:50:50:50:50:50:50:50:50:50:50:50:50:50:50:50
< LwLj) Wireless < (AeLj) Status
iSLWUUL iS Jg> LogLo
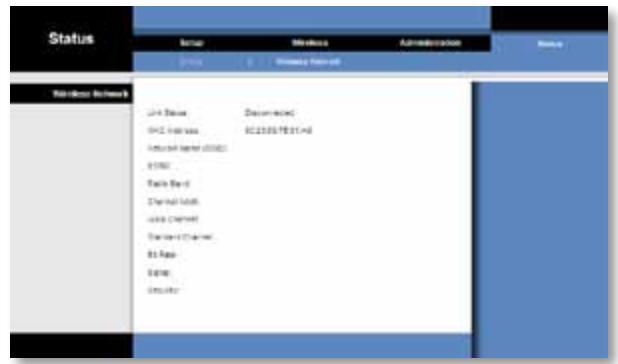
(SLW) Wireless
LwUJ LjAJIaJL (JbJ) Link Status
aLwUJ Lc y JLaS JLaS JMac jgic (MAC jlgic) MAC Address
. SSID g c < LwL_f≤ _w (SSID) (SSID) Network Name
BSSID
jaoal aolw oioo oiooai oicLuoai 1
Laoa
(aasss) (sasss) sasss
jglalol jlcic
aai aai iai jai jai jai jai jai jai jai jai jai jai jai jai jai jai jai jai jai jai jai jai jai jai jai jai jai jai jai jai jai jai jai jai jai jai jai jai jai jai jai jai jai jai jai jai jai jai jai jai jai jai
oL! oioiog. iioi joiia oaiy jai yaiy jaiy iaiy iaiy iaiy iaiy iaiy iaiy iaiy iaiy iaiy iaiy iaiy iaiy iaiy iaiy iaiy iaiy iaiy iaiy iaiy iaiy iaiy iaiy iaiy iaiy iaiy iaiy iaiy iaiy iaiy iaiy iaiy iaiy iaiy i ai yjaoi. aioi aioi aioi aioi aioi aioi aioi aioi aioi aioi aioi aioi aioi aioi aioi aioi aioi aioi aioi aioi aioi aioi aioi aioi aioi aioi aioi aioi aioi aioi aioi aioi aioi aioi
j 1 j 1 1 1 1 1 1 1 1 1 1 1 1 1 1 1 1 1 1 1 1 1 1 1 1 1 1
Lli/1c 1
a 1.
| L - L| = 1
J 1
JJIaJIbJI JgOoJooJgJooJoo
. Refresh g ge y
Lc Linksys g0g jy. lii 1
Linksys.com/support
L_g > L_ l_g( L_h + L_h)
WES610N/WET610N
LwJl 4gJU JLaJy jLw Ethernet jIgjrgssJlc
LalLeJIaio gJL,LoJIuLi IP Ujgic JI pssuJU jS 13
.(1) Save Settings. 5
iws 4 iXao jIg jS Lw Ethernet jIg gJ JnnnJ 4 jXaoJJ jggssJ Jai j
.(ieIbgljgssLj)SLSUJLua21
Lao zai jy
aSLwUaLjGggo SLwUJlaol aaojj joo
JLL JauoJI jL Lwll Ethernet jLG> gjgoccJl LGlcgagJLgma
.
.
#
2.68×5.04×6.97
(68×128×177)
(ρ,295) Jb,0.65
Wi-Fi .CE.RSS210 .ICES-003.UL/cUL .FCC
.WPA2TM.(IEEE 802 11a/b/g/draft n)
WMM. Wi-Fi aaaa
1.12
(a40J0)L104J32
.Wi-Fi Protected SetupTM, Ethernet,
JNJ Ethernet 1L;1,1,1,1,1,1,1,1,1,1,1,1,1,1,1,1,1,1,1,1,1,1,1
(4) Ethernet
Wi-Fi auiin, gaii jiey iuei oLe!
CAT5e
( ,1) ( ,1) 3
g0
X
64-QAM,16-QAM,QPSK,OFDM/BPSK:802.11a
BPSK.CCK/QPSK:802.11b
64-QAM,16-QAM,QPSK,OFDM/BPSK :802.11g
64-QAM.16-QAM.QPSK.OFDM/BPSK:802.11n
LJIiLiC54@(g)J1gJLLa/J1s315:802.11a
11@(jg)Jb9yUa/19:802.11b
54 @ (yjg) 16:802.11g
MCS15 @ (jg) 18: (2.4) 802.11n
MCS15 @ (j) 16: () 802.11n
aJJIJIcIe54@(jgj)JbJgJULo/JJU2-72:802.11a
11@(j)JgJlLo/Je-85:802.11b
LJIy Ll 54 @ (jg) JbJ g/Lo/1-73:802.11g
MCS15 @ (jg)Jg/Lo/20 802.11n
MCS15 @ (jg) 69: (j40) 802.11n
1
.(WPA) Wi-Fi Protected Access™. WEP
(WPA2) Wi-Fi Protected Access™ 2
128 JJ
jL
1
1g
1j
gJgJg
ggljgog
(2) (a)
山
(EIRP)
1g 1
a1JJwLus
a
J
L
Lol
i
2.05×4.17×5.71
( 52× 106× 145)
(159) a 5.61
Wi-Fi,CE,RSS210,ICES-003,UL/cUL,FCC
WPA2TM. (IEEE 802 11a/b/g/draft n)
WMM. Wi-Fi a
- 12
(a40J0)104J32
OTbapHe Ha 6a3npaHaTa Ha 6pay3bp NOMOuHa nporpama . . .6
Setup (Hactpoikn) > Basic Setup (OchOBn Hactpoikn) . . . . .7
Language (E3nk) 7
Network Setup (Hactpoikn Ha mpekata) 7
Wireless (Бeзкуни) > Basic Wireless Settings
(OcHOBHN 6e3xNCHn HacTpoiKn) .7
Basic Wireless Settings (OchOBHn 6e3KuHn HacTpoiKn) 8
3aunTaHa6e3xHnHaTaMpexa 8
Wi-Fi Protected Setup (3aunTeHO KOHngpynpaHe Ha 6eKnUHa Bpb3Ka) 9
Administration (Адм uninстриранe) > Upgrade Firmware
(HaicTroiKa Ha _b pmyep) 15
Upgrade Firmware (Haictroka Ha _b pyep) 16
Status (CbctoHne) > Bridge (Mocr). 16
Bridge Information (Информаць за моста) 16
Local Network (Iokajna mpeka) 16
Status (CbctoHne) > Wireless (Be3xuHa Mpeka) 16
Wireless (Бeзкуна Мрека) 16
WPA e cTaHndapr 3a 3aunTa, no-CnIpyeH OT uNΦpObaHeTo Ha WEP.
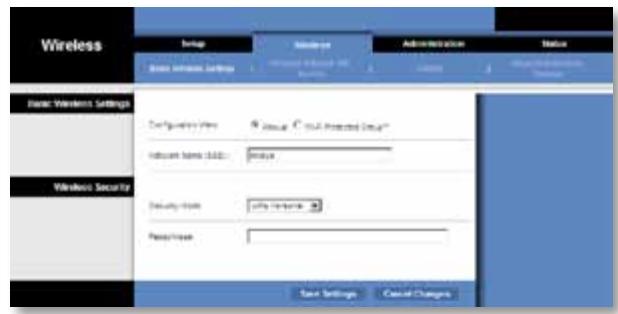
Encryption (LHΦpOBAHe) WPA nOДьржа MeToJa Ha ⅢnΦpOBAHe TKIP c ΣИнHaMnUHn KIIOUObe Ha ⅢnΦpOBAHe.
Passphrase (Iapona) BbBeTe KJIoua, KOItO e 063 3a MoCTa N BaIIny 6e3JInueH pyTe npNToKa 3a DoCTbN. ToI TpR6Ba Da e CbCTaBEn OT 8-63 3HaKa.
UpaKHe Te Bbpy Save Settings (3aHc Ha HacTpoKnTe), 3a Da npInoXnTe npomeHnTe cn, nIe UpaKHeTe Bbpy Cancel Changes (OTMaHa Ha npomeHnTe), 3a Da OTMeHnTe npomeHnTe cn.
WPA2IuHa
WPA2 e no-ycbBpbpeHCTBaHa nNo-CnrgpHa Bepcna Ha WPA.
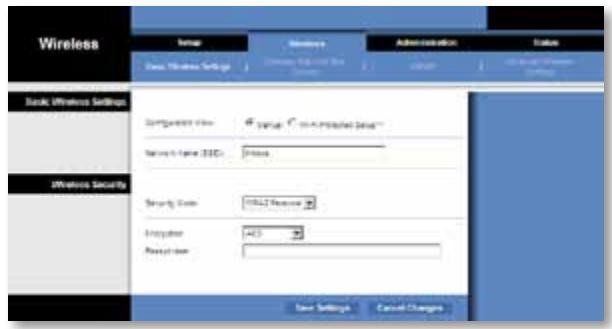
Encryption (шифpoBaHe) WPA2 подьржа Два метда нашифpoBaHe, TKIP и AES, с динамчни Клиоче нашифpoBaHe. Изберете метда нашифpoBaHe, AES ипн TKIP пи AES. Избразно по рабиране метда e AES.
Passphrase (Iapona) BbBeTe KJIoua, KoTo e 06u 3a MoCTa n Baunr 6e3KnueH pyTe npN ToKa 3a DoctBn. ToT TpR6Ba da e CbCTaBeH OT 8-63 3HaKa.
UpaKHe Te Bbpy Save Settings (3aHc Ha HacTpoKnTe), 3a Da npInoXnTe npomeHnTe cn, nIe UpaKHeTe Bbpy Cancel Changes (OTMaHa Ha npomeHnTe), 3a Da OTMeHnTe npomeHnTe cn.
WEP
WEP e 6a3nceH MeToH Na 7uΦpOBAHe, KoITo He e ToJIKOBa CnIpyeH, KoJIKOto WPA nII WPA2.
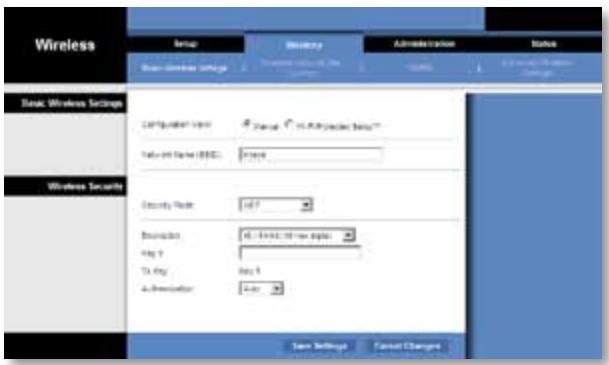
Encryption (ШифpoBaHe) ИЗбере НИВО на WEP ШифpoBaHe, 40/64 bits (10 hex digits) (40/64 6nta (10 ъechтайсетунчни чсna)) пл 104/128 bits (26 hex digits) (104/128 6nta (26 єechтайсетунчни чсna)). По подазпране това e 40/64 bits (10 hex digits) (40/64 6nta (10 єechтайсетунчни чсna)).
Key 1 B'beTe WeP KInOHa Ha BaShaTa MpeKa.
Tx Key Key 1 (Klou 1) e npedabaTeHnT KIOU, n3noI3BaH OT MocTa.
Authentication (YdOCTOBepBaHe) Pn oNpa36uPaHe e Auto (ABTo), KcETo nO3BolraBa da ce n3POn3Ba yDcOCTOBepBaHe ype3 OTBopeHa cNCTema nn ype3 cnOJeHKnIOU. N36epe T Open (OTBopeHa), 3a Da n3POn3BaTe yDcOCTOBepBaHe ype3 OTBopeHa cNCTema; nOdaTeJr n OnuyataJrT He n3POn3BaT WEP kIIOU 3a yDcOCTOBepBaHe. N36epe TShared (CnoJenEH), 3a Da n3POn3BaTe yDcOCTOBepBaHe ype3 cnOJeHKnIOU; nOdaTeJr n OnuyataJrT n3POn3BaT WEP kIIOU 3a yDcOCTOBepBaHe.
UpaKHe Te Bbpy Save Settings (3aInc Ha HacTpoKnTe), 3a Da npInoXnTe npomeHnTe cn, nIe UpaKHeTe Bbpy Cancel Changes (OTMaHa Ha npomeHnTe), 3a Da OTMeHnTe npomeHnTe cn.
Wi-Fi Protected Setup (3auntetoKoHfnpnpaHe Ha 6e3xuHa Bp3ka)
CbIeCTByBaT Dba MeToDa. IV3non3BaIte MeToDa, KoITo e npINIOXIM 3a BaIInr pyTeP.
MeToa#1
I3noJI3BaIte To3n MeToD, aKO BaIaIaIpyTepe IMa 6yTOH 3a 3aIITeHO KOHfNpyPipaHe Ha 6e3JNUHa BpB3Ka.
- Μιρακητε Bbpxu Μινη Ḁπιςθε ΕγΤΟΗ Wi-Fi Protected Setup (3aιπιTeHo KOHΦιγριραή Ηα δεχιμήν Βρβɜka) Μυγτepa.
- B pamknte Ha IBe MInHyTn ⅢpaKHeTe Bbpxy 6yToHa Wi-Fi Protected Setup (3aunTeHO KOHfNpynpaHe Ha 6e3KuHa Bp3Ka) Ha ekpaHa Wi-Fi Protected Setup (3aunTeHO KOHfNpynpaHe Ha 6e3KuHa Bp3Ka) Ha MoCTa.
- Cnei KOHfIpynpaHeTo Ha MocTa ⅢpaKHeTe Bbpxy Close (3aTbapnHe).
Ha ekpaHa Wi-Fi Protected Setup ce noka3BaT cbCToHnETo Ha Bpb3KaTa, mMeTO Ha MPekkata (SSID) u MeToIbT Ha 3aunTa.
MeToa #2
I3noJI3BaIte To3n MeToD, aKO BaIaIaT pyTeP i3NcKbA PIN KoJa Ha MoCTa.
- Ha ekpaHa Wi-Fi Protected Setup (3aunTeHo KOHfNrgpnpaHe ha 6e3KnUHa Bpb3ka) Ha pytepa BbBeJeTE PIN kOda Ha ekpaHa Wi-Fi Protected Setup (3aunTeHo KOHfNrgpnpaHe ha 6e3KnUHa Bpb3ka) Ha MOCTa. Cnej TOBa UpiKaHete Bbpxy Register (PernctpnpaHe) nIi Ha cbOTBeTHn86yToH. (ToI e nocouen CbIo TakaHa eTnKeTa Ha nbHOTo Ha MOCTa.)
- Ha ekpaHa Wi-Fi Protected Setup (3auiTeHO KOHfumpypnaHe Ha 6e3KuHa Bpb3Ka) Ha MOCTa upaKHeTbpxy OK.
- Cnei KOHfIpynpaHeTo Ha MocTa IpuKaHHe Tbpxy Close (3aTbapnHe).
Ha ekpaHa Wi-Fi Protected Setup (3aunTeHO KOHnpynpaHe Ha 6e3KnUHa Bp3Ka) ce NOKa3BaT cbCToHnETo Ha Bp3KaTa, ImETo Ha MPexKaTa (SSID) n MeToIbT Ha 3aUnTa.
Best Effort (Haɪ-ɒðbɒr BɒɜMɔːkeH)
Status (Състаяне) > Bridge (Мост)
IokaBaCeHΦopMaun3aTeKyuToCbCTOHNHeHaMOCTa.
Bridge Information (Инфомацnia за моста)
Firmware Version (BercnHa bpmyepa) Poka3Ba ce Tekyuata BercnHa bpmyepa Ha MOCTa.
Local Network (Лобкальна мрека)
Ako nckaTe MoCTbT BnHaT Na n3NoJ3Ba cTaTuYeH IP aDpec, cneBaiTe INHCTpyKunTe NO-dOly:
- Otvbopete 6a3npaHaTa Ha 6pay3bp nOmoUHa npOrpMa Ha MoCTa.
- UpaKHeTe Bbpy pa3dena Network Setup (HaCtpoRkn Ha MpeKaTa).
- OT napaTo MEno Network Connection Type (TnmpexkoBa Bpb3ka) n36epTe Static IP (CtataueH IP).
- Повленье полета Static IP Address (Сразунен IP апес), Subnet Mask (Повlmрекова маскa) u Default Gateway (Шлиоз no полдабиранe).
- LpakHeTe Bbpxy Save Settings (3aInc Ha NaCTpoKnTe).
Komnombpmb, Koimo u3non3ba Mocm unu dpyzo Ka6enho Ethernet ycmpoicmeo He ocbucecm8Ba 8pb3ka c dpyzo ycmpoicmeo c 6e3xuHa 8pb3ka (Hanp. Komnombp unu npunmep).
OnntaTe cneHTo:
- Поберете далу устороството сбзшина врьзka в сьцату Мражка Камютьрпдлл друто Кабелно Ethernet усторостvo, CBp3aho KBM моста.
- Поберете дади сиэлгьа сбю и сью по на мрека (SSID) за BCИЧКУстpoиства в Беэнчнata мрека.
- Поберете дали BCNUKи устpoICTBa ca B eнha n cbua IP Мржа n dani n3ПОЛЗВAT CBМecTIMn IP aDpeCn.
Ba3upanama Ha 6pay3b npomouha npo2pama He npuema bawama napola.
OnPntaTe cneHnTo:
- NapoJata pa3IuYBa rnaBn m MaJIk 6yKbN. IpoBepTe daJI n 3nON3BaTe npaBnHO rnaBn m MaJIk 6yKbN pRn BbBeJdaHe ha napoJata.
Ako cTe 3a6paBnI npoJaTa cn, MoKeTe da HynipaTe MocTa do fapuHnte My NaCTpOKn.
HaTnSchHe n 3aDpBxKTe 6yToHa Reset (HynipaHe) Ha MocTa 3a npn6I. net cekyni; napoIata ige ce Hynipa do fapnuchno HactpoeHATA, admin. BcnuKn dpyrna HactpoiKn Ha MocTa ige ce HynipaTdo fapnuchne.(3a da imate Doctbn Do 6a3npaHATA Ha 6pay3bp nOmoUHa nporpaMa, BBeDeTe admin B noJeTo Password (Napona).)
CneB 8b8ekdahe Ha npomeHume ype3 6a3upahama Ha 6pay3bp nomouha npo2pama HoBume Hacmpouku He ce noka38am Ha ekpana.
BbB Bauny ye6 6pay3bp upaKaHHe T Bpxy Refresh (O6HOBaHe). Ako HOBnTe NaCTpoKn He ce noka3BaT, cneBaTne NHCtpyKUnTe No-dOJy:
1.ИЗключeteаадалтepаза3axpaHbaHeOTMOCTa.
2.ИЗчakайтейпетсEquнди СледTOBA OTHOBO ГВКЛЮЧЕТБМОCTa.
3. BbB Baunyye66pay3bp upaKaHHe Tbpyxuy Refresh (O6HOBAhe).
YEB
Ако He hamipaTe OTROBOpu Na BaushiTe BbIpcOu Tuk, HanpaBeTe cnpaBka Bye6caiTa Ha Linksys Ha aDpec Linksys.com/support.
CpeunΦnKaun
WES610N
| Моden | WES610N |
| Сточарты | IEEE 802.3u, 802.11g, 802.11b, 802.11a, 802.11n |
| С党支部аои | Зхранвае, Ethernet, Wi-Fi Protected Setup™, Бeзшина мрека, отелна Ethernet врьзkaи akтувhoect |
| Портоve | Ethernet (4), 3ххалвае |
| Бутоны | Нуларао, Wi-Fi Protected Setup |
| Тип кабели | CAT5e |
| Аntechи | 3 (въtrightшни) |
| Тип сныен сбединтел | Хама |
| Оденьи ce (Да/He) | He |
| Модаци | 802.11a: OFDM/BPSK, QPSK, 16-QAM, 64-QAM802.11b: CCK/QPSK, BPSK802.11g: OFDM/BPSK, QPSK, 16-QAM, 64-QAM802.11n: OFDM/BPSK, QPSK, 16-QAM, 64-QAM |
| RF Pwr (EIRP) in dBm | 802.11a: 15 dBm (obикноево) @ 54 Mbps802.11b: 19 dBm (obикноево) @ 11 Mbps802.11g: 16 dBm (obикноево) @ 54 Mbps802.11n (2.4 GHz): 18 dBm (obикноево) @ MCS15802.11n (5 GHz): 16 dBm (obикноево) @ MCS15 |
| Чувствітелност на приемао | 802.11a: -72 dBm (obикноево) @ 54 Mbps802.11b: -85 dBm (obикноево) @ 11 Mbps802.11g: -73 dBm (obикноево) @ 54 Mbps802.11n (20 MHz): -75 dBm (obикноево) @ MCS15802.11n (40 MHz): -69 dBm (obикноево) @ MCS15 |
| Ус ninthае на щенита в dBi | 1 |
| Заша на зөзшина мрека | WEP, Wi-Fi Protected Access™ (WPA),Wi-Fi Protected Access™ 2 (WPA2) |
| Битове на зашистners Клич | До 128-6итовошифравае |
Данни по OTношенье на Okолнота срEDA
| Размeperи | 6.97" x 5.04" x 2.68" (177 x 128 x 68 mm) |
| Терло | 0.65 Ib (295 g) |
| Сертофikатия | FCC, UL/cUL, ICES-003, RSS210, CE, Wi-Fi (IEEE 802 11a/b/g/draft n), WPA2TM, Wi-Fi Protected Setup, WMM® |
| Зхраныане | 12 V, 1 A |
| Разотна Temпераразуа | 32 до 104°F (0 до 40°C) |
| Temпераразуа на сбхсане | -4 до 140°F (-20 до 60°C) |
| Разотна влажност | 10 до 85% бeз кондения |
| Влажност на сбхсане | 5 до 90% beз кондения |
CneuKauZnTe npMeH 6e3 npdun3BecTne.
WET610N
| Моden | WET610N |
| Стоандарту | IEEE 802.3u, 802.11g, 802.11b, 802.11a, 802.11n |
| С党支部аоюн | Зхсановае, Ethernet, Wi-Fi Protected Setup™, Wireless |
| Портоve | Ethernet (4), Зхсановае |
| Бутон | Нуларане, Wi-Fi Protected Setup |
| Тир кабел | CAT5e |
| Антоны | 3 (вътpeшни) |
| Тир сених сбединтел | Хама |
| Оделяце (Да/He) | He |
| Модаulative | 802.11a: OFDM/BPSK, QPSK, 16-QAM, 64-QAM 802.11b: CCK/QPSK, BPSK 802.11g: OFDM/BPSK, QPSK, 16-QAM, 64-QAM 802.11n: OFDM/BPSK, QPSK, 16-QAM, 64-QAM |
| RF Pwr (EIRP) in dBm | 802.11a: 15 dBm (obukhoвец) @ 54 Mbps 802.11b: 18 dBm (obukhoвец) @ 11 Mbps 802.11g: 16 dBm (obukhoвец) @ 54 Mbps 802.11n: 12 dBm (obukhoвец) @ 130 Mbps (HT20), 270 Mbps (HT40) |
| Чubствітелноct на приемао | 802.11a: -72 dBm (obukhoвец) @ 54 Mbps 802.11b: -85 dBm (typical) @ 11 Mbps 802.11g: -73 dBm (obukhoвец) @ 54 Mbps 802.11n: -70 dBm (obukhoвец) @ MCS15/2.4 GHz, -69 dBm (typical) @ MCS15/5.0 GHz |
| УсILAВе на щтеньата в dBi | 1 |
| Заша на бezжоча мрека | WEP, Wi-Fi Protected Access™ (WPA), Wi-Fi Protected Access™ 2 (WPA2) |
| Битove на заши沦я клоч | До 128-битoveшифравае |
Wi-Fi Protected Setup 9
Wireless (Bezdrátové pripojeni) > Wireless Network Site Survey
Wi-Fi Protected Setup
Wi-Fi Protected Setup 9
Wireless > Advanced Wireless Settings
Status > Wireless. 16
Wireless-Geräte 16
Fehlerbehebung
WES610N/WET610N 17
Spezifikationen
WES610N 18
WET610N 19
Produktübersicht
Wi-Fi Protected Setup
Wi-Fi Protected Setup 9
Wireless (Trådløs) > Wireless Network Site Survey
Administration > Management (Styring). 14
Management (Styring) 14
Administration > Factory Defaults
(Standardindstillingera fabrikken) 15
Factory Defaults (Standardindstillinger fra fabrikken) 15
Administration > Upgrade Firmware (Opgrader firmware) . . . 15
Upgrade Firmware (Opgrader firmware) 15
Status > Bridge (Bro) 15
Bridge Information (Oplysninger om bro) 16
Local Network (Lokalt netvark) 16
Status > Wireless (Trädløs). 16
Wireless (Tradløs) 16
Fejlfinding
WES610N/WET610N 17
Specificationer
WES610N 18
WET610N 19
Produktoversigt
Wireless Security (Tradløs sikkerhed)
Wi-Fi Protected Setup
Method #1 (Metode 1)
Brugienne metode, hvis din router har en knap til Wi-Fi Protected Setup.
- Klik eller tryk på knappen Wi-Fi Protected Setup på routeren.
- Klik på knappen Wi-Fi Protected Setup på skærmbilledet Wi-Fi Protected Setup for broen inden for to minutter.
- Klik på Close (Luk), när broen er blevet konfigureret.
Skaermbilledet Wi-Fi Protected Setup viser Link Status (Linkstatus), Network Name (SSID) (Netværksnavn (SSID)) og Security method (Sikkerhedsmetode).
Method #2 (Metode 2)
Brugdenne metode,hvisruteren anmoderombroensPIN-nummer.
Best Effort (Bedste praesation)
Use Aggregation (BrugSAMenlaegning) Denne indstilling angiver, om MAC-laget (Media Access Control) opretter en ADDBA-session (Add Block Acknowledgement). Standardindstillingen er Yes (Ja). Vaelg No (Nej) for at deaktivere indstillingen.
Accept Aggregation (AcceptorSAMenlaegning) Denne indstilling angiver, om MAC-laget accepterer en ADDBA-anmodning. Standardindstillingen er Yes (Ja).Vaelg No (Nej) for at deaktivere indstillingen.
Max.Number of Packets in Aggregation (Maks.antal pakker isammenlaegning) Denne indstilling angiver det maksimale antal pakker (underrammer) i sammenlaegningen. Intervallet er 0 til 10. Standardindstillingen er 10.
Administration > Management (Styring)
Management (Styring)
Bridge Access (Broadgang)
Administration > Upgrade Firmware (Opgrader firmware)
Upgrade Firmware (Opgrader firmware)
Status > Bridge (Bro)
Local Network (Red local) 16
Local Network (Red local)
Administration (Valvonta) > Upgrade Firmware
Wi-Fi Protected Setup 9
Wi-Fi Protected Setup
Administration > Gestion
Backup and Restore (Sauvegarde et restauration)
Wireless (Sans fil) > Basic Wireless Settings
Wireless (Sans fil) > Advanced Wireless Settings
Administration > Management (Gestion) 14
Management (Gestion) 14
Administration > Factory Defaults
Administration > Upgrade Firmware
Administration > Management (Gestion)
Management (Gestion)
EvepyoioiogkpuToypapno 4
Tevikc odnyie c aopaliaac diktouu .4
Wireless Security (Aóµαnt Ασφáλεια) 8
Wi-Fi Protected Setup 9
Wi-Fi Protected Setup
Ynapxouv duo diaeoiue mc e0ooi. Xpnaiopoinote tn meo o nou avtoioxi oTo dpoooynt nou xnpaiopoinie.
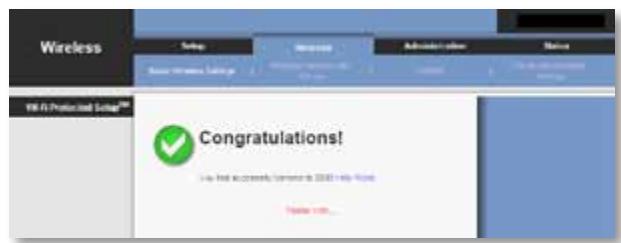
Me0ooc1
Xpnoiooiote autn tn o o ev o p o u o l o y n t n c oac i a e i koupi Wi-Fi Protected Setup.
- Παπησετο κουμπi Wi-Fi Protected Setup στο δρομλογητή.
- Evtoc duo , nataoTe to kouuni Wi-Fi Protected Setup oTnv oOovn Wi-Fi Protected Setup tnc yEupac.
- Meta tn iauoppwon tnc yepupac, nathote Close (Kεiio).
Status (Kατάσταση) > Bridge (Γέφυρα)
EuapaviOvtaoi nnpoopopiec tpexouoa c kataoTaon tnc yepupac.
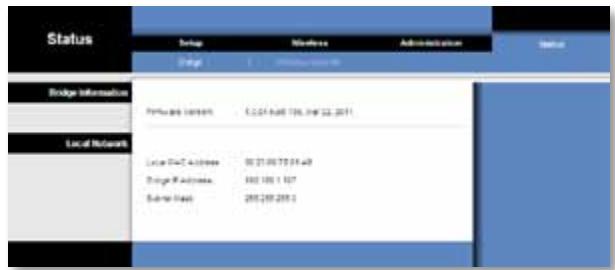
Bridge Information (Плneyразорiativeς γέφυρας)
Firmware Version (Ekdoon ulikooyiou) Emuaviεtaio to tpéxov ulikooyioukó tnc yéφupac.
Local Network (Toπikó δικτuo)
Wi-Fi Protected Setup 9
Wireless (Nirkabel) > Wireless Network Site Survey
(Penjajakan Lokasi Jaringan Nirkabel) 10
Wireless Network Site Survey (Penjajakan Lokasi Jaringan Nirkabel) 10
Wireless (Nirkabel) > WMM. 11
WMM 12
Wireless (Nirkabel) > Advanced Wireless Settings
(Setelan Nirkabel Lanjutan) 13
Advanced Wireless (Nirkabel Lanjutan) 14
Administration (Administrasi)> Management (Manajemen) . .14
Management (Manajemen) 14
Administration (Administrasi) >Factory Defaults
(DefaultPabrik). 15
Factory Defaults (Default Pabrik) 15
Administration (Administrasi) > Upgrade Firmware
(Tingkatkan Firmware) 15
Upgrade Firmware (Tingkatkan Firmware) 15
Status > Bridge (Jembatan) 16
Bridge Information (Informasi Jembatan) 16
Local Network (Jaringan Lokal) 16
Status > Wireless (Nirkabel) 16
Wireless (Nirkabel) 16
Pemecahan Masalah
WES610N/WET610N 17
Spesifikasi
WES610N 18
WET610N 19
Ringkasan Produkt
WPA Personal (WPA Pribadi)
WPA2 Personal (WPA2 Pribadi)
Wi-Fi Protected Setup
Tombol Setel Ulang, Wi-Fi Protected Setup
Jenis Kabel CAT5e
Antena 3 (internal)
Jenis Konektor Antena N/A
Wi-Fi Protected Setup 9
Wireless > Wireless Network Site Survey (Wireless > Ricerca situ su rete wireless). 10
Wireless Network Site Survey (Ricerca site su rete wireless) 10
Wireless ^* WMM 11
WMM 12
Wireless > Advanced Wireless Settings (Wireless > Impostazioni wireless avanzate) 13
Advanced Wireless (Impostazioni wireless avanzate) 14
Upgrade Firmware (Aggiorna firmware) 15
Status > Bridge (Stato > Bridge) 16
Status > Wireless (Stato > Wireless) 16
Wireless 16
Wi-Fi Protected Setup
Best Effort (In base al traffico)
Management (Gestione)
Bridge Access (Accesso al bridge)
Upgrade Firmware (Aggiorna firmware)
Status > Wireless (Stato > Wireless)
Wireless (WLAN) > Basic Wireless Settings
Wireless Security (WLAN-beveiliging) 8
Wi-Fi Protected Setup 9
Wireless (WLAN) > Wireless Network Site Survey
Wireless (WLAN) > WMM® 11
WMM 12
Wireless (WLAN) > Advanced Wireless Settings
Administration (Administratie) > Upgrade Firmware
(Firmware upgraden) 15
Upgrade Firmware (Firmware upgraden) 15
Status > Bridge. 16
Local Network (Lokaal network) 16
Status > Wireless (WLAN) 16
Wireless (WLAN) 16
Probleemoplossing
WES610N/WET610N 17
Specifications
WES610N 18
WET610N 19
Productoverzicht
Wireless Security (WLAN-beveiliging)
Wi-Fi Protected Setup
Wireless (WLAN) > WMM®
Best Effort (Beste poging)
Administration (Administratie) > Upgrade Firmware (Firmware upgraden)
Upgrade Firmware (Firmware upgraden)
Local Network (Lokaal network)
Status > Wireless (WLAN)
Wi-Fi Protected Setup 9
Wireless (Trådløs) > Wireless Network Site Survey
Administration (Administrajon) > Management (Styring) 14
Management (Styring) 14
Administration (Administrajon) >Factory Defaults
(Fabrikstandarher) 15
Factory Defaults (Fabrikstandarder) 15
Administration (Administrajsjon) > Upgrade Firmware
(Oppgrader fastvare) 15
Upgrade Firmware (Oppgrader fastvare) 15
Status > Bridge (Bro) 15
Wi-Fi Protected Setup
Det finnes to tilgengelige metoder. Bruk metoden som gjelder for ruteren du konfigurerer.


Metode nr. 1
Bruk davon metoden hvis ruteren har en knapp for Wi-Fi Protected Setup.
Best Effort (Beste innsats)
Use Aggregation (Bruk aggregering) Dette alternatively definerer om MAC-laget (Media Access Control) vil definere en ADDBA-økt (Add Block Acknowledgement). Standardinnstillingen er Yes (Ja). Velg No (Nei) his du vil deaktivere dette alternativet.
Accept Aggregation (Godta aggregering) Dette alternativet definerer om MAC-laget vil godta en ADDBA-foresporsel. Standardinnstillingen er Yes (Ja). Velg No (Nei) hvis du vil deaktivere dette alternativet.
Max. Number of Packets in Aggregation (Maks. antall pakker i aggregering) Dette alternatively definerer det maksimale antallet pakker (underrammer) i aggregeringen. Området er 0 til 10. Standardinnstillingen er 10.
Max. Aggregation Size (Maks. aggregeringsstørrelse) Dette alternatively definerer den maksimale størrelsen på aggregeringen (i byte). Området er 0 til 20 000. Standardinnstillingen er 16 000.
Timeout Internal (Internt tidsavbrudd) Dette alternatively definerer tidsavbruddsperioden der aggregeringen skal lukkes, med et "lukkevilkar" for tidtakeren lukker den. Omradet er 0 til 100 ms. Standardinnstillingen er 3.
Min. Size of Packet in Aggregation (Min. pakkestørrelse i aggregering) Dette alternatively definerer minimumsstrørelsen (i byte) for pakker som skal samles i aggregeringen. Området er 0 til 1500. Standardinnstillingen er 10.
Management (Styring)
Bridge Access (Brotilgang)
Upgrade Firmware (Oppgrader fastvare)
Status > Bridge (Bro)
Gjeldende statusinformationjon for broen vises.
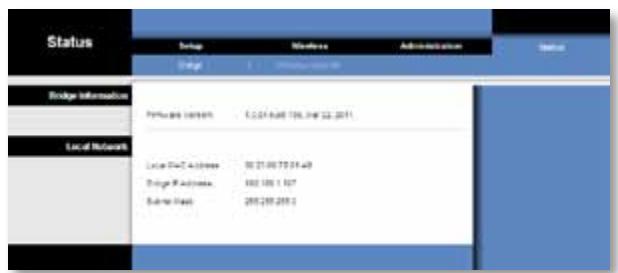
Administration > Upgrade Firmware (Administração >
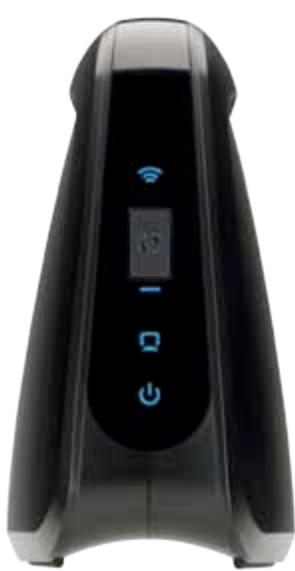
Panel diod LED
WES610N
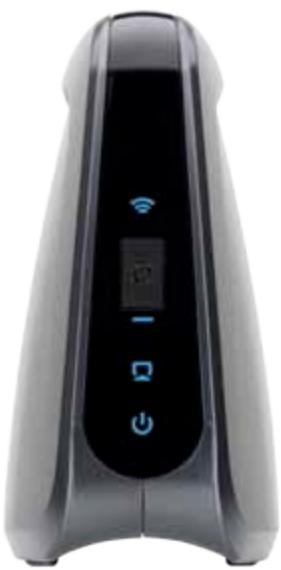
WET610N
Wireless > Basic Wireless Settings
Status > Bridge (Stan > Most)
Wi-Fi Protected Setup 9
Wireless (Sem fios) > Wireless Network Site Survey
(Pesquisa de sites de redes sem fios) 10
Pesquisa de sites de redes sem fios 10
Wireless (Sem fios) >WMM^® 11
WMM 12
Wireless (Sem fios) > Advanced Wireless Settings
Wi-Fi Protected Setup
Estão disponibleis dois métodos. Utilize o método que se aplicá ao router que está a utiliser.


Método n.° 1
Administration (Administração) > Upgrade Firmware (Actualizar firmware)
Wireless (Fára fir) > Basic Wireless Settings
Wireless Security (Securitate fara fir) 8
Wi-Fi Protected Setup (Configurare protejata Wi-Fi) 9
Wireless (Fãrã fir) > Wireless Network Site Survey
Administration (Administrare) > Management. 14
Management 14
Administration (Administrare) > Factory Defaults
Administration (Administrare) > Upgrade Firmware 15
Upgrade Firmware 15
Status (Stare) > Bridge (Punte) 15
Bridge Information (Informatii despite punte) 16
Local Network (Reţea locală) 16
Status (Stare) > Wireless (Färă fir). 16
Wireless (Fara fir) 16
Depanare
WES610N/WET610N 17
Specifications
WES610N 18
WET610N 19
Daca selecta Static IP (IP static), completeness urmatoarele campuri:
Security Mode (Mod de securitate)
Best Effort (Cel mai performant)
Administration (Administrare) > Management
Administration (Administrare) > Upgrade Firmware
i-Fi Protected Setup
CyueCTByET DbA cnoc6a HactpOKn 3ToI yHKnU. IcnoJIb3yIe ToT cnOCo6, KOtOpbl IPOxOuNT dIy IcNoJIb3yeMoTO MapupTyN3aTopa.
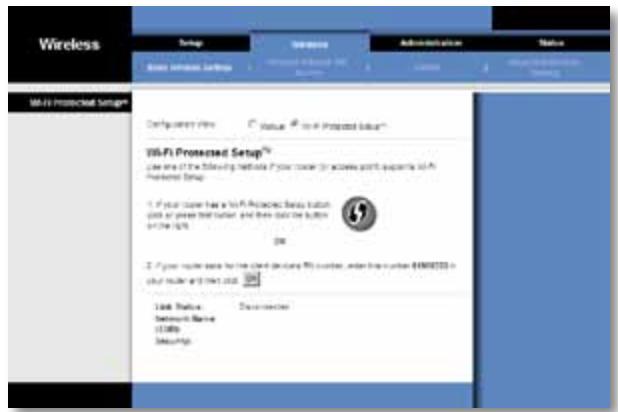
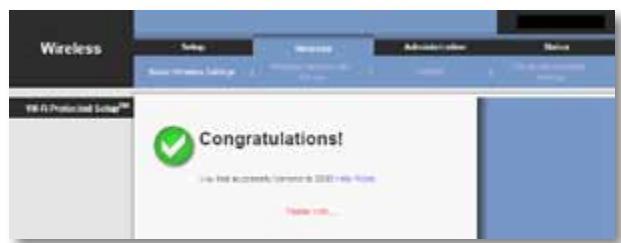
Cnoc061
IcnoJIb3yIte 3OT cNoC6, ecn mApIpyTu3aTOp oChauen KhoNkoi Wi-Fi Protected Setup.
- HaxmTe KhoNky Wi-Fi Protected Setup Ha MapuPyTu3aTope.
2.ВтугшдУнMuHуTпосLEТOTOнжмITEКНОПКу Wi-Fi Protected Setup HaЗкpane Wi-Fi Protected Setup (3aшиш�ная Habсюрka Wi-Fi) Be6-утлntы мocTa. - Посл Настори моста нахмп Te Khoнку Close (3akpbTb).
Ha 3kpane Wi-Fi Protected Setup (3aunuennnna Hacrpoika Wi-Fi) oTo6paKaetc8 coCTOHNHe KaHana, cTeBOe nM8 (SSID) n MeTOd o6ecneueHn8 6e0nacHOCTn.
Cnoc062
IcnoIb3yIte 3OT cnOco6, ecnn MapuTy3aTOp Tpe6yeT BVOa PIN-koJa MocTa.
- Ha ኆkpahe MapuTyMaTOpa Wi-Fi Protected Setup (3auniueHna HacTroPka Wi-Fi) BVEeNTe PIN-KoIy, yka3aHHbI Ha ኄkpaHe Wi-Fi Protected Setup (3auniueHna HacTroPka Wi-Fi) be6-ymunmbi Mocma. 3aTEM HaxMITE KHOKNy Register (3apeHCTpnpOBAtB) nII npdyIIO COOTBeTCTByHOUcy IHOHNy. (On TaKKeHa Ha ΘTKETke, pNkpeJIneHHoB B HIXKnE qACTn MOCTa.)
- HaЭkpane Wi-Fi Protected Setup (3aùnùeHnHa nactpOJa Wi-Fi) naxMnte OK.
- Посл Настори моста нахмITE Кноку Close (ЗakpbITb).
Haэкpane Wi-Fi Protected Setup (3aцишенинга nauseюka Wi-Fi) otobpaхаetca coctorhne kaHana, ceteBoe nMЯ (SSID) nmetoI obecneuehenia 6ezonachoCTn.
Upgrade Firmware (Овиьп troшнburgу)
Komnbomep unu dpyzoe npoobohoe Ethernet-ycmpoucmeo, nodknuehenoe K Mocmy, He moxem noeknoucbra K dpyzomy 6ecnpoobohomy ycmpoucmey (Hanpupep, K Komnbomepy unu npunmepy).
Поверпс点点头:
- 乙6eIITecb BY TOM,чTO 6eCpOBoHOe yCTpoiCTBO haxOITcB Y TOJ xE 6eCpOBoHoi cETN,чTO N KOMpbIOTeP uIN dpyroe npOBoHOe Ethernet-yCTpoiCTBO,пОДКЛIOUeHHOe K MOCTY.
- Y6eIITecb B TOM,чTO BCE yCTpoiCTBa B 6ecnpoBOiHOI CETn IcIOJIb3yIOT OINHaKOBoE cTeBOE nIMr (SSID).
- Y6eIntecb B TOM,ЧTO BCE yCTpoiCTBa NOkJIIOUeHbI K OJHOI IP-ceTn c CINPOJIb3OBAHnEM COBMeCTmMbIX IP-aDpecoB.
Be6-ymulma He npunmuem bau napolb.
PpOBeBpTe cneJeUoee:
- NapojB BBOUITcra C yuetom pernctpa KnaBnAtypb. PpocneHte 3a Tem, YTO6bl npn BBOe napoJy uHTbIbAclrpeuCTpr CmBOnOB.
- EcII Bbl 3a6bln CBOI napOJIb, TO MOxHOb BOCTaHOBNTb 3aBOJCKne HAcTPOIKMOCTa, INCNoJIb3yEmble NO yMOJIuHaHHIO.
Haxmnte u yedeqxnbaiTe KhoNky Reset (C6poc) MocTa B TeueHne npimepHo
PAnTu Cekynd; 6yIeT BoCCTaHOBnE NapoJIb, 3aDaHnbl POn13BOOInTeJeM, -admin.
JLa BcEx IpoUHX napameTPOB MoCTa TAKKe 6yIyT BoCCTaHOBnEbl 3aBOIDcKne
HaCTPOKn. (JLa BxOJa B Be6-yTNInTy BVeDInTe admin B noJIe Password (PaOpJIb).)
Iocne npoBeeHbIX 6 8e6-ymuIme u3MeHeHu Ho8bie 3NaueHua napaempoB He om6paKaIomcHa 3KpaHe.
HaxmTe KhONky Refresh (O6HOBHTb) B CBOeM Be6-6pay3epe. EcIn HOBbIe HAcTpoKn BCE eue He OTo6paXaIOrTa, BbINOJIHnTe CJeDyUoIe DeiCTBn:
- Otklouchte aadantep nItaHn oT MoCTa.
- Побождente пьтс eckyн и сюва полочite aadantep nitaHЯ KMocTy.
- Haxmnte KhoNky Refresh (O6HOBntb) B CBOEm Be6-6pay3epe.
BEB
EcnBbHeHaawnpeeHnIaCBOeroBopoca,NoceTnteBe6-caNT Linksys no aDpecy www.linksys.com
Texhnuechne xapaKtepncnKn
WES610N
Wi-Fi Protected Setup 9
Wireless (Trädlöst) > Wireless Network Site Survey
Administration > Upgrade firmware (Uppgraders fast
programvara) 15
Upgrade Firmware (Uppgradera fast programvara) 16
Status > Bridge (Brygga). 16
Information om bryggan 16
Lokalt nätverk 16
WPA are en mer kraftfull sakerhetsstandard an WEP-krptering.
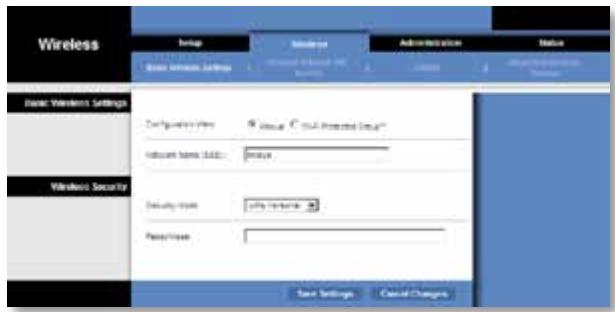
Wi-Fi Protected Setup
Administration > Management (Hantering)
Management (Hantering)
Åtkomst till brygga
Administration > Upgrade firmware (Uppgradera fast programvara)
Upgrade Firmware (Uppgradera fast programvara)
Wi-Fi Protected Setup 9
Wireless (Brežična povezava) > Wireless Network Site Survey
(Pregled mest brezicienega omreza) 10
Wireless Network Site Survey (Pregled mest brezzičega omrežja) 10
Wireless (Brezzična povezava) > WMM® 11
WMM 12
Wireless (Brežićna povezava) > Advanced Wireless Settings
(Dodatne breziciene nastavitve) 13
Advanced Wireless (Dodatne nastavitve brezicne povezave) 14
Administration (Skrbništvo) > Management (Upravljanje) . . . 14
Administration (Skrbnistvo) > Upgrade Firmware
(Nadgradnja vgrajene programske opreme) 15
Upgrade Firmware (Nadgradnja vgrajene programske opreme) 15
Status (Stanje) > Bridge (Most) 16
Bridge Information (Informacije o mostu) 16
Local Network (Lokalno omrežje) 16
Wi-Fi Protected Setup
Bridge Access (Dostop do mostu)
Wireless Security Checklist (57)
山 4
山
4
4
nunnnnnae nnnaaennnnnnnnnnnnnnnnnnnnnnnnnnnnnnnnnnnnnnnnnnnnnnnnnnnnnnnnnnnnnnnnnnnnnnnnnnnnnnnnnnnnnnnnnnnnnnnnnnnnnnnnnnnnnnnnnnn.. 4
5
n
6
Setup (nrs) > Basic Setup (nrs) 7
Language (n) 7
7
Wireless (R) > Basic Wireless Settings (n)
Basic Wireless Settings (n7nnnnnnnnnnnnnnnnnnnnnnnnnnnnnnnnnnnnnnnnnnnnnnnnnnnnnnnnnnnnnnnnnnnnnnnnnnnnnnnnnnnnnnnnnnnnnnnnnnnnnnnnnnnnnnnnnnnnnnnnnnnnnn
Wireless Security (nraaannnnnaaennnnnnnnnnnnnnnnnnnnnnnnnnnnnnnnnnnnnnnnnnnnnnnnnnnnnnnnnnnnnnnnnnnnnnnnnnnnnnnnnnnnnnnnnnnnnnnnnnnnnnnnnnnnnnnnnnnnnnnnnn
Wi-Fi Protected Setup (nwiwiwiWi-Fi) 9
Wireless (Www.wireless.com) > Wireless Network Site Survey (www.www.wireless.com) 10
Wireless Network Site Survey (uunnnnnaa aenne nnnnnae) 10
Wireless (南南南南南) > WMM^圆 11
WMM 12
Wireless ( 不 _ 1 ^ 一 Advanced Wireless Settings
(ngnnnnaaennnnnnnnnnnnnnnn) 13
Advanced Wireless (w) 13
Administration (nalrnnnnae) > Management
(ngn) 14
Management (nrrnr) 14
Administration (ন্ধীীীীীী) >Factory Defaults
(17)
Factory Defaults (wnnnnnaaannnnn) 15
Administration (ntnreunrnu> Upgrade Firmware
(前山终归无期可待) 15
Upgrade Firmware (15
Status (sntu> Bridge (un) 15
Bridge Information (xayuayyuyu) 16
Local Network (n) 16
Status (nun> Wireless (wn) 16
Wireless (2013) 16
n5nn
WES610N/WET610N 17
N
WES610N 18
WET610N 19
N
Wuwaanwnan Linksys Dual-Band N Entertainment Bridge 1nanaaennnnnnae
Wuwaanannanrnnnnae Ethernet wnuwunnne nnuwauynnnae nnnuwauynnne
Wuwaanannanrnnnnae Wireless-N Wwauunnnae nnnuwauynnnae nnnuwauynnne
Wuwaanannanrnnnnae Wireless-N, -G, -A wua -B 2007 annuwauynnnae nnnuwauynnne
LED panel (UNIVLED)

WES610N
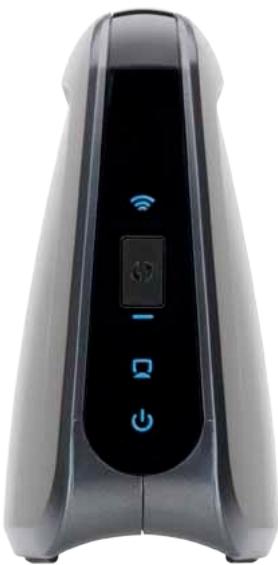
WET610N
()
Wi-Fi Protected Setup Button (###) Wi-Fi Protected Setup (###) Wi-Fi Protected Setup (###) Wi-Fi Protected Setup (###) Wi-Fi Protected Setup (###) Wi-Fi Protected Setup (###) Wi-Fi Protected Setup (###) Wi-Fi Protected Setup (###) Wi-Fi Protected Setup (###) Wi-Fi Protected Setup (###) Wi-Fi Protected Setup (###) Wi-Fi Protected Setup (###) Wi-Fi Protected Setup (###) Wi-Fi Protected Setup (###) Wi-Fi Protected Setup (###) Wi-Fi Protected Setup (###
Wi-Fi Protected Setup (###
Wi-Fi Protected Setup (###
Wi-Fi Protected Setup (###
Wi-Fi Protected Setup (###
Wi-Fi Protected Setup (###
Wi-Fi Protected Setup (###
Wi-Fi Protected Setup (###
Wi-Fi Protected Setup (###
Wi-Fi Protected Setup (###
Wi-Fi Protected Setup (###
Wi-Fi Protected Setup (###
Wi-Fi Protected Setup (###
Wi-Fi Protected Setup (###
Wi-Fi Protected Setup (###
Wi-Fi Protected Setup (###
Wi-Fi Protected Setup (###
Wi-Fi Protected Setup
Wi-Fi Protected Setup (###
Wi-Fi Protected Setup (###
Wi-Fi Protected Setup (###
Wi-Fi Protected Setup (###
Wi-Fi Protected Setup (###
Wi-Fi Protected Setup (###
Wi-Fi Protected Setup (###
Wi-Fi Protected Setup (###
Wi-Fi Protected Setup (###
Wi-Fi Protected Setup (###
Wi-Fi Protected Setup (###
Wi-Fi Protected Setup (###
Wi-Fi Protected Setup (###
Wi-Fi Protected Setup (###
Wi-Fi Protected Setup (###
Wi-Fi Protected Setup (###
Wi-Fi ProtectedSetup(
Wi-Fi Protected Setup LED (WuWuWuWuWu) (WuWuWuWu) WULED wuWuWuWu Ww uwuwuwuwuwuwuwuwuwuwuwuwuwuwuwuwuwuwuwuwuwuwuwuwuwuwuwuwuwuwuwuwuwuwuwuwuwuwuwuwuwuwuwuwuwuwuwuwuwuwuwuwuwuwuwuwuwuwuwuwuwuwuwuwuwuwuwuwuwuwuwuwuwuwuwuwuwuwuwuwuwuwuwuwuwuwuwuwuwuwuwuwuwuwuwuwuwuwuwuwu
Ethernet (suiu) wLED ay Ethernet aay uuyu
U 1/()wLED
Ports panel (wvwa)
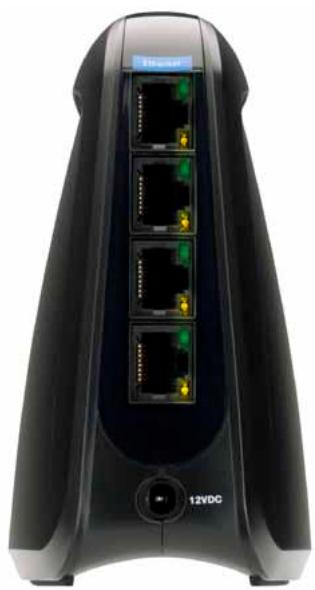
WES610N
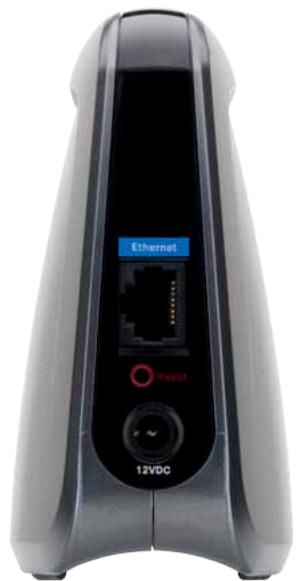
WET610N

Ethernet The Ethernet 1234567890123456789012345678901234567890123456789012345678901234567890123456789012345678901234567890123456789

NtWPA/WPA2) Wied Equivalent Privacy (WEP)
WPA/WPA2 1000000000000000000000000000000000000000000000000000000000000000000000
nnaaannnnnnaananaananaananaananaananaananaananaananaananaananaananaananaananaananaananaananaananaananaananaananaananaananaananaananaananaananaananaananaananaananaananaananaananaananaananaananaananaananaananaananaananaananaananaananaananaananaananaananaananaananaanara
- 1
Personal Firewall
- 連日日日日日日日日日日日日日日日日日日日日日日日日日日日日日日日日日日日日日日日日日日日日日日日日日日日日日日日日日日日日日日日日日日日日日日日日日日日日日日日日日日日
n
- 1
- 105
- 1
75
nnaananaananaananaananaananaananaananaananaananaananaananaananaananaananaananaananaananaananaananaananaananaananaananaananaananaananaananaananaananaananaananaananaananaananaananaananaananaananaananaananaananaananaananaananaananaananaananaananaananaananaanaraannnnnnnnnnnnnnnnnnnnnnnnnnnnnnnnnnnnnnnnnnnnnnnnnnnnnnnnnnnnnnnnnnnnnnnnnnnnnnnnnnnnnnnnnnnnnnnnnnnnnnnnnnnnnnnnnnnnnnnnnnnnnnnnnnnnnnnnnnnnnnnn
uunnnnnaaannnnn nn (Setup), nnnnnnnn (Wireless), nanaee (Administration) naan (Status) nnnnnnnnnn
15
山
Nnunurnrnnnnaaannnnnnaaennnnn nn nnnnnnnnnnnnnnnnnnnnnnnnnnnnnnnnnnnnnnnnnnnnnnnnnnnnnnnnnnnnnnnnnnnnnnnnnnnnnnnnnnnnnnnnnnnnnnnnnnnnnnnnnnnnnnnnnnnnnnnnnnnnnnnnnnnnnnnnnnnnnn nn nannn nn nannn nn nannn nn nannn nn nannn nn nannn nn nannn nn nannn nn nannn nn nannn nn nannn nn nannn nn nannn nn nannn nn nannn nn nannn nn nannn nn nannn nn nannn nn nannn nn nannn nn nannn nn nannn nn nannn nn nannn nn n annn nn nannn nn nannn nn nannn nn nannn nn nannn nn nannn nn nannn nn nannn nn nannn nn nannn nn nannn nn nannn nn nannn nn nannn nn nannn nn nannn nn nannn nn nannn nn nannn nn nannn nn nannn nn nannn nn nannn nn nannn nn nennn nn nannn nn nannn nn nannn nn nannn nn nannn nn nannn nn nannn nn nannn nn nannn nn nannn nn nannn nn nannn nn nannn nn nannn nn nannn nn nannn nn nannn nn nannn nn nannn nn nannn nn nannn nn nannn nn nannn nn nannn nn narnnrnrnrnrnrnrnrnrnrnrnrnrnrnrnrnrnrnrnrnrnrnrnrnrnrnrnrnrnrnrnrnrnrnrnrnrnrnrnrnrnrnrnrnrnrnrnrnrnrnrnrnrnrnrnrnrnrnrnrnrnrnrnrnrnrnrnrnrnrnrnrnrnrnrnrnrnrnrnrnrnrnrnrnrnrnrnr
vua
wnuuauauauauauauuu (nuiuulnnuWindowsXP uunununna
nuuauauuuu) uunuau User name (uau) nnuu uauuauuauu
nuuauuuuuuuuuuuuuuu (nuuueuuuuuuuuuuuuuuuuuuuuuuuuuuuuuuuuuuuuuuuuuuuuuuuuuuuuuuuuuuuuuuuuuuuuuuuuuuuuuuuuuuuuuuuuuuuuuuuuuuuuuuuuuuuuuuuuuuuuuuuuuuuuuuuuuuuuuuuuuuuuuuuuuuuuuuuuuuuuuuuuuuuuuuuuuuuuuuuuUU
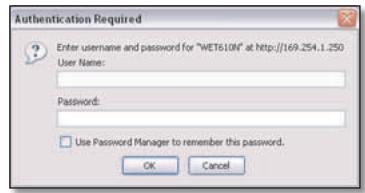
#
wauuunauuunuunuunuauuauuauuuuauuuuuuuuuuuuuuuuuuuuuuuuuuuuuuuuuuuuuuuuuuuuuuuuuuuuuuuuuuuuuuuuuuuuuuuuuuuuuuuuuuuuuuuuuuuuuuuuuuuuuuuuuuuuuuuuuuuuuuuuuuuuuuuuuuuuuuuuuuuuuuuuuuuuuuuuuuuuuuuuuuuuuuuuuuuuuuuuuuuuuuuuuuuuuuuuuuuuuuuuuUU
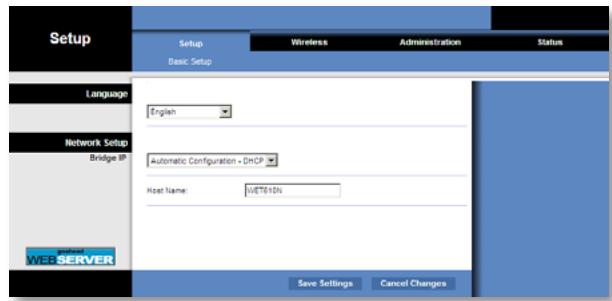
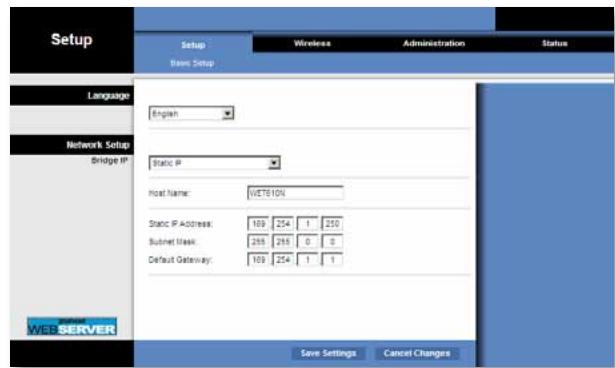
Language (nvn)
Language (n)
n
Basic Wireless Settings (ngwnu
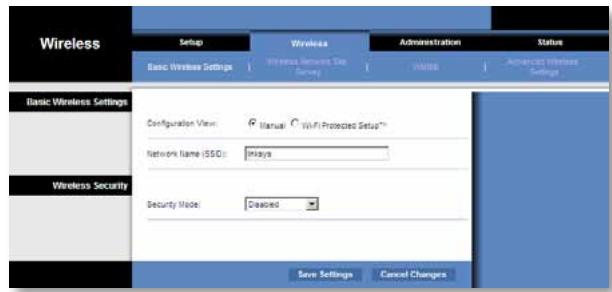
Network Name (SSID) (ssid)
Wireless Security (nssnnnnnaaannnnn nnne)
WPA Personal, WPA2 Personal WEP WPA (Wi-Fi Protected Access) WPA2 Wi-Fi WPA2 Wi-Fi WPA2 Wi-Fi WPA2 Wi-Fi Wi-Fi Wi-Fi Wi-Fi Wi-Fi Wi-Fi Wi-Fi Wi-Fi Wi-Fi Wi-Fi Wi-Fi Wi-Fi Wi-Fi Wi-Fi Wi-Fi Wi-Fi Wi-Fi Wi-Fi Wi-Fi Wi-Fi Wi-Fi Wi-Fi Wi-Fi Wi-Fi Wi-Fi Wi-Fi Wi-Fi Wi-Fi Wi-Fi Wi-Fi Wi-Fi Wi-Fi Wi-Fi Wi-Fi Wi-Fi Wi-Fi Wi-Fi Wi-Fi Wi-Fi Wi-Fi Wi-Fi Wi-Fi Wi-Fi Wi-Fi Wi-Fi Wi-Fi Wi-Fi Wi-Fi Wi-Fi Wi-Fi Wi-fi Wi-fi Wi-fi Wi-fi Wi-fi Wi-fi Wi-fi Wi-fi Wi-fi Wi-fi Wi-fi Wi-fi Wi-fi Wi-fi Wi-fi Wi-fi Wi-fi Wi-fi Wi-fi Wi-fi Wi-fi Wi-fi Wi-fi Wi-fi Wi-fi Wi-fi Wi-fi Wi-fi Wi-fi Wi-fi Wi-fi Wi-fi Wi-fi Wi-fi Wi-fi Wi-fi Wi-fi Wi-fi Wi-fi Wi-fi Wi-fi Wi-fi Wi-fi Wi-fi Wi-fi Wi-fi Wi-fi Wi-fi Wi-fi Wi-fi Wi-Fi WPA Security Checklist (WPA Security Checklist), 4
Security Mode (nannnnnnnnnnnnnnnnnnnn)
Lnnnnae nnne nnnnnae nnne ne nnnnne nne nne nne nne nne nne nne nne nne nne nne nne nne nne nne nne nne nne nne nne nne nne nne nne nne nne nne nne nne nne nne nne nne nne nne nne nne nne nne nne nne nne nne nne nne nne nne nne nne nne nnnee
#
11111111111111111111111111111111111111
WPA Personal
WPA 11111111111111111111111111111111111111111111111

Encryption (nra) WPA aauuunnnrnrnnae TKIP waaanee
Passphrase (snu) 1auuuiu uunu uunu uunu uunu uunu uunu uunu uunu uunu uunu uunu uunu uunu uunu uunu uunu uunu uunu uunu uunu uunu uunu uunu uunu uunu uunu uunu uunu uunu uunu uunu uunu uunu uun
Save Settings (uunnnnnae) wauanrueuuuauuaaunu u
WPA2 Personal
WPA2 1uunuaaunuaanwnw WPA
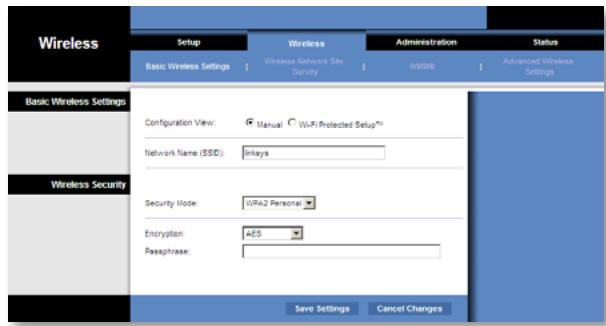
Encryption (ntuun) WPA2 uunununununun 2 TKP AES wauuununununun ununun unan ununun unan unan unan unan unan unan unan unan unan unan unan unan unan unan unan unan unan unan unan unan unan unan unan unan unan unan unan unan unan unan unan unan unan unan unan unan unan unan unan unan unan unan unan unan unan unan unan unan unan unan un
Passphrase (snu) 1auuuiu uuuu uuaa uuaa uuaa uuaa uuaa uuaa uuaa uuaa uuaa uuaa uuaa uuaa uuaa uuaa uuaa uuaa uuaa uuaa uuaa uuaa uuaa uuaa uuaa uuaa uuaa uuaa uuaa uuaa uuaa uuaa uuaa uuaa uuaa uuaa
Save Settings (uunnnnrsv) wauunruluuuuaaunu uuuu
WEP
WEP 11111111111111111111111111111111111111111111111
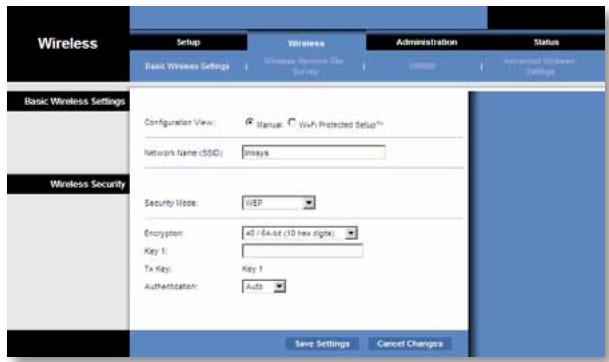
Encryption (ntuun) 10 hex digits) (40/64 10 (10 uun) w(40/64 10 (10 uun) 40/64 bits (10 hex digits) (40/64 10 (10 uun))
Key 1 (第1) WEP
Tx Key (Tx) Key 1
Authentication (ntnnaeannnnnnae) nne Waaeeae Auto (aennnn)
wnnnnne nnne ne nnnnne aennnnnne anan ean an Open (10) waeaneanrnnnnae anan anan an anan anan anan anan anan anan anan anan anan anan anan anan anan anan anan anan anan anan anan anan anan anan anan anan anan anan anan anan anan anan anan anan anan anan anan anan anan anan anan anan anan anan anan anan anan anan anan anan anan anan ananae aeae
Save Settings (uunnnnna) wauanrnuuauuauuauu uuuu
Wi-Fi Protected Setup (nssnnnu Wi-Fi)
2 2
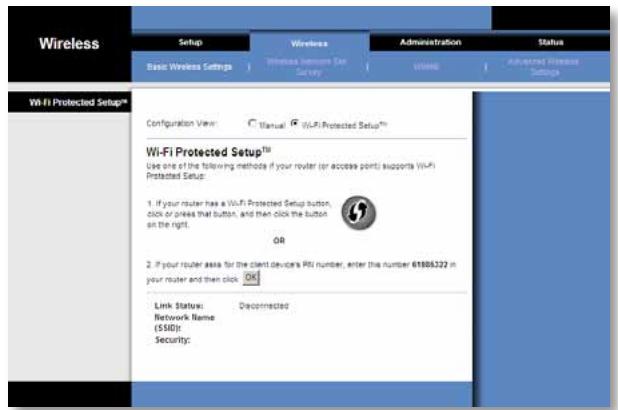
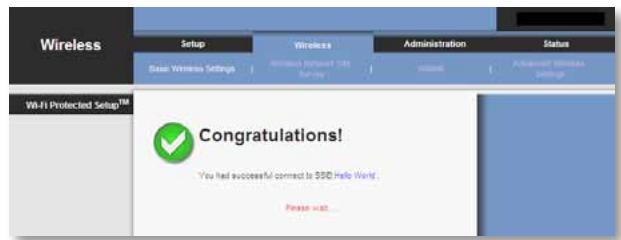
1
Wu Wwunwnnnaaavwauwauwauw u Wi-Fi Protected Setup (nuu wu wu Wi-Fi)
Wireless (wireless > Wireless Network Site Survey (wireless)
Wireless Network Site Survey Wireless Network Site Survey
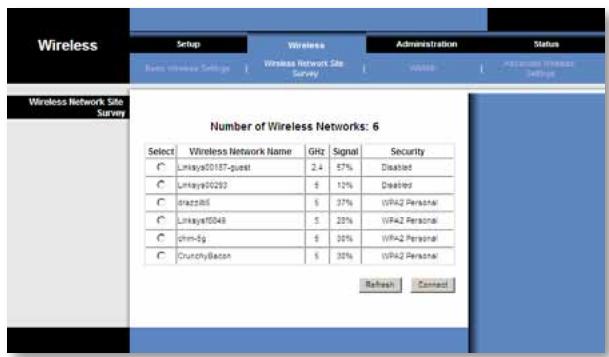
Wireless Network Site Survey (www.wireline.net)
Number of Wireless Networks (wnnnnne nnnnne nnne)
an wataaunnaeauuauauauauauauauauauauauauauauauauauauauauauauauauauauauauauauauauauauauauauauauauauauauauauauauauauauauuuuuuuuuuuuuuuuuuuuuuuuuuuuuuuuuuuuuuuuuuuuuuuuuuuuuuuuuuuuuuuuuuuuuuuuuuuuuuuuuuuuuuuuuuuuuuuuuuuuuuuuuuuuuuuuuuuuuuuuuuuuuuuuuuuuuuuuuuuuuuuuuuuuuuuuuuuuuuuuuuuuuuuuuuuuuuuuuuuuuuuuuuuuuuuuuuuuuuuuuUU
Wireless Network Name (ال在网络运营商) محيى ل在网络运营商 SSID
GHz
Signal (N) uauuuaa aauuuuauuauuauuauuauuauuauuauuauuauuauuauu
Security (ntn nn nnnnnaa) nn nnean an annnnu Wi-Fi Protected Setup Niannu Wi-Fi Protected Setup 4 aunnnae nee nee nnnnnae
ReFresh
Nvvaanrnnnnae anenrnnnnae nn nann Connect(1aun) nuanaa uauuuaa uuuuue aee
WPA
Network Name (SSID) (aataaataaataa (SSID)) uaaataaataaataaataaata
Security Mode (lwnnnnnaaannnnnnaan) WPA Personal aunnuu
Encryption (ntw) WPA aunauuunruea TkIP waaan
Passphrase (snu) 1auuuiu uuuu uuuu uuuu uuuu uuuu uuuu uuuu uuuu uuuu uuuu uuuu uuuu uuuu uuuu uuuu uuuu uuuu uuuu uuuu uuuu uuuu uuuu uuuu uuuu uuuu uuuu uuuu uuuu uuuu uuuu uuuu uuuu uuuu uuu uuuu uuuu uuuu uuuu uuuu uuuu uuuu uuuu uuuu uuuu uuuu uuuu uuuu uuuu uuuu uuuu uuuu uuuu uuuu uuuu uuuu uuuu uuuu uuuu uuuu
ReFresh
nnaananaananaananaananaananaananaananaananaananaananaananaananaananaananaananaananaananaananaananaananaananaananaananaananaananaananaananaananaananaananaananaananaananaananaananaananaananaananaananaananaananaananaananaananaananaananaananaananaananaananaan
Connect (uaua)
WPA2
Network Name (SSID) (SA10000000000000000000000000000000000000000000000000000000000000000000000000000000000000000000
Security Mode (lwnnnnnaaannnnnnaan) WPA Personal aunnuu
Encryption (ntuwr) WPA2 aununrnrn 2 TkIP AES wauu uuuu uuuuuea AES TKIP na AES
Passphrase (snu) iauuuiu uunu u uuaaunu uauuauu uuuu 8-63
n Refresh (w) waaanayannna
Nvwnnnnnaunnrnnnnnnnnnnnnnnnnnnnnnnnnnnnnnnnnnnnnnnnnnnnnnnnnnnnnnnnnnnnnnnnnnnnnnnnnnnnnnnnnnnnnnnnnnnnnnnnnnnnnnnnnnnnnnnnnnnnnnnnnnnnnnnnnnn
WEP
Network Name (SSID) (SAIATANSSID))
Security Mode (lwnnnnnaaannnnaaanaa) WPA aananaananaananaanana
Encryption (nalwur) nanaanwunwne WEP 40/64 bits (10 hex digits) (40/64 10 10 10 10 10 10 10 10 10 10 10 10 10 10 10 10 10 10 10 10 10 10 10 10 10 10 10 10 10 10 10 10 10 10
Key 1 (第1) WEP
Nauuunnunnuunnnnunnuuun 4 nunnnnnnae nnnuuauauauauauauauauauauauauauauauauuuuuuuuuuuuuuuuuuuuuuuuuuuuuuuuuuuuuuuuuuuuuuuuuuuuuuuuuuuuuuuuuuuuuuuuuuuuuuuuuuuuuuuuuuuuuuuuuuuuuuuuuuuuuuuuuuuuuuuuuuuuuuuuuuuuuuuuuuuuuuuuuuuuuuuuuuuuuuuuuuuuuuuuuuuuuuuuuuuuuuuuuuuuuuuuuuuuuuuuuUU
Background (WuNv)
Use Aggregation (laan) Media Access Control (MAC) Add Block Acknowledgement (ADDBA) No(No) Yes Yes
Min. Size of Packet in Aggregation (wunwnnnn) 1500 waaanr 10
ADDBA Timeout (ntnnaa aad DBA) nnean ane nn nnnnne ne nnnnne nnnnne nnnnne nnnnne nnnnne nnnnne nnnnne nnnnne nnnnne nnnnne nnnnne nnnnne nnnnne nnnnne nnnnne nnnnne nnnnne nnnnne nnnnne nnnnne nnnnne nnnnne nnnnne nnnnne nnnnne nnnnnee nnnnne nnnnne nnnnne nnnnne nnnnne nnnnne nnnnne nnnnne nnnnne nnnnne nnnnne nnnnne nnnnne nnnnne nnnnne nnnnne nnnnne nnnnne nnnnne nnnnne nnnnne nnnnne nnnnne nnnnne nnnnae
Aggregation Window Size (unnnnne nnnnnnnn) nnnnnnnn nn nnnnnnnnnnnnnnnnnnnnnnnnnnnnnnnnnnnnnnnnnnnnnnnnnnnnnnnnnnnnnnnnnnnnnnnnnnnnnnnnnnnnnnnnnnnnnnnnnnnnnnnnnnnnnnnnnnnnnnnnnnnnnnnnnnnnnnnnnnnnnnnnnnnnnnnnnnnnnn nn 64
Save Settings (uunnnnnae) wauanrueaauauauauauuauu uuuuauuauuuuu
Best Effort
Max. Aggregation Size (uniprot) 10000
Timeout Internal (ntnunnnnna) nneanne ane nnne nee annne nne nne nne nne nne nne nne nne nne nne nne nne nne nne nne nne nne nne nne nne nne nne nne nne nne nne nne nne nne nne nne nne nne nne nne nne nne nne nne nne nne nne nne nne nne nne nne nne nne nne
nwnnnnna Advanced Wireless Settings
Advanced Wireless (
Use LDPC (LDPC) Low-Density Parity-Check Code (LDPC) #n#n#n#n# n##n#n#n#n# n##n#n#n# n##n#n#n# n##n#n#n# n##n#n#n# n##n#n#n# n##n#n#n# n##n#n#n# n##n#n#n# n##n#n#n# n##n#n#n# n##n#n#n# n##n#n# n##n#n# n##n#n# n##n#n# n##n#n# n##n#n# n##n#n# n##n#n# n##n#n# n##n#n# n##n#n# n##n#n# n##n#n# n##n#n# n##n#n# n##n#n# n##n#n# LDCP No
11n Protection Type (uaaauauauuauauauu 11n) nauuuuuuuuuuuuuuuuuuuuuuuuuuuuuuuuuuuuuuuuuuuuuuuuuuuuuuuuuuuuuuuuuuuuuuuuuuuuuuuuuuuuuuuuuuuuuuuuuuuuuuuuuuuuuuuuuuuuuuuuuuuuuuuuuuuuuuuuuuuuuuuuuuuuuuuuuuuuuuuuuuuuuuuuuuuuuuuuuuuuuuuuuuuuuuuuuuuuuuuuuUU
rtan RTS/CTS 1nntnanaaunnnnnae nne nannnnnnae TCS2Self
mavanan RTS/CTS mnnnnnnnnaaennnnae naaee nannnnnnae
wnnnaanRTS/CTS nnnnnnnnnaaennnnae nne nne nne None
an nn nnnnnnnaaennnnae nne nne nne nne nne nne nne nne nne nne nne nne nne nne nne nne nne nne nne nne nne nne nne nne nne nne nne nne nne nne nne nne nne nne nne nne nne nne nne nne nne nne nne nne nne nne nne nne nne nne nae
Percentage of maximal transmit power (uauuunununununununununun)
uuuuuuuuuuuuuuuuuuuuuuuuuuuuuuuuuuuuuuuuuuuuuuuuuuuuuuuuuuuuuuuuuuuuuuuuuuuuuuuuuuuuuuuuuuuuuuuuuuuuuuuuuuuuuuuuuuuuuuuuuuuuuuuuuuuuuuuuuuuuuuuuuuuuuuuuuuuuuuuuuuuuuuuuuuuuuuuuuuuuuuuuuuuuUUUUUUUUUUUUUUUUUUUUUUUUUUUUUUUUUUUUUUUUUUUUUUUUUUUUUUUUUUUUUUUUUUUUUUUUUUUUUUUUUUUUUUUUUUUUUUUUUUUUUUUUUUUUUUUUUUUUUUUUUUUUUUUUUUUUUUUUUUUUUUUUUUUUUUUUUUUUUUUUUUUUUUUUUUUUUUUUUUUUUUUUUUUUUUUUUUUUUUUU
QoS Classification Type (ntraunnnsn QoS) nnaanannnnn 802.1D wra 802.1Q anwnip IP DSCP/TOS field wmm (wnu, Best Effects, nW, wu) 802.1Dwauan 802.1Q wnuip IPTV
Re-establish Ethernet connection when initiating wireless connection (ntnneethernet
nauuauuueuuuuuuuuuuuuuuuuuuuuuuuuuuuuuuuuuuuuuuuuuuuuuuuuuuuuuuuuuuuuuuuuuuuuuuuuuuuuuuuuuuuuuuuuuuuuuuuuuuuuuuuuuuuuuuuuuuuuuuuuuuuuuuuuuuuuuuuuuuuuuuuuuuuuuuuuuuuuuuuuuuuuuuuuuuuuuuuuuuuuuuuuuuuuuuuuuuuuuuuuUU
Upgrade Firmware (山
IP Address (IP地址)
Ethernet
Network Name (SSID) (###SSID (SSID)) ###SSID
BSSID MAC uauuuaaunauuuuauuuuuuuuuuuuuuuuuuuuuuuuuuuuuuuuuuuuuuuuuuuuuuuuuuuuuuuuuuuuuuuuuuuuuuuuuuuuuuuuuuuuuuuuuuuuuuuuuuuuuuuuuuuuuuuuuuuuuuuuuuuuuuuuuuuuuuuuuuuuuuuuuuuuuuuuuuuuuuuuuuuuuuuuuuuuuuuuuuuuuuuuuuuuuuuUU
Radio Band (n)
Channel Width (nunnuuauuauu) uuuuuuuuuuuuuuuuuuuuuuuuuuuuuuuuuuuuuuuuuuuuuuuuuuuuuuuuuuuuuuuuuuuuuuuuuuuuuuuuuuuuuuuuuuuuuuuuuuuuuuuuuuuuuuuuuuuuuuuuuuuuuuuuuuuuuuuuuuuuuuuuuuuuuuuuuuuuuuuuuuuuuuuuuuuuuuuuuuuuuuuuuuUU
Wide Channel (uaaunnnnna) uauuuaa aauuuuauu uuuuauuuuuuuuuuuuuuuuuuuuuuuuuuuuuuuuuuuuuuuuuuuuuuuuuuuuuuuuuuuuuuuuuuuuuuuuuuuuuuuuuuuuuuuuuuuuuuuuuuuuuuuuuuuuuuuuuuuuuuuuuuuuuuuuuuuuuuuuuuuuuuuuuuuuuuuuuuuuuuuuuuuuuuuuuuuuuuuuuuuuuuuuuuuuuuuuuuuUU
WuWuWuWuWuWuWuWuWuDHCP (WuWuWuWuWuWuWuWuWuDHCP WU WU WU WU WU WU WU WU WU WU WU WU WU WU WU WU WU WU WU WU WU WU WU WU WU WU WU WU WU WU WU WU WU WU WU WU WU WU WU WU WU WU WU WU WU WU WU WU WU WU WLUWU WLUWU WLUWU WLUWU WLUWU WLUWU WLUWU WLUWU WLUWU WLUWU WLUWU WLUWU WLUWU WLUWU
nnaaannnnnnaeipipnnaaaananaaannn nnnnnnnnnnaa a
- Network Setup (n#
- Network Connection Type (15000000000000000000) Static IP(IP Address)
- Static IP Address (IP地址), Subnet Mask (地址) and Default Gateway (地址)
- Save Settings (uannnnae)
- 7wauuunnnaaunnnnnaanrwwwnny aonnnnnnnn nn
- wnuuauwuuuauu u uauuauuauu u uuuuuuuuuuuuuuuuuuuuuuuuuuuuuuuuuuuuuuuuuuuuuuuuuuuuuuuuuuuuuuuuuuuuuuuuuuuuuuuuuuuuuuuuuuuuuuuuuuuuuuuuuuuuuuuuuuuuuuuuuuuuuuuuuuuuuuuuuuuuuuuuuuuuuuuuuuuuuuuuuuuuuuuuuuuuuuuuuuuuuuuuuuuuuuuuuuuuuuuuuUU
Wireless (Kablosuz) > Advanced Wireless Settings
(Gelismis Kablosuz Ayarli) 13
Advanced Wireless (Gelişmiş Kablosuz) 14
Administration (Yönetim) > Upgrade Firmware
Local Network (Yerel A ) 16
Status (Durum) > Wireless (Kablosuz). 16
Wireless (Kablosuz) 16
Sorun giderme
WES610N/WET610N 17
Spesifikasyonlar
WES610N 18
WET610N 19
Ürüne Genel Bakış
Upgrade Firmware (Bellenimi Yükselt)
Status (Durum) > Bridge (Köprü)
Local Network (Yerel Ağ)
Wi-Fi Protected Setup (3axuene BcTaHOBLeHHa Wi-Fi) 9
Wireless (Бeздротови 3В'язOK) > Wireless Network Site Survey (Почук Лokалнх 6e3дротови мерек). . . . . . . . . . . . . . . . . . . . . . . . . . . . . . . . . . . . . . . . . . . . . . . . . . . . . . . . . . . . . . . . . . . . . . . . .
Wireless Network Site Survey (Пошук Лokальник 6e3дротови мерек) 10
Management (KepyBaHnHa) 14
Management (KepyBaHHa) 14
Administration (Адмініструва新闻记者) >Factory Defaults
(3aBoDcBi 3HaueHnnaPapMeTpIb) 15
Factory Defaults (3aBocbki 3NaueHnnaPapMeTpib) 15
Administration (АдмініструваIGNь) > Upgrade Firmware
(OHOBJIeHHa MIkponporpaMHO 3a6e3neueHH) .15
Upgrade Firmware (OnoblennmiKpOporpaHoro 3a6e3neueHH) 15
Status (Ctah) > Bridge (MicT) 15
Bridge Information (InΦopmaizipo miCt) 16
Local Network (JokalbHa mepexa) 16
Status (Ctah) > Wireless (БeэдpoTOBи 3В'ЯЗК) .16
Wireless (Bézdpotobni 3B'ЯЗК) 16
UcynenHHeCnPaBHOCTeI
WES610N/WET610N 17
TexhiHi xapaKTepeNCTnKn
WES610N 18
WET610N 19
Ог��д вибору
Дякуемо за пидбань муньтимединоро мосту подіноро дIANa3OHy Linksys ДЯ мерек стаду N. Мст пизначени до пійкlioчень 6yd-якnx ДрOTOBxnpicstpoiB (пспстpoь 3i 3'EDHAHньm Ethernet)do 6e3dpoTOBOМерекi.ВОCHOBIМСТУ leжntb texhONORI 6e3dpoTOBO 3B'3KY 3a cStahapTom N, TOMy bIN cymicn i3 6yd-якIMN 6e3dpoTOBMn Mapшутузatopamn abo Tockamn DoCTynu, zuo BiDNOBIAJIOCTaHdaptam 6e3dpoTOBO 3B'3KY N, G, A abo B.ДлЯ BCTAHOBNeHH Heo6xIDHO BHKOHATN IHCTpyKci, loMiCTaTbCBy npanzi Ha KOMNAKT-DnCKy. 3aDaTIЗHAueHHNDAODaTKOBIX napameTpib MoXHa 3a ДОПOMOrOTo 3pyHoi CnyK6OBoI nporpaMn, zuo npaioe y 6pay3epi.
HanaHTyBaHHaOdaTKOBnX npaMeTpIB
Picra BnKoHaHHI HcTpyKuI 3 HaIaHTyBaHnH MaOCTa, HabeEHx y nAni HA KOMNaKTdNCKy, mCt 6yIe rotOBn DO BnKOpNCtAHn. Ondak 3mHInTu 3NaHeHH DaDAtKOBnX npametpiB, Heo6XiHO CKOpNCtATncs Cnyk6BOO npOrpAmO MOCTa, 0o npaioe y 6pay3epi. Y ubomy po3diPi pO3rJaIObTcB Ci Be6-ctopin ki ci cyj6BOoi nporpamTa BiINobiHi OCHOBHI fHKuII. BiIKpnTi cnyk6BOBy nporpamy MoHa i3 Be6-6pay3epa Ha KOM'IOTePi, NiikLIOueHoro do Mepeksi BoRo MocTa.
Y cnyk6obni nporpami, 90 npa4o8 y 6pay3epi, 9 taki ochOBHI BklaKn: Setup (HaJauStyBaHHra), Wireless (Be3dpoTobn 3B'3ok), Administration (AdmiHicTpBuHna) Ta Status (Ctah). IdoatkoBI BklaKn BiO6paKaHObci niCnI nepexOdy Ha oNDy 3 OCHOBHX BKlaoK.
BidkpTTcIyX6OBoI npoRpaMn, 0o npaioe y 6pay3epi
Дя Вдкрптг слжбови nporpaMu, lo npaioe y 6pay3epi, cnid ckopnctaTnca Be6-6pay3epom.
Якwo mict πidклочenvи до мерекi iz DHCP-ceрвepom (3a3bvyча чез мерекеви mapшутузатор), mict otprumye IP-aadpecy BiD DHCP-cepbera.Якwo DHCP-cepber biDcythi, mict BnKOpuctOBvBaTmme ctaTunHy IP-aadpecy 3a 3amOBvBaHnM: 169.254.1.250. (Якwo noctiHa ctaTUnHa IP-aadpeca HadaeTBcR MoCTy 3a donomoroi cnyk6oboi nporpaMn, lo ppaioe y 6pay3epi, BBeditb HOBy IP-aadpecy 3amCtB 3a3Nauehoi.)
ПРИМITKA
Encryption (山nФpyBaHЯ) WPA niДtpmYe MeToI ΜιΦpyBaHЯ TKIP, B yKOMy BKNOPICTOBYIObCЯ DInHaMiCyI ΜιΦpyBaJIbHi KJIouci.
Passphrase (Papojb) BBeiditb napojb, cnijbnHn IJRA MoCTa Ta 6e3dpoToboro Mapupytn3aTopa a6o Toukn DocTyny. BiH MaE MicTtN BiD 8 do 63 cmmBoiB.
HaTnCHiTb Save Settings (36epeRtn 3naueHnna napaMeTpib), 0o6 3actocyBatn 3miHn, a6o Cancel Changes (CkacyBaN 3miHn), 0o6 ckacyBaN 3miHn.
WPA2 Personal (IIndubidyaalbHuWPA2)
WPA2 — ue 6iIbI cyuacHa ta HaJIiHa BepcIa cTaHdapTy WPA.
WEP—ze 6a3OBm MeToD uHΦpyBaHHa,MeHn HaJIiHN, aIX WPA a6o WPA2.
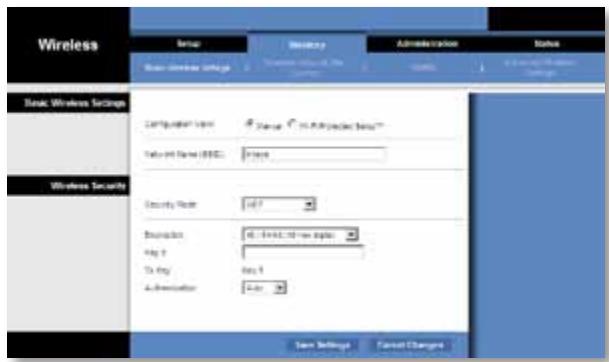
Encryption (Шифруваимь) Виберить рівеньшифруваимь WEP: 40/64 bits (10 hex digits) (40/64 6it (10 šičтнадцятуковин сифр)) a60 104/128 bits (26 hex digits) (104/128 6it (26 šičтнадцятуковин сифр)). 3haчehня за зamочуваим: 40/64 bits (10 hex digits) (40/64 6it (10 šičтнадцятуковин сифр)).
Key 1 (Klou 1) BBeiItb KluW WEP mepeksi.
Tx Key (Klou nepedaBaHn) Key 1 (Klou 1) - Klu nepedaBaHn, zu BKNOPUCTOByETbCRA MOCTOM.
Authentication (AyeHTnΦiKaizia) 3HaueHnna 3a 3AmOByBaHHaM: Auto (ABTomTuHo). BOHO da € 3mory BnKOpNCTOBvBaTn ayTeHTnΦiKaizio 3a MeToDM BIDKpNTOc nCTeMeN a6o cnIbHoro kIoua. Bn6epiB 3HaueHnna Open (BiDkpTa), 106 yBIMKHyTN ayTeHTnΦiKaizio 3a MeToDM BIDKpNTOc nCTeMeN. IpepaBaay i npniMaay daHnx He BnKOpNCTOBvBaTMuTyb kIou WEP dny ayeHTnΦiKaizii. Bn6epiB 3HaueHnna Shared (CnilbHa), 106 yBIMKHyTN ayTeHTnΦiKaizio 3a MeToDM cnilbHoro kIoua. IpepaBaay i npniMaay daHnx BnKOpNCTOBvBaTMuTyb kIou WEP dny ayeHTnΦiKaizii.
HaTnCiHtB Save Settings (36epeTn 3NaueHnna napaMeTpIb), 0o6 3actocyBaTu 3MiHn, a6o Cancel Changes (CkacyBaTu 3MiHn), 0o6 ckacyBaTu 3MiHn.
Wi-Fi Protected Setup (3axnuehe BCTaHOBJeHHra Wi-Fi)
IcHyE DbCnO6B BkOpncTaHn Yei FyHKci. Bn6epiTb Cnoci6, Akn BiNobiae HaBHOMy MapuPyTu3aTopy.
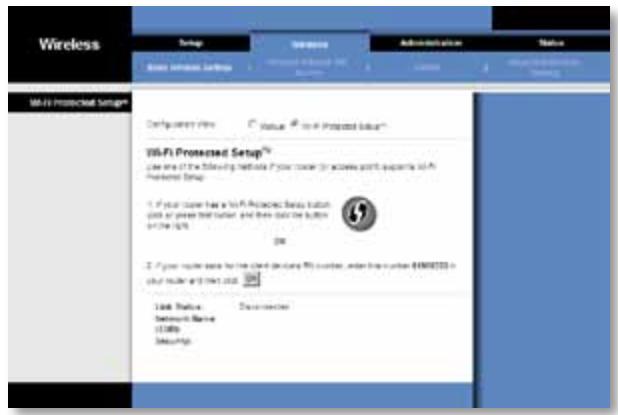

Cnoci6 1
LIMC cno6oM MoKHa CkOpNCTaTnCra, KaIcO MapuTyN3aTOp MaE KHOnKy Wi-Fi Protected Setup (3axuIeHe BCTaHOBLeHHr Wi-Fi).
- Hatncitb ekpaHny a6o fi3nHy KhoNky Wi-Fi Protected Setup (3axnuehe BCTaHOBJIeHHaWi-Fi) ha MapuPyTu3aTopi.
2.УпpoДовЖ ДBox XВиЛин�аТСИЧь KНОКу Wi-Fi Protected Setup (3axише Встановлени Wy-Fi) ha ekpani Wi-Fi Protected Setup mapшутNiЗаTopа.
3.Пиету toro,яп napametpn Mocta 6уde ckOHphiirypobaHo, haTncHtB Close (3akpntn).
Ha ekpahi Wi-Fi Protected Setup (3axuenehe BCTaHOBlenHa Wi-Fi) BiO6paxoTbc TaKi napameTp: Link Status (Ctah kaHany), Network Name (SSID) (Im'Я Мepexi (SSID)), a TAKOK MeToD 3axuCTy.
Cnoci6 2
CkopncTaItecyaIcIcO6oM,JaKIO mapuTyIaTOp 3aIITae PIN-KoI MocTa.
- Ha ekpahi MapspTy3aTopa Wi-Fi Protected Setup (3axuhe BCTaHOBJENHa Wi-Fi) BBeItb PIN-ko, BiIO6paXeHn Ha OINHOMeHHOMy ekpaHI MoCTa . Notim HATNCiTB KONKy Register (3apeectpyBaTu) a6o IHsy BiIOBIDHy KHONky. (LIOIHΦOpMaIIO TAKOx 3a3HaueHO Ha HAKLeIz 3 HIXHBORO 6OKy MoCTa.)
- Ha ekpahi Mocta Wi-Fi Protected Setup (3axuene BCTaHOBnHnWi-Fi) HATNCiTB KNONKY OK.
3.Пися того,яп napametpn Mocta 6уde ckOHphiirypobaHo,натиситb Close (3akpntu).
Ha ekpani Wi-Fi Protected Setup (3axnuehe BCTaHOBlenHra Wi-Fi) BiO6paXaHTbc TaKi napameTp: Link Status (Ctah kaHany), Network Name (SSID) (Im'Я Мерекi (SSID)), a TAKOK MeToD 3axuCTy.
Encryption (山uΦpyBaHn) WPA niTpmye MeToI uΦpyBaHHa TKIP, B yKOMy BVKOPNCTOBHyOTbCa DnHaMiHi uΦpyBaJIbHI KJIouH.
Passphrase (Papojb) BBeiMb npoB, cnIbHn IJMa MoCTa Ta 6e3dpOTOBoro MapuTyN3atopa a60 ToKn Doctyny. BiH MaE MICTTN BiD 8 do 63 cunBONIB.
HaTnCHiTb Refresh (OHOBNTn), Ⅲo6 OHOBNTn iHΦopMaζio Ha ekpaHi.
Bvibn 3naeHn npaMeTpib 3axuCTy,HaTnciTb Connect (PiKJIouHTn).
WPA2
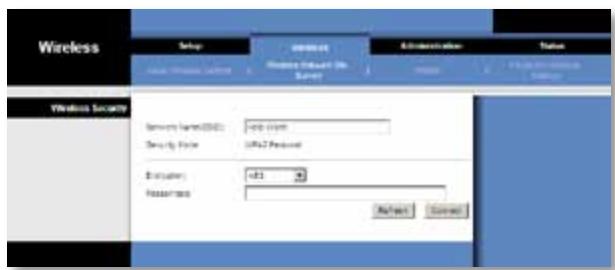
Network Name (SSID) (IM'Я мереки (SSID))标明атунов biodobpaжаеву BИбрано мереки.
Security Mode (Pexm 3axncty) ABTomatuHObiIO6paKaETbCpexmWPA2 Personal (IHNBIDyaJIbHn WPA2).
Encryption (LHnΦpyBaHHa) WPA2 nIITpMMy eBa MeToDn ΜnΦpyBaHHa: TKIP ta AES, yAknx BnKOpNCtOByIObC aINHaMiyH iNΦpyBaJIbHi KInOci. Bn6epiMb MeToD nHΦpyBaHHaAES a6o TKIP or AES (TKIP a6o AES).
Bvibn 3NaueHn npaMeTpB 3axncTy, HATNCiTb Connect (PiiknluOHTn).
WEP
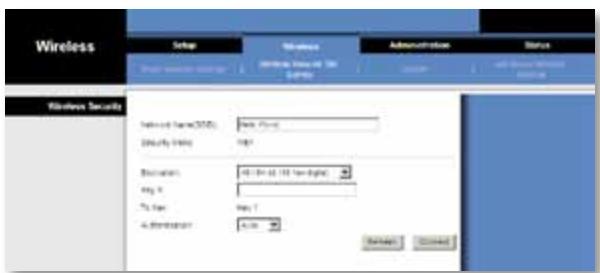
Bvibn 3naeHn npaMeTpib 3axncty, HATNCiTb Connect (PiiknouHTn).
Use Aggregation (BnKopncTObYBaTH arpeyBaHH) LcH npaMeTp Bn3Haay, Cn MaepiBeHb KepyBaHH MyIbTmEidiHm DoCTynom (Media Access Control, MAC) noCuHaTnceAHCdoDaBaHH NiITBepJxKeHH 6IokIB (Add Block Acknowledgement, ADDBA).3HaueHH 3a 3amOBuBaHHM: Yes (TaK). Bn6epiTb No (Hi), 106 BnMKnHyTu 10 fHyKciIO.
Management (KepyBaHnHa)
Status (Ctanh) > Bridge (Mict)
Tyt Biö6paXaεTbcra iHφopMaúci npo nToUHm CTah MocTa.
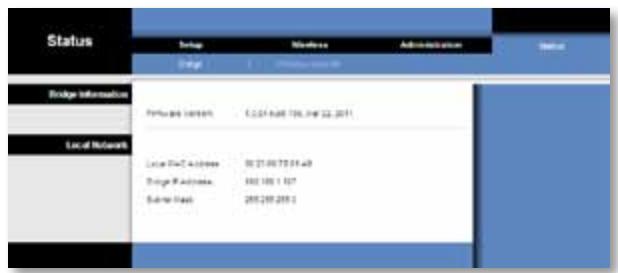
Bridge Information (Iифорmaця npo mičt)
Firmware Version (Bepcia miKpOnporpamHoro 3a6e3neuHn) BiO6paKaETbcra nOtouHa Bepcia miKpOnporpamHoro 3a6e3neuHn MoCTa.
Local Network (Лokалва мерека)
YcyHeHHa HeCnpaBHOCTeH
WES610N/WET610N
Komn'omep a6o ihuu npomobu npucpiu (3i 3'edhannm Ethernet) He Moxe o6minohamuc dahumu i3 6e3dpomobum mapupymuzamopom.
Moe Bao matao sung. 5
Cái hìn nang cao
Wireless (Khôngday) > Basic Wireless Settings
(Cai dát khong day co' bān). 7
Basic Wireless Settings (Cai dāt khòngday co bàn) 8
Wireless Security (Bao mát khongDay) 8
Wi-Fi Protected Setup (Thiét lâp Bǎo mât WiFi) 9
Wireless (Khongday) ≥ WMM® 11
WMM 12
Wireless (Khôngday) > Advanced Wireless Settings
(Cai dát KhóngDay Náng cao) 13
Advanced Wireless (KhôngDayNang cao) 14
Administration (Quàn tri) > Management (Quàn lý) 14
Management (Quan Iy) 14
Administration (Quàn trij) > Factory Defaults
(Giá tri Măc dinh khi Xuat xuǒng) 15
Factory Defaults (Gia tri Mac dinh khi Xuat xuong) 15
Administration (Quàn trij) > Upgrade Firmware
(Nang cap Phan mem Hé thóng). 15
Upgrade Firmware (Nang cap Phàn mèm Hé thóng) 16
Status (Trang thai) > Bridge (Cau noi). 16
Bridge Information (Thong tin vè Càu néi) 16
Local Network (Mang Nói bô) 16
Status (Trang thai) > Wireless (Khongday) 16
Wireless (Khongday) 16
Khac phuc su co
WES610N/WET610N 17
Thòng sǒ kǔ thuator
WES610N 18
WET610N 19
Tóng quan Sân phám
Cám on ban dā chon mua thiet bi Cau néi Già tri chuán N dai kép cua Linksys. Cau néi nay có thekét néi bát ký thiet bi có day, Ethernet não vovi mang khong day cua ban. Cau néi duva trén chuán Wireless-N dai kép, vi vay cau néi nay tuong thich voi bát ký diém truy cap hay bó dinh tuyén chuán Wireless-N, -G, -A, hoac -B não. Hay lam theo cac buócstrong thu muc CD cho lan cai dàt dàu tièn. De cau sinh cai dàt náng cao, hay su'dung tièn ich tièn dung, duà trén trinh duyêt.
Măt bó tri rdèn LED

WES610N
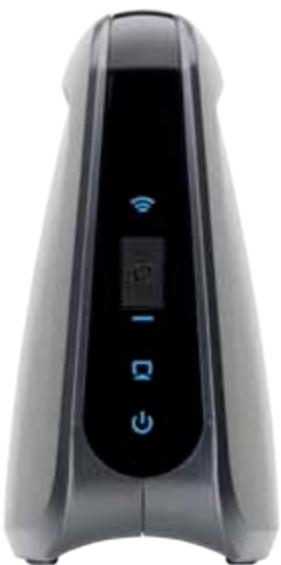
WET610N
Khóngday(Xanh)DenLED Khongdaybatsangkiché kétnói khongday.DenLED nháysangkichau noidang guihaynhanyiduiequama mangkhongday.
Nút Wi-Fi Protected Setup Néu bó dinh tvyén cua ban hó tro Wi-Fi Protected Setup và sutung tinh näng bao mát WPA hay WPA2, ban có the su dung Wi-Fi Protected Setup dé tu dong két não vovi cau néi. De sut dung Wi-Fi Protected Setup (Thiet lap bao mát WiFi), tham khào "Wireless (KhongDay) > Basic Wireless Settings (Cái dαt khongDay co bàn)" trèn tranq 7.
Encryption (Mā hoa) WPA2 hōtro hai phuong thuc mā hoa, TKIP va AES, vói cac mā khóa mā hoa dong. Chon phuong thuc mā hoa, AES or TKIP (AES hoac TKIP) hoac AES. Lya chon mac dinh la AES.
GHz Hien thi bang tan radio cua mang khong day.
Signal (Tin hieu) Hien thi tí le phàn trám cuong do tin hieu. 100% la cuong do tin hieu mánh ng co the có; 0% là cuong do tin hieu yéu ng co the có.
Security (Báo mát) Néu mang hô tro Wi-Fi Protected Setup, bièu tiên ng Wi-Fi Protected Setup ⁶ sê hiên thi. Hien thi phuong thuc bao mát duoc mang khòngDay su dung
Nháp Refresh (Làm bói) dé cap nhát thong tin trén man hinh.
Sau khi dā chon mang, hyy nháp Connect (Két néi). Môt mân先进技术 xuát hiên Làm theo cac hróng dan dashn cho phuǒng thúc bǎo mát mang cúa ban
WPA
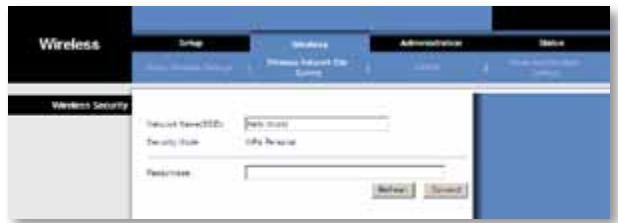
Wireless (Khôngday) > WMM®
Cáu先进技术 Cáu先进技术 WMM 1000 MHz WMM 1000 MHz WMM 1000 MHz WMM 1000 MHz WMM 1000 MHz WMM 1000 MHz WMM 1000 MHz WMM 1000 MHz WMM 1000 MHz WMM 1000 MHz WMM 1000 MHz WMM 1000 MHz
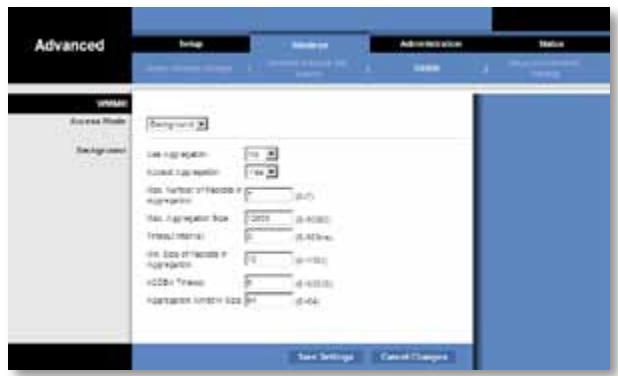
LUU Y
Cài dát trèn män hinh WMM duoc thiét ké chǐ dashh cho nguòi dung náng cao.
WMM
Access Mode (Ché dô Truy cap)
Ban có the gán cac cai dát khac nhau cho bón ché do truy cap co sān. Chon ché do ban muón cau hinh Background (Nèn), Best Effort (No luc Tót nhát), Video, hoac Voice (Thoai). Lam theo nhùng huóng dān cho ché do ban chon.
Background (Nèn)
Use Aggregation (Sùdung Táp hop) Túy chon nay xác dinh lieu lóp Kiém soát Truy cap Phuong tién (MAC) có thiet lap mòt phièn Them Xác nhân theo Khói (ADDBA). Giá tri mác dinh là No (Khóng). Chon Yes (Có) de bát túy chon này.
Accept Aggregation (Chap nhân Tapest) Tuy chon nay xac dinh lieu lôp Kiem soat Truy cap Phuong tiên (MAC) co chap nhân yêu cau ADDBA khong. Mác dinh la Yes (Có). Chon No (Khong) dé tát tuy chon nay.
Max. Number of Packets in Aggregation (Só Gói tin Tói dastrong Tâp hop)
Tuy chon nay xac dinh só goi tin tói da (khung phu)strong tâp hop. Pham vu tó 0 dén 7. Mac dinh la 7.
Kiemtra cac muc sau:
- Dàm bǎo rǎng thiet bi hōtro khòng day dang o' cung trong mòt mang khòngday vói may tinh hoac thiet bi Ethernet, códay khác duoc két nòi vói cau néi.
- Dàm bǎo bàn suì dung cung Network Name (SSID) (Tèn máng) chô tát ca cac thiet bi trèn mang khòngday.
- Dàm bǎo rǎng tát cà céc thiet bi déu òr o trong cung mòt mang IP bang cach su dung cac dja chi IP tuong thich.
Tien ich dya trén trinh duyét khong chap nhān māt kháu cua ban.
Kiemtra cac muc sau:
- Mát kháu có phàn biét kieu chūr. Dám bǎo rāng bàn dung dung kieu chūr, khi nhap mát kháu.
- Néu quen mát khāu, bān có thecāi lái cau néi vè giá tri mac dinh khi xuàt xuǒng.
Bám vā giūr nút Reset (Cái lái) cuá cùn néistrong khoàng 5 giày; mát khāu sé duoc cai lái vè gia tri mac dinh khi xuát xuǒng, admin. Tát cá cai dát khac cua cùn néi cung sè duoc cai lái vè gia tri mac dinh khi xuát xuǒng. (Dé truy cap vào tién ich dura trén trinh duyet, hǎy nhap admin vào trúnq Password (Mát khāu).)
Sau khi thuc hiên thay doi trong tién ich duva trèn trinh duyét, cai dàt moi chua hiên thi trèn màn先进技术
Trén trinh duyét web, hya nhap Refresh (Làm ), Néu cai dát ), vān chuá hien thi, hya lam theo cac huóng dān nay
- Rút bó thich ñng nguàn ra khói cαu nài.
- Doi 5 giay roi camlai bo thich ung nguon vao cau noi.
- Trén trinh duyét web, hyay nhap Refresh (Lam moi).
WEB
Néu cac thac mac cua ban khong duoc de cap o'day, hãy tham khào tranq web Linksys tai Linksys.com/support
Thếng sô ký thai
WES610N
| Kieu | WES610N |
| Chuan | IEEE 802.3u, 802.11g, 802.11b, 802.11a, 802.11n |
| Đen LED | Nguôn, Ethernet, Wi-Fi Protected SetupTM, Khòng dày, hoàd dòng và lién két Ethernet có nhân |
| Cộng | Ethernet (4), Nguôn |
| Nút | Reset (Cà lài), Wi-Fi Protected Setup |
| Loài cap | CAT5e |
| Âng-ten | 3 (trong) |
| Loai tiên cám Ľng-ten | Khòng áp dung |
| Có the tháo ròi (Có/Khòng) | Khòng |
| Dièu bien | 802.11a: OFDM/BPSK, QPSK, 16-QAM, 64-QAM 802.11b: CCK/QPSK, BPSK 802.11g: OFDM/BPSK, QPSK, 16-QAM, 64-QAM 802.11n: OFDM/BPSK, QPSK, 16-QAM, 64-QAM |
| Cộng suat bùc xà dang huáng hǐeu dung (EIRP) theo dBm | |
| 802.11a: 15 dBm (quy chuǎn) @ 54Mbps | |
| 802.11b: 19 dBm (quy chuǎn) @ 11 Mbps | |
| 802.11g: 16 dBm (quy chuǎn) @ 54 Mbps | |
| 802.11n (2,4 GHz): 18 dBm (quy chuǎn) @ MCS15 | |
| 802.11n (5 GHz): 16 dBm (quy chuǎn) @ MCS15 | |
| Đǒ nhay thu | 802.11a: -72 dBm (quy chuǎn) @ 54 Mbps |
| 802.11b: -85 dBm (quy chuǎn) @ 11 Mbps | |
| 802.11g: -73 dBm (quy chuǎn) @ 54 Mbps | |
| 802.11n (20 MHz): -75 dBm (quy chuǎn) @ MCS15 | |
| 802.11n (40 MHz): -69 dBm (quy chuǎn) @ MCS15 | |
| Đǒ tàng izh cúa Ľng ten theo dBi | 1 |
| Bǎo mát Khòng dày | WEP, Wi-Fi Protected AccessTM (WPA), Wi-Fi Protected AccessTM 2 (WPA2) |
| Bit mǎ khoá bǎo mát | Mǎ hoá tói da 128-bit |
Mói truong
| Kích thúóc | 6.97" x 5.04" x 2.68" (177 x 128 x 68 mm) |
| Trùng l权重 | 0,65 lb (295 g) |
| Chùng chi | FCC, UL/cUL, ICES-003, RSS210, CE, Wi-Fi (IEEE 802 11a/b/g/draft n), WPA2TM, Wi-Fi Protected Setup, WMM® |
| Nguôn | 12V, 1A |
| Nhiế t do hoàt d權益 | 32 dén 104°F (0 dén 40°C) |
| Nhiế t do bao quàn | -4 dén 140°F (-20 dén 60°C) |
| Dô am hoàt d權益 | 10 dén 85% Khòng ngùng tu |
| Dô am bao quàn | 5 dén 90% Khòng ngùng tu |
Thong so ky thuat co the they dai ma khong bao truc.
WET610N
Kièu WET610N
Chuàn IEEE 802.3u, 802.11g, 802.11b, 802.11a, 802.11n
Den LED Power, Ethernet, Wi-Fi Protected Setup™, Wireless
Cong Ethernet, Nguon
Nút Reset (CàIàI), Wi-Fi Protected Setup
Loai cap CAT5e
Ang-ten 3 (trong)
Loai giac cam ang-ten Khong ap dung
Chung chi FCC, UL/cUL, ICES-003, RSS210, CE, Wi-Fi (IEEE 802 11a/b/g/draft n), WPA2TM, Wi-Fi Protected Setup, WMM®
Nguàn 12V, 1A
Nhiét do hoat dong 32 dén 104^ (0 dén 40^ )
Nhiét dô bao quán -4 dén 140°F (-20 dén 60°C)
Dô am hoat dōng 10 dén 85% Khòng ngung tu
- Wireless Security Checklist
- Advanced Configuration
- Troubleshooting
- Specifications
- Product Overview
- LED panel
- Ports panel
- Change the default wireless network name or SSID
- Change the default password
- Enable MAC address filtering
- Enable encryption
- General Network Security Guidelines
- Additional Security Tips
- How to access the browser-based utility
- NOTE
- Setup > Basic Setup
- Language
- Network Setup
- Wireless > Basic Wireless Settings
- Basic Wireless Settings
- Wireless Security
- Security Mode
- WPA Personal
- WPA2 Personal
- WEP
- Wi-Fi Protected Setup
- Method #1
- Method #2
- Wireless > Wireless Network Site Survey
- Wireless Network Site Survey
- WPA
- WPA2
- Wireless > WMM®
- WMM
- Access Mode
- Background
- Best Effort
- Video
- Voice
- Wireless > Advanced Wireless Settings
- Advanced Wireless
- Administration > Management
- Management
- Bridge Access
- Web Access
- Backup and Restore
- System Reboot
- Administration > Factory Defaults
- Factory Defaults
- Administration > Upgrade Firmware
- Upgrade Firmware
- Status > Bridge
- Bridge Information
- Local Network
- Status > Wireless
- Wireless
- WES610N/WET610N
- Your computer or other wired, Ethernet device cannot communicate with the wireless router.
- The bridge's IP address needs to be changed.
- The browser-based utility does not accept your password.
- Check the following:
- After you make changes through the browser-based utility, the new settings are not displayed on-screen.
- WEB
- WES610N
- Environmental
- WET610N
- Lg
- Advanced Wireless Settings < (
- Lg> Lg<1h>
- #
- i 150
- LwUJ L0xJn nn Jaa
- paaa 1
- iiie 1c aolc jzj
- jai jai
- JLo8 4oL21 13L
- LwUJ LoxJn nn gaa
- SSID gJ 1
- aaijio81gaiol aOLS
- MAC 1gic aaaa
- JU
- ab = 16
- ab = 30
- Basic Wireless Settings < (1,1) Wireless
- (wLw81 5LwU1 c81)
- (Lw)Basic Setup<(S) Setup
- (Wi-Fi i.i. j. y) Wi-Fi Protected Setup
- 1
- (aLw) Wireless Network Site Survey
- 2
- Wireless Network Site Survey < (w) Wireless
- WMM® < (S L W U) Wireless
- Video
- ()Access Mode
- Advanced Wireless Settings < (w) Wireless
- (aaaaal aLwU U 1scl)
- m = 311
- (Advanced Wireless
- (Voice
- (_j, _j) Management < (_j, _j) Administration
- Web Access
- (δLeWgblzIj) Backup and Restore
- Upgrade Firmware
- Bridge < (JL) Status
- L_g > L_ l_g( L_h + L_h)
- i
- WPA2IuHa
- Wi-Fi Protected Setup (3auntetoKoHfnpnpaHe Ha 6e3xuHa Bp3ka)
- MeToa#1
- MeToa #2
- Best Effort (Haɪ-ɒðbɒr BɒɜMɔːkeH)
- Status (Състаяне) > Bridge (Мост)
- Bridge Information (Инфомацnia за моста)
- Local Network (Лобкальна мрека)
- Ba3upanama Ha 6pay3b npomouha npo2pama He npuema bawama napola.
- CneB 8b8ekdahe Ha npomeHume ype3 6a3upahama Ha 6pay3bp nomouha npo2pama HoBume Hacmpouku He ce noka38am Ha ekpana.
- YEB
- CpeunΦnKaun
- Данни по OTношенье на Okолнота срEDA
- Fehlerbehebung
- Spezifikationen
- Produktübersicht
- Fejlfinding
- Specificationer
- Produktoversigt
- Wireless Security (Tradløs sikkerhed)
- Method #1 (Metode 1)
- Method #2 (Metode 2)
- Best Effort (Bedste praesation)
- Administration > Management (Styring)
- Management (Styring)
- Bridge Access (Broadgang)
- Administration > Upgrade Firmware (Opgrader firmware)
- Upgrade Firmware (Opgrader firmware)
- Status > Bridge (Bro)
- Local Network (Red local)
- Administration > Gestion
- Backup and Restore (Sauvegarde et restauration)
- Administration > Management (Gestion)
- Management (Gestion)
- Me0ooc1
- Status (Kατάσταση) > Bridge (Γέφυρα)
- Bridge Information (Плneyразорiativeς γέφυρας)
- Local Network (Toπikó δικτuo)
- Pemecahan Masalah
- Spesifikasi
- Ringkasan Produkt
- WPA Personal (WPA Pribadi)
- WPA2 Personal (WPA2 Pribadi)
- Best Effort (In base al traffico)
- Management (Gestione)
- Bridge Access (Accesso al bridge)
- Upgrade Firmware (Aggiorna firmware)
- Status > Wireless (Stato > Wireless)
- Probleemoplossing
- Productoverzicht
- Wireless Security (WLAN-beveiliging)
- Wireless (WLAN) > WMM®
- Best Effort (Beste poging)
- Administration (Administratie) > Upgrade Firmware (Firmware upgraden)
- Upgrade Firmware (Firmware upgraden)
- Local Network (Lokaal network)
- Status > Wireless (WLAN)
- Metode nr. 1
- Best Effort (Beste innsats)
- Bridge Access (Brotilgang)
- Upgrade Firmware (Oppgrader fastvare)
- Status > Bridge (Stan > Most)
- Método n.° 1
- Administration (Administração) > Upgrade Firmware (Actualizar firmware)
- Depanare
- Security Mode (Mod de securitate)
- Best Effort (Cel mai performant)
- Administration (Administrare) > Management
- Administration (Administrare) > Upgrade Firmware
- i-Fi Protected Setup
- Cnoc061
- Cnoc062
- Upgrade Firmware (Овиьп troшнburgу)
- BEB
- Texhnuechne xapaKtepncnKn
- Administration > Management (Hantering)
- Management (Hantering)
- Åtkomst till brygga
- Administration > Upgrade firmware (Uppgradera fast programvara)
- Upgrade Firmware (Uppgradera fast programvara)
- Bridge Access (Dostop do mostu)
- Wireless Security Checklist (57)
- n
- n5nn
- LED panel (UNIVLED)
- Ports panel (wvwa)
- - 1
- 75
- 15
- vua
- Language (nvn)
- Basic Wireless Settings (ngwnu
- Wireless Security (nssnnnnnaaannnnn nnne)
- Security Mode (nannnnnnnnnnnnnnnnnnnn)
- Wi-Fi Protected Setup (nssnnnu Wi-Fi)
- Wireless (wireless > Wireless Network Site Survey (wireless)
- Wireless Network Site Survey (www.wireline.net)
- Background (WuNv)
- Advanced Wireless (
- Upgrade Firmware (山
- Sorun giderme
- Spesifikasyonlar
- Ürüne Genel Bakış
- Upgrade Firmware (Bellenimi Yükselt)
- Status (Durum) > Bridge (Köprü)
- Local Network (Yerel Ağ)
- UcynenHHeCnPaBHOCTeI
- TexhiHi xapaKTepeNCTnKn
- Ог��д вибору
- HanaHTyBaHHaOdaTKOBnX npaMeTpIB
- BidkpTTcIyX6OBoI npoRpaMn, 0o npaioe y 6pay3epi
- ПРИМITKA
- WPA2 Personal (IIndubidyaalbHuWPA2)
- Wi-Fi Protected Setup (3axnuehe BCTaHOBJeHHra Wi-Fi)
- Cnoci6 1
- Cnoci6 2
- Management (KepyBaHnHa)
- Status (Ctanh) > Bridge (Mict)
- Bridge Information (Iифорmaця npo mičt)
- Local Network (Лokалва мерека)
- YcyHeHHa HeCnpaBHOCTeH
- Komn'omep a6o ihuu npomobu npucpiu (3i 3'edhannm Ethernet) He Moxe o6minohamuc dahumu i3 6e3dpomobum mapupymuzamopom.
- Cái hìn nang cao
- Khac phuc su co
- Thòng sǒ kǔ thuator
- Tóng quan Sân phám
- Măt bó tri rdèn LED
- Wireless (Khôngday) > WMM®
- LUU Y
- Access Mode (Ché dô Truy cap)
- Background (Nèn)
- Tien ich dya trén trinh duyét khong chap nhān māt kháu cua ban.
- Sau khi thuc hiên thay doi trong tién ich duva trèn trinh duyét, cai dàt moi chua hiên thi trèn màn先进技术
- Thếng sô ký thai
- Mói truong
Brand : LINKSYS
Model : WET610N
Category : Wireless Network Adapter