Drumfit Elliptical 9000 Eir Pro 07088 80 - Fitness Equipment CECOTEC - Free user manual and instructions
Find the device manual for free Drumfit Elliptical 9000 Eir Pro 07088 80 CECOTEC in PDF.


| Product type | Elliptical trainer |
| Brand | Cecotec |
| Model | Drumfit Elliptical 9000 Eir Pro 07088 80 |
| Use | Home cardio training |
| Resistance | Adjustable (magnetic system) |
| Power supply | Power adapter supplied by Cecotec |
| Display | LCD screen with backlight |
| Displayed measurements | Time, speed, distance, calories, heart rate |
| Heart rate sensors | Integrated measuring handles |
| Training programs | Several preset modes |
| Foot platforms | Wide and non-slip |
| Transport wheels | Yes, for easy movement |
| Maximum user weight | 120 kg (estimated) |
| Dimensions (L x W x H) | 128 x 62 x 160 cm (estimated) |
| Net weight | 38 kg (estimated) |
| Noise level | Quiet (drive belt) |
| Safety | Complies with European safety standards |
| Maintenance | Clean with a dry cloth, check screws and nuts |
| Spare parts | Available through Cecotec after-sales service |
| Warranty | Official Cecotec warranty (see manual) |
| Recycling | Compliant with WEEE directive |
Frequently Asked Questions - Drumfit Elliptical 9000 Eir Pro 07088 80 CECOTEC
User questions about Drumfit Elliptical 9000 Eir Pro 07088 80 CECOTEC
0 question about this device. Answer the ones you know or ask your own.
Ask a new question about this device
Download the instructions for your Fitness Equipment in PDF format for free! Find your manual Drumfit Elliptical 9000 Eir Pro 07088 80 - CECOTEC and take your electronic device back in hand. On this page are published all the documents necessary for the use of your device. Drumfit Elliptical 9000 Eir Pro 07088 80 by CECOTEC.
USER MANUAL Drumfit Elliptical 9000 Eir Pro 07088 80 CECOTEC










RITMO CARDÍACO

Fig./Img./Abb./Afb./Rys./Obr. 30

Fig./Img./Abb./Afb./Rys./Obr. 31
Instrucciones de seguridad 15
Safety instructions 18
Instructions de sécurité 22
Sicherheitshinweise 26
Istruzioni di sicurezza 30
Instruções de segurança 34
Veiligheidsvoorschriften 38
Instrukcje bezpieczeństwa 42
Bezpečnostní pokyny 46
ÍNDICE
- Parts and components 61
- Before use 62
- Product assembly 62
- Operation 65
- Information on exercising 68
- Cleaning and Maintenance 69
- Technical specifications 69
- Disposal of old electrical appliances 69
- Technical support and warranty 70
- Copyright 70
SOMMAIRE
Please, keep this instruction manual in a safe place for future reference or new users.
- Read these instructions carefully before assembling or using the product. These instructions contain important
information that will help you get the best out of your equipment.
- WARNING: Safe and efficient use can only be achieved if the product is properly assembled, maintained, and used. It is your responsibility to make sure every user is informed about the warnings and precautions stated in this instruction manual.
- It is advisable for two people to assemble the product.
- The device can only be used with the supply unit provided by Cecotec.
- Do not use any other spare parts than the Cecotec original ones.
- The device must be only supplied at a safety extra-low voltage in accordance with the voltage indicated on the device.
- Make sure to perform a safe and correct assembly, use, and maintenance.
- Keep children and animals away from the exercising area as small parts could cause risk of suffocation if swallowed.
- This appliance can be used by children aged 8 years and above and persons with reduced physical, sensory or mental capabilities or lack of experience and knowledge if they have been given supervision or instruction concerning the use of the appliance in a safe way and understand the hazards involved.
- Children should not play with the appliance. Cleaning and user maintenance should not be carried out by unsupervised children.
- Keep children and animals away from the elliptical cross trainer. Do not allow children to use it and/or play with the machine. It is designed for adult use only.
- Check that the bolts and nuts are securely fastened before
using the product. The safety level of the bike can only be maintained through regular examination for damage and/or wear and tear signals.
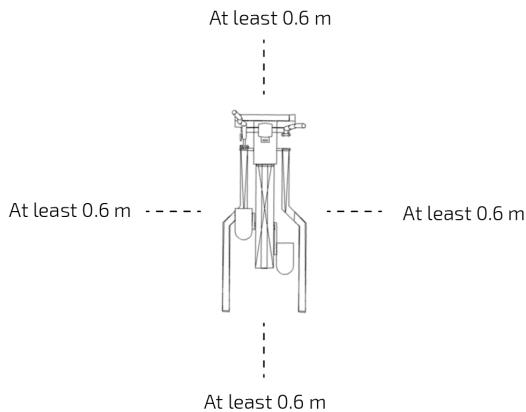
- Make sure you have enough space to lay out the parts before starting. Leave at least 0.6 m space free in the equipment accessing areas for emergency cases. You can share accessing areas with other equipment nearby. Always ensure there are not any objects blocking the entrance and exit of the machine.
- Use the equipment as indicated in this instruction manual. If you find any defective piece when assembling or testing the product, or if it makes unusual noise during use, stop using it immediately and contact the Technical Support Service of Cecotec. Do not use the equipment until the problem has been fixed.
- Any misuse or non-compliance with these instructions renders the warranty and the manufacturer's liability null and void.
-
Care must be taken when lifting or moving the equipment so as not to injure your back.
-
Keep your hands and any loose clothing or objects away from all moving parts.
- Assemble the item as close to its final location (in the same room) as possible.
- Do not place any sharp objects around the equipment.
- Use the equipment on a solid, even and flat surface with a protective cover for your floor or carpet.
- This product is HA class. It is intended for household use only. Do not use it in shops, institutions or for therapeutic purposes. Not recommended for outdoor use.
- It is recommended that you consult your physician if you have any adverse health or physical condition that may create a safety risk when using this equipment. Your doctor's advice is essential if you are taking medication that affects your heart rate, blood pressure, or cholesterol level.
- Be aware of your body signals. Incorrect or excessive exercise can deteriorate your health. Stop exercising if you experience any of the following symptoms: pain, tightness in your chest, irregular heartbeat, extreme shortness of breath, dizziness or nausea.
- You are buying this equipment to exercise at your own risk. If you have any health condition or feel you may be at risk of one, please consult with your physician or doctor before starting any exercise programme.
- Follow the recommended warm-up and stretching exercises before using the equipment to exercise.
- Only one person at a time should use the equipment.
- Wear suitable clothing whilst using the machine. Avoid wearing loose clothing which may get caught in the equipment. Please, run it slowly in the beginning and hold the handlebar tightly.
- This product is suitable for a maximum user weight of 130
kg.
- WARNING: The heart rate sensors may be inaccurate as it is not a medical device. Sensors can give you estimated heart rate information. If you feel any discomfort, stop exercising immediately. It may be dangerous for your health. If it persists, go immediately to the nearest medical centre.
- Note: Remember the machine does not have a freewheel. The moving parts cannot be stopped immediately. Decrease the machine speed in a controlled manner. Be careful not to get trapped.
- WARNING: The human power required to perform the exercise may be different from the mechanical power shown.
INSTRUCTIONS DE SÉCURITÉ
- Spring washer ( 8 )
- Screw (M8×20)
- Washer ( 8×16×2,0T )
- Allen key
- Screw (M5×14)
- Curve washer (ø8)
- Screw (4×20, 2 units)
- Washer ( 6 , 4 units)
- Nut (M6, 4 units)
- Screw (ST3×20, 6 units)
- Washer ( 6 , 4 units)
- Screw (M8×25, 4 units)
- Small Allen key
- Large spanner
- Small spanner
- ∅8 washer (2 units)
- M8×30 screw (2 units)
- M8×40 screw (4 units)
- M8 lock nuts (2 units)
- M8 screw (4 units)
- Rear arm upper cover
- Front arm upper cover
- Main handlebar
- Main handlebar sensor
- LCD monitor
- Bottle holder
- Main post
- Left side handlebar
- Right side handlebar
- Left handlebar arm
- Right handlebar arm
- Post cover
- Exterior arm lower cover
- Interior arm lower cover
- Left pedal
-
Right pedal
-
Main frame
- Rear anti-roll bar
- Front anti-roll bar
- Left pedal spring
- Right pedal spring
- Rear upper cover
- Rear lower cover
- Flat washer
- Plastic washer (4 units)
- Nut
- Handlebar cover
- Flywheel fixing
- Heart rate sensor cable
- LCD monitor cable
2. BEFORE USE
- Take all the parts out of the box and remove all packaging materials.
- Check carefully that the pieces are not damaged and there are no parts missing. If so, contact the Technical Support Service of Cecotec.
Box contents
- DrumFit Elliptical 9000 Eir Pro elliptical cross trainer.
- LCD monitor.
- Tools.
- Instruction manual.
- Power adapter.
3. PRODUCT ASSEMBLY
Scanning the following QR code, you can view the complete assembly, step by step of the product.

ENGLISH
Step 1. Assembly of the main frame and anti-roll bars
Fig. 2
- Place the main frame (37) on the anti-roll bars.
- Pay attention to the anti-roll bars position.
- The front anti-roll bar (39) is the one with casters to make transport easy.
- Take the front anti-roll bar (39).
- In every one of the holes, as shown in figure 2, place the washer (3), the spring washer (1) and tighten the screw (2) on them to fix the main frame to the anti-roll bar.
- Repeat the process with the rear anti-roll bar (38).
Step 2. Assembly of the main body
Fig. 3
- Insert the post cover (32) on the post (27).
- First, connect the post cables (27) to the guide cable on the main frame (37).
- Place the post (27) on the main frame protrusion. Place the curve washers (6), the spring washer (1) and the screws (2) in the fixing point.
- Slide the post cover (32) down until it stops sliding.
- Use the Allen key (4).
Note
Use extreme caution to avoid damaging the wires when screwing the post to the main body.
Step 3: Assembly of the bottle holder
Fig. 3
Screw the bottle holder (26) to the main post (27) with the screws (5).
Step 4: Assembly of the pedals
Fig. 4
- Take the left pedal spring (40).
- Screw the left pedal (35) by placing first the flat washer (8), the spring washer (11) and the locking nut (9) under the left pedal spring (40).
- Screw the pedal from its upper part and insert and tighten both screws (12).
Note
Make sure it is the corresponding pedal for each side of the machine. It could affect performance and safety.
- Repeat the process with the right pedal spring (41).
- Use the Allen keys (4 and 13) and the spanners (14 and 15).
Step 5: Assembly of the pedal springs in the handlebar arm
Fig. 4
- Insert the left pedal spring (40) in the left handlebar arm (30) in the main post (27) by fixing the screw (2) and the washer (3).
- Once fixed, install the covers (33 and 34) with the screws (5 and 7).
- Remove one of the plastic washers (45), the flat washer (44) and the nut (46) from the flywheel fixing (48).
- Insert the hole on the back part of the left pedal spring (40) in the fixing (48).
Important
Make sure there is a plastic washer between both surfaces (45) to prevent any direct friction.
- Fix the left pedal spring (40) to the flywheel fixing (48) by placing the plastic washer (45), the flat washer (44) and the nut (46).
- Finally, install the rear upper and lower covers (42 and 43) on the left pedal spring (40).
- Assemble the upper cover (43) and the lower cover (42).
- Next, fix the lower part with the screws (10).
- Use the spanners (14 and 15).
- Repeat the process with the right pedal spring (41).
Step 6. Assembly of the main handlebar
Fig. 5
- Insert the heart rate sensor cables (49) from the handlebar (23) through the hole, as shown in the figure.
- Take them out from the upper part of the post (27).
- Place the handlebar (23) on the post housing (27).
- Fix it with the flat washer (16), the spring washer (1) and tighten the screw (17).
- Use the Allen key (4).
- Place the handlebar cover (47) by applying a slight pressure.
Step 7. Assembly of the side handlebars
Fig. 6
- Insert the left side handlebar (28) in the left handlebar arm (30).
- Place the locking nut (19) the spring washer (1) and the curve washer (6).
- Fix the screw (18) from the front part.
- Finally, place the covers (32) with the screw (5).
- Repeat the process with the right side handlebar (29).
- Use the Allen key (4) and the spanner (15).
ENGLISH
Step 8. Assembly of the LCD monitor
Fig. 7
Connect the cables
- Connect the LCD monitor cable (50) with the LCD monitor cable (50) from the post (27). This one has a larger size.
- Repeat the process with the heart rate sensor cables (49) from the LCD monitor with the heart rate sensor cables (49) from the post (27). The connection between both heart rate sensor cables is unimportant, you can connect them freely.
Note
- The connections must click.
- Make sure you make a good connection as it will influence the correct functioning of the LCD monitor.
- Gently slide the cables inside the post (27) to ensure a good positioning of the LCD monitor and to avoid damaging them when screwing.
- Fix the LCD monitor (25) to the post (27) with the screws (20).
Note
Use extreme caution not to damage the cables when screwing as this may affect the measurement of your training data.
4. OPERATION
- Place your feet on the pedals.
- You can place your hands on the steady handlebar.
- If you want a more intense work out, you can place your hands on the moving side handlebars.
- Remember to position your hands on the sensors if you want estimated information about your pulse.
Monitor operation
Button functions
- RECOVERY: press this button to activate the recovery function. This function is used to test your heart rate recovery level.
- START/STOP: press this button to start and stop the training.
- RESET: press this button:
a. When the bike is on standby, to go back to the main menu.
b. For 2 seconds to restart the monitor.
- UP, press this button:
a. To select the training mode.
b. To increase the selected training setting. - MODE: on standby, press this button to confirm the set values.
- DOWN, press this button:
a. To select the training mode.
b. To decrease the selected training setting.
Settings:
| Function | Description | Display range | Setting range |
| TIME | Training time | 0:00 ~ 99:99 | 0:00 ~ 99:00 minutes |
| DISTANCE | Training distance | 0 ~ 99.99 | 0 ~ 99.90 km |
| CALORIES | Calorie consumption | 0 ~ 9999 | 0 ~ 9990 cals |
| PULSE | Heart rate | 30 ~ 230 | 0-30 ~ 230 |
| WATT | Pedalling rate | 0 ~ 999 watts | 10 ~ 350 watts |
| SPEED | Speed per hour | 0.0~99.9 km/h | - |
| RPM | Revolutions per minute | 0~999 | - |
Training modes:
Fig. 8-14
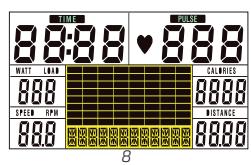
- Connect the adapter to a plug or hold down the RESET button for two seconds. An alarm will sound for 1 second. The display will show as in figure 8 for 2 seconds.
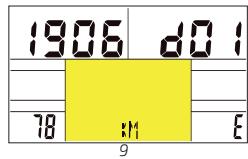
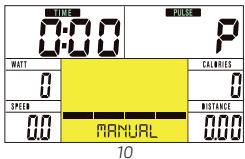
- The monitor will show some values (Fig. 9) for 1 second before entering standby mode. Fig. 10
- Now, the resistance level is 1.
- Press the MODE button to select a programme: Manual → BEGINNER → ADVANCE → SPORTY → HRC → WATT.
- Press MODE again to set the time with the UP and DOWN buttons. Fig. 11
- Press MODE again to move to the next setting.
ENGLISH
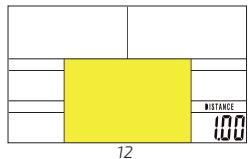
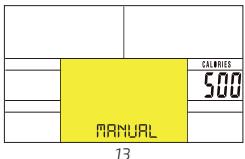
- After selecting distance/calories, press START/STOP to start the exercise and let the monitor calculate the parameters. Fig. 12-13
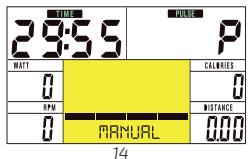
- Press UP/DOWN to set the resistance level. Fig. 14
Changing the programme
- Press the START/STOP button in any programme and press RESET to get back to the main menu.
- MANUAL will flash, press UP to change the programme and confirm the selected programme by pressing MODE.
- Now, you will be able to set the settings as explained before.
- Press START/STOP to start exercising.
- Press UP/DOWN to set the resistance level.
BEGINNER/ADVANCE/SPORTY functions
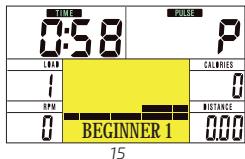
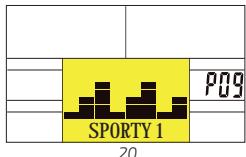
Fig. 15-20
- The BEGINNER function is programmed for users who are starting to work out (Fig. 15).
- The ADVANCE function is programmed for users with an intermediate level of exercising (Fig. 16).
- The SPORTY function is programmed for users with a high level of exercising (Fig. 17).
-
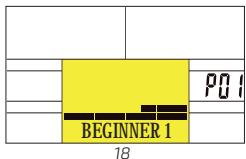
Within every programme you can select 4 different modes. To do so, after selecting the desired programme:
-
Press UP/DOWN to select any of the 4 modes. Fig. 18-20
- Press MODE to confirm.
- Press the START/STOP button to start exercising.
- Press UP/DOWN to set the resistance level.
HRC function
This function allows you to set heart rate targets. To do so, you have 3 HRC modes (heart rate control) and a HRC TRG (heart rate control target):
- HRC 55.
- HRC 75.
- HRC 90.
- The HRC TRG mode controls that you remain within your target beats per minute.
HRC MODE
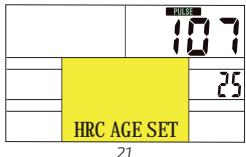
Fig. 21-23
- Press UP/DOWN to set your age, then the monitor will estimate and show your target heart rate.
- Press MODE to confirm. Fig. 21
- Press UP/DOWN to set a target time. Fig. 22
- Press START/STOP to start exercising. Fig. 23
HRC TRG MODE
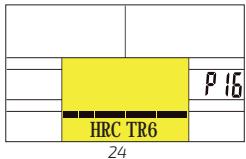
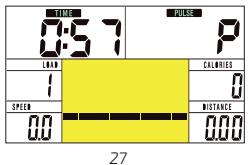
Fig. 25-27
- If you select HRC-TRG in the programme, you can set your own heart rate target.
- Press UP/DOWN to set your age. Fig. 25
- Press the MODE button again to set your goal. Fig. 26
- Press MODE to confirm and UP/DOWN to set your target time.
- Press the START/STOP button to start exercising. Fig. 27
Recovery function
Fig. 28-29
- If you do not place your hands on the sensors, even if you press this button, the function will not be activated.
- Press the RECOVERY button, then, TIME and PULSE will appear on the display, the rest of the functions will be deactivated. Fig. 28
- The time display will show 0:60 and it will start a countdown. The value shown on the pulse display during the countdown will be the actual heart rate.
- When the countdown is over, the monitor will beep and the pulse display will show F1, F2, F3, F4, F5 or F6. Fig. 30.
- During this process, if you press RECOVERY again, you will return to the previous display.
| F1 | F2 | F3 | F4 | F5 | F6 |
| Bad condition | Improvable condition | Medium condition | Error in measurement | Good condition | Excellent condition |
5. INFORMATION ON EXERCISING
A proper workout should consist of the following three activities:
- Warm-up: Consisting of 5 to 10 minutes of stretching and light exercise. A proper warm-up increases your body temperature, heart rate, and circulation in preparation for exercise. Fig. 30
- Training: Consisting of 20 to 30 minutes of exercise. (Note: During the first few weeks of your exercise programme, do not keep your heart rate in your training zone longer than 20 minutes).
- Cool-down: 5 to 10 minutes of stretching exercises. This will increase the flexibility of your muscles and will help prevent injuries.
Fig. 31
Workout routine
To maintain or improve your physical condition, exercise three times per week, with at least one day of rest between workouts. After a few months of regular exercise, you may exercise
ENGLISH
up to five times per week, if desired. Remember, the key to success is making exercise a regular and enjoyable part of your everyday life.
6. CLEANING AND MAINTENANCE
Note
The cleaning and maintenance frequency depends on the use frequency and intensity.
- Examine the equipment periodically in order to detect any issue or change, like loose bolts.
- Periodically lubricate the moving parts of the product to prevent premature deterioration. After lubricating these parts, operate the product as usual during at least half a minute.
- Inspect and tighten all parts before using the equipment. Replace any defective parts immediately, and do not use the equipment again until it is in perfect working condition.
- Do not use any spare parts which are not official from Cecotec.
- Check the condition of nuts and bolts at least every two weeks.
- The equipment can be cleaned using a slightly damp cloth and mild non-abrasive detergent. Do not use solvents.
- Do not try to repair the product by yourself. Should you have any difficulty with its assembly or operation, or if you think that any part is missing, contact the official Technical Support Service of Cecotec.
7. TECHNICAL SPECIFICATIONS
Reference: 07088
Model: DrumFit Elliptical 9000 Eir Pro elliptical cross trainer
Flywheel: 9 Kg
Maximum user weight: 130 Kg
Adaptor Input: 100-240 V\~, 0,5 A, 50/60 Hz
Adaptor Output: 9 V DC, 1000 mA
Made in China | Designed in Spain
8. DISPOSAL OF OLD ELECTRICAL APPLIANCES

The European directive 2012/19/EU on Waste Electrical and Electronic Equipment (WEEE) specifies that old household electrical appliances must not be disposed of with the normal unsorted municipal waste.
Old appliances must be collected separately, in order to optimise the recovery and recycling of the materials they contain and reduce the impact on human health and the environment.
The crossed out "wheeled bin" symbol on the product reminds you of your obligation to dispose of the appliance correctly.
If the product has a built-in battery or uses batteries, they should be removed from the appliance and disposed of appropriately.
Consumers must contact their local authorities or retailer for information concerning the correct disposal of old appliances and/or their batteries.
9. TECHNICAL SUPPORT AND WARRANTY
This product is under warranty for 2 years from the date of purchase, as long as the proof of purchase is submitted, the product is in perfect physical condition, and it has been given proper use, as explained in this instruction manual.
The warranty will not cover the following situations:
- The product has been used for purposes other than those intended for it, misused, beaten, exposed to moisture, immersed in liquid or corrosive substances, as well as any other fault attributable to the customer.
- If the product has been disassembled, modified, or repaired by persons not authorised by the Cecotec official Technical Support Service.
- Faults deriving from the normal wear and tear of its parts, due to use.
The warranty service covers every manufacturing defect of your appliance for 2 years, based on current legislation, except consumable parts. In the event of misuse, the warranty will not apply.
If at any moment you detect any problem with your product or have any doubt, do not hesitate to contact Cecotec official Technical Support Service at +34 963 210 728.
10. COPYRIGHT
The intellectual property rights over the texts in this manual belong to CECOTEC INNOVACIONES, S.L. All rights reserved. The contents of this publication may not, in whole or in part, be reproduced, stored in a retrieval system, transmitted or distributed by any means (electronic, mechanical, photocopying, recording or similar) without the prior authorization of CECOTEC INNOVACIONES, S.L.
1. PIÈCES ET COMPOSANTS
Img. 1
FRANÇAIS
ITALIANO
NEDERLANDS
POLSKI
Fig./Img./Abb./Afb./Rys./Obr. 4
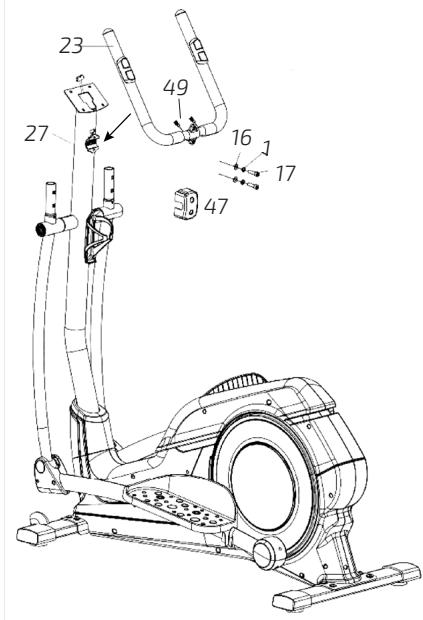
Fig./Img./Abb./Afb./Rys./Obr. 5
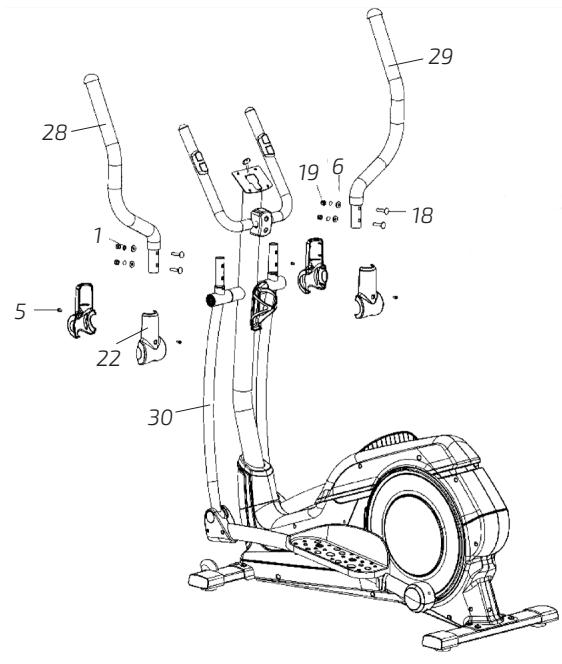
Fig./Img./Abb./Afb./Rys./Obr. 6
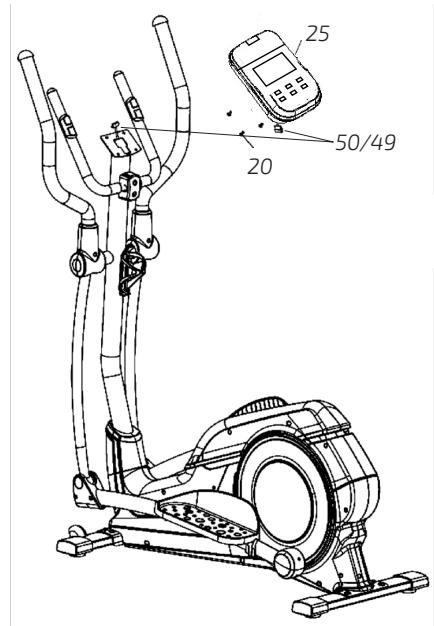
Fig./Img./Abb./Afb./Rys./Obr. 7
www.cecotec.es
Quart de Poblet, Valencia (Spain)
EA01211026
- ÍNDICE
- SOMMAIRE
- INSTRUCTIONS DE SÉCURITÉ
- BEFORE USE
- BOX CONTENTS
- PRODUCT ASSEMBLY
- ENGLISH
- STEP 1. ASSEMBLY OF THE MAIN FRAME AND ANTI-ROLL BARS
- FIG. 2
- STEP 2. ASSEMBLY OF THE MAIN BODY
- FIG. 3
- NOTE
- STEP 3: ASSEMBLY OF THE BOTTLE HOLDER
- STEP 4: ASSEMBLY OF THE PEDALS
- FIG. 4
- STEP 5: ASSEMBLY OF THE PEDAL SPRINGS IN THE HANDLEBAR ARM
- IMPORTANT
- STEP 6. ASSEMBLY OF THE MAIN HANDLEBAR
- FIG. 5
- STEP 7. ASSEMBLY OF THE SIDE HANDLEBARS
- FIG. 6
- STEP 8. ASSEMBLY OF THE LCD MONITOR
- CONNECT THE CABLES
- OPERATION
- MONITOR OPERATION
- BUTTON FUNCTIONS
- TRAINING MODES
- CHANGING THE PROGRAMME
- BEGINNER/ADVANCE/SPORTY FUNCTIONS
- FIG. 15-20
- HRC FUNCTION
- HRC MODE
- FIG. 21-23
- HRC TRG MODE
- FIG. 25-27
- RECOVERY FUNCTION
- FIG. 28-29
- INFORMATION ON EXERCISING
- WORKOUT ROUTINE
- CLEANING AND MAINTENANCE
- TECHNICAL SPECIFICATIONS
- DISPOSAL OF OLD ELECTRICAL APPLIANCES
- TECHNICAL SUPPORT AND WARRANTY
- COPYRIGHT
- PIÈCES ET COMPOSANTS
- IMG. 1
- FRANÇAIS
- ITALIANO
- NEDERLANDS
- POLSKI
Brand : CECOTEC
Model : Drumfit Elliptical 9000 Eir Pro 07088 80
Category : Fitness Equipment