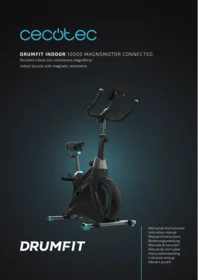
Drumfit Indoor 10000 Magnomotor Connected - Fitness Equipment CECOTEC - Free user manual and instructions
Find the device manual for free Drumfit Indoor 10000 Magnomotor Connected CECOTEC in PDF.


| Product type | Connected exercise bike |
| Brand | Cecotec |
| Model | Drumfit Indoor 10000 Magnomotor Connected |
| Category | Fitness and sports |
| Resistance | Magnetic, with 16 levels |
| Flywheel | 10 kg |
| Connectivity | Bluetooth, compatible with fitness apps |
| Console | LCD with display of time, speed, distance, calories and heart rate |
| Pedals | With straps, with adjustable toe clips |
| Handlebar | Height-adjustable, with heart rate sensors |
| Saddle | Adjustable in height and tilt |
| Frame | Reinforced steel, stable |
| Dimensions (L x W x H) | Approximately 105 x 55 x 115 cm |
| Net weight | Approximately 35 kg |
| Maximum user weight | 120 kg |
| Power supply | 2 AAA batteries for console |
| Maintenance | Clean with a dry or damp cloth, check the tightenings |
| Safety | Emergency brake, compliance with CE safety requirements |
| Spare parts | Available from Cecotec after-sales service |
| Warranty | 2 years legal warranty |
| Package contents | Bike, assembly tools, instruction manual |
Frequently Asked Questions - Drumfit Indoor 10000 Magnomotor Connected CECOTEC
User questions about Drumfit Indoor 10000 Magnomotor Connected CECOTEC
0 question about this device. Answer the ones you know or ask your own.
Ask a new question about this device
Download the instructions for your Fitness Equipment in PDF format for free! Find your manual Drumfit Indoor 10000 Magnomotor Connected - CECOTEC and take your electronic device back in hand. On this page are published all the documents necessary for the use of your device. Drumfit Indoor 10000 Magnomotor Connected by CECOTEC.
USER MANUAL Drumfit Indoor 10000 Magnomotor Connected CECOTEC
Indoor bicycle with magnetic resistance.

DRUMFIT
Safety instructions 7
-
Parts and components 39
-
Before use 40
-
Assembly 40
-
Operation 41
-
Information on exercising 42
-
Cleaning and maintenance 44
-
Troubleshooting 44
-
Technical specifications 44
-
Disposal of old electrical and electronic appliances 45
-
Technical support and warranty 45
-
Copyright 45
-
Simplified Declaration of Conformity 45
SOMMAIRE
Read these instructions thoroughly before using the device. Keep this instruction manual for future reference or new users.
- Read the entire manual before assembling and using the machine. The product will only be safe if it is properly assembled, cared for and used correctly. It is your responsibility to make sure every user is informed about the warnings and precautions stated in this instruction manual.
- Before starting a training session, it is recommended that you consult your doctor if you have any adverse health or physical condition that may pose a risk to your safety or make it difficult to use the appliance properly. Your doctor's advice is essential if you are taking medication that affects your heart rate, blood pressure, or cholesterol level.
- Be aware of your body signals. Incorrect or excessive exercise can deteriorate your health. Stop exercising if you experience any of the following symptoms: pain, tightness in your chest, irregular heartbeat, extreme shortness of breath, dizziness, or nausea. If you experience any of these conditions, you should consult your doctor before continuing with your training.
- This appliance can be used by children aged 14 years and above and persons with reduced physical, sensory, or mental capabilities or lack of experience and knowledge if they have been given supervision or instruction concerning the use of the appliance in a safe way and understand the hazards involved. Children must not play with the machine. Cleaning and user maintenance should not be carried out by unsupervised children.
- Keep children and animals away from the assembling area, as small parts could cause risk of suffocation if swallowed.
- Keep children and pets away from the machine. Do not allow children to use it and/or play with the machine. It is designed for adults only.
- Use the exercise bike on a solid, even surface with a protective cover for your floor or carpet.
- Make sure that the screws and nuts are securely fastened before using the machine.
- The safety level of the machine can be only maintained through regular examination for damage and/or signs of wear and tear.
- Use the machine as indicated in this instruction manual. If you find any defective component while assembling or checking the machine, or if you hear any unusual noise coming from the equipment during use, stop using it. Do not use the equipment until the problem has been solved.
- Make sure you have enough space to lay out the parts before starting. Leave a free space of at least 0.6 m in front of all access areas of the machine in case of emergency. You can share the access areas with other machine nearby. Always ensure there are not any objects blocking the entrance and exit of the machine.

- Wear suitable clothing while using the machine. Avoid wearing loose clothing which may get caught in the equipment.
- WARNING: this training machine is not suitable for high-precision purposes. This equipment is HC class.
- WARNING: this machine operates by means of a flywheel. Be careful when in motion and ensure that it completely stops before getting down, as the inertia of the flywheel and pedals could cause injury to yourself or others.
- Maximum user weight: 120 kg.
- It is not recommended for outdoor use.
- This machine is designed for domestic use only and is not intended for bars, restaurants, farmhouses, hotels, motels, and offices.
- The air bike is not suitable for therapeutic use.
- Care must be taken when lifting or moving the equipment so as not to injure your back. Always use proper lifting techniques and/or assistance.
- WARNING: the heart rate sensors may be inaccurate, as it is not a medical device. Sensors can give you estimated heart rate information. If you feel any discomfort, stop exercising immediately. It may be dangerous for your health. If it persists, go immediately to the nearest medical centre.
- If repairs are required, please consult your supplier for further information or contact Cecotec Customer Service.
- If any parts protrude from the machine, they may interfere with the user's movement.
INSTRUCTIONS DE SÉCURITÉ
Producto: DrumFit Indoor 10000 MagnoMotor Connected
| No. | NAME | QUANT. |
| 1 | Main frame | 1 pc. |
| 2 | Front stabilising feet | 1 pc. |
| 3 | Rear stabilising feet | 1 pc. |
| 4 | Handlebar stem | 1 pc. |
| 5 | Handlebar | 1 pc. |
| 6 | Adjustment knob | 1 pc. |
| 7 | Front housing | 1 pc. |
| 8 | Saddle | 1 pc. |
| 9 | Left pedal (includes nut) | 1 pc. |
| 10 | Right pedal (includes nut) | 1 pc. |
| 11 | Hexagonal screw M8x12 mm | 8 pcs. |
| 12 | Curved spring washer ø8 | 2 pcs. |
| 13 | Plain washer ø8 | 6 pcs. |
| 14 | Hex nut M10 | 4 pcs. |
| 15 | Plain washer ø10 | 4 pcs. |
| 16 | Spring washer ø10 | 4 pcs. |
| 17 | 5 mm hex spanner | 1 pc. |
| 18 | 13-15 fixed spanner | 1 pc. |
| 19 | 17-19 fixed spanner | 1 pc. |
Fig. 1
NOTE:
the graphics in this manual are schematic representations and may not exactly match the device.
2. BEFORE USE
- This appliance is packaged in a way as to protect it during transport. Take the device out of its box and remove all packaging materials. You can keep the original box and other packaging elements in a safe place. This will help you prevent damage to the device when transporting it in the future. In case the original packaging is disposed of, make sure all packaging materials are recycled accordingly.
- Make sure all parts and components are included and in good conditions. If there is any piece missing or in bad conditions, contact the official Cecotec Technical Support Service immediately.
Box content
- DrumFit Indoor 10000 MagnoMotor Connected indoor bike
- Instruction manual
- Assembly kit
- Power cable
3. ASSEMBLY
Step 1. Fig. 2
- Unpack the box and take out the machine.
- Place the front stabilising feet (2) on the main frame (1) and fix them firmly with a hex nut (14), a spring washer (16) and a plain washer (15).
- Place the rear stabilising feet (3) on the main frame (1) and fix them firmly with a hex nut (14), a spring washer (16) and a plain washer (15).
Step 2. Fig. 3
- Insert the handlebar stem (4) into the front housing (7). Then, connect the exposed cable connector of the handlebar stem and the exposed cable connector of the main frame. Do it slowly and, after that, insert the handlebar stem (4) into the main frame (1).
- Fix the handlebar stem to the main frame. Align the holes, fit the plain washer (13) for the flat holes and the curved washer (12) for the curved holes, and the screws (11). Next, tighten them with the hex spanner.
- Slide the front housing (7) downwards until it clicks into the housing lock.
- Pull the adjustment knob (6), set the approximate height, and screw it into the nut of the handlebar stem.
Step 3. Fig. 4
- Position the handlebar (5) and connect the exposed handlebar cable connector to the exposed handlebar stem cable connector. Insert the excess cable into the inside of the
handlebar stem. Fix the handlebar to the handlebar stem with screws (11) and a plain washer (13). Make sure the cable is not pinched.
Step 4. Fig. 5
- Install the saddle (8) in the bracket, make sure that the saddle adjustment knob fits into the hole in the saddle slide guide. Make sure the saddle is straight.
- Tighten the screws and nuts on the saddle bracket to hold it in place.
Step 5. Fig. 6
- Unscrew the pre-installed nuts on the left and right pedals and position them.
- Install the pedals on the main frame. The left pedal is tightened counterclockwise. Make sure to install the left pedal on the right side. The orientation is based on the sitting position on the bicycle. The left pedal is marked with an "L", the right one with an "R".
- Use the 13-15 fixed spanner (18) and tighten in the direction shown in the picture.
- Connect the power supply with the adapter and plug it into the DC input on the side of the bike to switch it on.
4. OPERATION
Resistance adjustment
- After switching on the appliance, the display lights up. Press the central button briefly to start the movement. Long press the central button to select the desired parameters, such as "distance", "speed", "calories", etc.
- Press "+" to increase the resistance to level 32.
- Press “-” to reduce the resistance to level 1.
- When an emergency stop is required, press the brake until the flywheel stops rotating.
Display. Fig. 7
a. Time function: display range 00:00 to 99:59. Timing starts when motion is detected and stops after 4 seconds of inactivity.
b. Calorie function: display range 0.0 to 999.9 kcal. It is proportional to the resistance level: resistance 1 corresponds to 11.4 kcal/km, resistance 32 corresponds to 44.6 kcal/km.
c. Travelled distance function: display range 0.0 \~ 999.9 km. When this icon is on, the corresponding km icon is also on.
d. Speed function: display range 0.0 \~ 999.9 km/h 60 RPM - 21.5 Km/h This icon lights up with the corresponding RPM.
e. Heart rate function: display range 0.0 \~ 999.0/min.
f. Increase or decrease. Press M to change the function. After pressing M for 2 seconds, functions change automatically.
RPM: during pedalling, the current speed of the flywheel is displayed. The sensor source is the red cable signal.
LEVEL: resistance 1-32 or 1-24. By default, speeds 1-32 are set.
Bluetooth use (app)
- Remove the insulation foil from the Bluetooth sensor.
- Turn the crank so that the crank magnet can be detected when turning. Otherwise, adjust the crank distance above and below the magnet.
- As soon as you pedal, Bluetooth is automatically activated, and the bike can thus be paired.
Saddle and handlebar adjustment
Properly positioned saddles increase efficiency of movement and comfort, as well as reduce the risk of injury.
- When placing the pedal in the forward position, centre the sole of the foot. Your knees should be slightly bent.
- Adjust the saddle up and down. Pull the adjustment knob and raise the saddle upwards to the appropriate height. Then, release the adjustment knob so that it clicks and locks into one of the fixing holes.
- Adjusting the saddle forwards and backwards. Unscrew and pull the adjustment knob under the saddle tube. Adjust the saddle to the desired position, forward or backward. Re-lock the adjustment knob clockwise.
- Adjusting the handlebar height. Unscrew the handlebar adjustment knob and adjust the handlebar to the desired position so that the pin is inserted into the small hole in the sliding front post. After that, lock the pin on the handlebar adjustment knob.
5. INFORMATION ON EXERCISING
- A successful exercise programme consists of three parts, Warm Up, Aerobic Exercise, and Cool Down. Perform the entire programme at least two or three times a week, resting one day between training sessions. After several months, you can increase the training sessions to four or five times a week.
- Never start a training session without warming up. Before starting each training session, it is advisable to prepare the body for more intense exercise by warming up and stretching the muscles, increasing circulation and pulse, and supplying more oxygen to the muscles. To reduce stiffness, at the end of each workout, cool your body by repeating these exercises. The following warm-up and cool-down exercises are suggested:
Rotating your head
Rotate your head to the right once, until you feel a slight pull on the left side of your neck. Then
turn your head back once, extending your chin towards the ceiling and leaving your mouth open. Repeat the action by turning your head to the left once. Lastly, drop your head to your chest.
Shoulder lift
Lift the right shoulder towards the ear once. Next, raise the left shoulder while lowering the right one.
Lateral stretching
Open both arms to the side and gently lift them above your head. Stretch your right arm as far as you can towards the ceiling once. Repeat this action with your left arm.
Quadriceps stretching
With one hand resting on the wall for balance, grab your ankle and gently bring your heel towards your buttocks until you feel a tug on the front of your thigh. Bring the heel as close to the buttocks as possible. Hold for 15 seconds and repeat with the left foot.
Inner thigh stretching
Sit on the floor with the soles of your feet together and your knees pointing outwards. Bring your feet as close to your inner thighs as possible.
Gently push the knees towards the ground. Hold for 15 seconds.
Touching your feet
Slowly bend forward at the waist, letting your back and shoulders relax as you stretch your fingertips towards your toes. Stretch down as far as you can and hold the position for 15 seconds.
Hamstring stretching
Extend the right leg. Place the sole of the left foot against the inside of the right thigh. Stretch towards the toe as far as you can. Hold this position for 15 seconds. Relax and then repeat with the left leg.
Calf/Achilles tendon stretching
Lean against a wall with your right leg in front of your left leg and your arms in front of you. Keep your left leg stretched out and your right foot on the floor. Then, bend your right leg and lean forward, moving your hips towards the wall. Hold the position for 15 seconds and repeat with the other leg.
6. CLEANING AND MAINTENANCE
- Lubricate the moving parts periodically to prevent premature wear.
- Inspect and tighten all parts before using the machine. Replace any defective parts immediately, and do not use the equipment again until it is in perfect working condition.
- The machine can be cleaned using a slightly damp cloth and mild non-abrasive detergent. Do not use solvents.
- Do not try to repair the machine by yourself. Should you have any difficulty with the assembly or operation of the exercise bike, or if you think that any part is missing, contact the official Cecotec Technical Support Service.
Note:
The cleaning and maintenance frequency depends on the use frequency and intensity.
7. TROUBLESHOOTING
| Problem | Cause | Solution |
| The base is unstable | 1. The ground is not flat or there is an object under the stabiliser.2. The rear stabiliser end caps have not levelled out when adjusted. | 1. Remove the object.2. Tighten the rear stabiliser end caps. |
| The handlebar is not stable | The bolts are loose. | Tighten the bolts. |
| Loud noise from moving parts | The parts are not tightened properly. | Tighten them. |
8. TECHNICAL SPECIFICATIONS
Product reference: 07244
Product: DrumFit Indoor 10000 MagnoMotor Connected indoor bike
Maximum user weight: 120 kg.
HC Class
Dimensions: 890 x 520 x 1150 mm
Weight: 29 kg
Operating frequency band: 2.4 GHz
Maximum power transmission of bluetooth module: 10 dBm
Technical specifications may change without prior notification to improve product quality. Made in China | Designed in Spain
9. DISPOSAL OF OLD ELECTRICAL AND ELECTRONIC APPLIANCES

This symbol indicates that, according to the applicable regulations, the product and/or batteries must be disposed of separately from household waste. When this product reaches the end of its shelf life, you should dispose of the cells/batteries/accumulators and take them to a collection point designated by the local authorities.
Consumers must contact their local authorities or retailer for information concerning the correct disposal of old appliances and/or their batteries.
Compliance with the above guidelines will help protecting the environment.
10. TECHNICAL SUPPORT AND WARRANTY
Cecotec shall be liable to the end user or consumer for any lack of conformity that exists at the time of delivery of the product under the terms, conditions, and deadlines established by the applicable regulations.
It is recommended that repairs be carried out by qualified personnel.
If at any moment you detect any problem with your product or have any doubt, do not hesitate to contact the official Cecotec Technical Support Service at +34 963 210 728.
11. COPYRIGHT
The intellectual property rights over the texts in this manual belong to CECOTEC INNOVACIONES, S.L. All rights reserved. The contents of this publication may not, in whole or in part, be reproduced, stored in a retrieval system, transmitted, or distributed by any means (electronic, mechanical, photocopying, recording or similar) without the prior authorization of CECOTEC INNOVACIONES, S.L.
12. SIMPLIFIED DECLARATION OF CONFORMITY

Tecotec Innovaciones hereby declares that this indoor bike, model 07244_DrumFit Indoor 10000 MagnoMotor Connected, is in conformity with the Radio Equipment Directive 2014/53/EU.
The full text of the EU Declaration of Conformity can be found on the following website: www.cecotec.es
- PIÈCES ET COMPOSANTS
- Hometrainer Drumfit Indoor 10000 MagnoMotor Connected
- Handleiding
- Montage kit
- Netsnoer
3. MONTAGE
Stap 1. Fig. 2
7. PROBLEEMOPLOSSING
Product: DrumFit Indoor 10000 MagnoMotor Connected
Fig./Img./Abb./Afb./Rys.1
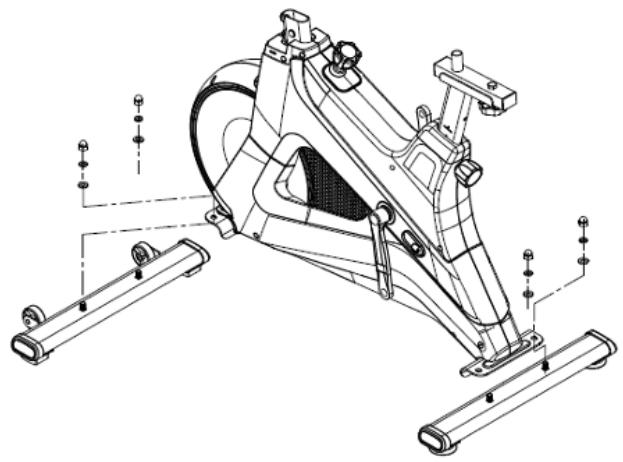
Fig./Img./Abb./Afb./Rys. 2
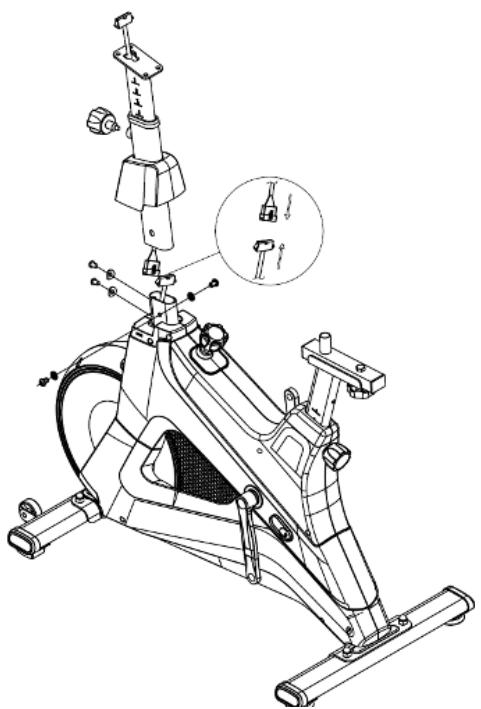
Fig./Img./Abb./Afb./Rys. 3

Fig./Img./Abb./Afb./Rys. 4

Fig./Img./Abb./Afb./Rys. 5

Fig./Img./Abb./Afb./Rys. 6
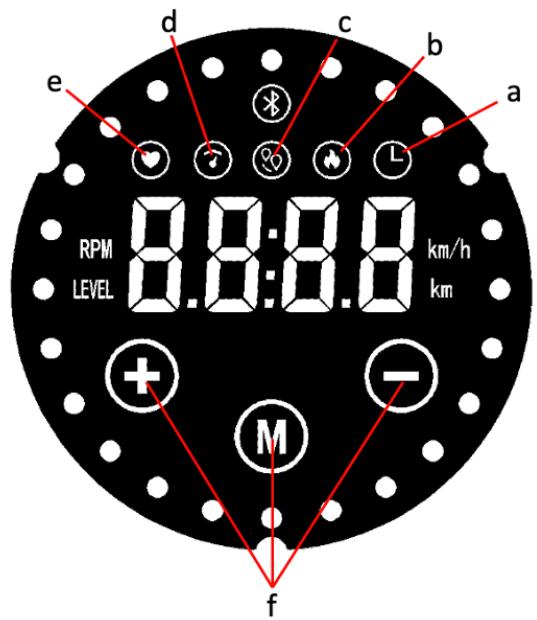
Fig./Img./Abb./Afb./ Rys. 7
www.cecotec.es
- DRUMFIT
- SOMMAIRE
- INSTRUCTIONS DE SÉCURITÉ
- BEFORE USE
- BOX CONTENT
- ASSEMBLY
- STEP 1. FIG. 2
- STEP 2. FIG. 3
- STEP 3. FIG. 4
- STEP 4. FIG. 5
- STEP 5. FIG. 6
- OPERATION
- RESISTANCE ADJUSTMENT
- DISPLAY. FIG. 7
- BLUETOOTH USE (APP)
- SADDLE AND HANDLEBAR ADJUSTMENT
- INFORMATION ON EXERCISING
- ROTATING YOUR HEAD
- SHOULDER LIFT
- LATERAL STRETCHING
- QUADRICEPS STRETCHING
- INNER THIGH STRETCHING
- TOUCHING YOUR FEET
- HAMSTRING STRETCHING
- CALF/ACHILLES TENDON STRETCHING
- CLEANING AND MAINTENANCE
- TROUBLESHOOTING
- TECHNICAL SPECIFICATIONS
- DISPOSAL OF OLD ELECTRICAL AND ELECTRONIC APPLIANCES
- TECHNICAL SUPPORT AND WARRANTY
- COPYRIGHT
- SIMPLIFIED DECLARATION OF CONFORMITY
- MONTAGE
- STAP 1. FIG. 2
- PROBLEEMOPLOSSING
Brand : CECOTEC
Model : Drumfit Indoor 10000 Magnomotor Connected
Category : Fitness Equipment