VARIAX ACOUSTIC 300 - Electric acoustic guitar LINE 6 - Free user manual and instructions
Find the device manual for free VARIAX ACOUSTIC 300 LINE 6 in PDF.
User questions about VARIAX ACOUSTIC 300 LINE 6
0 question about this device. Answer the ones you know or ask your own.
Ask a new question about this device
Download the instructions for your Electric acoustic guitar in PDF format for free! Find your manual VARIAX ACOUSTIC 300 - LINE 6 and take your electronic device back in hand. On this page are published all the documents necessary for the use of your device. VARIAX ACOUSTIC 300 by LINE 6.
USER MANUAL VARIAX ACOUSTIC 300 LINE 6
Before using your Variax Acoustic 300 you should read these Important Safety Instructions. Keep these instructions in a safe place.
- Obey all warnings in this Pilot's Handbook. Failure to obey these warnings may void your warranty, cause damage to your Variax Acoustic 300, or both.
- Do not store your Variax Acoustic 300 in extremes of temperature or humidity. If it is too hot, cold, wet, or dry for you, it is probably too hot, cold, wet, or dry for your Variax Acoustic 300.
- Guard against objects (flying or otherwise) or liquids (alcoholic or otherwise). Guard against the vindictiveness and spite of ex-significant others.
- Power Variax Acoustic 300 with alkaline AA cells or the included XPS Mini only. Use only the included Power Supply or equivalent with the XPS Mini.
- Connect the Power Supply only to AC power outlets rated 100-120V or 230V 47-63Hz (depending on the voltage range of the included power supply).
- Do not step on power cords. Do not place items on top of power cords so that they are pinched or leaned on.
- Unplug your Variax Acoustic 300 and XPS Mini when not in use for extended periods of time.
- Do not perform service operations beyond those described in the Pilot's Handbook. Repairs and service operations beyond the scope of those in the Pilot's Handbook should be performed only by qualified service personnel.
- Prolonged listening at high volume levels may cause irreparable hearing loss and/or damage. Always be sure to practice "safe listening."
Your Variax should include these accessories: XPS Mini, PX-2 Power Supply,TRS Cable, Truss Rod Wrench
WARNING: To reduce the risk of fire or electric shock, do not expose this appliance to rain or moisture.
CAUTION: No user-serviceable parts inside. Refer servicing to qualified service personnel.
CAUTION: This equipment has been tested and found to comply with the limits for a Class B digital device pursuant to Part 15 of FCC Rules. Operation is subject to the following two conditions: (1) This device may not cause harmful interference, and (2) this device must accept any interference received, including interference that may cause undesired operation.
Please Note:
Line 6®, POD®, POD® xt, POD® xt Live, Bass POD® xt Live, POD® xt Pro, A.I.R.™, FBV™, FBV Express™, FBV Shortboard™, FB4™, FBV2™, Amp Farm®, Line 6 Monkey™, Line 6 Edit™, and Variax® are trademarks of Line 6, Inc. All product names, trademarks, and artist names are the property of their respective owners, which are in no way associated or affiliated with Line 6. Product names, images, and artists' names are used solely to identify the products whose tones and sounds were studied during Line 6's sound model development. The use of these products, trademarks, images and names does not imply any cooperation or endorsement.
Table of Contents
Welcome to Variax Acoustic 300............
Hook Me Up. 2-3
Old School
XPS Power
Cable Specifications
Control Yourself. 4-6
VOL
BODY
MIC
COMP
VERB
PROG
TUNE
Save Me. 7
Care and Maintenance. 8
Welcome to the Variax Acoustic 300
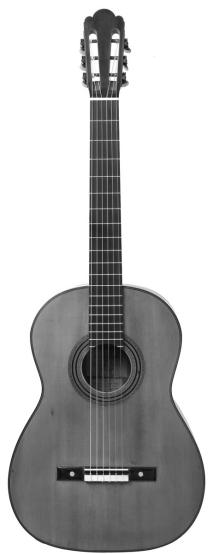
Thanks for buying a Variax Acoustic 300 and joining us in our quest to apply the miracle of modern technology to the pursuit of great acoustic guitar tone. Contained within the comfortable thinline body of this instrument you will discover an amazing world of acoustic sound that is as convenient in the studio as it is effective on stage.
How does it work?
How do we get such tasty smorgasbord of acoustic sound from the compact Variax Acoustic 300? We start with a conventional piezo bridge saddle to capture the string's vibrations. But instead of trying to smooth out the piezo response with a simple EQ, we process the signals through software algorithms that capture the physical properties of actual guitars. This process dynamically alters the natural string vibrations in real time to match the modeled instrument's unique tonal characteristics.
For an even greater tonal range, we also model the tonal variations that result from different microphone positions, and throw in compression and reverb to ice the cake. We tie it all together with a simple control panel that makes it easy for you to not only dial in your favorite sounds, but also to save and recall them - and stay in tune.
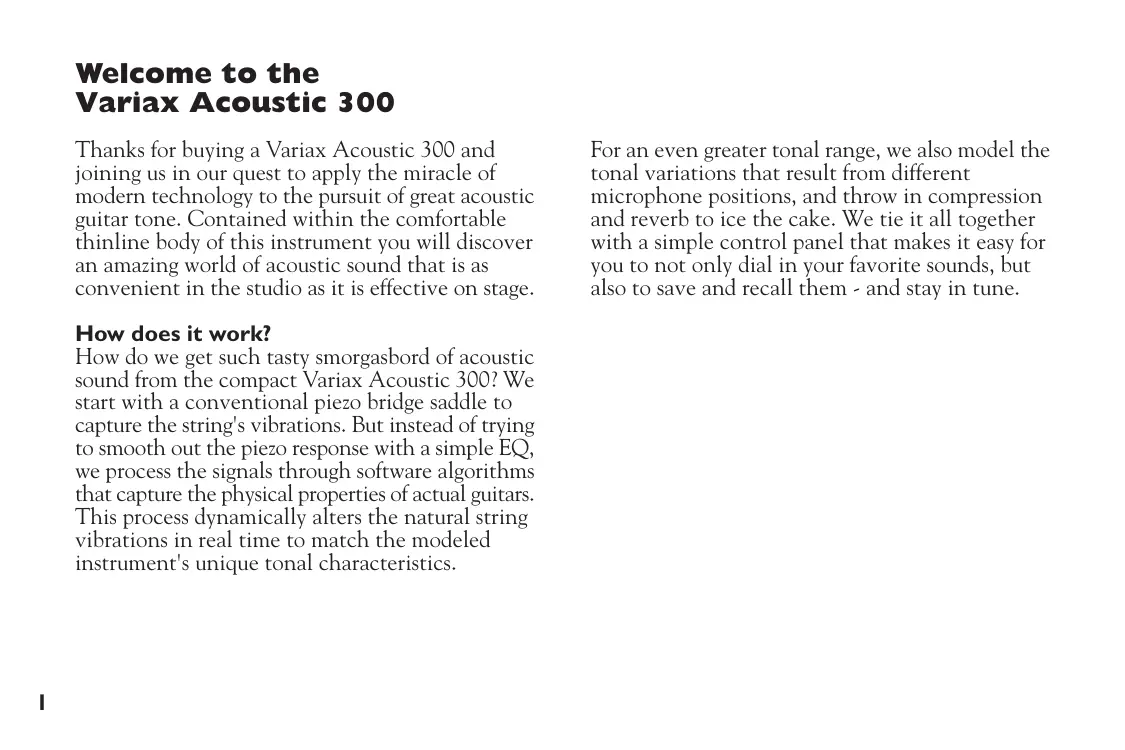
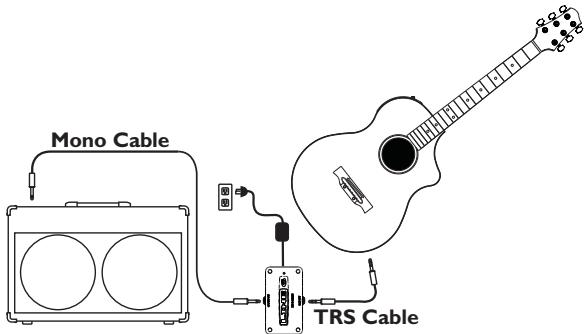
Hook Me Up
Old School
The simplest way to use the Variax is to connect it directly to an acoustic amplifier (or directly to the PA) with a standard mono guitar cable.
Of course, the electronics of the Variax will need power, so for this mode of operation you'll have to install six AA cells in the on-board battery compartment. If you use fresh alkalines, you should get approximately 10-12 hours of operation.

The battery will only be used when a mono cable is connected – the standard cable you'd use for a guitar. For longest battery life, always unplug your Variax when not in use.
NOTE: If you find yourself at a gig with no AA cells, you can unclip the plastic battery holder from the connector and substitute an ordinary 9V battery. This is only an "emergency" alternative, though, and the battery will only last 1 to 2 hours.
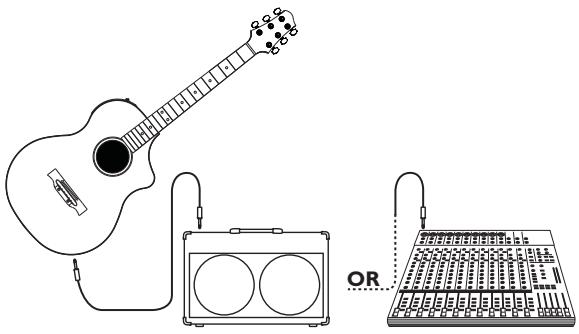
XPS Power
We realize that constantly changing batteries can be a real drag, so we included a more convenient option—the unobtrusive yet capable XPS Mini.
NOTE: Use only the XPS Mini (or batteries) to power your Variax Acoustic 300. Using other types of external power supplies, even other Line 6 power supplies, may result in diminished performance or unreliable operation.
Powering your Variax with the XPS is easy. Use the included TRS cable (meaning "tip-ring-sleeve" or also simply known as a "stereo" cable) to connect the Variax to the INPUT jack of the XPS. Connect the power supply to the XPS POWER jack, and use a standard mono guitar cable to connect the XPS's 1/4" OUTPUT to your amp or PA.
CAUTION! If you have the output of the XPS hooked up an acoustic amplifier or PA, mute the output of the amplifier or PA before plugging, or unplugging, the Variax Acoustic. Your speakers will thank you.
NOTE: If you have batteries installed in your Variax, they will be bypassed when using your XPS. If the guitar is connected to the XPS and the XPS power is disconnected, any batteries installed in the Variax will be drained.
Cable Specifications
If you happen to lose the Custom Cable supplied with your Variax, you can obtain a replacement from the Line 6 online store. You can also simply use any high-quality TRS cable up to 20 feet long.
Control Yourself
VOL
We all know what this is for: set it to about 50% for sound check, then discreetly roll it wide-open as soon as you get a chance.
BODY
The Body control is the throttle of the sonic engine of the Variax Acoustic 300. For both the Steel String and Nylon String versions, you'll find our model based on a specific instrument at both ends of this control's rotation, and a continuously variable hybrid of the two at all the points in between.
Steel String
If you rotate the Body control fully counterclockwise, you'll hear our model inspired by the immaculate clarity and presence of a 1967 Martin® 0-18. If you rotate the Body knob fully clockwise and you'll hear our model inspired by the warm, rich resonance of a 1954 Gibson® J-45®. When you rotate between these two positions, you'll notice that the Body control is not simply crossfading between two presets. Instead, the characteristics of the models are combined in a complex and not entirely predictable way, greatly increasing the range of sounds available.
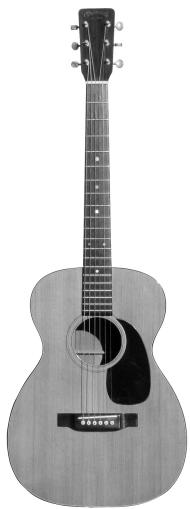
1967 Martin 0-18
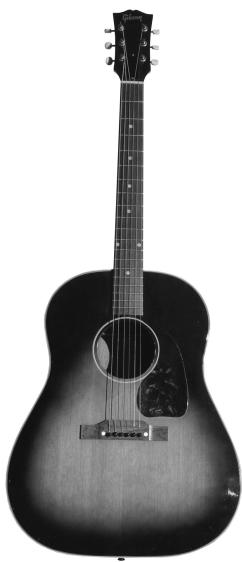
1954 Gibson ^® J-45 ^®
- All product names used in this manual are trademarks of their respective owners, which are in no way associated or affiliated with Line 6. These product names, descriptions and images are provided for the sole purpose of identifying the specific products that were studied during Line 6's sound model development. Martin is a registered trademark of Dreadnought, Inc. Gibson and J-45 are registered trademarks of Gibson Guitar Corp.
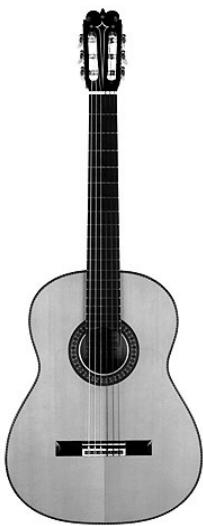
Nylon String
If you rotate the Body control fully counterclockwise, you'll hear our model inspired by the biting attack of 2004 Maldonado Flamenco. If you rotate the Body knob fully clockwise you'll hear our model inspired by the astoundingly round, balanced tone of an 1867 Torres Classical.
Just as on the Steel String, when you rotate between these two positions, you'll notice that the Body control is not simply crossfading between two presets; the characteristics of the models are combined in a complex and not-entirely predictable way, greatly increasing the range of sounds available.
MIC
The top slider (the one furthest away from you when you hold the guitar) allows you to alter the position of the modeled microphone. Here's a simple way to remember how it works: As you move the slider closer to the soundhole (away from the VOL and BODY controls), the modeled microphone is also getting closer to the soundhole. When the slider is close to the soundhole, the body (and lower frequencies) are emphasized. Move it away from the soundhole and the strings (and upper frequencies) are emphasized.
2004 Maldonado Flamenco
1867 Torres Classical
COMP
The middle slider allows you to change the level of compression. A compressor usually has a lot of controls to adjust, but we take care of all the complicated stuff for you. Just push the slider toward the VOL and BODY controls for more compression, and away from the knobs for less.
VERB
No, this isn't a grammar lesson, but a way to add some ambience to your acoustic sounds. Push the slider toward the VOL and BODY controls for more reverb; pull it away for less.

PROG
Press this button to perform "In the Court of the Crimson King" as a solo acoustic number. Just kidding. This button is how you step through the 10 preset sounds and save new sounds. See the Save Me section for details on how to save a sound.
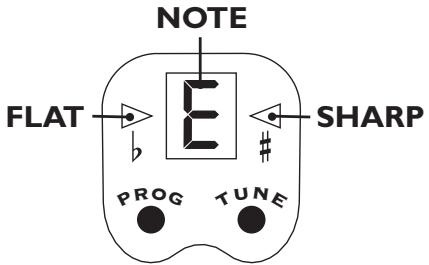
TUNE
Press the TUNE button to mute the output and activate the on-board chromatic tuner. Press it again to return to normal operation.
Save Me
To really take advantage of the sonic capabilities of the Variax Acoustic 300, especially when performing, you'll want to get some sounds ready for instant recall. Use the Save function of Variax Acoustic 300's PROG button to get your sounds down.
- Step through the Programs with the PROG button until you reach the one you want to customize.
- Adjust the BODY setting.
- Adjust MIC, COMP, and VERB to suit your needs.
- Press and hold the PROG button. The Program number display will go blank.
- When the Program number display returns after a few seconds, release the PROG button.
That's all there is to it. You've saved your settings to the active preset. Now that you've got it all down, you can repeat these steps for the remaining 9 positions. (Or not, if you like the factory settings.) And if your needs or tastes change, you can re-customize any of your presets as often as you like.
Care and Maintenance
Only a few simple measures are required to keep your Variax Acoustic looking and performing like new.
After playing, wipe down the guitar and strings with a clean, soft cloth.
- Change strings when they become discolored or the guitar begins to sound dull.
- Occasionally clean the fingerboard surface with lemon oil and the painted surfaces with guitar or furniture polish.
Neck Relief Adjustment
Depending on where you live, seasonal temperature and humidity variations may make it necessary to adjust the neck relief of the Variax. If you find that your Variax suddenly starts buzzing or is generally difficult to play, it may be time for this kind of adjustment. To check the neck relief, press the high E string to the first fret with your left hand, and press the same string to the last fret with your right hand. While holding the string at both points, check the point where the E string passes over the 10th fret. If the string is touching the fret, or if
there is more space under the string than the thickness of a thin pick, it's time to adjust the neck. If you are familiar with this kind of adjustment, use the supplied wrench to turn the truss rod adjust nut, which can be accessed through the "sound hole". If the string was touching at the 10th fret (too little relief), turn the rod counterclockwise. If the gap was too great (too much relief), turn the rod clockwise. In both cases, make small adjustments and check the relief as you go. Never force the rod to turn—excessive tightening can damage your Variax. If you are unfamiliar or uncomfortable with this kind of adjustment, ask your local guitar shop to refer you to a qualified guitar tech.

Special thanks to Larry Thomas for graciously allowing us to model selected specimens from his outstanding collection of rare classical guitars.
Variax
SERIE ACOUSTIC 300