
M9 Stompbox Modeler - Effects pedal LINE 6 - Free user manual and instructions
Find the device manual for free M9 Stompbox Modeler LINE 6 in PDF.


| Product Type | Effects Pedal |
| Brand | Line 6 |
| Model | M9 Stompbox Modeler |
| Power Supply | AC 100-240V, 50/60Hz (using included adapter) |
| Effects Units | 3 FX Units each with A/B memories |
| Effect Types | Distortion, Delay, Modulation, Filter, Reverb |
| Scenes | 6 scenes per folder, 4 folders (total 24 scenes) |
| Looper | Up to 28 seconds mono (56 half speed), with overdub, undo/redo, half speed, reverse |
| Connectivity | Stereo Input/Output, MIDI In/Out, Expression Pedal 1 & 2 |
| Bypass | True Bypass or DSP Bypass |
| Display | LCD with color backlight |
| Tuner | Built-in tuner with bypass or mute |
| Tap Tempo | For delay, modulation, and filter effects |
| Cleaning | Use dry cloth only |
| Safety | Follow all safety instructions; avoid moisture; use specified power supply |
| Reparability | No user-serviceable parts inside; refer to qualified service personnel |
Frequently Asked Questions - M9 Stompbox Modeler LINE 6
User questions about M9 Stompbox Modeler LINE 6
0 question about this device. Answer the ones you know or ask your own.
Ask a new question about this device
Download the instructions for your Effects pedal in PDF format for free! Find your manual M9 Stompbox Modeler - LINE 6 and take your electronic device back in hand. On this page are published all the documents necessary for the use of your device. M9 Stompbox Modeler by LINE 6.
USER MANUAL M9 Stompbox Modeler LINE 6
Important Safety Instructions

CAUTION
RISK OF ELECTRIC SHOCK DO NOT OPEN

WARNING : TO REDUCE THE RISK OF FIRE OR ELECTRIC SHOCK, DO NOT REMOVE SCREWS. NO USER-SERVICEABLE PARTS INSIDE. REFER SERVICING TO QUALIFIED SERVICE PERSONNEL.
WARNING : TO REDUCE THE RISK OF FIRE OR ELECTRIC SHOCK, DO NOT EXPOSE THE APPLIANCE TO RAIN OR MOISTURE.
CAUTION: This equipment has been tested and found to comply with the limits for a Class B digital device pursuant to Part 15 of FCC Rules. Operation is subject to the following two conditions: (1) This device may not cause harmful interference, and (2) this device must accept any interference received, including interference that may cause undesired operation.

The lightning symbol within a triangle means “electrical caution!” It indicates the presence of information about operating voltage and potential risks of electrical shock.

The exclamation point within a triangle means “caution!” Please read the information next to all caution signs.
Please Note:
Line6 and M9 are trademarks of Line6, Inc. All other product names, trademarks, and artists' names are the property of their respective owners, which are innoway associated or affiliated with Line6. Productnames, images, and artists' names are used solely to identify the products whose tones and sounds were studied during Line6's soundmodel development for this product. The use of these products, trademarks, images, and artists' names does not imply any cooperation or endorsement.

Line 6, Inc.:
The POD, Clifton House, Butler's leap.
Rugby, Warwickshire, United Kingdom, CV 21 3RQ
26580 Agoura Road,
Calabasas, CA 91302-1921 USA
SERIAL NO:

You should read these Important Safety Instructions. Keep these instructions in a safe place

- Read these instructions.
- Keep these instructions.
- Heed all warnings.
• Follow all instructions.
• Do not use this apparatus near water.
• Clean only with dry cloth. - Do not block any ventilation openings. Install in accordance with the manufacturer's instructions.
- Do not install near any heat sources such as radiators, heat registers, stoves, or other apparatus (including amplifiers) that produce heat.
• This apparatus shall be connected to a MAINS socket outlet with a protective earthing connection. - Do not defeat the safety purpose of the polarized or grounding-type plug. A polarized plug has two blades with one wider than the other. A grounding type plug has two blades and a third grounding prong. The wide blade or the third prong are provided for your safety. If the provided plug does not fit into your outlet, consult an electrician for replacement of the obsolete outlet.
- Protect the power cord from being walked on or pinched particularly at plugs, convenience receptacles, and the point where they exit from the apparatus.
- Only use attachments/accessories specified by the manufacturer.
- Use only with the cart, stand, tripod, bracket, or table specified by the manufacturer, or sold with the apparatus. When a cart is used, use caution when moving the cart/apparatus combination to avoid injury from tip-over.
- Unplug this apparatus during lightning storms or when unused for long periods of time.
- Refer all servicing to qualified service personnel. Servicing is required when the apparatus has been damaged in any way, such as power-supply cord or plug is damaged, liquid has been spilled or objects have fallen into the apparatus, the apparatus has been exposed to rain or moisture, does not operate normally, or has been dropped.
• The apparatus shall not be exposed to dripping or splashing and that no objects filled with liquids, such as vases, shall be placed on the apparatus. - WARNING: To reduce the risk of fire or electric shock do not expose this apparatus to rain or moisture.
• The appliance coupler is used as the disconnect device, the disconnect device shall remain readily operable. - Connect only to AC power outlets rated: 100/120V 220/240V 50/60Hz (depending on the voltage range of the included power supply).
- Prolonged listening at high volume levels may cause irreparable hearing loss and/or damage. Always be sure to practice “safe listening.”
• Service is required when the apparatus has been damaged in any way, such as:
• power-supply cord or plug is damaged.
- liquid has been spilled or objects have fallen into the apparatus.
• the unit has been exposed to rain or moisture.
• the unit is dropped or the enclosure is damaged.
- the unit does not operate normally or changes in performance in a significant way.

REAR CONNECTIONS

-
Cable Retainer - Wrap your power supply cable around this once or twice to prevent an accidental disconnect.
-
Power - Connect your Line 6 Power Supply here to power the unit.
-
MIDI In/Out - Please see www.line6.com/manuals for the skinny on MIDI features, which allow you to remote control scene changes, FX unit memory selection, looper operation, expression pedals, and tap tempo. Plus dump and receive scene data via MIDI System E messages.
-
Expression Pedal 1 + 2 - Compatible with standard expression pedals, including the Line6 EX-1. Control FX parameters in real assigning them to either of these expression pedal inputs. expression pedal is a passive 10K ohm mono linear taper pot, u standard 1/4 inch mono instrument cable.
-
Stereo Input - When connecting your guitar or other mono source use the L(MONO) input.
-
Stereo Output - For mono output, use the L(MONO) output.
BASIC OPERATION
flowchart
graph TD
    A["FX ① UNIT"] --> B["B Unit"]
    C["FX ② UNIT"] --> D["A Unit"]
    E["FX ③ UNIT"] --> F["B Unit"]
    G["3"] --> H["TAP"]
    I["1"] --> J["1A Control Panel"]
    K["2"] --> L["4 Control Panel"]
    M["5"] --> N["5 Control Panel"]
-
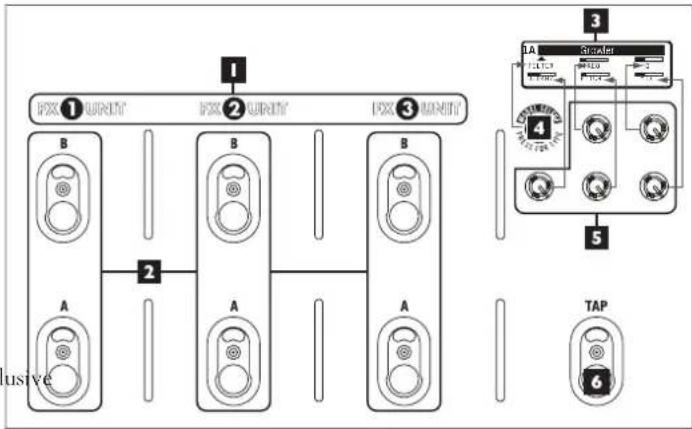
FX (1,2,3) Units - You can run up to 3 effects at once. Each FX Unit has time by memories (A & B), which can run any model of any type (Distortion-ThelldyneDelay-green, Modulation-blue, Filter-purple & Reverb-ng orange.
-
Memory Footswitches - All FX Units have 2 memories (A & B). Only one memory can be active at a time: its footswitch will be brightly lit, and colored to show the effect type. Inactive switches are dimly lit. Step on a footswitch to activate that memory. Step on an active switch to bypass the FX Unit.
-
Display - Your display will show all the settings for the most recently selected FX Unit memory (shown in upper left corner of the display). The display illuminates the color of current effect type (Dist yellow, Delay-green, Modulation-blue, Filter-purple & Reverb-orange). When a currently displayed FX Unit is turned off the display will show the first active FX Unit in your signal chain. If no FX Units are on the display will read "All FX Bypassed". To edit an active FX Unit that
is not currently displayed simply double tap the Memory Footswitch you would like to edit, or press and hold TAP and quickly press the MODEL SELECT knob to scroll through active FX Units.
- Model Select - Press in the knob to select an effect type Modulation, Distortion, Filter or Reverb) you want. Then turn the knob to scroll through available effect models.
- Parameter Knobs - Use these knobs to edit current effect settings shown in your display. These knobs usually control the setting locations as shown in the diagram to your left.
- TAP - Tap your tempo on the switch a few times to set the time/speed/tempo of all TAP enabled effects.
SCENES & SCENE SETUP
You can run your M9 Stompbox Modeler in Scene Select Mode giving you 6 scenes, each of which is a complete pedalboard, storing all the settings of the A/B memories of the 3 FX Units. We've scene with an example pedalboard, to get you inspired.

To access your Scenes, simultaneously press 3A + Tap. Your display will now look similar to the display shown above. The 6 Scenes are displayed as A & B for each of the 3 FX rows. The currently active Scene is shown in the solid circle (FX2 Unit A in the example above). To select a different Scene, press any of the other 5 FX Unit Footswitches. Momentary Scene Mode is the default setting, so selecting a new scene puts you right into a whole new pedal board where you can turn effects off and on.
Choosing Momentary or Latch Scene Modes
Simultaneously press 1B + 2B to enter setup then press the model encoder until you see this screen:

(Uslay your parameter knob (bottom center) to select between Momentary (MOMEN SCENE) or Latch (LATCH SCENE). When you are done, simultaneously press 1B + 2B to exit setup.
Momentary Scene Mode
In Momentary Scene Mode, once you select a new Scene your display will then return to the basic view displaying the current settings of the first active FX Unit in your chain. You can now activate or bypass any FX Unit if you would like. Any changes you make to the Sc automatically be saved, just like a traditional pedalboard setup. To select a new Scene, simultaneously press3A + TAP, then press any A or B footswitch.
Latch Scene Mode
In Latch Scene Mode, the only difference is when you access your Scenes loaded each (3A + TAP), the 6 Scenes remain on the display after you load a new Scene - you won't see FX Unit settings in the LCD.
This mode is exceptionally handy when you want to switch from one set of multiple effects to another. You can tweak individual effects in Latch mode by simply pressing 3A + Tap to toggle out of scene mode. After you are done tweaking just press 3A + Tap again.
Scene Save
To save your current set of FX Units settings to a scene or to copy your currently loaded Scene, press and hold 3A + TAP until the following screen appears:

Now press the footswitch of the desired location you'd like to save your scene to. Your display should now read "Save Completed" for 2 seconds then return to normal operation for the mode your Scenes are set to.
Scene Folders
Your M9 is equipped with 4 scene folders giving you a total of 24 scenes. To access a new folder press 3A + Tap to access your folder then turn the Model Select knob and select the folder you wish to load (1-4) then press any scene to load it. Scenes will now default to the new folder.
LOOPER & SETUP
The Looper in the M9 gives you up to 28 seconds of mono recording time at normal speed, or 56 seconds at half speed. Your loop will always run in mono, even if you're running stereo FX.

HOLD FOR LOOPER
To begin, press and hold the TAP/Hold for Looper footswitch. Your TAP LED will now stay on. When in Loop mode you can still use TAP to set FX tempo and speed - you just won't have the LED flashing in time for reference.

Press REC/ODUB to start recording your loop. You can press REC/ODUB again to immediately end your loop and begin recording as many overdubs as you'd like, or...

Press PLAY/STOP to continue the loop without recording. You can still jam over your loop. It just won't be overdubbed into your loop. Press again to stop the loop playback.

PLAY ONCE can be pressed from stop or during playback, to cause play to end when the loop completes.

Hit a bad note? You can press UNDO/REDO to discard your last overddub. This is also handy if you just want to remove your last overdub momentarily. Press UNDO/REDO again to recall the discarded overdub.

Step on HALF SPEED while in playback mode and your loop will now play back in half speed. Start a new loop in half speed when you need additional loop time - up to 56 seconds.

The REV footswitch sets your playback to reverse. Reverse cannot be engaged during record - doing so will immediately stop recording and start playback of your loop in reverse.
Press and hold TAP to exit Loop Mode.
Using FX while looping
Any effects you have on when entering Looper mode will your signal path. To change your FX Units or Switch Scer looping press and hold TAP to exit loop mode, make your selections and then press and hold TAP to return to Loop mode. Setting your looper to "PRE" will apply FX to your guitar signal only. In the Setup Menu setting the looper to "POST" will apply FX to your loop recording and your guitar signal.
Looper Setup
To view and edit setup options for your Looper functionality you'll need to access the setup screen. First, make sure you are in normal operation - if you are currently in looper mode press and hold TAP to exit. Now simultaneously press 1B + 2B to enter setup then press the model encoder until you see this screen:

Your bottom left knob switches your looper's audio path from Pre (your looper before FX Units) to Post (after FX Units).PLAY adjusts the level of your loop. OVERDUB adjusts the level of each overdub pass from 0dB to -20dB. LO CUT and HI CUT eq filters affect your recorded and looped audio only.
DETAILS
Constant Memory
As you adjust an effect (say, a Screamer distortion running memory A of FX Unit I), those adjustments are retained as you switch away to a different A/B memory and back again—no save function is
required. It's just as if you were adjusting different physical stompboxes, each of which would still have the last knob settings you made to it. The same is true as you switch scenes, swapping one virtual pedalboard for another: when you come back to a previously used scene, it loads with all the last adjustments you made to it.
If you prefer that scenes not remember your last adjustments, simultaneously press 1B + 2B to enter setup, then press the model encoder until you see this screen:

Now set the Scenes parameter to MNL SAVE (Manual Save) instead of AUTOSAVE. You will then need to use the scene setup mode any time you want to manually force a "save" of current settings to a scene: Simultaneously press and hold TAP + 3A then select and hold on the same memory location you are currently on to "save". Display will say "Save Completed".
Tap Tempo
Tap tempo is available for all Delay effects, most MOD effects, and some Filter effects. For Delay and MOD effects turn the second top row knob or for Filters turn the first bottom row knob of the FX Unit all the way to max, and you'll switch between tap tempo and regular control modes. Once you're in Tap tempo control mode, turn the knob to select one of the available note values. Tap 2 or more times on the TAP switch, and all the effects set to tap tempo control will change the tempo to match the tempo you tapped. To end tap tempo operation for an effect, turn the knob to max again. NOTE: Parameters set to tap tempo control are NOT affected by expression pedal operation.
Tuning
Simultaneously press 2B + 3B to enter Tuner Mode. All effects processing and looping will be bypassed. Use your lower left parameter knob to set your reference frequency. Use the lower right parameter knob to select either "BYPASS AUDIO" or "MUTE AUDIO" for silent operation.

Mono / Stereo Operation
Some models (like Stereo Delay) provide stereo operation. When run before a mono model (like a distortion), the signal will collapse to mono as it feeds the mono effect, and will then be passed on in mono to the next effect or outputs.
Effect Copy
An effect can be copied to any other memory location within a scene. For example you can copy your effect in memory location FX Unit 1A to FX Unit 3B. To begin, select the memory location you would like to copy (the effect must be on and currently showing its parameters in your display). Press and hold the Model Select knob. Your display should read "Copy Effect: Select Destination". Press the memory footswitch for the location you want to copy to. Your display now reads "Copy Completed". Your copy is now stored in both the original and new location.
ADDITIONAL SETUP
Access all the setup screens by simultaneously pressing 1B + 2B. Then press the MODEL SELECT knob to scroll through the different setup pages.

True Bypass / DSP Bypass
Choose True Bypass when you want to remove the M9 Stomp Modeler from your signal path when all FX Units, Looper and Tuner are not in
use. When choosing DSP Bypass you'll get the benefit of hearing delay and reverb trails smoothly decay when disengaging those effects.
Signal Path Routing
1>2>3 is standard operation with FX Unit 1 being the first FX in your chain and FX Unit 3 being the last. 3>2>1 reverses this order with FX Unit 3 being the first and FX Unit 1 being last. Hey, whatever floats your boat!
DIM ON / OFF
Enables the dimly lit footswitch LED's when effect memories passed (on) or disables them (off).
Relative / Absolute Pots
In REL mode when you turn a knob the parameters will not jump to the position of the knob but change proportionally to the amount of your parameter knob movement up or down. When set to ABS it is not possible to make incremental edits of an effect parameter. The parameter value always adjusts from the current pot position.

Tempo
Use TEMPO to manually adjust your TAP tempo from 30 to 240 BPM instead of using the TAP footswitch.
Expression Pedals
The remaining four parameters of this setup page are for Expression Pedal operation. Download the Advanced User Guide at www.line6.com/manuals for details.

MIDI,
Use "DUMP" to backup a scene, scene folder or all four folders to your computer. You can also restore the factory settings. The second parameter is for assigning the MIDI channel your M9 Stompbox modeler sends and receives. Get the Advanced Guide at www.line6.com for details and download the Line 6 Monkey utility software to check for upgrades and updates of the M9 Stompbox modeler firmware.
Gate
Think of the Gate as a special additional pedal that applies scene. There is no footswitch control for this effect so only use it when you always want the gate engaged.
Contrast
This sets the brightness of display.


- Important Safety Instructions
- CAUTION
- RISK OF ELECTRIC SHOCK DO NOT OPEN
- Please Note:
- You should read these Important Safety Instructions. Keep these instructions in a safe place
- REAR CONNECTIONS
- BASIC OPERATION
- SCENES & SCENE SETUP
- Choosing Momentary or Latch Scene Modes
- Momentary Scene Mode
- Latch Scene Mode
- Scene Save
- Scene Folders
- LOOPER & SETUP
- Using FX while looping
- Looper Setup
- DETAILS
- Constant Memory
- Tap Tempo
- Tuning
- Mono / Stereo Operation
- Effect Copy
- ADDITIONAL SETUP
- True Bypass / DSP Bypass
- Signal Path Routing
- DIM ON / OFF
- Relative / Absolute Pots
- Tempo
- Expression Pedals
- MIDI,
- Gate
- Contrast
Brand : LINE 6
Model : M9 Stompbox Modeler
Category : Effects pedal